
CHAPTER 36
Imaging and Deploying Windows 10
Windows 10 is gaining more presence in larger companies, schools, and corporations as a standard operating system. To meet the high demands that corporations and large businesses have for maintaining and deploying systems, larger organization and corporations need a way to set up and configure individual client desktops quickly and efficiently. In addition, client desktops generally must be standardized in an enterprise so each base system functions identically.
Windows 10's imaging capabilities provides a way to standardize a base installation and then deploy that “image” or copy to other desktops quickly and efficiently. This chapter describes Windows 10 imaging, how to use the system preparation tools, and how to deploy and modify images.
Understanding Windows 10 Imaging
Imaging provides a way to install Windows 10 on devices in a way that lets system administrators duplicate installs on multiple computers in a pseudo-automated way. Once a Windows 10 image is created, including customizations, applications, mappings, device drivers, and so on, administrators can use that image to deploy Windows to other similar types of devices.
Imaging is helpful when an organization purchases a number of computers that it has to place out in the organization. For example, say a company's IT department receives 1,000 new desktop computers to be distributed to its call center. To prepare each computer for call center employees, the IT department would have to install Windows on each computer, and likely would perform the following duties on each one:
- Customize the Windows environment for each computer manually. For example, simply adding a custom corporate logo to each wallpaper setting would require manually copying the image to the new computer and then specifying it as the computer's wallpaper via the Personalization settings in the Control Panel.
- Install and customize each application manually. Many applications may be customized when installed on corporate computers, such as turning on or off specific features, specifying installation folders, and similar application settings.
- Set drive mappings and other network file locations manually.
- Install proper device drivers for all devices, including network interface card drivers, printer drivers, and video display drivers, and other system settings.
With imaging, the IT department sets up and configures one desktop client, then clones that client to the other 999 computers. This process increases efficiency, reduces mistakes, and provides other system-wide processes (such as a way to inventory the devices quickly, for example).
You can image and deploy Windows in the following ways:
- Use the set of tools provided in the Microsoft System Center Configuration Manager (SCCM).
- Use the Microsoft Deployment Toolkit (MDT).
Using Windows Assessment and Deployment Kit (ADK)
You use the Windows Assessment and Deployment Kit (ADK) to access the tools you need to create an image of your system. The Windows ADK includes Windows Imaging and Configuration Designer (ICD). The ICD provides a way to create a provisioning package to use to automate configuration of multiple computers.
Understanding Provisioning Packages
A provisioning package (PPKG) is a good choice when you need to apply the image over an existing Windows 10 deployment. For example, say your company or organization receives a shipment of 1,000 computers that have a version of Windows already installed, but include programs, OEM programs, drivers, apps, settings, and other items that you do not want each device to have.
In some cases this could include an OEM (original equipment manufacturer) help desk system that adds files and “bloatware” to your computers. Another type of software many vendors ship standard on new computers is free antivirus software (free, but limited to a time period, such as 90 days). In these cases, you likely will want to remove these tools, install an approved set of device drivers, and include other settings standard for your company. Creating and deploying a provisioning package is a good way to configure your devices efficiently.
Accessing the Windows Assessment and Deployment Kit (ADK)
To download the Windows Assessment and Deployment Kit (ADK), use the following steps:
- Open a web browser, such as Microsoft Edge.
- Navigate to
https://developer.microsoft.com/en-us/windows/hardware/windows-assessment-deployment-kit. - Click Get Windows ADK for Windows 10, version 1607 (see Figure 36.1). Make sure you download the ADK for version 1607 or later.
- Click Save to save the ADKSETUP.EXE file to your computer. By default, it is downloaded to your Downloads folder.
- After the file downloads, click the View Downloads button and click ADKSETUP.EXE in the Downloads pane to continue the ADK download and installation process. The Specify Location screen of the Windows Assessment and Deployment Kit — Windows 10 program appears. See Figure 36.2.
- Click Next. The Windows Kits Privacy window appears (see Figure 36.3). Click Yes to participate in the Windows Customer Experience Improvement Program, or No if you don't want to participate.
- Click Next. The License Agreement window appears (see Figure 36.4).
- Select Accept. The Select the Features You Want To Install window appears (see Figure 36.5). Select those features you want to install. In most cases, you can keep all the default features selected.
- Click Install. The Installing Features window appears as the ADK is downloaded and installed on your computer. When finished, the Welcome to the Windows Assessment and Deployment Kit — Windows 10 window appears (see Figure 36.6).
- Click Close to end the installation process.

FIGURE 36.1 Visit the Download the Windows ADK web site to download the Windows ADK to enable you to image on Windows 10.

FIGURE 36.2 Specify the location to install the Windows ADK.

FIGURE 36.3 The Windows Kits Privacy window.

FIGURE 36.4 The Windows ADK License Agreement window.

FIGURE 36.5 The Select the Features You Want to Install window.

FIGURE 36.6 After the Windows 10 ADK downloads and installs, you can close the installation window.
Once installed, the Windows ADK's Imaging and Configuration Designer (ICD) can be executed to start the imaging process. The following section describes running the ICD.
Running Windows Imaging and Configuration Designer (ICD)
You use the Windows Imaging and Configuration Designer (ICD) to create an image of your Windows 10 setup. The following steps show how to use ICD to create a provisioning package to install on top of an existing Windows 10 installation.
- Start ICD by choosing the Start button and navigating to Windows Kit.
- Click Windows Imaging and Configuration Designer to display the Windows Imaging and Configuration Designer windows (see Figure 36.7).
- Click Simple Provisioning. The New Project window appears (see Figure 36.8).
- Type a name for the new image in the Name box. The default name is Project 1, but you may want to be more descriptive.
- Specify a location for the image in the Project Folder box.
- Type a description of the image in the Description box.
- Click Finish. A new tab in the ICD window is created, using the name of the image you entered in Step 4. Figure 36.9 shows this tab, named “Windows10Image” in this example.
- Enter a device name that the image can use for naming your computers as they are being imaged. The name can be up to 15 characters long. For names that are to include random characters, use %RAND%. For names that include serial number for a device, use %SERIAL%.
- If you are upgrading Windows during the imaging process, enter a Windows product key in the Product Key box.
- Click Set Up Network to display network configuration settings for the image (see Figure 36.10). You can set the network name, SSID, network type (open or secure), and, if the network is secure, the password for the network.
- Click Enroll into Active Directory to display settings for enrolling devices into the active directory during the deployment process (see Figure 36.11). Enrolling devices means setting them up. Enter the domain name, username, and user password for the domain. Optionally, you can enter a username and password for a local administrator account.
- Click Finish to display the Summary window (see Figure 36.12). Read the summary to ensure your settings are correct. Also, to password-protect the image package, select the Yes slider under Protect Your Package and enter a password.
- Click Create. The Windows ICD begins working, building the new image package.

FIGURE 36.7 Start the ICD from the Windows Kit folder on the Start menu.

FIGURE 36.8 Name and specify a location for your new image in the New Project window.

FIGURE 36.9 The ICD shows the tab in which you can specify image details.

FIGURE 36.10 Set network configuration settings for your image.

FIGURE 36.11 Set active directory settings for your image.

FIGURE 36.12 The ICD Summary screen.
As the package builds, a note appears above the Create button you clicked in Step 13.
Deploying Windows Using an ICD Package
The provisioning package can be distributed to other computers using a USB flash drive, network drive, or external hard drive. To deploy the PPKG package, perform the following steps:
- Boot the computer on which you want to run the provisioning package.
- Locate the provisioning package using Windows Explorer.
- Double-click the provisioning file to launch it.
- Click Allow to enable the provisioning package to configure the device.
This procedure allows you to completely configure a new device without having to perform the steps manually on each device.
Modifying Windows 10 Images
Many times you want to ensure your system is configured a certain way before you create an image. You can customize settings in Windows using the Windows Imaging and Configuration Designer. Some of the customizations you can perform include adding apps to the installation, choosing device drivers to set up, setting up Windows settings, and more.
To customize settings for a Windows image, use the following steps:
- Start Windows Imaging and Configuration Designer.
- In the Windows Imaging and Configuration Designer window (see Figure 36.13), click Windows Image Customization. The New Project window appears (see Figure 36.14).
- Type a name in the Name field, specify a location to store the new image, and type a description.
- Click Next. The Select Imaging Source Format window appears, as shown in Figure 36.15.
- Select The Windows Image Is Based on a Windows Image (WIM) File option. Unless you have downloaded and unpacked other Windows packages, only the first option is available.
- Click Next. The Select Image window appears. You need to specify the .WIM file to use. Click Browse to locate the .WIM file and click Open to select it. Figure 36.16 shows an example of selecting the install.wim file for Windows 10 and the available images in the Available Images list.
- Click Next. The Import a Provisioning Package (Optional) window appears (see Figure 36.17). Select the package you want to modify. This step is optional, so if you do not have a provisioning package, skip to the next step without selecting a package.
- Click Finish. The new project is created and the Windows Imaging and Configuration Designer window appears with the new project tab showing (see Figure 36.18).
-
In the Available Customizations column (left column), click the View drop-down list to see a list of setting categories (such as Common Imaging Settings, Common OEM Settings, and so on). As you select an item from the View drop-down list, the settings change below the Search field. For example, when you select Common Imaging Settings, the following settings appear: Deployment Assets, Image Time Settings, and Runtime Settings.
Expand a category to see a specific setting. Figure 36.19 shows the Deployment Assets category expanded with the Applications item selected.
- Customize the image as needed using the ICD.
- When finished, click Create and choose Production Media. The Build window appears.
- Click FFU (Full Flash Update file), as shown in Figure 36.20. FFU provides a more efficient method for deploying the image because it is sector-based and not file-based. This allows the FFU file to capture the full set of drive information (such as partitions) on a single file, as opposed to a WIM file, which stores all in a set of files.
- Click Next. The Select Imaging Options window appears.
- Click Yes (see Figure 36.21) to compact the operating system image.
- Click Next. The Configure Audit Mode Boot window appears (see Figure 36.22).
- Keep the defaults in the Configure Audit Mode Boot window.
- Click Next. The Choose Where the FFU File Is Saved window appears (see Figure 36.23).
- Enter the location where the FFU file is to be stored. In addition, you must specify a name for the file.
- Click Next. The Build the Windows Image window appears (see Figure 36.24).
- Click Build to start the build process.

FIGURE 36.13 Use the Windows Image Customization option to modify settings for Windows images.
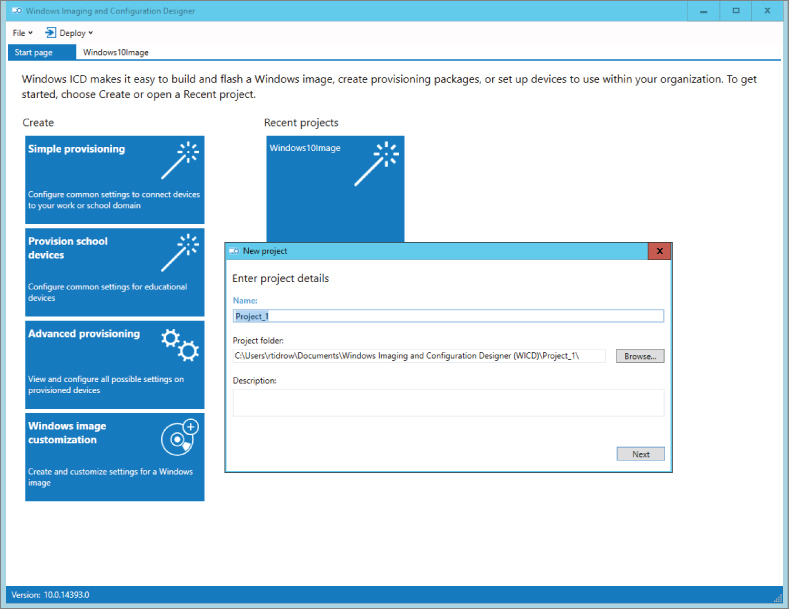
FIGURE 36.14 Name the new image project.

FIGURE 36.15 The Select Imaging Source Format window specifies the image type.

FIGURE 36.16 Select a Windows image file.

FIGURE 36.17 As an option, you can specify the provisioning package you want to customize with the image.

FIGURE 36.18 Use the Windows Imaging and Configuration Designer to customize individual settings.

FIGURE 36.19 Windows ICD includes hundreds of image settings you can customize.

FIGURE 36.20 Use the FFU option for a more streamlined imaging file.

FIGURE 36.21 Select to compact the image file to reduce its size.

FIGURE 36.22 You can keep the default audit settings for this image.

FIGURE 36.23 Specify the file location destination and file name for the image file.

FIGURE 36.24 The Build the Windows Image window details the image file.
After the image is built, which can take some time, you can copy the FFU file to a removable storage device. You can use an external USB drive, for example, to make the image file highly portable.
Wrapping Up
You can create images to help speed the process of preparing a large number of computers in your organization. With the Windows Imaging and Configuration Designer (ICD), you can create provisioning images to deploy Windows 10 installations.
The ICD also provides options for customizing images so you can create images that are specific to the needs of your organization. This chapter introduced the following points:
- Understanding Windows 10 imaging
- Using Windows system preparation tools
- Running Windows Imaging and Configuration Designer
- Deploying Windows using ICD
- Modifying Windows 10 images