
Chapter 1: Exploring the Canon EOS Rebel T5i/700D
The Canon Rebel T5i/700D has many buttons and dials, and it’s important that you take the time to review each control and option at least once. You may not need them all now, but as you become more familiar with your camera, it helps to know what options are available. In this chapter, I cover each side of the camera to help you understand the standard controls, as well as the viewfinder, LCD screen, and display options. I also review the camera exposure modes, where the tripod and connection sockets are, and how to use the dioptric adjustment dial. Once you understand the camera’s controls, you can focus on taking photos.
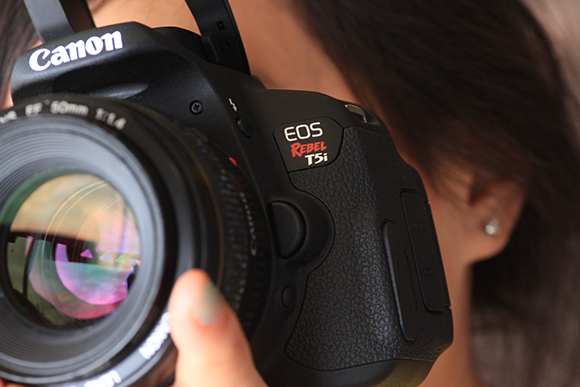
Make sure you understand the function of each of the buttons on your camera.
The Top of the Camera
The top of the camera houses the power switch, exposure modes, Main dial ( ![]() ), and the ISO (
), and the ISO ( ![]() ) and shutter buttons. All of these play an integral role in creating photographs.
) and shutter buttons. All of these play an integral role in creating photographs.

1.1 The top of the Canon EOS Rebel T5i/700D.
The following list explains what each switch and button does:
• ISO button ( ![]() ). The ISO setting represents the camera’s sensitivity to light. Your camera has a range of ISO 100 to ISO 12800. You also have the option of H, which if engaged increases the camera light sensitivity to ISO 25600. To turn this option on, use the Custom Function 2 ISO expansion.
). The ISO setting represents the camera’s sensitivity to light. Your camera has a range of ISO 100 to ISO 12800. You also have the option of H, which if engaged increases the camera light sensitivity to ISO 25600. To turn this option on, use the Custom Function 2 ISO expansion.
• Shutter button. This button triggers the camera to take a photograph. Pressing the button halfway activates the focusing and exposure system. To view the shutter speed and aperture, look through the viewfinder. When using slower shutter speeds, press the shutter button slowly to avoid camera shake.
• Main dial ( ![]() ). Use this to move through different menus and options on your camera. For example, if you press the Menu button (
). Use this to move through different menus and options on your camera. For example, if you press the Menu button ( ![]() ) and turn the Main dial (
) and turn the Main dial ( ![]() ) either left or right, you scroll across the menu screen. If you select Shutter-priority AE mode (
) either left or right, you scroll across the menu screen. If you select Shutter-priority AE mode ( ![]() ), you use the Main dial (
), you use the Main dial ( ![]() ) to increase and decrease your shutter speed.
) to increase and decrease your shutter speed.
• Power switch. You have three options on the power switch: On, Off, and Movie ( ![]() ). On is for photographing still images; Movie (
). On is for photographing still images; Movie ( ![]() ) is for creating videos.
) is for creating videos.
• Mode dial. This dial houses the 12 exposure modes. The white line next to the Mode dial tells you which option is in use. Unlike previous models, the dial rotates 360 degrees to make it easier to change modes. There are also three additional options located under the Special Scene mode ( ![]() ): Night Portrait (
): Night Portrait ( ![]() ), Handheld Night Scene (
), Handheld Night Scene ( ![]() ), and HDR Backlight (
), and HDR Backlight ( ![]() ). You can view the Special Scene mode (
). You can view the Special Scene mode ( ![]() ) options on the LCD screen. If the LCD screen is off, press the Quick control/Print button (
) options on the LCD screen. If the LCD screen is off, press the Quick control/Print button ( ![]() ) to view the three mode options.
) to view the three mode options.
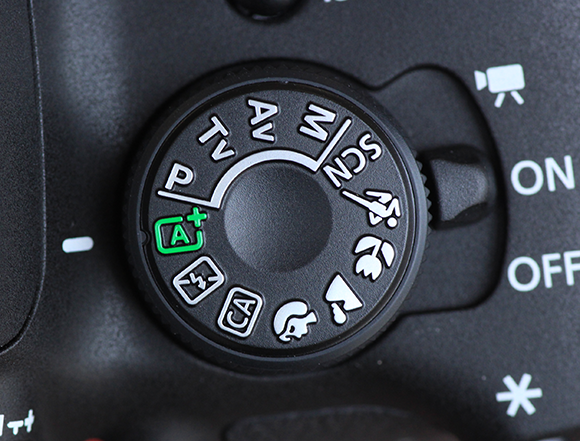
1.2 The Canon T5i/700D has 12 exposure Modes on the Mode dial.
• Microphones. There are two microphones on top of the camera to record audio for videos. The microphone controls are found under Movie shooting menu 2 ( ![]() ).
).
• Hot shoe. The hot shoe holds an external flash, such as the Canon Speedlite 430 EX II. It is also the connection point for flash-related accessories, such as the Canon OC-E3 off-camera shoe cord.
Table 1.1 lists the exposure modes available on your Canon T5i/700D. The Creative Zone modes offer greater flexibility. The automatic exposure options are located in the Basic Zone.
Table 1.1 The Exposure Modes
|
Mode |
Description |
|
Manual ( |
You set the shutter speed and aperture. |
|
Aperture-priority AE ( |
You set the aperture and the camera sets the shutter speed for proper exposure. |
|
Shutter-priority AE ( |
You set the shutter speed and the camera sets the aperture for proper exposure. |
|
Program AE ( |
The camera automatically sets the shutter speed and aperture. |
|
Scene Intelligent Auto ( |
The camera analyzes the scene and chooses the proper settings, such as shutter speed, aperture, ISO, and focus mode. It also activates the flash if needed. |
|
Flash off ( |
Performs the same function as the Scene Intelligent Auto mode ( |
|
Creative Auto ( |
The default setting is the same as Scene Intelligent Auto mode ( |
|
Portrait ( |
This mode blurs the background so that your subject is the central focus. This mode works best with a long lens. |
|
Landscape ( |
Use this mode when you want a large depth of field and crisp images. Note that it enhances the green and blue colors in your image. This mode works best with a wide-angle lens. |
|
Close-up ( |
This mode is for photographing small subjects that are close to your lens. A long or macro lens is optimal for this setting. |
|
Sports ( |
Ideal for action photography, this mode prevents the blurring of moving objects, such as active children or athletics. |
|
Special Scene Mode ( |
This mode houses the Night Portrait ( |
|
Night Portrait ( |
When photographing people at night, this mode can help you capture as much of the background light as possible by slowing the shutter speed. Use a tripod to minimize camera shake or hold the camera as steady as possible. |
|
Handheld Night Scene ( |
When you don’t have a tripod, this mode can help you capture handheld night shots. It accomplishes this by quickly shooting and combining four exposures. |
|
HDR Backlight ( |
This mode takes three quick shots at different exposures, and then combines them to create better highlight and shadow detail. For best results, use a tripod with this mode. |
The Bottom of the Camera
The following items are located on the bottom of your camera:
• Tripod socket. Use this threaded hole to attach tripod plates or attachments.
• Battery. Your camera uses an LP-E8 battery pack. It takes approximately 2 hours to fully charge.

1.3 The bottom of the Canon EOS Rebel T5i/700D.
A battery grip (BG-E8) is available for your Canon T5i/700D. This accessory holds two LP-E8 battery packs and allows for easier vertical shooting.
The Front of the Camera
The front of the camera features important things like the lens, and the flash ( ![]() ) and Depth-of-Field Preview (
) and Depth-of-Field Preview ( ![]() ) buttons.
) buttons.

1.4 The front of the Canon EOS Rebel T5i/700D.
The following buttons and features are found on the front of your camera:
• Flash. The built-in pop-up flash is a handy feature in low- and backlit situations. It syncs between 1/60 and 1/200 second. The effective distance of the flash depends on the aperture and ISO settings and the lens that you are using. I don’t recommend using flash for subjects farther than 12 feet from your camera.
• Flash button ( ![]() ). You have more control over your camera when using the Creative Zone modes because they prevent the pop-up flash from activating, even if it’s dark. If you need additional light and don’t have an external flash, press the Flash button (
). You have more control over your camera when using the Creative Zone modes because they prevent the pop-up flash from activating, even if it’s dark. If you need additional light and don’t have an external flash, press the Flash button ( ![]() ) to activate the built-in flash.
) to activate the built-in flash.
• Depth-of-Field Preview button ( ![]() ). It is sometimes helpful to know what the depth of field in your photo will look like in advance. The Depth-of-Field Preview button (
). It is sometimes helpful to know what the depth of field in your photo will look like in advance. The Depth-of-Field Preview button ( ![]() ) closes down the aperture so you can see the depth of field before you take your picture. In other words, you can see which parts of your image are in and out of focus.
) closes down the aperture so you can see the depth of field before you take your picture. In other words, you can see which parts of your image are in and out of focus.
• Red-eye Reduction/Self-timer lamp. When Red-eye reduction is enabled, this lamp lights up when you press the shutter button. To enable this option, press the Menu button ( ![]() ), and then select Red-eye reduc., located at the bottom of Shooting menu 1 (
), and then select Red-eye reduc., located at the bottom of Shooting menu 1 ( ![]() ). This lamp also blinks during the Self-timer (
). This lamp also blinks during the Self-timer ( ![]() ) exposure countdown if you enable that option.
) exposure countdown if you enable that option.
• Remote Control sensor. Point a camera remote (such as the RC-6) at this location to trigger your camera’s shutter.
• Lens Release button. Press this button (on the right side of the front of your camera) to release the lens, and then turn the lens counterclockwise to remove it. Remember to hold onto both the lens and the camera. To attach a Canon-dedicated lens, point the camera away from you. Rotate the lens until the red or white dots on both the camera and lens are aligned. Attach the lens to the camera lens mount, and then turn the lens to the left until you hear a click and the lens stops turning.
The Back of the Camera
The back of your camera is where the action takes place. Most of the options and controls are accessible from here, including menus, photo information, and standard functions. The LCD touchscreen adds additional functionality compared to other cameras — many standard functions are available just by touching an icon on the screen. The available menu options depend on which mode you are using. For example, you have fewer menu options when you use the Basic Zone modes.
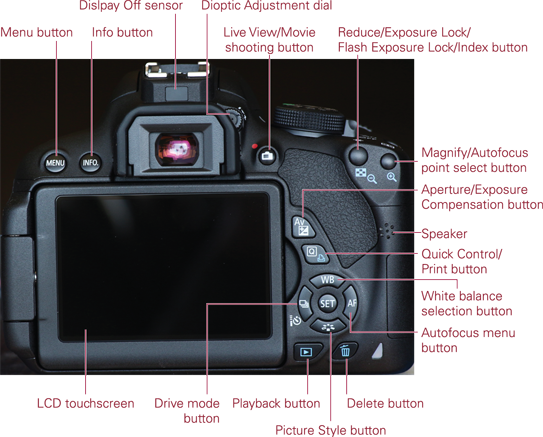
1.5 The back of the Canon EOS Rebel T5i/700D.
The following buttons and options are available on the back of your camera:
• Menu button ( ![]() ). Pressing this button takes you to the menu screen. You have fewer menu options available when the camera is in the following Basic Zone modes: Scene Intelligent Auto (
). Pressing this button takes you to the menu screen. You have fewer menu options available when the camera is in the following Basic Zone modes: Scene Intelligent Auto ( ![]() ), Flash off (
), Flash off ( ![]() ), Creative Auto (
), Creative Auto ( ![]() ), Portrait (
), Portrait ( ![]() ), Landscape (
), Landscape ( ![]() ), Close-up (
), Close-up ( ![]() ), Sports (
), Sports ( ![]() ), and Special Scene (
), and Special Scene ( ![]() ). There are three additional mode options located under Special Scene (
). There are three additional mode options located under Special Scene ( ![]() ): Night Portrait (
): Night Portrait ( ![]() ), Handheld Night Scene (
), Handheld Night Scene ( ![]() ), and HDR backlight (
), and HDR backlight ( ![]() ). The menus are divided into the following six groups:
). The menus are divided into the following six groups:
• The Shooting menu ( ![]() ). This menu includes options for taking photographs.
). This menu includes options for taking photographs.
• The Movie shooting menu ( ![]() ). Here is where you find the options for creating videos.
). Here is where you find the options for creating videos.
• The Live View shooting menu ( ![]() ). These options are for setting the Live View functions.
). These options are for setting the Live View functions.
• The Playback menu ( ![]() ). This menu contains options for reviewing images and postproduction.
). This menu contains options for reviewing images and postproduction.
• The Setup menu ( ![]() ). This menu is packed with camera operation functions.
). This menu is packed with camera operation functions.
• My Menu ( ![]() ). Here, you can set up your own menu of favorite settings.
). Here, you can set up your own menu of favorite settings.
Chapter 2 explains all of the menu options in detail.
• Info button ( ![]() ). Press the Playback button (
). Press the Playback button ( ![]() ), select an image using the Cross keys (
), select an image using the Cross keys ( ![]() ), and then press the Info button (
), and then press the Info button ( ![]() ). It offers four informational display options about your photographs, including two with histograms. When you press the Info button (
). It offers four informational display options about your photographs, including two with histograms. When you press the Info button ( ![]() ) when the LCD screen is blank, a display appears with statistics about your camera, including how much free space is on the memory card and which color space you are using. When using the Live View Shooting (
) when the LCD screen is blank, a display appears with statistics about your camera, including how much free space is on the memory card and which color space you are using. When using the Live View Shooting ( ![]() ) or Movie (
) or Movie ( ![]() ) modes, press the Info button (
) modes, press the Info button ( ![]() ) to display the available functions and mode options.
) to display the available functions and mode options.
• Display Off sensor. This sensor detects your eye moving toward the viewfinder and turns off the LCD screen. When you move your eye away from the camera, the LCD screen turns back on. This helps prevent glare from hitting your eye when trying to look through the viewfinder. This feature does not work in the Live View Shooting mode ( ![]() ). You can turn the sensor off in Setup menu 2 (
). You can turn the sensor off in Setup menu 2 ( ![]() ).
).
• Dioptric Adjustment dial. This dial, located above and to the right of the viewfinder, adjusts the viewfinder’s clarity. To customize the clarity to your requirements, focus on the nine autofocus (AF) points in the viewfinder, and then move the dial left or right until the points are sharp.
• Live View Shooting button ( ![]() ). This button activates the Live View shooting mode (
). This button activates the Live View shooting mode ( ![]() ) on the LCD screen. This option allows you to watch what’s happening live through the lens without looking through the viewfinder. It is also used for starting and stopping movie capture when shooting in Movie mode (
) on the LCD screen. This option allows you to watch what’s happening live through the lens without looking through the viewfinder. It is also used for starting and stopping movie capture when shooting in Movie mode ( ![]() ). You can also tap the Magnify button (
). You can also tap the Magnify button ( ![]() ) in the Live View shooting mode (
) in the Live View shooting mode ( ![]() ) to magnify a scene.
) to magnify a scene.
• Aperture/Exposure Compensation Button ( ![]() ). This button has two options when you are shooting in any of the following Creative Zone modes: Manual (
). This button has two options when you are shooting in any of the following Creative Zone modes: Manual ( ![]() ), Aperture-priority AE (
), Aperture-priority AE ( ![]() ), Shutter-priority AE (
), Shutter-priority AE ( ![]() ), or Program AE (
), or Program AE ( ![]() ). When in Manual mode (
). When in Manual mode ( ![]() ), use the Main dial to adjust the shutter speed. When you press the Aperture/Exposure Compensation button (
), use the Main dial to adjust the shutter speed. When you press the Aperture/Exposure Compensation button ( ![]() ), the Main dial switches to aperture control. When you are shooting in the Program AE (
), the Main dial switches to aperture control. When you are shooting in the Program AE ( ![]() ), Shutter-priority AE (
), Shutter-priority AE ( ![]() ), or Aperture-priority AE (
), or Aperture-priority AE ( ![]() ) modes, press this button, and then use the Main dial (
) modes, press this button, and then use the Main dial ( ![]() ) to adjust the exposure compensation as many as 5 stops.
) to adjust the exposure compensation as many as 5 stops.
• Reduce/Exposure Lock ( ![]() )/Flash Exposure Lock (
)/Flash Exposure Lock ( ![]() )/Index button (
)/Index button ( ![]() ). This button has four uses. In Playback mode (
). This button has four uses. In Playback mode ( ![]() ), it reduces magnified images. It also allows you to lock an exposure when recomposing a shot, which is helpful in high-contrast or backlit situations. It also serves as the Flash Exposure Lock (
), it reduces magnified images. It also allows you to lock an exposure when recomposing a shot, which is helpful in high-contrast or backlit situations. It also serves as the Flash Exposure Lock ( ![]() ), preventing your flash from readjusting its exposure. This allows you to recompose your image without worrying that the flash will under- or overexpose your image. When you view your images in Playback mode (
), preventing your flash from readjusting its exposure. This allows you to recompose your image without worrying that the flash will under- or overexpose your image. When you view your images in Playback mode ( ![]() ), this button serves as the Index Display and shows multiple photographs at one time on the LCD screen.
), this button serves as the Index Display and shows multiple photographs at one time on the LCD screen.
• Magnify (![]() )/Autofocus point select (
)/Autofocus point select (![]() ) button. This button has two uses. First, it magnifies your photos when you review them in the Playback mode (
) button. This button has two uses. First, it magnifies your photos when you review them in the Playback mode ( ![]() ).You also can magnify the scene on the LCD screen if the camera is not in Face Tracking mode (
).You also can magnify the scene on the LCD screen if the camera is not in Face Tracking mode ( ![]() ). If you are in a Creative Zone mode and Live View shooting mode (
). If you are in a Creative Zone mode and Live View shooting mode ( ![]() ) is turned off, this button can be used in conjunction with the Main dial (
) is turned off, this button can be used in conjunction with the Main dial ( ![]() ) to select autofocus (AF) points.
) to select autofocus (AF) points.
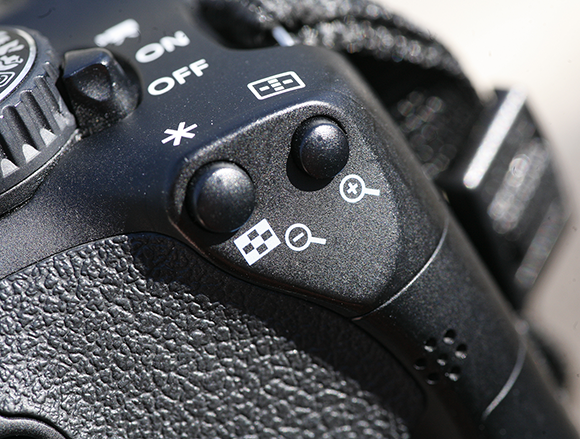
1.6 The Reduce/Exposure Lock/Flash Exposure Lock/Index and Magnify/Autofocus point select buttons are located on the back of your camera on the upper-right side.
• Speaker. The speaker plays the sound from videos and slide shows.
• Setting button ( ![]() ). This button works like a return or input button on a computer. It affirms the highlighted setting you want to engage on a menu, option, or function.
). This button works like a return or input button on a computer. It affirms the highlighted setting you want to engage on a menu, option, or function.
• Delete button ( ![]() ). When you want to delete an image or video during playback, press the Delete button (
). When you want to delete an image or video during playback, press the Delete button ( ![]() ).
).
• Autofocus menu button ( ![]() ). In the Basic Zone modes, autofocus is set according to the mode and scene, and it cannot be adjusted. In Playback mode (
). In the Basic Zone modes, autofocus is set according to the mode and scene, and it cannot be adjusted. In Playback mode ( ![]() ) and when maneuvering through menus, this button acts as the right Cross key (
) and when maneuvering through menus, this button acts as the right Cross key ( ![]() ) button. In the Creative Zone modes, the Autofocus menu button (
) button. In the Creative Zone modes, the Autofocus menu button ( ![]() ) has the following three options:
) has the following three options:
• One-shot AF mode ( ![]() ). This locks on your subject after you press the shutter button halfway.
). This locks on your subject after you press the shutter button halfway.
• AI Servo focusing mode ( ![]() ). Use this mode to follow-focus on your subject.
). Use this mode to follow-focus on your subject.
• AI Focus ( ![]() ). This setting defaults to the One-shot AF mode (
). This setting defaults to the One-shot AF mode ( ![]() ) and switches to AI Servo focusing mode (
) and switches to AI Servo focusing mode ( ![]() ) if the camera detects movement.
) if the camera detects movement.
• Access Lamp. When this light is on, it means the camera is recording an image. Make sure this light is off before removing the memory card or opening the battery compartment.
• Picture Style button ( ![]() ). Your camera offers many options for creating stunning images. The Picture Styles are designed to enhance your photographs, depending on the type of scene you are photographing. For example, if you are shooting a landscape, using the Picture Style Landscape mode (
). Your camera offers many options for creating stunning images. The Picture Styles are designed to enhance your photographs, depending on the type of scene you are photographing. For example, if you are shooting a landscape, using the Picture Style Landscape mode ( ![]() ) enhances the blues and greens, and increases the sharpness of your image. The Portrait Picture Style (
) enhances the blues and greens, and increases the sharpness of your image. The Portrait Picture Style ( ![]() ) softens the image. You can also make your own Picture Styles in the Picture Style Editor software that is included with your camera. In Playback mode (
) softens the image. You can also make your own Picture Styles in the Picture Style Editor software that is included with your camera. In Playback mode ( ![]() ) and when navigating through menus, this button acts as the down Cross key (
) and when navigating through menus, this button acts as the down Cross key ( ![]() ) button.
) button.
Full descriptions of the Picture Style options can be found in Chapter 3.
• Playback button ( ![]() ). This option allows you to review your images. You can use the Main dial (
). This option allows you to review your images. You can use the Main dial ( ![]() ) or a finger swipe on the LCD screen to advance to the next image.
) or a finger swipe on the LCD screen to advance to the next image.
• Drive mode button ( ![]() ). This button can be used in any exposure mode. It allows you to shoot one image at a time or take continuous shots of up to 5 frames per second (fps). You also have the following three self-timer options: 2 seconds, 10 seconds, and multiple shots with 10-second countdowns. In Playback mode (
). This button can be used in any exposure mode. It allows you to shoot one image at a time or take continuous shots of up to 5 frames per second (fps). You also have the following three self-timer options: 2 seconds, 10 seconds, and multiple shots with 10-second countdowns. In Playback mode ( ![]() ) and when navigating through menus, this button acts as the left Cross key (
) and when navigating through menus, this button acts as the left Cross key ( ![]() ) button.
) button.
• White balance selection button ( ![]() ). This button lets you change color tones in your photographs when the camera is in a Creative Zone mode. Use it to adjust the color of the environment to appear more natural. For example, photographing in a room with tungsten bulbs as the main light source produces a yellow cast in in your photographs. If you select the Tungsten white balance setting (
). This button lets you change color tones in your photographs when the camera is in a Creative Zone mode. Use it to adjust the color of the environment to appear more natural. For example, photographing in a room with tungsten bulbs as the main light source produces a yellow cast in in your photographs. If you select the Tungsten white balance setting ( ![]() ), the camera adds a blue filter to the scene to neutralize the yellow. In Playback mode (
), the camera adds a blue filter to the scene to neutralize the yellow. In Playback mode ( ![]() ) and when navigating through menus, this button acts as the up Cross key (
) and when navigating through menus, this button acts as the up Cross key ( ![]() ) button.
) button.
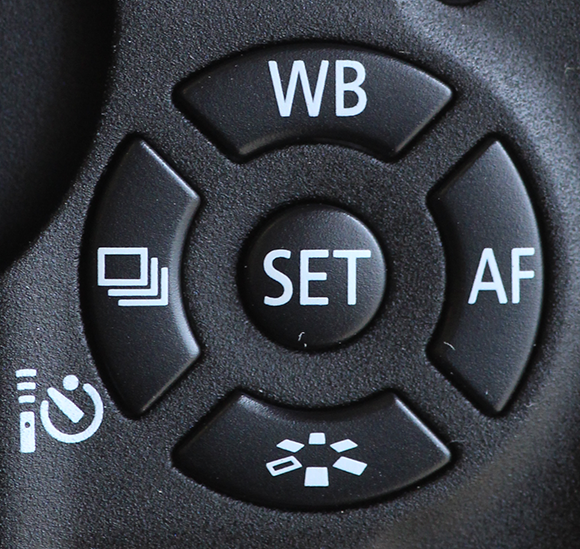
1.7 These buttons on the back of your camera are also used as Cross keys to navigate around the LCD screen.
For more about white balance, see Chapter 3.
• Quick Control/Print button ( ![]() ). When using either the Creative or Basic Zone modes, use the Quick Control/Print button (
). When using either the Creative or Basic Zone modes, use the Quick Control/Print button ( ![]() ) to make active options available for that specific mode. For example, if you want to change your shutter speed while shooting in Shutter-priority AE mode (
) to make active options available for that specific mode. For example, if you want to change your shutter speed while shooting in Shutter-priority AE mode ( ![]() ), press the Quick Control/Print button (
), press the Quick Control/Print button ( ![]() ). The shutter speed options activate on the LCD screen. The Print function allows you to print directly to your home printer when the camera is connected to it with the supplied USB cable. If your printer is PictBridge-compatible, it is also compatible with your camera.
). The shutter speed options activate on the LCD screen. The Print function allows you to print directly to your home printer when the camera is connected to it with the supplied USB cable. If your printer is PictBridge-compatible, it is also compatible with your camera.
• LCD touchscreen. The screen on the back of your camera is a vari-angle LCD touchscreen. It is covered in detail later in this chapter.
The Sides of the Camera
The sides of your camera are dedicated to electronic and computer functions. With the lens pointing away from you, the input and output terminals are located on the left side. The memory card slot is on the right side. Use memory cards with as much space as possible. If you plan to shoot a lot of video, I recommend using cards with more than 8GB of memory. If you want to transfer photos and videos wirelessly to your computer, consider purchasing an Eye-Fi card. The settings for the Eye-Fi card are found under Setup menu 1 ( ![]() ).
).

1.8 The memory card slot is located on the right side of the camera.
The following terminals are located on the left side of the camera:
• A/V Out Digital. This terminal is for connecting your camera to a non-HD television or monitor. An AVC-DC400ST cable is required.
• HDMI out. Use this socket to connect the camera to an HD television or monitor to view your photographs or movies on a larger screen. You will also need an HDMI cable HTC-100.
• Remote terminal. This is where you plug in a remote control, which allows you to keep the shutter open for long exposures. It is located above the microphone terminal.
• External microphone terminal. If you plan to produce professional-quality videos, you need an external microphone. Your camera has a built-in microphone, but it also picks up camera noise, which is unacceptable for a good video presentation.
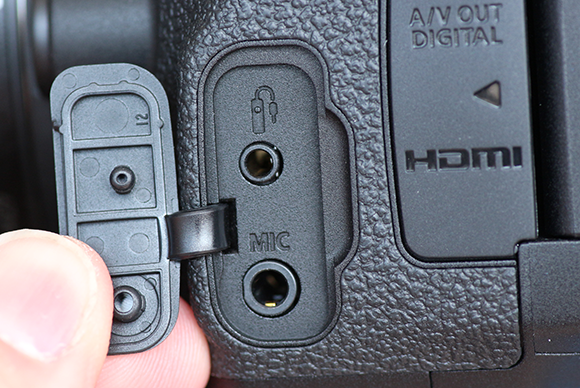
1.9 The connection terminals are located under the two covers on the left side of your camera.
The A/V and HDMI outputs are discussed in more detail in Chapter 9.
Lens Controls
Each lens has its own set of controls, and they vary depending on the purpose it was designed for and the company that manufactures it. You must use a lens with a dedicated Canon lens mount.
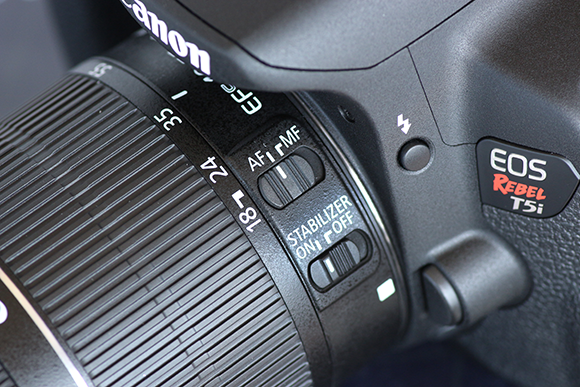
1.10 The Canon T5i/700D 18-55mm kit lens has Image Stabilization and focus switches on the left.
Here are a few common features and controls you find on lenses:
• Focus mode. The focus mode lets you switch back and forth between manual and autofocus.
• Focus ring. If you switch your lens to Manual focus mode ( ![]() ), you use this ring to focus.
), you use this ring to focus.
• Image Stabilization switch. This switch turns Image Stabilization on or off in lenses that have it. Image Stabilization helps prevent blurring in images when handholding the camera and using slow shutter speeds; however, it will not prevent the blurring of a moving subject.
• Distance scale. Many lenses have a distance scale on top that can be used to estimate focus in feet or meters. The low number represents the closest your lens can be to an object to focus properly. Infinity is used when you want to focus at a distance, such as when shooting a landscape.
• Zoom ring. If you are using a zoom lens, turning the zoom ring sets your desired lens focal length.
The Viewfinder Display
The viewfinder is your photographic dashboard. The display only shows information relevant to the scene or your choice of options. It lets you know if the flash is ready to fire, if the exposure is correct, and if your subject is in focus.

1.11 The information you see in the viewfinder.
The following are the indicators you see in the viewfinder (the options displayed depend on the mode you are using):
• Focusing screen. This is the electronic screen that you see when you look through the viewfinder to focus the camera.
• Spot metering circle. This is the area the Spot metering mode ( ![]() ) reads to determine the proper exposure.
) reads to determine the proper exposure.
• AF points. There are nine autofocus points on the focus screen that can be used to focus the camera.
• AF point activation indicator. Each of the nine autofocus points light up round dot indicators as the AF points are activated.
• ISO speed ( ![]() ). This setting displays the camera’s ISO setting.
). This setting displays the camera’s ISO setting.
• White Balance Correction ( ![]() ). This lets you know that a white balance correction is being applied.
). This lets you know that a white balance correction is being applied.
• Focus confirmation light. This light indicates that the camera believes your image is in focus. This is especially helpful when focusing manually.
• Max. burst. This is the number of photographs your camera buffer can hold before it is full.
• Monochrome shooting ( ![]() ). This lights up if you are using a black-and-white or monochromatic option.
). This lights up if you are using a black-and-white or monochromatic option.
• Highlight tone priority ( ![]() ). This lets you know that Custom Function 3, Highlight tone priority (
). This lets you know that Custom Function 3, Highlight tone priority ( ![]() ) is on. This option improves highlight detail in your photos.
) is on. This option improves highlight detail in your photos.
• Exposure level indicator. This lets you know how much your image is under- or overexposed based on the camera’s internal light meter.
• Exposure compensation amount. This indicates how much of an increase or decrease in exposure is set.
• Auto Exposure Bracketing range. This lets you know how many stops under- and overexposed your bracket is set.
• Red-eye Reduction lamp-on indicator. This lets you know that the Red-eye Reduction option is on.
• Aperture. This tells you at what aperture your camera is set.
• Card full warning. When the memory card is full, this warning alerts you. You cannot take any more photographs until you delete some images or replace the card.
• Card error or no card warning ( ![]() ). When you see this warning, your camera is experiencing an error reading or writing to the memory card, or there is no card in your camera.
). When you see this warning, your camera is experiencing an error reading or writing to the memory card, or there is no card in your camera.
• Shutter speed. This tells you at which shutter speed the camera is set.
• Flash Exposure Lock ( ![]() ). When this icon appears, it means that the Flash Exposure Lock is engaged.
). When this icon appears, it means that the Flash Exposure Lock is engaged.
• Busy ( ![]() ). When you see this, the camera is still processing images.
). When you see this, the camera is still processing images.
• Built-in flash recycling. This indicates that the built-in flash is recharging.
• Flash Exposure Compensation ( ![]() ). This light comes on when Flash Exposure Compensation is in use.
). This light comes on when Flash Exposure Compensation is in use.
• High-speed sync ( ![]() ). This indicates that High-speed sync is engaged on your speedlite.
). This indicates that High-speed sync is engaged on your speedlite.
• Flash Exposure Lock/Flash Exposure Bracketing in-progress ( ![]() ). This icon indicates that the Flash Exposure Lock and Flash Exposure Bracketing are in use.
). This icon indicates that the Flash Exposure Lock and Flash Exposure Bracketing are in use.
• Built-in flash recycling. This indicates that the built-in flash is recharging.
• Flash-ready ( ![]() ). When your flash is ready to fire, this icon lights up.
). When your flash is ready to fire, this icon lights up.
• Auto Exposure Lock/Auto Exposure Bracketing in progress ( ![]() ). This indicates that the Auto Exposure Lock or Auto Exposure Bracketing is in use.
). This indicates that the Auto Exposure Lock or Auto Exposure Bracketing is in use.
The LCD Touchscreen and Live View Mode
The LCD touchscreen on your Canon Rebel T5i/700D adds a flexible dimension to your camera. It gives you a large, adjustable screen to use while shooting photos and video. The touchscreen also makes features easy to access. You use the LCD screen to review photos and videos the same way you would on a smartphone. Swipe your fingers across the LCD screen to view the next image. Pinch or spread your fingers to zoom in or out of an image.
The utility software that comes with your camera allows you to connect it to a computer and take photos remotely.
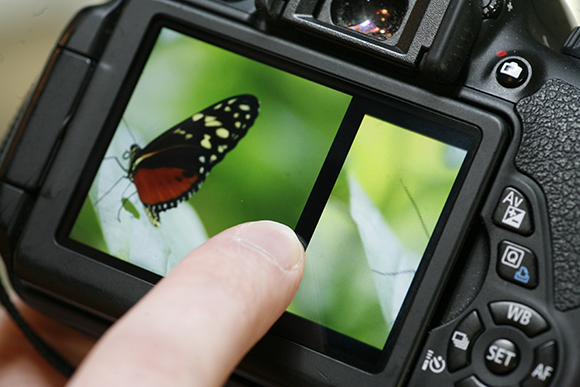
1.12 Use your finger to swipe to the next image.
The Live View shooting mode ( ![]() ) is a useful feature, particularly when you are shooting video, because the touchscreen menus are found on the edges of the LCD screen. To turn on Live View mode (
) is a useful feature, particularly when you are shooting video, because the touchscreen menus are found on the edges of the LCD screen. To turn on Live View mode ( ![]() ), press the Live View button (
), press the Live View button ( ![]() ) located to the right of your camera’s eyepiece. The default focus system for Live View is Continuous autofocus. There are options to make adjustments using the four information displays. Each time that you press the Info button (
) located to the right of your camera’s eyepiece. The default focus system for Live View is Continuous autofocus. There are options to make adjustments using the four information displays. Each time that you press the Info button ( ![]() ) the display switches to the next option. If you don’t want to use the Live View mode (
) the display switches to the next option. If you don’t want to use the Live View mode ( ![]() ), disable it by pressing the Menu button (
), disable it by pressing the Menu button ( ![]() ), and then select the Live View menu (
), and then select the Live View menu ( ![]() ).
).
For more information about the Live View Shooting mode ( ![]() ), see Chapter 8.
), see Chapter 8.
The following list covers how to navigate the options and views available in the Live View Shooting mode ( ![]() ):
):
• Making selections. Menu options differ from the Creative to Basic Zone modes. You have more options in Creative Zone modes. When you want to make a selection, touch the icon on the LCD screen, and additional options appear (if applicable).
• Viewing photos. To view your photos, press the Playback button ( ![]() ), which shows the last photograph you created. Swipe one finger across the screen to scroll back to the previous picture. Move your finger to the left to view the newest image, and to the right to view older photos or those with lower file numbers. If you use two fingers when you swipe, the camera jumps the number of images set in Playback menu 2 (
), which shows the last photograph you created. Swipe one finger across the screen to scroll back to the previous picture. Move your finger to the left to view the newest image, and to the right to view older photos or those with lower file numbers. If you use two fingers when you swipe, the camera jumps the number of images set in Playback menu 2 ( ![]() ). When you place two fingers in the middle of the screen and spread them apart, you zoom in to the photograph. When you pinch your fingers together, you zoom out. You can also use the Cross keys (
). When you place two fingers in the middle of the screen and spread them apart, you zoom in to the photograph. When you pinch your fingers together, you zoom out. You can also use the Cross keys ( ![]() ) to navigate through your photos.
) to navigate through your photos.
• Viewing videos. Press the Playback button ( ![]() ). You will know which files are videos because they have a large Playback icon (
). You will know which files are videos because they have a large Playback icon ( ![]() ) displayed on the LCD screen; press it and the video starts playing. There are additional options at the bottom of the LCD screen to fast-forward, rewind, turn the sound off, or edit the video. Use the Main dial (
) displayed on the LCD screen; press it and the video starts playing. There are additional options at the bottom of the LCD screen to fast-forward, rewind, turn the sound off, or edit the video. Use the Main dial ( ![]() ) to control the volume.
) to control the volume.
• Still information display. When shooting photos, there are standard information displays for the Creative and Basic Zone modes (these do not appear in the Live View shooting mode ![]() ). Press the Quick Control/Print button (
). Press the Quick Control/Print button ( ![]() ) to adjust the available options.
) to adjust the available options.
• Movie information display. This display includes some of the same information that the still display does, including white balance, AF method, and Picture Styles. However, it also includes the video size and frame rate. Like the still information, you have a few more options when you use the Creative Zone modes. For example, you don’t have white balance or Picture Style options available if you’re using a Basic Zone mode.