
Chapter 6: Working with Lighting and Flash
Do you have enough light? Lighting is the most important element in photography. Fortunately, your camera’s light meter serves as a guide. However, even if the light meter indicates that there is enough light in a scene to achieve a proper exposure, there is still a lot to consider before pressing the shutter button. No lighting situation is perfect for every subject. Some subjects look best with soft light, while others stand out in hard light. This chapter explores the lighting choices available to you when contemplating various types of scenes. Sometimes, natural light is the best choice, while other environments require flash to capture the subject. If you know how to use it to your advantage, proper lighting can make a good scene fantastic.

Understanding how to use light can greatly improve your images.
The Importance of Light and Shadow
The foundation of photography is light, and how you approach it separates the beginner from the more experienced photographer. Lighting doesn’t have to be difficult, though. My best advice is to start with one light, and learn how the direction, quality, and color all play a role in creating good images. Using one main light source also helps you learn how to manage shadows. Once you feel more confident, you can add more lights. If you follow this basic rule, managing light will come more naturally over time.
The best way to improve your lighting skills is to practice. Look for images and scenes that inspire you and try to replicate them. Chances are that the lighting is playing a key role in these images. Try to figure out what decisions the photographer made to create the image. The rest of this chapter covers concepts, tips, and the Canon T5i/700D features that can help you create beautiful images.
A good way to approach light is by managing shadows. This doesn’t mean that you should try to avoid or remove shadows from your photographs, but rather you should have an awareness of how they affect your subject or scene. Look for shadows that help balance your photograph. Some shadows can make the subject look mysterious or edgy. Observe patterns in shadows or think about how different shadow shapes may enhance your subject. Not all shadows need to be harsh or solid black — soft shadows can add dimension to a photo. In fact, a photograph without shadows is often flat or boring.
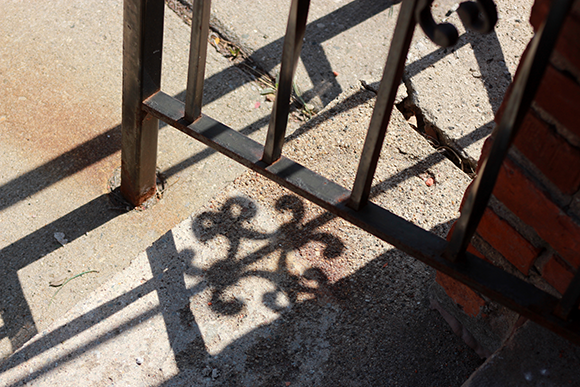
6.1 Look for shadows to add balance to your images. Exposure: ISO 100, f/5.6, 1/500 second, 28-70mm f/2.8 lens at 70mm.
The Direction of Light
The direction of light affects the mood of your photographs. When you use light well, it adds more depth to your images than straight-on lighting, which tends to flatten the subject. Always be aware of the location of the sun — it is more dramatic and colorful in the early morning or late evening than it is at midday. If you are using your camera’s fixed-direction, pop-up flash, your options are limited. However, if you use an attached flash with swivel capabilities, you can bounce the flash in various directions to create different lighting effects. Using off-camera or multiple flashes opens up an unlimited world of opportunity because you are no longer dependent on the direction of the sun, as you can aim the flash anywhere.
Frontlighting
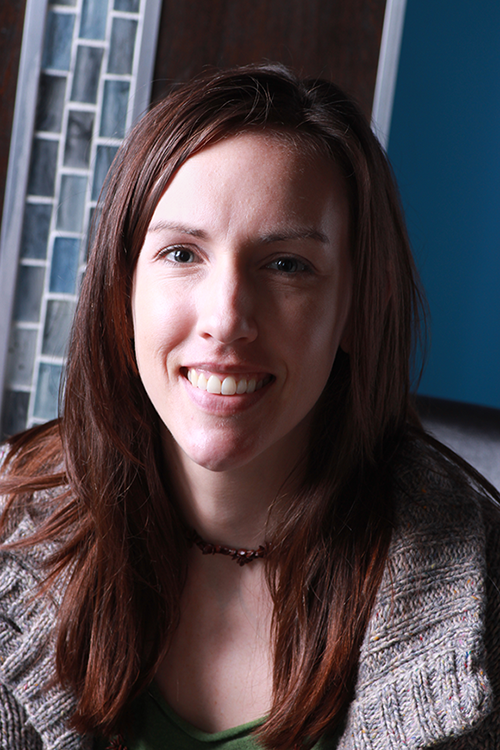
Frontlight is generated from the sun behind you or an on-camera flash. When photographing nature or architecture, it is nice to have the sun at your back. If you are looking for a clean image with no shadows, frontlight does the trick. The downside of frontlighting is that you don’t see the shadows that often add character to a photograph. Images with frontlighting from the sun or your flash appear flatter than images using sidelighting.

6.2 This example of frontlighting created with flash doesn’t have as much depth when compared with portraits created using sidelighting. Exposure: ISO 100, f/6.3, 1/125 second, 100mm f/2.8 lens.
Sidelighting
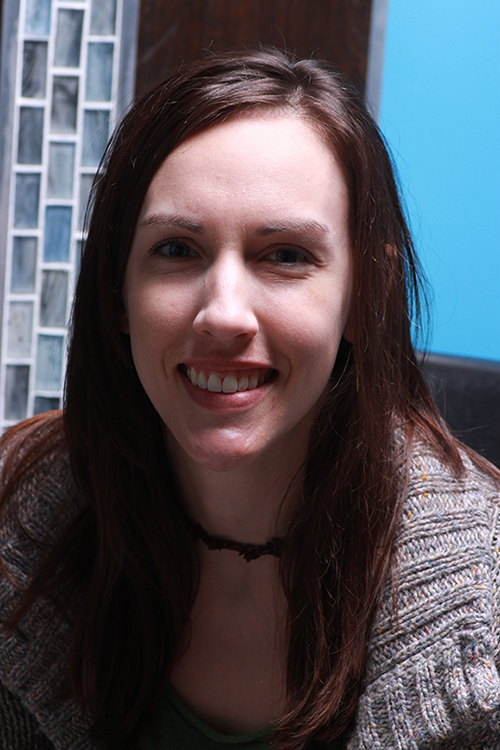
Sidelighting is more dramatic than frontlighting, and adds depth to the subject, as shown in Figure 6.3. It is created when the light source is coming from the left or right of the subject. This casts the opposite side of the subject in shadow. The more intense the light source, the greater the contrast, and the darker the opposite side appears. Additional light sources or reflectors can be used to soften the harshness of sidelighting.
Look for sidelight when creating landscape photographs. Sidelight from the early-morning sun slanting through a stand of trees creates a dramatic shadow effect. In architectural photography, sidelighting brings out the texture of the building materials, such as wood or brick (both look much flatter with frontlighting). Keep an eye out for patterns or columns to which sidelighting can add interest and dimension. The earlier in the morning or later in the evening, the more dramatic the shadows.
6.3 This image was shot with sidelighting to add some drama and character. Exposure: ISO 200, f/6.3, 1/80 second, 100mm f/2.8 lens.
There is more than one type of sidelighting. Any position between front- and backlighting could be considered a variation of sidelighting. Two of the most common types of sidelighting are short and broad lighting. Short lighting is created when the light is focused on the opposite side of the subject away from the camera. Broad lighting comes from the same side on which the camera is positioned and is a flattering form of lighting.

6.4 To create short light, place the light source on the far side of the face, as shown here. Exposure: ISO 200, f/3.2, 1/200 second, 100mm f/2.8 lens.

6.5 To create broad light, place the light source on the side of the face nearest the camera. Exposure: ISO 400, f/3.5, 1/160 second, 100mm f/2.8 lens.
Another popular form of sidelighting when photographing people is called Rembrandt lighting, after the master painter. This is achieved by positioning the light at a 45-degree angle at or above the top of the subject’s head. You know you have achieved this type of lighting when you see an inverted triangle below the subject’s eye on the opposite side from the light source. Sidelight adds dimension to your subjects and is good for portraits.

6.6 Rembrandt lighting is easy to spot due to the inverted triangle shape that appears below the subject’s right eye. Exposure: ISO 400, f/3.5, 1/160 second, 100mm f/2.8 lens.
Overhead lighting
Overhead lighting is the result of artificial light found in ceilings, stage lights, or from the midday sun. This type of lighting is dramatic because it enhances the texture of some subjects. Generally, it’s not flattering for photographing people because the subject’s eyes are cast into dark shadows, as shown in Figure 6.7. Photographers who use overhead lighting also use additional lighting and reflectors to decrease the harsh effects.
6.7 Overhead lighting casts unflattering shadows over the eyes. Exposure: ISO 200, f/6.3, 1/125 second, 100mm f/2.8 lens.
Backlighting
Photographers sometimes find backlighting difficult to master. It takes practice to achieve the best exposure to create the look you want. Backlighting offers two main possibilities. The first is the silhouette, as shown in Figure 6.8, which turns the subject into a solid black outline against the main light source (in this case, the sun). You can achieve this by metering off a bright light behind the main subject. If you meter off the subject with a strong light behind it, you get a form of rim lighting. This type of lighting blurs the edges of your subject with an outline of light. The strength of the light dictates the outcome. An overpowering light source will blow out the photograph background and overtake your subject.
Backlighting is a good choice when photographing translucent objects, such as leaves, flowers, or snow. Backlight is a popular advanced lighting technique when photographing people or subjects with interesting shapes. A hard, undiffused light (explained later in this chapter), such as direct sunlight, is recommended for displaying detail in a subject, as shown in Figure 6.9.
It is important to protect your eyes when pointing your lens toward the sun. If you have a lens hood, use it to help prevent undesired lens flare (unless the light is shining directed into your lens). Some photographers like to use lens flare as part of their composition. In such cases, use the LCD screen and Live View shooting mode ( ![]() ) to compose your image and prevent eye damage.
) to compose your image and prevent eye damage.

6.8 This silhouette was created by metering off the sky behind the subject. Exposure: ISO 100, f/5.0, 1/2000 second, 28-70mm f/2.8 lens at 55mm.

6.9 Here, the camera is pointing into the sun, backlighting the signs. Exposure: ISO 400, f/4.5, 1/250 second, 12-24mm f/4.0 lens at 12mm.
The Canon T5i/700D has an HDR Backlight mode ( ![]() ) designed to ensure that backlit subjects are not underexposed or made into an undesired silhouette. The camera combines three consecutive shots taken at different exposures (underexposed, correctly exposed, and overexposed). This creates a properly exposed final image with both good shadow and highlight detail. It is not a perfect system but it can be helpful in certain situations.
) designed to ensure that backlit subjects are not underexposed or made into an undesired silhouette. The camera combines three consecutive shots taken at different exposures (underexposed, correctly exposed, and overexposed). This creates a properly exposed final image with both good shadow and highlight detail. It is not a perfect system but it can be helpful in certain situations.
Always use a tripod when shooting in HDR Backlight mode ( ![]() ). Otherwise, the three images may not align properly due to camera shake.
). Otherwise, the three images may not align properly due to camera shake.
The Quality of Light
The mood of your images is greatly affected by the quality of the light. The quality of light refers to the light source, and how it affects the subject or scene. For example, a strong light at an extreme angle may add depth or texture to your subject. Contrast, color, and the textures revealed within an image all depend on the quality of the lighting.
Hard lighting
Direct light without diffusion is called hard light (see Figure 6.10). The rule is that the narrower the light source, the harder the light will be. This type of light generates high-contrast images with deep, dark shadows. Many photographers avoid this type of light in favor of softer light. However, hard light offers many opportunities to create exciting and intense images. It helps define the edges, curves, and angles of a subject. Photographers using hard light depend on good shadow management to create powerful images. Be aware of the depth, direction, and shape of the shadows in your scene. The summer sun or an unfiltered flash are good examples of direct light sources.

6.10 Hard light is unfiltered and produces strong shadows. Exposure: ISO 100, f/5.0, 1/125 second, 100mm f/2.8 lens.
You can create dramatic portraits using hard light because texture and details pop out, and shadows are strongly defined. Hard lighting can also bring out the detail in bricks on a building or highlight a fabric’s texture. When used well, hard light can add drama and depth to your images.

6.11 Textures and subject details are more visible and dramatic when you use hard lighting. Exposure: ISO 100, f/3.2, 1/200 second, 100mm f/2.8 lens.
Hard light is an effective tool for creating contrast in black-and-white photographs.
Soft lighting
Diffused or reflected light produces what is called soft light. The rule is that the broader the light source is, the softer the light will be. Soft light is popular for portraits because it reduces the hardness of shadows. It doesn’t show textures as well as hard light, but for many subjects this is positive because soft shadows make the skin look smoother. Placing translucent material, such as plastic, fabric, or a softbox, in front of the light source creates soft light. Soft light, as shown in Figure 6.12, can also be achieved by bouncing light off walls or reflective material, such as a photo umbrella. Nature offers its own soft light filters in the form of cloud cover, which diffuses harsh sunlight.

6.12 A photo umbrella and reflector softened the light for this portrait. Notice the soft shadows and catchlights in the subject’s eyes. Exposure: ISO 100, f/5.0, 1/200 second, 100mm f/2.8 lens.
Soft light is ideal for subjects with multiple elements, such as a family or group photo. It limits the harshness of the shadows between complex elements that can detract from the image. Soft light is also popular when shooting video because it is easier to manage when following moving subjects. Harsh shadows move around as a subject moves, but soft light minimizes the need for heavy shadow management.
Remember that when you bounce light off a wall or ceiling, the color of the surface bounces with it.
Types of Light
Sunlight, and flash and other artificial light (such as light bulbs) are the three main light sources used in photography. Many photographers have a favorite type that they use most often, but I like to use all three. You don’t always have a choice of lighting options; flash may not be allowed at an event or the sun might be shining directly into your lens. It is a good idea to enhance your skillset so that you are prepared for any type of lighting situation. The ability to work with the light available to you is a valuable asset.
Natural light
The sun is the favorite light source of many photographers because it’s readily available and free. Sunlight offers different lighting opportunities throughout the day. This is both a benefit and a curse because the photographer can’t control the direction, quality, or color of the light. Fortunately, a well-planned shooting schedule allows you to create a variety of images as the day progresses. The three natural types of lighting are front-, side-, and backlighting. There is also midday, overhead light in the summer. The nice thing about sunlight, which may seem obvious, is that it always looks natural.
With that in mind, it is important to know which type of light you find at different times of day and during various weather conditions. The harsh or soft light on sunny or cloudy days affects contrast. The warmth or coolness of the light (depending on the time of day) sets the mood. Early-morning or evening shadows add dimension. All of these factors play a role in your photos.
Windows are an excellent source of natural light and can be used for indoor photography. You don’t have to be satisfied with one light source — you can use reflectors to tone down harsh, direct light coming through a window. You can also use mirrors to redirect light. Beyond sunlight, there are other natural light sources. Using higher ISO settings, long exposures, and your tripod, you can capture images using light from the moon, the stars, or even an aurora borealis.
See Chapter 5 for more details about long exposures.
Continuous light
Artificial light (also known as a hot light) directs continuous light onto your subject. This type of light helps the photographer visualize what the photograph will look like in the final image. Some photographers mix continuous light with flash. Remember, flash light only extends so far and casts your background in darkness. Slowing your camera’s shutter speed helps pick up the continuous ambient light in the background, adding dimension to the photograph.
There are many new types of continuous light sources available on the market. Light-emitting diodes (LEDs) are a popular lighting choice because they produce a flattering light that doesn’t emit a lot of heat. This is valuable when photographing people. HMI (hydrargyrum medium-arc iodide) lights produce a powerful, consistent light, and are used to provide additional light inside, outside, or when competing with the sun. Continuous lights are also commonly used when shooting video. The light source may be attached to the camera or on a stand facing the subject. In most cases, a filter or softbox is used to diffuse light for video.
Flash
The flash produces a burst of white light. Many new photographers are unsure about using flash because they are often under the impression that flash photography is complicated. Fortunately, the Canon Evaluative Through-the-Lens (E-TTL) technology allows the camera and flash to communicate easily and create a proper exposure. This means that exploring new lighting techniques is low risk and a lot of fun.
The Canon Rebel T5i/700D has a maximum ISO rating of 12800, which is expandable to ISO 25600. This allows you to photograph using white balance filters in many indoor situations. You can use this technique in situations in which flash is not allowed or is inappropriate. When you photograph inside using ambient (available) light, you are dependent on the fixed placement and direction of the established lights.
Understanding how to use flash well opens a new world to photographers. Flash allows you to control the light on your subject, direct it where you want it, and adjust its color and quality. This is not the case with the sun or ambient light. You can also control the pop-up flash or the settings of an attached Canon speedlite (covered later in this chapter) via your camera’s LCD screen.
Shutter speed and flash
You may set your shutter speed anywhere between 1/200 second and 30 seconds in the Shutter-priority AE mode ( ![]() ). This means that you may select slower shutter speeds for different lighting and movement effects. This is helpful when you want to show more ambient light in the background. If you set your shutter speed too slow, and either you or the subject is moving, the camera creates a ghosting effect, as shown in Figure 6.13.
). This means that you may select slower shutter speeds for different lighting and movement effects. This is helpful when you want to show more ambient light in the background. If you set your shutter speed too slow, and either you or the subject is moving, the camera creates a ghosting effect, as shown in Figure 6.13.

6.13 Ghosting is created by the combination of flash, slow shutter speed, and subject or camera movement. Exposure: ISO 100, f/11, 1/15 second, 40mm f/2.8 lens.
Your camera syncs up to 1/200 second with the built-in flash, which means that you cannot set your shutter speed above 1/200 second. If you do, only part of your picture will be exposed. This is why the camera automatically adjusts the shutter speed back to 1/200 second if you set it higher than the maximum sync. If you use a dedicated speedlite, you can engage its High-speed Sync mode and sync to the maximum shutter speed. When using the Canon Rebel T5i/700D, the maximum shutter speed is 1/4000 second.

6.14 Flash and a fast shutter speed create a dark background in a low-light environment. Exposure: ISO 200, f/8.0, 1/160 second, 12-24mm f/4.0 lens at 24mm.

6.15 Even in a low–light environment, flash and a slow shutter speed can expose some background. Exposure: ISO 200, f/8.0, 1/8 second, 12-24mm f/4.0 lens at 24mm.
Aperture and flash
The Aperture-priority AE mode ( ![]() ) controls the amount of light that enters your camera. It also controls the depth of field, which is the area of focus around the subject. When using a larger aperture number, it takes more power for the flash to achieve the proper exposure. This wears down batteries faster and slows the recycle time, especially if you use a high aperture setting, such as f/16 or f/22. Family and wedding photographers often use an aperture range of f/5.6 to f/11 as all-purpose aperture settings. When I photograph events, I prefer to use f/8.0, as this allows a little room for error when focusing in a busy environment. However, that doesn’t mean you can ignore the importance of focus.
) controls the amount of light that enters your camera. It also controls the depth of field, which is the area of focus around the subject. When using a larger aperture number, it takes more power for the flash to achieve the proper exposure. This wears down batteries faster and slows the recycle time, especially if you use a high aperture setting, such as f/16 or f/22. Family and wedding photographers often use an aperture range of f/5.6 to f/11 as all-purpose aperture settings. When I photograph events, I prefer to use f/8.0, as this allows a little room for error when focusing in a busy environment. However, that doesn’t mean you can ignore the importance of focus.
Manual mode and flash
When photographing with flash, many professionals and advanced amateurs set their cameras on Manual mode ( ![]() ) for full exposure control. As a general rule, the aperture controls the intensity of the flash, and the shutter controls the amount of ambient or background light visible. For example, if you use a fast shutter speed indoors, the background often goes dark or black. When you use a slow shutter speed, the ambient light brightens the background.
) for full exposure control. As a general rule, the aperture controls the intensity of the flash, and the shutter controls the amount of ambient or background light visible. For example, if you use a fast shutter speed indoors, the background often goes dark or black. When you use a slow shutter speed, the ambient light brightens the background.
For more about shutter speed and depth of field, see Chapter 5.
Direct flash produced by the pop-up flash or an external model attached to your camera’s hot shoe is convenient for everyday casual photography. Unfortunately, it doesn’t always produce the most flattering light when compared with other options. To achieve more advanced results in your photography, it is important to learn about all of the opportunities flash photography offers.
Be aware, too, that ambient light from a ceiling fixture is not often flattering to your subject. It can be dull, flat, and does not enhance color as well as a direct light. Despite the criticisms of direct flash, its white light provides color that is more accurate and that can really pop the subject out of the background. If you have a Canon Speedlite 430EX II or equivalent that you can turn and adjust to bounce light off ceilings and walls, you have more options than straight-on flash. If you bounce your flash off the ceiling or wall, you achieve a softer light, and often produce a more natural-looking result. It’s important to be aware of the color of the surface off of which you bounce light because that color will also bounce onto your subject. For example, if you bounce your flash toward a green wall, the light bouncing toward your subject will have a green tint.
Bouncing light off a high or dark ceiling is not very effective because the light is absorbed and doesn’t bounce back onto your subject.
A diffuser is helpful when trying to soften the light produced from your flash. You may flip down the built-in diffuser available on many Canon flashes. Another option is to cover your flash with a translucent fabric or other material. There is a large selection of flash diffusion and bounce accessories available at your local camera store or online. One such accessory is an umbrella. You can use umbrellas to bounce light from inside back to the subject. Some umbrellas are so thin that they are translucent or they convert to a translucent material, allowing the photographer to use them as a flash diffuser.
Different materials create different results. A gold umbrella bounces warm light toward the subject. Metallic silver creates more contrast and specularity (the brightness or metallic feel in reflective highlights) when compared to the softness of a white, pearl-colored reflector. A light fabric disperses the light differently than a plastic cover. Both may be good options, but it is good to test multiple options and styles of bounce flash and diffusion accessories to find the right one for you. Flash is also helpful outdoors. It can be used as fill light (support or secondary light) to help minimize shadows from harsh, direct sunlight. Outdoor flash is also helpful for separating the subject from the background.

6.16 This photograph was taken in the evening using a filtered, off-camera flash under the shade of a large tree. Exposure: ISO 400, f/22, 1/200 second, 12-24mm f/4.0 lens at 12mm.
For more advanced results, remove the flash from your camera. Canon makes E-TTL off-camera shoe cords (such as the Canon D OC-E3) that attach between the camera’s hot shoe and the flash. This gives you the flexibility to move the flash around and create customized lighting. You can also use one or multiple flashes off-camera with Canon’s wireless system, which allows you to fire multiple flashes at once. However, before you start using multiple flashes, make sure that you know how to use one flash well.
The Color of Light
Whether you use warm, cool, or unnatural-looking colors in your photography depends on the mood and style you are trying to create. The color of the light is measured by its Kelvin temperature. For example, white light is measured as 5500K. Light with a temperature below 5500 degrees displaying reds, oranges, and yellows is considered warmer, even though its temperature in degrees Kelvin is lower. Light with a temperature above 5500 degrees that displays more blue tones is considered cooler, but it is actually hotter when measured in degrees Kelvin.
The color of the light alters the appearance of the objects in the scene.
Many new artificial lights, such as modern white fluorescents and LEDs, create daylight colors. Other options, such as older fluorescents, create an unpleasant green cast. Older tungsten light bulbs give off a familiar yellow cast. Photographers adjust their cameras and use external gels to manipulate the color of light sources. For example, the Fluorescent white balance setting ( ![]() ), which you can activate by pressing the White Balance button (
), which you can activate by pressing the White Balance button ( ![]() ), neutralizes the green cast from fluorescent lights.
), neutralizes the green cast from fluorescent lights.
You can mix different types of artificial light, such as LED, tungsten, fluorescent, or neon to create colorful images.
Images don’t have to be neutral or balanced to white light. Photographers have the following choices:
• Warm light. The early morning and late day sun produces reds, oranges, and yellows, providing the opportunity to create beautiful and inviting images. This light is excellent for landscapes and outdoor portraits. Near cities and high-pollution areas, sunsets tend to be warmer than sunrises. This is because the particles from daytime pollution increase the amount of scattered light.
• Cool light. Cool colors have a blue tint to them, representing cold or winter weather. Dark or sad moods are also connected with cool lighting. Winter is a good time to capture cool light landscapes. Snow reflects the blue sky, increasing the visual feeling of cold weather.
Combining warm with cool lighting can create a dramatic effect. A warm foreground with a cool background is a creative option. Lighting one side of a subject with warm light and the opposite side with cool can create an interesting contrast. One way to create this effect is to place a warm filter over your flash on a cool, overcast day. The subject close to your camera is lit with the warm light from the flash and the background is cooler or bluer from the natural light.
White balance options
The term white balance means adjusting the camera to see the existing light as natural or white light. The technology in your camera makes this easier than trying to change the light source with filters. White or natural light is not always available, so the existing light needs to be corrected to give the scene a more natural look. Even sunlight changes color temperature throughout the day. To adjust for the changes in light or different color light sources, your Canon T5i/700D has seven white balancing options beyond the Auto white balance ( ![]() ). If one of the seven settings doesn’t satisfy your needs, you can set your own white balance, which is helpful in mixed-light situations. White balance saves time when color-correcting your images on the computer. Use the white square on the color chart in Appendix C to create a custom white balance under the actual light source.
). If one of the seven settings doesn’t satisfy your needs, you can set your own white balance, which is helpful in mixed-light situations. White balance saves time when color-correcting your images on the computer. Use the white square on the color chart in Appendix C to create a custom white balance under the actual light source.
Your camera has a White Balance Auto Bracketing mode ( ![]() ) that is like exposure bracketing (explained in Chapter 5). The camera takes three consecutive shots, and adjusts between blue and amber, or magenta and green. This feature also gives you white balance options you can decide on later when you edit your photos on your computer. If you use the camera’s RAW setting (
) that is like exposure bracketing (explained in Chapter 5). The camera takes three consecutive shots, and adjusts between blue and amber, or magenta and green. This feature also gives you white balance options you can decide on later when you edit your photos on your computer. If you use the camera’s RAW setting ( ![]() ), you can make white balance adjustments without degrading image quality.
), you can make white balance adjustments without degrading image quality.
For a full list of the available white balance settings on your Canon T5i/700D, see Chapter 3.
Using Picture Styles
Picture Styles ( ![]() ) are a convenient way to photograph scenes or subjects based on preset or custom settings. These settings are like the past practice of selecting different types of film. Each style adjusts the color, saturation, contrast, and sharpness commonly preferred in such images. For example, you may want softer images with higher color saturations for portraits rather than what you get in standard shooting modes. The Portrait Picture Style setting (
) are a convenient way to photograph scenes or subjects based on preset or custom settings. These settings are like the past practice of selecting different types of film. Each style adjusts the color, saturation, contrast, and sharpness commonly preferred in such images. For example, you may want softer images with higher color saturations for portraits rather than what you get in standard shooting modes. The Portrait Picture Style setting ( ![]() ) is a preset that provides just that.
) is a preset that provides just that.
The Canon Rebel T5i/700D has the eight preset Picture Styles ( ![]() ) from which you can choose. The full list is available in Chapter 3.
) from which you can choose. The full list is available in Chapter 3.
The Picture Style Editor
Canon offers a Picture Style Editor on the DVD that comes with your camera. Designed for advanced users, this method is more precise than using the LCD screen to create custom Picture Style adjustments. To do this, open a RAW image in the Picture Style Editor. Apply a Picture Style to the image, and then make adjustments with the multiple color adjustment options. Once you make your custom changes using the editor, save your changes as a Picture Style file (PF2). Use the EOS utility program (also found on the Canon DVD) to register the file in the camera so you can apply it to future photographs.

6.17 The Picture Style Editor allows you to customize hue, saturation, and lightness settings. You may save your custom Picture Style settings for future use in your camera by registering them as a PF2 file.
To upload a PF2 file to your camera, it must be connected to your computer via a USB cable.
Ambience Effects
When photographing in the automatic modes, you can set Ambience Effects to enhance your images. These are similar to Picture Styles for automatic settings. You can check the ambience effect on the screen by pressing the Live View button ( ![]() ) on the back of your camera. If you want to enhance your images, select from the following effects:
) on the back of your camera. If you want to enhance your images, select from the following effects:
• Standard. The camera does not adjust your photograph.
• Vivid. Adds color saturation, and increases contrast and sharpness.
• Soft. Decreases the sharpness for a soft-focus look.
• Warm. Adds warm tones, such as reds and oranges, and softens the image.
• Intense. Increases color saturation and contrast beyond the Vivid setting.
• Cool. Adds cool blue tones to your image.
• Brighter. Lightens the photograph.
• Darker. Darkens the photograph.
• Monochrome. Creates black-and-white photos with color tint options similar to Picture Styles.
Ambience effects are not available in the Scene Intelligent Auto ( ![]() ), No Flash (
), No Flash ( ![]() ), or HDR backlight (
), or HDR backlight ( ![]() ) modes.
) modes.
Choosing a color space
A common dilemma among photographers is deciding which color space to use. The available options — Adobe RGB or sRGB — are found under Shooting menu 2 ( ![]() ). Adobe RGB is the standard choice for photographers who regularly print their images. This is because Adobe RGB has a larger color gamut (that is, more colors to work with). As more images are shared on the Internet, many photographers have switched to sRGB because it displays colors better for e-mail and web use.
). Adobe RGB is the standard choice for photographers who regularly print their images. This is because Adobe RGB has a larger color gamut (that is, more colors to work with). As more images are shared on the Internet, many photographers have switched to sRGB because it displays colors better for e-mail and web use.
Measuring Light
What is a correct exposure? The answer depends on your goal for the photograph. Consider which part of your subject or scene you want to see or highlight. The direction of the light and how much of it is illuminating your main subject helps you determine which metering mode to use.
When you press your shutter button halfway, the camera combines four distinct elements to calculate the proper exposure of a scene: the intensity of the light (source), the size of the opening allowing light into the camera (aperture), how long the camera lets light in (shutter), and the light sensitivity of the material capturing the image (ISO). With dSLRs, photographers have a large latitude of digital sensitivity settings.
Choosing the proper exposure
The first step is to consider the scene. Everything has detail, and it is important to show as much as possible in a properly exposed photograph. Highlight detail is found in the light or white areas of your photograph. If your subject is wearing a white shirt, you should be able to see the fabric details. If there is no texture in the whites, the detail is considered blown out.
Shadow detail is the fine points found in the shadows or blacks. If your subject is wearing a black shirt, the detail in the shirt should be visible. You also want your photographs to have a nice balance of contrast. Too much contrast leaves your photos with little or no highlight and shadow detail. Low contrast leaves your images flat and lifeless. Often in high-contrast scenes, it is difficult to successfully capture the entire highlight and shadow detail. In this case, the photographer must decide which of the details is more important and adjust the exposure as needed.
The Canon T5i/700D offers multiple exposure mode options. A full list and explanations are found in Chapter 3.
When evaluating your exposure, consider the histogram — an often feared and misunderstood, yet valuable tool for the digital photographer. The histogram is a graph that charts the brightness levels in an image from darks to lights in a range from 0 to 255. In the center is medium gray. The darker areas are on the left and the lighter on the right, as shown in Figure 6.18.

6.18 This histogram shows some overexposed highlights from the background and sidewalk.
A brightness histogram gives you a sense of the distribution of the lights and darks in your image. Generally, a good histogram spreads across the entire screen, but this is not always the case. If you photograph a white cat in the snow, chances are the histogram will not break anywhere near the left side. It is worth noting that if your histogram bumps up to either edge of the graph with many pixels, you may be losing some important shadow or highlight detail. If your histogram is bunched up in the middle of the graph, you may find you have a rather flat image.
To view your image’s histogram, press the Playback button ( ![]() ), select the image you want to view, and then press the Info button (
), select the image you want to view, and then press the Info button ( ![]() ).
).
A color or RGB histogram displays how the brightness levels of all three colors (Red, Green, and Blue) are distributed in the image. Colors on the left side of the graph are more prominent than the brighter or less intense colors on the right. If a color is bumping up against the left side of the graph, it may be oversaturated and not displaying much detail. If the color histogram channel is bumping against the right side, it may be completely lacking in the scene. Ultimately, a histogram is a guide, not a pattern you must obey.
Metering modes
Your camera has four metering modes from which you can choose. Each mode calculates the scene exposure using different parts of the scene or subject.
Evaluative metering mode
This is Canon’s all-purpose metering system. The camera divides the viewfinder into zones from which to work when calculating the proper exposure of a scene. In the Evaluative metering mode ( ![]() ), the camera software selects multiple points and applies different weight to any of the active nine focus points seen through the viewfinder. The Evaluative metering mode (
), the camera software selects multiple points and applies different weight to any of the active nine focus points seen through the viewfinder. The Evaluative metering mode ( ![]() ) is the default metering system for the camera’s automatic modes. It is also a good default setting to leave your camera in for everyday photography. When you face a backlit subject, Evaluative metering mode (
) is the default metering system for the camera’s automatic modes. It is also a good default setting to leave your camera in for everyday photography. When you face a backlit subject, Evaluative metering mode ( ![]() ) is recommended.
) is recommended.
Center-weighted average metering mode
The Center-weighted average metering mode ( ![]() ) averages the light in the entire frame, but assumes that the subject is in the center, giving more weight to those points of exposure. The advantage of this metering system is that it is not overly influenced by bright edges or spots of light within the scene. It is the default setting for many photographers because the exposure is more predictable than the Evaluative metering mode (
) averages the light in the entire frame, but assumes that the subject is in the center, giving more weight to those points of exposure. The advantage of this metering system is that it is not overly influenced by bright edges or spots of light within the scene. It is the default setting for many photographers because the exposure is more predictable than the Evaluative metering mode ( ![]() ), which uses complex calculations to determine the best exposure. As long as the subject is in the center, this is a good standard exposure setting.
), which uses complex calculations to determine the best exposure. As long as the subject is in the center, this is a good standard exposure setting.
Spot metering mode
The Spot metering mode ( ![]() ) focuses on approximately 4 percent of the frame to calculate the best exposure. A circle in the middle of the viewfinder represents it, as shown in Figure 6.19. If you need a precise meter measurement, this setting gives you more control over the exposure. You can also use this mode if you need the best exposure for only part of a scene. This setting is helpful when there is a lot of light behind your subject or if it is in the shade.
) focuses on approximately 4 percent of the frame to calculate the best exposure. A circle in the middle of the viewfinder represents it, as shown in Figure 6.19. If you need a precise meter measurement, this setting gives you more control over the exposure. You can also use this mode if you need the best exposure for only part of a scene. This setting is helpful when there is a lot of light behind your subject or if it is in the shade.
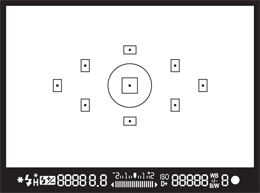
6.19 The circle in the middle of the frame represents the Spot meter’s coverage.
If you find that your favorite metering mode regularly under- or overexposes your images, consider using exposure compensation.
If you set your camera to the Spot metering mode ( ![]() ) and point it at bright light behind your subject, you create a silhouette. If you don’t want to create a silhouette, use the Spot metering mode (
) and point it at bright light behind your subject, you create a silhouette. If you don’t want to create a silhouette, use the Spot metering mode ( ![]() ) and focus on your subject. The spot meter calculates the proper exposure based on approximately 4 percent of the frame pointed at your subject.
) and focus on your subject. The spot meter calculates the proper exposure based on approximately 4 percent of the frame pointed at your subject.
If you are concerned about your exposure, consider using Auto Exposure Bracketing ( ![]() ), which is explained in Chapter 3. This feature takes three consecutive images at different exposures. This gives you a choice of exposures when you are ready to edit or print your images. Another recommendation is to photograph using the RAW setting (
), which is explained in Chapter 3. This feature takes three consecutive images at different exposures. This gives you a choice of exposures when you are ready to edit or print your images. Another recommendation is to photograph using the RAW setting ( ![]() ). This allows you to readjust your exposure while editing your images.
). This allows you to readjust your exposure while editing your images.
Partial metering mode
The Partial metering mode ( ![]() ) is similar to the Spot metering mode (
) is similar to the Spot metering mode ( ![]() ), except that it takes into account about double the area of the center of the frame when calculating the proper exposure. This mode is good for exposing small or distant objects.
), except that it takes into account about double the area of the center of the frame when calculating the proper exposure. This mode is good for exposing small or distant objects.
The Canon Flash System
The Canon flash system consists of multiple flash models, called speedlites, which are available for the Canon Rebel T5i/700D. The Speedlite 270EX II is a compact flash that is a step above your camera’s pop-up flash. The 270EX II is fine for casual use when photographing subjects within a range of less than 12 feet. It is also a good choice for use as a trigger flash for multiple-flash photography, which is covered later in this chapter. The Speedlite 430EX II is a good all-purpose flash with a swivel head, bounce, and enough power to cover most of your needs. If you need a durable, high-performance flash, the Speedlite 600EX-RT is a good choice. The 600EX-RT is a wireless, multiple-flash system that uses radio wave communication for up to five groups of flashes.

Image courtesy of Canon.
6.20 From left to right, Canon Speedlite 600EX-RT, 320EX, and 270EX.
The pop-up flash
The pop-up or built-in flash, shown in Figure 6.21, is on top of your camera. It is good for casual photography of subjects that are within a 12-foot range. Make sure that you are not using a lens hood because it may obstruct the flash and create unwanted shadows. If you are serious about flash photography, I recommend that you consider purchasing an external flash. You will have more flexibility, features, and power with most external flashes, especially Canon Speedlites.
To turn on the built-in flash, press the Flash button ( ![]() ) on the front of the camera just above the Lens Release button. You must press this button to turn on the flash in the Program AE (
) on the front of the camera just above the Lens Release button. You must press this button to turn on the flash in the Program AE ( ![]() ), Shutter-priority AE (
), Shutter-priority AE ( ![]() ), Aperture-priority AE (
), Aperture-priority AE ( ![]() ), Manual (
), Manual ( ![]() ), and Bulb (
), and Bulb ( ![]() ) exposure modes. In the automatic exposure modes, such as Sports (
) exposure modes. In the automatic exposure modes, such as Sports ( ![]() ) and Landscape (
) and Landscape ( ![]() ), the camera automatically pops up the flash when required.
), the camera automatically pops up the flash when required.
While the flash is charging or recycling, a Busy ( ![]() ) icon is displayed in the viewfinder. When the flash is ready, the icon (
) icon is displayed in the viewfinder. When the flash is ready, the icon ( ![]() ) is displayed in the bottom left of the viewfinder. Your pop-up flash has a convenient Red-eye Reduction mode. To enable this option, go into Shooting menu 1 (
) is displayed in the bottom left of the viewfinder. Your pop-up flash has a convenient Red-eye Reduction mode. To enable this option, go into Shooting menu 1 ( ![]() ), select Redeye reduc., and then select Enable. Red-eye Reduction works in every mode except Flash Off (
), select Redeye reduc., and then select Enable. Red-eye Reduction works in every mode except Flash Off ( ![]() ), Landscape (
), Landscape ( ![]() ), Sports (
), Sports ( ![]() ), and Movie (
), and Movie ( ![]() ).
).

6.21 The Canon Rebel T5i/700D pop-up flash ready to fire.
The Red-Eye Reduction mode is not foolproof. It works better when there is more light in the environment.
The pop-up flash also works with the camera’s self-timer, which is helpful when shooting family pictures. Your camera has two options for this: Self-timer 2 seconds ( ![]() ) and Self-timer 10 seconds (
) and Self-timer 10 seconds ( ![]() ). You can also select up to 10 additional continuous shots so that you don’t have to keep running back and forth to the camera.
). You can also select up to 10 additional continuous shots so that you don’t have to keep running back and forth to the camera.
Using an external flash
On top of your camera is a hot shoe for external flashes. This is where you can attach a Canon Speedlite flash directly to the camera. You may also use an off-camera shoe cord and hold the flash in your hand or attach it to a bracket. Just because external speedlites are larger and more powerful does not mean that they are more difficult to use. The Canon Speedlite’s E-TTL II technology makes it easy for the flash to talk to the camera. As a result, well-exposed flash photographs are as easy as attaching the flash to the camera hot shoe, turning on the flash, and pressing the shutter button.
An external flash is generally optimal for subjects in the range of 8 to 50 feet away, depending on the flash model and ISO setting. The maximum range is limited when you bounce the flash, which is good for softening the light. Some flashes can reach more than 150 feet, but the intensity of the flash diminishes the farther your subject is from the camera.
All Canon Speedlites, including the T5i/700D pop-up flash, have a Flash Exposure Lock button ( ![]() ). If you focus on your subject and press the Flash Exposure Lock button (
). If you focus on your subject and press the Flash Exposure Lock button ( ![]() ), the flash emits a pulse of light to calculate the proper exposure, and then stores it in memory. Press the AE Lock button (
), the flash emits a pulse of light to calculate the proper exposure, and then stores it in memory. Press the AE Lock button ( ![]() ) and recompose your image. Once your photograph is composed and you press the shutter button all the way, the flash-locking system uses the flash exposure settings stored in memory.
) and recompose your image. Once your photograph is composed and you press the shutter button all the way, the flash-locking system uses the flash exposure settings stored in memory.
The Flash Exposure Lock button ( ![]() ) doesn’t work in the Live View shooting mode (
) doesn’t work in the Live View shooting mode ( ![]() ).
).
When you don’t agree with results of your flash photography, consider using Flash Exposure Compensation (FEC) ( ![]() ). You can quickly access it by pressing the Quick Control/Print button (
). You can quickly access it by pressing the Quick Control/Print button ( ![]() ) on the back of your camera.
) on the back of your camera.
You can set Flash Exposure Compensation directly on your speedlite, but it will override any flash setting on your camera.
Flash Exposure Compensation is commonly used in fill-flash situations when the subject is in front of a bright light source, such as the sun or a window. More advanced photographers use Flash Exposure Compensation with exposure compensation. Flash Exposure Compensation is used to control the flash exposure, and exposure compensation is used to adjust the ambient light. It’s like adjusting two exposures in one photograph. If you are using the flash on your camera, I recommend purchasing a bounce reflector, a softbox, or a filter designed to soften its light.
Using multiple flashes
Removing the flash from your camera is a great way to quickly improve the quality of your photography. Whether you use one or multiple flashes, you can spend a lifetime learning new skills related to off-camera flash photography.
The Canon flash system includes a remote system that allows the use of multiple flashes at one time. There are many ways you can approach using multiple flashes. You can use your camera’s external or pop-up flash to trigger external Canon Speedlite flashes in Slave mode ( ![]() ). Another excellent option is to use Canon’s Speedlite radio transmitter to trigger up to 15 individual flashes at one time. Radio transmitters have an advantage over optical triggers. Optical triggers depend on light from other flashes to be triggered, whereas radio transmitters are not affected by the direction of another flash or obstructions between multiple flashes. Be sure to use a radio transmitter when shooting around other photographers, so their flashes do not trigger your equipment.
). Another excellent option is to use Canon’s Speedlite radio transmitter to trigger up to 15 individual flashes at one time. Radio transmitters have an advantage over optical triggers. Optical triggers depend on light from other flashes to be triggered, whereas radio transmitters are not affected by the direction of another flash or obstructions between multiple flashes. Be sure to use a radio transmitter when shooting around other photographers, so their flashes do not trigger your equipment.
You should always have one main light source. When using multiple light sources, consider assigning one of your flashes as the main light at a higher power level. The rest of the flashes can then be used as support lights. How you approach multiple light sources depends on your photographic goals.