
Chapter 5: Exploring Exposure and Composition
Which aperture to use is one of the most common issues discussed by photographers. Understanding how other photographers approach a subject is an important part of learning to improve your own photography. It is helpful to think about the process of taking a photograph. If you want to be a successful photographer, you need to understand the mechanics of exposure and composition. Your job, with the support of your camera’s metering system, is to decide which combination is best for the scene in front of you. Although there are many automatic exposure options, I urge you to explore and learn more about how exposure works. Don’t just point and shoot, and then settle for what the camera gives you. Take charge and compose your images to create the results you desire.

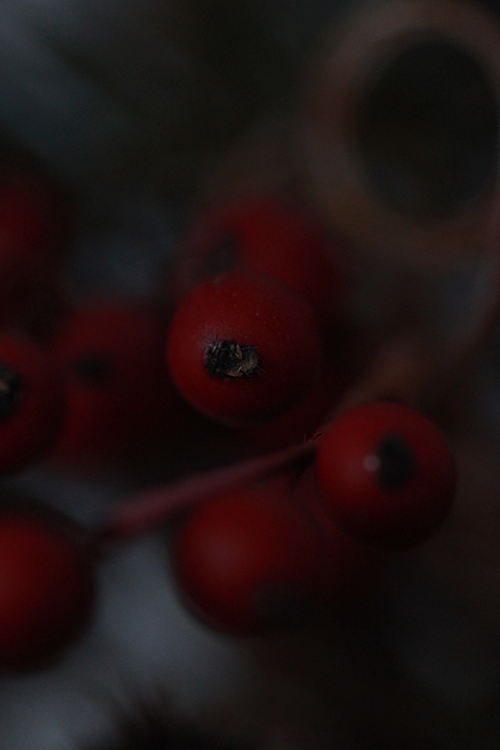
The shallow depth of field in this image was achieved by using a large aperture.
Choosing the Right Exposure
You can turn almost anything into a camera, which is just a lightproof box. Even the room you are in could be a camera if you cover the windows and keep out all of the light. If you place a large white piece of paper on one wall and drill a hole in the other, you see an image of the outside world reflected upside down on the paper. Light travels in a straight line, reflecting from its source. The piece of paper is the light-sensitive material that captures the image. In your camera, the light-sensitive material is electronic, and it is known as a sensor.
The hole in the wall is the aperture that allows light to pass through. If you let the light continuously hit the light-sensitive material, it overexposes the image. You need the shutter to start and stop the light from traveling into your camera. The intensity of light and the sensitivity of the light-sensitive material (the sensor) also determine how large or small the opening (the aperture) in the wall is, and how long the shutter must remain open. When using a dSLR, exposure is the amount of light that fills the camera sensor after you click the shutter button.
Fortunately, your camera makes all the complicated stuff easy. The advanced technology in the Canon Rebel T5i/700D makes creating a photograph as simple as pressing a button in the Basic Zone modes. If you want more control over the process, you can take the reins by using the Creative Zone modes. These modes give you full or partial control of the exposure.
Here are some quick tips to get you started (they are explained in more detail later in this chapter):
• Use the Program AE mode ( ![]() ). Consider this the P for Panic mode. This mode sets the shutter speed and aperture for the proper exposure. You can also use Scene Intelligent Auto mode (
). Consider this the P for Panic mode. This mode sets the shutter speed and aperture for the proper exposure. You can also use Scene Intelligent Auto mode ( ![]() ) for the same purpose. This mode detects and applies settings to enhance your photo based on the scene. When you are not sure what to do and need to get the shot, let the camera do the thinking.
) for the same purpose. This mode detects and applies settings to enhance your photo based on the scene. When you are not sure what to do and need to get the shot, let the camera do the thinking.
• Select a high-enough shutter speed. When you handhold your camera, use a shutter speed of 1/60 second or higher to prevent blur. If you want to stop the action, use a shutter speed of more than 1/500 second. The general rule is to use a shutter speed equal to or greater than the length of the lens. For example, if you are using a 100mm lens, your shutter speed should be at least 1/125.
• Select the right aperture. The higher the aperture number, the greater the depth of field. The lower the aperture number, the shallower the depth of field. If you want everything in focus, use a higher aperture number, such as f/22. If you want your subject to pop (that is, to appear separate from the background) use a low aperture number, such as f/2.8, to create a shallow depth field.
• Select the right ISO setting. The higher the ISO setting, the less light necessary for an exposure. If you want crisper and cleaner images (that is, with less noise), I recommend that you use a lower ISO, such as ISO 100, for better quality.
• Use the Bulb shooting mode ( ![]() ) for long exposures. If you desire an exposure over 30 seconds, use Bulb mode (
) for long exposures. If you desire an exposure over 30 seconds, use Bulb mode ( ![]() ). This setting holds the shutter open as long as you press the shutter button. Use a tripod and cable release to make this easier, and avoid camera shake when you press the shutter button. Your camera must be on Manual mode (
). This setting holds the shutter open as long as you press the shutter button. Use a tripod and cable release to make this easier, and avoid camera shake when you press the shutter button. Your camera must be on Manual mode ( ![]() ) to use the Bulb shooting mode (
) to use the Bulb shooting mode ( ![]() ).
).
• Remember the dark side of filters. When you put dark or color filters on the lens, they reduce the amount of light entering the lens, and the photograph needs more exposure. This also affects the shutter speed or aperture, depending on what exposure setting you use. The amount of light blocked by the filter is called the filter factor. Knowing how a filter affects your exposure helps you determine what support equipment you might need, such as a tripod.
• Know how shutter speed and aperture work. A fast shutter speed (like 1/1000 second) stops action. A slow shutter speed (like 1/8 second) shows motion. Increasing the shutter speed by 1 stop cuts the amount of light entering the camera by half; decreasing it by 1 stop doubles the amount of light entering the camera. Opening the aperture by 1 stop doubles the amount of light entering the camera; closing it by 1 stop cuts the amount of light in half. A high aperture (f/22) creates a large depth of field and a low aperture number (f/2.8) creates a shallow depth of field. Depth of field looks different depending on the lens you use.
• Meter the exposure. The combination of the intensity of the light source and camera ISO (sensitivity) setting determines the proper shutter speed and aperture necessary for a proper exposure. If you photograph a subject at a distance, handhold a gray card and meter off it under the same lighting conditions. Use the same meter reading off the gray card for the subject in the distance.
A photograph is underexposed when there is not enough light during the exposure process. This makes the photograph look too dark, as shown in Figure 5.1. A photograph that is overexposed has received too much light in the exposure process. This makes the picture look too bright, as shown in Figure 5.2.
5.1 In this underexposed photo, the shadow details are lacking. Exposure: ISO 1600, f/2.8, 1/2000 second, 100mm f/2.8 lens.
5.2 In this overexposed image, the highlight details are lacking. Exposure: ISO 1600, f/2.8, 1/30 second, 100mm f/2.8 lens.
The Basic Zones are automatic; you do not have to make any adjustments when using them. The following are the Basic Zone modes and when to use them:
• Scene Intelligent Auto ( ![]() ). You can use this all-purpose mode for everyday photography. It analyzes the scene and adjusts the shutter speed, aperture, and focus as needed. This mode is good for family events, travel, or changing scenes and weather conditions.
). You can use this all-purpose mode for everyday photography. It analyzes the scene and adjusts the shutter speed, aperture, and focus as needed. This mode is good for family events, travel, or changing scenes and weather conditions.
• No flash ( ![]() ). When it is not appropriate or allowed, such as in a museum, this prevents the flash from firing. Otherwise, it is the same mode as Scene Intelligent Auto (
). When it is not appropriate or allowed, such as in a museum, this prevents the flash from firing. Otherwise, it is the same mode as Scene Intelligent Auto ( ![]() ).
).
• Creative Auto ( ![]() ). Unlike the Scene Intelligent Auto mode (
). Unlike the Scene Intelligent Auto mode ( ![]() ), in which the camera sets everything for you, Creative Auto mode (
), in which the camera sets everything for you, Creative Auto mode ( ![]() ) gives you some flexibility to adjust the depth of field, the drive mode, and flash firing. You can also add ambience settings to your photographs.
) gives you some flexibility to adjust the depth of field, the drive mode, and flash firing. You can also add ambience settings to your photographs.
• Portrait ( ![]() ). This mode creates a shallow depth of field, which is helpful for portraits. I recommend that you use a good portrait lens (70-135mm) in combination with this mode for maximum benefit.
). This mode creates a shallow depth of field, which is helpful for portraits. I recommend that you use a good portrait lens (70-135mm) in combination with this mode for maximum benefit.
• Landscape ( ![]() ). This creates a large depth of field, which is helpful for panoramic shots. This mode works best when more light is available in the scene.
). This creates a large depth of field, which is helpful for panoramic shots. This mode works best when more light is available in the scene.
• Close-up ( ![]() ). Use the macro setting to shoot close-ups or for small-object photography.
). Use the macro setting to shoot close-ups or for small-object photography.
• Sports ( ![]() ). This mode uses a fast shutter speed to stop action. It is commonly used for wildlife, sports, and fast-moving children.
). This mode uses a fast shutter speed to stop action. It is commonly used for wildlife, sports, and fast-moving children.
• Special Scene ( ![]() ). This mode also houses the following three additional modes that are available via the LCD touchscreen:
). This mode also houses the following three additional modes that are available via the LCD touchscreen:
• Night Portrait ( ![]() ). This slow shutter speed mode helps capture background lights at night. Remember that the flash pops up if the camera detects the need.
). This slow shutter speed mode helps capture background lights at night. Remember that the flash pops up if the camera detects the need.
• Handheld Night Scene ( ![]() ). It’s hard to take good photographs at night, especially if you handhold the camera. This mode allows you to handhold the camera while it takes four consecutive shots and layers them. The result is a well-exposed nighttime image.
). It’s hard to take good photographs at night, especially if you handhold the camera. This mode allows you to handhold the camera while it takes four consecutive shots and layers them. The result is a well-exposed nighttime image.
• HDR Backlight Control ( ![]() ). This mode takes three quick exposures and combines them into one image to compensate for any intense light behind your subject.
). This mode takes three quick exposures and combines them into one image to compensate for any intense light behind your subject.
Setting the shutter speed
Photographs of fast-moving objects frozen in motion, such as a cheetah bounding through the grass toward its prey, are a result of a fast shutter speed. Likewise, a trail of stars advancing across the night sky is the result of a slow shutter speed.
Most of the time, shutter speed is measured in fractions of a second. Your camera has shutter speed settings that range anywhere from a 30-second exposure to 1/4000 second. In most cases, any speed more than 1/500 second stops action. You start to see more motion blur at 1/30 second or lower; the faster you or your subject is moving, the more blur you see.
When considering shutter speed, ask yourself whether you want to show motion or stop it. If stopping or showing motion is an important element of your photograph, consider using the Shutter-priority AE mode ( ![]() ). This mode allows you to control the shutter speed, while the camera controls the aperture. Pay attention to the aperture number displayed next to the shutter speed in the viewfinder. If it is blinking, the shutter speed is too high or low for a proper exposure.
). This mode allows you to control the shutter speed, while the camera controls the aperture. Pay attention to the aperture number displayed next to the shutter speed in the viewfinder. If it is blinking, the shutter speed is too high or low for a proper exposure.
The longer the camera lens, the higher the minimum shutter speed should be to avoid blur from lens movement.
When to use fast shutter speeds
You can stop action in your photographs by using a fast shutter speed. Sports and wildlife photographers generally use fast shutter speeds to create crisp images with little or no movement. A shutter speed over 1/125 second is considered a fast shutter speed. If you want to stop action and convey no movement in the image, a shutter speed over 1/500 second is required in most cases. The top shutter speed on your camera is 1/4000 second. It is rare that you will need such a fast shutter speed unless you are photographing in bright sunlight at a high ISO, such as ISO 1600.
Use the Shutter-priority AE mode ( ![]() ) when photographing sports, wildlife, or any moving subject to help prevent blurring. If you prefer to use the Basic Zone modes, the Sports mode (
) when photographing sports, wildlife, or any moving subject to help prevent blurring. If you prefer to use the Basic Zone modes, the Sports mode ( ![]() ) is a good option because it keeps the shutter at the highest possible setting for every shot. If you are not getting a fast enough shutter speed to achieve the results you want, consider increasing the ISO setting.
) is a good option because it keeps the shutter at the highest possible setting for every shot. If you are not getting a fast enough shutter speed to achieve the results you want, consider increasing the ISO setting.
Increasing the ISO setting to achieve a higher shutter speed, although helpful, affects the quality of the image by increasing the amount of digital noise.
When to use slow shutter speeds
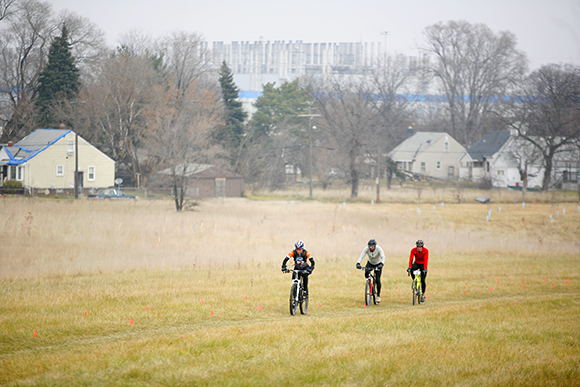
A slow shutter speed is required when you want to show movement. A slow shutter speed is required when you want to use photographic techniques, such as panning and ghosting. Using motion well in your photos can turn everyday pictures into action-filled images, as shown in Figure 5.4. It can also create a more ambient background light when using flash.

5.3 When shooting action or sports, a high shutter speed freezes the subject. Exposure: ISO 800, f/2.8, 1/400 second, 100mm f/2.8 lens.
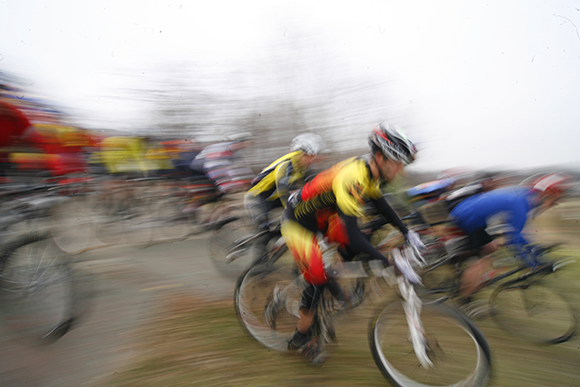
5.4 A slow shutter speed was used to show the movement of this bike race. Exposure: ISO 200, f/22, 1/25 second, 12-24mm f/4.0 lens at 20mm.
If you need a greater depth of field (which is explained later in this chapter), try slowing down the shutter speed until you reach the desired aperture. As the shutter speed decreases, the aperture number needs to increase to keep proper exposure. Landscape and architectural photographers often use very slow shutter speeds, especially in the early morning or late evening, to help keep the aperture numbers high for a greater depth of field. For this type of photography, use a tripod to steady the camera.
If the shutter speed falls below 1/60 second, you can use a tripod to prevent blurry photographs. A helpful guideline to remember — especially if the subject is still or moving toward you — is if the shutter speed is lower than the focal length of the lens, you should use a tripod. This isn’t a perfect recipe for sharp images — there are other things to consider, such as the speed and movement of your subject. If your subject is moving side-to-side, you most likely need a faster shutter speed.
Moving water, such as waterfalls or crashing waves, is a great opportunity to influence the outcome of the image with the shutter speed. Use a fast shutter speed, such as 1/500 second, to capture individual water droplets cascading down a falls or to stop the action of breakers crashing onto rocks. Use a slow shutter speed, such as 1/8 second, to bring out the silken flow of the falling water or to create a peaceful seascape. You can use fast and slow shutter speeds to set different visual tones. For example, you can demonstrate speed using the motion blur of a fast-moving train, or convey the power of a hammer hitting a rock by using stop action at the point of impact.
If you need a slower shutter speed, but don’t want to blur your photo, use the Handheld Night Scene mode ( ![]() ). Canon’s Image Stabilization (IS) lenses are also helpful when lens shake might ruin a good photo opportunity. The stabilization technology cancels out much (if not all) of the blur by adding the equivalent of up to 4 full shutter speed stops.
). Canon’s Image Stabilization (IS) lenses are also helpful when lens shake might ruin a good photo opportunity. The stabilization technology cancels out much (if not all) of the blur by adding the equivalent of up to 4 full shutter speed stops.
For more details about lenses, see Chapter 4.
If you handhold your camera at a slow shutter speed (under 1/60 second), both the background and the subject will show motion in the image. How much motion depends on how slow the shutter is, how steady you handhold the camera, and the speed and movement of your subject. Try playing with the blur by moving the camera in different directions while you shoot to see what forms and shapes you can create.
When you use a tripod and set your camera to a slow shutter speed to shoot a moving object, the object shows blur but the background remains in focus. How much blur is created depends on how fast the object is moving and how slow you set the shutter.

5.5 When shooting this image, I quickly turned the camera during the exposure to add movement. Exposure: ISO 200, f/18, 1/25 second, 12-24mm f/4.0 lens at 12mm.

5.6 This shot was taken using a tripod while cars sped by. Exposure: ISO 100, f/22, 1/6 second, 12-24mm f/4.0 lens at 14mm.
Panning is a fun technique to use with a slower shutter speed. To do so, track a moving subject with your camera and use a slow shutter speed. This technique delivers an image with the subject in focus against a blurred background, as shown in Figure 5.7. Sports photographers use this technique for auto racing, biking, and track and field. Don’t plan to get panning right the first time. Shoot multiple images using this technique for practice.

5.7 Panning creates an image in which the subject is in focus and the background is blurred. Exposure: ISO 100, f/11, 1/80 second, 100mm f/2.8 lens.
The Bulb setting ( ![]() ) is commonly used for extra-long exposures to capture streaks of light, as shown in Figure 5.8. Use this setting when you are trying to capture car headlights on the highway, stars moving across the night sky, or the silky movement of water.
) is commonly used for extra-long exposures to capture streaks of light, as shown in Figure 5.8. Use this setting when you are trying to capture car headlights on the highway, stars moving across the night sky, or the silky movement of water.
Your camera syncs with the flash up to 1/200 second. If you use a faster shutter speed, part of your image will be dark or black because the flash isn’t synced with the shutter. Fortunately, you can prevent this from happening. Even if you set a higher shutter speed, as soon as you turn on the flash it reverts to 1/200 second.

5.8 I set the camera on the ground, used the Bulb mode, and waved a flashlight to illuminate parts of this cat sculpture. Exposure: ISO 200, f/5.6, approximately 8 seconds, 12-24mm f/4.0 lens at 24mm.
The built-in flash on top of your camera has a maximum sync level of 1/200 second. You can slow down the shutter speed as much as you want. When you slow the shutter speed in combination with flash, you can create a ghosting effect. This means that the camera flash freezes the subject and the slow shutter speed continues to expose, causing a blur. The result is a motion-filled photograph.
If you use external flashes, such as the Canon Speedlite series, the top shutter speed is 1/4000 second using the High-speed sync feature.
See Chapter 6 for more details about ghosting.
Night photography and painting with light
Have you ever wanted to create one of those beautiful shots of a skyline at night, or capture a large moon rising over a landscape? Night photography offers many dramatic photographic opportunities — all you need is a little knowledge and the right tools. Two necessary accessories for night photography are a cable release (remote switch) and a tripod. A tripod is necessary to keep the camera steady for long exposures. You can use a cable release to trip the shutter at any shutter speed without touching the camera. This is especially helpful for extra-long exposures of more than 30 seconds.
When shooting nighttime photographs, it is tempting to use the camera’s higher ISO settings, but if you are using a tripod, time is on your side. Consider using a slower setting, such as ISO 200, ISO 400, or ISO 800, for better image clarity, color, and less noise. Night photographs tend to have more digital noise, so consider using the camera’s Long exposure noise reduction feature. You can find this setting under Custom Function 4.

5.9 I took this image of the stars using a tripod and long exposure. Exposure: ISO 1600, f/5.6, 30 seconds, 12-24mm f/4.0 lens at 12mm, tripod.
The Canon RS-60E3 Remote Switch (cable release) fits the Canon T5i/700D remote control terminal.
For more information about Custom Functions, see Chapter 2.
Photographing stars is always a treat. In just a few minutes of exposure, you can create an image of stars moving across the sky. To see a lot of stars and movement, you need to get away from the city lights. It can take minutes to hours to get the desired image. Make sure that your camera is securely mounted to a tripod, and that the tripod is anchored. Any movement can cause blurring in the photo. When considering night scenes, look for colors, shapes, and patterns. Expect to take more than one photograph at multiple exposure settings.
Jeff White’s Night Photography Tips
Jeff White is an urban night photographer. He enjoys shooting at night because he feels it gives him more flexibility, especially with shutter speed. He likes the option of creating an exposure at 1/30 second or several hours. In Jeff’s opinion, night photography is more fun and offers more opportunities to create high-contrast images. He looks for opportunities to capture interesting light sources, such as moving lights that create streaks or reflections after a hard rain. The following are a few of Jeff’s tips:
• You need a tripod. Consider attaching a weight bag to the tripod to help avoid camera movement on windy days.
• Most of the time, you will use a wide-angle lens. Photographers rarely use telephoto lenses for night photography, unless they are trying a specific creative technique, such as using a zoom lens to convey movement. This is achieved by zooming in or out during the exposure.
• Bring extra lighting, such as an external flash, a flashlight, or a penlight. Walk around the scene and highlight unique subjects to make your images more interesting.

Image courtesy of Jeff White
Jeff White lives and works in Detroit, Michigan. Art directors and designers regularly purchase his work for marketing purposes, or simply to display on their walls. You can see more of his work at http://jwhitephoto.com.
Painting with light is a fun technique that requires a slow shutter speed and a tripod. It is best to do it in a dark room or outside at night. Try leaving the shutter open using the Bulb mode ( ![]() ) or a long shutter speed, such as 30 seconds. Use a flashlight, match, or glow stick to write or draw a design in the air. If you are the subject, set the drive mode to Self-timer mode continuous (
) or a long shutter speed, such as 30 seconds. Use a flashlight, match, or glow stick to write or draw a design in the air. If you are the subject, set the drive mode to Self-timer mode continuous ( ![]() ) so you can take up to 10 shots in a row without running back and forth to the camera.
) so you can take up to 10 shots in a row without running back and forth to the camera.

5.10 You can use a flashlight or LEDs to illuminate, draw in the air, or outline objects. To get this image, I ran around the playground and turned on the lights when I wanted to expose a section of the scene. Exposure: ISO 200, f/8.0, 16 seconds, 12-24mm f/4.0 lens at 12mm, tripod.
Setting the aperture
When you see a portrait with the background fading out of focus, or a beautiful landscape with the entire scene in focus, aperture played a role. Aperture is the opening inside the camera that lets in light. It is adjustable and represented by a number system that can be confusing. The larger the number, the smaller the opening. The smaller the number, the larger the opening. Most standard lenses have an aperture range of f/2.8 to f/22. Many of the better prime lenses have even larger aperture openings. Some standard lens apertures are f/2.8, f/4.0, f/5.6, f/8.0, f/11, f/16, f/22, and f/32.
If you don’t have a lens attached to the camera, 00 is displayed as the aperture setting.
Think of depth of field as the area of focus around the subject. If there is a large area in focus surrounding the subject, then the photograph has a large depth of field (also known as deep depth of field), such as in landscape photography. If there is little focus around the main object of the photograph, then you have a shallow depth of field. For example, a portrait with a blurry background has a shallow depth of field. Unfortunately, you can’t make the statement that f/8.0 has a depth of field of 8 feet in front of, and 16 feet behind, the subject. The combination of focal length and distance between the subject and the camera determines the total available depth of field. In other words, each focal length has a different effect on the depth of field around the subject at the same distance.
A 28mm lens at f/8.0 that is 10 feet from the camera doesn’t have the same depth of field at the same distance as a 200mm lens. The 28mm lens spreads out the image and creates a larger depth of field, displaying everything in focus between 6 and 24 feet from the camera. The 200mm lens compresses the field of view, leaving little room for error with only 9.89 to 10.1 feet from the camera in focus. The Aperture-priority AE mode ( ![]() ) is good to use when depth of field is an important consideration. This mode lets you control the aperture, while the camera controls the shutter speed to create the proper exposure.
) is good to use when depth of field is an important consideration. This mode lets you control the aperture, while the camera controls the shutter speed to create the proper exposure.
If the camera is in the Program AE mode ( ![]() ), you can adjust the aperture by turning the Main dial (
), you can adjust the aperture by turning the Main dial ( ![]() ). Please note that if you increase the aperture, your shutter speed will be slower, and if you decrease the aperture, your shutter speed will be faster. Although the shutter and aperture numbers are moving up and down, the exposure stays the same because they are moving in proportion. If the shutter speed increases 1 stop, such as 1/60 to 1/125 second (which cuts the amount of light in half), and your aperture opens from f/8.0 to f/5.6 (doubling the amount of light), your exposure stays the same.
). Please note that if you increase the aperture, your shutter speed will be slower, and if you decrease the aperture, your shutter speed will be faster. Although the shutter and aperture numbers are moving up and down, the exposure stays the same because they are moving in proportion. If the shutter speed increases 1 stop, such as 1/60 to 1/125 second (which cuts the amount of light in half), and your aperture opens from f/8.0 to f/5.6 (doubling the amount of light), your exposure stays the same.
The following are some common situations in which you would use a deep or shallow depth of field:
• A deep depth of field is excellent when shooting landscapes, or environmental portraits (that is, pictures of people posing in their environment). Use a wide-angle lens to help increase the depth of field in your images. If you prefocus in anticipation of an important event, use a higher aperture to increase your depth of field. This increases the odds that your subject will be in focus, such as when trying to capture a runner crossing the finish line or a door opening as the guest of honor enters at a surprise party.
• A shallow depth of field is commonly used in studio portraits, sports, and fashion photography because it separates the subject from the background. A shallow depth of field adds a stylized look to your pictures. When you want a shallow depth of field, move in close to the subject. Use a lower aperture, such as f/2.8, to add a new dimension to your photographs. Not everything in a shallow depth-of-field image is in focus. When using this setting, decide on a focal point — the part of the subject on which you want the viewer to focus.

5.11 This image has a shallow depth of field; the background is out of focus and separate from the subject. Exposure: ISO 200, f/2.8, 1/250 second, 100mm f/2.8 lens.
Setting the ISO
The sensitivity of your camera’s digital sensor is represented by its ISO (International Organization for Standardization) rating. The higher the number, the less light you need to take a photograph. The lower the number, the more light you need. For example, ISO 100 is perfect for a bright summer day while ISO 3200 is good for shooting in a school gymnasium. Each time you increase the ISO to the next level — from ISO 100 to ISO 200, for example — you double the camera sensor’s light sensitivity. This allows you to reduce the aperture or increase the shutter speed 1 full stop.
You may be wondering why you wouldn’t use a high ISO setting, like ISO 6400, all of the time. It’s because high ISO settings create more digital noise than lower ones. Digital noise is similar to the grainy texture on film. Prints or enlargements of photos shot at ISO 6400 are not as crisp and clean as those shot at ISO 100. Your Canon Rebel T5i/700D is expandable to ISO 25600 using Custom Function 2. This is helpful when you need a faster shutter speed, aperture, or can’t use a flash. However, ISO 25600 also has a lot more noise than the lower settings.
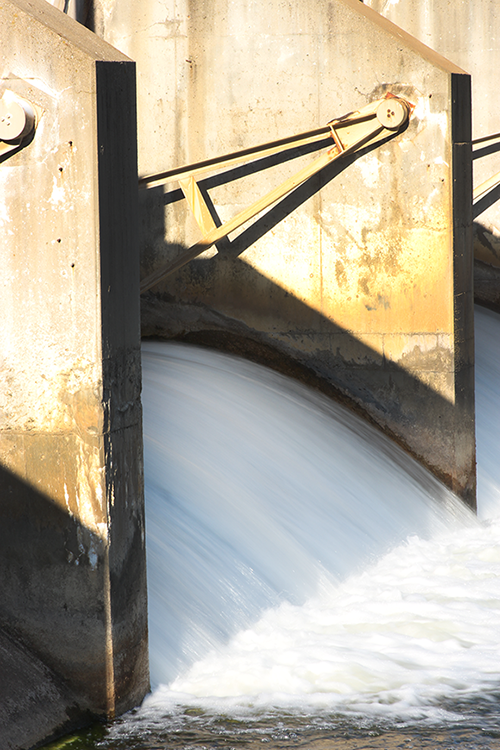
5.12 A low ISO setting was used for this image to create a silky look on the flowing water. Exposure: ISO 100, f/20, 1/15 second, 100mm f/2.8 lens.
A fast shutter speed is important for stop-action photography, such as sports, animals, or children on the move. If you don’t have enough light to reach the desired shutter speed, then you need to adjust the ISO to a higher setting. Another advantage of a higher ISO setting is that the flash has a farther reach. If you are at an event, push the ISO higher to extend the reach of the flash across the room. How much noise can you handle? Your camera has the following eight ISO settings: 100, 200, 400, 800, 1600, 3200, 6400, 12800, and is expandable to 25,600 for still photography with the camera’s Custom Function 2. When using ISO 3200 and above, the additional noise may be less than optimal depending on the type of photograph you want to create.
The following guide might be helpful when setting the ISO:
• 1SO 100-400. This range is ideal for sunny days.
• ISO 400-1600. Use these settings when shooting with overcast skies or in the evening.
• ISO 1600-6400. This range is good for night photography or when shooting indoors in low light.
• Custom Function 2. Here, you can set the ISO to 25600 for use in low-light situations.
Fortunately, a few options on your Canon T5i/700D can help reduce the grain in your photos. Long exposure noise reduction is for exposures of more than 1 minute. If you are not concerned about noise reduction related to long exposures, leave this setting turned off. The function has an auto mode that detects if an image took more than 1 second to expose; it then automatically applies the function. You may also leave it in the on position, which applies noise reduction each time an exposure of more than 1 minute is created.
Another option when you use high ISOs is high-speed noise reduction. This option, found under Shooting menu 3 ( ![]() ), has the following four settings:
), has the following four settings:
• 0: Standard
• 1: Low
• 2: Strong
• 3: Disable
If you activate a noise reduction function, you cannot take another photograph until the noise reduction process is complete.
The Multi-shot Noise Reduction option combines four consecutive images at high ISO settings to create low-noise images. This mode also optimizes to reduce subject blur, making night photography much easier. This option may not work if your shots are greatly misaligned. You can find this option with High ISO speed NR listed in Shooting menu 3 ( ![]() ). This option is not available when shooting in RAW (
). This option is not available when shooting in RAW ( ![]() ) or Large RAW (
) or Large RAW ( ![]() ). Both your Canon software and Adobe Raw have noise reduction filters. There are also plug-ins available for Photoshop that help reduce noise.
). Both your Canon software and Adobe Raw have noise reduction filters. There are also plug-ins available for Photoshop that help reduce noise.
The ISO settings in the Basic Zone modes are between ISO 100 and ISO 3200 (except Portrait mode ![]() , which is fixed at ISO 100). The Creative Zone modes set the ISO between ISO 100 and ISO 6400. The automatic setting when shooting in Bulb mode (
, which is fixed at ISO 100). The Creative Zone modes set the ISO between ISO 100 and ISO 6400. The automatic setting when shooting in Bulb mode ( ![]() ) is ISO 400.
) is ISO 400.
Using Exposure Compensation
You may not always agree with your camera’s exposure suggestions for every scenario. Even with all the advanced technology in your camera, you may find that your photographs are regularly under- or overexposed in specific situations. You can correct these problems using exposure compensation.
If you photograph a white cat in the snow, the exposure may not turn out as you expect. You might need some help with all of the white light bouncing back to your camera, depending on the exposure mode you use. In this case, try overexposing the image to create a more accurate one.
Photographing a black horse in front of a dark background is another example of an extreme that might require exposure compensation. In this case, underexpose the photograph to bring out the detail of the horse better. When the main source of light is behind the subject, this is called backlighting. You can use exposure compensation to prevent unwanted silhouettes or the main subject from becoming too dark to see. This can happen if your subject is in front of a window or in bright sunlight.
You have multiple options to use in backlit situations. Use the HDR Backlight mode ( ![]() ) to compensate for intense light behind your subject.
) to compensate for intense light behind your subject.
See Chapter 6 for more information about lighting.
If you are not sure of the exposure you want to use, you can play it safe and bracket. This option is only available when neither the subject nor the photographer is moving. Bracketing is taking multiple shots at different exposures. You can do this manually using the exposure compensation and taking one photograph at -1 (underexposed), another at normal exposure (or 0), and a third image at +1 (overexposed). This gives you three images with different exposure options.
Your camera is also equipped with Auto Exposure Bracketing ( ![]() ). AEB automatically takes three images — an underexposed image, a normal exposure, and an overexposed frame. You control the difference in the exposure range among the three images, up to 2 stops in 1/3-stop increments.
). AEB automatically takes three images — an underexposed image, a normal exposure, and an overexposed frame. You control the difference in the exposure range among the three images, up to 2 stops in 1/3-stop increments.
High Dynamic Range Photography
High Dynamic Range (HDR) is how photographers create colorful, high-contrast, fantasy-like images of landscapes, cityscapes, architecture, or even people. HDR photos are made by combining bracketed images to create a new hybrid image. Each image brings different exposure merits to the final one. Some images capture highlights while others capture the shadow detail. Combined, they do what a traditional single image cannot: expose for detail in both highlights and shadow at a high level of accuracy.
Sometimes photographers manipulate images to create a fantasy effect. This is a popular technique among landscape photographers. Not everyone likes the surreal quality of this photography style. Remember that HDR images also can be adjusted for a more natural look. Traditionally, HDR photographs require a steady camera on a tripod to get multiple images of the same scene at a variety of exposures. This is one reason why you rarely see true HDR photographs of people or moving objects. When you do see such images, chances are the photographer used a technique called tone mapping. The Canon T5i/700D has modes that can help you use the HDR technique. The nice thing about these modes is that you can handhold the camera while shooting, if you are steady.

5.13 This HDR image is a combination of five exposures. Exposure: ISO 800, f/5.6, 1/160 second, 1/320 second, 1/640 second, 1/1300 second, 1/2700 second, 12-24mm f/4.0 lens at 12mm.
The Handheld Night Scene mode ( ![]() ), found in the Basic Zone under Special Scene (
), found in the Basic Zone under Special Scene ( ![]() ), shoots and aligns four photographs while you handhold the T5i/700D. It then merges the four photos into one image that exposes for detail in the subject of your scene, while still allowing for ambient light.
), shoots and aligns four photographs while you handhold the T5i/700D. It then merges the four photos into one image that exposes for detail in the subject of your scene, while still allowing for ambient light.
The HDR Backlight control ( ![]() ) is one of three modes found under Special Scene (
) is one of three modes found under Special Scene ( ![]() ). It takes three consecutive shots at multiple exposures in a backlit setting, and then creates a well-exposed image. This function displays the detail from the bright light source, such as the sky, as well as the subject in the foreground. I recommend using a tripod when using this mode. The camera will not always line up the images correctly if the subject moves or if there is camera shake.
). It takes three consecutive shots at multiple exposures in a backlit setting, and then creates a well-exposed image. This function displays the detail from the bright light source, such as the sky, as well as the subject in the foreground. I recommend using a tripod when using this mode. The camera will not always line up the images correctly if the subject moves or if there is camera shake.
If you take individual brackets without using your camera’s HDR Backlight control ( ![]() ), you need software to combine the images. Although you can do this in Photoshop, one of the more popular programs is Photomatix Pro. It gives you a good range of options to create both natural-looking and high-contrast, fantasy-style HDR images. It has a number of helpful features such as aligning the photos automatically. This is helpful if you don’t use a tripod when bracketing the images. If you want to create the look of HDR and don’t have a series of bracketed photographs, a Tone Mapping option is available for single frames.
), you need software to combine the images. Although you can do this in Photoshop, one of the more popular programs is Photomatix Pro. It gives you a good range of options to create both natural-looking and high-contrast, fantasy-style HDR images. It has a number of helpful features such as aligning the photos automatically. This is helpful if you don’t use a tripod when bracketing the images. If you want to create the look of HDR and don’t have a series of bracketed photographs, a Tone Mapping option is available for single frames.
Exposing for Video
A good place to start when exposing for video is Auto Exposure movie mode ( ![]() ). This works for most of your video needs, such as at family events. Auto Exposure movie mode (
). This works for most of your video needs, such as at family events. Auto Exposure movie mode ( ![]() ) sets the ISO, shutter speed, and aperture. All you have to do is point and shoot.
) sets the ISO, shutter speed, and aperture. All you have to do is point and shoot.
The Manual exposure mode ( ![]() ) is standard for advanced users, and it’s a good option once you are comfortable with your camera. It prevents your camera from changing the exposure during the middle of a scene. When shooting a moving subject, shutter speeds from 1/30 second to 1/125 second are recommended. It is also worth noting that it is not a good idea to change your exposure while shooting. The change will distract the viewer and the video will not look professional.
) is standard for advanced users, and it’s a good option once you are comfortable with your camera. It prevents your camera from changing the exposure during the middle of a scene. When shooting a moving subject, shutter speeds from 1/30 second to 1/125 second are recommended. It is also worth noting that it is not a good idea to change your exposure while shooting. The change will distract the viewer and the video will not look professional.
Remember that you can’t use exposure compensation when in the Manual Exposure mode ( ![]() ).
).
You don’t have as many options for exposure in Movie mode ( ![]() ) as you do for still pictures, but there are a few. Exposure compensation (
) as you do for still pictures, but there are a few. Exposure compensation ( ![]() ) is available in the Auto Exposure movie mode (
) is available in the Auto Exposure movie mode ( ![]() ), and it is helpful when photographing light, dark, or backlit subjects. To activate this option, press the Aperture/Exposure Compensation button (
), and it is helpful when photographing light, dark, or backlit subjects. To activate this option, press the Aperture/Exposure Compensation button ( ![]() ). Make your adjustments using the main dial (
). Make your adjustments using the main dial ( ![]() ) — they are viewable on the bottom of the LCD screen. You are limited to three stop adjustments in Movie mode (
) — they are viewable on the bottom of the LCD screen. You are limited to three stop adjustments in Movie mode ( ![]() ) (for still photos, you can make up to five). The ISO can be set anywhere between ISO 100 and ISO 6400, and expanded to 12800 in Movie mode (
) (for still photos, you can make up to five). The ISO can be set anywhere between ISO 100 and ISO 6400, and expanded to 12800 in Movie mode ( ![]() ).
).
You also have Picture Styles available in the Movie mode ( ![]() ). These are the same as those found in the still shooting modes. Picture Styles adjust color and tone based on the characteristic style or subject matter you are shooting.
). These are the same as those found in the still shooting modes. Picture Styles adjust color and tone based on the characteristic style or subject matter you are shooting.
For more information about Picture Styles, see Chapter 3.
Composition
Have you noticed that most of the photographs you appreciate don’t have the main subject directly in the middle of the frame? This is because point-and-shoot photography (with the subject positioned in the middle of the frame) usually doesn’t capture the scene as well as a planned-out and thoughtful composition. When it comes to composition, challenge yourself. Create variety in your photographs. Every scene or subject doesn’t have to be shot in the same way.
While your camera does so much for you, the one thing it can’t do is create your vision. The way that you see things is different from anyone else. The way that you frame an image is up to you, and that is what composition is all about. The Rule of Thirds and filling the frame are guidelines that can help you make good decisions when photographing the subjects in front of your lens. Another way to improve composition is to look for different points of view — not every photo has to be shot at eye level. Get down on your knees or climb up high (be careful!) to capture new angles. If you are photographing children, make sure that you get down on their level.
The lens you use plays a role in how you should frame an image. A long lens compresses a scene and brings the subject closer to you. A wide lens spreads out the scene, giving you more room to work when composing your photograph.
For more about lenses, see Chapter 4.
Sometimes, even though you may be following the rules, some compositions don’t sit well with the viewer. Sometimes, it may be because part of the subject is cut off in an awkward position. There is nothing wrong with cropping your image later, but I don’t recommend that you shoot with the mind-set that you can crop during editing. Work on getting your composition right the first time. Later, if you notice that the image could still use some adjustments, you can crop.
When cropping images, make sure that you don’t crop people at the knees or elbows — it looks awkward and uncomfortable to the viewer.
You have two ways to view a scene when developing a composition. You can use the viewfinder or Live View shooting mode ( ![]() ) to view the scene in front of the lens. Some photographers find the screen on the back of the camera easier to use. However, this is not always the case — in bright sunlight, looking through the viewfinder is often the better choice. The flexible, 180-degree LCD screen is also helpful when holding the camera high over crowds, when shooting down low from a ground view, or even for shooting around corners.
) to view the scene in front of the lens. Some photographers find the screen on the back of the camera easier to use. However, this is not always the case — in bright sunlight, looking through the viewfinder is often the better choice. The flexible, 180-degree LCD screen is also helpful when holding the camera high over crowds, when shooting down low from a ground view, or even for shooting around corners.
The Rule of Thirds
I’m a firm believer that you need to learn the rules before you can break them. After you learn them, you can use the rules as guides. When it comes to rules about composition, the Rule of Thirds is the most important.
5.14 This image uses the composition technique Rule of Thirds because the subjects are not in the middle of the frame. Exposure: ISO 200, f/2.8, 1/800 second, 70-200mm f/2.8 lens at 200mm.
The idea is to divide the frame into thirds mentally, both horizontally and vertically. Combining the two creates what looks like a tic-tac-toe board, as shown in Figure 5.15. There are many ways to use this tic-tac-toe board on your camera. Consider the four cross sections in the frame as points at which you can place your subject. Another way to satisfy the Rule of Thirds is to mentally draw a diagonal line through the frame and photograph the main subject above or below that line. It’s important to note, however, that sometimes you do want your subject in the middle of the frame. The Rule of Thirds encourages asymmetrical images, but that is not always the best result. In some circumstances, the best photograph is a symmetrical one, in which everything is balanced.
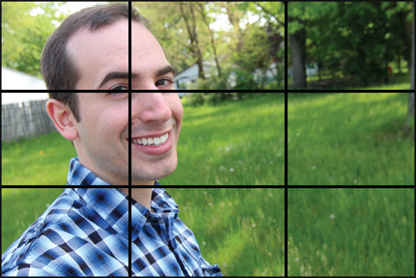
5.15 This grid demonstrates the Rule of Thirds. Exposure: ISO 200, f/8.0, 1/125 second, 12-24mm f/4.0 lens at 24mm.
Horizon lines should follow the Rule of Thirds. The horizon line between the earth and the sky should not be in the center of your frame. It also should not cut through the back of the subject’s head. When photographing from a distance, the Rule of Thirds still applies. For example, a boat on the horizon should be placed anywhere but in the middle of the frame. Consider the direction in which the subject is moving, and then leave room in front of it to create a sense of motion by giving the subject a place to go. In the case of a runner, place him on the right side of the frame if he is moving to the left across the LCD screen.
Filling the frame
Don’t be afraid of the edge of the frame — get closer. This is one of the best ways to satisfy the Rule of Thirds. In fact, get as close as the lens allows and don’t worry if some parts are left out of the image. You will discover the closer you get to your subjects, the more interesting your photographs become. Take a step closer and look for details within your subject. Architecture is an excellent example. You don’t need to show the entire building if the details tell the story. A close-up of a person’s face creates an intimate image, which is often more powerful than a photograph of the entire body.
It is important to understand the limitations of lenses. Some only allow you to get so close before proper focus is unavailable.
If you want to get really close to your subject, consider using a macro lens.

5.16 Filling the frame with your subject gives the image a more personal feel. Exposure: ISO 200, f/2.8, 1/400 second, with a 100mm f/2.8 lens.
Lines and shapes
One of the most important rules of composition is that you have a focal point, which is something to which the eye is automatically drawn, or a starting point at which to view the image. The eye then follows a pattern, shape, or lines through your image. Understanding this concept is helpful, whether you are developing high-level conceptual ideas or just photographing your kids at the playground.

5.17 The layered lines in the fore- and background lead the viewer’s eye through this image. Exposure: ISO 800, f/5.0, 1/200 second, 50mm f/1.4 lens.
One of the first things to which a viewer’s eyes are drawn is the lightest object in the frame. Leading lines take the viewer’s eye to the final destination of your image. S shapes are another nice compositional tool, and geometric shapes can be very powerful. The triangle is the most powerful shape in art. Start looking at your environment. You will be amazed at the patterns you find around you. Parking lines, columns of streetlights, rows of corn, and architectural details, such as windows, are all good examples of everyday patterns.
Challenge yourself to look for patterns, and see if you can incorporate them with your subjects. Use leading lines to guide the viewer’s eyes where you want them to look. An S shape takes the viewer on a journey across the page. You can also lead your viewer’s eyes into the distance with strong leading lines, or use them to create a vanishing point deep in the image.
Foreground and background
Most things do not happen on a single plane. You should consider the fore- and backgrounds as part of your composition. When you look at a scene, consider whether you should take a two- or three-dimensional photograph. If you keep everything on the same focal plane, such as a straight-on shot of a building, it creates a flat look. You can add dimension to your photographs by placing objects in the fore- or background, as shown in Figure 5.18. This technique is helpful in landscape and architectural photography.

5.18 I used playground equipment in the foreground to add dimension to this photograph. Exposure: ISO 100, f/4.0, 1/250, 12-24mm f/4.0 lens at 24mm.
You can also play objects off the foreground. If you are shooting a mountain in the distance, look around to see if there is something of interest to use in the foreground, such as a flower or an interesting rock. Frame your subject with an interesting foreground object or shoot through a fence. Consider how you can use the background, such as clouds moving behind a mountain, as part of your composition.
Keeping it simple
Many of the best compositions are great because they are simple. The saying less is more holds true in photography. Every part of your photo should be there for a reason. When in doubt, leave it out is another good rule to live by. Make it easy for the viewer to understand what you are trying to show.
When you keep things simple, it is much easier to create an obvious focal point for the viewer, as shown in Figure 5.19.

5.19 This flower fills the frame and a shallow depth of field makes it the sole focus. Exposure: ISO 100, f/2.8, 1/250 second, 100mm f/2.8 macro lens.
As mentioned previously, a shallow depth of field is helpful because it sets the subject apart from the background. It also creates form and shape, rather than identifiable objects in the background. Sometimes colors, lights, shadows, or shapes can also be used as compositional balancing tools in an image.
In the beginning, composition is something you think about if you are trying to improve your photos. Fortunately, over time, composition becomes a habit, and you will automatically place subjects a little to the right or left, and fill the frame. It just takes time and practice.