
Chapter 2: Setting Up the Canon EOS Rebel T5i/700D
This chapter covers the menus displayed on the LCD screen when you press the menu button ( ![]() ) on the back of the camera. I also share an overview of what each option does. Generally, each menu has a theme, such as the shooting, movie, setup, and playback menus. Some menus are visible only when using specific modes, such as movie shooting (
) on the back of the camera. I also share an overview of what each option does. Generally, each menu has a theme, such as the shooting, movie, setup, and playback menus. Some menus are visible only when using specific modes, such as movie shooting ( ![]() ). It’s not easy to remember where all of the functions are located within the menus, so take some time to review where the key settings are, such as long exposure noise reduction, and the custom and wireless functions. The menu color codes can help you remember the locations of your favorite settings. If you continue to have trouble finding certain functions, make sure that you keep your Digital Field Guide with you for reference.
). It’s not easy to remember where all of the functions are located within the menus, so take some time to review where the key settings are, such as long exposure noise reduction, and the custom and wireless functions. The menu color codes can help you remember the locations of your favorite settings. If you continue to have trouble finding certain functions, make sure that you keep your Digital Field Guide with you for reference.

The Menu button is on the upper-left side on the back of your camera.
The Shooting Menus
If you use the Creative Zone modes — Program AE ( ![]() ), Shutter-priority AE (
), Shutter-priority AE ( ![]() ), Aperture-priority AE (
), Aperture-priority AE ( ![]() ), and Manual (
), and Manual ( ![]() ) — you have three shooting menus available to you. When you use the Basic Zone modes — Scene Intelligent Auto (
) — you have three shooting menus available to you. When you use the Basic Zone modes — Scene Intelligent Auto ( ![]() ), Flash off (
), Flash off ( ![]() ), Creative Auto (
), Creative Auto ( ![]() ), Portrait (
), Portrait ( ![]() ), Landscape (
), Landscape ( ![]() ), Close-up (
), Close-up ( ![]() ), Sports (
), Sports ( ![]() ), Night Portrait (
), Night Portrait ( ![]() ), Handheld Night Scene (
), Handheld Night Scene ( ![]() ), and HDR backlight (
), and HDR backlight ( ![]() ) — only Shooting menu 1 (
) — only Shooting menu 1 ( ![]() ) is available.
) is available.
When you are using any of the shooting modes, you can press the Info button ( ![]() ) on the back of the camera next to the Menu button (
) on the back of the camera next to the Menu button ( ![]() ) to display a screen containing many of your camera’s major functions.
) to display a screen containing many of your camera’s major functions.
Shooting menu 1
This first menu is for both the Basic and Creative Zone modes. Flash control is the only option not available when your camera is set to a Basic Zone mode. When you are in Movie shooting mode ( ![]() ), flash control and red-eye reduction are not available on the menu list. I find that Image quality is the most common option I select from this list.
), flash control and red-eye reduction are not available on the menu list. I find that Image quality is the most common option I select from this list.
Settings and corrective functions
The following list of options is available in Shooting menu 1 ( ![]() ):
):

2.1 Shooting menu 1.
• Image quality. You have 10 options here. RAW ( ![]() ) is the option with the highest quality and Small 3 (
) is the option with the highest quality and Small 3 ( ![]() ) is the smallest. The RAW (
) is the smallest. The RAW ( ![]() ) and Large fine (
) and Large fine ( ![]() ) combination creates both image types at the same time.
) combination creates both image types at the same time.
• Beep. The beep sounds when the camera has achieved focus, during self-timer countdown, and when you press a button on the LCD touchscreen. Select Enable or Disable to turn the beep on or off. You can also turn the beep off for the LCD touchscreen only, and leave it on for both the focus and self-timer.
• Release shutter without card. This option allows you to shoot even if there is no memory card in your camera. The default is Off, which prevents you from taking a photograph without a card. I recommend leaving this off. It’s no fun finding out later that you took a bunch of pictures without a card to record them.
• Image review. After you take a photograph, the image displays on the LCD screen. This option gives you the choice of turning Image review off, or setting the review time to 2, 4, or 8 seconds. There is also an option called hold. This leaves the image displayed until the Auto power off timer (found under Setup menu 2 ![]() ) turns off the display or you press a button on the camera, such as the shutter or Menu (
) turns off the display or you press a button on the camera, such as the shutter or Menu ( ![]() ) button.
) button.
• Lens aberration correction. Some lenses produce images with peripheral light falloff, which creates darker corners in your photos. This is also known as vignetting. Other lenses create chromatic aberration, which means that the color fringes along light and dark (high-contrast) lines because the colors traveling through the lens are not able to focus on the same point. If you have these issues with your lens, this selection is an option to help correct it. If you photograph in the RAW file format, you can also make adjustments using the Canon Digital Photo Professional software that came with your camera.
• Red-eye reduction. When using flash indoors, the light from it reflects off of your subject’s pupils and back into the lens of your camera, making your subject’s eyes appear to be red. The closer the flash is to your lens, the greater the chance of red eye. When you enable Red-eye reduction, the camera’s red-eye reduction lamp lights up to reduce the size of your subject’s pupils, thereby decreasing the chance of red eye. Red-eye reduction does not work in the Flash off ( ![]() ), Landscape (
), Landscape ( ![]() ), Sports (
), Sports ( ![]() ), or HDR backlight (
), or HDR backlight ( ![]() ) modes.
) modes.
Flash control
Selecting this option opens a new menu with the following flash controls:
• Flash firing. By default, this option is normally set to Enable, so select Disable when flash is not allowed. This prevents the flash from popping up and firing while using Basic Zone modes. It also disables an external speedlite connected to the camera.
Disabling the flash from firing does not prevent the AF-assist beam from illuminating in low-light situations.
• E-TTL II Metering. This is Through-the-Lens metering for your flash. You have two flash metering options: Evaluative and Average. Evaluative is the default metering option, and it sets the exposure based on the scene the camera reads. I recommend using this option because it allows you to take full advantage of the camera’s technology. Average metering averages the light in the entire scene to determine the proper exposure.
• Flash sync. speed in Av mode. There are three flash sync options when using a Creative Zone mode in Aperture-priority AE mode ( ![]() ). Auto ranges from 1/200 second to 30 seconds; this can be an issue if you don’t want any blur in your photographs caused by low light. The 1/200 second to 1/60 second auto option prevents the camera from setting the shutter speed below 1/60 second. This helps prevent camera shake and ghosting, which happens when using slower shutter speeds. The third option is a fixed 1/200 second shutter speed. In low light, this setting tends to create a dark or black background.
). Auto ranges from 1/200 second to 30 seconds; this can be an issue if you don’t want any blur in your photographs caused by low light. The 1/200 second to 1/60 second auto option prevents the camera from setting the shutter speed below 1/60 second. This helps prevent camera shake and ghosting, which happens when using slower shutter speeds. The third option is a fixed 1/200 second shutter speed. In low light, this setting tends to create a dark or black background.
• Built-in flash settings. When you select this option, you are taken to another menu with more options. Normal firing is the default for most flash photography using the pop-up, built-in flash. Easy wireless lets you set the channel you want to use to trigger an external speedlite when it is set to Slave, as shown in Figure 2.2. CustWireless offers more options to set up the camera’s built-in flash to your specifications.

2.2 The switch to turn a speedlite to Slave mode is often found at the base, as shown here on the Canon 430EX.
• Flash mode E-TTL II. This option, available under CustWireless, gives you the choice of using Canon’s E-TTL II flash metering system or manual metering. Manual is for controlled flash output. This option is recommended for advanced users.
• Shutter sync. This selection gives you two curtain sync options. First-curtain sync is the standard option, meaning that the flash triggers immediately after the shutter button is fully pressed. Second-curtain sync delays the curtain until the end of the shutter cycle.
• Wireless func. You have three wireless options. The first sets the built-in flash to extend only enough to trigger the external speedlite. The second is designed to trigger multiple speedlites. The third uses the internal flash and external speedlites for exposure. Each wireless function setting adds dedicated options to the menu, such as flash ratio setup and group firing options.
• Channel. You have four channels from which to choose for wireless to trigger an external speedlite using the Slave option. Make sure that both the camera and the speedlite are set on the same channel.
• Exp. comp. This gives you the opportunity to manually increase or decrease the flash output by 2 stops.
• External flash func. Setting. You can set some of your external flash settings from your camera’s menu using this setting.
• External flash C.Fn Setting. This custom function setting varies depending on your flash model.
• Clear settings. If you want to set the camera’s flash settings back to the defaults, select clear settings. You have the option of clearing the built-in and external flash settings, as well as the flash Custom Functions.
Shooting menu 2
Exposure, color, and contrast options are found under Shooting menu 2 ( ![]() ). Some of the most helpful options are Auto Exposure Bracketing (AEB), Picture Style, and Metering mode. These options are only available in the Creative Zone modes. You find the following options in Shooting menu 2 (
). Some of the most helpful options are Auto Exposure Bracketing (AEB), Picture Style, and Metering mode. These options are only available in the Creative Zone modes. You find the following options in Shooting menu 2 ( ![]() ):
):

2.3 Shooting menu 2.
• Expo.comp./AEB. This option has two settings. The first (top) is for exposure compensation, which allows you to increase the camera’s exposure settings by plus or minus 5 stops. Use the Cross keys ( ![]() ) to adjust exposure compensation. The bottom setting is the stop range between exposures for Auto Exposure Bracketing (AEB). Use the main dial (
) to adjust exposure compensation. The bottom setting is the stop range between exposures for Auto Exposure Bracketing (AEB). Use the main dial ( ![]() ) to adjust the stop range between brackets.
) to adjust the stop range between brackets.
• Auto Lighting Optimizer. This setting automatically corrects the brightness and contrast of your image when you create JPEG files. You have four choices: Off, Low, Standard, and High. The default setting is Standard. This feature improves underexposed images. It helps bring out shadow detail in the dark areas of an image and automatically adds contrast without blowing out highlights. I recommend that you turn this option off or leave it on Standard, depending on your exposure preferences.
• Custom White Balance. Use Custom White Balance when you want to set white balance based on the light of a specific environment. For example, you may want to balance the greenish light found in many school gymnasiums. To do this, fill the frame with a white piece of paper and take a photograph of it in the same lighting you are balancing. Using the Custom White Balance setting, select the image of the white piece of paper (which will reflect the color of the light in the room), and the camera sets the custom white balance based on the selected image.
• WB Shift/Bkt. Just like bracketing for exposure, you can bracket for white balance. This selection is best for advanced users who are familiar with color temperature conversion. It gives you bracketing options between blue and amber, or green and magenta. So, in one shot you create three images with different color balances.
• Color space. You have two color spaces from which to choose: sRGB (the default) and Adobe RGB. sRGB is a good choice for e-mail, digital media, and Internet use. Adobe RGB has a larger gamut (that is number of colors) available and is a good choice if your photographs are going to be printed.
• Picture Style. These settings are designed to enhance various photographic scenes with sharpness, contrast, saturation, and tone adjustments. The Picture Styles menu and the Picture Styles button on the back of the camera offer the same options. You may select a specific style, adjust a preset style, or create your own style to be stored in the user-defined section.
For more information about Picture Styles, see Chapter 3.
• Metering mode. The Canon T5i/700D has four metering modes — the default is Evaluative ( ![]() ). This is the recommended option because it sets the exposure for the scene in front of you. The other three options are Partial (
). This is the recommended option because it sets the exposure for the scene in front of you. The other three options are Partial ( ![]() ), Spot (
), Spot ( ![]() ), and Center-weighted (
), and Center-weighted ( ![]() ) metering.
) metering.
Shooting menu 3
The third Shooting menu ( ![]() ) houses the ISO, noise reduction, and image-quality options. You can only use these options in Creative Zone modes. The following options are available in Shooting menu 3 (
) houses the ISO, noise reduction, and image-quality options. You can only use these options in Creative Zone modes. The following options are available in Shooting menu 3 ( ![]() ):
):

2.4 Shooting menu 3 on your Canon T5i/700D.
• Dust Delete Data. This option helps collect data on dust not removed by the self-cleaning sensor. Once you go through the data collection process, it attaches the information to your JPEG and RAW files. This option works in conjunction with the Canon Digital Photo Professional software that comes with your camera to automatically remove dust from your photographs.
• ISO Auto. If you don’t want your automatic settings to exceed a specific ISO setting, you can set the maximum ISO within the range of ISO 400 to ISO 6400.
• Long exp. noise reduction. Long exposures tend to create a lot of noise in photographs. Noise is like visual static. It appears as specks in your image. When enabled, this setting can reduce the noise produced in your images by exposures of 1 second or more. When set on Auto, the camera detects and applies the setting as needed.
• High ISO speed NR. This is a Noise Reduction (NR) option. It can remove noise in shadow detail at all ISO settings, but the effect is more noticeable at higher ISO settings.
The Live View Shooting Menu
Press the Live View Shooting mode button ( ![]() ) to the right of the viewfinder to view the scene in front of your lens. The LCD touchscreen can swivel 180 degrees horizontally from the camera, which is helpful when shooting self- or family portraits. The screen can also swivel up or down to capture high or low angles. This section covers the options available under the Live View Shooting menu (
) to the right of the viewfinder to view the scene in front of your lens. The LCD touchscreen can swivel 180 degrees horizontally from the camera, which is helpful when shooting self- or family portraits. The screen can also swivel up or down to capture high or low angles. This section covers the options available under the Live View Shooting menu ( ![]() ), including the autofocus tracking method, touch options, and grid display.
), including the autofocus tracking method, touch options, and grid display.
You find the following options in the Live View Shooting menu ( ![]() ):
):

2.5 The Live View shooting menu.
• Live View shoot. Here, you can enable or disable Live View.
• AF method. This setting offers four focus modes. All of them (except the Quick focus mode ![]() ) use the image sensor to autofocus. The first option is the Face Tracking mode (
) use the image sensor to autofocus. The first option is the Face Tracking mode ( ![]() ), in which the camera focuses on and follows any face it detects. The second is the FlexiZone-Multi mode (
), in which the camera focuses on and follows any face it detects. The second is the FlexiZone-Multi mode ( ![]() ), which uses 31 focal points that also may be manually divided (using the LCD touchscreen or the Setting button (
), which uses 31 focal points that also may be manually divided (using the LCD touchscreen or the Setting button ( ![]() )) into one of nine zones. The third is the FlexiZone-Single mode (
)) into one of nine zones. The third is the FlexiZone-Single mode ( ![]() ), in which you can select one of the 31 focal points as the point of focus for your photograph. The last option is the Quick focus mode (
), in which you can select one of the 31 focal points as the point of focus for your photograph. The last option is the Quick focus mode ( ![]() ). It is the fastest focusing option because it uses only nine AF points to focus.
). It is the fastest focusing option because it uses only nine AF points to focus.
• Continuous AF. When the Quick focus mode ( ![]() ) is enabled, Continuous AF is automatically turned off.
) is enabled, Continuous AF is automatically turned off.
• Touch Shutter. If you enable Touch Shutter, all you have to do is touch the LCD screen to focus and take a photograph. If it is disabled, there is an icon on the bottom left of your screen to enable the option at any time. This option works in all shooting modes.
• Grid display. You have two grid display options to help level your camera in comparison to your scene. One is shaped like a tic-tac-toe board, with two horizontal and two vertical lines resulting in nine squares in the grid. The second option contains 24 squares and 15 line intersections to help you compose your image.
• Aspect ratio. The aspect ratio is the shape in which the camera frames a scene. There are four options available on the T5i: 3:2 (35mm film), 4:3 (old television), 16:9 (HD video standard), and 1:1 (square). The aspect ratio option is only available in the Creative Zone modes.
RAW images always save at the 3:2 aspect ratio.
• Metering timer. Choose this option to select how long exposure settings are displayed on the LCD screen. You can select 4 sec., 16 sec., 30 sec., 1 min., 10 min., or 30 min. This option is available only in the Creative Zone modes (in the Basic Zone modes, the default is 16 sec.).
The Movie Shooting Menus
Your camera has two Movie shooting menus ( ![]() ). These options only display when your camera is set to Movie shooting mode (
). These options only display when your camera is set to Movie shooting mode ( ![]() ).
).
Movie shooting menu 1
The first Movie shooting menu ( ![]() ) contains options such as autofocus, grid display, and meter timer. The following list covers all available options in Movie shooting menu 1 (
) contains options such as autofocus, grid display, and meter timer. The following list covers all available options in Movie shooting menu 1 ( ![]() ):
):

2.6 The five choices available in Movie shooting menu 1.
• AF method. These are the same as the AF methods in the Live View shooting menu ( ![]() ), except that you don’t have an option for the Quick focus mode (
), except that you don’t have an option for the Quick focus mode ( ![]() ). Face tracking (
). Face tracking ( ![]() ) detects a human face and places a focus point over it. FlexiZone-Multi (
) detects a human face and places a focus point over it. FlexiZone-Multi ( ![]() ) uses multiple points to focus on the subject. FlexiZone-Single (
) uses multiple points to focus on the subject. FlexiZone-Single ( ![]() ) uses one of the 31 available points of focus. You can use the Setting button (
) uses one of the 31 available points of focus. You can use the Setting button ( ![]() ) to reset your focus to the center of your screen.
) to reset your focus to the center of your screen.
• Movie Servo AF. This selection turns the Movie Servo AF feature ( ![]() ) on or off — it is on by default. If either you or your subject is moving, the Movie Servo AF (
) on or off — it is on by default. If either you or your subject is moving, the Movie Servo AF ( ![]() ) will follow-focus on your subject. If you are concerned about focusing noise from your lens, consider using one of the Canon STM lenses designed to limit noise.
) will follow-focus on your subject. If you are concerned about focusing noise from your lens, consider using one of the Canon STM lenses designed to limit noise.
When the Movie Servo AF setting ( ![]() ) is enabled, turn off the camera before switching the lens to Manual focus mode (
) is enabled, turn off the camera before switching the lens to Manual focus mode ( ![]() ).
).
• AF w/shutter button during ![]() . Your camera allows you to take still photos while shooting in Movie mode (
. Your camera allows you to take still photos while shooting in Movie mode ( ![]() ). The One shot selection (the default) is activated by pressing the shutter button halfway. It then refocuses for your still photograph while you are shooting your video. When this option is turned off, you can still take photographs, but the camera will not refocus.
). The One shot selection (the default) is activated by pressing the shutter button halfway. It then refocuses for your still photograph while you are shooting your video. When this option is turned off, you can still take photographs, but the camera will not refocus.
• Grid display. Your camera has two grid display options useful for leveling your scenes. The grids are displayed on the LCD screen. This option is turned off by default.
• Metering timer. This sets how long the exposure settings are displayed on the LCD screen. This option is only available in the Creative Zone modes. In the Basic Zone modes, the default is automatically set to 16 seconds.
Movie shooting menu 2
The following options are available in Movie shooting menu 2 ( ![]() ):
):

2.7 Movie shooting menu 2.
• Movie rec. size. You have four movie recording options for each of the two video systems: NTSC and PAL. NTSC (National Tele-vision System Committee) is the standard video system used in North America and Japan (among other countries). PAL (Phase Alternating Line) is the standard recording format for Europe, much of Africa, and China (among other countries). Each of these settings gives you a combination of movie image sizes in pixels and frame rate (frames per second). The frame rate options for NTSC are based on recording at 30 frames per second (29.97). PAL is based on 25 frames per second. The third statistic displayed is how much recording time you have before you run out of storage space on your memory card. The maximum recording time is 29 minutes, 59 seconds.
• Sound recording. This selection turns the microphone (located on top of the camera) on or off. You have five sound recording options: Auto, Manual, Disable, Wind filter, and Attenuator. If an external microphone is plugged into the camera, it is given priority.
• Video snapshot. Your camera can create quick snapshots and save them to albums. When this setting is turned on, you can adjust the length of your clips to 2, 4, or 8 seconds. Disable this option if you want to create movies longer than your selected short clip length.
For more information about the Video snapshot option, see Chapter 8.
The Playback Menus
The two Playback menus ( ![]() ) are where you find the options for viewing your photographs. The first menu focuses on postproduction and the second is where you find the image review options.
) are where you find the options for viewing your photographs. The first menu focuses on postproduction and the second is where you find the image review options.
Playback menu 1
Playback menu 1 ( ![]() ) contains postproduction features, including options to print your photographs, create books, and protect or erase images. You also find the camera’s creative filters here. The options are:
) contains postproduction features, including options to print your photographs, create books, and protect or erase images. You also find the camera’s creative filters here. The options are:

2.8 Playback menu 1 has seven options.
• Protect images. This option protects images from being erased from the memory card or unlocks images on the memory card.
• Rotate image. If you are not using Auto rotate (found in Setup menu 1 ![]() ), then you can manually rotate your images using this option.
), then you can manually rotate your images using this option.
• Erase images. This option lets you erase selected (checkmarked) images. You have three options: Erase selected images, Erase images from a specific folder, or Erase all images on your memory card. Protected images are not erased.
If you use the RAW ( ![]() ) and Large Fine (
) and Large Fine ( ![]() ) image settings, the Erase option removes both images.
) image settings, the Erase option removes both images.
• Print order. If you use the digital print order format (DPOF) available with your camera, this option helps you select the print type, and date or file number imprint for your orders. The settings are applied to all print-ordered images.
• Photobook Set-up. If you want to create a photobook, this option helps you select images. The images are placed in a dedicated folder that is accessible using the EOS utility provided with your camera. You may select up to 998 images.
• Creative filters. Use this selection to apply creative filters to existing images. The options include Grainy B&W, Soft focus, Fish-eye effect, Art bold effect, Water painting effect, Toy camera effect, and Miniature effect. When you apply a filter, the camera creates a new file and leaves the original unaltered.
See Chapter 9 for examples of the Creative filters.
• Resize. Use this option to create smaller image files in-camera. Resize creates a new file so that your original is not erased. However, note that you cannot resize JPEG S3 ( ![]() ) or RAW (
) or RAW ( ![]() ) images, or make larger images from smaller JPEGs.
) images, or make larger images from smaller JPEGs.
Playback menu 2
Playback menu 2 ( ![]() ) focuses on photograph review. Options such as histogram display, slide show, and photograph rating options are located here. The following options are available:
) focuses on photograph review. Options such as histogram display, slide show, and photograph rating options are located here. The following options are available:
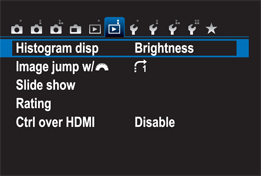
2.9 The options in Playback menu 2.
• Histogram disp. A histogram is a visual representation of the tones in a photograph. The left side represents black, the right side represents white, and the middle represents gray tones. This selection gives you the option of displaying either the brightness or RGB histogram when reviewing your photographs. Press the Info button ( ![]() ) to see the histogram of your photographs.
) to see the histogram of your photographs.
• Image jump w/![]() . Increase the image jump number when you want to move through your photos faster. The default setting is to browse one image at a time, but here you can adjust it to move between 10 or 100 images. This is useful when you have a lot of photographs and videos on your memory card. You can also set up your browsing based on different jump methods, such as by date, folder, movies only, stills only, or image rating.
. Increase the image jump number when you want to move through your photos faster. The default setting is to browse one image at a time, but here you can adjust it to move between 10 or 100 images. This is useful when you have a lot of photographs and videos on your memory card. You can also set up your browsing based on different jump methods, such as by date, folder, movies only, stills only, or image rating.
• Slide show. You can share your images as a slide show on the LCD screen, or use the HDMI output to show them on an external TV or monitor. You can select specific images, or select them by date, folder, rating, or whether they are stills or movies. You also have a choice of five transitions and music options.
• Rating. Choose this option to rate your images and movies. This makes it easier to sort your photographs when using the Image jump or Slide show options.
• Ctrl over HDMI. When you connect your camera to an HDTV using an HDMI cable, you can use a remote control to activate your Canon T5i/700D’s playback functions. You do this by selecting Enable and following the directions. Not all televisions allow this function. If yours does not, return to the default Disable setting.
The Setup Menus
The Setup menus are full of options to customize your camera the way you like it. There are four menus from which to choose when using the Creative Zone modes, which are Manual ( ![]() ), Aperture-priority AE (
), Aperture-priority AE ( ![]() ), and Shutter-priority AE (
), and Shutter-priority AE ( ![]() ). There are three options available in the Basic Zone modes, which are Scene Intelligent Auto (
). There are three options available in the Basic Zone modes, which are Scene Intelligent Auto ( ![]() ), Flash off (
), Flash off ( ![]() ), Creative Auto (
), Creative Auto ( ![]() ), Portrait (
), Portrait ( ![]() ), Landscape (
), Landscape ( ![]() ), Close-up (
), Close-up ( ![]() ), Sports (
), Sports ( ![]() ), Night Portrait (
), Night Portrait ( ![]() ), Handheld Night Scene (
), Handheld Night Scene ( ![]() ), and HDR backlight (
), and HDR backlight ( ![]() ).
).
Setup menu 1
The following options are available in Setup menu 1 ( ![]() ):
):
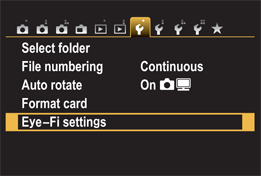
2.10 Setup menu 1.
• Select folder. This option allows you to select the folder where your captured photographs are saved. You can also create new folders here. This is helpful for organizing your photos in the field. For example, you can create a specific folder to contain images you want to delete when clearing your memory card.
• File numbering. You have three options when it comes to file numbering. Continuous numbers your files from 0001–9999. Auto reset reverts the file number to 0001 with each new memory card you insert or new folder you create. Manual reset gives you the opportunity to reset your file numbers to 0001 at any time. I find that the Continuous numbers option makes it easier to keep track of images and prevent overwriting photos.
A new folder is automatically created when your file numbers reset using the Continuous file numbering setting.
• Auto rotate. When this option is on, the camera rotates vertical images to display them in the horizontal frame of the LCD screen or computer. You also have the option to not have your images rotate during playback; they still rotate when viewed on the computer, however. You can also turn the Auto rotate option off.
A vertical image does not rotate automatically after you take a photo. Images only rotate in Playback mode ( ![]() ).
).
• Format card. When you purchase a new memory card or use one that was initialized by another camera, you should format the card for the Canon T5i/700D. After formatting the card, you may not be able to recover any images that were on the card. To ensure complete formatting of all sectors of the memory card, select Low-level formatting. This takes longer to execute than the Normal formatting, but it completely clears the card of recoverable data. There are many reasons a photographer might want to permanently remove all data from a memory card, such as to erase photos of a sensitive or security-related nature.
• Eye-Fi setting. You have two options under this selection: Enable or Disable. An Eye-Fi card allows you to automatically transfer images to your personal computer or an online hosting service. Although the option to enable an Eye-Fi card is in the T5i/700D firmware, Eye-Fi cards aren’t officially supported by Canon. This option is only available when an Eye-Fi card is placed in the memory card slot.
Setup menu 2
Setup menu 2 ( ![]() ) addresses power, the LCD screen, date/time, language, and video systems. The following seven options are available:
) addresses power, the LCD screen, date/time, language, and video systems. The following seven options are available:
• Auto power off. You can set the camera to shut off automatically if left untouched for 30 seconds or 15 minutes. You can disable this option, but if you do (or if you set it for a longer period of time), you risk wearing down the battery before its next use.

2.11 Setup menu 2.
• LCD brightness. This option controls the brightness of the LCD screen.
• LCD auto off. This setting disables the eye sensor from turning off the LCD screen, which it does when you bring your eye to the viewfinder. It turns on again when you remove your eye from the eyepiece.
• Time zone. This option lets you set the time zone based on a major city in your zone. The sun icon allows you to turn daylight saving time on or off.
• Date/Time. Use this option to set the date and time on your camera.
• Language. This option lets you select the language you want your camera to display.
• Video system. Use this option to select the video recording standard you want to use for your movies, NTSC (the default), or PAL.
Setup menu 3
Setup menu 3 ( ![]() ) gives you options for screen color, the feature guide, touch control, sensor cleaning, and GPS device settings. The following menu options are available:
) gives you options for screen color, the feature guide, touch control, sensor cleaning, and GPS device settings. The following menu options are available:
• Screen color. Your camera has five screen color options: Black, light gray, dark gray, blue, and red. Red is often used for night photography to help prevent the loss of night vision.

2.12 Setup menu 3.
• Feature guide. The Feature guide is like an in-camera tutorial that explains different features as you review them. This is helpful when you are new to the camera. You can choose to enable or disable this option here.
• Touch control. This option turns the Touch control for the LCD screen on or off.
• Sensor cleaning. When you turn the power switch On or Off, you can activate the camera’s sensor cleaner. The cleaner shakes dust off of the camera’s front sensor. This setting gives you three options: Enable or Disable the auto sensor cleaning, Clean your sensor now, or Clean manually. If you choose manual cleaning, the camera locks the mirror up for easier sensor access. I recommend that you leave the auto sensor cleaning on.
You should always use the proper tools or have an experienced professional clean the camera sensor; otherwise, you risk creating unwanted scratches.
• GPS device settings. If you purchase GPS accessories for your camera, this is where you control the settings for them. This menu option is only available if you are connected to a GPS device, such as the Canon GP-E2.
Setup menu 4
In Setup menu 4 ( ![]() ), there are options for Custom Functions, copyright, clearing settings, and firmware updates. The options are:
), there are options for Custom Functions, copyright, clearing settings, and firmware updates. The options are:
• Certification Logo Display. Highlight this menu option and press the Settings button ( ![]() ). The camera displays some of the manufacturer certifications.
). The camera displays some of the manufacturer certifications.

2.13 Setup menu 4.
• Custom Functions (C.Fn). This selection allows you to control all eight of the camera’s Custom Functions individually. The following four Custom Function groupings are available on the Canon T5i/700D:
• C.Fn I: Exposure. Here, you can adjust the exposure level in 1/3- or 1/2-stop increments. If you prefer more refined increments for your exposure settings, such as shutter speed, aperture, and exposure compensation, use the 1/3-stop option. The other option under this function is turning ISO expansion on or off. ISO expansion allows you to shoot at the equivalent of ISO 12800 for stills or ISO 6400 for videos. This option is helpful in low light, but remember that high ISO settings produce more noise in digital files.
• C.Fn II: Image. In this menu, you can turn the Highlight tone priority function on or off. This option expands the camera’s dynamic range into brighter areas, improving the highlight detail in your images.
• C.Fn III: Autofocus/Drive. There are two options here: AF-assist beam firing and Mirror lockup. The AF-assist beam supports the pop-up and external E-TTL flashes to properly expose your subject. I recommend that you leave this option on. The Mirror lockup function locks the camera mirror to help prevent vibration during long exposures when using telephoto and macro lenses.
• C.Fn IV: Operation/Others. You can adjust three settings here. The Shutter A/E lock button can be assigned different functions, such as autofocus lock, exposure lock (without autofocus lock), and autofocus lock (without exposure lock). Assign Set button allows you to assign a specific function to the Setting button ( ![]() ), such as image quality, flash exposure compensation, or ISO speed. You can enable the LCD display when power on function if you want the LCD screen to turn on automatically when the camera’s power switch is turned on (this is the default). To save power, use the Previous display status option. To activate it, with the LCD screen turned off, press the Info button (
), such as image quality, flash exposure compensation, or ISO speed. You can enable the LCD display when power on function if you want the LCD screen to turn on automatically when the camera’s power switch is turned on (this is the default). To save power, use the Previous display status option. To activate it, with the LCD screen turned off, press the Info button ( ![]() ) before turning off the camera. When you turn the camera back on, the LCD screen will not turn on automatically. To return to the default setting, press the Info button (
) before turning off the camera. When you turn the camera back on, the LCD screen will not turn on automatically. To return to the default setting, press the Info button ( ![]() ).
).
• Copyright information. This option inserts copyright information into your files. There are four menu options here. The first is to turn the Copyright information option on or off. The second option allows you to list the author’s name (your name). The third option allows you to add more information, and the final option is to delete copyright information. When you select options two and three, a keyboard displays on the LCD screen so you may type the information. You can then view this information under File Info in standard photo-editing programs.
• Clear settings. Use this option if you want to clear all of the camera’s settings and return them to their default status. You can clear all settings or only the Custom Settings.
• ![]() firmware ver. This setting displays the camera’s current firmware version (that is, the software running your camera). Make sure that you register your camera because Canon will send you notifications about firmware updates. You then activate those updates here. To do so, you use your computer to download the latest firmware to a clean, formatted memory card. The Format memory card option is in Setup menu 1 (
firmware ver. This setting displays the camera’s current firmware version (that is, the software running your camera). Make sure that you register your camera because Canon will send you notifications about firmware updates. You then activate those updates here. To do so, you use your computer to download the latest firmware to a clean, formatted memory card. The Format memory card option is in Setup menu 1 ( ![]() ).
).
The LCD touchscreen is disabled during firmware updates.
My Menu Settings
Over time, you will discover which settings you use most often. My Menu ( ![]() ), designated by the star, is customizable. It gives you six locations in which you can register your favorite options. My favorites listed under My Menu (
), designated by the star, is customizable. It gives you six locations in which you can register your favorite options. My favorites listed under My Menu ( ![]() ) include Image quality, Format card, and Custom functions. Follow these steps to customize your My Menu (
) include Image quality, Format card, and Custom functions. Follow these steps to customize your My Menu ( ![]() ) settings:
) settings:
1. Select My Menu settings under My Menu ( ![]() ).
).
2. Select Register to My Menu. All of the available options are displayed. You can move through the options using the Cross keys ( ![]() ). If an option is grayed out, this means that it is already on the list.
). If an option is grayed out, this means that it is already on the list.
3. Press the Setting button ( ![]() ) to register your option. Repeat this process until all six locations are filled.
) to register your option. Repeat this process until all six locations are filled.

2.14 The options I selected for My Menu.
These settings are not permanent — you can sort (move a registered option up and down the list) or Delete them at any time in My Menu ( ![]() ).
).