Chapter 8: Shooting in the Live View and Movie Modes
Video is a fun way to preserve memories, and creating them with a dSLR camera has become popular due to the advantages of price, ease of use, and the lenses that are available. Your Canon Rebel T5i/700D is a powerful video tool. Perhaps you have seen a beautiful video created by a photographer using a dSLR camera and wondered if you could do the same thing. The answer is yes, if you follow the standard production rules. The goal is consistency — it doesn’t matter if you are creating a family video, a school project, or the next great documentary. It is important to plan ahead, especially if you are going to edit your video. You don’t have as many postproduction options with video as you do with still photography, so it isn’t as easy to fix problems later.

An outtake frame from a video shot with the Canon Rebel T5i/700D.
Using the Live View Shooting Mode
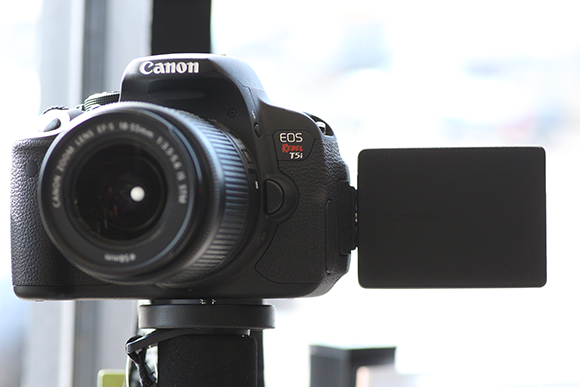
Live View shooting mode ( ![]() ) is helpful for creating both still photographs and videos. The large, 3-inch touchscreen makes it easier to view and follow subjects in real time. The Canon Rebel T5i/700D has a vari-angle LCD screen that swings out 175 degrees. This allows you to place the camera at unique angles, or hold it above your head or down low while following your subject. You can flip the screen 180 degrees so you can protect it against the back of the camera, view it on the back of the camera, or extend it out to view it from the front of the camera.
) is helpful for creating both still photographs and videos. The large, 3-inch touchscreen makes it easier to view and follow subjects in real time. The Canon Rebel T5i/700D has a vari-angle LCD screen that swings out 175 degrees. This allows you to place the camera at unique angles, or hold it above your head or down low while following your subject. You can flip the screen 180 degrees so you can protect it against the back of the camera, view it on the back of the camera, or extend it out to view it from the front of the camera.
A helpful feature in the Live View shooting mode ( ![]() ) is the Magnify option (
) is the Magnify option ( ![]() ). This feature magnifies the scene in front of you up to 10 times. The Magnify button (
). This feature magnifies the scene in front of you up to 10 times. The Magnify button ( ![]() ) is in the lower-right corner of the LCD screen. You can also use the Magnify button (
) is in the lower-right corner of the LCD screen. You can also use the Magnify button ( ![]() ) on the back of your camera. Use the four arrows along each side of the frame to view different parts of the scene. This option is helpful when focusing on subjects at a distance. When you press the Live View shooting mode button (
) on the back of your camera. Use the four arrows along each side of the frame to view different parts of the scene. This option is helpful when focusing on subjects at a distance. When you press the Live View shooting mode button ( ![]() ) to record a movie, the camera returns to 1X magnification.
) to record a movie, the camera returns to 1X magnification.

8.1 You can hold your camera high or low and use the vari-angle LCD screen to capture new angles.
If you use the Live View shooting mode ( ![]() ) for an extended period of time, it can raise the camera’s internal temperature, which can affect image quality. Make sure that you turn off the Live View shooting mode (
) for an extended period of time, it can raise the camera’s internal temperature, which can affect image quality. Make sure that you turn off the Live View shooting mode ( ![]() ) when it’s not in use.
) when it’s not in use.
To turn on the Live View shooting mode ( ![]() ), press the Live View button (
), press the Live View button ( ![]() ) to the right of the eyepiece. You should note that the Live View (
) to the right of the eyepiece. You should note that the Live View ( ![]() ) and Movie shooting (
) and Movie shooting ( ![]() ) modes, while similar, have different menus and features. When you turn on Live View shooting mode (
) modes, while similar, have different menus and features. When you turn on Live View shooting mode ( ![]() ), you see an information display on the LCD screen. Most of this information is related to exposure settings. The exposure information display has four variations that you can access when you press the Info button (
), you see an information display on the LCD screen. Most of this information is related to exposure settings. The exposure information display has four variations that you can access when you press the Info button ( ![]() ), including exposure mode, an automatically adjusting histogram, and Picture Styles (
), including exposure mode, an automatically adjusting histogram, and Picture Styles ( ![]() ). The last option clears the screen of all information.
). The last option clears the screen of all information.
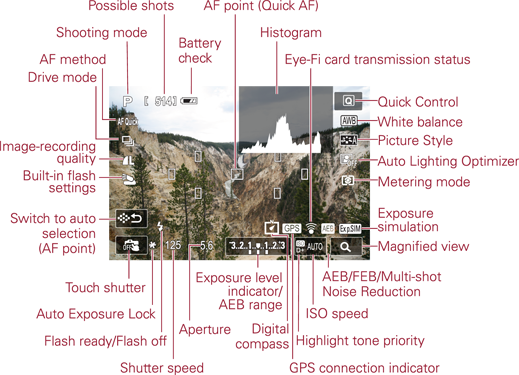
8.2 This graphic shows the information available via your camera’s Info button.
If you don’t see the information display on the screen after pressing the Live View button ( ![]() ), press the Info (
), press the Info ( ![]() ) button.
) button.
The Live View information display offers four options — one is clear, and the other three have different combinations of the following options:
• Shooting mode. The exposure mode to which your camera is set, such as Program AE ( ![]() ) or Portrait (
) or Portrait ( ![]() ).
).
• Possible shots. This the estimated number of available shots left on the memory card.
• Battery check ( ![]() ). This icon shows how much battery power is left in your camera.
). This icon shows how much battery power is left in your camera.
• AF point (Quick AF). This is one of the nine autofocus points available for focusing in Quick mode ( ![]() ).
).
• Histogram. This is a live, continuously adjusting graphical representation of the shades of white to black in your scene.
• Auto Lighting Optimizer ( ![]() ). This adjusts your photograph to the optimal brightness and contrast when using the Basic Zone modes.
). This adjusts your photograph to the optimal brightness and contrast when using the Basic Zone modes.
• Quick Control ( ![]() ). Press this for quick access to your shooting functions. Each individual mode displays different options.
). Press this for quick access to your shooting functions. Each individual mode displays different options.
• White balance. Internal adjustments naturalize the light found in the shooting environment. This icon indicates which white balance setting is in use.
• Picture Style. Displays the Picture Style your camera is currently using.
• Metering mode. This shows you which of the four metering modes your camera is using: Evaluative ( ![]() ), Partial (
), Partial ( ![]() ), Spot (
), Spot ( ![]() ), or Center-weighted (
), or Center-weighted ( ![]() ).
).
• Eye-Fi card transmission status. Indicates that the Eye-Fi card is active.
• Exposure simulation. Your camera displays real-time exposure (how your photo looks at the current exposure settings).
• Magnified view. This option allows you to magnify the scene, which is helpful for checking focus.
• AEB/FEB/Multi-shot Noise Reduction. Displays the Auto Exposure Bracketing setting, Flash Exposure Bracketing setting, and Multi-shot Noise Reduction (which reduces noise at all ISO settings).
• ISO speed. Indicates the ISO setting of your camera.
• Highlight tone priority ( ![]() ). This indicates that this feature is active. It is designed to improve the highlight detail in your scene.
). This indicates that this feature is active. It is designed to improve the highlight detail in your scene.
• GPS connection indicator. This shows that the Global Positioning System is active (a GPS receiver is required).
• Digital compass. This indicates the direction in which your camera is pointing when used in combination with a GPS receiver.
• Exposure level indicator/AEB range. This displays how under- or overexposed the camera setting is. It also indicates the set range of the Auto Exposure Bracketing feature.
• Aperture. This displays at what aperture your camera is set.
• Flash exposure compensation. You can adjust your flash exposure by up to 2 stops in 1/3-stop increments.
• Shutter speed. This displays at what shutter speed your camera is set.
• Flash ready ( ![]() )/Flash off (
)/Flash off ( ![]() ). This indicates whether the flash is on or off.
). This indicates whether the flash is on or off.
• Auto Exposure Lock ( ![]() ). This reminds you that the Auto Exposure Lock is engaged.
). This reminds you that the Auto Exposure Lock is engaged.
• Touch shutter. This turns the LCD screen touch shutter on and off. This option allows the photographer to trigger the shutter from the LCD touchscreen.
• Switch to auto selection (AF point). Turns auto selection on or off. Auto selection selects the best autofocus point. If the subject moves, the camera switches to AI Servo AF ( ![]() ) and follow focuses on the subject.
) and follow focuses on the subject.
• Built-in flash settings. This lets you know that the pop-up flash is active.
• Image-recording quality. This represents the quality and size of the image file.
• Drive mode. This indicates which of the following drive modes is engaged: Single shooting ( ![]() ), Continuous shooting (
), Continuous shooting ( ![]() ), or one of the three Self-timer options (
), or one of the three Self-timer options ( ![]() ).
).
• AF method. This shows which focusing method is being using when the Live View shooting mode ( ![]() ) is on. The options are Face tracking (
) is on. The options are Face tracking ( ![]() ), FlexiZone-multi (
), FlexiZone-multi ( ![]() ), FlexiZone-single (
), FlexiZone-single ( ![]() ), and Quick mode (
), and Quick mode ( ![]() ).
).
To get to the Live View menu, press the Menu button ( ![]() ), and then select the Live View shooting mode (
), and then select the Live View shooting mode ( ![]() ). The menu has seven options to consider, such as focusing, grid display, and aspect ratio.
). The menu has seven options to consider, such as focusing, grid display, and aspect ratio.
See Chapter 2 for a full explanation of menu options.
The Quick Control/Print button
The Quick Control/Print button ( ![]() ) or the Quick Control icon (
) or the Quick Control icon ( ![]() ) in the upper-right corner of the Live View screen enables you to make changes to many key functions, depending on the mode you are using. When you are photographing in a Basic Zone mode, Live View gives you access to the AF method, image-recording quality, and drive mode. If you are shooting in one of the Creative Zone modes — Program AE (
) in the upper-right corner of the Live View screen enables you to make changes to many key functions, depending on the mode you are using. When you are photographing in a Basic Zone mode, Live View gives you access to the AF method, image-recording quality, and drive mode. If you are shooting in one of the Creative Zone modes — Program AE ( ![]() ), Shutter-priority AE (
), Shutter-priority AE ( ![]() ), Aperture–priority AE (
), Aperture–priority AE ( ![]() ), or Manual (
), or Manual ( ![]() ) — you have access to the same options that you do in the Basic Zone modes, plus the built-in flash options, white balance, Picture Style, Auto Lighting Optimizer, and Metering modes.
) — you have access to the same options that you do in the Basic Zone modes, plus the built-in flash options, white balance, Picture Style, Auto Lighting Optimizer, and Metering modes.
Shooting stills
You have two options to trigger the shutter button while using the Live View shooting mode ( ![]() ). You can use the shutter button the same as you would when looking through the viewfinder, or you can enable the touch shutter by pressing the Touch Shutter disabled button (
). You can use the shutter button the same as you would when looking through the viewfinder, or you can enable the touch shutter by pressing the Touch Shutter disabled button ( ![]() ) in the lower-left corner of the LCD screen. To disable the touch shutter, press the Touch Shutter enabled button (
) in the lower-left corner of the LCD screen. To disable the touch shutter, press the Touch Shutter enabled button ( ![]() ). You can also enable this option under Live View shooting menu 1 (
). You can also enable this option under Live View shooting menu 1 ( ![]() ). I find it easier to use the LCD touchscreen when the camera is mounted on a tripod rather than when handholding it.
). I find it easier to use the LCD touchscreen when the camera is mounted on a tripod rather than when handholding it.
8.3 This photo was shot handheld and composed using the Live View shooting mode. Exposure: ISO 200, f/8.0, 1/800 second, 12-24mm f/4.0 lens at 24mm.
The Live View shooting mode ( ![]() ) drains the battery much faster than the viewfinder, so be sure to turn it off when it’s not in use.
) drains the battery much faster than the viewfinder, so be sure to turn it off when it’s not in use.
The camera’s sensor, viewfinder, and LCD screen all have a standard aspect ratio of 3:2. When shooting in Live View mode ( ![]() ), you have three additional options beyond standard: 4:3, 16:9, and 1:1. When you turn on the 4:3, 16:9, or 1:1 ratio, a black mask outlines the new screen proportions. If you shoot in the RAW file format (
), you have three additional options beyond standard: 4:3, 16:9, and 1:1. When you turn on the 4:3, 16:9, or 1:1 ratio, a black mask outlines the new screen proportions. If you shoot in the RAW file format ( ![]() ), the images save as 3:2 with the information stored and appended to the RAW file. If you photograph in the JPEG file format, the ratios are saved permanently. If you are unsure, use 3:2 and crop your images later.
), the images save as 3:2 with the information stored and appended to the RAW file. If you photograph in the JPEG file format, the ratios are saved permanently. If you are unsure, use 3:2 and crop your images later.
Focus modes
The default focus mode for Live View shooting ( ![]() ) is Continuous focus. This means that the camera follows your subject to keep it in focus. You can disable Continuous focus in the Live View shooting menu (
) is Continuous focus. This means that the camera follows your subject to keep it in focus. You can disable Continuous focus in the Live View shooting menu ( ![]() ). When you do so, the camera switches to One-shot focusing mode (
). When you do so, the camera switches to One-shot focusing mode ( ![]() ). This means that the camera focuses once and stays that way until you lift your finger from the shutter button. You can designate a new focus point by touching the LCD screen, but you need to press the shutter button for the camera to refocus.
). This means that the camera focuses once and stays that way until you lift your finger from the shutter button. You can designate a new focus point by touching the LCD screen, but you need to press the shutter button for the camera to refocus.
You have four autofocus (AF) methods available in Live View shooting mode ( ![]() ) and three when shooting video (which is covered later in this chapter). In Face Tracking mode (
) and three when shooting video (which is covered later in this chapter). In Face Tracking mode ( ![]() ), the camera detects a face and follows it until you take the photo. If you have multiple faces in your scene, the camera selects one. You can change the focus target by touching the subject’s face on the LCD screen. FlexiZone-multi (
), the camera detects a face and follows it until you take the photo. If you have multiple faces in your scene, the camera selects one. You can change the focus target by touching the subject’s face on the LCD screen. FlexiZone-multi ( ![]() ) uses up to 31 autofocus points to focus on your scene. When you press the Setting button (
) uses up to 31 autofocus points to focus on your scene. When you press the Setting button ( ![]() ) or touch the LCD screen, this AF option divides your screen into nine focus zones. To revert to the larger AF focus area, press the Setting button (
) or touch the LCD screen, this AF option divides your screen into nine focus zones. To revert to the larger AF focus area, press the Setting button ( ![]() ) again.
) again.
8.4 The Face Tracking technology follows your subject anywhere in the frame.
If your subject is far away from the camera and his face is too small in the frame, Face Tracking mode ( ![]() ) may not work.
) may not work.
FlexiZone-single ( ![]() ) uses the 31 autofocus points individually. Press any point on the LCD screen and the focus point lights up where your finger is placed. You can also press the Setting button (
) uses the 31 autofocus points individually. Press any point on the LCD screen and the focus point lights up where your finger is placed. You can also press the Setting button ( ![]() ) and Cross keys (
) and Cross keys ( ![]() ) to make autofocus adjustments. The last focus option is the Quick mode (
) to make autofocus adjustments. The last focus option is the Quick mode ( ![]() ), which is the fastest of the four focus options. It drops the mirror, the LCD screen goes dark, and the camera uses the nine traditional focus points to focus. This option is not available in the Movie shooting mode (
), which is the fastest of the four focus options. It drops the mirror, the LCD screen goes dark, and the camera uses the nine traditional focus points to focus. This option is not available in the Movie shooting mode ( ![]() ).
).
If you prefer, you can use Manual focus ( ![]() ) in Live View shooting mode (
) in Live View shooting mode ( ![]() ). While the large LCD screen is helpful for manually focusing, consider using the Magnify button (
). While the large LCD screen is helpful for manually focusing, consider using the Magnify button ( ![]() ) to get in close on your subject for fine focusing. To help line up horizon lines and elements in your scene, you have the Grid display option found under the Live View shooting menu (
) to get in close on your subject for fine focusing. To help line up horizon lines and elements in your scene, you have the Grid display option found under the Live View shooting menu ( ![]() ). You can also check the depth of field in the Live View shooting mode (
). You can also check the depth of field in the Live View shooting mode ( ![]() ) by pressing the Depth-of-Field Preview button on the right side of the front of your camera.
) by pressing the Depth-of-Field Preview button on the right side of the front of your camera.
Live View and video
When you set your camera to Movie mode ( ![]() ), the viewfinder turns black. To view the scene, use Live View shooting mode (
), the viewfinder turns black. To view the scene, use Live View shooting mode ( ![]() ) on the LCD screen so you can watch the environment. This allows you to prepare for a subject coming into the frame from any direction. For even better viewing, attach your camera to a larger screen, such as an external monitor or TV. Live View shooting mode (
) on the LCD screen so you can watch the environment. This allows you to prepare for a subject coming into the frame from any direction. For even better viewing, attach your camera to a larger screen, such as an external monitor or TV. Live View shooting mode ( ![]() ) has four information display options: autofocus, histograms, drive mode, and movie size. There is also an option to clear the information. Press the Info button (
) has four information display options: autofocus, histograms, drive mode, and movie size. There is also an option to clear the information. Press the Info button ( ![]() ) to access each of the display options.
) to access each of the display options.
Here are some tips to help you when shooting video:
• Use a tripod. Because video is shot in the Live View shooting mode ( ![]() ), you cannot brace the camera in the same way that you do when holding it to your eye to shoot still photos. Camera shake is also very noticeable in video, so you need a tripod to avoid it. If you do decide to handhold your camera, or if the subject is moving, take advantage of the camera’s Movie servo AF mode (
), you cannot brace the camera in the same way that you do when holding it to your eye to shoot still photos. Camera shake is also very noticeable in video, so you need a tripod to avoid it. If you do decide to handhold your camera, or if the subject is moving, take advantage of the camera’s Movie servo AF mode ( ![]() ) to help keep your subject in focus.
) to help keep your subject in focus.
8.5 Use a tripod whenever possible to create professional-looking videos.
• Use Quick Control ( ![]() ). There is a slightly different setup on the LCD screen for this option in the Live View shooting mode (
). There is a slightly different setup on the LCD screen for this option in the Live View shooting mode ( ![]() ) when you are shooting video. You have additional options, such as Movie recording quality and frame rate (the flash control option is not available because you cannot use flash while shooting video). The Creative Zone modes have a few more options than the Basic Zone modes, such as white balance and Picture Style.
) when you are shooting video. You have additional options, such as Movie recording quality and frame rate (the flash control option is not available because you cannot use flash while shooting video). The Creative Zone modes have a few more options than the Basic Zone modes, such as white balance and Picture Style.
Shooting Video
A great advance in dSLR camera technology is the option to shoot video, and your Canon T5i/700D is no exception. It has high-definition (HD) capabilities that give you the power to create high-quality videos. However, it is important to understand both the limitations and the advantages of shooting video with a dSLR camera. One thing to consider is that a dSLR is not designed to be a movie camera.
If you are serious about creating video with your camera, you might want to consider investing in accessories that will help you operate the T5i at peak performance, such as a screen loupe, external microphones, lights, and steady support brackets to prevent camera shake. Don’t forget the necessary ingredients of a good video: Steady images, quality sound, well-thought-out scene development, and editing. All of these are necessary to create quality productions. The same applies to home productions of events with family and friends.

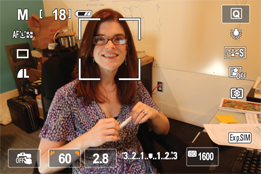
8.6 A frame from a video shot with the Canon Rebel T5i/700D. Exposure: ISO 400, f/5.6, 1/1000 second, 50mm f/1.4 lens.
One of the biggest advantages of using a dSLR rather than a traditional video camera is the lower cost. Additionally, many dSLRs offer higher-quality results, with higher sensitivity and less noise. One of my favorite advantages is the ability to change the lens. The traditional consumer video camera may have a zoom lens, but you are stuck with the one that is attached. A Canon dSLR can use any Canon E-series lens. The option to attach a lens, like a 50mm f/1.4, which creates a cinematic style with a shallow depth of field, is popular with still photographers. The ability to add a macro or tilt-shift lens is a wonderful advantage to traditional video cameras.
For more information about lenses, see Chapter 4.
Shooting video requires a different mind-set from creating still photographs. When you photograph stills, your goal is to capture the decisive moment. When you shoot video, you are capturing multiple moments, and all of these should tell a story with a beginning, a middle, and an end. Most experts recommend that you avoid the automatic settings when creating a video. Manual settings allow you to maintain control over your equipment and the look of your video. Automatic modes and settings that adjust in the middle of a scene distract the viewer, and make your video look unprofessional.
Your camera’s video shooting feature is great for everyday shooting. If your goal is to create a longer, edited video, make sure that you have lots of extra footage before and after each scene. In other words, don’t shoot video clips less than 10 seconds long unless you have a good reason. Make sure that you take at least 15 to 20 seconds of video before and after a scene to give yourself room for editing.
The two microphones built into your camera are very basic. They pick up camera noise because they are part of the camera body. They are not bad for a quick family-and-friends clip. If, however, you plan to shoot a lot of video, buy an external microphone. You can even use a completely external recording device, such as a digital audio recorder, to replace your camera’s sound. I recommend keeping the internal microphones on if you use an external microphone and recording device because this makes it much easier to match the sound during editing. The more you can do while shooting to make your editing easier, the happier you will be in the end. Preparation and planning in advance the style of video you want to create is very important — even for family videos.
If you like to shoot with autofocus, you might want to consider Canon’s STM lenses. They are designed to be quiet while continuously focusing in Movie Servo AF mode ( ![]() ). Whatever lens you use, remember that shooting video, just like shooting still photos, requires good-quality lenses.
). Whatever lens you use, remember that shooting video, just like shooting still photos, requires good-quality lenses.

Image courtesy of Canon
8.7 The Canon 40mm STM lens is designed to shoot video.
Setting up for a video shoot
Preparation is an important part of shooting successful video. Take the time to plan, even if it is just a few moments before you press the record movie button (which is the Live View shooting button ![]() ). Think about your goal and what you want to accomplish. Are you documenting family memories? Are you telling the story of a company or recording a testimonial video for the Web? Remember that planning makes the editing process easier.
). Think about your goal and what you want to accomplish. Are you documenting family memories? Are you telling the story of a company or recording a testimonial video for the Web? Remember that planning makes the editing process easier.
What type of scene are you shooting? This is a good question to ask when making setup decisions, such as selecting the aperture. You have a wonderful advantage with a dSLR because you have a selection of multiple lenses, some of which generate a very shallow depth of field and offer a cinematic effect, as covered earlier. If your scene involves a person, shallow depth of field is the perfect choice. If you are panning over a beautiful landscape, a large depth of field is considered the better option.
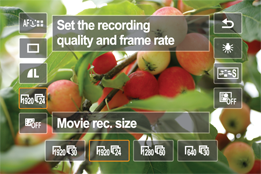
You must also decide what size file you want to use. I recommend you use the largest one available. You can always downsize later, but you cannot increase the size of your movie files without losing quality. To select the video recording size, look in the Movie shooting menu 2 ( ![]() ). Two of the three options (1920 and 1280) are high definition (HD) and shoot in a 16:9 aspect ratio. The smallest of the three is shot at 4:3. You also have the options of shutter speed and film rate, which are discussed later in this chapter. Are you going to use the manual modes, as many professionals recommend? Do you plan to rely on the incredible technology your camera has to offer, such as the Scene Intelligent Auto (
). Two of the three options (1920 and 1280) are high definition (HD) and shoot in a 16:9 aspect ratio. The smallest of the three is shot at 4:3. You also have the options of shutter speed and film rate, which are discussed later in this chapter. Are you going to use the manual modes, as many professionals recommend? Do you plan to rely on the incredible technology your camera has to offer, such as the Scene Intelligent Auto ( ![]() ) and Movie Servo AF (
) and Movie Servo AF ( ![]() ) modes, and the AF tracking methods?
) modes, and the AF tracking methods?
Picture Styles work for videos, too. If you keep the Picture Style ( ![]() ) on auto, the camera picks the best style to suit the scene. All Picture Styles apply the same sharpness, contrast, saturation, and color-tone effects when shooting video that they do for still images. Standard (
) on auto, the camera picks the best style to suit the scene. All Picture Styles apply the same sharpness, contrast, saturation, and color-tone effects when shooting video that they do for still images. Standard ( ![]() ) is a general style that is good for most scenes, while Portrait (
) is a general style that is good for most scenes, while Portrait ( ![]() ) is ideal for accurately capturing skin tones and softening a scene. Landscape (
) is ideal for accurately capturing skin tones and softening a scene. Landscape ( ![]() ) creates sharp images with vivid blues and greens. Neutral (
) creates sharp images with vivid blues and greens. Neutral ( ![]() ), as its name suggests, keeps images natural looking. Faithful (
), as its name suggests, keeps images natural looking. Faithful ( ![]() ) offers accurate color of images captured under light that is less than 5200K. Monochromatic (
) offers accurate color of images captured under light that is less than 5200K. Monochromatic ( ![]() ) is for black-and-white photography. Your user-defined Picture Styles (those that you create) also work when shooting video.
) is for black-and-white photography. Your user-defined Picture Styles (those that you create) also work when shooting video.
There is more to video than shooting visuals. You must also consider how you are going to record the audio and if you plan to edit it. By the time you finish this chapter, you’ll have a better understanding of how to handle the audio and editing portions of video production.
The frame rate
You’re not alone if you are a little confused about frame rate or fps (frames per second) compared to shutter speed. The frame rate is the number of frames captured per second by the camera. The shutter speed is how long that frame is exposed to light. Your camera has two options under Setup menu 2 ( ![]() ) for frames per second: PAL and NTSC standards. PAL is the standard for Europe, while NTSC is the standard in North America. The default setting for your camera is NTSC. You have three further options under each standard. Under NTSC, your options are 24, 30, and 60 fps. PAL options are 24, 25, and 50 fps. All are progressive (or noninterlaced) scanning for both standards. This means that each line of the movie is displayed in order or sequence, rather than every other line, as it is with interlaced scanning.
) for frames per second: PAL and NTSC standards. PAL is the standard for Europe, while NTSC is the standard in North America. The default setting for your camera is NTSC. You have three further options under each standard. Under NTSC, your options are 24, 30, and 60 fps. PAL options are 24, 25, and 50 fps. All are progressive (or noninterlaced) scanning for both standards. This means that each line of the movie is displayed in order or sequence, rather than every other line, as it is with interlaced scanning.
8.8 The recording quality and frame rate options are based on the NTSC standard. You can choose the standard under Setup menu 2.
The following list includes the different frame rates and the types of video recordings for which each is best suited:
• 24 fps 1/50 second. This is the combination used to achieve a classic film look.
• 30 fps 1/60 second. This combination makes your video resemble 35mm film, which is a middle point between classic cinema style and the video look produced using faster shutter speeds.
• 60 fps 1/125 second. If you shoot action or sports, this setting gives you a sharp video. It is especially useful if you plan to use slow motion as part of your video presentation.
Blur is not a bad thing when it comes to video. In fact, blur can give your footage a more natural feel. Faster shutter speeds result in less subject blur from frame to frame. No matter the fps, the shutter speed should be double the frame rate based on what is called the 180-degree rule. Your camera uses a rolling shutter, which means that it doesn’t capture the entire image at the same time. Unfortunately, the result of this type of shutter is the Jell-O effect, which means the video is wobbly or skewed. This effect is the result of quick movement or panning your camera from side to side. The best way to avoid this is to limit fast movements, use a tripod with a smooth head, and pan slowly whenever possible.
When you set the ISO to automatic, the camera chooses the right option for the best exposure. Unfortunately, maximum ISO is not available for video. If you want to expand the ISO to 12800, use Custom Function 2. However, this option is very grainy and not recommended. If Custom Function 3 — Highlight tone priority ( ![]() ) — is set, the range is ISO 200 to ISO 6400.
) — is set, the range is ISO 200 to ISO 6400.
The shutter speed
The shutter speed when shooting video is how long each frame is exposed to light. Slower shutter speeds show more motion through image blur, as shown in Figure 8.9, which lends a more natural feel to your video. Faster shutters speeds are much less fluid, as shown in Figure 8.10, but are valuable for action, such as sports shooting.

8.9 In this video frame, you can see the motion of the water. Exposure: ISO 100, f/16, 1/30 second, 100 mm f/2.8 lens.

8.10 You can see the spray and droplets of the water in this video frame, which was captured at a faster shutter speed. Exposure: ISO 100, f/5.0, 1/500 second, 100 mm f/2.8 lens.
If you plan to use slow motion in your video, a faster shutter speed gives you a crisper image for each frame. To achieve a shallow depth of field, you sometimes have to set a faster shutter speed or lower the ISO to set a lower aperture. Your camera does not let you go below the designated shutter speed set with your frame rate. It’s worth experimenting to find which shutter speed is best for the type of video you are creating.
The combination of shutter speed, aperture, and ISO gives you the proper exposure for your video. You have a lot of latitude with higher ISO options. Although your camera allows up to ISO 6400 for stills and ISO 12800 in Movie mode ( ![]() ), this doesn’t mean that you should use it. Avoid using the higher ISOs if possible because graininess is not as forgiving in video as it is in still photography. The lower the ISO, the better the video.
), this doesn’t mean that you should use it. Avoid using the higher ISOs if possible because graininess is not as forgiving in video as it is in still photography. The lower the ISO, the better the video.
Lighting
Like still photography, video needs proper lighting to work well. However, the approach is a bit different with video. You cannot use the flash to light your subject, so a continuous source of light is the solution. The most common approach is to keep the light flat and even so that unexpected shadows don’t develop while you are shooting your video. If you use more dramatic light, you need to plan for changes in the light as your subject moves or the scene changes, which is a lot of work.
You can use many types of lighting for video. The sun is a good choice, but it can be harsh. Without a diffuser, strong shadows are cast on the opposite side of your subject. Try shooting on a cloudy day for a softer, more even light. When shooting indoors, consider bringing your own light sources rather than depending on the light available in the room.
If you leave your camera on Auto white balance ( ![]() ), it should adjust to the light in your environment or the light that you provide. Auto white balance is not perfect; you may want to consider using a Custom white balance setting (
), it should adjust to the light in your environment or the light that you provide. Auto white balance is not perfect; you may want to consider using a Custom white balance setting ( ![]() ). For example, you may not be satisfied with the color tint, such as a yellowish cast, that you see in the overall environment. To fix this, make sure that you have a white piece of paper to photograph (fill the frame) in the environment in which you are shooting. Next, in Shooting menu 2 (
). For example, you may not be satisfied with the color tint, such as a yellowish cast, that you see in the overall environment. To fix this, make sure that you have a white piece of paper to photograph (fill the frame) in the environment in which you are shooting. Next, in Shooting menu 2 ( ![]() ), select Custom white balance (
), select Custom white balance ( ![]() ). Select the photograph of the white piece of paper, and then press the Setting button (
). Select the photograph of the white piece of paper, and then press the Setting button ( ![]() ). This step ensures that your custom white balance is not based on the light in the room or environment.
). This step ensures that your custom white balance is not based on the light in the room or environment.
For more information on other white balance options, see Chapter 3.
When you are indoors, some of the first considerations should be from where the light is coming and if you have enough light to use lower or higher ISO settings. Bringing your own light source is a good option. You can use almost any light source, such as tungsten, if you balance it using your camera’s Custom white balance setting ( ![]() ). LEDs have become popular on- and off-camera — some even attach directly to your camera’s hot shoe. Fluorescent lights come in a variety of Kelvin temperatures and are often used with softboxes. When you need high or powerful light output, HMI lights are a good choice.
). LEDs have become popular on- and off-camera — some even attach directly to your camera’s hot shoe. Fluorescent lights come in a variety of Kelvin temperatures and are often used with softboxes. When you need high or powerful light output, HMI lights are a good choice.
For more information on lighting, see Chapter 6.
When bouncing flash, remember that the color of paint on a wall will also bounce onto your subject. Therefore, a green wall may not be the most flattering one to use.
Sound
It is often said that the most important part of video is the audio. Viewers will suffer through visual glitches, but bad audio will lose their attention fast. The built-in microphones are on top of the camera, as shown in Figure 8.11. The external microphone terminal is on the left side of your Canon Rebel T5i/700D. The internal microphones pick up all of the noise around you, including camera noise. This is why you should consider using an external microphone when shooting video.

8.11 The microphones on top of your camera are good for casual use.
There are different types of microphones, such as booms, shotguns, and lavaliers, and each is available in various levels of quality and designed for a different use. Price is often an indicator of quality, but it is worth testing a few microphone brands before you decide on one. I recommend purchasing at least one that attaches to the camera’s hot shoe. Microphones that work with your Canon T5i/700D have a 3.5mm-diameter plug.
You can purchase a converter to enable some microphones to fit your camera.
The following are the different types of microphones you should consider using with your camera:
• Boom. This is a direct microphone (unidirectional) attached to a boom, which is a pole. A boom mic is often handheld and extended over the subject.
• Omnidirectional. This all-purpose microphone gathers a wide range of sounds from different directions. The microphones built into your camera are omnidirectional.
• Unidirectional. This is the type of microphone you use when you want to focus on a single sound and minimize ambient noise.
• Handheld. Most often, you see these used by reporters interviewing someone on the street or a person singing onstage. These microphones are either omnidirectional or unidirectional. Unidirectional is best for interviews.
• Shotgun. This is also known as a boom mic because it is often held in the air by a boom. They are good for focused recording (unidirectional).
• Lavalier. You see these small microphones clipped to the clothing of people being interviewed. Also sometimes called lapel microphones, these are good for capturing clean audio from a single source.
Sound is a complex subject with many solutions. Your camera offers a few options for the internal microphones. In the Movie shooting menu 2 ( ![]() ), press the Sound recording option. Notice that the Disable level meter at the bottom of the LCD screen reacts to the sound around you.
), press the Sound recording option. Notice that the Disable level meter at the bottom of the LCD screen reacts to the sound around you.
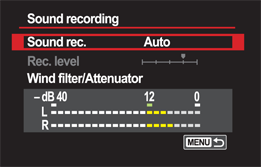
8.12 This is what the Sound recording menu looks like under Movie shooting menu 2.
On this screen, if you are in one of the Basic Zone modes, you can select sound On or Off. If you are in one of the Creative Zone modes, you have the following sound options:
• Sound rec. You have three options under this selection: Auto, Manual, and Disable. Auto adjusts the sound recording level automatically. Manual turns on the next option, Rec level. Disable turns off the camera’s audio recording ability.
• Rec level. Advanced users select the Manual recording option to set the recording to one of 64 levels.
• Wind filter/Attenuator. The wind filter reduces wind noise; it is only available for the internal microphones. The attenuator is recommended if there are very loud sounds in your recording. It works in both Auto and Manual audio settings.
The sound level balance between the right and left built-in microphones cannot be adjusted.
You can add music to your slide shows and videos. To do so, register the music using the EOS utility that comes with your camera. To use this option, the utility must be installed on your computer and your camera must be connected to your computer via USB. Follow these steps:
1. With your camera turned off, connect your computer and camera via USB.
2. Launch your EOS utility and turn on your camera.
3. Click Register Background Music.
4. After registration is complete, disconnect your camera from the computer. The next time that you play a slide show or video, you can turn on the music option, and your selections will be available.
To play your background music for a video, press the Setting button ( ![]() ), press the Background music button (
), press the Background music button ( ![]() ) in the lower-right corner of the LCD screen, and then select your music. To play your background music for a slide show, select the slide show option in Playback menu 2 (
) in the lower-right corner of the LCD screen, and then select your music. To play your background music for a slide show, select the slide show option in Playback menu 2 ( ![]() ). Music options are in the Setup menu (
). Music options are in the Setup menu ( ![]() ) under the Background music option.
) under the Background music option.
In the EOS utility, you are limited to WAV files of up to 29 minutes and 59 seconds. When you register a new list of music, it overwrites the old list.
Choosing a focus mode
Your camera automatically defaults to Movie servo AF mode ( ![]() ) when placed in the Movie shooting mode (
) when placed in the Movie shooting mode ( ![]() ). This means that it continuously focuses until it finds something to focus on, and then it continues to adjust and follows your subject to maintain focus. If you are not using an external microphone, your camera picks up the sound of the lens focusing. Canon offers the STM series of lenses to minimize this problem. You can disable Movie servo AF mode (
). This means that it continuously focuses until it finds something to focus on, and then it continues to adjust and follows your subject to maintain focus. If you are not using an external microphone, your camera picks up the sound of the lens focusing. Canon offers the STM series of lenses to minimize this problem. You can disable Movie servo AF mode ( ![]() ) in the Movie shooting menu 1 (
) in the Movie shooting menu 1 ( ![]() ). When Movie servo AF mode (
). When Movie servo AF mode ( ![]() ) is turned off, your camera reverts to the One-shot autofocus mode (
) is turned off, your camera reverts to the One-shot autofocus mode ( ![]() ). Press the shutter button halfway to focus. Once the focus is locked, it stays fixed until you lift your finger and refocus.
). Press the shutter button halfway to focus. Once the focus is locked, it stays fixed until you lift your finger and refocus.
You can temporarily stop Movie servo AF mode ( ![]() ) by pressing the Auto Exposure Lock button (
) by pressing the Auto Exposure Lock button ( ![]() ) or tapping the AI Servo button (
) or tapping the AI Servo button ( ![]() ) on the lower-left side of the LCD screen.
) on the lower-left side of the LCD screen.
You have three autofocus options available when shooting video. To access the three AF methods, press the Quick Control/Print button ( ![]() ), and then press the top icon on the left side of the LCD touchscreen. Look for the three AF methods of focus displayed at the bottom of the frame. The first option is Face Tracking (
), and then press the top icon on the left side of the LCD touchscreen. Look for the three AF methods of focus displayed at the bottom of the frame. The first option is Face Tracking ( ![]() ), which means that your camera detects faces, and then tracks them to keep your subject in focus while you shoot. If you have more than one face in the frame, the camera selects one. If you want to switch to a different subject, touch it on the LCD screen with your finger. You also can use the Setting button (
), which means that your camera detects faces, and then tracks them to keep your subject in focus while you shoot. If you have more than one face in the frame, the camera selects one. If you want to switch to a different subject, touch it on the LCD screen with your finger. You also can use the Setting button ( ![]() ) to reset the focus to the center of the LCD screen.
) to reset the focus to the center of the LCD screen.
The FlexiZone-multi focusing mode ( ![]() ) uses your camera’s 31 autofocus points to focus on the scene. If you press the Setting button (
) uses your camera’s 31 autofocus points to focus on the scene. If you press the Setting button ( ![]() ) or touch the LCD screen, this AF option divides your screen into nine focus zones. To revert to the larger AF focus area, press the Setting button (
) or touch the LCD screen, this AF option divides your screen into nine focus zones. To revert to the larger AF focus area, press the Setting button ( ![]() ) again.
) again.
The FlexiZone-single focusing mode ( ![]() ) uses the 31 autofocus points individually. In other words, you can select any one of the 31 points to focus on your subject. To do this, press any point on the LCD screen or press the Setting button (
) uses the 31 autofocus points individually. In other words, you can select any one of the 31 points to focus on your subject. To do this, press any point on the LCD screen or press the Setting button ( ![]() ). You can press other points of focus or use the Cross keys (
). You can press other points of focus or use the Cross keys ( ![]() ) to move the focus point.
) to move the focus point.
Even with all of this wonderful technology inside your camera, professionals still recommend using Manual Focus mode ( ![]() ). For everyday shooting, the other options are useful, especially if you are using Canon’s STM lens system. If you purchased a kit lens with your Canon T5i/700D, it is an STM lens. However, when you want more professional-looking videos, Manual Focus mode (
). For everyday shooting, the other options are useful, especially if you are using Canon’s STM lens system. If you purchased a kit lens with your Canon T5i/700D, it is an STM lens. However, when you want more professional-looking videos, Manual Focus mode ( ![]() ) is still a good choice. To switch to Manual Focus mode (
) is still a good choice. To switch to Manual Focus mode ( ![]() ), look on the left side of your lens and flip the switch to Manual.
), look on the left side of your lens and flip the switch to Manual.
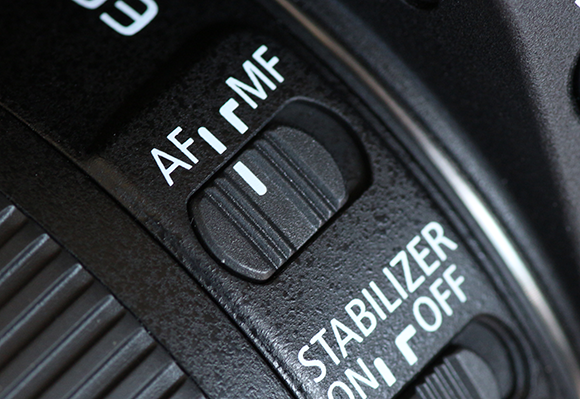
8.13 Flip the switch on your lens to change the focus mode from Autofocus to Manual.
When in Manual Focus mode ( ![]() ), you can use the Magnify button (
), you can use the Magnify button ( ![]() ) to help you focus. However, you cannot magnify while recording.
) to help you focus. However, you cannot magnify while recording.
If your lens is in Manual Focus mode ( ![]() ), the LCD touchscreen does not react to your touch for focus-point adjustments.
), the LCD touchscreen does not react to your touch for focus-point adjustments.
Turn on the grid display found in the Live View shooting menu ( ![]() ) to help balance the composition of your scene. You have two grid display options. One looks like a tic-tac-toe board (nine sections) and the other divides the frame into 24 sections.
) to help balance the composition of your scene. You have two grid display options. One looks like a tic-tac-toe board (nine sections) and the other divides the frame into 24 sections.
Recording video
To turn on the video option, dial the power switch to Movie mode ( ![]() ). When you’re ready to start recording, press the Live View shooting mode button (
). When you’re ready to start recording, press the Live View shooting mode button ( ![]() ) on the back of your camera. If you are shooting family or casual events, handholding your camera and using the built-in microphones is fine (although an external mic is better). Try not to move your camera around too much. Fast movement and swings lead to what is called the Jell-O effect, which is unnatural-looking movement, or wobbly scenes or subjects. Also, too much movement tends to make your viewer seasick. When you are recording, you should always keep your camera horizontal because that is the orientation of televisions and monitors.
) on the back of your camera. If you are shooting family or casual events, handholding your camera and using the built-in microphones is fine (although an external mic is better). Try not to move your camera around too much. Fast movement and swings lead to what is called the Jell-O effect, which is unnatural-looking movement, or wobbly scenes or subjects. Also, too much movement tends to make your viewer seasick. When you are recording, you should always keep your camera horizontal because that is the orientation of televisions and monitors.

8.14 As you can see from this outtake, this video doesn’t work because it was shot at a vertical orientation. Video should always be shot horizontally to match the orientation of TVs and monitors.
The Canon Rebel T5i/700D has some recording limitations. For example, once the file size hits 4GB, the camera automatically creates a new file. The camera also has a video shooting time limit of 29 minutes and 59 seconds, and it stops recording once you reach this limit. Don’t panic — just press the Record button ( ![]() ), and the camera begins recording again, creating a new file. I recommend that you look for a good break in the action at about the 20-minute mark so you can restart your recording. It’s much better than having the camera stop automatically during a peak moment.
), and the camera begins recording again, creating a new file. I recommend that you look for a good break in the action at about the 20-minute mark so you can restart your recording. It’s much better than having the camera stop automatically during a peak moment.
A 16GB memory card can easily hold a full 29 minutes and 59 seconds of recording time.
In the Creative Zone modes, both Aperture-priority AE ( ![]() ) and Shutter-priority AE (
) and Shutter-priority AE ( ![]() ) work the same as the Program AE mode (
) work the same as the Program AE mode ( ![]() ). Manual mode (
). Manual mode ( ![]() ) gives you control over the shutter speed, aperture, and ISO settings. All Basic Zone modes use the Scene Intelligent Auto mode (
) gives you control over the shutter speed, aperture, and ISO settings. All Basic Zone modes use the Scene Intelligent Auto mode ( ![]() ). In the Creative Zone modes, you can use the Auto Exposure Lock button (
). In the Creative Zone modes, you can use the Auto Exposure Lock button ( ![]() ) to lock your exposures. This is helpful to fix your exposure during recording. When shooting, use the Basic Zone exposure setting. An icon appears in the upper-left corner of your screen representing the exposure mode it is using.
) to lock your exposures. This is helpful to fix your exposure during recording. When shooting, use the Basic Zone exposure setting. An icon appears in the upper-left corner of your screen representing the exposure mode it is using.
When you are not recording, you can press the Quick Control/Print button ( ![]() ) to change standard features, such as the frame rate, AF method, image quality, and so on, but you cannot use it while recording. You can make a few adjustments (depending on the mode you are using), such as turning Movie servo AF (
) to change standard features, such as the frame rate, AF method, image quality, and so on, but you cannot use it while recording. You can make a few adjustments (depending on the mode you are using), such as turning Movie servo AF ( ![]() ) on or off, or adjusting the shutter speed, aperture, and ISO settings via the touch controls at the bottom of the LCD screen. If you don’t see the options, press the Info button (
) on or off, or adjusting the shutter speed, aperture, and ISO settings via the touch controls at the bottom of the LCD screen. If you don’t see the options, press the Info button ( ![]() ). Maintaining consistency is important while you are recording. Make sure that you leave room for editing, keep your movements slow and smooth, and avoid making adjustments during recording. Professionals recommend that you use the Manual settings; changing options while shooting distracts the viewer and makes your video look inconsistent and unprofessional.
). Maintaining consistency is important while you are recording. Make sure that you leave room for editing, keep your movements slow and smooth, and avoid making adjustments during recording. Professionals recommend that you use the Manual settings; changing options while shooting distracts the viewer and makes your video look inconsistent and unprofessional.
While shooting video, you can still take photographs by pressing the shutter button. It is important to note that if you are using your camera’s internal microphones, camera noise will be picked up. When you take a photograph, the Live View shooting mode ( ![]() ) is turned off and the video is delayed or interrupted for up to 1 second. Once you see the Live View screen again, the camera has resumed shooting video. The video and photo are saved as separate files. When it comes to focusing during a video shoot, it is important to check and recheck. This is especially true when you shoot in Manual mode (
) is turned off and the video is delayed or interrupted for up to 1 second. Once you see the Live View screen again, the camera has resumed shooting video. The video and photo are saved as separate files. When it comes to focusing during a video shoot, it is important to check and recheck. This is especially true when you shoot in Manual mode ( ![]() ) or with a shallow depth of field because you never know if your subject is moving out of your focal range.
) or with a shallow depth of field because you never know if your subject is moving out of your focal range.
Creating video snapshots
Your camera has the ability to capture short video clips for 2-, 4-, and 8-second sessions, and then place them in a video snapshot album. Ultimately, all of the clips you record are combined into one longer clip (a single movie file). When you play the album, the clips play in the order of creation. This is a nice option when you are photographing events. You should note, however, that there are a number of limitations when using this option. For example, you can only combine video clips of the same length. If you turn off your camera, a new file is created and starts a new album, so plan accordingly. You can review a clip before deciding to keep it or delete it from your album.

8.15 The Video snapshot Save options.
To create an album while in Movie shooting mode ( ![]() ), look in Movie shooting menu 2 (
), look in Movie shooting menu 2 ( ![]() ) and select Enable. You then have two additional options: Use the current album file, or create a new one. The next option is to determine how long you want your clips to be. Once you engage this option, all of the videos you shoot are limited to the time selected. A blue bar appears on the LCD screen, and it counts down how many seconds you have left while shooting your movie. When you finish using this mode, disable it to return to the standard recording functions. Press the Playback button (
) and select Enable. You then have two additional options: Use the current album file, or create a new one. The next option is to determine how long you want your clips to be. Once you engage this option, all of the videos you shoot are limited to the time selected. A blue bar appears on the LCD screen, and it counts down how many seconds you have left while shooting your movie. When you finish using this mode, disable it to return to the standard recording functions. Press the Playback button ( ![]() ) to view your movie.
) to view your movie.
Once you create a video snapshot album, you cannot add new video clips to previous albums in the camera.
Equipment
Support equipment is important to turn your dSLR into a serious video camera. Lights, lenses, microphones, a good tripod, and focusing aides help make your videos appear more professional. The following is a list of equipment you should consider purchasing if you plan to shoot serious video:
• Color meter. This is a useful tool when you are shooting different scenes in various lighting conditions. It measures the Kelvin temperature of the light in your scene so that you can accurately correct the white balance. It also helps flow each scene together by preventing obvious color shifts that may distract the viewer.
• Microphone. As covered earlier in this chapter, microphones are an important investment when it comes to video. The type that you purchase depends on your needs. An omnidirectional microphone captures the sound all around it, while a unidirectional mic focuses where it picks up sound.
• Neutral density (ND) filters. If you want to take advantage of slow shutter speeds and shallow depth of field, you can achieve this with neutral density (ND) filters. They limit the amount of light coming into your camera without altering color, which helps maintain the desired exposure in bright environments that would otherwise require faster shutter speeds and larger aperture settings.
• Lenses. If you are interested in lenses designed specifically for video, Canon offers the STM series. They are quieter than traditional lenses, reducing the amount of camera noise picked up by the internal microphones. Lenses with stabilization features are also worth your consideration because they can add a shutter speed the equivalent of up to 4 stops faster and prevent any unwanted camera shake.
• Lights. LEDs are popular with dSLR photographers shooting at close range. Daylight-balanced fluorescents are also a good, all-purpose solution. HMI lights are ideal when you need powerful lights.
• Loupe. This can help you check the camera’s focus, and it is important that you continuously do so, especially if you are using the Manual Focus option ( ![]() ). A full LCD screen cover loupe or viewfinder is also helpful outdoors because bright sunlight often makes it tough to see the LCD screen clearly. You can also press the Magnify button (
). A full LCD screen cover loupe or viewfinder is also helpful outdoors because bright sunlight often makes it tough to see the LCD screen clearly. You can also press the Magnify button ( ![]() ) to see details of your scene or image without a loupe.
) to see details of your scene or image without a loupe.
• Audio recorder. A secondary audio recorder is highly recommended if you need high-quality sound. Make sure that you have a good set of headphones, too.
• Support. When you handhold your camera, keeping it steady is important. Many companies make different types of brackets or support rigs that attach to you to keep the camera steady, even while you are moving.
• Tripod. A good tripod is one of the most important pieces of equipment you can buy for your camera — especially for shooting video. The head should be fluid and move the camera without jerking it.
• Bag. Consider purchasing a good utility bag or belt to keep everything handy when you are on the move.
The Movie mode ( ![]() ) uses a lot of power and drains batteries more quickly than still photography, so make sure that you always carry extras. Video also takes up a lot of space on memory cards. I recommend that you always have a few backups, and purchase at least one fast (at least class 6), high-quality 16GB memory card.
) uses a lot of power and drains batteries more quickly than still photography, so make sure that you always carry extras. Video also takes up a lot of space on memory cards. I recommend that you always have a few backups, and purchase at least one fast (at least class 6), high-quality 16GB memory card.
Types of video
There are many ways to approach shooting a video. Before you do anything, think about the type of video that you are going to create and where you are going to use it. Some videos, like a family event, are simple because you can keep all of the camera’s settings on automatic. If you plan to share your video only online, you might want to consider a smaller movie size. As you become more comfortable and begin shooting more complex videos, you may decide that manual settings are the right option.
The following is a list of a few types of videos you can shoot:
• Testimonials. Let your clients do the talking. Businesses upload videos of their clients singing their praises to YouTube or Vimeo to share on their website or social media. These videos are rarely more than 2 minutes long, and, in most cases, less than a minute is ideal. Make sure that you use a tripod and flattering lighting. You don’t want to make your good client look bad. Ask your clients to share who they are and why they like working with you. Record the testimonial a few times until you are both satisfied with the results.
• Business videos. In general, these videos tell a company’s story. You need to let people know what the business is and why they should use it. A person standing in front of the camera talking for 15 minutes doesn’t accomplish this very well. Show people what the person is talking about. This involves capturing and editing in some b-roll detail segments of the company. B-roll is additional video that supports the main video with details, behind-the-scenes footage, or examples of what the subject is talking about. Successful business videos are often entertaining and funny.
• Demonstrations. Sometimes, it’s easier to show people how to do something rather than tell them. Video is a great way to share your knowledge and expertise.

8.16 A sample frame from a demonstration video created with the Canon Rebel T5i/700D. Exposure: ISO 400, f/4.5, 1/50 second, 50mm f/1.4 lens.
• Sports and action videos. This type of photography requires longer lenses, faster shutter speeds (over 1/125 second), a great eye, and timing. You must anticipate what is going to happen, which requires a deep understanding of your subject.
• Documentaries. This type of moviemaking has been helped greatly by dSLRs with video. It has made recording video available to people of all skill levels, giving many a voice to tell a story. Some are personal, and others are related to a cause they want to share with the world. When creating your documentary, it is important to follow the professional rules of good moviemaking. Use the manual settings, and make sure that your camera is steady and that you have good audio.
Tips for Shooting Video
Pascal Depuhl, who has travelled as far as Afghanistan for his video projects, has a few tips to help you create better videos:
• Think about movement. Consider all the things that can move during the video-shooting process, such as your camera’s position, the subject, and the focus. Think about how you can synchronize with your subject and the choreography of the scene in front of you.
• Use a good tripod. Avoiding camera shake is an important part of creating good video. If your video is too bouncy, it can make your viewers sick. Your tripod should have a fluid, movable head to help avoid jerky motions.
• Use lenses with Image Stabilization. This is helpful to keep your images sharp when handholding your camera.
• Pay attention to sound. Half of the story you are telling is in the sound. People will accept poor video quality if the audio is good but not vice versa.
• Shoot from multiple angles. Don’t shoot an entire video from a static location — move around. You will appreciate the variety in the editing process.
• Touch the camera as little as possible. You can use a video rig, to keep the camera steady, and build your equipment around it.
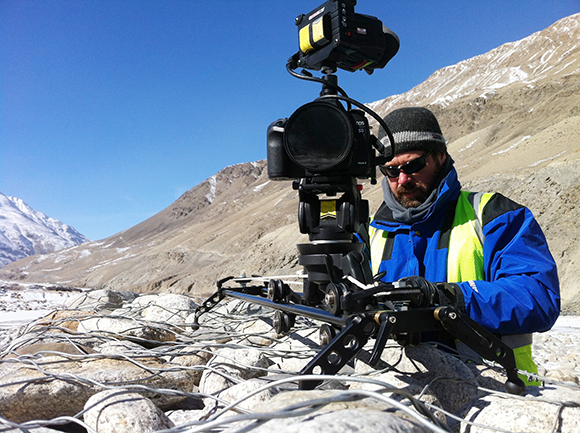
Image courtesy of Pascal Depuhl
Pascal Depuhl is a still photographer and videographer from Florida. His most recent film work is the acclaimed documentary, On Wings of Hope. You can view Pascal’s photography work at: http://blog.depuhl.com, and his recent video projects at: http://movies.depuhl.com.