
Chapter 3: Basic OS X Housekeeping
In This Chapter
![]() Copying, moving, and duplicating files
Copying, moving, and duplicating files
![]() Deleting and recovering files
Deleting and recovering files
![]() Renaming files
Renaming files
![]() Finding specific files
Finding specific files
![]() Locking files
Locking files
![]() Using Apple menu commands
Using Apple menu commands
![]() Using Services, the Go menu, and menu icons
Using Services, the Go menu, and menu icons
![]() Listening to audio discs and recording data discs
Listening to audio discs and recording data discs
![]() Printing within OS X applications
Printing within OS X applications
After you master basic Mac spell-casting — things like selecting items, using menus, opening and saving documents, working with windows, and launching an application or two — it’s time to delve deeper into OS X.
In this chapter, I discuss file management, showing you the hidden power behind the friendly Apple menu (![]() ). I also discuss some of the more advanced menu commands, how to print within most applications, and how to listen to an audio CD on your Mac. (It makes a doggone good stereo, especially with a good set of external speakers.) Finally, I introduce you to the built-in CD/DVD recording features within the Big X and how to add a standard USB printer to your system.
). I also discuss some of the more advanced menu commands, how to print within most applications, and how to listen to an audio CD on your Mac. (It makes a doggone good stereo, especially with a good set of external speakers.) Finally, I introduce you to the built-in CD/DVD recording features within the Big X and how to add a standard USB printer to your system.
The Finder: It’s the Wind beneath Your Wings
So what exactly is the Finder anyway? It’s a rather nebulous term, but in essence, the Finder gives OS X the basic functions that you’ll use for the procedures I outline in this chapter. This über-OS has been around in one guise or another since the days of System 6 — the creaking old days when a Mac was an all-in-one computer with a built-in screen. Come to think of it, some things never change (as I glance at my iMac).
The Finder is always running, so it’s always available — and you can always switch to it, even when several other applications are open and chugging away. Figure 3-1 illustrates the Dock with the rather perspective-crazy Finder icon at the far left side.
Figure 3-1: The Finder is always there, supporting you with a unique smile.

Is that icon supposed to be one face or two faces? I’m still confused, and I’ve been using the Mac now since 1989.
 Don’t forget that OS X gives you a second method of doing everything I cover in this chapter: You can use Terminal to uncover the text-based Unix core of OS X, employing your blazing typing speed to take care of things from the command line. Of course, that’s not the focus of this book, but for those who want to boldly go where no Mac operating system has gone before, you’ll find more in Book VIII, Chapter 2. Despite what you might have been led to believe, power and amazing speed are to be found in character-based computing.
Copying and Moving Files and Folders
Here’s where drag-and-drop makes things about as easy as computing can get:
![]() To copy a file or folder from one window to another location on the same drive: Hold down the Option key and click and drag the icon from its current home to the new location. (Note: You can drop files and folders on top of other folders, which puts the copy inside that folder.) If you’re copying multiple items, select them first (read how in Book I, Chapter 2) and then drag and drop the entire crew.
To copy a file or folder from one window to another location on the same drive: Hold down the Option key and click and drag the icon from its current home to the new location. (Note: You can drop files and folders on top of other folders, which puts the copy inside that folder.) If you’re copying multiple items, select them first (read how in Book I, Chapter 2) and then drag and drop the entire crew.
 “Is the Desktop a valid target location for a file or folder?” You’re darn tootin’! I recommend, though, that you avoid cluttering your Desktop with no more than a handful of files. Instead, create a folder or two on your Desktop and then store those items within those folders. If you work with the contents of a specific folder often, drag it into the Favorites heading in the Sidebar (the column at the left side of any Finder window), and you can open that folder from the Finder with a single click — no matter where you are! (Alternatively, drag the folder to the right side of the Dock and drop it there, and you can open it with a single click from anywhere.)
![]() To copy items from one window to a location on another drive: Click and drag the icon from the window to a window displaying the contents of the target drive. Or, in the spirit of drag-and-drop, you can simply drag the items to the drive icon, which places them in the root folder of that drive.
To copy items from one window to a location on another drive: Click and drag the icon from the window to a window displaying the contents of the target drive. Or, in the spirit of drag-and-drop, you can simply drag the items to the drive icon, which places them in the root folder of that drive.
![]() To move items from one window to another location on the same drive: Simply drag the icon to the new location, whether it be a window or a folder. (To move items to a different drive, hold down the
To move items from one window to another location on the same drive: Simply drag the icon to the new location, whether it be a window or a folder. (To move items to a different drive, hold down the ![]() key while dragging.)
key while dragging.)
OS X provides you with a number of visual cues to let you know what’s being copied or moved. For example, dragging one or more items displays a ghost image of the items. When you’ve positioned the mouse pointer over the target, OS X highlights that location to let you know that you’re in the zone. If you’re moving or copying items into another Finder window, the window border is highlighted to let you know that OS X understands the game plan.
In case you move the wrong thing or you port it to the wrong location, press ![]() +Z to undo the previous action.
+Z to undo the previous action.
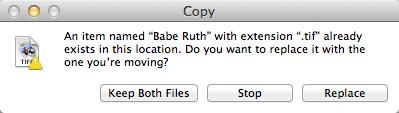
If the item that you’re dragging already exists in the target location, you get a confirmation dialog like the one you see in Figure 3-2. You can choose to replace the file, leave the existing file alone, keep both files, or stop the entire shooting match. (If you decide to keep both, OS X appends a numeric string to the new arrival’s filename.)
Figure 3-2: To replace or not to replace — the choice is yours.
Cloning Your Items — It’s Happening Now!
No need for sci-fi equipment or billions in cash — you can create an exact duplicate of any item within the same folder. This is often handy when you need a simple backup of the same file in the same folder or when you’re going to edit a document but you want to keep the original intact.
Click the item to select it and then choose File⇒Duplicate (or use the keyboard shortcut and press ![]() +D). To distinguish the duplicate from the original, OS X adds the word copy to the end of the duplicate’s icon name; additional copies have a number added to the name as well.
+D). To distinguish the duplicate from the original, OS X adds the word copy to the end of the duplicate’s icon name; additional copies have a number added to the name as well.
Alternatively, drag-and-drop aficionados can hold down the Option key and drag the original item to another spot in the same window. When you release the button, the duplicate appears.
Heck, if you prefer the mouse (or trackpad), you can right-click the item and then choose Duplicate from the contextual menu that appears. Decisions, decisions. . . .
Oh, and don’t forget that Action button (it looks like a little gear with a downward-pointing arrow) on the Finder toolbar (refer to Figure 3-1). You can also click the Action button and choose Duplicate from the pop-up menu.
When you duplicate a folder, OS X automatically duplicates all the contents of the folder as well. Remember that this could take some time if the folder contains a large number of small files (or a small number of large files). Groucho would’ve loved computers!
Deleting That Which Should Not Be
Even Leonardo da Vinci made the occasional design mistake. No doubt, his trash can was likely full of bunched-up pieces of parchment. Luckily, no trees will be wasted when you decide to toss your unneeded files and folders; this section shows you how to delete items from your system.
By the way, as you’ll soon witness for yourself, moving items to the Trash doesn’t necessarily mean that they’re immediately history.
Dragging unruly files against their will
In OS X, the familiar Trash can (a spiffy-looking wire can) appears on the right edge of the Dock. (Did you expect anything less from Mountain Lion?) You can click and drag the items that you’ve selected to the Trash and drop them on top of the wire can icon to delete them. When the Trash contains at least one item, the wire can icon changes to appear as if it were full of trash.
You can also add a Delete icon to your Finder toolbar. For all the details, see Book II, Chapter 1.
Deleting with the menus and the keyboard
The mouse isn’t the only option when deleting items. Your other options for scrapping selected files include
![]() Choosing File from the Finder menu and choosing the Move to Trash menu item
Choosing File from the Finder menu and choosing the Move to Trash menu item
![]() Pressing the
Pressing the ![]() +Delete keyboard shortcut
+Delete keyboard shortcut
![]() Clicking the Action button on the Finder toolbar and choosing Move to Trash from the pop-up menu
Clicking the Action button on the Finder toolbar and choosing Move to Trash from the pop-up menu
![]() Right-clicking the item to display the contextual menu and then choosing Move to Trash from that menu
Right-clicking the item to display the contextual menu and then choosing Move to Trash from that menu
Emptying That Wastepaper Basket
As I mention earlier, moving items from your Mac’s hard drive to the Trash doesn’t actually delete them immediately from your system. Believe me, this fail-safe measure comes in handy when you’ve been banging away at the keyboard for several hours and you stop paying close attention to what you’re doing. (I usually also blame lack of Diet Coke.) More on how to rescue files from the Trash in the next section.
 As you can with any folder, you can check the contents of the Trash by clicking its icon on the Dock.
After you double-check the Trash contents and you’re indeed absolutely sure that you want to delete its contents, use one of the following methods to nuke the digital Bit Bucket:
![]() If the contents of the Trash are still displayed in a Finder window, click the Empty button at the upper right of the window.
If the contents of the Trash are still displayed in a Finder window, click the Empty button at the upper right of the window.
![]() Choose the Empty Trash menu item from the Finder menu.
Choose the Empty Trash menu item from the Finder menu.
![]() Choose Secure Empty Trash from the Finder menu.
Choose Secure Empty Trash from the Finder menu.
Believe it or not, if you use the standard Empty Trash command, you still haven’t completely zapped that refuse! Some third-party hard drive repair and recovery programs will allow an uncool person to restore items from the Trash. Comparatively, use the Secure Empty Trash method for those sensitive files and folders that you want to immediately and irrevocably delete. The data is overwritten with random characters, making it impossible to recover without resorting to your backup. (A great idea for that Mac you want to sell on eBay, no? In fact, if you like, you can reinstall OS X before you ship the Mac, leaving the Setup Assistant ready-to-run for the new owner.)
![]() Press the
Press the ![]() +Shift+Delete keyboard shortcut.
+Shift+Delete keyboard shortcut.
![]() Click the Trash icon on the Dock, hold down the mouse button, and choose Empty Trash from the menu that appears.
Click the Trash icon on the Dock, hold down the mouse button, and choose Empty Trash from the menu that appears.
![]() Right-click the Trash icon on the Dock and then choose Empty Trash from the contextual menu that appears.
Right-click the Trash icon on the Dock and then choose Empty Trash from the contextual menu that appears.
Depending on the method you select and the settings you choose in System Preferences (which I cover in Book II, Chapter 3), OS X might present you with a confirmation dialog to make sure that you actually want the Trash emptied.
Wait! I Need That After All!
In the adrenaline-inducing event that you need to rescue something that shouldn’t have ended up in the scrap pile, first click the Trash icon on the Dock to display the contents of the Trash. Then rescue the items that you want to save by dragging them to the Desktop or a folder on your hard drive. (This is roughly analogous to rescuing your old baseball glove from the family garage sale.)
Feel free to gloat. If someone else is nearby, ask her to pat you on the back and call you a lifesaver.
Renaming Your Items
You wouldn’t get far in today’s spacious virtual world without being able to change a moniker for a file or folder. To rename an item in OS X, use one of these methods:
![]() With the mouse or trackpad: Click once on an icon’s name to highlight it, and then click the name again or press Return. OS X highlights the text in an edit box. Type the new name and then press Return when you’re done.
With the mouse or trackpad: Click once on an icon’s name to highlight it, and then click the name again or press Return. OS X highlights the text in an edit box. Type the new name and then press Return when you’re done.
You want to wait a few seconds between clicks, as opposed to doing a rapid-fire double-click.
![]() From the Info dialog: Select the item and press
From the Info dialog: Select the item and press ![]() +I to display the Info dialog; then click the triangle next to Name & Extension. Click in the name field, drag the mouse to highlight the text that you want to change, and type the replacement text.
+I to display the Info dialog; then click the triangle next to Name & Extension. Click in the name field, drag the mouse to highlight the text that you want to change, and type the replacement text.
Naturally, the first method is the easiest, and it’s the one that I use most often.
Adding a Dash of Color
In Mountain Lion, you can color-code files and folders to help you organize and recognize your data in a hurry. For example, why not assign the green label color to the files and folders that make up your current project? Or, if you need to mark a file for immediate attention, assign it the red label color.
To assign a label color to selected files and folders, you have three options:
![]() Click the Action button on the Finder toolbar and then click the desired color.
Click the Action button on the Finder toolbar and then click the desired color.
![]() Right-click the selection and then choose the color from the pop-up menu.
Right-click the selection and then choose the color from the pop-up menu.
![]() From the File menu, choose that perfect shade from the menu.
From the File menu, choose that perfect shade from the menu.
Displaying the Facts on Files and Folders
The Finder’s Info dialog is the place to view the specifics on any highlighted item (including drives and aliases). Select an item and press ![]() +I, click the Action toolbar button and then select Get Info from the menu; right-click the item and choose Get Info; or open the Finder’s File menu and then choose Get Info. (See the results in Figure 3-3.) If you select more than one item (up to ten items), Mountain Lion opens a separate Info dialog for each item.
+I, click the Action toolbar button and then select Get Info from the menu; right-click the item and choose Get Info; or open the Finder’s File menu and then choose Get Info. (See the results in Figure 3-3.) If you select more than one item (up to ten items), Mountain Lion opens a separate Info dialog for each item.
You can also show an Info dialog that summarizes multiple items, and this is A Good Thing if you need to see the total size for several files or folders. To display the Summary Info dialog, select the desired items, hold down the Control key, and choose File⇒Get Summary Info. (Yep, in case you were wondering, some of the items on the File menu do change when you hold down Control. Display the File menu and try it yourself!)
Figure 3-3: The General information panel appears first when you display the Info dialog.

There’s yet another species of the Info dialog: the Inspector dialog displays the same data as the Summary Info dialog, but it’s automatically updated when you click a different file or folder! (This is a great convenience if you’re checking the information on a number of separate items in different locations on your MacBook.) To display the Inspector dialog, press ![]() +Option+I.
+Option+I.
OS X displays the General information panel when you first open the Info dialog, but other panels are usually available (depending on the type of selected items).
For most types of files and folders, the Info dialog can tell you
![]() Kind: What type of item it is — for example, whether it’s a file, folder, drive, or alias
Kind: What type of item it is — for example, whether it’s a file, folder, drive, or alias
![]() Open With: What program launches automatically when you open the selected item
Open With: What program launches automatically when you open the selected item
![]() Size: The total size of the item (or items, if there are more than ten) that you select
Size: The total size of the item (or items, if there are more than ten) that you select
![]() Where: The path on your hard drive where the item is located
Where: The path on your hard drive where the item is located
![]() Dates: When the item was created and was last modified
Dates: When the item was created and was last modified
![]() Version: The application version number
Version: The application version number
![]() Name & Extension: The file’s name and extension
Name & Extension: The file’s name and extension
![]() Sharing & Permissions: The privileges that control who can do what to the file (more on this later, in Book II, Chapter 6) and whether a file is locked in read-only mode
Sharing & Permissions: The privileges that control who can do what to the file (more on this later, in Book II, Chapter 6) and whether a file is locked in read-only mode
Some of this information you can change, and some can only be displayed. To banish the Info dialog from your Desktop, click the dialog’s Close button.
You can hide or display various parts of the Info dialog by clicking the triangles next to each section heading.
For the rest of this section, I describe a number of tasks that you can accomplish from the Info dialog.
If you use a specific document over and over as a basis for different revisions, you can enable the Stationery Pad check box on the General information panel to use the file as stationery. Opening a stationery file automatically creates a new, untitled version of the file in the linked application, which can save you steps compared with duplicating the file.
Adding Spotlight comments
OS X provides you with a Spotlight Comments field in the Info and Inspector dialogs, where you can add additional text that’s stored along with the file (and can be matched with Spotlight). I use this feature to record the version number of manuscript chapters and programs that I create during the course of writing books.
To add a comment, follow these steps:
1. Display the Info dialog for the item by pressing ![]() +I or choosing File⇒Get Info.
+I or choosing File⇒Get Info.
2. Click in the Spotlight Comments box and type the comment text.
If you need to expand the Spotlight Comments section of the Info dialog, click the triangle next to the Spotlight Comments heading. The arrow rotates, and the Spotlight Comments box appears.
3. Close the Info dialog to save the comment.
Displaying file extensions
File extensions are alien creatures to most Mac owners. However, these (usually) three- or four-character add-ons that follow a period at the end of a filename have been a mainstay in character-based operating systems like Unix for years. A file extension identifies what program owns a specific file, and therefore which application launches automatically when you double-click that file’s icon. Examples of common extensions (and the applications that own them) include
![]()
.pdf: Preview, or Adobe Acrobat
![]()
.doc or .docx: Microsoft Word
![]()
.pages: Apple Pages
![]()
.key: Apple Keynote
![]()
.psd: Adobe Photoshop or Photoshop Elements
![]()
.jpeg or .jpg: Preview, or your image editor
![]()
.tiff or .tif: Preview, or your image editor
![]()
.htm or .html: Safari, or your web browser of choice
Why would someone want to see a file’s extension? It comes in handy when a number of different types of files are linked to the same application. For example, both JPEG and TIFF images are displayed as thumbnails in a Finder window, so it’s sometimes very hard to tell one from the other. With extensions displayed, it’s easy to tell what type of file you’re looking at.
Follow this procedure to hide or display extensions with your filenames:
1. Display the Info dialog for the item by pressing ![]() +I or choosing File⇒Get Info.
+I or choosing File⇒Get Info.
2. If you need to expand the Name & Extension section of the Info dialog, click the triangle next to the Name & Extension heading.
3. To display the extension for the selected file, clear the Hide Extension check box to disable it.
4. Close the Info dialog to save your changes.
Choosing the application with which to launch a file
So what’s the plan if the wrong application launches when you double-click a file? Not a problem: You can also change the linked application from the Info dialog as well. (I told you this was a handy toybox, didn’t I?) Follow these steps to choose another application to pair with a selected file:
1. Click the Action button on the Finder toolbar and then click Get Info to display the Info dialog for the item.
2. Click the triangle next to the Open With heading to expand it.
3. Click the pop-up menu button.
OS X displays the applications that it feels are best suited to open this type of document.
4. Select the application that should open the file.
To go completely hog-wild and choose a different application, select Other from the Open With pop-up menu. OS X displays a Choose Other Application dialog, where you can navigate to and select the application you want. (If the application isn’t recognized as recommended, open the Enable pop-up menu and choose All Applications.) After you highlight the application, select the Always Open With check box and click the Add button.
If you don’t have an application that can open a specific file type, you can also opt to search the App Store for an application you can purchase to open it. Just choose App Store from the Open With pop-up menu. (A sometimes pricey option, of course, but certainly convenient!)
5. To globally update all the documents of the same type to launch the application that you chose, click the Change All button.
OS X displays a confirmation dialog asking whether you’re sure about making this drastic change. Click Continue to update the other files of the same type or click Cancel to return to the Info dialog.
6. Close the Info dialog to save your changes.
Locking files against evildoers
“Holy Item Insurance, Batman!” That’s right, Boy Wonder: Before I leave the friendly land of the Info dialog, every Mac owner needs to know how to protect files and folders from accidental deletion or editing. By locking a file, you allow it to be opened and copied — but not changed, renamed, or sent to the Trash. Locked items appear in the Finder with a small padlock attached to the icon.
To lock or unlock a file, you have to have ownership of the file. I cover privileges in Book II, but on a Mac where you’ve configured only one administrator account, you should already have ownership.
 If you’re considering changing the ownership of a system-owned file, don’t do it. You could throw a serious monkey wrench into your Mountain Lion system.
To lock a file, follow this procedure:
1. Display the Info dialog for the item.
2. Select the Locked check box.
Find the Locked check box in the General section of the dialog. Refer to Figure 3-3.
3. Close the Info dialog to save your changes.
Creating an Alias
I mention aliases in Book I, Chapter 2. As I discuss in that chapter, an alias acts as a link to an application or document that actually exists elsewhere on your system (a handy trick to use when organizing items on your hard drive). You have a number of different ways to conjure an alias after you select an item:
![]() From the Finder menu, choose File⇒Make Alias. You have to move the alias yourself.
From the Finder menu, choose File⇒Make Alias. You have to move the alias yourself.
![]() Press the
Press the ![]() +L keyboard shortcut. Again, you have to move the new alias to its new location.
+L keyboard shortcut. Again, you have to move the new alias to its new location.
![]() Click the Action button on the Finder toolbar and then click Make Alias.
Click the Action button on the Finder toolbar and then click Make Alias.
![]() Right-click the selected item and then choose Make Alias from the contextual menu that appears.
Right-click the selected item and then choose Make Alias from the contextual menu that appears.
In addition, you can hold down the ![]() +Option key combination and drag the item to the location where you want the alias.
+Option key combination and drag the item to the location where you want the alias.
Although OS X does a great job in tracking the movements of an original and updating an alias, some actions can break the link. For example, if you delete the original, the alias is left wandering in search of a home. However, all is not lost. When you double-click a broken alias, OS X offers to help you fix the alias. This involves browsing through your system to locate a new original.
Using the Apple Menu
The Apple menu (![]() ) is a familiar sight to any Mac owner. Although Apple contemplated removing it during the original development and beta cycle for OS X version 10.0, the ruckus and cry from beta-testers ensured that it remains today. It’s amazing how reassuring that little fellow can be when you boot the Big X for the first time.
) is a familiar sight to any Mac owner. Although Apple contemplated removing it during the original development and beta cycle for OS X version 10.0, the ruckus and cry from beta-testers ensured that it remains today. It’s amazing how reassuring that little fellow can be when you boot the Big X for the first time.
In this section, I cover the important things that are parked under the Apple menu.
Using Recent Items
If you’re like most of us — and I think I’m safe in assuming that you are — you tend to work on the same set of applications and files (and use the same network servers) during the day. Even with features like Mission Control, Launchpad, and Stacks, you’ll sometimes find yourself drilling down through at least one layer of folders to actually reach the stuff that you need. To make things easier on yourself, you could create a set of aliases on your Desktop that link to those servers, files, and applications . . . but as you moved from project to project, you’d find yourself constantly updating the aliases. As Blackbeard the Pirate was wont to exclaim, “Arrgh!”
Ah, but OS X is one right-smart operating system, and several years ago, Apple created the Recent Items menu to save you the trouble of drilling for applications and files (and even network servers as well). Figure 3-4 illustrates the Recent Items menu from my system. Note that the menu is thoughtfully divided into Applications, Documents, and Servers. When you open documents or launch applications, they’re added to the list. To launch an application or document from the Recent Items menu — or connect to a network server — just click it.
Figure 3-4: Use the Recent Items menu to access files, applications, and servers you’ve been using.

To wipe the contents of the Recent Items menu — for example, if you’ve just finished a project and want to turn over a new digital leaf — click Recent Items and choose the Clear Menu item.
You can specify the number of recent items that will appear in the menu from System Preferences; display the General pane and click the list box next to the Recent Items field. (More on this in Book II, Chapter 3.)
Also, remember the trick that I mention earlier: You can drag any folder or server into the Sidebar column at the left of a Finder window, adding it to that exclusive club that includes your Home folder, Applications folder, and media folders.
Playing with the Dock
You know how Air Force One acts as the mobile nerve center for the president? And how The Chief can jet all around the world and take all his stuff along with him? Well, the Dock is kind of like that. Sort of.
If you want your Dock to go mobile as well, click the Apple menu (![]() ) and choose the Dock item to display the submenu. Here’s a rundown of the options that you’ll find:
) and choose the Dock item to display the submenu. Here’s a rundown of the options that you’ll find:
![]() Hiding: Click Turn Hiding On/Off to toggle the automatic hiding of the Dock. With hiding on, the Dock disappears off the edge of the screen until you move the mouse pointer to that edge. (This is great for those who want to make use of as much Desktop territory as possible for their applications.)
Hiding: Click Turn Hiding On/Off to toggle the automatic hiding of the Dock. With hiding on, the Dock disappears off the edge of the screen until you move the mouse pointer to that edge. (This is great for those who want to make use of as much Desktop territory as possible for their applications.)
You can press ![]() +Option+D to toggle Dock hiding on and off from the keyboard.
+Option+D to toggle Dock hiding on and off from the keyboard.
![]() Magnification: Click Turn Magnification On/Off to toggle icon magnification when your pointer is selecting an icon from the Dock. With magnification on, the icons on the Dock get really, really big . . . a good thing for Mr. Magoo or those with grandiose schemes to take over the world. Check out the rather oversized icons in Figure 3-5. (The amount of magnification can be controlled from the System Preferences Dock settings, which I explain in Book II, Chapter 3.)
Magnification: Click Turn Magnification On/Off to toggle icon magnification when your pointer is selecting an icon from the Dock. With magnification on, the icons on the Dock get really, really big . . . a good thing for Mr. Magoo or those with grandiose schemes to take over the world. Check out the rather oversized icons in Figure 3-5. (The amount of magnification can be controlled from the System Preferences Dock settings, which I explain in Book II, Chapter 3.)
![]() Position: Click one of three choices (Position on Left, Bottom, or Right) to make the Dock appear on the left, bottom, or right of the screen, respectively.
Position: Click one of three choices (Position on Left, Bottom, or Right) to make the Dock appear on the left, bottom, or right of the screen, respectively.
![]() Dock Preferences: Click this to display the System Preferences Dock settings, which I explain in Book II, Chapter 3.
Dock Preferences: Click this to display the System Preferences Dock settings, which I explain in Book II, Chapter 3.
Bad program! Quit!
Once in a while, you’ll encounter a stubborn application that locks up, slows to a crawl, or gets stuck in an endless loop. Although OS X is a highly advanced OS, it can still fall prey to bad programming or corrupted data.
Luckily, you can easily shut down these troublemakers from the Apple menu. Just choose Force Quit to display the Force Quit Applications dialog that you see in Figure 3-6. (Keyboard types can press ![]() +Option+Esc.) Select the application that you want to banish and then click the Force Quit button; OS X requests confirmation, after which you click the Force Quit button again.
+Option+Esc.) Select the application that you want to banish and then click the Force Quit button; OS X requests confirmation, after which you click the Force Quit button again.
Figure 3-5: Now those, my friend, are some pumped-up icons.
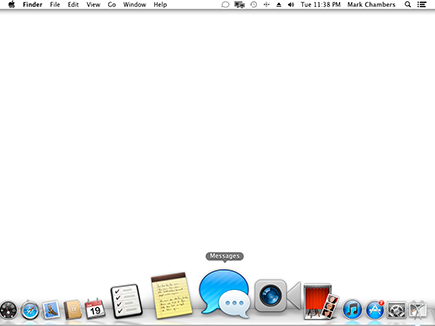
Figure 3-6: Forcing an application to take a hike.

If you select Finder in the Force Quit Applications dialog, the button changes to Relaunch. This allows you to restart the Finder, which comes in handy if your system appears to be unstable. This is much faster than actually restarting your Mac.
Forcing an application to quit will also close any open documents that you were working with in that application, so save your work beforehand (if the program will allow you to save anything). This is not a good time to rely solely on Mountain Lion’s Resume feature, which may not work correctly if an application has locked up. If you relaunch the Finder, some programs might restart as well.
Tracking down your version
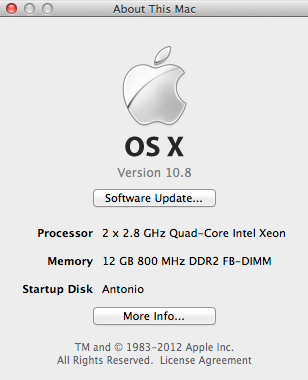
This isn’t a big deal, but if you choose About This Mac from the Apple menu, OS X displays the About This Mac dialog that you see in Figure 3-7 (in this example, proudly displaying my Mac Pro supercomputer). In case you need to check the amount of memory or the processor in an unfamiliar Mac, the About This Mac dialog can display these facts in a twinkling. However, I primarily use it to check the OS X version and build number as well as to launch the Apple System Information utility (which I discuss in full in Chapter 9 of this minibook). Click the More Info button to launch System Information.
Figure 3-7: Display your Mac’s memory, processor, startup disk, and Big X version.
Apple allows you to launch Software Update from three spots: the About This Mac dialog, the System Preferences window, and the Apple menu. Sheesh, they must really want you to keep your Big X up to date, I guess.
Visiting the App Store
If you haven’t jumped into Apple’s virtual storefront for Mac software, click the Apple menu and choose App Store, or click that handy App Store icon on the Dock. The App Store is a slick way to take care of the Big Three Points when shopping for software: finding the right application, installing the application, and keeping it updated. You can shop by categories, view the latest software additions to the App Store, or click in the App Store search box (at the upper right of the window) to find a specific title or type of application. Click the thumbnail for an application to view detailed information, including screenshots and user reviews. Click the Back arrow at the top left of the App Store window to return to the previous screen, just as you do on a web page in Safari.
Along the top of the App Store window, you’ll see a number of toolbar buttons that let you jump directly to Apple’s featured titles, as well as lists of the applications you’ve already purchased and a list of the software you’ve bought that needs updating.
When you locate the perfect application for your needs, click the price button to purchase it. It’s automatically downloaded to your Mac, and the App Store even adds an icon to your Launchpad so that you can try out your new software. In fact, you can install your App Store purchases on all of your Macs (using the same Apple ID), without having to buy additional copies or licenses. Leave it to Apple to Do Things the Right Way.
Specifying a location
OS X allows you to create multiple network locations. Think of a location as a separate configuration that you use when you connect to a different network from a different locale. For instance, if you travel to a branch office, you’d assign a location for your desk and a location for the remote branch. Or, a student might assign one location for her home network and another for the college computer lab network.
A location saves all the specific values that you’ve entered in the System Preferences Network settings, including IP address, DNS servers, proxy servers, and the like. If all this means diddly squat to you, don’t worry; I explain it all in Book VI, Chapter 1. For now, just remember that you can switch between locations by choosing Location from the Apple menu, which displays a submenu of locations that you can choose among. You must, though, create at least a second location for the Location menu item to appear in the Apple menu. Makes sense, right?
Availing Yourself of OS X Services
In OS X, Services allow you to merge information from one application with another. To Mac old-timers, that might sound suspiciously like the Clipboard; however, Services can also include functionality from an application, so you can create new documents or complete tasks without running another program. Services can be used in both the Finder and OS X applications.
To illustrate, here’s a fun example:
1. Launch TextEdit from within Launchpad and type your name.
2. Highlight your name.
3. Click the TextEdit menu — don’t switch to the Finder; use the TextEdit application menu — and choose Services.
4. From the Services submenu, choose Search with Google.
After you’ve shaken your head at all the sites devoted to people with the same name, consider what you just did — you ran the Safari application from within TextEdit, using selected words! Pretty slick, eh?
A glance at the other Services that show up from within most applications gives you an idea of just how convenient and powerful OS X Services can be. I often use Services to take care of things such as
![]() Sending an e-mail message from an e-mail address in a text file or your Contacts (via the Mail Service)
Sending an e-mail message from an e-mail address in a text file or your Contacts (via the Mail Service)
![]() Capturing a screen snapshot within an application (using the Capture Selection from Screen Service)
Capturing a screen snapshot within an application (using the Capture Selection from Screen Service)
![]() Sending a file to a Bluetooth-equipped PDA or cellphone within an application (using the Send File to Bluetooth Device service)
Sending a file to a Bluetooth-equipped PDA or cellphone within an application (using the Send File to Bluetooth Device service)
At the time of this writing, you can’t use this Bluetooth file transfer feature with an iPhone, iPod touch, or iPad.
You can access the Services menu from an OS X application by picking that program’s application menu (sometimes called the named menu). For instance, in the demonstration earlier, I use the TextEdit menu that appears on the TextEdit menu bar. In Microsoft Word, I would click the Word menu.
Geez, I think the computing world needs another word for menu — don’t you?
Many third-party applications that you install under OS X can add their own commands under the Services menu, so be sure to read the documentation for a new application to see what Service functionality it adds.
You can enable or disable menu items from the Services menu. For example, the Send File to Bluetooth Device service that I mention earlier is turned off by default. To make changes to your Services, display the Services menu from the Finder menu bar and choose Services Preferences. Mountain Lion displays the Services list in the Keyboard pane of System Preferences, and you can toggle the display of a service by selecting the check box next to it.
Get Thee Hence: Using the Go Menu
Remember the transporter from Star Trek? Step on the little platform, assume a brave pose, and whoosh! — you’re transported instantaneously to another ship (or more likely) to a badly designed planet exterior built inside a soundstage). Talk about convenience . . . that is, as long as the doggone thing didn’t malfunction. (And you weren’t wearing a red shirt.)
The Finder’s Go menu gives you the chance to play Captain Kirk: You can jump immediately to specific spots, both within the confines of your own system as well as external environments, such as your network or the Internet. (You can leave your phaser and tricorder in your cabin.)
The destinations that you can travel to using the Go menu include the following:
![]() Back/Forward/Enclosing Folder: I lump these three commands together because they’re all basic navigation commands. For example, Back and Forward operate just as they do in Safari or your favorite web browser. If you’re inside a folder, you can return to the parent folder by clicking Enclosing Folder.
Back/Forward/Enclosing Folder: I lump these three commands together because they’re all basic navigation commands. For example, Back and Forward operate just as they do in Safari or your favorite web browser. If you’re inside a folder, you can return to the parent folder by clicking Enclosing Folder.
![]() All My Files: This window displays all the documents you’ve created or added, such as word processing documents, images, and movies.
All My Files: This window displays all the documents you’ve created or added, such as word processing documents, images, and movies.
![]() Documents: Yep, you guessed it: This window displays the contents of your Documents folder.
Documents: Yep, you guessed it: This window displays the contents of your Documents folder.
![]() Desktop: This window displays the files and folders that you’ve stored on your Mountain Lion desktop.
Desktop: This window displays the files and folders that you’ve stored on your Mountain Lion desktop.
![]() Downloads: Here, you’ll find the contents of your Downloads folder.
Downloads: Here, you’ll find the contents of your Downloads folder.
![]() Home: This window displays the home directory for the user currently logged in.
Home: This window displays the home directory for the user currently logged in.
![]() Library: This window displays the contents of the Library folder for the user currently logged in. (The Library folder is located within the user’s home directory but is hidden by default.) The Library entry in the Go menu appears only when you hold down the Option key.
Library: This window displays the contents of the Library folder for the user currently logged in. (The Library folder is located within the user’s home directory but is hidden by default.) The Library entry in the Go menu appears only when you hold down the Option key.
![]() Computer: This window includes your hard drives, CD and DVD drives, and your network — the same places that appear when you open a new Finder window with the
Computer: This window includes your hard drives, CD and DVD drives, and your network — the same places that appear when you open a new Finder window with the ![]() +N key shortcut.
+N key shortcut.
![]() Network: Did you guess that this displays a window with all your network’s servers? Dead giveaway, that.
Network: Did you guess that this displays a window with all your network’s servers? Dead giveaway, that.
![]() Applications: This window includes all the applications that appear in your OS X Applications folder (a neat Just the programs, ma’am arrangement that really comes in handy).
Applications: This window includes all the applications that appear in your OS X Applications folder (a neat Just the programs, ma’am arrangement that really comes in handy).
![]() Utilities: This window displays the contents of your OS X Utilities folder.
Utilities: This window displays the contents of your OS X Utilities folder.
![]() Recent Folders: This window displays a submenu that allows you to choose among the folders that you’ve recently opened.
Recent Folders: This window displays a submenu that allows you to choose among the folders that you’ve recently opened.
You can also type the path for a specific folder (use the Go to Folder command) or connect to a specific network server (use the Connect to Server command).
Note that most of the Go menu commands include keyboard shortcuts, proving once again that the fingers are quicker than the mouse.
Monkeying with the Menu Bar
Ever stared at a menu bar for inspiration? Fortunately for Mac owners like you and me, people in Cupertino are paid to do just that, and these designers get the big bucks to make the OS X menu bar the best that it can be. Thus were born menu bar icons, which add useful controls in what would otherwise be a wasted expanse of white.
Using menu bar icons
Depending on your hardware, OS X might install several menu bar icons. The Spotlight, Notification Center, and Volume icons are always there by default, along with the Clock display, which is actually an icon in disguise. Figure 3-8 illustrates these standard icons, along with a couple of others.
Figure 3-8: Adjust your Mac with a click of these menu icons.

Some icons won’t appear unless you turn them on. For instance, the Display icon won’t appear unless you enable the Show Mirroring Options in the Menu Bar When Available check box within the Displays pane in System Preferences. The Display menu bar icon, which looks like a pair of monitors, allows you to choose from multiple monitors connected to your Mac. You can also jump directly to the System Preferences Display settings by choosing Open Displays Preferences from the menu.
To quickly change the audio volume level within OS X, click the Volume icon (it looks like a speaker with emanating sound waves) once to display its slider control; then click and drag the slider to adjust the level up or down. After you select a level by releasing the mouse button, your Mac thoughtfully plays the default system sound to help you gauge the new volume level.
Depending on the functionality that you’re using with OS X, these other menu bar icons might also appear:
![]() Modem status: You can turn on the display of the Modem status icon from the corresponding modem panel on the Network pane in System Preferences, which I discuss in Book II, Chapter 3. The icon can be set to show the time that you’ve been connected to the Internet as well as the status of the connection procedure. (Naturally, your Mac will need a Mountain Lion–compatible external USB modem to use this status icon.)
Modem status: You can turn on the display of the Modem status icon from the corresponding modem panel on the Network pane in System Preferences, which I discuss in Book II, Chapter 3. The icon can be set to show the time that you’ve been connected to the Internet as well as the status of the connection procedure. (Naturally, your Mac will need a Mountain Lion–compatible external USB modem to use this status icon.)
![]() Wi-Fi: If your Mac is equipped with an AirPort or AirPort Extreme card, you can enable the Show Wi-Fi Status in Menu Bar check box within System Preferences. To do so, click the Network icon and then choose your Wi-Fi connection in the column at the left. The Wi-Fi status icon displays the status of the connection; click the Wi-Fi icon to toggle your wireless hardware on or off. The icon displays the relative strength of your Wi-Fi signal, whether you’re connected to a Base Station or a peer-to-peer computer network, or whether Wi-Fi is turned off. You can also switch between multiple Wi-Fi networks from the menu.
Wi-Fi: If your Mac is equipped with an AirPort or AirPort Extreme card, you can enable the Show Wi-Fi Status in Menu Bar check box within System Preferences. To do so, click the Network icon and then choose your Wi-Fi connection in the column at the left. The Wi-Fi status icon displays the status of the connection; click the Wi-Fi icon to toggle your wireless hardware on or off. The icon displays the relative strength of your Wi-Fi signal, whether you’re connected to a Base Station or a peer-to-peer computer network, or whether Wi-Fi is turned off. You can also switch between multiple Wi-Fi networks from the menu.
![]() Bluetooth: You can toggle Bluetooth networking on or off. You can also make your Mac discoverable or hidden to other Bluetooth devices, send a file to a Bluetooth device, or browse for new Bluetooth devices in your vicinity. Additionally, you can set up a Bluetooth device that’s already recognized or open the Bluetooth pane within System Preferences. (If you don’t see the angular Bluetooth icon in your menu bar, display the Bluetooth pane within System Preferences and make sure the Show Bluetooth Status in the Menu Bar check box is enabled.)
Bluetooth: You can toggle Bluetooth networking on or off. You can also make your Mac discoverable or hidden to other Bluetooth devices, send a file to a Bluetooth device, or browse for new Bluetooth devices in your vicinity. Additionally, you can set up a Bluetooth device that’s already recognized or open the Bluetooth pane within System Preferences. (If you don’t see the angular Bluetooth icon in your menu bar, display the Bluetooth pane within System Preferences and make sure the Show Bluetooth Status in the Menu Bar check box is enabled.)
![]() Messages: You can monitor and change your online/offline status from the Messages menu bar icon, as well as check which of your Messages Buddies are online. You can also choose to compose a new message, which automatically launches Messages for you. This icon only appears if you launch Messages; choose Messages⇒Preferences, and select the Show Status in Menu Bar check box on the General pane.
Messages: You can monitor and change your online/offline status from the Messages menu bar icon, as well as check which of your Messages Buddies are online. You can also choose to compose a new message, which automatically launches Messages for you. This icon only appears if you launch Messages; choose Messages⇒Preferences, and select the Show Status in Menu Bar check box on the General pane.
![]() Time Machine: If you’re using Time Machine to back up your Mac automatically, this icon displays the date of your last backup. You can also manually start a backup from the menu bar icon. To display the icon, open System Preferences and click the Time Machine icon; then select the Show Time Machine Status in the Menu Bar check box.
Time Machine: If you’re using Time Machine to back up your Mac automatically, this icon displays the date of your last backup. You can also manually start a backup from the menu bar icon. To display the icon, open System Preferences and click the Time Machine icon; then select the Show Time Machine Status in the Menu Bar check box.
![]() Open/Close SuperDrive: If your Mac is equipped with a SuperDrive optical drive, click this icon (which bears the same familiar Eject symbol as your keyboard) to open the drive tray (if applicable) and eject the disc.
Open/Close SuperDrive: If your Mac is equipped with a SuperDrive optical drive, click this icon (which bears the same familiar Eject symbol as your keyboard) to open the drive tray (if applicable) and eject the disc.
![]() PPoE: The display of this icon is controlled from the PPoE settings on the Network pane within System Preferences. Click this icon to connect to or disconnect from the Internet using Point-to-Point over Ethernet (PPoE), which is a type of Internet connection offered by some digital subscriber line (DSL) providers.
PPoE: The display of this icon is controlled from the PPoE settings on the Network pane within System Preferences. Click this icon to connect to or disconnect from the Internet using Point-to-Point over Ethernet (PPoE), which is a type of Internet connection offered by some digital subscriber line (DSL) providers.
Doing timely things with the Clock
Even the Clock itself isn’t static eye candy on the OS X menu bar. (I told you this was a hardworking operating system, didn’t I?) Click the Clock display to toggle the icon between the default text display and a miniature analog clock. You’ll also find the complete day and date at the top of the menu.
In fact, you can even open the System Preferences Date & Time settings from the icon. From within the Date & Time settings, you can choose whether the seconds or day of the week are included, the separators should flash, or OS X should display the time in 24-hour (military) format. More on this in Book II, Chapter 3.
Eject, Tex, Eject!
OS X makes use of both static volumes (your Mac’s hard drive, which remains mummified inside your computer’s case) and removable volumes (such as USB Flash drives, external hard drives, your iPod, and CDs/DVD-ROMs). OS X calls the process of loading and unloading a removable volume by old-fashioned terms — mounting and unmounting — but you and I call the procedure loading and ejecting.
Just to keep things clear, I should point out that we’re talking hardware devices here, so static and removable volumes have nothing to do with the sound volume control on your menu bar.
I won’t discuss loading/mounting a removable volume. The process differs depending on the computer because some Macs need a button pushed on the keyboard, others have buttons on the drive itself, and some drives have just a slot with no button at all. However, there are a number of standard ways of unloading/unmounting/ejecting a removable volume:
![]() Drag the volume’s icon from the Desktop to the Trash, which displays an Eject pop-up label to help underline the fact that you are not deleting the contents of the drive. Let me underline that with a Mark’s Maxim because switchers from the Windows world are usually scared to death by the concept of dragging a volume to the Trash.
Drag the volume’s icon from the Desktop to the Trash, which displays an Eject pop-up label to help underline the fact that you are not deleting the contents of the drive. Let me underline that with a Mark’s Maxim because switchers from the Windows world are usually scared to death by the concept of dragging a volume to the Trash.
 Have no fear. In the Apple universe, you can drag removable volumes to the Trash with aplomb.
![]() Click the volume’s icon and use the
Click the volume’s icon and use the ![]() +E keyboard shortcut.
+E keyboard shortcut.
![]() With the volume open in a Finder window, click the Action button and choose Eject from the pop-up menu.
With the volume open in a Finder window, click the Action button and choose Eject from the pop-up menu.
![]() Choose File⇒Eject.
Choose File⇒Eject.
![]() Click the Eject button next to the device in the Finder window Sidebar.
Click the Eject button next to the device in the Finder window Sidebar.
![]() Right-click the volume’s icon to display the contextual menu; then choose Eject.
Right-click the volume’s icon to display the contextual menu; then choose Eject.
![]() Click the Eject icon on the Finder menu bar to eject a CD or DVD from your optical drive.
Click the Eject icon on the Finder menu bar to eject a CD or DVD from your optical drive.
![]() Press your keyboard Eject key (if it has one) to eject a CD or DVD from your built-in optical drive. (If you’re using a keyboard without a Media Eject key, press and hold F12 instead.)
Press your keyboard Eject key (if it has one) to eject a CD or DVD from your built-in optical drive. (If you’re using a keyboard without a Media Eject key, press and hold F12 instead.)
You can’t unmount a static volume from the Desktop — you have to use the Disk Utility application — so your internal hard drive icon will stay where it is.
Common Tasks Aplenty
Okay, I admit it — this section is kind of a grab bag of three very common tasks. However, I want to walk you through these three procedures early in the book. Most Mac owners will want to listen to and record CDs as soon as they start using Mountain Lion, and you’d be amazed how much information still flows across the Internet in plain, simple text.
Therefore, hang around and take care of business.
Opening and editing text files
Text files would seem to be another anachronism in this age of formatted web pages, rich text format (RTF) documents, and word processors galore. However, virtually every computer ever built can read and write in standard text, so text files are often used for
![]() Information files on the Internet, such as FAQs (Frequently Asked Questions files)
Information files on the Internet, such as FAQs (Frequently Asked Questions files)
![]() README and update information by software developers
README and update information by software developers
![]() Swapping data between programs, such as comma- and tab-delimited database files
Swapping data between programs, such as comma- and tab-delimited database files
Here’s the quick skinny on opening, editing, and saving an existing text file:
1. Navigate to your Applications folder and launch TextEdit.
2. Press ![]() +O to display the Open dialog.
+O to display the Open dialog.
3. Navigate to the desired text file and double-click the filename to load it.
You can also open an existing text file by dragging its icon from the Finder window to the TextEdit icon.
4. Click the insertion cursor anywhere in the file and begin typing. Or, to edit existing text, drag the insertion cursor across the characters to highlight them and type the replacement text.
TextEdit automatically replaces the existing characters with those that you type. To simply delete text, highlight the characters and press Delete.
5. After you finish editing the document, you can overwrite the original by pressing ![]() +S (the same as choosing File⇒Save), or you can save a new version by choosing File⇒Save As and typing a new, unique filename.
+S (the same as choosing File⇒Save), or you can save a new version by choosing File⇒Save As and typing a new, unique filename.
6. Exit TextEdit by pressing ![]() +Q.
+Q.
I can’t help but point out that the OS X Quick Look feature (which I discuss in Book II, Chapter 1) would display this same text file with a single key! Just select the file in the Finder window and press the spacebar. (However, you can’t edit a file using Quick Look.)
Listening to an audio CD
By default, Mountain Lion uses iTunes to play an audio CD. Although I cover iTunes in great detail in Book III, Chapter 2, take a moment to see how to master the common task of playing an audio CD (just in case you want to jam while reading these early chapters). Follow these steps:
1. Load the audio CD into your Mac’s optical drive.
A CD volume icon appears on your Desktop.
2. OS X automatically loads iTunes and displays its spiffy window.
3. By default, iTunes automatically begins playing the disc. If that doesn’t happen, though, and you have to manually start the music, click the Play button at the upper left of the iTunes window to begin playing the disc at the beginning. To play an individual track, double-click the track name in the iTunes window.
iTunes may also ask whether you’d like the music from the CD added (or imported) into your iTunes music library. If you’d like to listen to the contents of the CD without having to load the physical disc in the future, feel free to import the CD tracks to your library — as long as the original CD is your property, of course!
4. To adjust the volume from within iTunes, drag the Volume slider to the left or right — it’s to the right of the Play and Fast Forward buttons.
5. To eject the disc and load another audio CD, press ![]() +E, click the Eject icon next to the CD entry in the Source list, or choose Controls⇒Eject Disc.
+E, click the Eject icon next to the CD entry in the Source list, or choose Controls⇒Eject Disc.
6. Exit iTunes by pressing ![]() +Q.
+Q.
The first time that you run iTunes, you’re asked to configure the program and specify whether OS X should automatically connect to the Internet to download the track titles for the disc you’ve loaded. I recommend that you accept all the default settings and that you allow automatic connection. Is simple, no?
Recording — nay, burning — a data CD
OS X offers a built-in CD-recording feature that allows you to burn the simplest form of CD: a standard data CD-ROM that can hold up to approximately 700MB of files and folders and can be read on both Macs and PCs running Windows, Unix, and Linux. (To burn an audio CD, use iTunes, as I show you in Book III, Chapter 2.) Naturally, you’ll need a Mac with a CD or DVD recorder.
Adding the perfect font with Font Book
Need to install a font in OS X, or perhaps you’d like to organize your fonts into collections based on their theme or their designer? If so, you’re talking about Font Book, which is the font organizer that ships with Mountain Lion. To open Font Book, visit your Applications folder and double-click the Font Book icon.
Press ![]() +O (or choose File⇒Add Fonts) to import a new font into your system, or simply drag the font file from a Finder window into the Font Book window. Mountain Lion can accept TrueType, OpenType, and PostScript Type 1 fonts. When it’s been added, your new font can be categorized by dragging it into one of your collections, thus making that font easier to locate and display. Individual fonts and entire collections can be enabled or disabled (by using the Enable and Disable items on the Edit menu) so that you can “turn on” only those fonts that you need for a specific application or project. The Font Book window also comes fully equipped with a Search box, so you can find any font by name.
+O (or choose File⇒Add Fonts) to import a new font into your system, or simply drag the font file from a Finder window into the Font Book window. Mountain Lion can accept TrueType, OpenType, and PostScript Type 1 fonts. When it’s been added, your new font can be categorized by dragging it into one of your collections, thus making that font easier to locate and display. Individual fonts and entire collections can be enabled or disabled (by using the Enable and Disable items on the Edit menu) so that you can “turn on” only those fonts that you need for a specific application or project. The Font Book window also comes fully equipped with a Search box, so you can find any font by name.
Back to the story! To record a disc, follow these steps:
1. Load a blank CD-R, CD-RW, DVD-R, or DVD-RW into your drive.
I assume for this demonstration that you’re using a write-once CD-R.
A dialog appears and prompts you for an action to take.
2. Choose the default, Open Finder, for this demonstration.
OS X displays an Untitled CD volume icon on your Desktop. (It’s marked with the letters CDR so you know that the disc is recordable.)
3. Double-click the Untitled CD icon to display the contents — it’ll be empty, naturally.
4. Click and drag files and folders to the CD window as you normally do.
5. Rename any files or folders as necessary.
After you’ve started recording, this stuff is etched in stone, so your disc window should look just like the volume window should look on the finished CD-ROM.
6. Click the Burn button next to the disc heading in the Finder window sidebar, or click the Burn button in the CD window.
The Big X displays a confirmation dialog.
7. If you’ve forgotten something, you can click the Cancel or Eject button. Otherwise, click the Burn button and sit back and watch the fun.
Unfortunately, OS X doesn’t support recording from the Finder for some external and third-party drives available for the Macintosh. If you can’t burn from the Finder (or you’re willing to pay for a lot of extra recording formats and features), I recommend that you buy a copy of Roxio Toast Titanium recording software (www.roxio.com
).
All You Really Need to Know about Printing
To close out this chapter, I turn your attention to another task that most Mac owners need to tackle soon after buying a Mac or installing Mountain Lion: printing documents. Because basic printing is so important (and in most cases, so simple), allow me to use this final section to demonstrate how to print a document.
Most of us have a Universal Serial Bus (USB) printer — the USB being the favored hardware connection within OS X — so as long as your printer is supported by OS X, setting it up is as easy as plugging it into one of your Mac’s USB ports. The Big X does the rest of the work, selecting the proper printer software driver from the Library/Printers folder and setting your printer as the default power of the universe.
Before you print, preview! Would you jump from an airplane without a parachute? Then why would you print a document without double-checking it first? Most applications now have their own built-in Preview thumbnails within the Print dialog, as shown in Figure 3-9 — this is definitely A Good Thing! However, if the application you’re using doesn’t have a Preview display in the Print dialog (or if it’s too small to see clearly), I recommend that you click the Preview button with abandon. OS X opens the Preview application to show you what the printed document will look like, possibly saving you both paper and some of that hideously expensive ink or toner. When you’re done examining your handiwork, close the Preview application to return to your document.
To print from within any application using the default page characteristics — standard 81⁄2 x 11" paper, portrait mode, no scaling — follow these steps:
1. Within your application, choose File⇒ Print or press the ![]() +P keyboard shortcut.
+P keyboard shortcut.
Within most applications, OS X displays the simple version of the Print dialog. (To display all the fields that you see in Figure 3-9, click the Show Details button at the bottom of the sheet.)
Figure 3-9: The Print dialog is available from any application with any real guts.

Some applications use their own custom Print dialogs, but you should see the same general settings.
2. Click in the Copies field and enter the number of copies that you need.
You can also enable or disable collation, just as you can with those oh-so-fancy copiers.
3. Decide what you want to print.
• The whole shootin’ match: To print the entire document, use the default Pages radio button setting of All.
• Anything less: To print a range of selected pages, select the From radio button and enter the starting and ending pages.
4. (Optional) Choose application-specific printing parameters.
Each OS X application provides different panes so that you can configure settings specific to that application. You don’t have to display any of these extra settings to print a default document, but the power is there to change the look dramatically when necessary. To display these settings, open the pop-up menu in the center of the Print dialog and choose one of these panes. For example, if you’re printing from the Address Book, you can choose the Address Book entry from the pop-up menu and elect to print a phone list, an envelope, mailing labels, or an e-mail list.
5. When everything is go for launch, click the Print button.
Of course, there are more settings and more functionality to the printing system within OS X, and I cover more complex printing topics in much more detail in Book VII, Chapter 4. However, I can tell you from my experiences as a consultant and hardware technician that this short introduction to printing will likely suffice for 90 percent of the Mac owners on Earth. ’Nuff said.