
Chapter 5: Setting Up Multiuser Accounts
In This Chapter
![]() Adding, modifying, and deleting users
Adding, modifying, and deleting users
![]() Establishing Parental Controls
Establishing Parental Controls
![]() Configuring FileVault
Configuring FileVault
![]() Avoiding keychains
Avoiding keychains
In Chapter 4 of this minibook, I introduce you to the different OS X multiuser account levels and the login process. If you’re ready to share your Mac with others, you discover how to add new accounts and edit existing accounts in this chapter. Oh, and yes, I also show you how to frag — that’s multiplayer game-speak for “destroy” — accounts that you no longer need. I also demonstrate how to add optional limitations to an individual user account and how to avoid using a keychain (a tool that’s supposed to make it easier to store that pocketful of passwords you’ve created on the Internet).
Yes, you read correctly. By all that’s good and righteous, OS X actually has a feature that I don’t want you to use. Read on to find out more.
Adding, Editing, and Deleting Users
Most multiuser account chores you’ll encounter take place in a single System Preferences pane. (Cue James Bond theme song.) The Users & Groups pane is the star of this chapter, so open System Preferences and click the Users & Groups icon.
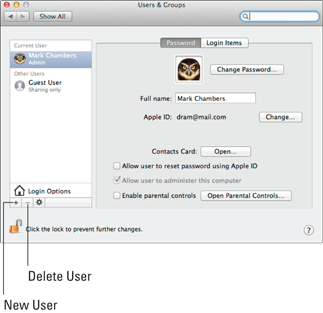
If you haven’t added any users to your system yet, the Users list should look like Figure 5-1. You should see your account, which you set up when you installed OS X, set to administrator (admin) level.
 You also have an entry for a Guest account, which anyone can use on an as-needed basis. To enable the Guest account, click the Guest entry in the list to the left and then select the Allow Guests to Log In to This Computer check box. Note that any files created or settings changed by the Guest user are automatically deleted when the Guest user logs out (or you restart or reboot your Mac). If you like, you can also choose to apply Parental Controls to the Guest account. (I discuss Parental Controls later in this chapter.)
If you can’t click the Guest User entry because it’s grayed out, you need to unlock the Users & Groups pane first. Click the padlock icon in the lower-left corner, type your Admin user account password, and then click Unlock. Most panes in System Preferences have this lock feature, which prevents accidental changes to your Mountain Lion settings. A Good Thing. But now you won’t be frustrated when you encounter a locked pane!
Figure 5-1: A typical first look at the Users & Groups pane.
Adding a new user account
To add a new user account, follow these steps:
1. In the Users & Groups pane (from System Preferences), click the New User button (plus sign) at the bottom of the accounts list (shown in Figure 5-1) to display an empty user record sheet that you see in Figure 5-2.
 If the New User button is disabled and you can’t click it, click the padlock at the bottom left of the System Preferences pane and provide your password to unlock the Users & Groups pane.
2. Select the access level for this user from the New Account pop-up menu.
By default, the user receives a standard level account. You can also choose an Administrator account, a managed standard account with Parental Controls already enabled, or a sharing-only account.
Figure 5-2: Setting up a new user account.
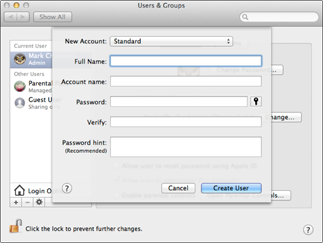
 The sharing-only account allows the user to copy or open shared files from your Mac remotely (from another computer), but that user can’t directly log in to your Mac.
3. In the Full Name text box, type the name that you want to display for this account (both in the Current User list and on the Login screen) and then press Tab to move to the next field.
OS X automatically generates a short name in the Account Name field for use as your screen and Buddy Name in Messages and various network applications. The short name is also the name of the folder that OS X creates on the computer’s hard drive for this user. You can keep the default short name or type a new one, but it cannot contain any spaces. For more on Messages, jump to Book V, Chapter 3. (I’ll wait for you here.)
4. Press Tab again.
5. In the Password text box, type the password for the new account.
Click the button with the key icon next to the Password field, and Mountain Lion is happy to display the Password Assistant, complete with a suggestion. Click the Suggestion pop-up menu to see additional suggestions. You can choose the length of the password and select among several types: letters and numbers, numbers only, memorable, completely random, or even government-quality. The Assistant automatically copies the current password you’re considering to the Password text box.
As always, when you enter a password or its verification, OS X displays bullet characters for security.
6. Press Tab, type the password in the Verify text box, and press Tab again.
7. (Optional) If you decide to use the password hint feature that I describe in Book II, Chapter 4, you can enter a short sentence or question in the Password Hint text box.
The hint is displayed after three unsuccessful attempts at entering the account password.
 I recommend that you do not use this option. Think about it: Any hack could type in anything three times to get your hint to pop up! If you do use this option, at least make sure that the hint is sufficiently vague!
8. Click the Create User button to finish and create the account.
The new account shows up in the Current User list and in the Login screen.
Editing an existing account
If you have administrator access, it’s a cinch to make changes to an existing account from the Users & Groups pane in System Preferences. (Often, this is to assign a personalized account picture, so I demonstrate that here.) Follow these steps:
1. Click the account that you want to change in the list to the left of the window.
If the accounts in the list are disabled and you can’t select one, you must unlock the Users & Groups pane. Click the lock at the bottom left of the System Preferences pane (and type your password, if prompted).
2. Edit the settings that you need to change.
Examples include enabling administrator rights for an account temporarily (by selecting the Allow User to Administer this Computer check box), and changing the account password (by clicking the Change Password button).
3. Click the square Picture well (the square that displays the image) to specify the thumbnail image that appears in the Login list next to the account name.
Apple provides a number of good images in the preview collection. Just click a thumbnail to select it.
4. To replace your account image, drag a new image from a Finder window or the iPhoto window and drop it into the Picture well.
• To choose an image from the default set of Mountain Lion icons: Click the Picture well, click the Defaults tab, click the desired image, and then click Done.
• To choose an icon image from those you’ve recently used: Click the Recents tab, click the desired image, and then click Done.
Alternatively, you can click the Picture well and click the Camera tab to grab a picture from your FaceTime HD, iSight, or other video camera connected to your Mac. When you’re set to take the photo, click the button with the camera icon and then click Done to accept it. Most cool.
5. After you make the changes (and you select just the right image to capture the user’s personality — a more difficult task than you might think), press ![]() +Q to save them and close the System Preferences window.
+Q to save them and close the System Preferences window.
Deleting an existing account
To wipe an account from the face of the Earth, follow these steps:
1. Click the account that you want to delete in the user list to the left of the window.
2. Click the Delete User button (which is smartly marked with a minus sign).
OS X displays the confirmation sheet that you see in Figure 5-3.
So you like your privacy . . .
These days, everyone’s interested in securing personal files from prying eyes. Granted, this isn’t a problem if you’re the only one using your Mac. However, if you’re sharing a computer in a multiuser environment, you might want a little more protection than just user permissions for those all-important Fantasy Football formations that you’ll unleash next season.
Never fear! Mountain Lion offers FileVault, which provides disk encryption that prevents just about anyone except the NSA or FBI from gaining access to the files in your Home folder. (You’ll notice that things slow down just a bit when logging in and out or working with files that are several gigabytes in size, but for those of us who need the peace of mind, this minimal performance hit is worth it.) You can enable the FileVault feature from the Security & Privacy pane in System Preferences. Two passwords control access to your drive when FileVault is active:
![]() The Recovery Key can unlock your drive if you forget your login password. Mountain Lion provides you with this key when you turn on the FileVault feature. I highly recommend that you write down this key and store your copy in a safe place, away from your Mac.
The Recovery Key can unlock your drive if you forget your login password. Mountain Lion provides you with this key when you turn on the FileVault feature. I highly recommend that you write down this key and store your copy in a safe place, away from your Mac.
![]() Your Login Password unlocks the drive automatically when you log in.
Your Login Password unlocks the drive automatically when you log in.
Personally, I love this feature, and I use it on all my Macs running Mountain Lion. Yet a risk is involved (insert ominous chord here). To wit: DO NOT forget your Login Password, and make doggone sure that your Admin user has access to a copy of that all-important Recovery Key! OS X displays a dire warning for anyone who’s considering using FileVault: If you forget these passwords, you can’t retrieve any data from your Mac’s drive. Period. As Jerry Reed used to say, “It’s a gone pecan.”
Figure 5-3: Are you quite sure that you want to delete this user?
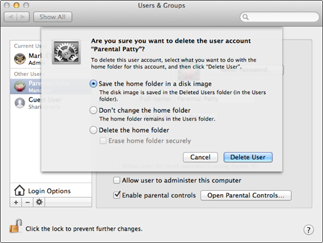
Note that the contents of the user’s Home folder can be saved in a disk image in the Deleted Users folder (just in case you need to retrieve something). That’s what I opted for in the figure. Alternatively, you can choose to leave the deleted user’s Home folder as is, without removing it.
If you’re absolutely sure you won’t be dating that person again, select the Delete the Home Folder radio button (which doesn’t save anything in the Deleted Users folder). You regain all the hard drive space that was being occupied by the contents of the deleted user’s Home folder. As an extra measure of protection, you can also choose to securely erase the contents of the deleted user’s Home folder.
3. Click Delete User to verify and delete the account. If you’re not sure, click the Cancel button to abort and return to the Accounts list.
Tightening Your Security Belt
Administrators are special people. Just ask one; you’ll see. Anyway, when an administrator creates or edits the account for a standard-level user, OS X offers a number of levels of specific rights — Parental Controls — that can be assigned on an individual account basis. When an account has Parental Controls assigned, it becomes a managed account.
Parental Controls are available only for standard-level users; administrators aren’t affected by them because an administrator-level account already has access to everything covered by controls.
When do you need Parental Controls? Here are three likely scenarios:
![]() You’re creating accounts for corporate or educational users, and you want to disable certain features of OS X to prevent those folks from doing something dumb. Just tell ’em you’re “streamlining the operating system.” (Yeah, that’s it.) For example, you might not want that one particular kid making CD copies of The Illustrated Anarchist’s Cookbook in the classroom while you’re gone. Therefore, you disable the ability for that account to burn CDs or DVDs.
You’re creating accounts for corporate or educational users, and you want to disable certain features of OS X to prevent those folks from doing something dumb. Just tell ’em you’re “streamlining the operating system.” (Yeah, that’s it.) For example, you might not want that one particular kid making CD copies of The Illustrated Anarchist’s Cookbook in the classroom while you’re gone. Therefore, you disable the ability for that account to burn CDs or DVDs.
![]() In the same environment, you might want to give a specific standard-level account the ability to administer printers. If Roger in Accounting is both helpful and knowledgeable — oh, and add trustworthy in there, too — you might want to give him this capability so that he can handle the print queues while you’re on vacation.
In the same environment, you might want to give a specific standard-level account the ability to administer printers. If Roger in Accounting is both helpful and knowledgeable — oh, and add trustworthy in there, too — you might want to give him this capability so that he can handle the print queues while you’re on vacation.
![]() You want one or more users to access one — and only one — application on the system, or perhaps just two or three applications. To illustrate: In my years as a hospital hardware technician, we had a number of computers that were used solely to display patient records. No Word, no e-mail, nothing but the one program that accessed the medical records database. We called these machines “dumb terminals” although they were actually personal computers. (This trick also works well if you’re a parent and you want to give your kids access without endangering your valuable files. Just don’t call your computer a “dumb terminal” lest your kids take offense. That’s experience talking there.) If you want to allow access to a specified selection of applications, you can set them in that account’s controls.
You want one or more users to access one — and only one — application on the system, or perhaps just two or three applications. To illustrate: In my years as a hospital hardware technician, we had a number of computers that were used solely to display patient records. No Word, no e-mail, nothing but the one program that accessed the medical records database. We called these machines “dumb terminals” although they were actually personal computers. (This trick also works well if you’re a parent and you want to give your kids access without endangering your valuable files. Just don’t call your computer a “dumb terminal” lest your kids take offense. That’s experience talking there.) If you want to allow access to a specified selection of applications, you can set them in that account’s controls.
Setting Parental Controls
Time to review what each of the settings does. (If the System Preferences window isn’t open, click the System Preferences icon on the Dock, and then click the Users & Groups icon.) To display the controls for a standard account, click the account in the list and then click the Open Parental Controls button. Click the Enable Parental Controls button, and (if necessary) click the Lock icon in the lower-left corner to confirm your access. Mountain Lion includes five different categories (tabs) of controls, as shown in Figure 5-4:
Figure 5-4: You can restrict access to many functions within a Standard account.
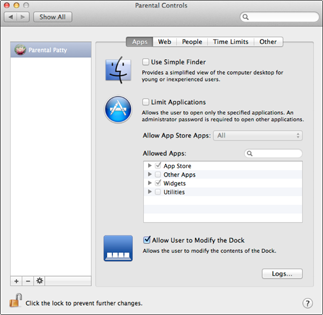
![]() Apps: These settings (which I discuss in more detail in a second) affect what the user can do within Mountain Lion as well as what the Finder itself looks like to that user.
Apps: These settings (which I discuss in more detail in a second) affect what the user can do within Mountain Lion as well as what the Finder itself looks like to that user.
![]() Web: Mountain Lion offers three levels of control for websites:
Web: Mountain Lion offers three levels of control for websites:
• Allow Unrestricted Access: Select this radio button to allow unfettered access for this user.
• Try to Limit Access: You can allow Safari to automatically block websites it deems adult. To specify particular sites that the automatic adult figure should allow or deny, click the Customize button.
• Allow Access to Only These Websites: Choose this radio button to specify which websites the user can view. To add a website, click the Add button (a plus sign), and Mountain Lion prompts you for a title and the website address.
![]() People: You can specify whether the user can join in Game Center multiplayer games, as well as allow or prevent the user from adding friends within Game Center.
People: You can specify whether the user can join in Game Center multiplayer games, as well as allow or prevent the user from adding friends within Game Center.
Select the Limit Mail and Limit Messages check boxes to specify the e-mail and instant messaging addresses that this user can communicate with. (Note that this affects only Apple Mail and Messages, so other mail clients, web-based mail, instant messaging applications, and audio/video chat applications aren’t controlled.) To add an address that the user can e-mail or chat with, click the Add button, which bears the familiar plus sign.
If you want a notification if the user is attempting to send an e-mail to someone not in the list, select the Send Permission Requests To check box and then type your e-mail address in the text box.
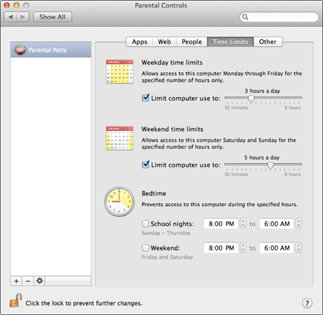
![]() Time Limits: Parents, click the Time Limits button, and you’ll shout with pure joy! Check out the options on this pane in Figure 5-5. You can limit an account to a certain number of hours of usage per weekday (Weekday Time Limits), limit to a specified number of hours of usage per weekend day (Weekend Time Limits), and set a bedtime computer curfew time for both weekdays (called “School Nights” here) and weekend days.
Time Limits: Parents, click the Time Limits button, and you’ll shout with pure joy! Check out the options on this pane in Figure 5-5. You can limit an account to a certain number of hours of usage per weekday (Weekday Time Limits), limit to a specified number of hours of usage per weekend day (Weekend Time Limits), and set a bedtime computer curfew time for both weekdays (called “School Nights” here) and weekend days.
Figure 5-5: Mountain Lion keeps track of your kid’s computer usage so that you don’t have to.
![]() Other: These settings control the Dictionary and hardware devices like your printer and DVD burner. They include
Other: These settings control the Dictionary and hardware devices like your printer and DVD burner. They include
• Hide Profanity in Dictionary: With this check box selected, profane terms are hidden within the Dictionary for this user.
• Limit Printer Administration: With this check box selected, the user cannot modify the printers and printer queues within the Print & Scan pane in System Preferences. If this option is enabled, the user can still print to the default printer and switch to other assigned printers but can’t add or delete printers or manage the OS X print queue. (Of course, if the print job encounters a problem, that user has to bug you to fix things. Go figure.)
• Limit CD and DVD Burning: Select this check box to prevent the user from recording CDs or DVDs via the built-in disc recording features in OS X. (Note, however, that if you load a third-party recording program, such as Toast, the user can still record discs with it.)
• Disable Changing the Password: Select this check box to prevent the user from changing the account password.
If you’re creating a single standard-level account for an entire group of people to use — for example, you want to leave the machine in kiosk mode in one corner of the office, or everyone in a classroom will use the same account on the machine — I recommend disabling the ability to change the account password. (Oh, and please do me a favor — don’t create a system with just one admin-level account that everyone is supposed to use! Instead, keep your one admin-level account close to your bosom and create a standard-level account for the Unwashed Horde.)
Mountain Lion keeps a number of different types of text log files (which track where the user goes on the Internet, which applications are launched by the account, and the contents of any Messages conversations where the user was a participant). Click the Logs button on any Parental Control screen to monitor all the logs for a particular account.
You can always tell whether an account has been assigned Parental Controls because the account description changes from Standard to Managed in the User list.
Of particular importance are the Finder and applications controls. Click the Apps tab (refer to Figure 5-4) to modify these settings:
![]() Use Simple Finder: I discuss the Simple Finder in the following section because it’s a great idea for families and classrooms with smaller children.
Use Simple Finder: I discuss the Simple Finder in the following section because it’s a great idea for families and classrooms with smaller children.
![]() Limit Applications: When this option is selected, you can select the specific applications that appear to the user. These restrictions are in effect whether the user has access to the Full Finder or just the Simple Finder.
Limit Applications: When this option is selected, you can select the specific applications that appear to the user. These restrictions are in effect whether the user has access to the Full Finder or just the Simple Finder.
From the Allow App Store Apps pop-up menu, you can choose to block the account from launching any applications purchased from the Apple App Store, or limit the user to installed App Store apps rated for specific ages.
To allow access to all the applications of a specific type — App Store, Other Apps (like the iLife and iWork suites), Widgets, and Utilities — select the check box next to the desired group heading. To restrict access to all applications within a group, select the check box next to any heading to deselect it. You can also toggle the restriction on and off for specific applications in these groups by clicking the triangle icon next to each group heading to expand the list and then marking/clearing the check box next to the desired applications. To locate a specific application, click in the Search box and type the application name.
To add a new application to the Allowed Apps list, drag its icon from the Finder and drop it in the list within the Other Apps group. After you add an application, it appears in the Other Apps group, and you can toggle access to it just like the applications in the named groups.
 These settings can work hand-in-hand with Mountain Lion’s new Gatekeeper feature, which prevents anyone from launching applications that were not downloaded from the App Store (or are not Apple-approved). For more information on Gatekeeper, visit Chapter 3 of this minibook — you’ll find it described as part of the Security & Privacy pane.
![]() Allow User to Modify the Dock: Select this check box, and the user can remove applications, documents, and folders from the Dock in the Full Finder. (If you don’t want the contents of the Dock changing according to the whims of other users, go ahead and deselect this check box.)
Allow User to Modify the Dock: Select this check box, and the user can remove applications, documents, and folders from the Dock in the Full Finder. (If you don’t want the contents of the Dock changing according to the whims of other users, go ahead and deselect this check box.)
Assigning the Simple Finder
You can restrict your standard-level users even further by assigning them the Simple Finder set of limitations. The default Simple Finder, as shown in Figure 5-6, is a highly simplified version of the regular OS X Finder. The simplified Dock contains only the following: the Finder icon; the Trash; and the folders for the user’s approved applications, documents, and shared files.
Figure 5-6: Whoa! It’s the Simple Finder — less filling; still runs great!

This is the network administrator’s idea of a foolproof interface for OS X: A user can access only those system files and resources needed to do a job, with no room for tinkering or goofing off.
A Simple Finder user can still make the jump to the full version of the Finder by clicking the Finder menu and choosing Run Full Finder. The user has to enter a correct admin-level username and password.
Planning on setting up a public access Mac? You can also change the Automatic Login account from the Users & Groups pane. Click the Login Options button under the User list and then click the Automatic Login pop-up menu to choose the account that automatically logs in when OS X starts up. Enter the account password on the confirmation sheet that appears and click OK. Although I’ve made it clear elsewhere that Automatic Login is not a good security feature in many cases (as with a laptop on the road), it can be a good feature for those preparing a Mac for public use because if you set the Automatic Login to your public standard-access account, OS X automatically uses the right account if the Mac is rebooted or restarted.
You can always choose Log Out from the Apple menu (![]() ) to log in under your own account.
) to log in under your own account.
Using Keychains — Not!
Before I leave this chapter, I want to discuss an OS X feature that’s been around for many years now: the keychain. Your account keychain stores all the username/password combinations for websites, file servers, File Transfer Protocol (FTP) servers, and the like, allowing you to simply waltz in and start using the service (whatever it is). Sounds downright convenient, doesn’t it? And it can be, but you better watch your step.
I’m perfectly honest here: I hate account keychains. With a passion, mind you. As a consultant, support technician, webmaster, and the SYSOP (an ancient Bulletin Board Service abbreviation meaning System Operator) of an Internet-based online system, I know what a hassle it is for users to remember separate passwords, and I feel that pain. (I use separate passwords for everything.) However, three massively big problems are inherent with using keychains:
![]() Anyone can log on as you without knowing your passwords. If your keychain is unlocked, which happens automatically when you log in, all someone has to do is sit at your desk, visit a site or connect with a server, and bam! They’re on. As you. Think about that. And then think how many times you get up from your desk, just for a second, to grab another Diet Coke or a doughnut.
Anyone can log on as you without knowing your passwords. If your keychain is unlocked, which happens automatically when you log in, all someone has to do is sit at your desk, visit a site or connect with a server, and bam! They’re on. As you. Think about that. And then think how many times you get up from your desk, just for a second, to grab another Diet Coke or a doughnut.
![]() You’ll forget your passwords. If the keychain file is corrupted — and it can happen — your passwords have gone to Detroit without you. Either you’ve got them on paper hidden somewhere, they’re on your recent Time Machine backup, or it’s time to change your online persona.
You’ll forget your passwords. If the keychain file is corrupted — and it can happen — your passwords have gone to Detroit without you. Either you’ve got them on paper hidden somewhere, they’re on your recent Time Machine backup, or it’s time to change your online persona.
![]() Keychains need yet another stinkin’ password. Yep, that’s right. Your keychain can be locked (manually, or with the right settings, automatically), and you have to remember yet another password/passphrase to unlock your keychain. “When, oh, when will the madness end?”
Keychains need yet another stinkin’ password. Yep, that’s right. Your keychain can be locked (manually, or with the right settings, automatically), and you have to remember yet another password/passphrase to unlock your keychain. “When, oh, when will the madness end?”
From a security standpoint, keychains should be completely off-limits for anyone who’s interested in maintaining a well–locked-down machine (whether it’s a Mac used in a company office, or a Mac shared by a classroom). Unfortunately, Mountain Lion creates a keychain automatically for every user, so you have to monitor (and delete) your keychain data manually. (Sigh.)
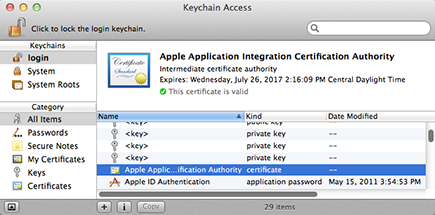
However, if you’re the only person using your Mac and it resides in your home — personally, I’d prefer a bank vault — and you absolutely must use keychains, you can display them all for the current account from the Keychain Access application (see Figure 5-7), conveniently located in the Utilities folder within Launchpad. Click the desired category, and then click an item in the keychain list to display or edit all its information.
Figure 5-7: Take my advice — stay away from the allure of the keychain.
Heck, just think about what I just wrote: Anyone can display and edit server and site information just by launching this application! That includes your nephew Damien — you know, the one who considers himself the hacker extraordinaire. (While I’m at it, I should mention that it’s just as bad to set the Automatic Login feature — which I discuss earlier in this chapter — to an admin-level account. One reboot, and you’re rolling out the red carpet for the little rascal. For the inside information on Automatic Login, visit Chapter 4 in this very minibook.)
To help lock down things — at least when it comes to your Internet communications — follow this path:
1. To display your Internet passwords, click the Passwords category.
2. Click each Internet password to select it in the list and then click the lowercase i button at the bottom of the window to display the information on that password.
3. Click the Access Control tab to display the settings that you see in Figure 5-8, one of which I strongly recommend.
Figure 5-8: Safeguarding a keychain rather dilutes its usefulness, but I’m security conscious.

To minimize the damage that someone can do with this password, you can select the Confirm before Allowing Access radio button. And for yet another level of security, select the Ask for Keychain Password check box.
Of course, you’re probably thinking, “Well, Mark, that pretty much eliminates the purpose of quick, convenient access without passwords, doesn’t it?” Yes, indeed it does, but at least your online identity is somewhat safeguarded.
Click the plus sign button at the bottom of the Keychain Access window to add a new password. Type a name for the item, the username that you typically type to gain access, and the password for that server or site. Then click Add and cross your fingers.
To display all the keychains you can access, choose Edit⇒Keychain List. To create a brand-new keychain, choose File⇒New Keychain. OS X prompts you for the filename for your new keychain file. In the New Keychain dialog that appears, enter a catchy name in the Save As text box. By default, the keychain file is created in the Keychains folder — a good idea — but if you want to store it elsewhere, click the down-arrow button next to the Save As text box and navigate to the desired folder. When you’re ready, click the Create button. Now you need to enter yet another password, type it again to verify it, and then click OK.
To lock or unlock your login keychain, click the Lock icon at the top-left of the Keychain Access window. (Unlocking your keychain requires you to enter your login password. Go figure.)
You might be saying to yourself, “Geez, this guy is more than a little paranoid.” And yes, dear reader, I suppose I am. But then again, who’s been uploading all those questionable images and MP3 files to the company server . . . using your account? And who wrote that tirade on your Facebook page?