
Chapter 9: The Joys of Maintenance
In This Chapter
![]() Deleting applications
Deleting applications
![]() Using Apple System Information Utility
Using Apple System Information Utility
![]() Using Activity Monitor and Disk Utility
Using Activity Monitor and Disk Utility
![]() Updating OS X and your drivers
Updating OS X and your drivers
![]() Backing up your system with Time Machine
Backing up your system with Time Machine
![]() Using a disk defragmenter and start-up keys
Using a disk defragmenter and start-up keys
The title of this chapter really sounds like a contradiction in terms, doesn’t it? The concepts of joy and maintenance are likely mutually exclusive to you — and it’s true that most OS X owners would rather work or play than spend time under the hood, getting all grimy. I understand completely; maintenance is far less sexy than a game like BioShock 2 or even an exciting productivity application like Pages.
However, if you do want to work or play uninterrupted by lockups and crashes — yes, believe it or not, the Big X can indeed take a dive if it’s not cared for — and you’d like your Mac to perform like Lance Armstrong, you have to get your hands dirty. That means performing regular maintenance on your hardware, OS X, and your all-important applications, documents, and folders.
Like most techno-types, I actually enjoy pushing my system to the limit and keeping it running in top form. And who knows — after you become a Mountain Lion power user, you could find yourself bitten by the maintenance bug as well. In this chapter, I cover how to take care of necessary tune-up chores, step by step.
Deleting Applications the Common Sense Way
Nothing lasts forever, and that includes your applications. You might no longer need an application, or maybe you need to remove it to upgrade to a new version or to reinstall it. In contrast to Windows XP and Vista (which have the Add or Remove Programs utility within Control Panel) or Windows 7 (which has the Programs and Features utility), OS X doesn’t have a stand-alone utility for uninstalling software — nor does it need one because virtually all Macintosh applications are self-contained in a single folder or series of nested folders. (And not by accident . . . keeping everything related to an application within a single folder has always been a rule for Apple software developers since the first days of the Macintosh.) Therefore, removing an application is usually as easy as deleting the contents of the installation folder from your hard drive (for example, removing the Quicken folder to uninstall Quicken). If an application does indeed sport an uninstall utility, that utility almost always appears in the same folder as well.
 Always check the application’s README file and documentation for any special instructions before you delete any application’s folder! If you created any documents in that folder that you want to keep, don’t forget to move them before you trash the folder and its contents. In fact, some applications may come complete with their own uninstall utility, so checking the README and documentation may save you unnecessary steps.
 Some applications can leave secondary files in other spots on your disk besides their home folder. When you’re uninstalling a program that has support files in other areas, use Spotlight in the Finder menu bar to locate other files that might have been installed with the application. (I cover Spotlight in Book I, Chapter 4.) And make sure to check whether an application has an uninstall utility, or an uninstall option available through the original setup application.
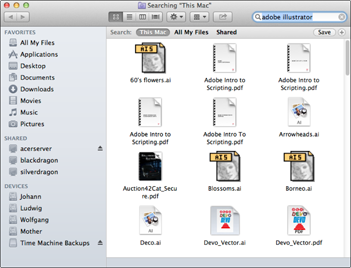
For example, Figure 9-1 illustrates a Spotlight search that I ran on my Adobe Illustrator software. By searching for the words Adobe Illustrator, I found a number of files created in other folders, such as project files, PDF files, and the font files that appear in the system Fonts folder. Typically, you want to delete the main application folder and then remove these orphans.
Figure 9-1: Use Spotlight to locate support files after uninstalling an application.
Popping the Hood: Using the System Information Utility
The day will likely come when you need hard information about your hardware. You might need to determine precisely what hardware is installed in your Mac for the following reasons:
![]() You’re working with a technical support person to solve a problem. This person will usually request information about your system, such as what processor you’re running and how much memory you have.
You’re working with a technical support person to solve a problem. This person will usually request information about your system, such as what processor you’re running and how much memory you have.
![]() You’re evaluating an application before you buy it. You’ll want to check its minimum system requirements against the hardware on your Mac.
You’re evaluating an application before you buy it. You’ll want to check its minimum system requirements against the hardware on your Mac.
![]() You’re considering an upgrade to your Mac. You’ll need to determine how much memory you have, what type it is, and which memory slots are filled. (The same goes for your hard drive and your video card, for those Macs with video card slots.) For more on upgrading your Mac, thumb through Book VII, Chapter 2.
You’re considering an upgrade to your Mac. You’ll need to determine how much memory you have, what type it is, and which memory slots are filled. (The same goes for your hard drive and your video card, for those Macs with video card slots.) For more on upgrading your Mac, thumb through Book VII, Chapter 2.
Apple provides OS X with an all-in-one hardware and software display tool — System Information — which resides in the Utilities folder within your Applications folder. You can also reach the System Information utility via the Apple menu (![]() ). Just click About This Mac, click the More Info button, and then click System Report. (Naturally, System Information is also available from the Utilities folder within Launchpad.)
). Just click About This Mac, click the More Info button, and then click System Report. (Naturally, System Information is also available from the Utilities folder within Launchpad.)
Like with the folders in a Finder window in List view mode, you can expand or collapse each major heading that appears in an Information screen. Just click the triangle that appears to the left of each Contents heading to expand or collapse that heading.
The System Information major headings include
![]() Hardware: This heading tells you “volumes” about your hard drives (forgive me, I couldn’t help that) as well as specifics concerning your memory; optical drives; modem; AirPort and Bluetooth hardware; printers; graphics and audio hardware; AC power settings; and any FireWire, Thunderbolt, eSATA, SCSI, and USB devices connected to your system. Figure 9-2 illustrates the information from my USB screen, with many of the devices expanded so that you can see them. (The text you see at the bottom half of the window is the detailed information on the selected item — my USB trackball.)
Hardware: This heading tells you “volumes” about your hard drives (forgive me, I couldn’t help that) as well as specifics concerning your memory; optical drives; modem; AirPort and Bluetooth hardware; printers; graphics and audio hardware; AC power settings; and any FireWire, Thunderbolt, eSATA, SCSI, and USB devices connected to your system. Figure 9-2 illustrates the information from my USB screen, with many of the devices expanded so that you can see them. (The text you see at the bottom half of the window is the detailed information on the selected item — my USB trackball.)
![]() Network: This heading shows a listing of your network configuration, active network connections, and other assorted network paraphernalia. You’ll probably need this screen only when asked by a technical support person for the network protocols that you’re using, but it’s handy nonetheless. (You’ll find details on your network connection here that you can’t find anywhere else in Mountain Lion.)
Network: This heading shows a listing of your network configuration, active network connections, and other assorted network paraphernalia. You’ll probably need this screen only when asked by a technical support person for the network protocols that you’re using, but it’s handy nonetheless. (You’ll find details on your network connection here that you can’t find anywhere else in Mountain Lion.)
![]() Software: Okay, this heading shows something useful to the average human being! This screen lists all the applications, fonts, and preferences recognized on your start-up volume, along with their version numbers. (This includes the fonts and preferences that are saved in your Home folder’s Library folder.) If you’re wondering whether you need to update an application with a patch file (to fix bugs in the software) or update a file from the developer, you can look here to check the current version number for the application. You also get a rather boring list of the extensions (or drivers) used by OS X applications. Logs are usually valuable only to tech support personnel; they document recent lockups, application crashes, and even system crashes.
Software: Okay, this heading shows something useful to the average human being! This screen lists all the applications, fonts, and preferences recognized on your start-up volume, along with their version numbers. (This includes the fonts and preferences that are saved in your Home folder’s Library folder.) If you’re wondering whether you need to update an application with a patch file (to fix bugs in the software) or update a file from the developer, you can look here to check the current version number for the application. You also get a rather boring list of the extensions (or drivers) used by OS X applications. Logs are usually valuable only to tech support personnel; they document recent lockups, application crashes, and even system crashes.
Figure 9-2: Display information about your Mac’s ports and connections.

Tracking Performance with Activity Monitor
Our next stop in Maintenance City is a useful little application dubbed Activity Monitor, which is specially designed to show you just how hard your CPU, hard drives, network equipment, and memory modules are working behind the scenes. (Activity Monitor is especially helpful in determining if your Mac is running low on system memory.) To run Activity Monitor, open the Utilities folder in Launchpad and click the Activity Monitor icon.
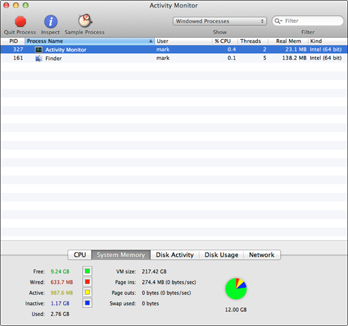
To display each different type of usage (CPU, system memory, and so on), click the buttons in the lower half of the window; the lower pane changes to reflect the desired type (see Figure 9-3). For example, if you click System Memory, you see the amount of unused memory; click CPU or Network to display real-time usage of your Mac’s CPU and network connections.
Figure 9-3: Keep tabs on Mountain Lion and what you’re running.
You can also display a separate window with your CPU usage; choose Window⇒CPU Usage or press ![]() +2. And just to make things fun, there are three different types of central processing unit (CPU, which is commonly called the “brain” of your Macintosh) displays available from Activity Monitor:
+2. And just to make things fun, there are three different types of central processing unit (CPU, which is commonly called the “brain” of your Macintosh) displays available from Activity Monitor:
![]() Floating CPU window: This is the smallest display of CPU usage; the higher the CPU usage, the higher the reading on the monitor. You can arrange the floating window in horizontal or vertical mode from the Window menu.
Floating CPU window: This is the smallest display of CPU usage; the higher the CPU usage, the higher the reading on the monitor. You can arrange the floating window in horizontal or vertical mode from the Window menu.
![]() CPU Usage window: This is the standard CPU monitoring window, which uses a blue thermometer-like display. The display works the same as the floating window.
CPU Usage window: This is the standard CPU monitoring window, which uses a blue thermometer-like display. The display works the same as the floating window.
![]() CPU History window: This scrolling display uses different colors to help indicate the percentage of CPU time being used by your applications (green) and what percentage is being used by Mountain Lion to keep things running (red). You can use the History window to view CPU usage over time.
CPU History window: This scrolling display uses different colors to help indicate the percentage of CPU time being used by your applications (green) and what percentage is being used by Mountain Lion to keep things running (red). You can use the History window to view CPU usage over time.
 Why do you have multiple bars in your CPU usage monitor? That’s because you’re running one of Apple’s multiple-core Intel processors. More than one engine is under the hood!
Whichever type of display you choose, you can drag the window anywhere that you like on your OS X Desktop. Use the real-time feedback to determine how well your system CPU is performing when you’re running applications or performing tasks in OS X. If this meter stays peaked for long periods of time while you’re using a range of applications, your processor(s) are running at full capacity.
You can even monitor CPU, network, hard drive, or memory usage right from the Dock! Choose View⇒Dock Icon; then choose what type of real-time graph you want to display in your Dock. (Feeling like a Mountain Lion power user yet? I thought so.) When you’re monitoring CPU usage from the Dock, the green portion of the bar indicates the amount of processor time used by application software, and the red portion of the bar indicates the CPU time given to the OS X operating system (same as how this works in the CPU History window).
 Note, however, that seeing your CPU capacity at its max doesn’t necessarily mean that you need a faster CPU or a new computer. For example, when I’m running memory-ravenous applications, such as Photoshop or Word, the Activity Monitor on my Mac mini is often pegged (indicating maximum use) for several seconds at a time. The rest of the time, it barely moves. Whether a computer is actually fast enough for you and the applications that you run is more of a subjective call on your part.
Fixing Things with the Disk Utility
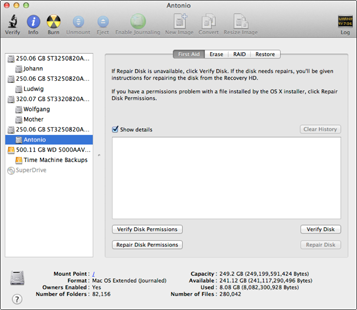
Another important application in your maintenance toolbox is Disk Utility, which you find (no surprise here) in the Utilities folder within your Applications folder. When you first run this program, it looks something like Figure 9-4, displaying all the physical disks and volumes on your system.
The Disk Utility application has its own toolbar that you can toggle on and off. Choose Window⇒Hide/Show Toolbar to display or hide the toolbar, or Window⇒Customize Toolbar to select which icons inhabit the Disk Utility toolbar.
Figure 9-4: The familiar face of Mountain Lion’s Disk Utility.
Displaying the goods on your disks
The volume tree structure on the left of the Disk Utility window lists both the physical disks and the partitions that you’ve set up. A partition is nothing more than another word for volume, which is the formatted section of a disk that contains data. A single physical hard drive can contain several partitions. The information display at the bottom of the Disk Utility window contains data about both the volumes and the partitions on your hard drive(s).
To illustrate: On my system, clicking the drive labeled 250.06 GB (the physical internal hard drive at the top of the tree) displays a description of the drive itself at the bottom of the window, including its total capacity, connection bus (the interface it uses), and whether the drive is internal or external (connection type). (See Figure 9-5.)
However, clicking the tree entry for Johann (the name of the partition that I created when I formatted the drive) displays information about the type of formatting, the total capacity of the partition and how much of that is used, and the number of files and folders stored on the partition (as shown at the bottom of Figure 9-6).
Figure 9-5: Display data on a physical drive.
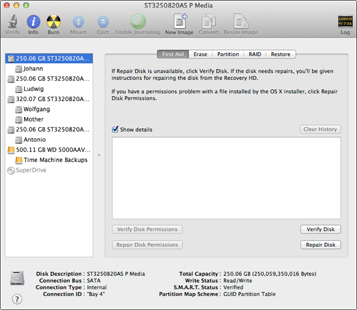
Figure 9-6: Display data on a volume.

Playing doctor with First Aid
From the First Aid pane, you can use Disk Utility to verify (or check) any disk (well, almost any disk) for errors, as well as repair any errors that it finds. Here are the two exceptions when the buttons are disabled:
![]() The start-up disk: Disk Utility can’t repair the start-up disk — that’s Mac talk for the boot drive that contains the OS X Mountain Lion system you’re using at the moment — which makes sense if you think about it, because that drive is being used!
The start-up disk: Disk Utility can’t repair the start-up disk — that’s Mac talk for the boot drive that contains the OS X Mountain Lion system you’re using at the moment — which makes sense if you think about it, because that drive is being used!
If you have multiple operating systems on multiple disks, you can boot from another OS X installation on another drive to check your current start-up disk. Or you can boot your system from the Recovery HD partition and run Disk Utility from the menu.
![]() Write-protected disks: Although you can use the Disk Utility to verify CDs and DVDs, Disk Utility can’t repair them — um, because they’re read-only. (Sound of my palm slapping my forehead.)
Write-protected disks: Although you can use the Disk Utility to verify CDs and DVDs, Disk Utility can’t repair them — um, because they’re read-only. (Sound of my palm slapping my forehead.)
You usually can’t repair a disk that has open files that are currently being used. If you’re running an application from a drive or you’ve opened a document that’s stored on that drive, you probably can’t repair that drive.
You can also elect to verify and repair the permissions (or privileges) on a disk (both permissions created by the Apple Installer and those created by the App Store); these are the read/write permissions that I discuss in detail in Book II, Chapter 6. If you can’t save or move a file that you should be able to access, I recommend checking that drive for permissions problems. Although you can’t fix disk errors on a boot drive, you can verify and repair permissions on any volume that contains an OS X installation (whether it was used to boot your Mac or not).
To verify or repair, you must be logged in as an admin-level user.
To verify or repair a drive, first select the target volume/partition in the list at the left. To check the contents of the drive and display any errors, click the Verify Disk button. Or, to verify the contents of the drive and fix any problems, click the Repair Disk button. (I usually just click Repair Disk because an error-free disk needs no repairs.) Disk Utility displays any status or error messages in the scrolling list; if you have eagle eyes, you’ll note that the window can be resized so that you can expand it to display more messages. (You can also drag the dot between the left and right panes to expand the list.)
I generally check my disks once every two or three days. If your Mac is caught by a power failure or OS X locks up, however, immediately check the disks after you restart your Mac. (Don’t forget that the start-up volume is automatically checked and repaired, if necessary.)
A number of very good commercial disk repair utilities are on the market. My favorite is Drive Genius 3 from Prosoft Engineering ($99; www.prosoft eng.com
). Disk Utility does a good job on its own, though, and it’s free.
Erasing without seriously screwing up
“Danger, Will Robinson! Danger!” That’s right, Robot, it is indeed very easy to seriously screw up and get “Lost in Erase.” (Man, I can’t believe I actually typed such a bad pun. I have no shame.) Anyway, it’s time for another of Mark’s Maxims. To paraphrase the rules for handling a firearm responsibly:
 Never — and I do mean never — click the Erase tab unless you mean to use it.
Figure 9-7 illustrates the Erase controls within Disk Utility. You need to erase a disk or volume only when you want to completely wipe the contents of that existing disk or volume. You can also erase a rewritable CD (CD-RW) or DVD (DVD-RW, DVD+RW, or DVD-RAM) from this pane.
Figure 9-7: The Disk Utility Erase controls.
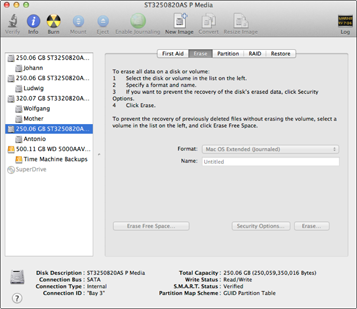
![]() Erasing an entire disk deletes all volumes on the disk and creates a single new, empty volume.
Erasing an entire disk deletes all volumes on the disk and creates a single new, empty volume.
![]() Erasing a volume wipes only the contents of that specific volume, leaving all other volumes on the physical disk untouched.
Erasing a volume wipes only the contents of that specific volume, leaving all other volumes on the physical disk untouched.
To erase, follow these steps:
1. Click the disk or volume icon that you want to erase from the list on the left side of the screen.
2. Click the Erase tab.
3. Click the format that you want to use from the Format pop-up menu.
Always choose Mac OS Extended (Journaled) entry from the Format list unless you have a specific reason to use the MS-DOS File System (for compatibility with PCs running Windows) or the ExFAT File System (for compatibility with high-capacity USB flash drives). In some cases, Disk Utility will force you to choose the Mac OS Extended entry instead, but the end result is the same. Note that you do not need to format a disk or volume with the MS-DOS File System just to read a file from a PC system — OS X recognizes MS-DOS removable media (such as a USB drive formatted under Windows) without a problem. You can also choose to encrypt a volume when formatting it — not a necessity (in most cases) for a personal Mac, but often a requirement in business and government offices.
4. In the Name field, type the name for the volume.
If you’re erasing an existing volume, the default is the existing name.
5. If you’re worried about security, click Security Options and specify the Secure Erase method you want to use.
By default, this is set to Fastest, so Disk Utility doesn’t actually overwrite any data while formatting; instead, it simply trashes the existing directory, rendering that data unreachable. Or is it? With some third-party disk utilities, an unscrupulous bum could actually recover your files after a simple Fast format, so you can specify alternative, more secure methods of erasing a disk or volume. Unfortunately, these more secure erasure methods can take a horrendous amount of time.
So, using the Fast option is okay unless you want to make sure that nothing can be recovered, or use the Zero Out Data to take a more secure route with the least amount of extra waiting. For example, you’d want to use the next-slowest option (which writes a single pass of all zeros over the entire disk) if you’re selling your Mac on eBay and you’re formatting the drive for the new owner. If you’re really set on the tightest, government-quality security, select Most Secure . . . but make sure you have plenty of time to spare!
You can even click Erase Free Space to wipe the supposedly “clean” areas of your drive before you format. Man, talk about airtight security!
6. Click the Erase button.
In the sheet that appears, click Erase to confirm that you do actually want to do the deleterious deed.
Partitioning the right way
From time to time, just about everyone wishes he had additional volumes handy for organizing files and folders, or at least a little extra space on a particular partition. If you find yourself needing another volume on a disk — or if you need to resize the total space on existing volumes on a disk — click the Partition tab within Disk Utility to display the controls that you see in Figure 9-8. (Make sure that you select a disk and not a volume.) From here, you can choose a volume scheme, creating anywhere from 1 to 16 volumes on a single disk.
Figure 9-8: The Disk Utility Partitioning controls.
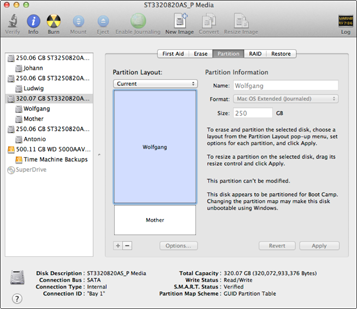
You can’t monkey around with the partitions on a start-up disk because OS X is currently running on that disk. (Think about removing your own appendix, and you get the idea.) Also, if you resize an existing volume, you may lose files and folders on that volume. Disk Utility will prompt you for permission, but always back up a partition before you resize it!
To set up the partitions on a disk, follow these steps:
1. From the Partition panel within Disk Utility, click the disk icon (left side of the pane) that you want to partition.
2. Click the Partition Layout pop-up menu and choose the total number of volumes that you want on the selected disk.
To add a partition to an existing layout, click the Add button (plus sign).
3. Click the first volume block in the partition list (under the Partition Layout pop-up menu) to select it.
I have two partitions set for this disk, as you can see.
4. Click in the Name field and enter the name for the selected volume.
5. From the Format pop-up menu, choose a format for the volume.
Always use Mac OS Extended or Mac OS Extended (Journaled) from the Format menu unless you have a specific reason to use the MS-DOS file system (for compatibility with PCs running Windows) or the ExFAT file system (for compatibility with high-capacity USB flash drives).
6. Type a total size for this volume in the Size field.
7. If you’re creating multiple volumes, click the next volume block to select it and repeat Steps 4–6.
Some folks create multiple volumes so that they can boot from multiple versions of OS X — like us author types.
8. To delete a partition from your new scheme, click the unwanted volume and then click the Delete button (a minus sign) to remove it.
9. After everything is set to your liking, click the Apply button to begin the process.
If you suddenly decide against a partition change, click the Revert button to return to the original existing partition scheme.
The Revert button is available only before you click the Apply button.
If you have more than one partition, check out the handles separating the volumes in the partition list — they appear as dashed lines in the lower-right corner of the partition. You can click and drag these handles to dynamically resize the volumes. This makes it easy to adjust the individual volume sizes for the disk until you get precisely the arrangement you want.
RAID has nothing to do with insects
The next stop on the Disk Utility hayride isn’t for everyone — as a matter of fact, only a OS X power user with a roomful of hardware is likely to use it. RAID (Redundant Array of Independent/Inexpensive Disks) is actually what it says. In normal human English, a RAID set is a group of multiple separate disks, working together as a team. RAID can
![]() Improve the speed of your system
Improve the speed of your system
![]() Help prevent disk errors from compromising or corrupting your data
Help prevent disk errors from compromising or corrupting your data
The RAID controls within Disk Utility are illustrated in Figure 9-9. (Note that I’ve turned on the Disk Utility toolbar as well, just to show you what it looks like.) You need at least two additional hard drives on your system besides the start-up disk, which I don’t recommend that you use in a RAID set.
Figure 9-9: The Disk Utility RAID controls.
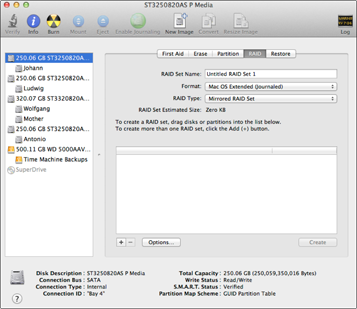
To set up a RAID array in OS X, follow these steps:
1. From the RAID tab of Disk Utility, click and drag the disks from the list at the left to the Disk box at the right.
2. Click the RAID Type pop-up menu to specify the type of RAID that you need.
• Striped RAID Set: Choosing this can speed up your hard drive performance by splitting data between multiple disks.
• Concatenated RAID Set: Choosing this allows several volumes (or even multiple disks) to appear as one volume within Mountain Lion.
• Mirrored RAID Set: Choosing this increases the reliability of your storage by creating a mirror backup of that data across multiple disks.
3. Click in the RAID Set Name field and type the name for your RAID set.
4. From the Format pop-up menu, choose a format for the volumes.
Always use Mac OS Extended or Mac OS Extended (Journaled) from the Format list unless you have a specific reason to use the MS-DOS File System (for compatibility with PCs running Windows). Journaling helps reduce the amount of disk fragmentation and also helps speed up your hard drive’s performance.
5. Click the Create button.
Updating OS X
As any good software developer should, Apple constantly releases improvements to OS X in the form of software updates. These updates can include all sorts of fun stuff, like
![]() Bug fixes
Bug fixes
![]() Improvements and new features
Improvements and new features
![]() Enhanced drivers
Enhanced drivers
![]() Security upgrades
Security upgrades
![]() Firmware upgrades
Firmware upgrades
Apple makes it easy to keep OS X up-to-date with the Software Update controls in System Preferences.
You don’t even have to display the System Preferences window to check for new software updates manually. Click the Apple menu (![]() ) on the menu bar and then choose Software Update to perform a manual check immediately.
) on the menu bar and then choose Software Update to perform a manual check immediately.
To check for new updates periodically, display the Software Update pane in System Preferences. Select the Check for Updates check box and choose how often you want these updates from the pop-up menu. (I suggest at least weekly, if not daily.) For a manual check, make sure that you’re connected to the Internet and then click the Check Now button.
Mountain Lion also displays a Notification window alerting you to new updates. You can choose to continue with the update from the Notification window, or wait and update manually later.
To download updates automatically, mark both the Download Updates Automatically and Automatically Update System Support Files check boxes to enable them; the Big X politely downloads the updates behind the scenes and then alerts you that they’re ready to be installed. With automatic downloading disabled, OS X launches the Updates pane of the App Store and displays any available updates with short descriptions, and you can manually click the Update button next to a specific update.
I recommend installing all updates, even for hardware that you don’t have yet. For example, I always install AirPort updates even though I don’t have AirPort hardware in my Mac Pro. The reason? Often, the functionality covered by an update may include system software that you do use, so you still benefit from installing it.
You might have to reboot after everything has been installed, so shut down any open apps.
I Demand That You Back Up Your Hard Drive
I know we’re friends, but there’s no excuse for not backing up your data. The more valuable and irreplaceable your documents are, the more heinous it is to risk losing them. (I don’t get to use the word heinous in many of my books, but it fits really well here.)
Although Apple does include the ability to create disk images and restore them in the Disk Utility (see the “So what’s a disk image?” sidebar, earlier in this chapter), I don’t recommend that you use disk images as your comprehensive backup solution. (Insert sound of stunned silence here.) The restore process can be confusing, and the disk image method doesn’t offer the level of control that you need when it comes to backing up individual files and folders (or selectively backing up by date or recent use).
If you do create backup datasets using disk images, you can restore them from the Restore tab in Disk Utility. You can also restore from a volume — typically, a volume you want to restore would be saved on a DVD or an external hard drive.
“Okay, Mark, what do I use to back up my valuable data?” Well, good citizen, only a bona fide backup application gives you such flexibility and convenience . . . and that’s why Mountain Lion power users turn to Time Machine, a feature that makes restoring files as easy as pointing and clicking!
Hitching a ride on the Time Machine
If you enable backups through Mountain Lion’s Time Machine feature, you can literally move backward through the contents of your Mac’s hard drive, selecting and restoring all sorts of data. Files and folders are ridiculously easy to restore — and I mean easier than any restore you’ve ever performed, no matter what the operating system or backup program. Time Machine can even handle things like deleted Contacts entries and photos you’ve sent to the Trash from iPhoto! To be blunt, Time Machine should be an important and integral part of every Mac owner’s existence.
You must have an external hard drive to use Time Machine — and if you travel often and you want to maintain a timely backup, you’ll have to take that external drive with you on the road, so that it can stay connected whenever possible. Luckily, there are countless portable hard drives on the market these days that take up less space than a paperback book.
Before you can use Time Machine, it must be enabled within the Time Machine pane in System Preferences. I cover these settings in detail in Book II, Chapter 3. I also recommend that you invest in an external USB, Thunderbolt, or FireWire hard drive to hold your Time Machine backups.
Here’s how you can turn back time, step-by-step, to restore a file that you deleted or replaced in a folder:
1. Open the folder that contained the file you want to restore.
2. In a separate window, open your Applications folder and launch the Time Machine application, or click the Time Machine icon on the menu bar and choose Enter Time Machine.
Naturally, you can also click the Launchpad icon on the Dock and then click the Time Machine icon.
The oh-so-ultra-cool Time Machine background appears behind your folder, complete with its own set of buttons at the bottom of the screen (as shown in Figure 9-10). On the right, you see a timeline that corresponds to the different days and months included in the backups that Mountain Lion has made.
Figure 9-10: Yes, Time Machine really does look like this!

3. Click within the timeline to jump directly to a date (displaying the folder’s contents on that date).
Alternatively, use the Forward and Back arrows at the right to move through the folder’s contents through time. (You should see the faces of Windows users when you “riffle” through your folders to locate something you deleted several weeks ago!)
The backup date of the items you’re viewing appears in the button bar at the bottom of the screen.
4. After you locate the file you want to restore, click it to select it.
5. Click the Restore button at the right side of the Time Machine button bar.
If you want to restore all the contents of the folder, click the Restore All button instead.
Time Machine returns you to the Finder, with the newly restored file now appearing in the folder. OUTstanding!
To restore specific data from your Contacts or images from iPhoto, launch the desired application first and then launch Time Machine. Instead of riffling through a Finder window, you can move through time within the application window.
For simple backup and restore protection, Time Machine is all that a typical Mac owner at home is likely to ever need. Therefore, a very easy Mark’s Maxim to predict:
Connect an external hard drive (or add a Time Capsule device to your system) and turn on Time Machine. Do it now. Don’t make a heinous mistake.
How about that? I got to use heinous twice in one chapter.
Using other backup solutions
Time Machine is indeed awesome, but some Mac owners prefer a more traditional automated backup and restore process — one that doesn’t involve running the Time Machine application and navigating through the files and folders on a drive. For example, a person backing up a Mac acting as a web server or iTunes media server would much rather restore the entire contents of a volume automatically, in bulk, or create a custom backup/restore schedule that safeguards only certain files and folders.
If you’re dead-set against Time Machine, you can turn to a commercial backup application for your salvation, like SuperDuper! (from www.shirt pocket.com
), which can create a fully bootable image backup (often called a clone) of your Mac’s hard drive.
If no other backup is available, you can always take a second to at least back up your most important documents by copying them to a rewriteable CD or a USB flash drive. With this poor man’s backup, even if you lose your entire hard drive, you can still restore what matters the most.
I Further Demand That You Defragment
Defragmenting your hard drive can significantly improve its performance. Using a defragmenter scans for little chunks of a file that are spread out across the surface of your hard drive and then arranges them to form a contiguous file. After a file has been optimized in this way, it’s far easier and faster for OS X to read than reassembling a fragmented file.
However, Apple dropped the ball on this one and didn’t include a defragmenter with OS X. Luckily, many third-party disk utilities (such as the aforementioned Drive Genius 3 from Prosoft Engineering) also include a defragmenting feature. If you have a defragmenter, I recommend that you use it once a month.
Special Start-Up Keys for Those Special Times
OS X includes a number of special keys that you can use during the boot process. These keys really come in handy when you need to force your operating system to do something that it normally wouldn’t, such as boot from a CD instead of the hard drive.
![]() To boot from a CD or DVD: Restart your Mac while pressing the C key. This is a great way to free your startup volume when you want to test it or optimize it using a commercial utility.
To boot from a CD or DVD: Restart your Mac while pressing the C key. This is a great way to free your startup volume when you want to test it or optimize it using a commercial utility.
![]() To boot from the Recovery HD partition: Restart or boot OS X while pressing
To boot from the Recovery HD partition: Restart or boot OS X while pressing ![]() +R.
+R.
![]() To eject a recalcitrant disc that doesn’t show up on the Desktop: Restart OS X and hold down the mouse button — or if you have a late-model Mac, press the Media Eject key as soon as you hear that magnificent startup chord.
To eject a recalcitrant disc that doesn’t show up on the Desktop: Restart OS X and hold down the mouse button — or if you have a late-model Mac, press the Media Eject key as soon as you hear that magnificent startup chord.
![]() To force your Mac to boot in OS X: Hold down the X key while restarting or booting the Mac.
To force your Mac to boot in OS X: Hold down the X key while restarting or booting the Mac.
![]() To display a system boot menu: Hold down the Option key while restarting or booting the Mac, and you can choose which operating system you want to use.
To display a system boot menu: Hold down the Option key while restarting or booting the Mac, and you can choose which operating system you want to use.
![]() To prevent start-up applications from running during login: Hold down the Shift key while you click the Login button on the Login screen. If you don’t see the Login screen during startup, just hold down Shift while OS X boots until the Finder menu appears.
To prevent start-up applications from running during login: Hold down the Shift key while you click the Login button on the Login screen. If you don’t see the Login screen during startup, just hold down Shift while OS X boots until the Finder menu appears.
Crave the Newest Drivers
No chapter on maintenance would be complete without a reminder to keep your hardware drivers current. Drivers are simply programs that allow your Mac to control hardware devices, such as a video card or an external SATA (eSATA) card that you’ve added to your Mac Pro. The OS X Software Update feature that I discuss earlier, in the section “Updating OS X,” provides most of the drivers you need for things like printers, USB, Thunderbolt, and FireWire peripherals, and digital cameras, but it’s still very important to check those manufacturer websites.
Like the software updates from Apple, updated drivers can fix bugs and even add new features to your existing hardware, which is my definition of getting something for nothing.