
Chapter 39
Core ASP.NET
WHAT’S IN THIS CHAPTER?
- Introduction to ASP.NET technologies
- Creating handlers and modules
- Configuring applications
- State management
- Membership and roles
WROX.COM CODE DOWNLOADS FOR THIS CHAPTER
The wrox.com code downloads for this chapter are found at http://www.wrox.com/remtitle.cgi?isbn=1118314425 on the Download Code tab. The code for this chapter is divided into the following major examples:
- Handlers and Modules
- State Management
- Membership and Roles
.NET FRAMEWORKS FOR WEB APPLICATIONS
Part of the .NET Framework, ASP.NET is a technology that enables the dynamic creation of documents on a web server when they are requested via HTTP. Unlike WPF, which requires the .NET Framework on the client, an ASP.NET client only needs a browser. Here, .NET code is running on the server, and thus the Framework is required on the server. The client just needs support for HTML and JavaScript.
With the .NET Framework and Visual Studio 2012 you’ve different frameworks for creating Web applications. ASP.NET Web Forms is the older of these technologies, ASP.NET MVC the newer one. Every one of these technologies has its use and advantages and disadvantages.
This chapter takes a detailed look at the foundation of ASP.NET, including how it works, what you can do with it, and what ASP.NET Web Forms and ASP.NET MVC share in common.
ASP.NET offers different frameworks to create web applications: ASP.NET Web Forms, ASP.NET Web Pages, and ASP.NET MVC. ASP.NET Web Forms is the oldest of these technologies, available since .NET 1.0. The other technologies are newer and based on newer concepts. The following sections look at these options for returning HTML to the client.
ASP.NET Web Forms
ASP.NET Web Forms, which has been in existence since 2002 with the inception of .NET, is now available in version 4.5. The goal of ASP.NET Web Forms is that Windows Forms developers should feel at home. This framework offers server-side controls that have properties and methods very similar to Windows Forms controls. The developer using this framework doesn’t need to know HTML and JavaScript because as the controls themselves create HTML and JavaScript to be returned to the client.
It’s very easy to use this framework without any knowledge of HTML, JavaScript, or HTTP requests that are sent across the network. However, it’s always useful to know something about these technologies otherwise you run the risk of sending unnecessary data across the network within a view state. The view state is used by the server-side controls to make event handling on the server side possible. Chapter 40, “ASP.NET Web Forms,” provides more details on the view state as it is used with ASP.NET server-side controls. Sometimes the generated HTML code is not the code wanted. Server-side controls often provide an option to define the HTML code with a custom template.
For small websites, ASP.NET Web Forms is extremely easy to use, with results quickly achieved. With bigger and more complex websites, it’s important to pay attention to the postbacks that are done from the client to the server and the view state that is sent across the network; otherwise, the application could easily become slow. ASP.NET Web Forms provides numerous options to effect this, making it fast and fluent, but this cancels out the advantage of using Web Forms and other frameworks might lead to better results. Making Web Forms fast and fluid means not using some of the available controls and writing custom code instead. So the advantage of not writing custom code with Web Forms is gone.
ASP.NET Web Pages
ASP.NET Web Pages is a new technology for those new to Microsoft .NET. This technology offers easier control of HTML and JavaScript. Indeed, in developing with this technology it’s necessary to write HTML and JavaScript. .NET code can be added to the same pages as HTML code. Rendering code and functionality is mixed within the same file. This actually has a big disadvantage when writing unit tests, but it provides HTML and JavaScript developers with an easier way to start using .NET.
ASP.NET Web Pages provide helper classes that enable using specific functionality with just a few lines of code, such as reading data from the database, as the following code snippet demonstrates:
@{
  var db = Database.OpenConnectionString(
    "server=(local)sqlexpress;database=Formula1;trusted_connection=true");
}
//...
  @foreach (row in db.Query("SELECT * FROM Racers") {
//...The Database class is part of the WebMatrix assembly. It enables querying the database with just a few lines of code. With this, database code and UI code are mixed within the same file. While this is not a recommended practice for maintainable code, it does offer a good way to begin programming simple websites.
After starting with ASP.NET Web Pages, users can easily move to ASP.NET MVC from there. Creating websites is simple with both ASP.NET MVC and ASP.NET Web Pages, and it’s easy to move code from within the page to the controller that’s used with ASP.NET MVC.
Because this book is targeted for professional programmers, this chapter does not discuss ASP.NET Web Pages. Instead, it focuses on ASP.NET Web Forms and ASP.NET MVC.
ASP.NET MVC
ASP.NET MVC is based on the MVC pattern: Model-View-Controller. Shown in Figure 39-1, this standard pattern (a pattern documented in the Design Patterns book by the GOF) defines a model that implements data entities and data access, a view that represents the information shown to the user, and a controller that makes use of the model and sends data to the view. The controller receives a request from the browser and returns a response. To build the response, the controller can make use of a model to provide some data, and a view to define the HTML that is returned.

With ASP.NET MVC, the controller and model are typically created with C# and .NET code that is all run server-side. The view is HTML code with JavaScript and just a little C# code to access server-side information.
The big advantage of this separation with the MVC pattern is that unit tests can easily test the functionality. The controller just contains methods with parameters and return values that can be covered easily with unit tests.
WEB TECHNOLOGIES
Before getting into the foundations of ASP.NET, this section describes core web technologies that are important to know when creating web applications: HTML, CSS, JavaScript, and jQuery.
HTML
HTML is the markup language that is interpreted by web browsers. It defines elements to display various headings, tables, lists, and input elements such as text and combo boxes.
The W3C recommendations for HTML 4.01 were released in December 1999. HTML5, still in draft at the time of this writing (2012), is already in use. By using a restricted subset of HTML5, it can be used in older browsers. It is also increasingly adopted because several new features make it unnecessary to use Flash and Silverlight, so browser add-ins are not required. Some browsers, such as Internet Explorer in Windows 8 or Safari on the iPad, don’t support add-ins.
HTML5 adds new semantic elements that can better be used by search engines to analyze the site. A canvas element enables the dynamic use of 2-D shapes and images, and video and audio elements make the object element obsolete.
HTML5 also defines APIs for drag-and-drop, storage, web sockets, and much more.
With ASP.NET Web Forms, server-side controls generate HTML. With ASP.NET MVC, the programmer has more responsibility to write HTML code.
CSS
Whereas HTML defines the content of web pages, CSS defines the look. In the earlier days of HTML, for example, the list item tag <li> defined whether list elements should be displayed with a circle, a disc, or a square. Nowadays such information is completely removed from HTML and is instead put into a cascading stylesheet (CSS).
With CSS styles, HTML elements can be selected using flexible selectors, and styles can be defined for these elements. An element can be selected via its id or its name, and you can define CSS classes that can be referenced from within the HTML code. With newer versions of CSS, quite complex rules can be defined to select specific HTML elements.
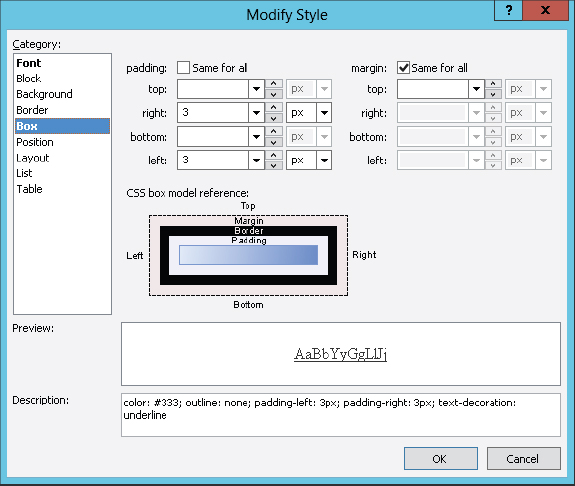
Figure 39-2 shows the Modify Style dialog of the CSS editor that is part of Visual Studio 2012, which can be used with all web applications to define stylesheets.
JavaScript and jQuery
Not all platforms and browsers can use .NET code, but nearly every browser understands JavaScript. One common misconception about JavaScript is that it has something to do with Java. In fact, only the name is similar because it uses some of the same naming conventions, and both Java and JavaScript have the same roots (the C programming language), which is also true for C#. JavaScript is a functional programming language that is not object-oriented, although object-oriented capabilities have been added to it.
JavaScript enables accessing the DOM from the HTML page and thus it is possible to change elements dynamically on the client. In addition to JavaScript, Internet Explorer enables the use of VBScript for accessing the DOM. However, as other browsers don’t support VBScript, JavaScript is the only real option to write client-side code that should run everywhere.
Supporting web pages with JavaScript across different browsers is still a nightmare, as many implementations are handled differently, not only between different browser vendors but also from a single vendor but using different browser versions. One solution for this is a JavaScript library, such as jQuery (http://www.jquery.org). Using just a few lines of code, jQuery makes it easy to do things that required a lot of JavaScript code, and it assumes the responsibility for dealing with different browser engines, abstracting this work away from the JavaScript programmer.
ASP.NET Web Projects include the jQuery library, and Visual Studio 2012 also supports IntelliSense and debugging JavaScript code.
HOSTING AND CONFIGURATION
A web application needs a host on which it can run. Usually, Internet Information Services (IIS) is the host used for production sites. On the developer system it’s not necessary to install IIS. Visual Studio 2012 includes Visual Studio Development Server and IIS Express.
Visual Studio Development Server is a simple server that hosts the ASP.NET runtime. This server runs in a different security context than IIS. Using IIS Express is a new option that is very similar to the full IIS.
Configure the server for your web project from the Web tab in the project settings, as shown in Figure 39-3.

To configure web applications, application configuration files come into play. The first configuration file that is used by all .NET applications (not only web applications) is the file machine.config, which can be found in the directory <windir>Microsoft.NETFrameworkv4.0.30319. For web applications, configuration is necessary for membership and role providers. These providers can also be used from other .NET applications, so it is useful to have this configuration within machine.config.
The web.config file in the same directory is used for specific ASP.NET configurations. The configurations here are exclusively for web applications. You will find default settings for trust levels and fully trusted assemblies (see Chapter 22, “Security” for more information on permissions for assemblies), compiler configurations that are used for compilation of C# code on first use of a website, referenced assemblies, health monitoring, event log and profile providers, HTTP handlers and modules, configured protocols for WCF, site maps, and Web Part configurations.
Other configuration files to define browser-specific capabilities are found in the subdirectory Browsers. Here you can find the files Default.browser, ie.browser, opera.browser, and iphone.browser, firefox.browser, among others, that define all the capabilities of the specified browser. These capabilities can be used — and are used — from server-side controls to influence the HTML and JavaScript code returned, depending on the capabilities of the caller.
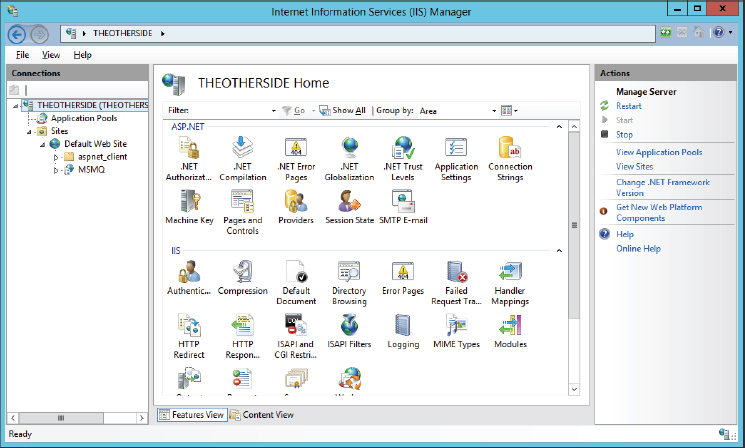
Running the web application with Internet Information Services (IIS), the next configuration file is in the directory inetpubwwwroot, if settings from the global Web.config file are overridden. Every web application and even subdirectories create other Web.config files that override parent settings. Using the Internet Information Services (IIS) Manager tool, you can change a configuration using a graphical UI, as shown in Figure 39-4.
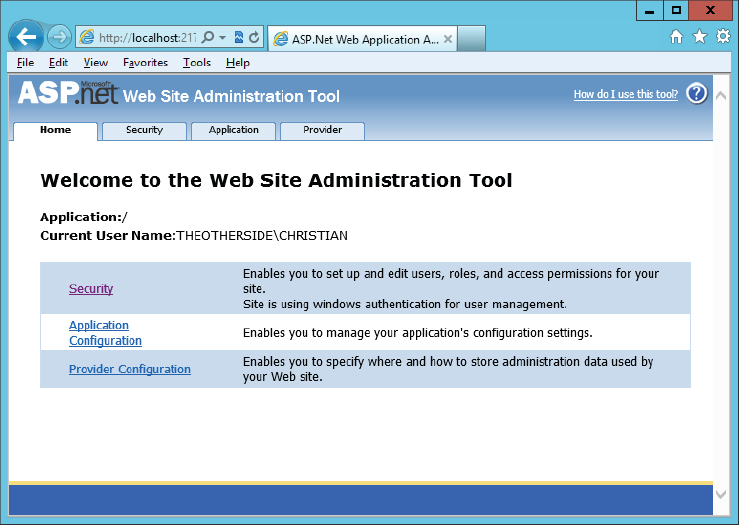
Another tool for changing the configuration of the Web.config file is the ASP.NET Web Site Administration Tool, shown in Figure 39-5. This tool is available both directly from within Visual Studio (select Project ⇒ ASP.NET Configuration) and when the application is not hosted within IIS. However, this tool provides very limited configuration options.
HANDLERS AND MODULES
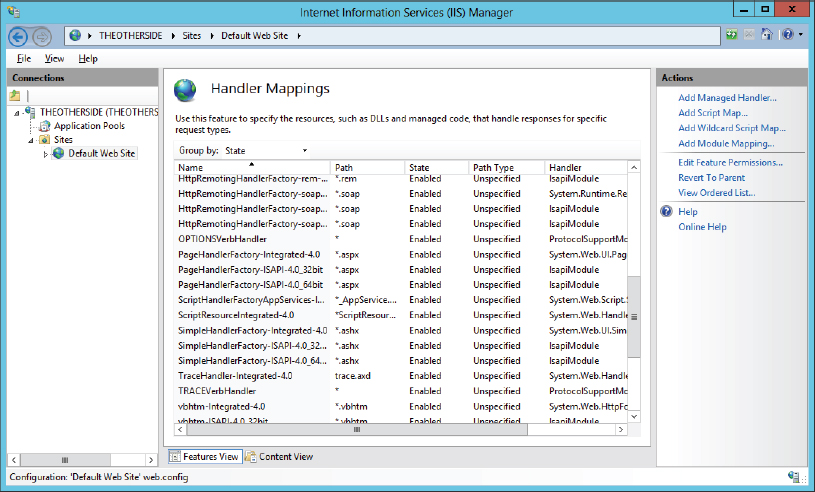
This section examines what happens when the client makes a request to the web server. First, the web server tries to find a handler suitable for the request type. IIS includes a large number of handlers, as shown in Figure 39-6, such as a handler for .aspx files that instantiates a page class through a PageHandlerFactory, or a handler for .svc files that is used by WCF.
With each handler that is invoked, several modules come into play. There’s a module to deal with security, to authenticate the user, to handle authorization, to create the session state, and so on. Figure 39-7 shows the Modules dialog and how they can be configured with IIS.

Creating a Custom Handler
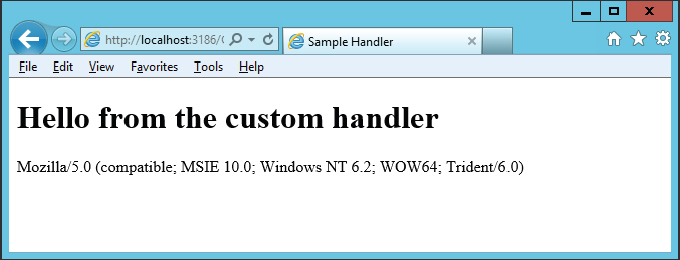
A custom handler can be created by creating a class that implements the interface IHttpHandler. The following example (code file HandlerSample/SampleHandler.cs) creates a library that references the System.Web assembly and defines the class SampleHandler, which implements the interface IHttpHandler. This interface defines a property IsReusable and a method ProcessRequest. IsReusable returns true if the handler instance can be reused across different requests. The ProcessRequest method receives an HttpContext with the argument. The HttpContext enables receiving request information from the caller and sends a response back. The sample code defines an HTML string that is returned. From the HttpRequest object, the UserAgent property is used to send the result from this property back with the response:
using System.Web;

namespace Wrox.ProCSharp.ASPNETCore
{
  public class SampleHandler : IHttpHandler
  {
    private string responseString = @"
<!DOCTYPE HTML>
<html>
<head>
  <meta charset=""UTF-8"">
  <title>Sample Handler</title>
</head>
<body>
  <h1>Hello from the custom handler</h1>
  <div>{0}</div>
</body>
</html>";

    public bool IsReusable
    {
      get { return true; }
    }

    public void ProcessRequest(HttpContext context)
    {
      HttpRequest request = context.Request;
      HttpResponse response = context.Response;
      response.ContentType = "text/html";
      response.Write(string.Format(responseString, request.UserAgent));
    }
  }
}
With a web application, the assembly from the handler is referenced, and the handler is added to the handlers section in the Web.config file. A handler is defined by specifying a name that can be used to reference it programmatically, a verb that specifies the HTTP method (GET, POST, HEAD, etc.), a path that specifies the link that is used by the user, and the type identifying the class implementing IHttpHandler. The path also enables specifying file extensions, e.g., *.aspx to invoke the handler with every request to an aspx file.
  <system.webServer>
    <handlers>
      <add name="SampleHandler" verb="*" path="CallSampleHandler"
        type="Wrox.ProCSharp.ASPNETCore.SampleHandler, HandlerSample" />
    </handlers>
  </system.webServer>
Requesting the link /CallSampleHandler, the handler is invoked to return the user agent string from the client. The user agent information from Internet Explorer 10 is shown in Figure 39-8.
ASP.NET Handlers
For ASP.NET Web Forms applications, a handler named PageHandlerFactory is configured for the file extension aspx. The type responsible for this handler is System.Web.UI.PageHandlerFactory. This type implements the interface IHttpHandlerFactory, which is a factory for IHttpHandler objects. This interface defines GetHandler and ReleaseHandler methods to return and release Web Form pages, respectively. The Web Form base class Page implements the interface IHttpHandler and serves as a handler.
For files that shouldn’t be served to the user (e.g., files with the extension .cshtml), the type HttpForbiddenHandler answers the request with HTTP 403 errors to deny access.
For ASP.NET MVC, an ExtensionlessUrlHandler is configured for the path *. The type dealing with these requests is System.Web.Handlers.TransferRequestHandler. For using routes as they are used by ASP.NET MVC, the UrlRoutingModule class takes action to transfer the request MvcRouteHandler. This handler creates an MvcHandler for a specific route. The MvcHandler searches for a controller to take the request.
With a web application it’s possible to create generic handlers. A generic handler has the file extension ashx and is indirectly invoked from the SimpleHandlerFactory type. Generic handlers implement the interface IHttpHandler in the same way as shown earlier, but it’s not necessary to configure them. Because of the file extension, the SimpleHandlerFactory is invoked, which searches for the requested file to transfer the handler request.
Creating a Custom Module
To create a custom module, the class needs to implement the interface IHttpModule. This interface defines Init and Dispose methods.
The following code snippet (code file WebApp/ModuleSample/SampleModule.cs) shows a module that verifies whether the request is coming from a predefined list of IP addresses, denying access if not. The Init method is invoked with the start of the web application. The parameter is of type HttpContext. However, not a lot can be done in this method because many of the HttpContext parameters are not filled yet, as the method is invoked before the first request is created. It is possible to add event handlers to events such as BeginRequest, EndRequest, AuthorizeRequest, AuthenticateRequest, PreRequestHandlerExecute, and so on. The sample code adds event handlers to the BeginRequest and PreRequestHandlerExecute events. With the BeginRequest method, a file is loaded to a list collection that contains all allowed IP addresses. The PreRequestExecute method verifies whether the IP address of the caller is in the list of allowed IP addresses by using the UserHostAddress property of the HttpRequest object. If it isn’t, it throws an exception of type HttpException with an HTTP error code 403:
using System;
using System.Collections.Generic;
using System.IO;
using System.Linq;
using System.Web;

namespace Wrox.ProCSharp.ASPNETCore
{
  public class SampleModule : IHttpModule
  {
    private const string allowedAddressesFile = "AllowedAddresses.txt";
    private List<string> allowedAddresses;

    public void Dispose()
    {
    }

    public void Init(HttpApplication context)
    {
      context.LogRequest += new EventHandler(OnLogRequest);
      context.BeginRequest += BeginRequest;
      context.PreRequestHandlerExecute += PreRequestHandlerExecute;
    }

    private void BeginRequest(object sender, EventArgs e)
    {
      LoadAddresses((sender as HttpApplication).Context);
    }

    private void LoadAddresses(HttpContext context)
    {
      if (allowedAddresses == null)
      {
        string path = context.Server.MapPath(allowedAddressesFile);
        allowedAddresses = File.ReadAllLines(path).ToList();
      }
    }

    private void PreRequestHandlerExecute(object sender, EventArgs e)
    {
      HttpApplication app = sender as HttpApplication;
      HttpRequest req = app.Context.Request;
      if (!allowedAddresses.Contains(req.UserHostAddress))
      {
        throw new HttpException(403, "IP address denied");
      }
    }

    public void OnLogRequest(Object source, EventArgs e)
    {
      //custom logging logic can go here
    }
  }
}
The file AllowedAddresses.txt contains a list of allowed IP addresses. In case you’re using IPv6, you should also add an IPv6 address to allow communication between the client and the server, as shown here:
127.0.0.1
10.0.0.22
::1
The module is configured in the section system.webServer in the file Web.config. The configuration is similar to the handlers; only here it needs to be within modules:
  <system.webServer>
    <modules>
      <add name="SampleModule"
        type="Wrox.ProCSharp.ASPNETCore.SampleModule, ModuleSample" />
    </modules>
  </system.webServer>
Common Modules
With every request, several modules are invoked. The following code snippet is from the InfoHandler.cs file of the HandlerSample project. It shows the loaded modules. HttpContext.ApplicationInstance returns the HttpApplication, and this type defines a Modules property, which returns a collection of all the loaded modules:
    public void ProcessRequest(HttpContext context)
    {
      var sb = new StringBuilder();
      sb.Append("<ul>");
      foreach (var module in context.ApplicationInstance.Modules)
      {
        sb.AppendFormat("<li>{0}</li>", module);
      }
      sb.Append("</ul>");
      context.Response.ContentType = "text/html";
      context.Response.Write(string.Format(responseString, sb.ToString()));
    }
Figure 39-9 shows the output of the configured handler. Common modules include OutputCache, to cache responses; Session, which deals with remembering memory state for a client; various authentication and authorization modules such as WindowsAuthentication, FormsAuthentication, FileAuthorization, and UrlAuthorization; Profile, for persistence user-based storage; and ServiceModule, for WCF.

In addition to dealing with common functionality globally by using handlers and modules, another way is to use the global application class, discussed next.
GLOBAL APPLICATION CLASS
The global application class is available globally for the web application to deal with events independent of the pages. Here you can add initialization code for the web application, and code that is invoked with every request. An Application object is created when an application is started for the first time, which is when the first HTTP request arrives. Also at this time, the Application_Start event is triggered, and a pool of HttpApplication instances is created. Each incoming request receives one of these instances, which performs request processing. Note that this means HttpApplication objects do not need to cope with concurrent access, unlike the global Application object. When all HttpApplication instances finish their work, the Application_End event fires and the application terminates, destroying the Application object.
The event handlers for the events mentioned earlier (along with handlers for all other events discussed in this chapter) can be defined in a global.asax file, which you can add to any website project (it is listed as Global Application Class in the templates that appear when you add a new item to a web application). The generated file contains blanks for you to fill in, as shown in this example:
   void Application_Start(Object sender, EventArgs e)
   {
      // Code that runs on application startup
   }
When an individual user accesses the web application, a session is started. Similar to the application, this involves the creation of a user-specific Session object, along with the triggering of a Session_Start event. Within a session, individual requests trigger Application_BeginRequest and Application_EndRequest events. These can occur several times during the scope of a session as different resources within the application are accessed. Individual sessions can be terminated manually or they will time out if no further requests are received. Session termination triggers a Session_End event and the destruction of the Session object.
Against the background of this process, you can do several things to streamline your application. If all instances of your application use a single, resource-heavy object, for example, then you might consider instantiating it at the application level. This can improve performance and reduce memory usage with multiple users because, in most requests, no such instantiation will be required.
Another technique you can use is to store session-level information for use by individual users across requests. This might include user-specific information that is extracted from a data store when the user first connects (in the Session_Start event handler), and which is made available until the session is terminated (through a timeout or user request).
REQUEST AND RESPONSE
In the handler example shown earlier, you saw how a request from a client is answered with a response. Information from the request can be directly accessed by using an HttpRequest object, and defining what to return is wrapped with an HttpResponse. The following sections examine these objects.
Using the HttpRequest Object
The HttpRequest object can be accessed by using the Request property of the class or the HttpContext. One feature of the HttpRequest is to receive browser information including the capabilities of the browser. The Browser property of HttpRequest returns an HttpBrowserCapabilities object that provides access to the capabilities of the browser. With this object you can check the JavaScript version, whether the browser supports cookies and frames, and so on.
The following code snippet uses the Browser property of the HttpRequest object to get information about the browser capabilities. You can use strongly typed access to check for various features, e.g., CanInitiateVoiceCall to check whether voice calls can be made, or CanSendMail to check whether e-mail can be sent. The following code snippet directly accesses a dictionary by using the Capabilities property:
      HttpBrowserCapabilities browserCapabilities = Request.Browser;
      Response.Write("<ul>");
      foreach (var key in browserCapabilities.Capabilities.Keys)
      {
        Response.Write("<li>");
        Response.Write(string.Format("{0}: {1}", key,
          browserCapabilities.Capabilities[key]));
        Response.Write("</li>");
      }
      Response.Write("</ul>");
Figure 39-10 shows the capabilities as returned from IE10.
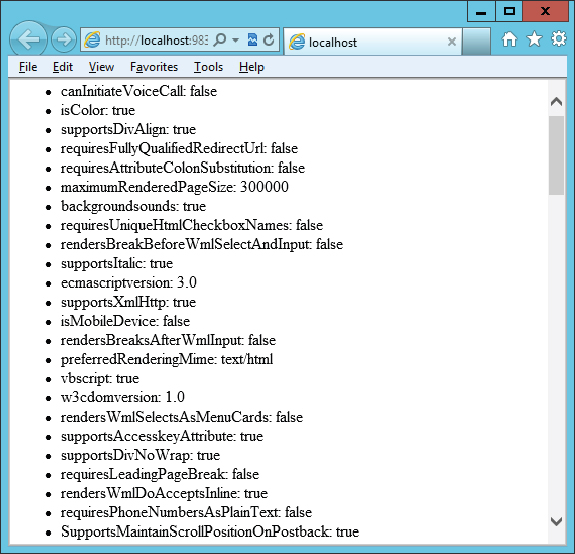
All the capabilities information is taken from the browser configuration files, as discussed earlier in the configuration section. The Browsers property of the HttpBrowserCapabilities object provides information about how the capabilities are retrieved. IE10 returns default, mozilla, ie, ie6plus, and ie10plus with this property, which specifies exactly from what configurations the capabilities are created.
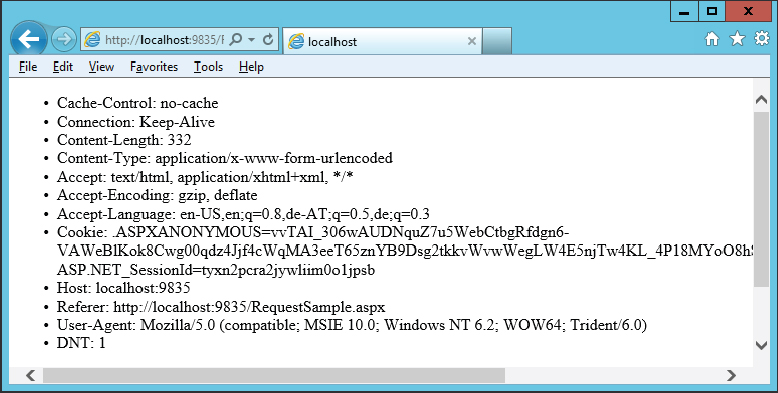
The Headers property of the HttpRequest object returns all HTTP header information. The following code snippet gets all header information from the browser. The result is shown in Figure 39-11.
      NameValueCollection headers = Request.Headers;
      Response.Write("<ul>");
      foreach (var key in headers.Keys)
      {
        foreach (var value in headers.GetValues(key.ToString()))
        {
          Response.Write("<li>");
          Response.Write(string.Format("{0}: {1}", key, value));
          Response.Write("</li>");
        }
      }
      Response.Write("</ul>");
The HTTP header includes cookies sent from the client. However, to retrieve cookies, an easier form of access than using the Headers property is to use the Cookies property. This is discussed later in the section “Cookies.” User information and the data that is sent from the client within the HTML Form can also be accessed using the request object.
Using the HttpResponse Object
The HttpResponse object enables sending data back to the client. The Response property of the Page (and the HttpContext) returns the current HttpResponse object.
You’ve already seen how the HttpResponse object was used to return data back to the client (with the Write method). Just as HTTP headers and cookie information can be accessed with the HttpRequest object, the header and cookies returned to the client are influenced by the HttpResponse object. HttpResponse defines Headers and Cookies properties as well.
Instead of sending content to the client, the response object can also send a redirect. Redirect sends a HTTP 302 status code with the information to the client that it should use another URL instead. RedirectPermanent sends a HTTP 301 status code instructing the caller to use the new URL permanently. RedirectToRoute uses the route table to find a matching route for building a redirect request to the client.
STATE MANAGEMENT
The HTTP protocol is stateless. Every new page request can be a new connection. However, it’s often necessary to remember user information. State can be remembered on either the client or the server. This section discusses the different options to do that and how to program them. The samples make use of ASP.NET Web Form pages and use simple TextBox, Label, and Button controls with equally simple event handlers to demonstrate the different state features. Properties of the Page class are used to access features for state management, e.g., the HttpSessionState object can be directly accessed from the Page class with the Session property. Outside of the Page class, the same can be achieved using the HttpContext. HttpContext.Current returns the active HttpContext object, and this class has a Session property as well to return the HttpSessionState. In other words, all the state management features can be easily achieved both from ASP.NET Web Forms and from ASP.NET MVC.
To keep state on the client, ASP.NET gives different options: view state, cookies, and parameters. Because of security issues there are some restrictions with this state. Keeping state on the server is done with session objects, global application state, cache, and user profiles. All these different options are covered in the following subsections.
View State
View state is valid only within a page. As long as the user stays on the same page, view state can be used. View state creates a hidden HTML field in the page that is sent to the server because it is within the <form> tag.
View state can be accessed by using the ViewState property of the Page. The ViewState property returns a StateBag object. Passing a key value to the indexer, data can be read and written with the view state. The following example reads data from the view state with the key state1, and writes the value from the Text property of TextBox1 to the same view state object:
    protected void Button1_Click(object sender, EventArgs e)
    {
      Label1.Text = string.Format("TextBox1.Text: {0}", TextBox1.Text);
      Label2.Text = string.Format("ViewState["state1"] {0}",
        ViewState["state1"]);
      ViewState["state1"] = TextBox1.Text;
    }
Opening the sample page ViewState1.aspx for the first time, the Button1_Click method was not yet invoked, and thus both labels show the initial value Label.
If you write one to the text box control and click the button, a postback to the server is done and the Button1_Click method invoked for the first time. Here the TextBox1.Text property returns the entered data, and thus the Text property of the first label is filled with this data. The second label only shows the first part of the message, the ViewState["state1"] returns null. In the last line of the method, view state is initialized to the value from the text box.
Writing two to the text box and clicking the button for the second time, another postback to the server is done. ViewState["state1"] now returns the previous entered data one, and TextBox1.Text returns the new string two.
View state is stored with a hidden field in the page:
<input type="hidden" name="__VIEWSTATE" id="__VIEWSTATE" value=
 "XSLM3n7Gl3EVtL9CN4jAYfe3T5x/Lr26ORPT4+MEsapcFdvlu0Ooc9uiyOGku2IKOyEgv3WyR0
  0iUNUKM0kBaVN1nMVm/W8c8Ilx2cyeHO+zVbzAfZCYVUPD1gIIlup2ZLW9fpfYZ+d8S+uBM/Vg
  WbCmsYBHW5RGaINY2QsSxep2kMfeoueD4YHND36J29XcRMV9K86Bzw4/OcX9uc7WwA==" />
Using a hidden field has the advantage that there’s no timeout. As long as the user keeps the page open, the hidden field is there and sent to the server the next time. If the user closes the page, the state is gone. The state is also gone if the user switches to a different page. Two disadvantages of view state is that the state must be represented in a string, and all the view state data is always sent across the network. This can involve transfer of large amount of data, slowing performance.
Cookies
Cookies are stored on the client, either just in the memory of the browser (session cookie) or on disk (persistent cookie). They are part of the HTTP protocol and sent within the HTTP header. Every time a user visits a website, the cookies from this site are sent to the server. If a path is set with the cookie, they are sent only if the path is the same.
With ASP.NET, cookies can be sent to the client with the HttpResponse class (Response property of the Page). HttpResponse has a SetCookie method (code file StateSample/CookieWrite.aspx.cs) to pass an HttpCookie. The constructor of the HttpCookie enables setting the name and value of the cookie. Other than that, the HttpCookie class defines the properties Domain and Path to associate and send the cookie to the server only if files within a specific directory are requested. The sample code sends a single value with the cookie named cookieState. A single cookie can also contain a list of values that can be assigned with the Values property. If the Expires property is set to a date, the cookie is a persistent cookie; otherwise, it’s just a temporary cookie that is lost as soon as the browser is closed. The following code creates a persistent cookie if a check box is selected. Setting the Secure property of the cookie to true sends the cookie only if the HTTPS protocol is used:
    protected void Button1_Click(object sender, EventArgs e)
    {
      var cookie = new HttpCookie("cookieState", TextBox1.Text);
      if (CheckBox1.Checked)
      {
        cookie.Expires = DateTime.Now.AddYears(1);
      }
      Response.SetCookie(cookie);
    }
The browser sends the cookies to the server. Of course the browser does not send all cookies to all servers, but only cookies to the server with the same domain name and path (if the path was specified). Retrieving the cookie is done with the Cookies property of the HttpRequest object. Just pass in the name to the indexer, and the HttpCookie is retrieved (code file StateSample/CookieRead.aspx.cs):
    protected void Page_Load(object sender, EventArgs e)
    {
      HttpCookie cookie = Request.Cookies["cookieState"];
      if (cookie != null)
      {
        Label1.Text = cookie.Value;
      }
    }
Using the developer tools from Internet Explorer (press the F12 key), cookies that are sent across can be easily seen when network profiling is done. Figure 39-12 shows the cookies information with the sample page CookieWrite.aspx.

Cookies have some limitations. The user can turn off persistent cookies with browser settings, so there’s no guarantee that they work at all. You should always expect that cookies might be deleted on the client. Some users delete cookies from time to time. The browser itself can also delete cookies. There’s a limit to the size of the cookie (4,096 bytes), the number of cookies the browser stores by the domain (50 cookies), and a limited number of cookies the browser stores overall (3,000 cookies). If the limit is reached, the cookies can be deleted by the browser without user interaction. Browsers must support the specified cookie numbers at least, but could also use higher limits instead. With the limitations in mind, cookies are usually used just to set some identifier on the client that is used to map it to the real user data on the server.
Session
You can remember state for a user session by using the HttpSessionState object that is returned from the Session property of the Page. It’s simple to write an object using a key to the session that is remembered on the server (code file StateSample/SessionWrite.aspx.cs). Any serializable object can be added to the session state:
    protected void Button1_Click(object sender, EventArgs e)
    {
      Session["state1"] = TextBox1.Text;
    }
For reading the data, the get accessor of the indexer can be used. You should always check whether the indexer did return anything:
    protected void Page_Load(object sender, EventArgs e)
    {
      object state1 = Session["state1"];
      if (state1 != null)
      {
        Label1.Text = state1.ToString();
      }
    }
Sessions are started when the user opens a page on the server and a session didn’t exist previously. As the user browses different files from the same website, the same session is used. The session ends with a timeout (when the user does not request another page before the timeout occurs), or if the session is prematurely ended by invoking the Abandon method of the HttpSessionState. To globally handle session start and session end events, the Global.asax.cs file defines a Session_Start and a Session_End event handler:
    protected void Session_Start(object sender, EventArgs e)
    {
    }

    protected void Session_End(object sender, EventArgs e)
    {
    }
The user can use multiple windows of IE to use the same session. Selecting File ⇒ New Window in IE opens a new window that uses the same session. Selecting File ⇒ New Session creates a new session. This enables two sessions to the same website from two different windows.
Session Identifiers
With session state on the server, the client needs to be identified somehow to map the session to the client. By default, this is done using a temporary cookie named ASP.NET_SessionId, as shown in Figure 39-13.

Session state can be configured in various ways. URLs can also be used to identify sessions if cookies are not used. This can be done by defining the sessionState within the system.web configuration, and setting the cookieless attribute to UseUri:
<sessionState cookieless="UseUri" />Figure 39-14 shows a session identifier with the URL string, as created with the UseUri configuration. Using the URL with identifiers in the link is not as nice as omitting them, but it has the advantage that sessions work without cookies.

The cookieless attribute enables settings of UseCookies (which is the default), UseUri, UseDeviceProfile, and AutoDetect. With UseDeviceProfile the capabilities of the browser are taken from the configuration files; and if the browser supports cookies, cookies are used. This setting doesn’t detect whether the user turns cookies off with the browser. Automatic detection is done by the setting AutoDetect. Automatic detection sends a detection cookie to the client, which uses any detected cookies returned for the session; otherwise URIs are used.
Session Storage
By default, session information is just stored in memory within the ASP.NET process. This is not practical in a web farm when the user might reach different servers on different requests, and session state is lost when the ASP.NET process is recycled. Storing session state in different places than the process is just a matter of configuration.
Using the StateServer mode, sessions can be stored in a separate process. The ASP.NET State Service is installed on every system running ASP.NET. It just needs to be started with the local services. With the session configuration, the mode needs to be set to StateServer, and the stateConnectionString to the server name and port of the state service. By default, that’s port 42424:
      <sessionState mode="StateServer"
        stateConnectionString="tcpip=127.0.0.1:42424"
        cookieless="UseCookies"
        timeout="20" />
Using the state server is greatly helpful with the recycling of ASP.NET processes, but it doesn’t help in a web farm scenario. If the web farm is used for reliability issues to serve the clients with answers even if one system from the web farm breaks, the reliability from the complete web farm does not help in case the state service is not accessible. Here, it helps if the session state is stored in a SQL Server database cluster. The mode needs to be set to SQLServer:
      <sessionState mode="SQLServer"
        sqlConnectionString="Integrated Security=SSPI;database=StateServer;" />
The database for the state service can be configured with the aspnet_regsql tool.
Session state can also be stored in custom state providers. Custom session state providers need to derive from the base class SessionStateProviderBase and implement the abstract methods accordingly. The configuration of a custom state provider is shown here to use the DistributedCacheSessionStateStoreProvider, which makes use of distributed memory with Windows Azure:
      <sessionState mode="Custom" customProvider="DistributedSessionProvider">
        <providers>
          <add name="DistributedSessionProvider"
           type=
       "Microsoft.Web.DistributedCache.DistributedCacheSessionStateStoreProvider,
       Microsoft.Web.DistributedCache" cacheName="default"
           applicationName="AzureSampleApp"
           useBlobMode="true" />
        </providers>
</sessionState>Application
Session state is a per-user, server-side state. Application state is a global server-side state; it is shared among all users.
In the following code snippet (code file StateSample/Global.asax.cs), the Application property returns an HttpApplicationState object. This can be used very similarly to the HttpSessionState object. However, as application state is shared among all users, it needs to be locked before changing values. Using Application.Lock and Application.UnLock, care must be taken to perform the unlock. To be on the safe side, a try/finally is used. The amount of time between locking and unlocking should be very short — you should only use memory access within this timespan — as long locking periods can degrade performance because only one thread can hold the lock; all others have to wait until it is released, with the Lock method:
    {
      Application["UserCount"] = 0;
    }

    protected void Session_Start(object sender, EventArgs e)
    {
      try
      {
        Application.Lock();
        int userCount = (int)Application["UserCount"];
        Application["UserCount"] = ++userCount;
      }
      finally
      {
        Application.UnLock();
      }
    }
With the code file StateSample/ApplicationStateRead.aspx.cs the application state is read:
    protected void Page_Load(object sender, EventArgs e)
    {
      int userCount = (int)Application["UserCount"];
      Label1.Text = userCount.ToString();
    }
Cache
Cache is very similar to application state in that it is shared among multiple users, but more control can be exercised over the lifetime of the cache object. The following code snippet (code file StateSample/CacheWrite.aspx.cs) shows how an object can be added to the cache. Cache is a property of the Page class, which returns a Cache object from the System.Web.Caching namespace:
    protected void Button1_Click(object sender, EventArgs e)
    {
      Cache.Add(key: "cache1", value: TextBox1.Text, dependencies: null,
        absoluteExpiration: Cache.NoAbsoluteExpiration,
        slidingExpiration: TimeSpan.FromMinutes(30),
        priority: CacheItemPriority.Normal, onRemoveCallback: null);
    }
The Add method of the Cache class enables flexible control of the cache object added. The first and second parameters define the key and the value of the object.
Cache Dependency
The third parameter is of type CacheDependency. The dependency can define when the cache object is invalidated. Besides passing a CacheDependency, any type that derives from the class CacheDependency can be added, such as SqlCacheDependency and AggregateCacheDependency. With such a dependency, it is possible to load the content of a file to the cache and create a dependency on the file — when the file changes, the cache object is invalidated.
Time
The fourth and fifth parameter define when the cache should be invalidated. With the absoluteExpiration parameter, a DateTime can be specified that indicates an absolute time when the cache should be invalidated. The slidingExpiration parameter allows a TimeSpan. Only one of these two values can be set. If the slidingExpiration is used, the absolute time must be set to Cache.NoAbsoluteExpiration. Conversely, if the absoluteExpiration is used, the TimeSpan must be set to Cache.NoSlidingExpiration.
Priority
Another parameter enables you to specify the priority of an object. When there’s not enough memory available for the web application, the ASP.NET runtime removes cache objects. Cache objects with a lower priority are removed before objects with a higher priority. The priority is defined with an enumeration of type CacheItemPriority. The values are Low, BelowNormal, Normal, AboveNormal, High, and NotRemovable.
Callback Method
With the last parameter, a callback method of type CacheItemRemovedCallback can be defined. This method is invoked when the cache item is removed. The reason for removing the cache item is found in the CachItemRemovedReason enumeration. DependencyChanged, Expired, Removed, and Underused are the possible values. With the callback handler you can decide — for example, if the cache consists of file content loaded — to reload the cache if the dependency changed. Of course, the cache item shouldn’t be recreated immediately if the reason for removing the cache item is low memory.
Profiles
If you’ve ever done any shopping online, then you are familiar with websites whose shopping-cart functionality fails to hold the selected items during the session. This creates a very bad user experience. When users take a break during their online shopping and a timeout occurs, they should not lose the items already selected. Otherwise, users must waste time retracing their steps and filling their baskets again. Companies who design their site this way can expect to lose sales. Instead, shopping cart items should be put into a database. ASP.NET profiles make this an easy task.
Profile Provider
The Profile API is based on a provider model. Providers are used with many features of ASP.NET — for example, you’ve already seen providers for session state. A provider derives from the base class ProviderBase in the namespace System.Configuration.Provider. Profile providers derive from the base class ProfileProvider, which itself derives from SettingsProvider. The one profile provider that is included with the .NET Framework is SqlProfileProvider. This provider stores profile information in the SQL Server database. The default provider is configured with machine.config and uses the SQL Server database defined with the connection string LocalSqlServer as shown:
    <profile>
      <providers>
        <add name="AspNetSqlProfileProvider"
          connectionStringName="LocalSqlServer" applicationName="/"
          type="System.Web.Profile.SqlProfileProvider, System.Web,
          Version=4.0.0.0, Culture=neutral, PublicKeyToken=b03f5f7f11d50a3a" />
      </providers>
    </profile>
Creating the Database
The database can be created on the fly. The first time the Profile API is used (or the Membership API that is discussed later), a new database is created. This is because the machine.config file contains the LocalSqlServer connection string that references an aspnetdb.mdf database file in the DataDirectory (App_data). The connection string named LocalSqlServer is by default used by the profile provider:
  <connectionStrings>
    <add name="LocalSqlServer" connectionString="data source=.SQLEXPRESS;
      Integrated Security=SSPI;AttachDBFilename=|DataDirectory|aspnetdb.mdf;
      User Instance=true" providerName="System.Data.SqlClient" />
  </connectionStrings>
With Visual Studio 2012, the connection string could be changed to use LocalDb instead, as shown in the Web.config file:
<connectionStrings>
<clear/>
<add name="LocalSqlServer" connectionString="data source=(localdb)v11.0;
Integrated Security=SSPI;AttachDBFilename=|DataDirectory|aspnetdb.mdf;"
providerName="System.Data.SqlClient" />
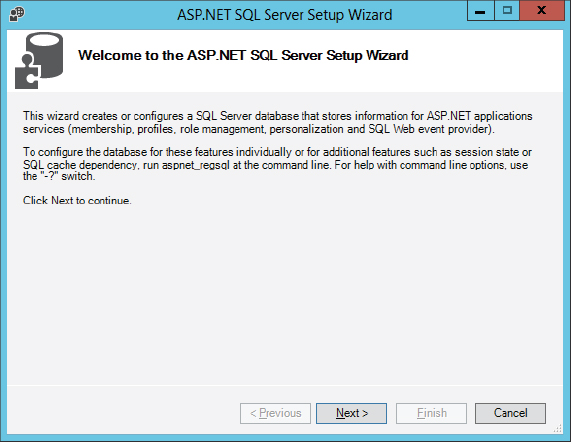
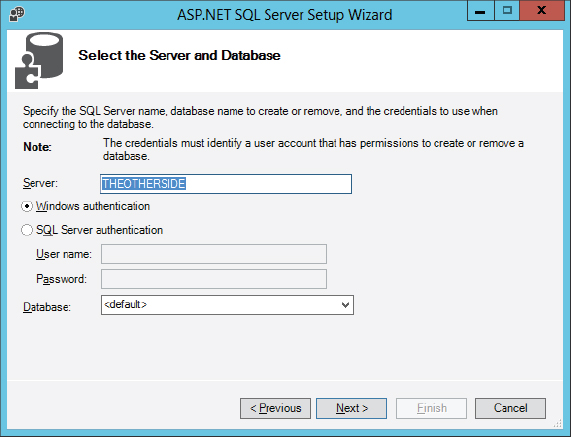
</connectionStrings>Instead of automatically creating a database on the first request, with the sample application a database is created in advance. You can create an ASP.NET SQL Server database that includes all the tables needed for the different ASP.NET services using the aspnet_regsql tool (located in the directory of the .NET Runtime). Starting aspnet_regsql without options starts the ASP.NET SQL Server Setup Wizard, shown in Figure 39-15.
When configuring the database, you can define the database name or use the default (aspnetdb) (see Figure 39-16).
Running the wizard creates a database with all tables needed for profiles, membership, roles, personalization, and so on. If you need only a subset of the ASP.NET features and want a database with fewer tables, you can use the command-line version of the aspnet_reqsql tool and create tables with only selected features.
The Web.config file now references the newly created database:
  <connectionStrings>
    <clear/>
    <add name="LocalSqlServer" connectionString=
      "data source=(local);Database=aspnetdb;Integrated Security=SSPI;"
      providerName="System.Data.SqlClient" />
  </connectionStrings>
Profile Settings
With the default profile provider, profile information can be defined with Web.config within the system.web element. You can save profile information for both users logged on to the system and anonymous users. If the user is not logged in, with anonymous identification enabled, an anonymous user ID is created. To map the user to the anonymous user in subsequent sessions, a persistent cookie is used. This way, the settings are always mapped to the same anonymous user. All the properties that should be stored for anonymous users must be marked with the allowAnonymous attribute. Profile properties are defined within the profile/properties. To add properties, use the add element. Profile properties are described by a name and a type. The type is used to hold the value for the property. How the type is serialized in the database is defined by the serializeAs attribute. Serialization can be handled as a string, using the binary or XML serializer, or with a custom class that handles serialization. To group profile state information, properties can be put into group elements:
      <anonymousIdentification enabled="true" />
      <profile>
        <properties>
          <add allowAnonymous="true" name="Color" type="System.String"
            serializeAs="Xml" />
          <add allowAnonymous="true" name="ShoppingCart"
            type="StateSample.ShoppingCart" serializeAs="Binary" />
          <group name="UserInfo">
            <add name="Name" type="String" serializeAs="Binary" />
          </group>
        </properties>
      </profile>
Using Custom Types
The sample profile makes use of the ShoppingCart type, which is defined to be binary serialized. This type (code file StateSample/ShoppingCart.cs) contains a list of items that are serialized:
  [Serializable]
  public class ShoppingCart
  {
    private List<Item> items = new List<Item>();
    public IList<Item> Items
    {
      get
      {
        return items;
      }
    }

    public decimal TotalCost
    {
      get
      {
        return items.Sum(item => item.Cost);
      }
    }
  }

  [Serializable]
  public class Item
  {
    public string Description { get; set; }
    public decimal Cost { get; set; }
  }
Writing Profile Data
With this setup it’s easy to write user profile data. The HttpContext defines a Profile property that returns ProfileBase. With ProfileBase, the indexer can be used to write and read profile properties. The configuration done earlier defines a profile property named Color; it is used here with the indexer:
      this.Context.Profile["Color"] = "Blue";
      this.Context.Profile.Save();
In case you’re using Visual Studio websites instead of web projects, the Page class defines a Profile property that returns a dynamically created ProfileCommon class. ProfileCommon derives from the base class ProfileBase and offers the properties defined with the configuration type as properties for strongly typed access. With web projects, the Profile property of the Page is not available. The ProfileCommon class is created in a similar way. Using the dynamic keyword, programming code looks better than using the indexer (code file StateSample/ProfileWrite.aspx.cs). The Save method writes the property names and values to the database:
      dynamic p = this.Context.Profile;
      p.Color = "Red";
      p.UserInfo.Name = "Christian";

      var cart = new ShoppingCart();
      cart.Items.Add(new Item { Description = "Sample1", Cost = 20.30M });
      cart.Items.Add(new Item { Description = "Sample2", Cost = 14.30M });

      p.ShoppingCart = cart;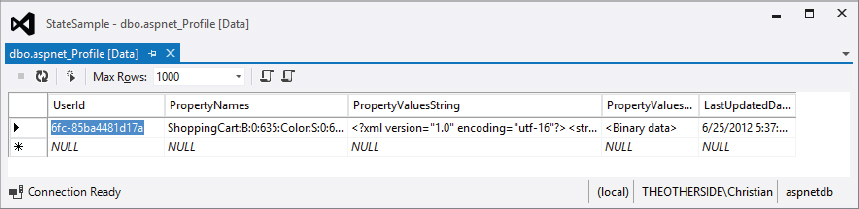
p.Save();After saving the profile, you can see a new row in the aspnet_Profile table, with the property names and values shown in Figure 39-17. If the user were an anonymous user, a new user with a unique user ID would be created as well.
Reading Profile Data
Reading profile data can be done in a similar way to access the Profile property from the HttpContext. The following example code accesses the Color profile property as well as the profile property that is defined within the group UserInfo, and the custom type ShoppingCart (code file StateSample/ProfileRead.aspx.cs):
      dynamic profile = Context.Profile;
      Response.Write(string.Format("Color: {0}", profile.Color));
      Response.Write("<br />");
      Response.Write(string.Format("Name: {0}", profile.UserInfo.Name));
      Response.Write("<br />");
      ShoppingCart shoppingCart = profile.ShoppingCart;
      foreach (var item in shoppingCart.Items)
      {
        Response.Write(string.Format("{0} {1}", item.Description, item.Cost));
        Response.Write("<br />");
      }
      Response.Write(shoppingCart.TotalCost);
      Response.Write("<br />");
Profile Manager
When profile state is used with anonymous users, over time “debris” accumulates. If an anonymous user deletes his cookies, next time another user with a new anonymous user ID is created. The old one cannot be mapped to the original user anymore.
There’s an API available that can manage all the profiles. The ProfileManager from the System.Web.Profile namespace offers simple methods to retrieve all the profiles (GetAllProfiles), including the inactive profiles (GetAllInactiveProfiles). The following code snippet returns all profiles from anonymous users that have been inactive over the last year:
     var inactiveProfiles = ProfileManager.GetAllInactiveProfiles(
       ProfileAuthenticationOption.Anonymous, DateTime.Now.AddYears(-1));
Inactive profiles can also be directly deleted with the method DeleteInactiveProfiles.
MEMBERSHIP AND ROLES
Authentication and authorization are important aspects of web applications. If a website or parts of it should not be public, users must be authorized. For authentication of users, the .NET Framework offers the Membership API. For the mapping of users to roles, the Roles API is available.
The Membership API can use the same database as the Profiles API used earlier. The Membership API is based on a provider that derives from the base class MembershipProvider (from the namespace System.Web.Security). Two membership providers are part of ASP.NET: SqlMembershipProvider and ActiveDirectoryMembershipProvider. The SqlMembershipProvider uses the SQL Server database to store username, password, and other security-related user information. The ActiveDirectoryMembershipProvider makes use of the Active Directory.
For mapping users to roles, the Roles API can be used. The Roles API uses the abstract RoleProvider. Existing concrete types are SqlRoleProvider and WindowsTokenRoleProvider. SqlRoleProvider accesses roles from the database; WindowsTokenRoleProvider uses Windows groups.
It’s also possible to mix different membership and role providers. For example, the users could be taken from the Active Directory with the ActiveDirectoryMembershipProvider, and roles from the SQL Server database with SqlRoleProvider.
Configuring Membership
To configure membership for user authentication, the authentication element within system.web needs to be set to Forms authentication. The default setting is Windows Authentication, and then IIS authenticates users before they arrive with ASP.NET. The forms child element of authentication can define the login page to which users should be redirected if they are not authenticated. With the forms element you can also configure whether authentication cookies should be used, whether identifiers should be sent with the URL string, and whether HTTPS is a requirement:
      <authentication mode="Forms">
        <forms defaultUrl="login.aspx" />
      </authentication>
Configuring the authentication mode does not automatically mean that anonymous users are not allowed to access the website. The following authorization element defines that anonymous users are not allowed:
<authorization>
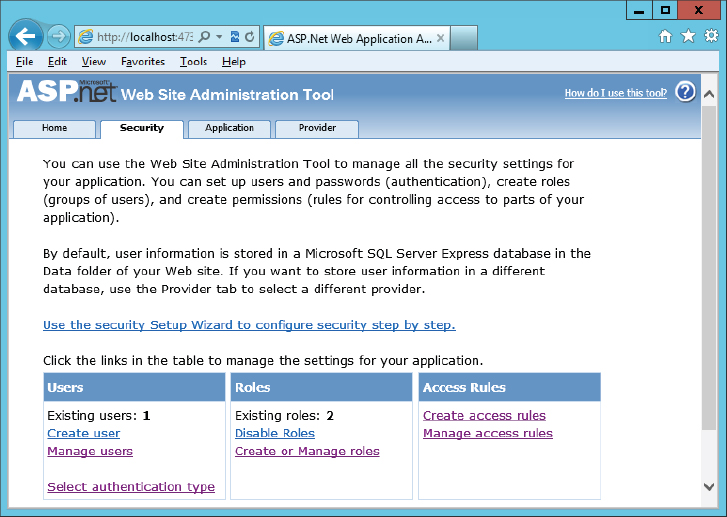
<deny users="?" />
</authorization>You can configure authentication and authorization either directly with the Web.config file and an XML editor or by using the ASP.NET Website Administration Tool, as shown in Figure 39-18.
With this configuration, users are automatically redirected to the login.aspx page if they are not authenticated.
The subdirectory AnonymousAllowed has a separate Web.config file that overrides the authorization section from the parent directory to allow anonymous users:
<?xml version="1.0" encoding="utf-8"?>
<configuration>
  <system.web>
    <authorization>
      <allow users="?" />
    </authorization>
  </system.web>
</configuration>
The default membership provider is defined with the machine.config file as shown in the following example. The AspNetSqlMembershipProvider offers many options for configuration. With the default configuration, it uses the same connection string name as the profile provider earlier, and thus the same aspnetdb database is used. You can also adjust password requirements. For example, the passwordStrengthRegularExpression enables specifying a regular expression requiring the user to enter a very strong password. In this example, the password requirement specifies a minimum of seven characters with minRequiredPasswordLength, and consisting of at least one non-alphanumeric character with minRequiredNonalphanumericCharacters. In the database, the password is not stored in clear text. The password format is hashed as defined by the passwordFormat attribute. If a user forgot the password, it can be reset using a question and answer. Question and answer is required upon creation of the user as defined by the requiresQuestionAndAnswer configuration:
    <membership>
      <providers>
        <add name="AspNetSqlMembershipProvider"
          type="System.Web.Security.SqlMembershipProvider, System.Web,
          Version=4.0.0.0, Culture=neutral, PublicKeyToken=b03f5f7f11d50a3a"
          connectionStringName="LocalSqlServer" enablePasswordRetrieval="false"
          enablePasswordReset="true" requiresQuestionAndAnswer="true"
          applicationName="/" requiresUniqueEmail="false" passwordFormat="Hashed"
          maxInvalidPasswordAttempts="5" minRequiredPasswordLength="7"
          minRequiredNonalphanumericCharacters="1" passwordAttemptWindow="10"
          passwordStrengthRegularExpression="" />
      </providers>
    </membership>
Configurations can be changed within the Web.config file as shown earlier with the profile provider.
Using the Membership API
The Membership API enables creating, finding, and deleting users, and validating the user password. The following code creates a new user (code file MembershipSample/AnonymousAllowed/CreateUser.aspx.cs) with the CreateUser method of the Membership class. This example creates a user with username, password, and other parameters such as question and answer. The output parameter MembershipCreateStatus returns information indicating whether the user was created successfully; and if not, what failure happened. Some of the possible failures are InvalidUserName, InvalidPassword, InvalidEmail, DuplicateUserName, and DuplicateEmail. These failures vary according to the configuration of the membership provider:
      MembershipCreateStatus status;
      MembershipUser user = Membership.CreateUser("Christian", "Pa$$w0rd",
        "[email protected]", "was wann wo warum", "keine ahnung",
        true, out status);
The CreateUser method is overloaded to offer a version whereby only username and password are provided. However, if the membership provider is configured to require Q&A, this overload throws an exception.
Login of the user is done in the page Login.aspx. Membership.ValidateUser verifies whether the username and password match the database. If so, with FormsAuthentication.RedirectFromLoginPage the user is redirected to the page from which he or she came. The first parameter of this method specifies the username that can be retrieved in all the pages with the identity information. The second parameter specifies whether a permanent or temporary cookie should be used. Passing false uses a temporary memory-based cookie, meaning the user needs to log in again when the browser is closed:
      string userName = TextBox1.Text;
      string password = TextBox2.Text;
      if (Membership.ValidateUser(userName, password))
      {
        FormsAuthentication.RedirectFromLoginPage(userName, false);
      }
      else
      {
        Label1.Text = "invalid username or password";
      }
After the user is authenticated, user information can be accessed. The code file MembershipSample/default.aspx.cs uses the User property of the Page to retrieve the username and write it to a label:
this.Label1.Text = string.Format("Hello, {0}", User.Identity.Name);Enabling the Roles API
If user groups should be used to allow or deny features of the website, the role manager for the Roles API needs to be enabled. Web.config is changed to enable roles with the roleManager element. You can also configure which roles are allowed to use folders or files from the web application. In the following example, the role Developers is granted authorization to use the site; all other users are denied access:
      <roleManager enabled="true" />
      <authorization>
        <allow roles="Developers" />
        <deny users="*" />
      </authorization>
The Roles class enables management of roles with the methods AddUser(s)ToRole(s), RemoveUser(s)FromRole(s), CreateRole, and DeleteRole. GetRolesForUser returns all the roles of a user. IsUserInRole returns true or false depending on whether the user is in the queried role. The last method can be used to allow or deny access programmatically.
SUMMARY
This chapter provided you with core information about ASP.NET, including the parts of ASP.NET that are shared with ASP.NET Web Forms and ASP.NET MVC. You looked behind the scenes at handlers and modules, which can also be used to create specific functionality that is invoked with every request. This chapter also covered requests and responses with web applications, state management, as well as some providers such as membership and roles.
You’ve learned how to create handlers and modules as well as the foundation of both ASP.NET Web Forms and ASP.NET MVC. You can create custom handlers and modules even if you’re creating web applications with non .NET technologies.
You’ve seen the different variants of state management, dealing with state on the client and state on the server. Client-side state view state is bound to single pages; cookies can be temporary as long as the browser session is alive, or persistent. With server-side state, you’ve seen different options with session, application, cache, and profiles. Session state is based on user sessions that can be configured to be stored in-process, in a state server, or in the database. Application state is shared between all users, and you need to pay attention to locking issues. Cache is stored just in memory mainly for reference data to not consult the database with every request. Profiles you’ve seen to act as a persistent store to keep user data.
The next chapter is on ASP.NET Web Forms, the ASP.NET technology in existence since .NET 1.0.