
Chapter 28
Localization?
WHAT’S IN THIS CHAPTER?
- Formatting of numbers and dates
- Using resources for localized content
- Creating and using satellite assemblies
- Localizing Desktop Applications
- Localizing Web Applications
- Localizing Windows Store Apps
- Creating custom resource readers
- Creating custom cultures
WROX.COM CODE DOWNLOADS FOR THIS CHAPTER
The wrox.com code downloads for this chapter are found at http://www.wrox.com/remtitle.cgi?isbn=1118314425 on the Download Code tab. The code for this chapter is divided into the following major examples:
- NumberAndDateFormatting
- CreateResource
- CultureDemo
- BookOfTheDay
- DatabaseResourceReader
- CustomCultures
GLOBAL MARKETS
NASA’s Mars Climate Orbiter was lost on September 23, 1999, at a cost of $125 million, because one engineering team used metric units while another one used inches for a key spacecraft operation. When writing applications for international distribution, different cultures and regions must be kept in mind.
Different cultures have diverging calendars and use different number and date formats; and sorting strings may lead to various results because the order of A–Z is defined differently based on the culture. To make usable applications for global markets, you have to globalize and localize them.
This chapter covers the globalization and localization of .NET applications. Globalization is about internationalizing applications: preparing applications for international markets. With globalization, the application supports number and date formats that vary according to culture, calendars, and so on. Localization is about translating applications for specific cultures. For translations of strings, you can use resources such as .NET resources or WPF resource dictionaries.
.NET supports the globalization and localization of Windows and web applications. To globalize an application, you can use classes from the namespace System.Globalization; to localize an application, you can use resources supported by the namespace System.Resources.
NAMESPACE SYSTEM.GLOBALIZATION
The System.Globalization namespace holds all the culture and region classes necessary to support different date formats, different number formats, and even different calendars that are represented in classes such as GregorianCalendar, HebrewCalendar, JapaneseCalendar, and so on. By using these classes, you can display different representations according to the user’s locale.
This section looks at the following issues and considerations when using the System.Globalization namespace:
- Unicode issues
- Cultures and regions
- An example showing all cultures and their characteristics
- Sorting
Unicode Issues
A Unicode character has 16 bits, so there is room for 65,536 characters. Is this enough for all languages currently used in information technology? In the case of the Chinese language, for example, more than 80,000 characters are needed. Fortunately, Unicode has been designed to deal with this issue. With Unicode you have to differentiate between base characters and combining characters. You can add multiple combining characters to a base character to build a single display character or a text element.
Take, for example, the Icelandic character Ogonek. Ogonek can be combined by using the base character 0x006F (Latin small letter o) and the combining characters 0x0328 (combining Ogonek) and 0x0304 (combining Macron), as shown in Figure 28-1. Combining characters are defined within ranges from 0x0300 to 0x0345. For American and European markets, predefined characters exist to facilitate dealing with special characters. The character Ogonek is also defined by the predefined character 0x01ED.
For Asian markets, where more than 80,000 characters are necessary for Chinese alone, such predefined characters do not exist. In Asian languages, you always have to deal with combining characters. The problem is getting the right number of display characters or text elements, and getting to the base characters instead of the combined characters. The namespace System.Globalization offers the class StringInfo, which you can use to deal with this issue.
The following table lists the static methods of the class StringInfo that help in dealing with combined characters.
| METHOD | DESCRIPTION |
| GetNextTextElement | Returns the first text element (base character and all combining characters) of a specified string |
| GetTextElementEnumerator | Returns a TextElementEnumerator object that allows iterating all text elements of a string |
| ParseCombiningCharacters | Returns an integer array referencing all base characters of a string |
Cultures and Regions
The world is divided into multiple cultures and regions, and applications have to be aware of these cultural and regional differences. A culture is a set of preferences based on a user’s language and cultural habits. RFC 1766 (http://www.ietf.org/rfc/rfc1766.txt) defines culture names that are used worldwide, depending on a language and a country or region. Some examples are en-AU, en-CA, en-GB, and en-US for the English language in Australia, Canada, the United Kingdom, and the United States, respectively.
Possibly the most important class in the System.Globalization namespace is CultureInfo. CultureInfo represents a culture and defines calendars, formatting of numbers and dates, and sorting strings used with the culture.
The class RegionInfo represents regional settings (such as the currency) and indicates whether the region uses the metric system. Some regions can use multiple languages. One example is the region of Spain, which has Basque (eu-ES), Catalan (ca-ES), Spanish (es-ES), and Galician (gl-ES) cultures. Similar to one region having multiple languages, one language can be spoken in different regions; for example, Spanish is spoken in Mexico, Spain, Guatemala, Argentina, and Peru, to name only a few countries.
Later in this chapter is a sample application that demonstrates these characteristics of cultures and regions.
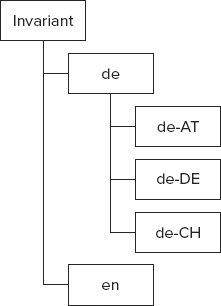
Specific, Neutral, and Invariant Cultures
When using cultures in the .NET Framework, you have to differentiate between three types: specific, neutral, and invariant cultures. A specific culture is associated with a real, existing culture defined with RFC 1766, as described in the preceding section. A specific culture can be mapped to a neutral culture. For example, de is the neutral culture of the specific cultures de-AT, de-DE, de-CH, and others. de is shorthand for the German language (Deutsch); AT, DE, and CH are shorthand for the countries Austria, Germany, and Switzerland, respectively.
When translating applications, it is typically not necessary to do translations for every region; not much difference exists between the German language in the countries Austria and Germany. Instead of using specific cultures, you can use a neutral culture to localize applications.
The invariant culture is independent of a real culture. When storing formatted numbers or dates in files, or sending them across a network to a server, using a culture that is independent of any user settings is the best option.
Figure 28-2 shows how the culture types relate to each other.
CurrentCulture and CurrentUICulture
When you set cultures, you need to differentiate between a culture for the user interface and a culture for the number and date formats. Cultures are associated with a thread, and with these two culture types, two culture settings can be applied to a thread. The Thread class has the properties CurrentCulture and CurrentUICulture. The property CurrentCulture is for setting the culture that is used with formatting and sort options, whereas the property CurrentUICulture is used for the language of the user interface.
Users can change the default setting of the CurrentCulture by using the Region and Language options in the Windows control panel (see Figure 28-3). With this configuration, it is also possible to change the defaults for the number format, the time format, and the date format for the culture.

The CurrentUICulture does not depend on this configuration. The CurrentUICulture setting varies according to the language of the operating system. Other languages can be added from the Add Languages setting in the control panel, as shown in Figure 28-4.

These settings provide a very good default, and in many cases you won’t need to change the default behavior. If the culture should be changed, you can easily do this by changing both cultures of the thread to, say, the Spanish culture, as shown in this code snippet:
System.Globalization.CultureInfo ci = new
   System.Globalization.CultureInfo("es-ES");
System.Threading.Thread.CurrentThread.CurrentCulture = ci;
System.Threading.Thread.CurrentThread.CurrentUICulture = ci;
Now that you know how to set the culture, the following sections discuss number and date formatting, which are influenced by the CurrentCulture setting.
Number Formatting
The number structures Int16, Int32, Int64, and so on in the System namespace have an overloaded ToString method. This method can be used to create a different representation of the number, depending on the locale. For the Int32 structure, ToString is overloaded with the following four versions:
public string ToString();
public string ToString(IFormatProvider);
public string ToString(string);
public string ToString(string, IFormatProvider);
ToString without arguments returns a string without format options. You can also pass a string and a class that implements IFormatProvider.
The string specifies the format of the representation. The format can be a standard numeric formatting string or a picture numeric formatting string. For standard numeric formatting, strings are predefined in which C specifies the currency notation, D creates a decimal output, E creates scientific output, F creates fixed-point output, G creates general output, N creates number output, and X creates hexadecimal output. With a picture numeric formatting string, it is possible to specify the number of digits, section and group separators, percent notation, and so on. The picture numeric format string ###,### means two 3-digit blocks separated by a group separator.
The IFormatProvider interface is implemented by the NumberFormatInfo, DateTimeFormatInfo, and CultureInfo classes. This interface defines a single method, GetFormat, that returns a format object.
NumberFormatInfo can be used to define custom formats for numbers. With the default constructor of NumberFormatInfo, a culture-independent or invariant object is created. Using the properties of NumberFormatInfo, it is possible to change all the formatting options, such as a positive sign, a percent symbol, a number group separator, a currency symbol, and a lot more. A read-only, culture-independent NumberFormatInfo object is returned from the static property InvariantInfo. A NumberFormatInfo object in which the format values are based on the CultureInfo of the current thread is returned from the static property CurrentInfo.
To create the next example, you can start with a simple console project. In this code, the first example shows a number displayed in the format of the culture of the thread (here: English-US, the setting of the operating system). The second example uses the ToString method with the IFormatProvider argument. CultureInfo implements IFormatProvider, so create a CultureInfo object using the French culture. The third example changes the culture of the thread. The culture is changed to German by using the property CurrentCulture of the Thread instance (code file NumberAndDateFormattingProgram.cs):
using System;
using System.Globalization;
using System.Threading;

namespace NumberAndDateFormatting
{
  class Program
  {
    static void Main(string[] args)
    {
      NumberFormatDemo();
    }

    private static void NumberFormatDemo()
    {
      int val = 1234567890;

      // culture of the current thread
      Console.WriteLine(val.ToString("N"));

      // use IFormatProvider
      Console.WriteLine(val.ToString("N", new CultureInfo("fr-FR")));

      // change the culture of the thread
      Thread.CurrentThread.CurrentCulture = new CultureInfo("de-DE");
      Console.WriteLine(val.ToString("N"));
    }
  }
}
You can compare the following different output for U.S. English, French, and German, respectively, shown here:
1,234,567,890.00
1 234 567 890,00
1.234.567.890,00
Date Formatting
The same support for numbers is available for dates. The DateTime structure has some methods for date-to-string conversions. The public instance methods ToLongDateString, ToLongTimeString, ToShortDateString, and ToShortTimeString create string representations using the current culture. You can use the ToString method to assign a different culture:
public string ToString();
public string ToString(IFormatProvider);
public string ToString(string);
public string ToString(string, IFormatProvider);
With the string argument of the ToString method, you can specify a predefined format character or a custom format string for converting the date to a string. The class DateTimeFormatInfo specifies the possible values. With DateTimeFormatInfo, the case of the format strings has a different meaning. D defines a long date format, d a short date format. Other examples of possible formats are ddd for the abbreviated day of the week, dddd for the full day of the week, yyyy for the year, T for a long time, and t for a short time format. With the IFormatProvider argument, you can specify the culture. Using an overloaded method without the IFormatProvider argument implies that the culture of the current thread is used:
      DateTime d = new DateTime(2012, 06, 12);

      // current culture
      Console.WriteLine(d.ToLongDateString());

      // use IFormatProvider
      Console.WriteLine(d.ToString("D", new CultureInfo("fr-FR")));

      // use culture of thread
      CultureInfo ci = Thread.CurrentThread.CurrentCulture;
      Console.WriteLine("{0}: {1}", ci.ToString(), d.ToString("D"));

      ci = new CultureInfo("es-ES");
      Thread.CurrentThread.CurrentCulture = ci;
      Console.WriteLine("{0}: {1}", ci.ToString(), d.ToString("D"));
The output of this example program shows ToLongDateString with the current culture of the thread, a French version where a CultureInfo instance is passed to the ToString method, and a Spanish version where the CurrentCulture property of the thread is changed to es-ES:
Tuesday, June 12, 2012
mardi 12 juin 2012
en-US: Tuesday, June 12, 2012
es-ES: martes, 12 de junio de 2012
Cultures in Action
To see all cultures in action, you can use a sample Windows Presentation Foundation (WPF) application that lists all cultures and demonstrates different characteristics of culture properties. Figure 28-5 shows the user interface of the application in the Visual Studio 2012 WPF Designer.
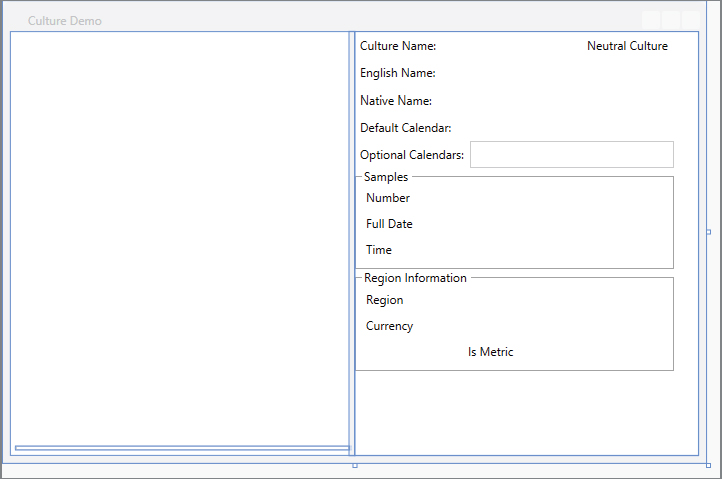
During initialization of the application, all available cultures are added to the TreeView control that is placed on the left side of the application. This initialization happens in the method SetupCultures, which is called in the constructor of the CultureDemoWindow class CultureDemoWindow (code file CultureDemo/MainWindow.xaml.cs):
    public CultureDemoWindow()
    {
      InitializeComponent();

      SetupCultures();
    }
For the data that is shown in the user interface, the custom class CultureData is created. This class can be bound to a TreeView control, as it has a property SubCultures that contains a list of CultureData. Therefore, the TreeView control enables walking through this tree. Other than the subcultures, CultureData contains the CultureInfo type and sample values for a number, a date, and a time. The number returns a string in the number format for the specific culture, and the date and time return strings in the specific culture formats as well. CultureData contains a RegionInfo class to display regions. With some neutral cultures (e.g., English), creating a RegionInfo throws an exception, as there are regions only with specific cultures. However, with other neutral cultures (e.g., German), creating a RegionInfo succeeds and is mapped to a default region. The exception thrown here is handled:
  public class CultureData
  {
    public CultureInfo CultureInfo { get; set; }
    public List<CultureData> SubCultures { get; set; }

    double numberSample = 9876543.21;
    public string NumberSample
    {
      get { return numberSample.ToString("N", CultureInfo); }
    }

    public string DateSample
    {
      get { return DateTime.Today.ToString("D", CultureInfo); }
    }

    public string TimeSample
    {
      get { return DateTime.Now.ToString("T", CultureInfo); }
    }

    public RegionInfo RegionInfo
    {
      get
      {
        RegionInfo ri;
        try
        {
          ri = new RegionInfo(CultureInfo.Name);
        }
        catch (ArgumentException)
        {
          // with some neutral cultures regions are not available
          return null;
        }
        return ri;
      }
    }
  }
In the method SetupCultures, you get all cultures from the static method CultureInfo.GetCultures. Passing CultureTypes.AllCultures to this method returns an unsorted array of all available cultures. The result is sorted by the name of the culture. With the result of the sorted cultures, a collection of CultureData objects is created and the CultureInfo and SubCultures properties are assigned. With the result of this, a dictionary is created to enable fast access to the culture name.
For the data that should be bound, a list of CultureData objects is created that contains all the root cultures for the tree view after the foreach statement is completed. Root cultures can be verified to determine whether they have the invariant culture as their parent. The invariant culture has the LCID 127. Root cultures are added to the rootCultures collection within the block of the if statement.
If the culture does not have a parent culture, it is added to the root nodes of the tree. To find parent cultures, all cultures are remembered inside a dictionary. (See Chapter 10, “Collections,” for more information about dictionaries, and Chapter 8, “Delegates, Lambdas, and Events,” for details about Lambda expressions.) If the culture iterated is not a root culture, it is added to the SubCultures collection of the parent culture. The parent culture can be quickly found by using the dictionary. In the last step, the root cultures are made available to the UI by assigning them to the DataContext of the Window:
    private void SetupCultures()
    {
      var cultureDataDict = CultureInfo.GetCultures(CultureTypes.AllCultures)
        .OrderBy(c => c.Name)
        .Select(c => new CultureData
        {
          CultureInfo = c,
          SubCultures = new List<CultureData>()
        })
        .ToDictionary(c => c.CultureInfo.Name);

      var rootCultures = new List<CultureData>();
      foreach (var cd in cultureDataDict.Values)
      {
        if (cd.CultureInfo.Parent.LCID == 127)
        {
          rootCultures.Add(cd);
        }
        else
        {
          CultureData parentCultureData;
          if (cultureDataDict.TryGetValue(cd.CultureInfo.Parent.Name,
            out parentCultureData))
          {
            parentCultureData.SubCultures.Add(cd);
          }
          else
          {
            throw new ParentCultureException(
              "unexpected error - parent culture not found");
          }

        }
      }
      this.DataContext = rootCultures.OrderBy(cd =>
        cd.CultureInfo.EnglishName);
    }
When the user selects a node inside the tree, the handler of the SelectedItemChanged event of the TreeView is called. Here, the handler is implemented in the method treeCultures_SelectedItemChanged. Within this method, the DataContext of a Grid control is set to the selected CultureData object. In the XAML logical tree, this Grid is the parent of all controls that display information about the selected culture information:
    private void treeCultures_SelectedItemChanged(object sender,
      RoutedPropertyChangedEventArgs<object> e)
    {
      CultureData cd = e.NewValue as CultureData;
      if (cd != null)
      {
        itemGrid.DataContext = cd;
      }
    }
Now let’s get into the XAML code for the display. A TreeView is used to display all the cultures (code file CultureDemo/MainWindow.xaml). For the display of items inside the TreeView, an item template is used. This template uses a TextBlock that is bound to the EnglishName property of the CultureInfo class. For binding the items of the tree view, a HierarchicalDataTemplate is used to bind the property SubCultures of the CultureData type recursively:
    <TreeView SelectedItemChanged="treeCultures_SelectedItemChanged" Margin="5"
      ItemsSource="{Binding}" >
      <TreeView.ItemTemplate>
        <HierarchicalDataTemplate DataType="{x:Type local:CultureData}"
          ItemsSource="{Binding SubCultures}">
          <TextBlock  Text="{Binding Path=CultureInfo.EnglishName}" />
        </HierarchicalDataTemplate>
      </TreeView.ItemTemplate>
    </TreeView>
To display the values of the selected item, several TextBlock controls are used. These bind to the CultureInfo property of the CultureData class and in turn to properties of the CultureInfo type that is returned from CultureInfo, such as Name, IsNeutralCulture, EnglishName, NativeName, and so on. To convert a Boolean value, as returned from the IsNeutralCulture property, to a Visibility enumeration value, and to display calendar names, converters are used:
      <TextBlock Grid.Row="0" Grid.Column="0" Text="Culture Name:" />
      <TextBlock Grid.Row="0" Grid.Column="1" Text="{Binding CultureInfo.Name}"
        Width="100" />
      <TextBlock Grid.Row="0" Grid.Column="2" Text="Neutral Culture"
        Visibility="{Binding CultureInfo.IsNeutralCulture,
        Converter={StaticResource boolToVisiblity}}" />

      <TextBlock Grid.Row="1" Grid.Column="0" Text="English Name:" />
      <TextBlock Grid.Row="1" Grid.Column="1" Grid.ColumnSpan="2"
        Text="{Binding CultureInfo.EnglishName}" />

      <TextBlock Grid.Row="2" Grid.Column="0" Text="Native Name:" />
      <TextBlock Grid.Row="2" Grid.Column="1" Grid.ColumnSpan="2"
        Text="{Binding CultureInfo.NativeName}" />

      <TextBlock Grid.Row="3" Grid.Column="0" Text="Default Calendar:" />
      <TextBlock Grid.Row="3" Grid.Column="1" Grid.ColumnSpan="2"
        Text="{Binding CultureInfo.Calendar,
        Converter={StaticResource calendarConverter}}" />

      <TextBlock Grid.Row="4" Grid.Column="0" Text="Optional Calendars:" />
      <ListBox Grid.Row="4" Grid.Column="1" Grid.ColumnSpan="2"

        ItemsSource="{Binding CultureInfo.OptionalCalendars}">
        <ListBox.ItemTemplate>
          <DataTemplate>
            <TextBlock Text="{Binding
              Converter={StaticResource calendarConverter}}" />
          </DataTemplate>
        </ListBox.ItemTemplate>
      </ListBox>
The converter to convert a Boolean value to the Visibility enumeration is defined in the class BooleanToVisibilityConverter (code file ConvertersBooleanToVisiblityConverter.cs):
    using System;
    using System.Globalization;
    using System.Windows;
    using System.Windows.Data;

    namespace CultureDemo.Converters
    {
      public class BooleanToVisibilityConverter : IValueConverter
      {

        public object Convert(object value, Type targetType, object parameter,
          CultureInfo culture)
        {
          bool b = (bool)value;
          if (b)
            return Visibility.Visible;
          else
            return Visibility.Collapsed;
        }

        public object ConvertBack(object value, Type targetType, object parameter,
          CultureInfo culture)
        {
          throw new NotImplementedException();
        }
      }
    }
The converter for the calendar text to display is just a little bit more complex. Here is the implementation of the Convert method in the class CalendarTypeToCalendarInformationConverter. The implementation uses the class name and calendar type name to return a useful value for the calendar:
    public object Convert(object value, Type targetType, object parameter,
      CultureInfo culture)
    {
      Calendar c = value as Calendar;
      if (c == null) return null;
      StringBuilder calText = new StringBuilder(50);
      calText.Append(c.ToString());
      calText.Remove(0, 21); // remove the namespace
      calText.Replace("Calendar", "");

      GregorianCalendar gregCal = c as GregorianCalendar;
      if (gregCal != null)
      {
        calText.AppendFormat(" {0}", gregCal.CalendarType.ToString());
      }
      return calText.ToString();
    }
The CultureData class contains properties to display sample information for number, date, and time formats. These properties are bound with the following TextBlock elements:
          <TextBlock Grid.Row="0" Grid.Column="0" Text="Number" />
          <TextBlock Grid.Row="0" Grid.Column="1"
            Text="{Binding NumberSample}" />

          <TextBlock Grid.Row="1" Grid.Column="0" Text="Full Date" />
          <TextBlock Grid.Row="1" Grid.Column="1"
            Text="{Binding DateSample}" />

          <TextBlock Grid.Row="2" Grid.Column="0" Text="Time" />
          <TextBlock Grid.Row="2" Grid.Column="1"
            Text="{Binding TimeSample}" />
The information about the region is shown with the last part of the XAML code. The complete GroupBox is hidden if the RegionInfo is not available. The TextBlock elements bind the DisplayName, CurrencySymbol, ISOCurrencySymbol, and IsMetric properties of the RegionInfo type:
<GroupBox x:Name="groupRegion" Header="Region Information" Grid.Row="6"
Grid.Column="0" Grid.ColumnSpan="3" Visibility="{Binding RegionInfo,
Converter={StaticResource nullToVisibility}}">
<Grid>
<Grid.RowDefinitions>
<RowDefinition />
<RowDefinition />
<RowDefinition />
</Grid.RowDefinitions>
<Grid.ColumnDefinitions>
<ColumnDefinition />
<ColumnDefinition />
<ColumnDefinition />
</Grid.ColumnDefinitions>
<TextBlock Grid.Row="0" Grid.Column="0" Text="Region" />
<TextBlock Grid.Row="0" Grid.Column="1" Grid.ColumnSpan="2"
Text="{Binding RegionInfo.DisplayName}" />
<TextBlock Grid.Row="1" Grid.Column="0" Text="Currency" />
<TextBlock Grid.Row="1" Grid.Column="1"
Text="{Binding RegionInfo.CurrencySymbol}" />
<TextBlock Grid.Row="1" Grid.Column="2"
Text="{Binding RegionInfo.ISOCurrencySymbol}" />
<TextBlock Grid.Row="2" Grid.Column="1" Text="Is Metric"
Visibility="{Binding RegionInfo.IsMetric,
Converter={StaticResource boolToVisiblity}}" />
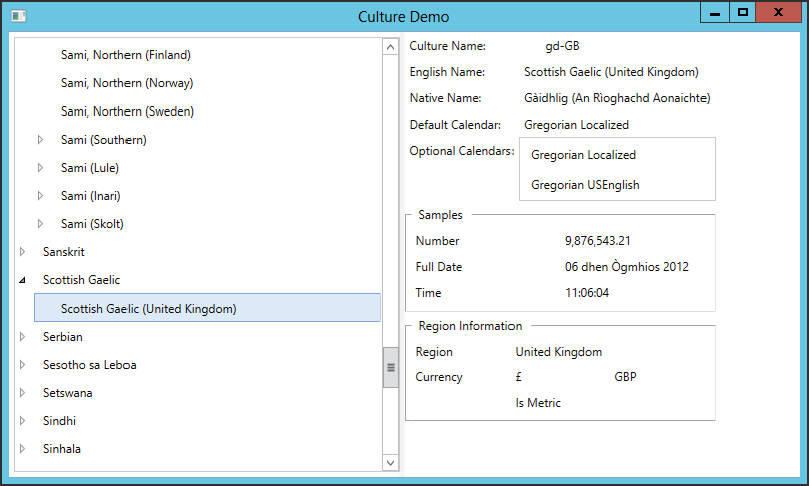
</Grid>When you start the application, you can see all available cultures in the tree view, and selecting a culture lists its characteristics, as shown in Figure 28-6.
Sorting
Sorting strings varies according to the culture. The algorithms that compare strings for sorting by default are culture-specific. For example, in Finnish the characters V and W are treated the same. To demonstrate this behavior with a Finnish sort, the following code creates a small sample console application in which some U.S. states are stored unsorted inside an array. You are going to use classes from the namespaces System.Collections.Generic, System.Threading, and System.Globalization, so these namespaces must be declared. The method DisplayNames shown here is used to display all elements of an array or a collection on the console (code file SortingDemo/Program.cs):
    static void DisplayNames(string title, IEnumerable<string> e)
    {
      Console.WriteLine(title);
      foreach (string s in e)
        Console.Write(s + "-");
      Console.WriteLine();
      Console.WriteLine();
    }
In the Main method, after creating the array with some of the U.S. states, the thread property CurrentCulture is set to the Finnish culture so that the following Array.Sort uses the Finnish sort order. Calling the method DisplayNames displays all the states on the console:
    static void Main()
    {
      string[] names = {"Alabama", "Texas", "Washington",
                        "Virginia", "Wisconsin", "Wyoming",
                        "Kentucky", "Missouri", "Utah", "Hawaii",
                        "Kansas", "Louisiana", "Alaska", "Arizona"};

      Thread.CurrentThread.CurrentCulture = new CultureInfo("fi-FI");

      Array.Sort(names);
      DisplayNames("Sorted using the Finnish culture", names);
After the first display of some U.S. states in the Finnish sort order, the array is sorted once again. If you want a sort that is independent of the users’ culture, which would be useful when the sorted array is sent to a server or stored somewhere, you can use the invariant culture.
You can do this by passing a second argument to Array.Sort. The Sort method expects an object implementing IComparer with the second argument. The Comparer class from the System.Collections namespace implements IComparer. Comparer.DefaultInvariant returns a Comparer object that uses the invariant culture for comparing the array values for a culture-independent sort:
      // sort using the invariant culture
      Array.Sort(names, System.Collections.Comparer.DefaultInvariant);
      DisplayNames("Sorted using the invariant culture", names);
    }
The program output shows different sort results with the Finnish and culture-independent cultures — Virginia is before Washington when using the invariant sort order, and vice versa when using Finnish:
Sorted using the Finnish culture
Alabama-Alaska-Arizona-Hawaii-Kansas-Kentucky-Louisiana-Missouri-Texas-Utah-
Washington-Virginia-Wisconsin-Wyoming -

Sorted using the invariant culture
Alabama-Alaska-Arizona-Hawaii-Kansas-Kentucky-Louisiana-Missouri-Texas-Utah-
Virginia-Washington-Wisconsin-Wyoming -In addition to a locale-dependent formatting and measurement system, text and pictures may differ depending on the culture. This is where resources come into play.
RESOURCES
Resources such as pictures or string tables can be put into resource files or satellite assemblies. Such resources can be very helpful when localizing applications, and .NET has built-in support to search for localized resources. Before you see how to use resources to localize applications, the following sections explain how resources can be created and read without looking at language aspects.
Creating Resource Files
Resource files can contain items such as pictures and string tables. A resource file is created by using either a normal text file or a .resX file that uses XML. This section starts with a simple text file.
A resource that embeds a string table can be created by using a normal text file. The text file just assigns strings to keys. The key is the name that can be used from a program to get the value. Spaces are allowed in both keys and values.
This example shows a simple string table in the file Wrox.ProCSharp.Localization.MyResources.txt:
Title = Professional C#
Chapter = Localization
Author = Christian Nagel
Publisher = Wrox PressResource File Generator
The Resource File Generator (Resgen.exe) utility can be used to create a resource file out of Wrox .ProCSharp.Localization.MyResources.txt. Typing the line
resgen Wrox.ProCSharp.Localization.MyResources.txtcreates the file Wrox.ProCSharp.Localization.MyResources.resources. The resulting resource file can either be added to an assembly as an external file or embedded into the DLL or EXE. Resgen also supports the creation of XML-based .resX resource files. One easy way to build an XML file is by using Resgen itself:
resgen Wrox.ProCSharp.Localization.MyResources.txt
  Wrox.ProCSharp.Localization.MyResources.resX
This command creates the XML resource file Wrox.ProCSharp.LocalizationMyResources.resX. You’ll see how to work with XML resource files in the section “Windows Forms Localization Using Visual Studio” later in this chapter.
Resgen supports strongly typed resources. A strongly typed resource is represented by a class that accesses the resource. The class can be created with the /str option of the Resgen utility:
resgen /str:C#,Wrox.ProCSharp.Localization,MyResources,MyResources.cs
Wrox.ProCSharp.Localization.MyResources.resX
With the /str option, the language, namespace, class name, and filename for the source code are defined, in that order.
The Resgen utility does not support adding pictures. The .NET Framework SDK includes a ResXGen sample with the tutorials. With ResXGen, it is possible to reference pictures in a .resX file. You can also add pictures programmatically by using the ResourceWriter or ResXResourceWriter classes, as shown next.
ResourceWriter
Instead of using the Resgen utility to build resource files, it’s a simple task to write a program to create resources. The class ResourceWriter from the namespace System.Resources can be used to write binary resource files; ResXResourceWriter writes XML-based resource files. Both of these classes support pictures and any other object that is serializable. When you use the class ResXResourceWriter, the assembly System.Windows.Forms must be referenced.
In the following code example, you create a ResXResourceWriter object, rw, using a constructor with the filename Demo.resx. After creating an instance, you can add a number of resources up to 2GB in total size by using the AddResource method of the ResXResourceWriter class. The first argument of AddResource specifies the name of the resource, and the second argument specifies the value. A picture resource can be added using an instance of the Image class. To use the Image class, you have to reference the assembly System.Drawing. You also add the using directive to open the namespace System.Drawing.
Create an Image object by opening the file logo.gif. You have to copy the picture to the directory of the executable or specify the full path to the picture in the method argument of Image.ToFile. The using statement specifies that the image resource should automatically be disposed of at the end of the using block. Additional simple string resources are added to the ResXResourceWriter object. The Close method of the ResXResourceWriter class automatically calls ResXResourceWriter.Generate to write the resources to the file Demo.resx (code file CreateResourceProgram.cs):
using System;
using System.Resources;
using System.Drawing;

class Program
{
  static void Main()
  {
    var rw = new ResXResourceWriter("Demo.resx");
    using (Image image = Image.FromFile("logo.gif"))
    {
      rw.AddResource("WroxLogo", image);
      rw.AddResource("Title", "Professional C#");
      rw.AddResource("Chapter", "Localization");
      rw.AddResource("Author", "Christian Nagel");
      rw.AddResource("Publisher", "Wrox Press");
      rw.Close();
    }
  }
}
Starting this small program creates the resource file Demo.resx, which embeds the image logo.gif. In the next example, the resources are used with a Windows application.
Using Resource Files
You can add resource files to assemblies with the command-line C# compiler csc.exe by using the /resource option, or directly with Visual Studio. To see how resource files can be used with Visual Studio, create a console application and name it ResourceDemo.
Use the context menu of Solution Explorer (Add ⇒ Existing Item) to add the previously created resource file Demo.resx to this project. By default, the Build Action of this resource is set to Embedded Resource so that the resource is embedded into the output assembly.
In the project settings (Application ⇒ Assembly information), set the Neutral Language setting of the application to the main language — for example, English (United States) — as shown in Figure 28-7. Changing this setting adds the attribute [NeutralResourceLanguageAttribute] to the file assemblyinfo.cs, as shown here:

[assembly: NeutralResourcesLanguageAttribute("en-US")]Setting this option improves performance with the ResourceManager because it more quickly finds the resources for en-US that are also used as a default fallback. With this attribute, you can also specify the location of the default resource by using the second parameter with the constructor. With the enumeration UltimateResourceFallbackLocation, you can specify that the default resource is to be stored in the main assembly or in a satellite assembly (values MainAssembly and Satellite).
After building the project, you can check the generated assembly with ildasm to see the attribute .mresource in the manifest (see Figure 28-8). This attribute declares the name of the resource in the assembly. If .mresource is declared as public (as in the example), the resource is exported from the assembly and can be used from classes in other assemblies. .mresource private means that the resource is not exported and is available only within the assembly.

To access the embedded resource, use the ResourceManager class from the System.Resources namespace. You can pass the assembly that has the resources as an argument to the constructor of the ResourceManager class. In this example, the resources are embedded in the executing assembly, so pass the result of Assembly.GetExecutingAssembly as the second argument. The first argument is the root name of the resource. The root name consists of the namespace and the name of the resource file, but without the resources extension. As shown earlier, ildasm specifies the name. You only need to remove the file extension resources from the name shown. You can also get the name programmatically by using the GetManifestResourceNames method of the System.Reflection.Assembly class:
using System;
using System.Drawing;
using System.Reflection;
using System.Resources;

namespace Wrox.ProCSharp.Localization
{
  class Program
  {
    static void Main()
    {
      var rm = new ResourceManager("Wrox.ProCSharp.Localization.Demo",
                                   Assembly.GetExecutingAssembly());
Using the ResourceManager instance rm, you can get all the resources by specifying the key to the methods GetObject and GetString:
      Console.WriteLine(rm.GetString("Title"));
      Console.WriteLine(rm.GetString("Chapter"));
      Console.WriteLine(rm.GetString("Author"));
      using (Image logo = (Image)rm.GetObject("WroxLogo"))
      {
        logo.Save("logo.bmp");
      }
    }
  }
}
With strongly typed resources, the code written earlier can be simplified; there is no need to instantiate the ResourceManager and access the resources using indexers. Instead, you can access the names of the resources with properties:
    private static void StronglyTypedResources()
    {
      Console.WriteLine(Demo.Title);
      Console.WriteLine(Demo.Chapter);
      Console.WriteLine(Demo.Author);
      using (Bitmap logo = Demo.WroxLogo)
      {
        logo.Save("logo.bmp");
      }
    }
To create a strongly typed resource with the Managed Resources Editor, reset the Access Modifier option from No Code Generation to Public or Internal. With Public, the generated class has a public access modifier and is available from other assemblies. With Internal, the generated class has an internal access modifier and can be accessed only from within the assembly.
When you set this option, the class Demo (it has the same name as the resource) is created. This class has static properties for all the resources to provide a strongly typed resource name. With the implementation of the static properties, a ResourceManager object is used, instantiated on first access and then cached (code file ResourceDemoDemo.Designer.cs):
//-----------------------------------------------------------------------------
// <auto-generated>
//     This code was generated by a tool.
//     Runtime Version:4.0.30319.17626
//
//     Changes to this file may cause incorrect behavior and will be lost if
//     the code is regenerated.
// </auto-generated>
//------------------------------------------------------------------------------

namespace Wrox.ProCSharp.Localization
{
  using System;


  /// <summary>
  ///   A strongly-typed resource class, for looking up localized strings, etc.
  /// </summary>
  // This class was auto-generated by the StronglyTypedResourceBuilder
  // class via a tool like ResGen or Visual Studio.
  // To add or remove a member, edit your .ResX file then rerun ResGen
  // with the /str option, or rebuild your VS project.
  [global::System.CodeDom.Compiler.GeneratedCodeAttribute(
    "System.Resources.Tools.StronglyTypedResourceBuilder", "4.0.0.0")]
  [global::System.Diagnostics.DebuggerNonUserCodeAttribute()]
  [global::System.Runtime.CompilerServices.CompilerGeneratedAttribute()]
  internal class Demo
  {
    private static global::System.Resources.ResourceManager resourceMan;

    private static global::System.Globalization.CultureInfo resourceCulture;

    [global::System.Diagnostics.CodeAnalysis.SuppressMessageAttribute(
      "Microsoft.Performance", "CA1811:AvoidUncalledPrivateCode")]
    internal Demo()
    {
    }

    /// <summary>
    ///   Returns the cached ResourceManager instance used by this class.
    /// </summary>
    [global::System.ComponentModel.EditorBrowsableAttribute(
      global::System.ComponentModel.EditorBrowsableState.Advanced)]
    internal static global::System.Resources.ResourceManager ResourceManager
    {
      get
      {
        if (object.ReferenceEquals(resourceMan, null))
        {
          global::System.Resources.ResourceManager temp =
            new global::System.Resources.ResourceManager(
            "Wrox.ProCSharp.Localization.Demo", typeof(Demo).Assembly);
          resourceMan = temp;
        }
        return resourceMan;
      }
    }

    /// <summary>
    ///   Overrides the current thread's CurrentUICulture property for all
    ///   resource lookups using this strongly typed resource class.
    /// </summary>
    [global::System.ComponentModel.EditorBrowsableAttribute(
      global::System.ComponentModel.EditorBrowsableState.Advanced)]
    internal static global::System.Globalization.CultureInfo Culture
    {
      get
      {
        return resourceCulture;
      }
      set
      {
        resourceCulture = value;
      }
    }

    /// <summary>
    ///   Looks up a localized string similar to Chapter.
    /// </summary>
    internal static string Chapter
    {
      get
      {
        return ResourceManager.GetString("Chapter", resourceCulture);
      }
    }

    //...

    internal static System.Drawing.Bitmap WroxLogo
    {
      get
      {
        object obj = ResourceManager.GetObject("WroxLogo", resourceCulture);
        return ((System.Drawing.Bitmap)(obj));
      }
    }
  }
}
The System.Resources Namespace
Before moving on to the next example, this section concludes with a review of the classes contained in the System.Resources namespace that deal with resources:
- ResourceManager — Can be used to get resources for the current culture from assemblies or resource files. Using the ResourceManager, you can also get a ResourceSet for a particular culture.
- ResourceSet — Represents the resources for a particular culture. When a ResourceSet instance is created, it enumerates over a class, implementing the interface IResourceReader, and it stores all resources in a Hashtable.
- IResourceReader — This interface is used from the ResourceSet to enumerate resources. The class ResourceReader implements this interface.
- ResourceWriter — This class is used to create a resource file. ResourceWriter implements the interface IResourceWriter.
- ResXResourceSet, ResXResourceReader, and ResXResourceWriter — These are similar to ResourceSet, ResourceReader, and ResourceWriter, but they are used to create an XML-based resource file, .resX, instead of a binary file. You can use ResXFileRef to make a link to a resource instead of embedding it inside an XML file.
- System.Resources.Tools — This namespace contains the class StronglyTypedResourceBuilder to create a class from a resource.
WINDOWS FORMS LOCALIZATION USING VISUAL STUDIO
In this section, you create a simple Windows Forms application that demonstrates how to use Visual Studio 2012 for localization. This application does not use complex Windows Forms or have any real inner functionality because the key feature it is intended to demonstrate here is localization. In the automatically generated source code, change the namespace to Wrox.ProCSharp.Localization and the class name to BookOfTheDayForm. The namespace is changed not only in the source file BookOfTheDayForm.cs but also in the project settings, enabling all generated resource files to share this namespace, too. You can change the namespace for all new items that are created by selecting Common Properties from the Project ⇒ Properties menu.
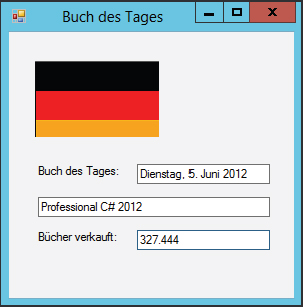
To demonstrate various aspects of localization, this program has an image, some text, a date, and a number. The image shows a flag that is also localized. Figure 28-9 shows this form of the application as it appears in the Windows Forms Designer.

The following table lists the values for the Name and Text properties of the Windows Forms elements:
| NAME | TEXT |
| labelBookOfTheDay | Book of the day |
| labelItemsSold | Books sold |
| textDate | Date |
| textTitle | Professional C# 2012 |
| textItemsSold | 30000 |
| pictureFlag |
In addition to this form, you might want a message box that displays a welcome message; this message might vary according to the current time of day. The following example demonstrates that localization for dynamically created dialogs must be done differently. In the method WelcomeMessage, you display a message box using MessageBox.Show. Then you call the method WelcomeMessage in the constructor of the form class BookOfTheDayForm, before the call to InitializeComponent.
Here is the code for the method WelcomeMessage:
    public void WelcomeMessage()
    {
      DateTime now = DateTime.Now;
      string message;
      if (now.Hour <= 12)
      {
        message = "Good Morning";
      }
      else if (now.Hour <= 19)
      {
        message = "Good Afternoon";
      }
      else
      {
        message = "Good Evening";
      }
      MessageBox.Show(String.Format("{0}
This is a localization sample",
        message));
    }
The number and date in the form should be set by using formatting options. The following adds a new method, SetDateAndNumber, to set the values with the format option. In a real application, these values could be received from a web service or a database, but this example focuses on localization. The date is formatted using the D option (to display the long-date name). The number is displayed using the picture number format string ###,###,###, where # represents a digit and “,” is the group separator (code file BookOfTheDay/BookOfTheDayForm.cs):
    public void SetDateAndNumber()
    {
      DateTime today = DateTime.Today;
      textDate.Text = today.ToString("D");
      int itemsSold = 327444;
      textItemsSold.Text = itemsSold.ToString("###,###,###");
    }
In the constructor of the BookOfTheDayForm class, both the WelcomeMessage and SetDateAndNumber methods are called:
    public BookOfTheDayForm()
    {
      WelcomeMessage();

      InitializeComponent();

      SetDateAndNumber();
    }
A magical feature of the Windows Forms Designer is started when you reset the Localizable property of the form from false to true. It results in the creation of an XML-based resource file for the dialog that stores all resource strings, properties (including the location and size of Windows Forms elements), embedded pictures, and so on. In addition, the implementation of the InitializeComponent method is changed; an instance of the class System.Resources.ResourceManager is created, and to get to the values and positions of the text fields and pictures, the GetObject method is used instead of writing the values directly into the code. GetObject uses the CurrentUICulture property of the current thread to find the correct localization of the resources.
Here is part of InitializeComponent from the file BookOfTheDayForm.Designer.cs before the Localizable property is set to true, where all properties of textboxTitle are set:
      private void InitializeComponent()
      {
        //...
        this.textTitle = new System.Windows.Forms.TextBox();
        //
        // textTitle
        //
        this.textTitle.Anchor = ((System.Windows.Forms.AnchorStyles)
          (((System.Windows.Forms.AnchorStyles.Top
          | System.Windows.Forms.AnchorStyles.Left)
          | System.Windows.Forms.AnchorStyles.Right)));
        this.textTitle.Location = new System.Drawing.Point(29, 164);
        this.textTitle.Name = "textTitle";
        this.textTitle.Size = new System.Drawing.Size(231, 20);
        this.textTitle.TabIndex = 3;
The code for the IntializeComponent method is automatically changed by setting the Localizable property to true:
    private void InitializeComponent()
    {
      System.ComponentModel.ComponentResourceManager resources =
        new System.ComponentModel.ComponentResourceManager(
          typeof(BookOfTheDayForm));
      //...
      this.textTitle = new System.Windows.Forms.TextBox();
      //
      // textTitle
      //
      resources.ApplyResources(this.textTitle, "textTitle");
      this.textTitle.Name = "textTitle";
From where does the resource manager get the data? When the Localizable property is set to true, the resource file BookOfTheDay.resX is generated. In this file, you can find the scheme of the XML resource, followed by all elements in the form: Type, Text, Location, TabIndex, and so on.
The class ComponentResourceManager is derived from ResourceManager and offers the method ApplyResources. With ApplyResources, the resources defined with the second argument are applied to the object in the first argument.
The following XML segment shows a few of the properties of textBoxTitle: the Location property has a value of 29, 164; the Size property has a value of 231, 20; the Text property is set to Professional C# 2012; and so on. For every value, the type of the value is stored as well. For example, the Location property is of type System.Drawing.Point, and this class can be found in the assembly System.Drawing.
Why are the locations and sizes stored in this XML file? With translations, many strings have completely different sizes and no longer fit into the original positions. When the locations and sizes are all stored inside the resource file, everything needed for localization is stored in this file, separate from the C# code (code file BookOfTheDay/BookOfTheDayForm.resx):
<data name="textTitle.Anchor" type=
"System.Windows.Forms.AnchorStyles, System.Windows.Forms">
<value>Top, Left, Right</value>
</data>
<data name="textTitle.Location" type="System.Drawing.Point, System.Drawing">
<value>29, 164</value>
</data>
<data name="textTitle.Size" type="System.Drawing.Size, System.Drawing">
<value>231, 20</value>
</data>
<data name="textTitle.TabIndex" type="System.Int32, mscorlib">
<value>3</value>
</data>
<data name="textTitle.Text" xml:space="preserve">
<value>Professional C# 2012</value>
</data>
<data name=">>textTitle.Name" xml:space="preserve">
<value>textTitle</value>
</data>
<data name=">>textTitle.Type" xml:space="preserve">
<value>System.Windows.Forms.TextBox, System.Windows.Forms, Version=4.0.0.0,
Culture=neutral, PublicKeyToken=b77a5c561934e089</value>
</data>
<data name=">>textTitle.Parent" xml:space="preserve">
<value>$this</value>
</data>
<data name=">>textTitle.ZOrder" xml:space="preserve">
<value>2</value>
</data>When changing some of these resource values, it is not necessary to work directly with the XML code. You can change these resources right in the Visual Studio Designer. Whenever you change the Language property of the form and the properties of some form elements, a new resource file is generated for the specified language. Create a German version of the form by setting the Language property to German, and a French version by setting it to French, and so on. For each language, you get a resource file with the changed properties: in this case, BookOfTheDayForm.de.resX and BookOfTheDayForm.fr.resX.
The following table shows the changes needed for the German version:
| GERMAN NAME | VALUE |
| $this.Text (title of the form) | Buch des Tages |
| labelItemsSold.Text | Bücher verkauft: |
| labelBookOfTheDay.Text | Buch des Tages: |
The next table shows the changes for the French version:
| FRENCH NAME | VALUE |
| $this.Text (title of the form) | Le livre du jour |
| labelItemsSold.Text | Des livres vendus: |
| labelBookOfTheDay.Text | Le livre du jour: |
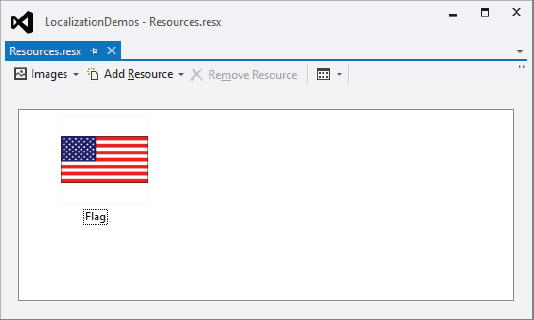
By default, images are not moved to satellite assemblies. However, in the sample application, the flag should vary according to the country. To achieve this, you have to add the image of the American flag to the file Resources.resx. You can find this file in the Properties section of the Visual Studio Solution Explorer. With the resource editor, select the Images category, as shown in Figure 28-10, and add the file americanflag.bmp. To make localization with images possible, the image must have the same name in all languages. Here, the image in the file Resources.resx has the name “Flag.” You can rename the image in the properties editor. Within the properties editor, you can also specify whether the image should be linked or embedded. For best performance with resources, images are linked by default. With linked images, the image file must be delivered together with the application. If you want to embed the image within the assembly, you can change the Persistence property to Embedded.
You can add the localized versions of the flags by copying the file Resource.resx to Resource.de.resx and Resource.fr.resx and replacing the flags with GermanFlag.bmp and FranceFlag.bmp. Because a strongly typed resource class is needed only with the neutral resource, the property CustomTool can be cleared with the resource files of all specific languages.
Compiling the project now creates a satellite assembly for each language. Inside the debug directory (or the release, depending on your active configuration), language subdirectories such as de and fr are created. In such a subdirectory, you will find the file BookOfTheDay.resources.dll. Such a file is a satellite assembly that includes only localized resources. Opening this assembly with ildasm, you’ll see a manifest with the embedded resources and a defined locale. For example, the assembly has the locale de in the assembly attributes, so it can be found in the de subdirectory. You can also see the name of the resource with .mresource; it is prefixed with the namespace Wrox.ProCSharp.Localization, followed by the class name BookOfTheDayForm and the language code de.
Changing the Culture Programmatically
After translating the resources and building the satellite assemblies, you will get the correct translations according to the configured culture for the user. The welcome message is not translated at this time. This needs to be done in a different way, as you’ll see shortly.
In addition to the system configuration, it should be possible to send the language code as a command-line argument to your application for testing purposes. In the following example, the BookOfTheDayForm constructor (in the code file BookOfTheDayBookOfTheDayForm.cs) is changed to enable the passing of a culture string, and the setting of the culture according to this string. A CultureInfo instance is created to pass it to the CurrentCulture and CurrentUICulture properties of the current thread. Remember that the CurrentCulture is used for formatting, and the CurrentUICulture is used for loading resources:
    public BookOfTheDayForm(string culture)
    {
      if (!String.IsNullOrEmpty(culture))
      {
        var ci = new CultureInfo(culture);
        // set culture for formatting
        Thread.CurrentThread.CurrentCulture = ci;
        // set culture for resources
        Thread.CurrentThread.CurrentUICulture = ci;
      }

      WelcomeMessage();

      InitializeComponent();
      SetDateAndNumber();
    }
The BookOfTheDayForm is instantiated in the Main method, which can be found in the file Program.cs. In this method, you pass the culture string to the BookOfTheDayForm constructor:
    [STAThread]
    static void Main(string[] args)
    {
      string culture = String.Empty;
      if (args.Length == 1)
      {
        culture = args[0];
      }

      Application.EnableVisualStyles();
      Application.SetCompatibleTextRenderingDefault(false);
      Application.Run(new BookOfTheDayForm(culture));
    }
Now you can start the application by using command-line options. Running the application, you can see the formatting options and the resources that were generated from the Windows Forms Designer. Figures 28-11 and 28-12 show the two localizations in which the application is started with the command-line options de-DE and fr-FR, respectively.

There is still a problem with the welcome message box: the strings are hard-coded inside the program. Because these strings are not properties of elements inside the form, the Forms Designer does not extract XML resources as it does from the properties for Windows controls when changing the Localizable property of the form. You have to change this code yourself.
Using Custom Resource Messages
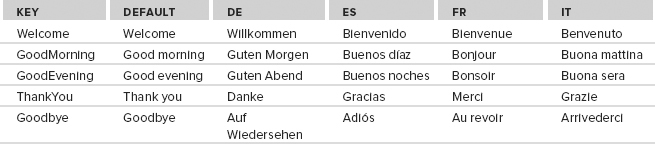
For the welcome message, you have to translate the hard-coded strings. The following table shows the translations for German and French. You can write custom resource messages directly in the file Resources .resx and the language-specific derivations. Of course, you can also create a new resource file.

The source code of the method WelcomeMessage must also be changed to use the resources. With strongly typed resources, it isn’t necessary to instantiate the ResourceManager class. Instead, the properties of the strongly typed resource can be used:
    public static void WelcomeMessage()
    {
      DateTime now = DateTime.Now;
      string message;
      if (now.Hour <= 12)
      {
        message = Properties.Resources.GoodMorning;
      }
      else if (now.Hour <= 19)
      {
        message = Properties.Resources.GoodAfternoon;
      }
      else
      {
        message = Properties.Resources.GoodEvening;
      }
      MessageBox.Show(String.Format("{0}
{1}", message,
          Properties.Resources.Message1);
    }
When the program is started using English, German, or French, a message box with the appropriate language will appear.
Automatic Fallback for Resources
For the French and German versions in the example, all the resources are located inside the satellite assemblies. If you are not using these versions, then all the values of labels or text boxes are changed; this is not a problem at all. You must have only the values that change in the satellite assembly; the other values are taken from the parent assembly. For example, for de-AT (Austria), you could change the value for the Good Afternoon resource to Grüß Gott while leaving the other values intact. During runtime, when looking for the value of the resource Good Morning, which is not located in the de-at satellite assembly, the parent assembly would be searched. The parent for de-AT is de. In cases where the de assembly does not have this resource either, the value would be searched for in the parent assembly of de, the neutral assembly. The neutral assembly does not have a culture code.
Outsourcing Translations
It is an easy task to outsource translations using resource files. It is not necessary to install Visual Studio to translate these files; a simple XML editor will suffice. The disadvantage of using an XML editor is that it doesn’t provide a way to rearrange Windows Forms elements and change their size if the translated text does not fit into the original borders of a label or button. Using a Windows Forms Designer to do translations is a natural choice.
Microsoft provides a tool as part of the .NET Framework SDK that fulfills all these requirements: the Windows Resource Localization Editor, winres.exe (see Figure 28-13). Users working with this tool do not need access to the C# source files; only binary or XML-based resource files are needed for translations. After these translations are completed, you can import the resource files to the Visual Studio project to build satellite assemblies.

If you don’t want your translation bureau to change the size and location of labels and buttons, and they cannot deal with XML files, you can send a simple text-based file. With the command-line utility resgen .exe, you can create a text file from an XML file:
resgen myresource.resX myresource.txtAfter you have received the translation from the translation bureau, you can create an XML file from the returned text file. Remember to add the culture name to the filename:
resgen myresource.es.txt myresource.es.resXLOCALIZATION WITH ASP.NET WEB FORMS
With ASP.NET Web Forms applications, localization happens in a similar way to Windows applications. Chapter 40, “ASP.NET Web Forms,” discusses the functionality of ASP.NET Web Forms applications; this section discusses the localization of ASP.NET applications. ASP.NET 4.5 and Visual Studio 2012 have many features to support localization. The basic concepts of localization and globalization are the same as discussed before, but some specific issues are associated with ASP.NET.
As you have already learned, you have to differentiate between the user interface culture and the culture used for formatting. This is the same with ASP.NET. Both of these cultures can be defined at the web and page level, as well as programmatically.
To be independent of the web server’s operating system, the culture and user interface culture can be defined with the <globalization> element in the configuration file web.config:
<configuration>
  <system.web>
    <globalization culture="en-US" uiCulture="en-US" />
  </system.web>
</configuration>
If the configuration should be different for specific web pages, the Page directive enables you to assign the culture:
<%Page Language="C#" Culture="en-US" UICulture="en-US" %>Users can configure the language with the browser. With Internet Explorer 10 and Windows 8, this setting is taken from the operating system. The configuration within IE takes you to the Language settings, as shown in Figure 28-14.

If the page language should be set according to the language setting of the client, the culture of the thread can be set programmatically to the language setting received from the client. ASP.NET has an automatic setting that does just that. Setting the culture to the value Auto sets the culture of the thread according to the client’s settings:
<%Page Language="C#" Culture="Auto" UICulture="Auto" %>In dealing with resources, ASP.NET differentiates between resources that are used for the complete web site and resources that are needed only within a page.
To create a resource used within a page, select Tools ⇒ Generate Local Resource from the Visual Studio menu in the design view. This creates the subdirectory App_LocalResources, where a resource file for every page is stored. These resources can be localized similarly to how they are localized in Windows applications. The association between the web controls and the local resource files is achieved by using a meta:resourcekey attribute, as shown in the following example with the ASP.NET Label control. Label1Resource1 is the name of the resource that can be changed in the local resource file:
<asp:Label ID="Label1" Runat="server" Text="English Text"
    meta:resourcekey="Label1Resource1"></asp:Label>
For resources that should be shared between multiple pages, you have to create an ASP.NET folder, Appl_GlobalResources. Here you can add resource files, such as Messages.resx and its resources. To associate the web controls with these resources, you can use Expressions in the property editor. To do so, click the Expressions button to open the Expressions dialog (see Figure 28-15). Here, select the expression type Resources, set the name of the ClassKey (which is the name of the resource file — in this case, a strongly typed resource file is generated), and the name of the ResourceKey, which is the name of the resource.

In the ASPX file, you can see the association to the resource with the binding expressions syntax <%$:
<asp:Label ID="Label2" Runat="server"
    Text="<%$ Resources:Messages, String1 %>">
</asp:Label>
LOCALIZATION WITH WPF
Visual Studio 2012 does not have great support for the localization of WPF applications, but you still can localize your WPF application. WPF has built-in localization support. With WPF, you can either use .NET resources, similar to what you’ve seen with Windows Forms and ASP.NET applications, or use an XAML (XML for Applications Markup Language) resource dictionary.
These options are discussed next. You can read more about WPF and XAML in Chapter 35, “Core WPF,” and Chapter 36, “Business Applications with WPF.” To demonstrate the use of resources with a WPF application, create a simple WPF application containing just one button, as shown in Figure 28-16.

The XAML code for this application is shown here (code file WPFApplicationUsingResourcesMainWindow.xaml):
<Window x:Class="Wrox.ProCSharp.Localization.MainWindow"
    xmlns="http://schemas.microsoft.com/winfx/2006/xaml/presentation"
    xmlns:x="http://schemas.microsoft.com/winfx/2006/xaml"
    Title="WPF Sample" Height="240" Width="500">
  <Grid>
    <Button Name="button1" Margin="30,20,30,20" Click="Button_Click"
        Content="English Button" />
  </Grid>
</Window>
With the handler code for the Click event of the button, only a message box containing a sample message pops up (code file WPFApplicationUsingResourcesMainWindow.xaml.cs):
    private void Button_Click(object sender, RoutedEventArgs e)
    {
      MessageBox.Show("English Message");
    }
.NET Resources with WPF
You add .NET resources to a WPF application similarly to how you do so with other applications. Define the resources named Button1Text and Button1Message in the file Resources.resx. By default, this resource file has an Internal access modifier to create the Resources class. To use it from within XAML, you must change this to Public within the Managed Resources Editor.
To use the generated resource class, you need to change the XAML code. Add an XML namespace alias to reference the .NET namespace Wrox.ProCSharp.Localization.Properties as shown in the following code. Here, the alias is set to the value props. From XAML elements, properties of this class can be used with the x:Static markup extension. The Content property of the Button is set to the Button1Text property of the Resources class (code file WPFApplicationUsingResourcesMainWindow.xaml):
<Window x:Class="Wrox.ProCSharp.Localization.Window1"
    xmlns="http://schemas.microsoft.com/winfx/2006/xaml/presentation"
    xmlns:x="http://schemas.microsoft.com/winfx/2006/xaml"
    xmlns:props="clr-namespace:Wrox.ProCSharp.Localization.Properties"
    Title="WPF Sample" Height="300" Width="300">
  <Grid>
    <Button Name="button1" Margin="30,20,30,20" Click="Button_Click"
      Content="{x:Static props:Resources.Button1Text}" />
  </Grid>
</Window>
To use the .NET resource from code-behind, just access the Button1Message property directly, in the same way you do with Windows Forms applications (code file WPFApplicationUsingResourcesMainWindow.xaml.cs):
    private void Button_Click(object sender, RoutedEventArgs e)
    {
      MessageBox.Show(Properties.Resources.Button1Message);
    }
Now the resources can be localized as before.
Using .NET resources for localization of WPF applications offers two main advantages:
- .NET resources can be easily managed.
- x:Static bindings are checked by the compiler.
Of course, there are also disadvantages:
- You need to add the x:Static bindings to the XAML file, and there’s no designer support for this.
- Binding is done to the generated resource classes that use the ResourceManager. You need to do some additional plumbing to support other resource managers, such as the DatabaseResourceManager, discussed later in this chapter.
- There’s no type-converter support that can be used with other XAML elements.
XAML Resource Dictionaries
Instead of using .NET resources for localization of WPF applications, you can work directly with XAML to create localized content. This has its own advantages and disadvantages. The steps for a localization process can be described by these actions:
These steps are described in the following sections.
Creating Satellite Assemblies
When compiling a WPF application, the XAML code is compiled to a binary format, BAML, that is stored into an assembly. To move the BAML code from the main assembly to a separate satellite assembly, you can change the .csproj build file by adding a <UICulture> element as a child to the <PropertyGroup> element, as shown in the following example. The culture, here en-US, defines the default culture of the project. Building the project with this build setting creates a subdirectory en-US and a satellite assembly containing BAML code for the default language (project file WPFApplicationUsingXAMLDictionaries/WPFApplicationUsingXAMLDictionaries.csproj):
<UICulture>en-US</UICulture>When separating the BAML into a satellite assembly, you should also apply the NeutralResourcesLanguage attribute and supply the resource fallback location to a satellite assembly. If you decide to keep BAML in the main assembly (by not defining the <UICulture> to the .csproj file), the UltimateResourceFallbackLocation should be set to MainAssembly (code file WPFApplicationUsingXAMLDictionaries/AssemblyInfo.cs):
[assembly: NeutralResourcesLanguage("en-US",
UltimateResourceFallbackLocation.Satellite)]
Adding a Resource Dictionary
For code-behind content that needs to be localized, a resource dictionary can be added. Using XAML, you can define resources within the <ResourceDictionary> element, as shown in the following code. With Visual Studio, you can create a new resource dictionary by adding a new resource dictionary item and defining the filename. In the example here, the resource dictionary contains one string item. To get access to the String type from the System namespace, an XML namespace alias needs to be defined. Here, the alias system is set to the clr-namespace System in the assembly mscorlib. The string that is defined can be accessed with the key message1. This resource dictionary is defined in the file LocalizedStrings.xaml:
<ResourceDictionary
      xmlns="http://schemas.microsoft.com/winfx/2006/xaml/presentation"
      xmlns:x="http://schemas.microsoft.com/winfx/2006/xaml"
      xmlns:system="clr-namespace:System;assembly=mscorlib">
   <system:String x:Key="Message1">English Message</system:String>
</ResourceDictionary>
To make the resource dictionary available with the application, it must be added to the resources. If the resource dictionary is required only within a window or a specific WPF element, it can be added to the resources collection of the specific window or WPF element. If the same resource dictionary is needed by multiple windows, it can be added to the file App.xaml within the <Application> element, making it available to the complete application. Here, the resource dictionary is added within the resources of the main window (code file WPFApplicationUsingXAMLDictionaries/MainWindow.xaml):
  <Window.Resources>
    <ResourceDictionary>
      <ResourceDictionary.MergedDictionaries>
        <ResourceDictionary Source="LocalizationStrings.xaml" />
      </ResourceDictionary.MergedDictionaries>
    </ResourceDictionary>
  </Window.Resources>
To use the XAML resource dictionary from code-behind, you can use the indexer of the Resources property, the FindResource method, or the TryFindResource method. Because the resource is defined with the window, the indexer of the Resources property of the Window class can be used to access the resource. FindResource does a hierarchical search for a resource. If you use the FindResource method of the Button and it is not found with the Button resources, then resources are searched in the Grid. If the resource is not there, a lookup to the Window resources is done before the Application resources are consulted (code file WPFApplicationUsingXAMLDictionaries/MainWindow.xaml.cs):
    private void Button_Click(object sender, RoutedEventArgs e)
    {
      MessageBox.Show(this.Resources["Message1"] as string);
      MessageBox.Show(this.FindResource("Message1") as string);
    }
Uid Attributes for Localization
With the custom resource dictionary file, you can reference the text from the code that should be localized. To localize XAML code with WPF elements, the x:Uid attribute is used as a unique identifier for the elements that need localization. You don’t have to apply this attribute manually to the XAML content; instead, you can use the msbuild command with this option:
msbuild /t:updateuidWhen you call this command in the directory where the project file is located, the XAML files of the project are modified to add an x:Uid attribute with a unique identifier to every element. If the control already has a Name or x:Name attribute applied, the x:Uid has the same value; otherwise, a new value is generated. The same XAML shown earlier now has the new attributes applied:
<Window x:Uid="Window_1"
        x:Class="WPFApplicationUsingXAMLDictionaries.MainWindow"
        xmlns="http://schemas.microsoft.com/winfx/2006/xaml/presentation"
        xmlns:x="http://schemas.microsoft.com/winfx/2006/xaml"
        Title="Main Window" Height="240" Width="500">
  <Window.Resources>
    <ResourceDictionary x:Uid="ResourceDictionary_1">
      <ResourceDictionary.MergedDictionaries>
        <ResourceDictionary x:Uid="ResourceDictionary_2"
                            Source="LocalizationStrings.xaml" />
      </ResourceDictionary.MergedDictionaries>
    </ResourceDictionary>
  </Window.Resources>
  <Grid x:Uid="Grid_1">
    <Button x:Uid="button1" Name="button1" Margin="30,20,30,20"
        Click="Button_Click" Content="English Button" />
  </Grid>
</Window>
If you change the XAML file after x:Uid attributes have been added, you can verify the correctness of the x:Uid attributes with the option /t:checkuid. Now you can compile the project to create BAML code containing the x:Uid attributes and use a tool to extract this information.
Using the LocBaml Tool for Localization
Compiling the project creates a satellite assembly containing the BAML code. From this satellite assembly, you can extract the content that needs to be localized with classes from the System.Windows.Markup .Localizer namespace. Included with the Windows SDK is the sample program LocBaml, a tool that can be used to extract localization content from BAML. You need to copy the executable, the satellite assembly with the default content, and LocBaml.exe to one directory and start the sample program to produce a .csv file with the localization content:
LocBaml /parse WPFApplicationUsingXAMLDictionaries.resources.dll /out: trans.csvYou can use Microsoft Excel to open the .csv file and translate its content. An extract from the .csv file that lists the content of the button and the message from the resource dictionary is shown here:
WPFandXAMLResources.g.en-US.resources:localizationstrings.baml,
system:String_1:System.String.$Content,None,True,True,,English Message
WPFandXAMLResources.g.en-US.resources:window1.baml,
button1:System.Windows.Controls.ContentControl.Content,Button,True,True,,
English Button
This file contains the following fields:
- The name of the BAML
- The identifier of the resource
- The category of the resource that provides the type of the content
- A Boolean value if the resource is visible for translation (readable)
- A Boolean value if the resource can be modified for the translation (modifiable)
- Localization comments
- The value of the resource
After localization of the resource, you can create a new directory for the new language (for example, de for German). The directory structure follows the same convention that was shown earlier in this chapter with satellite assemblies. With the LocBaml tool, you can create satellite assemblies with the translated content:
LocBaml /generate WPFandXAMLResources.resources.dll /trans:trans_de.csv
    /out: ./de /cul:de-DE
Now, the same rules for setting the culture of the thread and finding satellite assemblies that were shown with Windows Forms applications apply here.
As you’ve seen, it’s quite a chore to perform the localization with XAML dictionaries. This is one of the disadvantages. Luckily, it’s not necessary to do this on a daily basis. What are the advantages?
- You can delay the localization process within the XAML file until the application is completed. There’s no special markup or resource-mapping syntax needed. The localization process can be separated from the development process.
- Using XAML resource dictionaries is very efficient at runtime.
- Localization can be done easily with a CSV editor.
The disadvantages are as follows:
- LocBaml is an unsupported tool found in the samples of the SDK.
- Localization is a one-time process. It’s hard to make changes to the configured localization.
A CUSTOM RESOURCE READER
Using the resource readers that are part of .NET Framework 4.5, you can read resources from resource files and satellite assemblies. If you want to put the resources into a different store (such as a database), you can use a custom resource reader to read these resources.
To use a custom resource reader, you also need to create a custom resource set and a custom resource manager. Doing this is not a difficult task, however, because you can derive the custom classes from existing classes.
For the sample application, you need to create a simple database with just one table for storing messages; it should have one column for every supported language. The following table lists the columns and their corresponding values:
For the custom resource reader, you will create a component library with three classes: DatabaseResourceReader, DatabaseResourceSet, and DatabaseResourceManager.
Creating a DatabaseResourceReader
With the class DatabaseResourceReader, you define two fields: the connection string that is needed to access the database and the language that should be returned by the reader. These fields are filled inside the constructor of this class. The field language is set to the name of the culture that is passed with the CultureInfo object to the constructor (code file DatabaseResourceReaderDatabaseResourceReader.cs):
  public class DatabaseResourceReader: IResourceReader
  {
    private string connectionString;
    private string language;

    public DatabaseResourceReader(string connectionString,
      CultureInfo culture)
    {
      this.connectionString = connectionString;
      this.language = culture.Name;
    }
A resource reader has to implement the interface IResourceReader. This interface defines the methods Close and GetEnumerator to return an IDictionaryEnumerator that returns keys and values for the resources. In the implementation of GetEnumerator, you create a Hashtable where all keys and values for a specific language are stored. Next, you can use the SqlConnection class in the namespace System.Data .SqlClient to access the database in SQL Server. Connection.CreateCommand creates a SqlCommand object that you use to specify the SQL SELECT statement to access the data in the database. If the language is set to de, the SELECT statement is SELECT [key], [de] FROM Messages. Then you use a SqlDataReader object to read all values from the database and put them into a Hashtable. Finally, the enumerator of the Hashtable is returned:
    public System.Collections.IDictionaryEnumerator GetEnumerator()
    {
      Dictionary<string, string> dict = new Dictionary<string, string>();

      SqlConnection connection = new SqlConnection(connectionString);
      SqlCommand command = connection.CreateCommand();
      if (String.IsNullOrEmpty(language))
        language = "Default";

      command.CommandText = "SELECT [key], [" + language + "] " +
                            "FROM Messages";

      try
      {
        connection.Open();

        SqlDataReader reader = command.ExecuteReader();
        while (reader.Read())
        {
          if (reader.GetValue(1) != System.DBNull.Value)
          {
            dict.Add(reader.GetString(0).Trim(), reader.GetString(1));
          }
        }

        reader.Close();
      }
      catch (SqlException ex)
      {
        if (ex.Number != 207)  // ignore missing columns in the database
          throw;              // rethrow all other exceptions
      }
      finally
      {
        connection.Close();
      }
      return dict.GetEnumerator();
    }

    public void Close()
    {
    }
Because the interface IResourceReader is derived from IEnumerable and IDisposable, the methods GetEnumerator, which returns an IEnumerator interface, and Dispose must be implemented, too:
    IEnumerator IEnumerable.GetEnumerator()
    {
      return this.GetEnumerator();
    }

    void IDisposable.Dispose()
    {
    }
  }
Creating a DatabaseResourceSet
The class DatabaseResourceSet can use nearly all implementations of the base class ResourceSet. You just need a different constructor that initializes the base class with your own resource reader, DatabaseResourceReader. The constructor of ResourceSet allows passing an object by implementing IResourceReader; this requirement is fulfilled by DatabaseResourceReader (code file DatabaseResourceReaderDatabaseResourceSet.cs):
  public class DatabaseResourceSet: ResourceSet
  {
    internal DatabaseResourceSet(string connectionString, CultureInfo culture)
      : base(new DatabaseResourceReader(connectionString, culture))
    {
    }

    public override Type GetDefaultReader()
    {
      return typeof(DatabaseResourceReader);
    }
  }
Creating a DatabaseResourceManager
The third class you have to create is the custom resource manager. DatabaseResourceManager is derived from the class ResourceManager, and you only have to implement a new constructor and override the method InternalGetResourceSet.
In the constructor, create a new Dictionary<string, DatabaseResourceSet> to store all queried resource sets and set it in the field ResourceSets defined by the base class (code file DatabaseResourceReader/DatabaseResoureManager.cs):
  public class DatabaseResourceManager: ResourceManager
  {
    private string connectionString;
    private Dictionary<string, DatabaseResourceSet> resourceSets;

    public DatabaseResourceManager(string connectionString)
    {
      this.connectionString = connectionString;
      resourceSets = new Dictionary<string, DatabaseResourceSet>();
    }
The methods of the ResourceManager class that you can use to access resources (such as GetString and GetObject) invoke the method InternalGetResourceSet to access a resource set where the appropriate values can be returned.
In the implementation of InternalGetResourceSet, you first check whether the resource set for the culture queried for a resource is already in the hash table; if so, you return it to the caller. If the resource set is not available, you create a new DatabaseResourceSet object with the queried culture, add it to the dictionary, and return it to the caller:
    protected override ResourceSet InternalGetResourceSet(
        CultureInfo culture, bool createIfNotExists, bool tryParents)
    {
      DatabaseResourceSet rs = null;

      if (resourceSets.ContainsKey(culture.Name))
      {
        rs = resourceSets[culture.Name];
      }
      else
      {
        rs = new DatabaseResourceSet(connectionString, culture);
        resourceSets.Add(culture.Name, rs);
      }
      return rs;
    }
  }
Client Application for DatabaseResourceReader
The way in which the class ResourceManager is used from the client application here does not differ much from the earlier use of the ResourceManager class. The only difference is that the custom class DatabaseResourceManager is used instead of the class ResourceManager. The following code snippet demonstrates how you can use your own resource manager.
A new DatabaseResourceManager object is created by passing the database connection string to the constructor. Then, you can invoke the GetString method that is implemented in the base class as you did earlier, passing the key and an optional object of type CultureInfo to specify a culture. In turn, you get a resource value from the database because this resource manager is using the classes DatabaseResourceSet and DatabaseResourceReader (code file DatabaseResourceReaderClientProgram.cs):
   var rm = new DatabaseResourceManager(
                @"server=(local)sqlexpress;database=LocalizationDemo;" +
                 "trusted_connection=true");

   string spanishWelcome = rm.GetString("Welcome", new CultureInfo("es-ES"));
   string italianThankyou = rm.GetString("ThankYou", new CultureInfo("it"));
   string threadDefaultGoodMorning = rm.GetString("GoodMorning");
CREATING CUSTOM CULTURES
Over time, more and more languages have become supported by the .NET Framework. However, not all languages of the world are available with .NET, and for these you can create a custom culture. For example, creating a custom culture can be useful to support a minority within a region or to create subcultures for different dialects.
Custom cultures and regions can be created with the class CultureAndRegionInfoBuilder in the namespace System.Globalization. This class is located in the assembly sysglobl.
With the constructor of the class CultureAndRegionInfoBuilder, you can pass the culture’s name. The second argument of the constructor requires an enumeration of type CultureAndRegionModifiers. This enumeration allows one of three values: Neutral for a neutral culture, Replacement if an existing Framework culture should be replaced, or None.
After the CultureAndRegionInfoBuilder object is instantiated, you can configure the culture by setting properties. With the properties of this class, you can define all the cultural and regional information, such as name, calendar, number format, metric information, and so on. If the culture should be based on existing cultures and regions, you can set the properties of the instance using the methods LoadDataFromCultureInfo and LoadDataFromRegionInfo, changing the values that are different by setting the properties afterward.
Calling the method Register registers the new culture with the operating system. Indeed, you can find the file that describes the culture in the directory <windows>Globalization. Look for files with the extension .nlp (code file CustomCulturesProgram.cs).
using System;
using System.Globalization;

namespace CustomCultures
{
  class Program
  {
    static void Main()
    {
      try
      {
        // Create a Styria culture
        var styria = new CultureAndRegionInfoBuilder("de-AT-ST",
          CultureAndRegionModifiers.None);
        var cultureParent = new CultureInfo("de-AT");
        styria.LoadDataFromCultureInfo(cultureParent);
        styria.LoadDataFromRegionInfo(new RegionInfo("AT"));
        styria.Parent = cultureParent;
        styria.RegionNativeName = "Steiermark";
        styria.RegionEnglishName = "Styria";
        styria.CultureEnglishName = "Styria (Austria)";
        styria.CultureNativeName = "Steirisch";

        styria.Register();
      }
      catch (UnauthorizedAccessException ex)
      {
        Console.WriteLine(ex.Message);
      }
    }
  }
}
Because registering custom languages on the system requires administrative privileges, an application manifest file is required that specifies the requested execution rights. In the project properties, the manifest file needs to be set in the Application settings.
<?xml version="1.0" encoding="utf-8"?>
<asmv1:assembly manifestVersion="1.0" xmlns="urn:schemas-microsoft-com:asm.v1"
xmlsn:asmv1="urn:schemas-microsoft-com:asm.v1" xmlns:asmv2="urn:schemas-microsoft-
com:asm.v2" xmlns:xsi="http://www.w3.org/2001/XMLSchema-instance">
  <assemblyIdentity version="1.0.0.0" name="MyApplication.app"/>
  <trustInfo xmlns="urn:schemas-microsoft-com:asm.v2">
    <security>
      <requestedPrivileges xmlns="urn:schemas-microsoft-com:asm.v3">
        <requestedExecutionLevel level="requireAdministrator"
          uiAccess="false" />
      </requestedPrivileges>
    </security>
  </trustInfo>
</asmv1:assembly>
The newly created culture can now be used like other cultures:
   var ci = new CultureInfo("de-AT-ST");
   Thread.CurrentThread.CurrentCulture = ci;
   Thread.CurrentThread.CurrentUICulture = ci;
You can use the culture for formatting and for resources. If you start the Cultures In Action application that was written earlier in this chapter again, you can see the custom culture as well.
LOCALIZATION WITH WINDOWS STORE APPS
Localization with Windows Store apps is based on the concepts you’ve learned so far but brings some fresh ideas, as you will see here. For the best experience, you need to install the Multilingual App Toolkit for Visual Studio 2012 (http://msdn.microsoft.com/en-us/windows/apps/hh848309.aspx).
The concepts of cultures, regions, and resources are the same, but because Windows Store apps can be written with C# and XAML, C++ and XAML, and JavaScript and HTML, these concepts need to be available with all languages. Only the Windows Runtime is available with all these programming languages and Windows 8 apps. Therefore, new namespaces for globalization and resources are available with the Windows Runtime: Windows.Globalization and Windows.ApplicationModel.Resources. With the globalization namespaces you can find a Calendar, GeographicRegion (compare with the .NET RegionInfo) and a Language class. With subnamespaces, there are also classes for number and date formatting that vary according to the language. With C# and Windows Store apps you can still use the .NET classes for cultures and regions.
Let’s get into an example so you can see localization with Windows Store apps in action. Create a small application using the Blank App (XAML) Visual Studio project template. Add two TextBlock and one TextBox controls to the page.
Within the OnNavigatedTo method of the code file you can assign a date with the current format to the Text property of the text1 control. The DateTime structure can be used in a way very similar to before. Just note that a few methods are not available with Windows Store apps — for example, you cannot use the method ToLongDateString, but ToString with the same format is available:
    protected override void OnNavigatedTo(NavigationEventArgs e)
    {
      text1.Text = DateTime.Today.ToString("D");
    }
Using Resources
With Windows Store apps you can create resource files with the file extension resw instead of resx. Behind the scenes, the same XML format is used with resw files, and you can use the same Visual Studio resource editor to create and modify these files. The following example uses the structure shown in Figure 28-17. The subfolder Messages contains a subdirectory, en-us, in which two resource files Errors.resw and Messages.resw are created. In the folder Stringsen-us, the resource file Resources.resw is created.
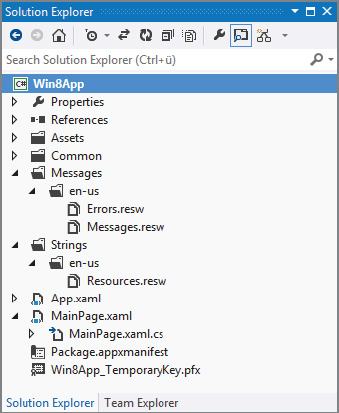
The Messages.resw file contains some English text resources, Hello with a value of Hello World, and resources named GoodDay, GoodEvening, and GoodMorning. The file Resources.resw contains the resources Text3.Text and Text3.Width, with the values "This is a sample message for Text 4" and a value of "300".
With the code, resources can be accessed with the help of the ResourceLoader class from the namespace Windows.ApplicationModel.Resources. Here we use the string "Messages" with the constructor parameter. Thus, the resource file Messages.resw is being used. Invoking the method GetString retrieves the resource with the key "Hello":
      var resourceLoader = new ResourceLoader("Messages");
      text2.Text = resourceLoader.GetString("Hello");
With Windows Store apps it is also easy to use the resources directly from XAML code. With the following TextBox, the x:Uid attribute is assigned the value Text3. This way, a resource named Text3 with extensions is searched for in the resource file Resources.resw. This resource file contains value for the keys Text3.Text and Text3.Width. The values are retrieved, and both the Text and Width properties are set:
    <TextBox x:Uid="Text3" HorizontalAlignment="Left" Margin="219,343,0,0"
      TextWrapping="Wrap" Text="TextBox" VerticalAlignment="Top"/>
Localization with the Multilingual App Toolkit
To localize Windows Store apps you can download the previously mentioned Multilingual App Toolkit. This toolkit integrates with Visual Studio 2012. After installing the toolkit you can enable it with the Windows Store apps via Tools ⇒ Enable Multilingual Toolkit. This adds a build command to the project file and adds one more options to the context menu in Solution Explorer. Select the option Add Translation Languages. . . to invoke the dialog shown in Figure 28-18, where you can choose which languages should be translated. The sample uses Pseudo Language, French, German, and Spanish. For these languages, a Microsoft Translator is available. This tool now creates a MultilingualResources subdirectory that contains .xlf files for the selected languages. The .xlf files are defined with the XLIFF (XML Localisation Interchange File Format) standard, a Microsoft-independent standard for localization.
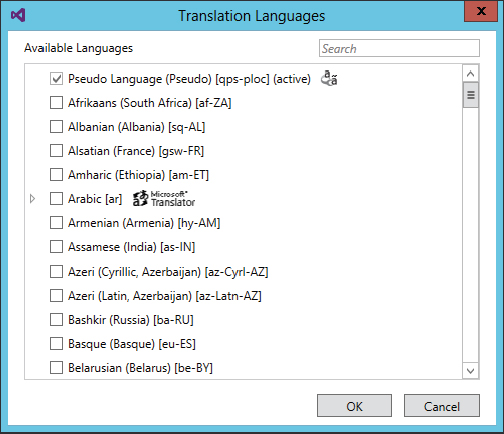
The next time you start the build process for the project, the XLIFF files are filled with content from all the resources. Selecting the XLIFF files in Solution Explorer, you can send these directly to translation. To do so, select Send For Translation. . ., which opens e-mail and attaches the XLIFF files.
Because you have the Multilingual Toolkit on the system, you can also start the translation process by opening the Multilingual Editor, shown in Figure 28-19. Clicking the Translate button makes use of the Microsoft Translation Service to translate all the resource values automatically.
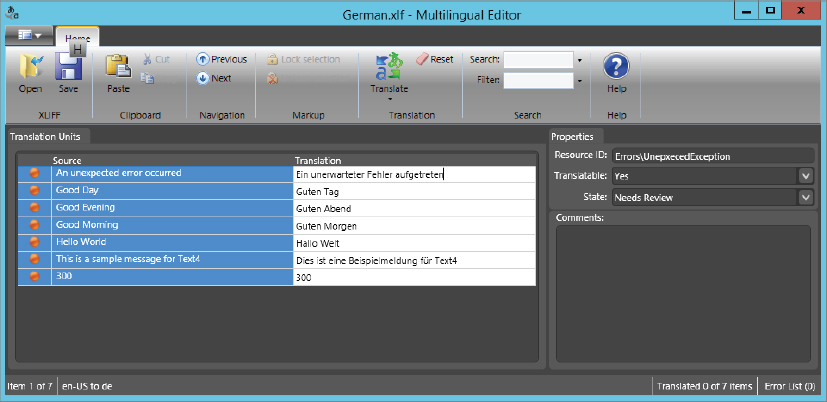
Don’t use the translation without a manual review. The tool shows a status for every resource that is translated. After the automatic translation, the status is set to Needs Review. You have probably seen applications with automatic translations that are incorrect and sometimes really funny.
SUMMARY
This chapter demonstrated how to globalize and localize .NET applications. For the globalization of applications, you learned about using the namespace System.Globalization to format culture-dependent numbers and dates. Furthermore, you learned that sorting strings by default varies according to the culture, and you looked at using the invariant culture for a culture-independent sort. Using the CultureAndRegionInfoBuilder class, you’ve learned how to create a custom culture.
Localizing an application is accomplished by using resources, which you can pack into files, satellite assemblies, or a custom store such as a database. The classes used with localization are in the namespace System.Resources. To read resources from other places, such as satellite assemblies or resource files, you can create a custom resource reader.
You also learned how to localize Windows Forms, WPF, ASP.NET, and Windows Store apps, and some important vocabulary in different languages.
The next chapter provides information about XAML. XAML is used with WPF, Silverlight, XPS, Windows Workflow Foundation, and Windows Store apps, so it provides a foundation for many technologies.