
Chapter 25
Transactions
WHAT’S IN THIS CHAPTER?
- Transaction phases and ACID properties
- Traditional transactions
- Committable transactions
- Transaction promotions
- Dependent transactions
- Ambient transactions
- Transaction isolation levels
- Custom resource managers
- Transactions with Windows 8 and Windows Server 2012
WROX.COM CODE DOWNLOADS FOR THIS CHAPTER
The wrox.com code downloads for this chapter are found at http://www.wrox.com/remtitle.cgi?isbn=1118314425 on the Download Code tab. The code for this chapter is divided into the following major examples:
- Transaction Samples
- Multithreading Ambient Transactions
- Custom Resource
- Windows 8 Transactions
INTRODUCTION
All or nothing — this is the main characteristic of a transaction. When writing a few records, either all are written, or everything will be undone. If there is even one failure when writing one record, all the other things that are done within the transaction will be rolled back.
Transactions are commonly used with databases, but with classes from the namespace System.Transactions, you can also perform transactions on volatile or in-memory-based objects such as a list of objects. With a list that supports transactions, if an object is added or removed and the transaction fails, the list action is automatically undone. Writing to a memory-based list can be done in the same transaction as writing to a database.
Since Windows Vista, the file system and registry also have transactional support. Writing a file and making changes within the registry supports transactions.
OVERVIEW
In order to understand transactions, consider the ordering of a book from a web site. The book-ordering process removes the book you want to buy from stock and puts it in your shopping cart, and the cost of your book is charged to your credit card. With these two actions, either both actions should complete successfully or neither of these actions should happen. If there is a failure when getting the book from stock, the credit card should not be charged. Transactions address such scenarios.
The most common use of transactions is writing or updating data within the database. Transactions can also be performed when writing a message to a message queue, or writing data to a file or the registry. Multiple actions can be part of a single transaction.
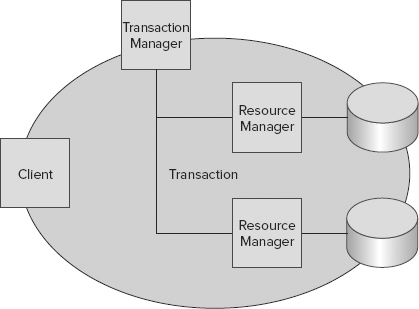
Figure 25-1 shows the main actors in a transaction. Transactions are managed and coordinated by the transaction manager, and a resource manager manages every resource that influences the outcome of the transaction. The transaction manager communicates with resource managers to define the outcome of the transaction.
Transaction Phases
The timely phases of a transaction are the active, preparing, and committing phases:
- Active phase — During the active phase, the transaction is created. Resource managers that manage the transaction for resources can enlist with the transaction.
- Preparing phase — During the preparing phase, every resource manager can define the outcome of the transaction. This phase starts when the creator of the transaction sends a commit to end the transaction. The transaction manager sends a Prepare message to all resource managers. If the resource manager can produce the transaction outcome successfully, it sends a Prepared message to the transaction manager. Resource managers can abort the transaction if they fail to prepare by forcing a rollback with the transaction manager by sending a Rollback message. After the Prepared message is sent, the resource managers must guarantee to finish the work successfully in the committing phase. To make this possible, durable resource managers must write a log with the information from the prepared state, so that they can continue from there in case of, for example, a power failure between the prepared and committing phases.
- Committing phase — The committing phase begins when all resource managers have prepared successfully. This is when the Prepared message is received from all resource managers. Then the transaction manager can complete the work by sending a Commit message to all participants. The resource managers can now finish the work on the transaction and return a Committed message.
ACID Properties
A transaction has specific requirements; for example, a transaction must result in a valid state, even if the server has a power failure. The characteristics of transactions can be defined by the term ACID. ACID is a four-letter acronym for atomicity, consistency, isolation, and durability:
- Atomicity — Represents one unit of work. With a transaction, either the complete unit of work succeeds or nothing is changed.
- Consistency — The state before the transaction was started and after the transaction is completed must be valid. During the transaction, the state may have interim values.
- Isolation — Transactions that happen concurrently are isolated from the state, which is changed during a transaction. Transaction A cannot see the interim state of transaction B until the transaction is completed.
- Durability — After the transaction is completed, it must be stored in a durable way. This means that if the power goes down or the server crashes, the state must be recovered at reboot.
Not every transaction requires all four ACID properties. For example, a memory-based transaction (for example, writing an entry into a list) may not need to be durable; and complete isolation from the outside is not always required, as discussed later with transaction isolation levels.
DATABASE AND ENTITY CLASSES
The sample database CourseManagement that is used with the transactions in this chapter is defined by the structure in Figure 25-2. The table Courses contains information about courses: course number and title. The table CourseDates contains the date of specific courses and is linked to the Courses table. The table Students contains information about persons attending a course. The table CourseAttendees is the link between Students and CourseDates. It defines which student is attending what course.

The sample applications in this chapter use a library with entity and data access classes. The class Student contains properties to define a student — for example, FirstName, LastName, and Company (code file DataLib/Student.cs):
using System;

namespace Wrox.ProCSharp.Transactions
{
  [Serializable]
  public class Student
  {
    public string FirstName { get; set; }
    public string LastName { get; set; }
    public string Company { get; set; }
    public int Id { get; set; }

    public override string ToString()
    {
      return String.Format("{0} {1}", FirstName, LastName);
    }
  }
}
Adding student information to the database is done in the method AddStudent of the class StudentData. Here, an ADO.NET connection is created to connect to the SQL Server database, the SqlCommand object defines the SQL statement, and the command is executed by invoking ExecuteNonQueryAsync (code file DataLib/StudentData.cs):
using System.Data.SqlClient;
using System.Threading.Tasks;
using System.Transactions;

namespace Wrox.ProCSharp.Transactions
{
  public class StudentData
  {
    public async Task AddStudentAsync(Student student)
    {
      var connection = new SqlConnection(
          Properties.Settings.Default.CourseManagementConnectionString);
      await connection.OpenAsync();
      try
      {
        SqlCommand command = connection.CreateCommand();

        command.CommandText = "INSERT INTO Students " +
            "(FirstName, LastName, Company) VALUES " +
            "(@FirstName, @LastName, @Company)";
        command.Parameters.AddWithValue("@FirstName", student.FirstName);
        command.Parameters.AddWithValue("@LastName", student.LastName);
        command.Parameters.AddWithValue("@Company", student.Company);

        await command.ExecuteNonQueryAsync();
      }
      finally
      {
        connection.Close();
      }
    }
  }
}TRADITIONAL TRANSACTIONS
Before System.Transactions was released, you could create transactions directly with ADO.NET, or you could do transactions with the help of components, attributes, and the COM+ runtime, which is covered in the namespace System.EnterpriseServices. Because COM+ usually is no longer used in new applications, it is not part of this book.
ADO.NET Transactions
Let’s start with traditional ADO.NET transactions. If you don’t create transactions manually, there is a single transaction with every SQL statement. If multiple statements need to participate with the same transaction, however, you must create a transaction manually to achieve this.
The following code segment shows how to work with ADO.NET transactions. The SqlConnection class defines the method BeginTransaction, which returns an object of type SqlTransaction. This transaction object must then be associated with every command that participates with the transaction. To associate a command with a transaction, set the Transaction property of the SqlCommand class to the SqlTransaction instance. For the transaction to be successful, you must invoke the Commit method of the SqlTransaction object. If there is an error, you must invoke the Rollback method, and every change is undone. You can check for an error with the help of a try/catch and do the rollback inside the catch (code file DataLib/CourseData.cs):
using System;
using System.Data.SqlClient;
using System.Diagnostics;
using System.Threading.Tasks;

namespace Wrox.ProCSharp.Transactions
{
  public class CourseData
  {
    public async Task AddCourseAsync(Course course)
    {
      var connection = new SqlConnection(
          Properties.Settings.Default.CourseManagementConnectionString);
      SqlCommand courseCommand = connection.CreateCommand();
      courseCommand.CommandText =
          "INSERT INTO Courses (Number, Title) VALUES (@Number, @Title)";
      await connection.OpenAsync();
      SqlTransaction tx = connection.BeginTransaction();

      try
      {
        courseCommand.Transaction = tx;

        courseCommand.Parameters.AddWithValue("@Number", course.Number);
        courseCommand.Parameters.AddWithValue("@Title", course.Title);
        await courseCommand.ExecuteNonQueryAsync();

        tx.Commit();
      }
      catch (Exception ex)
      {
        Trace.WriteLine("Error: " + ex.Message);
        tx.Rollback();
        throw;
      }
      finally
      {
        connection.Close();
      }
    }
  }
}
If multiple commands should run in the same transaction, every command must be associated with the transaction. Because the transaction is associated with a connection, every one of these commands must also be associated with the same connection instance. ADO.NET transactions do not support transactions across multiple connections; it is always a local transaction associated with one connection.
When you create an object persistence model using multiple objects—for example, classes Course and CourseDate — that should be persisted inside one transaction, it becomes very difficult using ADO.NET transactions. In this case, it is necessary to pass the transaction to all the objects participating in the same transaction.
System.EnterpriseServices
Enterprise Services provides a lot of services free. One of them is automatic transactions. Enterprise Services today are mainly replaced by new technologies such as System.Transactions, WCF, and the Windows App Server. The transactional features of enterprise services influences the functionality of System.Transactions, and that’s why Enterprise Services is covered here briefly.
Using transactions with System.EnterpriseServices has the advantage that it is not necessary to deal with transactions explicitly; transactions are automatically created by the runtime. You just have to add the attribute [Transaction] with the transactional requirements to the class. The [AutoComplete] attribute marks the method to automatically set the status bit for the transaction: if the method succeeds, the success bit is set, so the transaction can commit. If an exception happens, the transaction is aborted:
using System;
using System.Data.SqlClient;
using System.EnterpriseServices;
using System.Diagnostics;

namespace Wrox.ProCSharp.Transactions
{
  [Transaction(TransactionOption.Required)]
  public class CourseData: ServicedComponent
  {
    [AutoComplete]
    public void AddCourse(Course course)
    {
      var connection = new SqlConnection(
          Properties.Settings.Default.CourseManagementConnectionString);
      SqlCommand courseCommand = connection.CreateCommand();
      courseCommand.CommandText =
          "INSERT INTO Courses (Number, Title) VALUES (@Number, @Title)";
      connection.Open();
      try
      {
        courseCommand.Parameters.AddWithValue("@Number", course.Number);
        courseCommand.Parameters.AddWithValue("@Title", course.Title);
        courseCommand.ExecuteNonQuery();
      }
      finally
      {
        connection.Close();
      }
    }
  }
}
A big advantage of creating transactions with System.EnterpriseServices is that multiple objects can easily run within the same transaction, and transactions are automatically enlisted. The disadvantages are that it requires the COM+ hosting model, and the class using the features of this technology must be derived from the base class ServicedComponent.
SYSTEM.TRANSACTIONS
The namespace System.Transactions became available with .NET 2.0 and brought a modern transaction programming model to .NET applications.
This namespace offers a few dependent TransactionXXX classes. Transaction is the base class of all transaction classes and defines properties, methods, and events available with all transaction classes. CommittableTransaction is the only transaction class that supports committing. This class has a Commit method; all other transaction classes can perform only a rollback. The class DependentTransaction is used with transactions that are dependent on another transaction. A dependent transaction can depend on a transaction created from the committable transaction. Then the dependent transaction adds to the outcome of the committable transaction, whether or not it is successful. The class SubordinateTransaction is used in conjunction with the Distributed Transaction Coordinator (DTC). This class represents a transaction that is not a root transaction but can be managed by the DTC.
The following table describes the properties and methods of the Transaction class:
| TRANSACTION CLASS MEMBER | DESCRIPTION |
| Current | The property Current is a static property that doesn’t require an instance. Transaction.Current returns an ambient transaction if one exists. Ambient transactions are discussed later in this chapter. |
| IsolationLevel | The IsolationLevel property returns an object of type IsolationLevel. IsolationLevel is an enumeration that defines what access other transactions have to the interim results of the transaction. This reflects the “I” in ACID; not all transactions are isolated. |
| TransactionInformation | The TransactionInformation property returns a TransactionInformation object, which provides information about the current state of the transaction, the time when the transaction was created, and transaction identifiers. |
| EnlistVolatile EnlistDurable EnlistPromotableSinglePhase | With these enlist methods, you can enlist custom resource managers that participate with the transaction. |
| Rollback | With the Rollback method, you can abort a transaction and undo everything, setting all results to the state before the transaction. |
| DependentClone | With the DependentClone method, you can create a transaction that depends on the current transaction. |
| TransactionCompleted | TransactionCompleted is an event that is fired when the transaction is completed — either successfully or unsuccessfully. With an event handler object of type TransactionCompletedEventHandler, you can access the Transaction object and read its status. |
To demonstrate the features of System.Transactions, the following example class Utilities inside a separate assembly offers some static methods. The method AbortTx returns true or false depending on the input from the user. The method DisplayTransactionInformation gets a TransactionInformation object as parameter and displays all the information from the transaction: creation time, status, local, and distributed identifiers (code file Utilities/Utilities.cs):
  public static class Utilities
  {
    public static bool AbortTx()
    {
      Console.Write("Abort the Transaction (y/n)?");
      return Console.ReadLine().ToLower().Equals("y");
    }

    public static void DisplayTransactionInformation(string title,
        TransactionInformation ti)
    {
      Contract.Requires<ArgumentNullException>(ti != null);

      Console.WriteLine(title);
      Console.WriteLine("Creation Time: {0:T}", ti.CreationTime);
      Console.WriteLine("Status: {0}", ti.Status);
      Console.WriteLine("Local ID: {0}", ti.LocalIdentifier);
      Console.WriteLine("Distributed ID: {0}", ti.DistributedIdentifier);
      Console.WriteLine();
    }
  }
Committable Transactions
The Transaction class cannot be committed programmatically; it does not have a method to commit the transaction. The base class Transaction just supports aborting the transaction. The only transaction class that supports a commit is the class CommittableTransaction.
With ADO.NET, a transaction can be enlisted with the connection. To make this possible, an AddStudentAsync method is added to the class StudentData that accepts a System.Transactions.Transaction object as second parameter. The object tx is enlisted with the connection by calling the method EnlistTransaction of the SqlConnection class. This way, the ADO.NET connection is associated with the transaction (code file DataLib/StudentData.cs):
    public async Task AddStudentAsync(Student student, Transaction tx)
    {
      Contract.Requires<ArgumentNullException>(student != null);

      var connection = new SqlConnection(
          Properties.Settings.Default.CourseManagementConnectionString);
      await connection.OpenAsync();
      try
      {
        if (tx != null)
          connection.EnlistTransaction(tx);
        SqlCommand command = connection.CreateCommand();

        command.CommandText = "INSERT INTO Students (FirstName, " +
            "LastName, Company)" +
            "VALUES (@FirstName, @LastName, @Company)";
        command.Parameters.AddWithValue("@FirstName", student.FirstName);
        command.Parameters.AddWithValue("@LastName", student.LastName);
        command.Parameters.AddWithValue("@Company", student.Company);

        await command.ExecuteNonQueryAsync();
      }
      finally
      {
        connection.Close();
      }
    }
In the CommittableTransaction method of the console application TransactionSamples, first a transaction of type CommittableTransaction is created, and information is shown on the console. Then a Student object is created, which is written to the database from the AddStudent method. If you verify the record in the database from outside the transaction, you cannot see the student added until the transaction is completed. If the transaction fails, there is a rollback and the student is not written to the database.
After the AddStudentAsync method is invoked, the helper method Utilities.AbortTx is called to ask the user whether the transaction should be aborted. If the user aborts, an exception of type ApplicationException is thrown and, in the catch block, a rollback of the transaction is performed by calling the method Rollback of the Transaction class. The record is not written to the database. If the user does not abort, the Commit method commits the transaction, and the final state of the transaction is committed (code file TransactionSamples/Program.cs):
    static async Task CommittableTransactionAsync()
    {
      var tx = new CommittableTransaction();
      Utilities.DisplayTransactionInformation("TX created",
          tx.TransactionInformation);

      try
      {
        var s1 = new Student
        {
          FirstName = "Stephanie",
          LastName = "Nagel",
          Company = "CN innovation"
        };
        var db = new StudentData();
        await db.AddStudentAsync(s1, tx);

        if (Utilities.AbortTx())
        {
          throw new ApplicationException("transaction abort");
        }

        tx.Commit();
      }
      catch (Exception ex)
      {
        Console.WriteLine(ex.Message);
        Console.WriteLine();
        tx.Rollback();
      }

      Utilities.DisplayTransactionInformation("TX completed",
         tx.TransactionInformation);

    }
As shown in the following output of the application, the transaction is active and has a local identifier. In addition, the user has chosen to abort the transaction. After the transaction is finished, you can see the aborted state:
TX created
Creation Time: 7:30:49 PM
Status: Active
Local ID: bdcf1cdc-a67e-4ccc-9a5c-cbdfe0fe9177:1
Distributed ID: 00000000-0000-0000-0000-000000000000

Abort the Transaction (y/n)? y
Transaction abort

TX completed
Creation Time: 7:30:49 PM
Status: Aborted
Local ID: bdcf1cdc-a67e-4ccc-9a5c-cbdfe0fe9177:1
Distributed ID: 00000000-0000-0000-0000-000000000000
With the second output of the application that follows, the transaction is not aborted by the user. The transaction has the status committed, and the data is written to the database:
TX Created
Creation Time: 7:33:04 PM
Status: Active
Local ID: 708bda71-fa24-46a9-86b4-18b83120f6af:1
Distributed ID: 00000000-0000-0000-0000-000000000000

Abort the Transaction (y/n)? n

TX completed
Creation Time: 7:33:04 PM
Status: Committed
Local ID: 708bda71-fa24-46a9-86b4-18b83120f6af:1
Distributed ID: 00000000-0000-0000-0000-000000000000
Transaction Promotion
System.Transactions supports promotable transactions. Depending on the resources that participate with the transaction, either a local or a distributed transaction is created. SQL Server has supported promotable transactions since SQL Server 2005. So far, you have seen only local transactions. With all the previous examples, the distributed transaction ID was always set to 0, and only the local ID was assigned. With a resource that does not support promotable transactions, a distributed transaction is created. If multiple resources are added to the transaction, the transaction may start as a local transaction and be promoted to a distributed transaction as required. Such a promotion happens when multiple SQL Server database connections are added to the transaction. The transaction starts as a local transaction and then is promoted to a distributed transaction.
The console application is now changed to add a second student by using the same transaction object tx. Because every AddStudent method opens a new connection, two connections are associated with the transaction after the second student is added (code file TransactionSamples/Program.cs):
    static void TransactionPromotion()
    {
      var tx = new CommittableTransaction();
      Utilities.DisplayTransactionInformation("TX created",
          tx.TransactionInformation);

      try
      {
        var s1 = new Student
        {
           FirstName = "Matthias",
           LastName = "Nagel",
           Company = "CN innovation"
        };
        var db = new StudentData();
        db.AddStudent(s1, tx);

        var s2 = new Student
        {
           FirstName = "Stephanie",
           LastName = "Nagel",
           Company = "CN innovation"
        };
        db.AddStudent(s2, tx);

        Utilities.DisplayTransactionInformation(
            "2nd connection enlisted", tx.TransactionInformation);

        if (Utilities.AbortTx())
        {
          throw new ApplicationException("transaction abort");
        }

        tx.Commit();
      }
      catch (Exception ex)
      {
        Console.WriteLine(ex.Message);
        Console.WriteLine();
        tx.Rollback();
      }

      Utilities.DisplayTransactionInformation("TX finished",
          tx.TransactionInformation);
    }
Running the application now, you can see that with the first student added the distributed identifier is 0, but with the second student added the transaction was promoted, so a distributed identifier is associated with the transaction:
TX created
Creation Time: 7:56:24 PM
Status: Active
Local ID: 0d2f5ada-32aa-40eb-b9d7-cc6aa9a2a554:1
Distributed ID: 00000000-0000-0000-0000-0000000000
2nd connection enlisted
Creation Time: 7:56:24 PM
Status: Active
Local ID: 0d2f5ada-32aa-40eb-b9d7-cc6aa9a2a554:1
Distributed ID: 501abd91-e512-47f3-95d5-f0488743293d
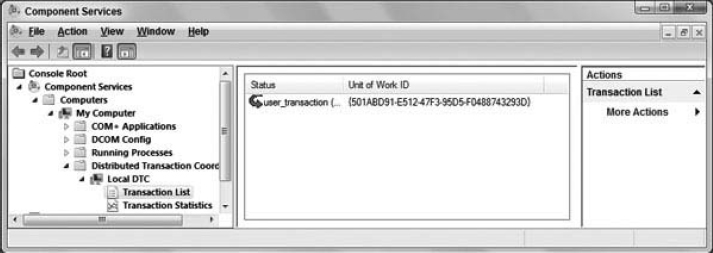
Abort the Transaction (y/n)?Transaction promotion requires the DTC to be started. If promoting transactions fails with your system, verify that the DTC service is started. Starting the Component Services MMC snap-in, you can see the actual status of all DTC transactions running on your system.
By selecting Transaction List on the tree view, you can see all active transactions. Figure 25-3 shows a transaction active with the same distributed identifier that was shown in the console output earlier. If you verify the output on your system, ensure that the transaction has a timeout, and aborts if the timeout is reached. After the timeout, you cannot see the transaction in the transaction list anymore. You can also verify the transaction statistics with the same tool. Transaction Statistics shows the number of committed and aborted transactions.
DEPENDENT TRANSACTIONS
With dependent transactions, you can influence one transaction among multiple tasks or threads. A dependent transaction depends on another transaction and influences the outcome of the transaction.
The sample application DependentTransactions creates a dependent transaction for a new task. TxTask is the method of the new task, in which a DependentTransaction object is passed as a parameter. Information about the dependent transaction is shown with the helper method DisplayTransactionInformation. Before the task exits, the Complete method of the dependent transaction is invoked to define the outcome of the transaction. A dependent transaction can define the outcome of the transaction by calling either the Complete or the Rollback method. The Complete method sets the success bit. If the root transaction finishes, and if all dependent transactions have set the success bit to true, the transaction commits. If any of the dependent transactions set the abort bit by invoking the Rollback method, then the entire transaction aborts:
    static void TxTask(object obj)
    {
      var tx = obj as DependentTransaction;
      Utilities.DisplayTransactionInformation("Dependent Transaction",
          tx.TransactionInformation);

      Thread.Sleep(3000);

      tx.Complete();

      Utilities.DisplayTransactionInformation("Dependent TX Complete",
          tx.TransactionInformation);
    }
With the DependentTransaction method, first a root transaction is created by instantiating the class CommittableTransaction, and the transaction information is shown. Next, the method tx.DependentClone creates a dependent transaction. This dependent transaction is passed to the method TxTask, which is defined as the entry point of a new task.
The method DependentClone requires an argument of type DependentCloneOption, which is an enumeration with the values BlockCommitUntilComplete and RollbackIfNotComplete. This option is important if the root transaction completes before the dependent transaction. Setting the option to RollbackIfNotComplete, the transaction aborts if the dependent transaction didn’t invoke the Complete method before the Commit method of the root transaction. Setting the option to BlockCommitUntilComplete, the method Commit waits until the outcome is defined by all dependent transactions.
Next, the Commit method of the CommittableTransaction class is invoked if the user does not abort the transaction:
    static void DependentTransaction()
    {
      var tx = new CommittableTransaction();
      Utilities.DisplayTransactionInformation("Root TX created",
          tx.TransactionInformation);

      try
      {
        Task.Factory.StartNew(TxTask, tx.DependentClone(
            DependentCloneOption.BlockCommitUntilComplete));

        if (Utilities.AbortTx())
        {
          throw new ApplicationException("transaction abort");
        }

        tx.Commit();
      }
      catch (Exception ex)
      {
        Console.WriteLine(ex.Message);
        tx.Rollback();
      }

      Utilities.DisplayTransactionInformation("TX finished",
          tx.TransactionInformation);
    }
The following output of the application shows the root transaction and its identifier. Because of the option DependentCloneOption.BlockCommitUntilComplete, the root transaction waits in the Commit method until the outcome of the dependent transaction is defined. As soon as the dependent transaction is finished, the transaction is committed:
Root TX created
Creation Time: 8:35:25 PM
Status: Active
Local ID: 50126e07-cd28-4e0f-a21f-a81a8e14a1a8:1
Distributed ID: 00000000-0000-0000-0000-0000000000

Abort the Transaction (y/n)? n

Dependent Transaction
Creation Time: 8:35:25 PM
Status: Active
Local ID: 50126e07-cd28-4e0f-a21f-a81a8e14a1a8:1
Distributed ID: 00000000-0000-0000-0000-0000000000

Dependent TX Complete
Root TX finished
Creation Time: 8:35:25 PM
Status: Committed
Local ID: 50126e07-cd28-4e0f-a21f-a81a8e14a1a8:1
Distributed ID: 00000000-0000-0000-0000-0000000000

Creation Time: 8:35:25 PM
Status: Committed
Local ID: 50126e07-cd28-4e0f-a21f-a81a8e14a1a8:1
Distributed ID: 00000000-0000-0000-0000-0000000000
Ambient Transactions
The biggest advantage of the classes in the System.Transactions namespace is the ambient transactions feature. With ambient transactions, there is no need to manually enlist a connection with a transaction; this is done automatically from the resources supporting ambient transactions.
An ambient transaction is associated with the current thread. You can get and set the ambient transaction with the static property Transaction.Current. APIs supporting ambient transactions check this property to get an ambient transaction and enlist with the transaction. ADO.NET connections support ambient transactions.
You can create a CommittableTransaction object and assign it to the property Transaction.Current to initialize the ambient transaction. Another way to create ambient transactions is with the TransactionScope class. The constructor of the TransactionScope creates an ambient transaction.
Important methods of the TransactionScope class are Complete and Dispose. The Complete method sets the happy bit for the scope, and the Dispose method finishes the scope and commits or rolls back the transaction if the scope is a root scope.
Because the TransactionScope class implements the IDisposable interface, you can define the scope with the using statement. The default constructor creates a new transaction. Immediately after creating the TransactionScope instance, the transaction is accessed with the get accessor of the property Transaction.Current to display the transaction information on the console.
To get the information when the transaction is completed, the method OnTransactionCompleted is set to the TransactionCompleted event of the ambient transaction.
Then a new Student object is created and written to the database by calling the StudentData.AddStudent method. With ambient transactions, it is not necessary to pass a Transaction object to this method because the SqlConnection class supports ambient transactions and automatically enlists it with the connection. Then the Complete method of the TransactionScope class sets the success bit. With the end of the using statement, the TransactionScope is disposed, and a commit is done. If the Complete method is not invoked, the Dispose method aborts the transaction:
    static void TransactionScope()
    {
      using (var scope = new TransactionScope())
      {
        Transaction.Current.TransactionCompleted +=
            OnTransactionCompleted;

        Utilities.DisplayTransactionInformation("Ambient TX created",
            Transaction.Current.TransactionInformation);

        var s1 = new Student
        {
          FirstName = "Angela",
          LastName = "Nagel",
          Company = "Kantine M101"
        };
        var db = new StudentData();
        db.AddStudent(s1);

        if (!Utilities.AbortTx())
          scope.Complete();
        else
          Console.WriteLine("transaction will be aborted");

      } // scope.Dispose()
    }

    static void OnTransactionCompleted(object sender,
                                       TransactionEventArgs e)
    {
      Utilities.DisplayTransactionInformation("TX completed",
          e.Transaction.TransactionInformation);
    }
Running the application, you can see an active ambient transaction after an instance of the TransactionScope class is created. The last output of the application is the output from the TransactionCompleted event handler to display the finished transaction state:
Ambient TX created
Creation Time: 9:55:40 PM
Status: Active
Local ID: a06df6fb-7266-435e-b90e-f024f1d6966e:1
Distributed ID: 00000000-0000-0000-0000-0000000000

Abort the Transaction (y/n)? n

TX completed
Creation Time: 9:55:40 PM
Status: Committed
Local ID: a06df6fb-7266-435e-b90e-f024f1d6966e:1
Distributed ID: 00000000-0000-0000-0000-0000000000
Using Nested Scopes with Ambient Transactions
With the TransactionScope class you can also nest scopes. The nested scope can be directly inside the outer scope or within a method that is invoked from a scope. A nested scope can use the same transaction as the outer scope, suppress the transaction, or create a new transaction that is independent from the outer scope. The requirement for the scope is defined with a TransactionScopeOption enumeration that is passed to the constructor of the TransactionScope class.
The following table describes the values and corresponding functionality available with the TransactionScopeOption enumeration.
| TRANSACTIONSCOPEOPTION MEMBER | DESCRIPTION |
| Required | Required defines that the scope requires a transaction. If the outer scope already contains an ambient transaction, the inner scope uses the existing transaction. If an ambient transaction does not exist, a new transaction is created. If both scopes share the same transaction, every scope influences the outcome of the transaction. Only if all scopes set the success bit can the transaction commit. If one scope does not invoke the Complete method before the root scope is disposed of, the transaction is aborted. |
| RequiresNew | RequiresNew always creates a new transaction. If the outer scope already defines a transaction, the transaction from the inner scope is completely independent. Both transactions can commit or abort independently. |
| Suppress | With Suppress, the scope does not contain an ambient transaction, whether or not the outer scope contains a transaction. |
The next example defines two scopes. The inner scope is configured to require a new transaction with the option TransactionScopeOption.RequiresNew:
      using (var scope = new TransactionScope())
      {
        Transaction.Current.TransactionCompleted +=
            OnTransactionCompleted;

        Utilities.DisplayTransactionInformation("Ambient TX created",
            Transaction.Current.TransactionInformation);

        using (var scope2 =
            new TransactionScope(TransactionScopeOption.RequiresNew))
        {
          Transaction.Current.TransactionCompleted +=
              OnTransactionCompleted;

          Utilities.DisplayTransactionInformation(
              "Inner Transaction Scope",
              Transaction.Current.TransactionInformation);

          scope2.Complete();
        }
        scope.Complete();
      }
Running the application, you can see from the following that both scopes have different transaction identifiers, although the same thread is used. With one thread but different ambient transaction identifiers, the transaction identifier just differs in the last number following the GUID.
Ambient TX created
Creation Time: 11:01:09 PM
Status: Active
Local ID: 54ac1276-5c2d-4159-84ab-36b0217c9c84:1
Distributed ID: 00000000-0000-0000-0000-0000000000

Inner Transaction Scope
Creation Time: 11:01:09 PM
Status: Active
Local ID: 54ac1276-5c2d-4159-84ab-36b0217c9c84:2
Distributed ID: 00000000-0000-0000-0000-0000000000

TX completed
Creation Time: 11:01:09 PM
Status: Committed
Local ID: 54ac1276-5c2d-4159-84ab-36b0217c9c84:2
Distributed ID: 00000000-0000-0000-0000-0000000000

TX completed
Creation Time: 11:01:09 PM
Status: Committed
Local ID: 54ac1276-5c2d-4159-84ab-36b0217c9c84:1
Distributed ID: 00000000-0000-0000-0000-0000000000
If you change the inner scope to the setting TransactionScopeOption.Required, you will find that both scopes use the same transaction, and both scopes influence the outcome of the transaction.
Multithreading with Ambient Transactions
If multiple threads should use the same ambient transaction, you need to do some extra work. An ambient transaction is bound to a thread, so if a new thread is created, it does not have the ambient transaction from the starter thread.
This behavior is demonstrated in the next example. In the Main method, a TransactionScope is created. Within this transaction scope, a new task is started. The main method of the new thread, TaskMethod, creates a new transaction scope. With the creation of the scope, no parameters are passed; therefore, the default option TransactionScopeOption.Required comes into play. If an ambient transaction exists, the existing transaction is used. Otherwise, a new transaction is created (code file MultiThreadingAmbientTx/Program.cs):
using System;
using System.Threading.Tasks;
using System.Transactions;

namespace Wrox.ProCSharp.Transactions
{
  class Program
  {
    static void Main()
    {
      try
      {
        using (var scope = new TransactionScope())
        {
          Transaction.Current.TransactionCompleted +=
              TransactionCompleted;

          Utilities.DisplayTransactionInformation("Main task TX",
              Transaction.Current.TransactionInformation);

          Task.Factory.StartNew(TaskMethod);

          scope.Complete();
        }
      }
      catch (TransactionAbortedException ex)
      {
        Console.WriteLine("Main—Transaction was aborted, {0}",
            ex.Message);
      }
    }

    static void TransactionCompleted(object sender,
        TransactionEventArgs e)
    {
      Utilities.DisplayTransactionInformation("TX completed",
          e.Transaction.TransactionInformation);
    }

    static void TaskMethod()
    {
      try
      {
        using (var scope = new TransactionScope())
        {
          Transaction.Current.TransactionCompleted +=
              TransactionCompleted;

          Utilities.DisplayTransactionInformation("Task TX",
              Transaction.Current.TransactionInformation);
          scope.Complete();
        }
      }
      catch (TransactionAbortedException ex)
      {
        Console.WriteLine("TaskMethod—Transaction was aborted, {0}",
            ex.Message);
      }
    }
  }
}
As shown in the following output, after starting the application, the transactions from the two threads are completely independent. The transaction from the new thread has a different transaction ID. The transaction ID differs by the number that is added to the GUID. You’ve seen this already with nested scopes:
Main task TX
Creation Time: 21:41:25
Status: Active
Local ID: f1e736ae-84ab-4540-b71e-3de272ffc476:1
Distributed ID: 00000000-0000-0000-0000-000000000000

TX completed
Creation Time: 21:41:25
Status: Committed
Local ID: f1e736ae-84ab-4540-b71e-3de272ffc476:1
Distributed ID: 00000000-0000-0000-0000-000000000000

Task TX
Creation Time: 21:41:25
Status: Active
Local ID: f1e736ae-84ab-4540-b71e-3de272ffc476:2
Distributed ID: 00000000-0000-0000-0000-000000000000

TX completed
Creation Time: 21:41:25
Status: Committed
Local ID: f1e736ae-84ab-4540-b71e-3de272ffc476:2
Distributed ID: 00000000-0000-0000-0000-000000000000
To use the same ambient transaction in another thread, you need the help of dependent transactions. In the next example, a dependent transaction is passed to the new task. The dependent transaction is created from the ambient transaction by calling the DependentClone method on the ambient transaction. With this method, the setting DependentCloneOption.BlockCommitUntilComplete is used so that the calling thread waits until the new task is completed before committing the transaction:
  class Program
  {
    static void Main()
    {
      try
      {
        using (var scope = new TransactionScope())
        {
          Transaction.Current.TransactionCompleted +=
              TransactionCompleted;

          Utilities.DisplayTransactionInformation("Main thread TX",
              Transaction.Current.TransactionInformation);

          Task.Factory.StartNew(TaskMethod,
              Transaction.Current.DependentClone(
                  DependentCloneOption.BlockCommitUntilComplete));

          scope.Complete();
         }
       }
       catch (TransactionAbortedException ex)
       {
         Console.WriteLine("Main—Transaction was aborted, {0}",
             ex.Message);
       }
     }
In the method of the thread, the dependent transaction that is passed is assigned to the ambient transaction by using the set accessor of the Transaction.Current property. Now the transaction scope is using the same transaction by using the dependent transaction. When you are finished using the dependent transaction, you need to invoke the Complete method of the DependentTransaction object:
    static void TaskMethod(object dependentTx)
    {
      var dTx = dependentTx as DependentTransaction;

      try
      {
        Transaction.Current = dTx;

        using (var scope = new TransactionScope())
        {
          Transaction.Current.TransactionCompleted +=
              TransactionCompleted;

          Utilities.DisplayTransactionInformation("Task TX",
              Transaction.Current.TransactionInformation);
          scope.Complete();
        }
      }
      catch (TransactionAbortedException ex)
      {
        Console.WriteLine("TaskMethod — Transaction was aborted, {0}",
            ex.Message);
      }
      finally
      {
        if (dTx != null)
        {
          dTx.Complete();
        }
      }
    }

    static void TransactionCompleted(object sender,
        TransactionEventArgs e)
    {
      Utilities.DisplayTransactionInformation("TX completed",
          e.Transaction.TransactionInformation);
    }
  }
Running the application now, you can see that the main thread and the newly created thread are using, and influencing, the same transaction. The transaction listed by the threads has the same identifier. If with one thread the success bit is not set by calling the Complete method, the entire transaction aborts:
Main task TX
Creation Time: 23:00:57
Status: Active
Local ID: 2fb1b54d-61f5-4d4e-a55e-f4a9e04778be:1
Distributed ID: 00000000-0000-0000-0000-000000000000

Task TX
Creation Time: 23:00:57
Status: Active
Local ID: 2fb1b54d-61f5-4d4e-a55e-f4a9e04778be:1
Distributed ID: 00000000-0000-0000-0000-000000000000

TX completed
Creation Time: 23:00:57
Status: Committed
Local ID: 2fb1b54d-61f5-4d4e-a55e-f4a9e04778be:1
Distributed ID: 00000000-0000-0000-0000-000000000000

TX completed
Creation Time: 23:00:57
Status: Committed
Local ID: 2fb1b54d-61f5-4d4e-a55e-f4a9e04778be:1
Distributed ID: 00000000-0000-0000-0000-000000000000
ISOLATION LEVEL
The beginning of this chapter mentioned the ACID properties that describe successful transactions. The letter I (Isolation) in ACID is not always fully required. For performance reasons, you might reduce the isolation requirements, but you must be aware of the issues that you may encounter if you change the isolation level.
Problems that you can encounter if you don’t completely isolate the scope outside the transaction can be divided into three categories:
- Dirty reads — Another transaction can read records that are changed within the transaction. Because the data that is changed within the transaction might roll back to its original state, reading this intermediate state from another transaction is considered “dirty” — the data has not been committed. You can avoid this by locking the records to be changed.
- Nonrepeatable reads — When data is read inside a transaction, and while the transaction is running, another transaction changes the same records. If the record is read once more inside the transaction, the result is different — nonrepeatable. You can avoid this by locking the read records.
- Phantom reads — When a range of data is read, for example, with a WHERE clause, another transaction can add a new record belonging to the range that is read within the transaction. A new read with the same WHERE clause returns a different number of rows. Phantom reads typically occur during an UPDATE of a range of rows. For example, UPDATE Addresses SET Zip=4711 WHERE (Zip=2315) updates the Zip code of all records from 2315 to 4711. After doing the update, there may still be records with a Zip code of 2315 if another user added a new record with Zip 2315 while the update was running. You can avoid this by doing a range lock.
When defining the isolation requirements, you can set the isolation level using an IsolationLevel enumeration that is configured when the transaction is created (either with the constructor of the CommittableTransaction class or with the constructor of the TransactionScope class). The IsolationLevel defines the locking behavior. The following table lists the values of the IsolationLevel enumeration.
| ISOLATION LEVEL | DESCRIPTION |
| ReadUncommitted | Transactions are not isolated from each other. With this level, there is no wait for locked records from other transactions. This way, uncommitted data can be read from other transactions — dirty reads. This level is usually used only for reading records for which it does not matter if you read interim changes (e.g., reports). |
| ReadCommitted | Waits for records with a write-lock from other transactions. This way, a dirty read cannot happen. This level sets a read-lock for the current record read and a write-lock for the records being written until the transaction is completed. During the reading of a sequence of records, with every new record that is read, the prior record is unlocked. That’s why nonrepeatable reads can happen. |
| RepeatableRead | Holds the lock for the records read until the transaction is completed. This way, the problem of nonrepeatable reads is avoided. Phantom reads can still occur. |
| Serializable | Holds a range lock. While the transaction is running, it is not possible to add a new record that belongs to the same range from which the data is being read. |
| Snapshot | With this level a snapshot is done from the actual data. This level reduces the locks as modified rows are copied. That way, other transactions can still read the old data without needing to wait for releasing of the lock. |
| Unspecified | Indicates that the provider is using an isolation level value that is different from the values defined by the IsolationLevel enumeration |
| Chaos | This level is similar to ReadUncommitted, but in addition to performing the actions of the ReadUncommitted value, Chaos does not lock updated records. |
The following table summarizes the problems that can occur as a result of setting the most commonly used transaction isolation levels:

The following code segment shows how the isolation level can be set with the TransactionScope class. With the constructor of TransactionScope, you can set the TransactionScopeOption that was discussed earlier and the TransactionOptions. The TransactionOptions class allows you to define the IsolationLevel and the Timeout.
      var options = new TransactionOptions
      {
        IsolationLevel = IsolationLevel.ReadUncommitted,
        Timeout = TimeSpan.FromSeconds(90)
      };
      using (var scope = new TransactionScope(
          TransactionScopeOption.Required, options))
      {
        // Read data without waiting for locks from other transactions,
        // dirty reads are possible.
      }
CUSTOM RESOURCE MANAGERS
One of the biggest advantages of the functionality offered by the classes in the System.Transactions namespace is that it is relatively easy to create custom resource managers that participate in the transaction. A resource manager can manage not only durable resources but volatile or in-memory resources — for example, a simple int and a generic list.
Figure 25-4 shows the relationship between a resource manager and transaction classes. The resource manager implements the interface IEnlistmentNotification, which defines the methods Prepare, InDoubt, Commit, and Rollback. This interface manages the transaction for a resource. To be part of a transaction, the resource manager must enlist with the Transaction class. Volatile resource managers invoke the method EnlistVolatile; durable resource managers invoke EnlistDurable. Depending on the transaction’s outcome, the transaction manager invokes the methods from the interface IEnlistmentNotification with the resource manager.

The next table explains the methods of the IEnlistmentNotification interface that you must implement with resource managers. As you review the table, recall the active, prepared, and committing phases explained earlier in this chapter in the “Transaction Phases” section.
| IENLISTMENTNOTIFICATION MEMBER | DESCRIPTION |
| Prepare | The transaction manager invokes the Prepare method for preparation of the transaction. The resource manager completes the preparation by invoking the Prepared method of the PreparingEnlistment parameter, which is passed to the Prepare method. If the work cannot be done successfully, the resource manager informs the transaction manager by invoking the method ForceRollback. A durable resource manager must write a log so that it can finish the transaction successfully after the prepare phase. |
| Commit | When all resource managers have successfully prepared for the transaction, the transaction manager invokes the Commit method. The resource manager can then complete the work to make it visible outside the transaction and invoke the Done method of the Enlistment parameter. |
| Rollback | If one of the resources could not successfully prepare for the transaction, the transaction manager invokes the Rollback method with all resource managers. After the state is returned to the state prior to the transaction, the resource manager invokes the Done method of the Enlistment parameter. |
| InDoubt | If there is a problem after the transaction manager invokes the Commit method (and the resources don’t return completion information with the Done method), the transaction manager invokes the InDoubt method. |
Transactional Resources
A transactional resource must keep the live value and a temporary value. The live value is read from outside the transaction and defines the valid state when the transaction rolls back. The temporary value defines the valid state of the transaction when the transaction commits.
To make nontransactional types transactional, the generic sample class Transactional<T> wraps a nongeneric type, so you can use it like this:
var txInt = new Transactional<int>();
var txString = new Transactional<string>();
The following example demonstrates implementation of the class Transactional<T>. The live value of the managed resource has the variable liveValue; the temporary value that is associated with a transaction is stored within the ResourceManager<T>. The variable enlistedTransaction is associated with the ambient transaction if there is one (code file CustomResource/Transactional.cs):
using System.Diagnostics;
using System.Transactions;

namespace Wrox.ProCSharp.Transactions
{
  public partial class Transactional<T>
  {
    private T liveValue;
    private ResourceManager<T> enlistment;
    private Transaction enlistedTransaction;
With the Transactional constructor, the live value is set to the variable liveValue. If the constructor is invoked from within an ambient transaction, the GetEnlistment helper method is invoked. It first checks whether there is an ambient transaction and asserts if there is none. If the transaction is not already enlisted, the ResourceManager<T> helper class is instantiated, and the resource manager is enlisted with the transaction by invoking the method EnlistVolatile. Also, the variable enlistedTransaction is set to the ambient transaction.
If the ambient transaction is different from the enlisted transaction, an exception is thrown. The implementation does not support changing the same value from within two different transactions. If you have this requirement, you can create a lock and wait for the lock to be released from one transaction before changing it within another transaction:
    public Transactional(T value)
    {
      if (Transaction.Current == null)
      {
        this.liveValue = value;
      }
      else
      {
        this.liveValue = default(T);
        GetEnlistment().Value = value;
      }
    }

    public Transactional()
        : this(default(T)) {}

    private ResourceManager<T> GetEnlistment()
    {
      Transaction tx = Transaction.Current;
      Trace.Assert(tx != null,
          "Must be invoked with ambient transaction");

      if (enlistedTransaction == null)
      {
        enlistment = new ResourceManager<T>(this, tx);
        tx.EnlistVolatile(enlistment, EnlistmentOptions.None);
        enlistedTransaction = tx;
        return enlistment;
      }
      else if (enlistedTransaction == Transaction.Current)
      {
        return enlistment;
      }
      else
      {
        throw new TransactionException(
            "This class only supports enlisting with one transaction");
      }
    }
The property Value returns the value of the contained class and sets it. However, with transactions, you cannot just set and return the liveValue variable. This would be the case only if the object were outside a transaction. To make the code more readable, the property Value uses the methods GetValue and SetValue in the implementation:
    public T Value
    {
      get { return GetValue(); }
      set { SetValue(value); }
    }
The method GetValue checks whether an ambient transaction exists. If one doesn’t exist, the liveValue is returned. If there is an ambient transaction, the GetEnlistment method shown earlier returns the resource manager, and with the Value property, the temporary value for the contained object within the transaction is returned.
The method SetValue is very similar to GetValue; the difference is that it changes the live or temporary value:
    protected virtual T GetValue()
    {
      if (Transaction.Current == null)
      {
        return liveValue;
      }
      else
      {
        return GetEnlistment().Value;
      }
    }

    protected virtual void SetValue(T value)
    {
      if (Transaction.Current == null)
      {
        liveValue = value;
      }
      else
      {
        GetEnlistment().Value = value;
      }
    }
The Commit and Rollback methods that are implemented in the class Transactional<T> are invoked from the resource manager. The Commit method sets the live value from the temporary value received with the first argument and nullifies the variable enlistedTransaction as the transaction is completed. With the Rollback method, the transaction is completed as well, but here the temporary value is ignored, and the live value is kept in use:
    internal void Commit(T value, Transaction tx)
    {
      liveValue = value;
      enlistedTransaction = null;
    }

    internal void Rollback(Transaction tx)
    {
      enlistedTransaction = null;
    }
  }
Because the resource manager that is used by the class Transactional<T> is used only within the Transactional<T> class itself, it is implemented as an inner class. With the constructor, the parent variable is set to have an association with the transactional wrapper class. The temporary value used within the transaction is copied from the live value. Remember the isolation requirements with transactions (code file CustomResource/ResourceManager.cs):
using System;
using System.Diagnostics;
using System.IO;
using System.Runtime.Serialization.Formatters.Binary;
using System.Transactions;

namespace Wrox.ProCSharp.Transactions
{
  public partial class Transactional<T>
  {
    internal class ResourceManager<T1>: IEnlistmentNotification
    {
      private Transactional<T1> parent;
      private Transaction currentTransaction;

      internal ResourceManager(Transactional<T1> parent, Transaction tx)
      {
        this.parent = parent;
        Value = DeepCopy(parent.liveValue);
        currentTransaction = tx;
      }

      public T1 Value { get; set; }
Because the temporary value may change within the transaction, the live value of the wrapper class may not be changed within the transaction. When creating a copy with some classes, it is possible to invoke the Clone method that is defined with the ICloneable interface. However, as the Clone method is defined, it allows implementations to create either a shallow or a deep copy. If type T contains reference types and implements a shallow copy, changing the temporary value would also change the original value. This would be in conflict with the isolation and consistency features of transactions. Here, a deep copy is required.
To do a deep copy, the method DeepCopy serializes and deserializes the object to and from a stream. Because in C# 5 it is not possible to define a constraint to the type T, indicating that serialization is required, the static constructor of the class Transactional<T> checks whether the type is serializable by checking the property IsSerializable of the Type object:
        static ResourceManager()
        {
          Type t = typeof(T1);
          Trace.Assert(t.IsSerializable, "Type " + t.Name +
              " is not serializable");
        }

        private T1 DeepCopy(T1 value)
        {
          using (var stream = new MemoryStream())
          {
            var formatter = new BinaryFormatter();
            formatter.Serialize(stream, value);
            stream.Flush();
            stream.Seek(0, SeekOrigin.Begin);

            return (T1)formatter.Deserialize(stream);
          }
        }
The interface IEnlistmentNotification is implemented by the class ResourceManager<T>. This is the requirement for enlisting with transactions.
The implementation of the Prepare method answers by invoking Prepared with preparingEnlistment. There should not be a problem assigning the temporary value to the live value, so the Prepare method succeeds. With the implementation of the Commit method, the Commit method of the parent is invoked, where the variable liveValue is set to the value of the ResourceManager that is used within the transaction. The Rollback method just completes the work and leaves the live value where it was. With a volatile resource, there is not a lot you can do in the InDoubt method. Writing a log entry could be useful:
        public void Prepare(PreparingEnlistment preparingEnlistment)
        {
          preparingEnlistment.Prepared();
        }

        public void Commit(Enlistment enlistment)
        {
          parent.Commit(Value, currentTransaction);
          enlistment.Done();
        }

        public void Rollback(Enlistment enlistment)
        {
          parent.Rollback(currentTransaction);
          enlistment.Done();
        }

        public void InDoubt(Enlistment enlistment)
        {
          enlistment.Done();
        }
      }
    }
}
The class Transactional<T> can now be used to make nontransactional classes transactional — for example, int and string but also more complex classes such as Student — as long as the type is serializable (code file CustomResource/Program.cs):
using System;
using System.Transactions;

namespace Wrox.ProCSharp.Transactions
{
  class Program
  {
    static void Main()
    {
      var intVal = new Transactional<int>(1);
      var student1 = new Transactional<Student>(new Student());
      student1.Value.FirstName = "Andrew";
      student1.Value.LastName = "Wilson";

      Console.WriteLine("before the transaction, value: {0}",
          intVal.Value);
      Console.WriteLine("before the transaction, student: {0}",
          student1.Value);

      using (var scope = new TransactionScope())
      {
        intVal.Value = 2;
        Console.WriteLine("inside transaction, value: {0}",
            intVal.Value);

        student1.Value.FirstName = "Ten";
        student1.Value.LastName = "SixtyNine";

        if (!Utilities.AbortTx())
          scope.Complete();
      }
      Console.WriteLine("outside of transaction, value: {0}",
          intVal.Value);
      Console.WriteLine("outside of transaction, student: {0}",
          student1.Value);
    }
  }
}
The following console output shows a run of the application with a committed transaction:
before the transaction, value: 1
before the transaction: student: Andrew Wilson
inside transaction, value: 2

Abort the Transaction (y/n)? n

outside of transaction, value: 2
outside of transaction, student: Ten SixtyNine
FILE SYSTEM TRANSACTIONS
You can write a custom durable resource manager that works with the File and Registry classes. A file-based durable resource manager can copy the original file and write changes to the temporary file inside a temporary directory to make the changes persistent. When committing the transaction, the original file is replaced by the temporary file. Writing custom durable resource managers for files and the registry isn’t necessary since Windows Vista and Windows Server 2008. With these and subsequent operating systems, native transactions with the file system and the registry are supported. For this, there are Windows API calls such as CreateFileTransacted, CreateHardLinkTransacted, CreateSymbolicLinkTransacted, CopyFileTransacted, and so on. What these API calls have in common is that they require a handle to a transaction passed as an argument; they do not support ambient transactions. The transactional API calls are not available from .NET 4.5, but you can create a custom wrapper by using Platform Invoke.
The sample application wraps the native method CreateFileTransacted for creating transactional file streams from .NET applications.
When invoking native methods, the parameters of the native methods must be mapped to .NET data types. Because of security issues, the base class SafeHandle is used to map a native HANDLE type. SafeHandle is an abstract type that wraps operating system handles and supports critical finalization of handle resources. Depending on the allowed values of a handle, the derived classes SafeHandleMinusOneIsInvalid and SafeHandleZeroOrMinusOneIsInvalid can be used to wrap native handles. SafeFileHandle itself derives from SafeHandleZeroOrMinusOneIsInvalid. To map a handle to a transaction, the class SafeTransactionHandle is defined (code file FileSystemTransactions/SafeTransactionHandle.cs):
using System;
using System.Runtime.Versioning;
using System.Security.Permissions;
using Microsoft.Win32.SafeHandles;

namespace Wrox.ProCSharp.Transactions
{
  [SecurityCritical]
  internal sealed class SafeTransactionHandle:
      SafeHandleZeroOrMinusOneIsInvalid
  {
    private SafeTransactionHandle()
        : base(true) { }

    public SafeTransactionHandle(IntPtr preexistingHandle,
        bool ownsHandle)
        : base(ownsHandle)
    {
      SetHandle(preexistingHandle);
    }

    [ResourceExposure(ResourceScope.Machine)]
    [ResourceConsumption(ResourceScope.Machine)]
    protected override bool ReleaseHandle()
    {
      return NativeMethods.CloseHandle(handle);
    }
  }
}
All native methods used from .NET are defined with the class NativeMethods shown here. With the sample, the native APIs needed are CreateFileTransacted and CloseHandle, which are defined as static members of the class. The methods are declared extern because there is no C# implementation. Instead, the implementation is found in the native DLL as defined by the attribute DllImport. Both of these methods can be found in the native DLL Kernel32.dll. With the method declaration, the parameters defined with the Windows API call are mapped to .NET data types. The parameter txHandle represents a handle to a transaction and is of the previously defined type SafeTransactionHandle (code file FileSystemTransactions/NativeMethods.cs):
using System;
using System.Runtime.ConstrainedExecution;
using System.Runtime.InteropServices;
using System.Runtime.Versioning;
using Microsoft.Win32.SafeHandles;

namespace Wrox.ProCSharp.Transactions
{
  internal static class NativeMethods
  {
    [DllImport("Kernel32.dll",
        CallingConvention = CallingConvention.StdCall,
        CharSet = CharSet.Unicode)]
    internal static extern SafeFileHandle CreateFileTransacted(
        String lpFileName,
        uint dwDesiredAccess,
        uint dwShareMode,
        IntPtr lpSecurityAttributes,
        uint dwCreationDisposition,
        int dwFlagsAndAttributes,
        IntPtr hTemplateFile,
        SafeTransactionHandle txHandle,
        IntPtr miniVersion,
        IntPtr extendedParameter);

    [DllImport("Kernel32.dll", SetLastError = true)]
    [ResourceExposure(ResourceScope.Machine)]
    [ReliabilityContract(Consistency.WillNotCorruptState, Cer.Success)]
    [return: MarshalAs(UnmanagedType.Bool)]
    internal static extern bool CloseHandle(IntPtr handle);

  }
}
The interface IKernelTransaction is used to get a transaction handle and pass it to the transacted Windows API calls. This is a COM interface and must be wrapped to .NET by using COM interop attributes as shown. The attribute GUID must have exactly the identifier as used here with the interface definition, because this is the identifier used with the definition of the COM interface (code file FileSystemTransactions/IKernelTransaction.cs):
using System;
using System.Runtime.InteropServices;

namespace Wrox.ProCSharp.Transactions
{
  [ComImport]
  [Guid("79427A2B-F895-40e0-BE79-B57DC82ED231")]
  [InterfaceType(ComInterfaceType.InterfaceIsIUnknown)]
  internal interface IKernelTransaction
  {
    void GetHandle(out SafeTransactionHandle ktmHandle);
  }
}
Finally, the class TransactedFile is the class that will be used by .NET applications. This class defines the method GetTransactedFileStream, which requires a filename as parameter and returns a System.IO.FileStream. The returned stream is a normal .NET stream; it just references a transacted file.
With the implementation, TransactionInterop.GetDtcTransaction creates an interface pointer of the IKernelTransaction to the ambient transaction that is passed as an argument to GetDtcTransaction. Using the interface IKernelTransaction, a handle of type SafeTransactionHandle is created. This handle is then passed to the wrapped API called NativeMethods.CreateFileTransacted. With the returned file handle, a new FileStream instance is created and returned to the caller (code file FileSystemTransactions/TransactedFile.cs):
using System;
using System.IO;
using System.Security.Permissions;
using System.Transactions;
using Microsoft.Win32.SafeHandles;

namespace Wrox.ProCSharp.Transactions
{
  public static class TransactedFile
  {
    internal const short FILE_ATTRIBUTE_NORMAL = 0x80;
    internal const short INVALID_HANDLE_VALUE = -1;
    internal const uint GENERIC_READ = 0x80000000;
    internal const uint GENERIC_WRITE = 0x40000000;
    internal const uint CREATE_NEW = 1;
    internal const uint CREATE_ALWAYS = 2;
    internal const uint OPEN_EXISTING = 3;

    [FileIOPermission(SecurityAction.Demand, Unrestricted=true)]
    public static FileStream GetTransactedFileStream(string fileName)
    {
      IKernelTransaction ktx = (IKernelTransaction)
          TransactionInterop.GetDtcTransaction(Transaction.Current);

      SafeTransactionHandle txHandle;
      ktx.GetHandle(out txHandle);

      SafeFileHandle fileHandle = NativeMethods.CreateFileTransacted(
          fileName, GENERIC_WRITE, 0,
          IntPtr.Zero, CREATE_ALWAYS, FILE_ATTRIBUTE_NORMAL,
          IntPtr.Zero,
          txHandle, IntPtr.Zero, IntPtr.Zero);

      return new FileStream(fileHandle, FileAccess.Write);
    }
  }
Now it is very easy to use the transactional API from .NET code. You can create an ambient transaction with the TransactionScope class and use the TransactedFile class within the context of the ambient transaction scope. If the transaction is aborted, the file is not written. If the transaction is committed, you can find the file in the temp directory (code file Windows8Transactions/Program.cs):
using System;
using System.IO;
using System.Transactions;

namespace Wrox.ProCSharp.Transactions
{
  class Program
  {
    static void Main()
    {
      using (var scope = new TransactionScope())
      {
        FileStream stream = TransactedFile.GetTransactedFileStream(
           "sample.txt");

        var writer = new StreamWriter(stream);
        writer.WriteLine("Write a transactional file");
        writer.Close();

        if (!Utilities.AbortTx())
            scope.Complete();
      }
    }
  }
}
Now you can use databases, volatile resources, and files within the same transaction.
SUMMARY
In this chapter, you learned the attributes of transactions and how you can create and manage transactions with the classes from the System.Transactions namespace.
Transactions are described with ACID properties: atomicity, consistency, isolation, and durability. Not all of these properties are always required, as you have seen with volatile resources that don’t support durability but have isolation options.
The easiest way to deal with transactions is by creating ambient transactions and using the TransactionScope class. Ambient transactions are very useful for working with the ADO.NET data adapter and the ADO.NET Entity Framework, for which you usually do not open and close database connections explicitly. ADO.NET is covered in Chapter 32. The Entity Framework is explained in Chapter 33, “ADO.NET Entity Framework.”
Using the same transaction across multiple threads, you can use the DependentTransaction class to create a dependency on another transaction. By enlisting a resource manager that implements the interface IEnlistmentNotification, you can create custom resources that participate with transactions.
Finally, you have seen how to use file system transactions with the .NET Framework and C#.
In the next chapter, you can learn how communication between different systems can be achieved with the System.Net namespace.