
Chapter 24
Manipulating Files and the Registry
WHAT’S IN THIS CHAPTER?
- Exploring the directory structure
- Moving, copying, and deleting files and folders
- Reading and writing text in files
- Reading and writing keys in the registry
- Reading and writing to isolated storage
WROX.COM CODE DOWNLOADS FOR THIS CHAPTER
The wrox.com code downloads for this chapter are found at http://www.wrox.com/remtitle.cgi?isbn=1118314425 on the Download Code tab. The code for this chapter is divided into the following major examples:
- BinaryFileReader
- DriveViewer
- FileProperties
- FilePropertiesAndMovement
- MappedMemoryFiles
- ReadingACLs
- ReadingACLsFromDirectory
- ReadingFiles
- ReadWriteText
FILE AND THE REGISTRY
This chapter examines how to perform tasks involving reading from and writing to files and the C# system registry. Microsoft has provided very intuitive object models covering these areas, and in this chapter you learn how to use .NET base classes to perform the listed tasks. In the case of file system operations, the relevant classes are almost all found in the System.IO namespace, whereas registry operations are dealt with by classes in the Microsoft.Win32 namespace.
Note that security is particularly important when modifying either files or registry entries. Security is covered entirely in Chapter 22, “Security.” In this chapter, however, we assume that you have sufficient access rights to run all the examples that modify files or registry entries, which should be the case if you are running from an account with administrator privileges.
MANAGING THE FILE SYSTEM
The classes used to browse around the file system and perform operations such as moving, copying, and deleting files are shown in Figure 24-1.
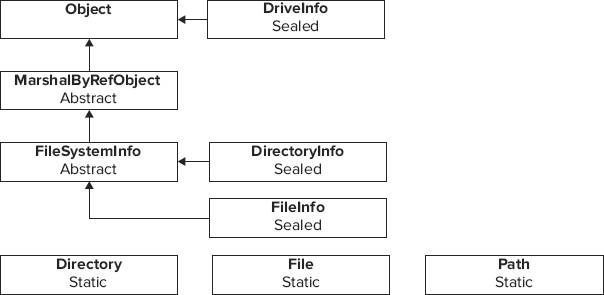
The following list explains the function of these classes:
- System.MarshalByRefObject — The base object class for .NET classes that are remotable; permits marshaling of data between application domains. The rest of the items in this list are part of the System.IO namespace.
- FileSystemInfo — The base class that represents any file system object
- FileInfo and File — These classes represent a file on the file system.
- DirectoryInfo and Directory — These classes represent a folder on the file system.
- Path — This class contains static members that you can use to manipulate pathnames.
- DriveInfo — This class provides properties and methods that provide information about a selected drive.
.NET Classes That Represent Files and Folders
You will notice in the previous list that two classes are used to represent a folder and two classes are used to represent a file. Which one of these classes you use depends largely on how many times you need to access that folder or file:
- Directory and File contain only static methods and are never instantiated. You use these classes by supplying the path to the appropriate file system object whenever you call a member method. If you want to do only one operation on a folder or file, using these classes is more efficient because it saves the overhead of instantiating a .NET class.
- DirectoryInfo and FileInfo implement roughly the same public methods as Directory and File, as well as some public properties and constructors, but they are stateful and the members of these classes are not static. You need to instantiate these classes before each instance is associated with a particular folder or file. This means that these classes are more efficient if you are performing multiple operations using the same object. That’s because they read in the authentication and other information for the appropriate file system object on construction, and then do not need to read that information again, no matter how many methods and so on you call against each object (class instance). In comparison, the corresponding stateless classes need to check the details of the file or folder again with every method you call.
This section mostly uses the FileInfo and DirectoryInfo classes, but it so happens that many (though not all) of the methods called are also implemented by File and Directory (although in those cases these methods require an extra parameter — the pathname of the file system object; also, a couple of the methods have slightly different names). For example,
FileInfo myFile = new FileInfo(@"C:Program FilesMy ProgramReadMe.txt");
myFile.CopyTo(@"D:CopiesReadMe.txt");
has the same effect as
File.Copy(@"C:Program FilesMy ProgramReadMe.txt", @"D:CopiesReadMe.txt");The first code snippet takes slightly longer to execute because of the need to instantiate a FileInfo object, myFile, but it leaves myFile ready for you to perform further actions on the same file. By using the second example, there is no need to instantiate an object to copy the file.
You can instantiate a FileInfo or DirectoryInfo class by passing to the constructor a string containing the path to the corresponding file system object. You have just seen the process for a file. For a folder, the code looks similar:
DirectoryInfo myFolder = new DirectoryInfo(@"C:Program Files");If the path represents an object that does not exist, an exception is not thrown at construction, but is instead thrown the first time you call a method that actually requires the corresponding file system object to be there. You can find out whether the object exists and is of the appropriate type by checking the Exists property, which is implemented by both of these classes:
FileInfo test = new FileInfo(@"C:Windows");
Console.WriteLine(test.Exists.ToString());
Note that for this property to return true, the corresponding file system object must be of the appropriate type. In other words, if you instantiate a FileInfo object, supplying the path of a folder, or you instantiate a DirectoryInfo object, giving it the path of a file, Exists will have the value false. Most of the properties and methods of these objects return a value if possible — they won’t necessarily throw an exception just because the wrong type of object has been called, unless they are asked to do something that is impossible. For example, the preceding code snippet might first display false (because C:Windows is a folder), but it still displays the time the folder was created because a folder has that information. However, if you tried to open the folder as if it were a file, using the FileInfo.Open method, you’d get an exception.
After you have established whether the corresponding file system object exists, you can (if you are using the FileInfo or DirectoryInfo class) find out information about it using the properties in the following table:
| PROPERTY | DESCRIPTION |
| CreationTime | Indicates when the file or folder was created |
| DirectoryName (FileInfo only) | Full pathname of the containing folder |
| Parent (DirectoryInfo only) | The parent directory of a specified subdirectory |
| Exists | Specifies whether a file or folder exists |
| Extension | Extension of the file; it returns blank for folders |
| FullName | Full pathname of the file or folder |
| LastAccessTime | Indicates when the file or folder was last accessed |
| LastWriteTime | Indicates when the file or folder was last modified |
| Name | Name of the file or folder |
| Root (DirectoryInfo only) | The root portion of the path |
| Length (FileInfo only) | Size of the file, in bytes |
You can also perform actions on the file system object using the methods in the following table:
| METHOD | DESCRIPTION |
| Create() | Creates a folder or empty file of the given name. For a FileInfo this also returns a stream object to let you write to the file. (Streams are covered later in this chapter.) |
| Delete() | Deletes the file or folder. For folders, there is an option for the Delete to be recursive. |
| MoveTo() | Moves and/or renames the file or folder. |
| CopyTo() | (FileInfo only) Copies the file. Note that there is no copy method for folders. If you are copying complete directory trees you need to individually copy each file and create new folders corresponding to the old folders. |
| GetDirectories() | (DirectoryInfo only) Returns an array of DirectoryInfo objects representing all folders contained in this folder. |
| GetFiles() | (DirectoryInfo only) Returns an array of FileInfo objects representing all files contained in this folder. |
| EnumerateFiles() | Returns an IEnumerable<string> of filenames. You can act on the items in the list before the entire list is returned. |
| GetFileSystemInfos() | (DirectoryInfo only) Returns FileInfo and DirectoryInfo objects representing all objects contained in the folder as an array of FileSystemInfo references. |
Note that these tables list the main properties and methods; they are not intended to be exhaustive.
Interestingly, the creation time, last access time, and last write time are all writable:
// displays the creation time of a file,
// then changes it and displays it again
FileInfo test = new FileInfo(@"C:MyFile.txt");
Console.WriteLine(test.Exists.ToString());
Console.WriteLine(test.CreationTime.ToString());
test.CreationTime = new DateTime(2010, 1, 1, 7, 30, 0);
Console.WriteLine(test.CreationTime.ToString());
Running this application produces results similar to the following:
True
2/5/2009 2:59:32 PM
1/1/2010 7:30:00 AM
Being able to manually modify these properties might seem strange at first, but it can be quite useful. For example, if you have a program that effectively modifies a file by simply reading it in, deleting it, and creating a new file with the new contents, you would probably want to modify the creation date to match the original creation date of the old file.
The Path Class
The Path class is not a class that you would instantiate. Rather, it exposes some static methods that make operations on pathnames easier. For example, suppose that you want to display the full pathname for a file, ReadMe.txt, in the folder C:My Documents. You could find the path to the file using the following code:
Console.WriteLine(Path.Combine(@"C:My Documents", "ReadMe.txt"));Using the Path class is a lot easier than using separation symbols manually, especially because the Path class is aware of different formats for pathnames on different operating systems. At the time of this writing, Windows is the only operating system supported by .NET. However, if .NET is ported to UNIX, Path would be able to cope with UNIX paths, in which case /, rather than , would be used as a separator in pathnames. Path.Combine is the method of this class that you are likely to use most often, but Path also implements other methods that supply information about the path or the required format for it.
Some of the static fields available to the Path class include those in the following table:
| PROPERTY | DESCRIPTION |
| AltDirectorySeparatorChar | Provides a platform-agnostic way to specify an alternative character to separate directory levels. In Windows, a / symbol is used, whereas in UNIX, a symbol is used. |
| DirectorySeparatorChar | Provides a platform-agnostic way to specify a character to separate directory levels. In Windows, a / symbol is used, whereas in UNIX, a symbol is used. |
| PathSeparator | Provides a platform-agnostic way to specify path strings that divide environmental variables. The default value of this setting is a semicolon. |
| VolumeSeparatorChar | Provides a platform-agnostic way to specify a volume separator. The default value of this setting is a colon. |
The following example illustrates how to browse directories and view the properties of files.
A FileProperties Sample
This section presents a sample C# application called FileProperties. This application presents a simple user interface that enables you to browse the file system and view the creation time, last access time, last write time, and size of files. (You can download the sample code for this application from the Wrox website at www.wrox.com.)
The FileProperties application works as follows. You type in the name of a folder or file in the main text box at the top of the window and click the Display button. If you type in the path to a folder, its contents are listed in the list boxes. If you type in the path to a file, its details are displayed in the text boxes at the bottom of the form and the contents of its parent folder are displayed in the list boxes. Figure 24-2 shows the FileProperties sample application in action.

The user can very easily navigate around the file system by clicking any folder in the right-hand list box to move down to that folder or by clicking the Up button to move up to the parent folder. Figure 24-2 shows the contents of the Users folder. The user can also select a file by clicking its name in the list box. This displays the file’s properties in the text boxes at the bottom of the application (see Figure 24-3).

Note that you can also display the creation time, last access time, and last modification time for folders using the DirectoryInfo property. In this case, these properties are displayed only for a selected file to keep things simple.
You create the project as a standard C# Windows application in Visual Studio 2012. Add the various text boxes and the list box from the Windows Forms area of the toolbox. You also rename the controls with the more intuitive names of textBoxInput, textBoxFolder, buttonDisplay, buttonUp, listBoxFiles, listBoxFolders, textBoxFileName, textBoxCreationTime, textBoxLastAccessTime, textBoxLastWriteTime, and textBoxFileSize.
Next, you need to indicate that you will be using the System.IO namespace:
using System;
using System.IO;
using System.Windows.Forms;
You need to do this for all the file-system–related examples in this chapter, but this part of the code is not explicitly shown in the remaining examples. You then add a member field to the main form:
   public partial class Form1: Form
   {
      private string currentFolderPath;
currentFolderPath stores the path of the folder whose contents are displayed in the list boxes.
Now you need to add event handlers for the user-generated events. The possible user inputs are as follows:
- User clicks the Display button — You need to determine whether what the user has typed in the main text box is the path to a file or folder. If it is a folder, you list the files and subfolders of this folder in the list boxes. If it is a file, you still do this for the folder containing that file, but you also display the file properties in the lower text boxes.
- User clicks a filename in the Files list box — You display the properties of this file in the lower text boxes.
- User clicks a folder name in the Folders list box — You clear all the controls and then display the contents of this subfolder in the list boxes.
- User clicks the Up button — You clear all the controls and then display the contents of the parent of the currently selected folder.
Before looking at the code for the event handlers, here is the code for the methods that do all the work. First, you need to clear the contents of all the controls. This method is fairly self-explanatory:
protected void ClearAllFields()
{
   listBoxFolders.Items.Clear();
   listBoxFiles.Items.Clear();
   textBoxFolder.Text = "";
   textBoxFileName.Text = "";
   textBoxCreationTime.Text = "";
   textBoxLastAccessTime.Text = "";
   textBoxLastWriteTime.Text = "";
   textBoxFileSize.Text = "";
}
Next, you define a method, DisplayFileInfo, that handles the process of displaying the information for a given file in the text boxes. This method takes one parameter, the full pathname of the file as a String, and then creates a FileInfo object based on this path:
protected void DisplayFileInfo(string fileFullName)
{
   FileInfo theFile = new FileInfo(fileFullName);

   if (!theFile.Exists)
   {
      throw new FileNotFoundException("File not found: " + fileFullName);
   }

   textBoxFileName.Text = theFile.Name;
   textBoxCreationTime.Text = theFile.CreationTime.ToLongTimeString();
   textBoxLastAccessTime.Text = theFile.LastAccessTime.ToLongDateString();
   textBoxLastWriteTime.Text = theFile.LastWriteTime.ToLongDateString();
   textBoxFileSize.Text = theFile.Length.ToString() + " bytes";
}
Note that you take the precaution of throwing an exception if there are any problems locating a file at the specified location. The exception itself will be handled in the calling routine (one of the event handlers). Finally, you define a method, DisplayFolderList, which displays the contents of a given folder in the two list boxes. The full pathname of the folder is passed in as a parameter to this method:
protected void DisplayFolderList(string folderFullName)
{
   DirectoryInfo theFolder = new DirectoryInfo(folderFullName);

   if (!theFolder.Exists)
   {
      throw new DirectoryNotFoundException("Folder not found: " + folderFullName);
   }

   ClearAllFields();
   textBoxFolder.Text = theFolder.FullName;
   currentFolderPath = theFolder.FullName;

   // list all subfolders in folder
   foreach(DirectoryInfo nextFolder in theFolder.GetDirectories())
      listBoxFolders.Items.Add(nextFolder.Name);

   // list all files in folder
   foreach(FileInfo nextFile in theFolder.GetFiles())
      listBoxFiles.Items.Add(nextFile.Name);
}
The event handler that manages the event triggered when the user clicks the Display button is the most complex because it needs to handle three different possibilities for the text the user enters in the text box. For instance, it could be the pathname of a folder, the pathname of a file, or neither of these:
protected void OnDisplayButtonClick(object sender, EventArgs e)
{
   try
   {
      string folderPath = textBoxInput.Text;
      DirectoryInfo theFolder = new DirectoryInfo(folderPath);

      if (theFolder.Exists)
      {
         DisplayFolderList(theFolder.FullName);
         return;
      }

      FileInfo theFile = new FileInfo(folderPath);

      if (theFile.Exists)
      {
         DisplayFolderList(theFile.Directory.FullName);
         int index = listBoxFiles.Items.IndexOf(theFile.Name);
         listBoxFiles.SetSelected(index, true);
         return;
      }

      throw new FileNotFoundException("There is no file or folder with "
                                       + "this name: " + textBoxInput.Text);
   }
   catch(Exception ex)
   {
      MessageBox.Show(ex.Message);
   }
}
This code establishes whether the supplied text represents a folder or a file by instantiating DirectoryInfo and FileInfo instances and examining the Exists property of each object. If neither exists, you throw an exception. If it’s a folder, you call DisplayFolderList to populate the list boxes. If it’s a file, you need to populate the list boxes and sort out the text boxes that display the file properties. You handle this case by first populating the list boxes. You then programmatically select the appropriate filename in the Files list box. This has exactly the same effect as if the user had selected that item — it raises the item-selected event. You can then simply exit the current event handler, knowing that the selected item event handler will immediately be called to display the file properties.
The following code is the event handler that is called when an item in the Files list box is selected, either by the user or, as indicated previously, programmatically. It simply constructs the full pathname of the selected file, and passes it to the DisplayFileInfo method presented earlier:
protected void OnListBoxFilesSelected(object sender, EventArgs e)
{
   try
   {
      string selectedString = listBoxFiles.SelectedItem.ToString();
      string fullFileName = Path.Combine(currentFolderPath, selectedString);
      DisplayFileInfo(fullFileName);
   }
   catch(Exception ex)
   {
      MessageBox.Show(ex.Message);
   }
}
The event handler for the selection of a folder in the Folders list box is implemented in a very similar way, except that in this case you call DisplayFolderList to update the contents of the list boxes:
protected void OnListBoxFoldersSelected(object sender, EventArgs e)
{
   try
   {
      string selectedString = listBoxFolders.SelectedItem.ToString();
      string fullPathName = Path.Combine(currentFolderPath, selectedString);
      DisplayFolderList(fullPathName);
   }
   catch(Exception ex)
   {
      MessageBox.Show(ex.Message);
   }
}
Finally, when the Up button is clicked, DisplayFolderList must also be called, except this time you need to obtain the path of the parent of the folder currently displayed. This is done with the FileInfo.DirectoryName property, which returns the parent folder path:
protected void OnUpButtonClick(object sender, EventArgs e)
{
   try
   {
      string folderPath = new FileInfo(currentFolderPath).DirectoryName;
      DisplayFolderList(folderPath);
   }
   catch(Exception ex)
   {
      MessageBox.Show(ex.Message);
   }
}
MOVING, COPYING, AND DELETING FILES
As mentioned earlier, moving and deleting files or folders is done by the MoveTo and Delete methods of the FileInfo and DirectoryInfo classes. The equivalent methods on the File and Directory classes are Move and Delete. The FileInfo and File classes also implement the methods CopyTo and Copy, respectively. However, no methods exist to copy complete folders — you need to do that by copying each file in the folder.
Using all of these methods is quite intuitive — you can find detailed descriptions in the SDK documentation. This section illustrates their use for the particular cases of calling the static Move, Copy, and Delete methods on the File class. To do this, you will build on the previous FileProperties example and call its iteration FilePropertiesAndMovement. This example has the extra feature that whenever the properties of a file are displayed, the application gives you the options to delete that file or move or copy the file to another location.
FilePropertiesAndMovement Sample
Figure 24-4 shows the user interface of the new sample application.

As you can see, FilePropertiesAndMovement is similar in appearance to FileProperties, except for the group of three buttons and a text box at the bottom of the window. These controls are enabled only when the example is actually displaying the properties of a file; at all other times, they are disabled. The existing controls are also squashed a bit to stop the main form from getting too big. When the properties of a selected file are displayed, FilePropertiesAndMovement automatically places the full pathname of that file in the bottom text box for the user to edit. Users can then click any of the buttons to perform the appropriate operation. When they do, a message box is displayed that confirms the action taken by the user (see Figure 24-5).
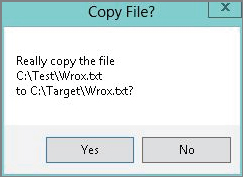
When the user clicks the Yes button, the action is initiated. Some actions in the form that the user can take will cause the display to be incorrect. For instance, if the user moves or deletes a file, you obviously cannot continue to display the contents of that file in the same location. In addition, if you change the name of a file in the same folder, your display will also be out of date. In these cases, FilePropertiesAndMovement resets its controls to display only the folder where the file resides after the file operation.
Looking at the Code for FilePropertiesAndMovement
To code this process, you need to add the relevant controls, as well as their event handlers, to the code for the FileProperties sample. The new controls are given the names buttonDelete, buttonCopyTo, buttonMoveTo, and textBoxNewPath.
First, look at the event handler that is called when the user clicks the Delete button:
protected void OnDeleteButtonClick(object sender, EventArgs e)
{
   try
   {
      string filePath = Path.Combine(currentFolderPath,
                                     textBoxFileName.Text);
      string query = "Really delete the file
" + filePath + "?";
      if (MessageBox.Show(query,
         "Delete File?", MessageBoxButtons.YesNo) == DialogResult.Yes)
      {
         File.Delete(filePath);
         DisplayFolderList(currentFolderPath);
      }
   }
   catch(Exception ex)
   {
      MessageBox.Show("Unable to delete file. The following exception"
                        + " occurred:
" + ex.Message, "Failed");
   }
}
The code for this method is contained in a try block because of the obvious risk of an exception being thrown if, for example, the user doesn’t have permission to delete the file, or the file is moved or locked by another process after it has been displayed but before the user presses the Delete button. You construct the path of the file to be deleted from the CurrentParentPath field, which contains the path of the parent folder, and the text in the textBoxFileName text box, which contains the name of the file.
The methods to move and copy the file are structured in a very similar manner:
protected void OnMoveButtonClick(object sender, EventArgs e)
{
   try
   {
      string filePath = Path.Combine(currentFolderPath,
                                     textBoxFileName.Text);
      string query = "Really move the file
" + filePath + "
to "
                      + textBoxNewPath.Text + "?";
      if (MessageBox.Show(query,
         "Move File?", MessageBoxButtons.YesNo) == DialogResult.Yes)
      {
         File.Move(filePath, textBoxNewPath.Text);
         DisplayFolderList(currentFolderPath);
      }
   }
   catch(Exception ex)
   {
      MessageBox.Show("Unable to move file. The following exception"
                        + " occurred:
" + ex.Message, "Failed");
   }
}

protected void OnCopyButtonClick(object sender, EventArgs e)
{
   try
   {
      string filePath = Path.Combine(currentFolderPath,
                                     textBoxFileName.Text);
      string query = "Really copy the file
" + filePath + "
to "
                      + textBoxNewPath.Text + "?";
      if (MessageBox.Show(query,
         "Copy File?", MessageBoxButtons.YesNo) == DialogResult.Yes)
      {
         File.Copy(filePath, textBoxNewPath.Text);
         DisplayFolderList(currentFolderPath);
      }
   }
   catch(Exception ex)
   {
      MessageBox.Show("Unable to copy file. The following exception"
                       + " occurred:
" + ex.Message, "Failed");
   }
}
You are not quite done. You also need to ensure that the new buttons and text box are enabled and disabled at the appropriate times. To enable them when you are displaying the contents of a file, add the following code to DisplayFileInfo:
protected void DisplayFileInfo(string fileFullName)
{
   FileInfo theFile = new FileInfo(fileFullName);

   if (!theFile.Exists)
   {
      throw new FileNotFoundException("File not found: " + fileFullName);
   }

   textBoxFileName.Text = theFile.Name;
   textBoxCreationTime.Text = theFile.CreationTime.ToLongTimeString();
   textBoxLastAccessTime.Text = theFile.LastAccessTime.ToLongDateString();
   textBoxLastWriteTime.Text = theFile.LastWriteTime.ToLongDateString();
   textBoxFileSize.Text = theFile.Length.ToString() + " bytes";

   // enable move, copy, delete buttons
   textBoxNewPath.Text = theFile.FullName;
   textBoxNewPath.Enabled = true;
   buttonCopyTo.Enabled = true;
   buttonDelete.Enabled = true;
   buttonMoveTo.Enabled = true;
}
You also need to make one change to DisplayFolderList:
protected void DisplayFolderList(string folderFullName)
{
   DirectoryInfo theFolder = new DirectoryInfo(folderFullName);

   if (!theFolder.Exists)
   {
      throw new DirectoryNotFoundException("Folder not found: " + folderFullName);
   }

   ClearAllFields();
   DisableMoveFeatures();
   textBoxFolder.Text = theFolder.FullName;
   currentFolderPath = theFolder.FullName;

   // list all subfolders in folder
   foreach(DirectoryInfo nextFolder in theFolder.GetDirectories())
      listBoxFolders.Items.Add(NextFolder.Name);

   // list all files in folder
   foreach(FileInfo nextFile in theFolder.GetFiles())
      listBoxFiles.Items.Add(NextFile.Name);
}
DisableMoveFeatures is a small utility function that disables the new controls:
      void DisableMoveFeatures()
      {
         textBoxNewPath.Text = "";
         textBoxNewPath.Enabled = false;
         buttonCopyTo.Enabled = false;
         buttonDelete.Enabled = false;
         buttonMoveTo.Enabled = false;
      }
Now add extra code to ClearAllFields to clear the extra text box:
      protected void ClearAllFields()
      {
         listBoxFolders.Items.Clear();
         listBoxFiles.Items.Clear();
         textBoxFolder.Text = "";
         textBoxFileName.Text = "";
         textBoxCreationTime.Text = "";
         textBoxLastAccessTime.Text = "";
         textBoxLastWriteTime.Text = "";
         textBoxFileSize.Text = "";
         textBoxNewPath.Text = "";
      }
READING AND WRITING TO FILES
Reading and writing to files is in principle very simple; however, it is not done through the DirectoryInfo or FileInfo objects. Instead, using .NET Framework 4.5, you can do it through the File object. Later in this chapter, you see how to accomplish this using a number of other classes that represent a generic concept called a stream.
Before .NET Framework 2.0, it took a bit of wrangling to read and write to files. It was possible using the available classes from the framework, but it was not straightforward. The .NET Framework 2.0 expanded the File class to make it as simple as just one line of code to read or write to a file. This same functionality is also available in version 4.5 of the .NET Framework.
Reading a File
For an example of reading a file, create a Windows Forms application that contains a regular text box, a button, and a multiline text box. When you are done, your form should appear similar to Figure 24-6.
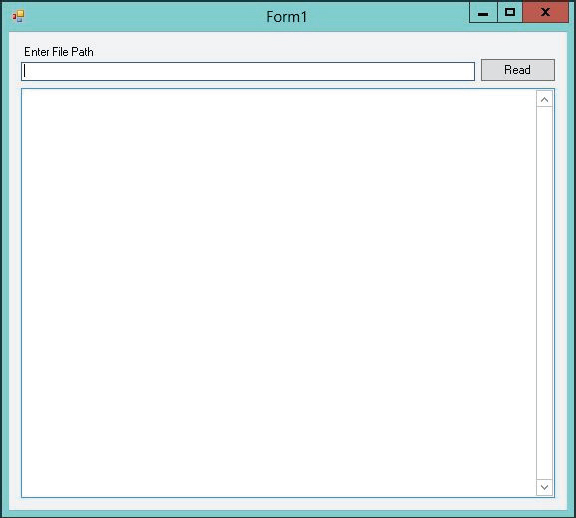
The purpose of this form is to enable end users to enter the path of a specific file in the first text box and click the Read button. From there, the application will read the specified file and display the file’s contents in the multiline text box. This is coded in the following example:
using System;
using System.IO;
using System.Windows.Forms;

namespace ReadingFiles
{
    public partial class Form1: Form
    {
        public Form1()
        {
            InitializeComponent();
        }

        private void button1_Click(object sender, EventArgs e)
        {
            textBox2.Text = File.ReadAllText(textBox1.Text);
        }
    }
}
In building this example, the first step is to add the using statement to bring in the System.IO namespace. From there, simply use the button1_Click event for the Send button on the form to populate the text box with what is returned from the file. You can now access the file’s contents by using the File.ReadAllText method. As you can see, you can read files with a single statement. The ReadAllText method opens the specified file, reads the contents, and then closes the file. The return value of the ReadAllText method is a string containing the entire contents of the file specified. The result would be something similar to what is shown in Figure 24-7.

The File.ReadAllText signature shown in the preceding example is of the following construction:
File.ReadAllText(FilePath);The other option is to also specify the encoding of the file being read:
File.ReadAllText(FilePath, Encoding);Using this signature enables you to specify the encoding to use when opening and reading the contents of the file. Therefore, you could do something like the following:
File.ReadAllText(textBox1.Text, Encoding.ASCII);Some of the other options for opening and working with files include using the ReadAllBytes and the ReadAllLines methods. The ReadAllBytes method enables you to open a binary file and read the contents into a byte array. The ReadAllText method shown earlier provides the entire contents of the specified file in a single string instance. If you are not interested in this, but instead would like to work with what comes back from the file in a line-by-line fashion, you should use the ReadAllLines method because it allows for this kind of functionality and will return a string array for you to work with.
Writing to a File
Besides making reading from files an extremely simple process under the .NET Framework umbrella, the base class library (BCL) has made writing to files just as easy. Just as the base class library gives you the ReadAllText, ReadAllLines, and ReadAllBytes methods to read files in a few different ways, it also provides the WriteAllText, WriteAllBytes, and WriteAllLines methods to write files.
For an example of how to write to a file, use the same Windows Forms application, but use the multiline text box in the form to input data into a file. The code for the button1_Click event handler should appear as shown here:
private void button1_Click(object sender, EventArgs e)
{
   File.WriteAllText(textBox1.Text, textBox2.Text);
}
Build and start the form, type C:Testing.txt in the first text box, type some random content in the second text box, and then click the button. Nothing will happen visually, but if you look in your root C: drive, you will see the Testing.txt file with the content you specified.
The WriteAllText method went to the specified location, created a new text file, and provided the specified contents to the file before saving and closing the file. Not bad for just one line of code!
If you run the application again, and specify the same file (Testing.txt) but with some new content, pressing the button again will cause the application to perform the same task. This time, though, the new content is not added to the previous content you specified — instead, the new content completely overrides the previous content. In fact, WriteAllText, WriteAllBytes, and WriteAllLines all override any previous files, so be very careful when using these methods.
The WriteAllText method in the previous example uses the following signature:
File.WriteAllText(FilePath, Contents)You can also specify the encoding of the new file:
File.WriteAllText(FilePath, Contents, Encoding)The WriteAllBytes method enables you to write content to a file using a byte array, and the WriteAllLines method enables you to write a string array to a file. An example of this is illustrated in the following event handler:
private void button1_Click(object sender, EventArgs e)
{
   string[] movies =
      {"Grease",
       "Close Encounters of the Third Kind",
       "The Day After Tomorrow"};

   File.WriteAllLines(@"C:Testing.txt", movies);
}
Now clicking the button for such an application will give you a Testing.txt file with the following contents:
Grease
Close Encounters of the Third Kind
The Day After Tomorrow
The WriteAllLines method writes out the string array with each array item occupying its own line in the file.
Because data may be written not only to disk but to other places as well (such as to named pipes or to memory), it is also important to understand how to deal with file I/O in .NET using streams as a means of moving file contents around. This is shown in the following section.
Streams
The idea of a stream has been around for a very long time. A stream is an object used to transfer data. The data can be transferred in one of two directions:
- If the data is being transferred from some outside source into your program, it is called reading from the stream.
- If the data is being transferred from your program to some outside source, it is called writing to the stream.
Very often, the outside source will be a file, but that is not always the case. Other possibilities include the following:
- Reading or writing data on the network using some network protocol, where the intention is for this data to be picked up by or sent from another computer
- Reading from or writing to a named pipe
- Reading from or writing to an area of memory
Of these examples, Microsoft has supplied a .NET base class for writing to or reading from memory, the System.IO.MemoryStream object. The System.Net.Sockets.NetworkStream object handles network data. There are no base stream classes for writing to or reading from pipes, but there is a generic stream class, System.IO.Stream, from which you would inherit if you wanted to write such a class. Stream does not make any assumptions about the nature of the external data source.
The outside source might even be a variable within your own code. This might sound paradoxical, but the technique of using streams to transmit data between variables can be a useful trick for converting data between data types. The C language used something similar — the sprintf function — to convert between integer data types and strings or to format strings.
The advantage of having a separate object for the transfer of data, rather than using the FileInfo or DirectoryInfo classes to do this, is that separating the concept of transferring data from the particular data source makes it easier to swap data sources. Stream objects themselves contain a lot of generic code that concerns the movement of data between outside sources and variables in your code. By keeping this code separate from any concept of a particular data source, you make it easier for this code to be reused (through inheritance) in different circumstances. For example, the StringReader and StringWriter classes are part of the same inheritance tree as two classes that you will be using later to read and write text files. The classes will almost certainly share a substantial amount of code behind the scenes. Figure 24-8 illustrates the actual hierarchy of stream-related classes in the System.IO namespace.

As far as reading and writing files, the classes that concern us most are as follows:
- FileStream — This class is intended for reading and writing binary data in a binary file. However, you can also use it to read from or write to any file.
- StreamReader and StreamWriter — These classes are designed specifically for reading from and writing to text files.
You might also find the BinaryReader and BinaryWriter classes useful, although they are not used in the examples here. These classes do not actually implement streams themselves, but they are able to provide wrappers around other stream objects. BinaryReader and BinaryWriter provide extra formatting of binary data, which enables you to directly read or write the contents of C# variables to or from the relevant stream. Think of the BinaryReader and BinaryWriter as sitting between the stream and your code, providing extra formatting (see Figure 24-9).

The difference between using these classes and directly using the underlying stream objects is that a basic stream works in bytes. For example, suppose that as part of the process of saving some document you want to write the contents of a variable of type long to a binary file. Each long occupies 8 bytes, and if you used an ordinary binary stream you would have to explicitly write each of those 8 bytes of memory.
In C# code, you would have to perform some bitwise operations to extract each of those 8 bytes from the long value. Using a BinaryWriter instance, you can encapsulate the entire operation in an overload of the BinaryWriter.Write method, which takes a long as a parameter, and which places those 8 bytes into the stream (and if the stream is directed to a file, into the file). A corresponding BinaryReader.Read method will extract 8 bytes from the stream and recover the value of the long. For more information on the BinaryReader and BinaryWriter classes, refer to the SDK documentation.
Buffered Streams
For performance reasons, when you read or write to or from a file, the output is buffered. This means that if your program asks for the next 2 bytes of a file stream, and the stream passes the request on to Windows, then Windows will not connect to the file system and then locate and read the file off the disk, just to get 2 bytes. Instead, Windows retrieves a large block of the file at one time and stores this block in an area of memory known as a buffer. Subsequent requests for data from the stream are satisfied from the buffer until the buffer runs out, at which point Windows grabs another block of data from the file.
Writing to files works in the same way. For files, this is done automatically by the operating system, but you might have to write a stream class to read from some other device that is not buffered. If so, you can derive your class from BufferedStream, which implements a buffer itself. (Note, however, that BufferedStream is not designed for the situation in which an application frequently alternates between reading and writing data.)
Reading and Writing to Binary Files Using FileStream
Reading and writing to and from binary files can be done using the FileStream class.
The FileStream Class
A FileStream instance is used to read or write data to or from a file. To construct a FileStream, you need four pieces of information:
The first piece of information is usually represented by a string that contains the full pathname of the file, and this chapter considers only those constructors that require a string here. Besides those, however, some additional constructors take an old Windows-API–style Windows handle to a file instead. The remaining three pieces of information are represented by three .NET enumerations called FileMode, FileAccess, and FileShare. The values of these enumerations are listed in the following table and are self-explanatory:
| ENUMERATION | VALUES |
| FileMode | Append, Create, CreateNew, Open, OpenOrCreate, or Truncate |
| FileAccess | Read, ReadWrite, or Write |
| FileShare | Delete, Inheritable, None, Read, ReadWrite, or Write |
Note that in the case of FileMode, exceptions can be thrown if you request a mode that is inconsistent with the existing status of the file. Append, Open, and Truncate throw an exception if the file does not already exist, and CreateNew throws an exception if it does. Create and OpenOrCreate will cope with either scenario, but Create deletes any existing file to replace it with a new, initially empty, one. The FileAccess and FileShare enumerations are bitwise flags, so values can be combined with the C# bitwise OR operator, |.
There are a large number of constructors for the FileStream. The three simplest ones work as follows:
   // creates file with read-write access and allows other streams read access
   FileStream fs = new FileStream(@"C:C# ProjectsProject.doc",
                       FileMode.Create);
   // as above, but we only get write access to the file
   FileStream fs2 = new FileStream(@"C:C# ProjectsProject2.doc",
                        FileMode.Create, FileAccess.Write);
   // as above but other streams don't get access to the file while
   // fs3 is open
   FileStream fs3 = new FileStream(@"C:C# ProjectsProject3.doc",
                        FileMode.Create, FileAccess.Write, FileShare.None);
As this code reveals, the overloads of these constructors have the effect of providing default values of FileAccess.ReadWrite and FileShare.Read to the third and fourth parameters depending upon the FileMode value. It is also possible to create a file stream from a FileInfo instance in various ways:
   FileInfo myFile4 = new FileInfo(@"C:C# ProjectsProject4.doc");
   FileStream fs4 = myFile4.OpenRead();
   FileInfo myFile5= new FileInfo(@"C:C# ProjectsProject5doc");
   FileStream fs5 = myFile5.OpenWrite();
   FileInfo myFile6= new FileInfo(@"C:C# ProjectsProject6doc");
   FileStream fs6 = myFile6.Open(FileMode.Append, FileAccess.Write,
                    FileShare.None);
   FileInfo myFile7 = new FileInfo(@"C:C# ProjectsProject7.doc");
   FileStream fs7 = myFile7.Create();
FileInfo.OpenRead supplies a stream that provides read-only access to an existing file, whereas FileInfo.OpenWrite provides read-write access. FileInfo.Open enables you to specify the mode, access, and file share parameters explicitly.
Of course, after finishing with a stream, you should close it:
fs.Close();Closing the stream frees up the resources associated with it and allows other applications to set up streams to the same file. This action also flushes the buffer. In between opening and closing the stream, you should read data from it and/or write data to it. FileStream implements a number of methods to do this.
ReadByte is the simplest way to read data. It grabs 1 byte from the stream and casts the result to an int that has a value between 0 and 255. If you have reached the end of the stream, it returns -1:
int NextByte = fs.ReadByte();If you prefer to read a number of bytes at a time, you can call the Read method, which reads a specified number of bytes into an array. Read returns the number of bytes actually read — if this value is 0, you know that you are at the end of the stream. The following example reads into a byte array called ByteArray:
int nBytesRead = fs.Read(ByteArray, 0, nBytes);The second parameter to Read is an offset, which you can use to request that the Read operation start populating the array at some element other than the first. The third parameter is the number of bytes to read into the array.
If you want to write data to a file, two parallel methods are available, WriteByte and Write. WriteByte writes a single byte to the stream:
   byte NextByte = 100;
fs.WriteByte(NextByte);Write, however, writes out an array of bytes. For instance, if you initialized the ByteArray mentioned before with some values, you could use the following code to write out the first nBytes of the array:
fs.Write(ByteArray, 0, nBytes);As with Read, the second parameter enables you to start writing from some point other than the beginning of the array. Both WriteByte and Write return void.
In addition to these methods, FileStream implements various other methods and properties related to bookkeeping tasks such as determining how many bytes are in the stream, locking the stream, or flushing the buffer. These other methods are not usually required for basic reading and writing, but if you need them, full details are in the SDK documentation.
BinaryFileReader Sample
The use of the FileStream class is illustrated by writing a sample, BinaryFileReader, that reads in and displays any file. Create the project in Visual Studio 2012 as a Windows application. It has one menu item, which brings up a standard OpenFileDialog asking what file to read in and then displays the file as binary code. As you are reading in binary files, you need to be able to display nonprintable characters. You will do this by displaying each byte of the file individually, showing 16 bytes on each line of a multiline text box. If the byte represents a printable ASCII character, you will display that character; otherwise, you will display the value of the byte in a hexadecimal format. In either case, you pad the displayed text with spaces so that each byte displayed occupies four columns; this way, the bytes line up nicely under each other.
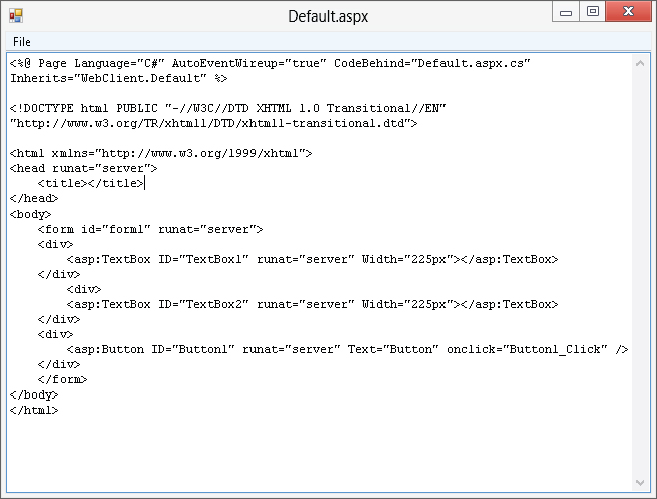
Figure 24-10 shows what the BinaryFileReader application looks like when viewing a text file. (Because BinaryFileReader can view any file, it can also be used on text files as well as binary files.) In this case, the application has read in a basic ASP.NET page (.aspx).
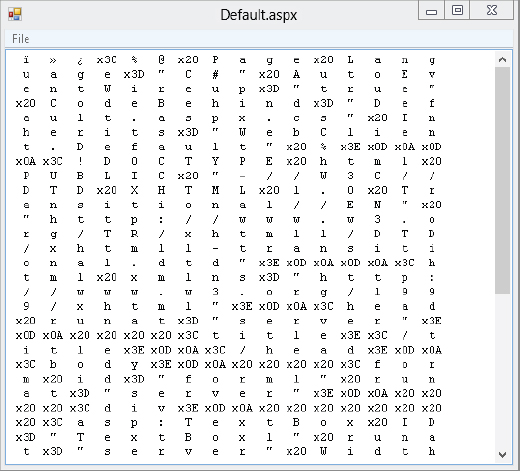
Clearly, this format is more suited for looking at the values of individual bytes than for displaying text! Later in this chapter, when you develop a sample that is specifically designed to read text files, you will see what this file really says. The advantage of this example is that you can look at the contents of any file.
This example does not demonstrate writing to files because you don’t want to get bogged down in the complexities of trying to translate the contents of a text box such as the one shown in Figure 24-10 into a binary stream! You will see how to write to files later when you develop an example that can read or write only to and from text files.
Here is the code used to get these results. First, you need to ensure that you have brought in the System.IO namespace through the use of the using statement:
using System.IO;Next, you add a couple of fields to the main form class — one representing the file dialog and a string that provides the path of the file currently being viewed:
   partial class Form1: Form
   {
      private readonly OpenFileDialog chooseOpenFileDialog =
         new OpenFileDialog();
      private string chosenFile;
   }
You also need to add some standard Windows Forms code to deal with the handlers for the menu and the file dialog:
      public Form1()
      {
         InitializeComponent();
         menuFileOpen.Click += OnFileOpen;
         chooseOpenFileDialog.FileOk += OnOpenFileDialogOK;
      }

      void OnFileOpen(object Sender, EventArgs e)
      {
         chooseOpenFileDialog.ShowDialog();
      }

      void OnOpenFileDialogOK(object Sender, CancelEventArgs e)
      {
         chosenFile = chooseOpenFileDialog.FileName;
         this.Text = Path.GetFileName(chosenFile);
         DisplayFile();
      }
As this code demonstrates, when the user clicks OK to select a file in the file dialog, you call the DisplayFile method, which does the work of reading in the selected file:
      void DisplayFile()
      {
         int nCols = 16;
         FileStream inStream = new FileStream(chosenFile, FileMode.Open,
                                                          FileAccess.Read);
         long nBytesToRead = inStream.Length;
         if (nBytesToRead > 65536/4)
            nBytesToRead = 65536/4;

         int nLines = (int)(nBytesToRead/nCols) + 1;
         string [] lines = new string[nLines];
         int nBytesRead = 0;

         for (int i=0; i<nLines; i++)
         {
            StringBuilder nextLine = new StringBuilder();
            nextLine.Capacity = 4*nCols;

            for (int j = 0; j<nCols; j++)
            {
               int nextByte = inStream.ReadByte();
               nBytesRead++;
               if (nextByte < 0 || nBytesRead > 65536)
                  break;
               char nextChar = (char)nextByte;
               if (nextChar < 16)
                  nextLine.Append(" x0" + string.Format("{0,1:X}",
                                                       (int)nextChar));
               else if
                  (char.IsLetterOrDigit(nextChar) ||
                                        char.IsPunctuation(nextChar))
                  nextLine.Append("  " + nextChar + " ");
               else
                  nextLine.Append(" x" + string.Format("{0,2:X}",
                                         (int)nextChar));
            }
            lines[i] = nextLine.ToString();
         }
         inStream.Close();
         this.textBoxContents.Lines = lines;
      }
There is quite a lot going on in this method, so here is the breakdown. You instantiate a FileStream object for the selected file, which specifies that you want to open an existing file for reading. You then determine how many bytes need to be read in and how many lines should be displayed. The number of bytes will normally be the number of bytes in the file. This example limits the display of the contents in the text box control to a maximum of only 65,536 characters — with the chosen display format, you are displaying four characters for every byte in the file.
The bulk of the method is given to two nested for loops that construct each line of text to be displayed. You use a StringBuilder class to construct each line for performance reasons: You are appending suitable text for each byte to the string that represents each line 16 times. If on each occasion you allocated a new string and took a copy of the half-constructed line, you would not only spend a lot of time allocating strings but also waste a lot of memory on the heap. Notice that the definition of printable characters is anything that is a letter, digit, or punctuation, as indicated by the relevant static System.Char methods. You exclude any character with a value less than 16 from the printable list, however; this means that you will trap the carriage return (13) and line feed (10) as binary characters (a multiline text box isn’t able to display these characters properly if they occur individually within a line).
Furthermore, using the Properties window, you change the Font property for the text box to a fixed-width font. In this case, you choose Courier New 9pt regular and set the text box to have vertical and horizontal scrollbars. Upon completion, you close the stream and set the contents of the text box to the array of strings that you have built.
Reading and Writing to Text Files
Theoretically, it is perfectly possible to use the FileStream class to read in and display text files. You have, after all, just done that. The format in which the Default.aspx file is displayed in the preceding sample is not particularly user-friendly, but that has nothing to do with any intrinsic problem with the FileStream class, only with how you choose to display the results in the text box.
Having said that, if you know that a particular file contains text, you will usually find it more convenient to read and write it using the StreamReader and StreamWriter classes instead of the FileStream class. That’s because these classes work at a slightly higher level and are specifically geared to reading and writing text. The methods that they implement can automatically detect convenient points to stop reading text, based on the contents of the stream. In particular:
- These classes implement methods to read or write one line of text at a time, StreamReader.ReadLine and StreamWriter.WriteLine. In the case of reading, this means that the stream automatically determines where the next carriage return is and stops reading at that point. In the case of writing, it means that the stream automatically appends the carriage return–line feed combination to the text that it writes out.
- By using the StreamReader and StreamWriter classes, you don’t need to worry about the encoding (the text format) used in the file. Possible encodings include ASCII (1 byte for each character), or any of the Unicode-based formats, Unicode, UTF7, UTF8, and UTF32. Text files on Windows 9x systems are always in ASCII because Windows 9x does not support Unicode; however, because Windows NT, 2000, XP, 2003, Vista, Windows Server 2008, Windows 7, and Windows 8 all support Unicode, text files might theoretically contain Unicode, UTF7, UTF8, or UTF32 data instead of ASCII data. The convention is such that if the file is in ASCII format, it simply contains the text. If it is in any Unicode format, this is indicated by the first 2 or 3 bytes of the file, which are set to particular combinations of values to indicate the format used in the file.
These bytes are known as the byte code markers. When you open a file using any of the standard Windows applications, such as Notepad or WordPad, you do not need to worry about this because these applications are aware of the different encoding methods and automatically read the file correctly. This is also true for the StreamReader class, which correctly reads in a file in any of these formats; and the StreamWriter class is capable of formatting the text it writes out using whatever encoding technique you request. If you want to read in and display a text file using the FileStream class, however, you need to handle this yourself.
The StreamReader Class
StreamReader is used to read text files. Constructing a StreamReader is in some ways easier than constructing a FileStream instance because some of the FileStream options are not required when using StreamReader. In particular, the mode and access types are not relevant to StreamReader because the only thing you can do with a StreamReader is read! Furthermore, there is no direct option to specify the sharing permissions. However, there are a couple of new options:
- You need to specify what to do about the different encoding methods. You can instruct the StreamReader to examine the byte code markers in the beginning of the file to determine the encoding method, or you can simply tell the StreamReader to assume that the file uses a specified encoding method.
- Instead of supplying a filename to be read from, you can supply a reference to another stream.
This last option deserves a bit more discussion because it illustrates another advantage of basing the model for reading and writing data on the concept of streams. Because the StreamReader works at a relatively high level, you might find it useful when you have another stream that is there to read data from another source but, you would like to use the facilities provided by StreamReader to process that other stream as if it contained text. You can do so by simply passing the output from this stream to a StreamReader. In this way, StreamReader can be used to read and process data from any data source — not only files. This is essentially the situation discussed earlier with regard to the BinaryReader class. However, in this book you only use StreamReader to connect directly to files.
The result of these possibilities is that StreamReader has a large number of constructors. Not only that, but there is another FileInfo method that returns a StreamReader reference: OpenText. The following examples illustrate just some of the constructors.
The simplest constructor takes only a filename. This StreamReader examines the byte order marks to determine the encoding:
StreamReader sr = new StreamReader(@"C:My DocumentsReadMe.txt");Alternatively, you can specify that UTF8 encoding should be assumed:
   StreamReader sr = new StreamReader(@"C:My DocumentsReadMe.txt",
                                        Encoding.UTF8);
You specify the encoding by using one of several properties on a class, System.Text.Encoding. This class is an abstract base class, from which a number of classes are derived and which implements methods that actually perform the text encoding. Each property returns an instance of the appropriate class, and the possible properties you can use are as follows:
- ASCII
- Unicode
- UTF7
- UTF8
- UTF32
- BigEndianUnicode
The following example demonstrates how to hook up a StreamReader to a FileStream. The advantage of this is that you can specify whether to create the file and the share permissions, which you cannot do if you directly attach a StreamReader to the file:
   FileStream fs = new FileStream(@"C:My DocumentsReadMe.txt",
                       FileMode.Open, FileAccess.Read, FileShare.None);
   StreamReader sr = new StreamReader(fs);
For this example, you specify that the StreamReader will look for byte code markers to determine the encoding method used, as it will do in the following examples, in which the StreamReader is obtained from a FileInfo instance:
   FileInfo myFile = new FileInfo(@"C:My DocumentsReadMe.txt");
   StreamReader sr = myFile.OpenText();
Just as with a FileStream, you should always close a StreamReader after use. Otherwise, the file will remain locked to other processes (unless you used a FileStream to construct the StreamReader and specified FileShare.ShareReadWrite):
sr.Close();Now that you have gone to the trouble of instantiating a StreamReader, you can do something with it. As with the FileStream, the following examples demonstrate the various ways to read data; other, less commonly used StreamReader methods are left to the SDK documentation.
Possibly the easiest method to use is ReadLine, which keeps reading until it gets to the end of a line. It does not include the carriage return–line feed combination that marks the end of the line in the returned string:
string nextLine = sr.ReadLine();Alternatively, you can grab the entire remainder of the file (or strictly, the remainder of the stream) in one string:
string restOfStream = sr.ReadToEnd();You can read a single character as follows:
int nextChar = sr.Read();This overload of Read casts the returned character to an int. This gives it the option of returning a value of -1 if the end of the stream has been reached.
Finally, you can read a given number of characters into an array, with an offset:
   // to read 100 characters in.

   int nChars = 100;
   char [] charArray = new char[nChars];
   int nCharsRead = sr.Read(charArray, 0, nChars);
nCharsRead will be less than nChars if you have requested to read more characters than remain in the file.
The StreamWriter Class
This works in the same way as the StreamReader, except that you can use StreamWriter only to write to a file (or to another stream). Possibilities for constructing a StreamWriter include the following:
StreamWriter sw = new StreamWriter(@"C:My DocumentsReadMe.txt");The preceding uses UTF8 encoding, which is regarded by .NET as the default encoding method. If you want, you can specify alternative encoding:
   StreamWriter sw = new StreamWriter(@"C:My DocumentsReadMe.txt", true,
      Encoding.ASCII);
In this constructor, the second parameter is a boolean that indicates whether the file should be opened for appending. There is, oddly, no constructor that takes only a filename and an encoding class.
Of course, you may want to hook up StreamWriter to a file stream to give you more control over the options for opening the file:
   FileStream fs = new FileStream(@"C:My DocumentsReadMe.txt",
      FileMode.CreateNew, FileAccess.Write, FileShare.Read);
   StreamWriter sw = new StreamWriter(fs);
FileStream does not implement any methods that return a StreamWriter class.
Alternatively, if you want to create a new file and start writing data to it, you will find this sequence useful:
   FileInfo myFile = new FileInfo(@"C:My DocumentsNewFile.txt");
   StreamWriter sw = myFile.CreateText();
Just as with all other stream classes, it is important to close a StreamWriter class when you are finished with it:
sw.Close();Writing to the stream is done using any of 17 overloads of StreamWriter.Write. The simplest writes out a string:
   string nextLine = "Groovy Line";
   sw.Write(nextLine);
It is also possible to write out a single character:
   char nextChar = 'a';
   sw.Write(nextChar);
And an array of characters:
   char [] charArray = new char[100];

   // initialize these characters

   sw.Write(charArray);
It is even possible to write out a portion of an array of characters:
   int nCharsToWrite = 50;
   int startAtLocation = 25;
   char [] charArray = new char[100];

   // initialize these characters

   sw.Write(charArray, startAtLocation, nCharsToWrite);
ReadWriteText Sample
The ReadWriteText sample displays the use of the StreamReader and StreamWriter classes. It is similar to the earlier ReadBinaryFile sample, but it assumes that the file to be read in is a text file and displays it as such. It is also capable of saving the file (with any modifications you have made to the text in the text box). It will save any file in Unicode format.
The screenshot in Figure 24-11 shows ReadWriteText displaying the same Default.aspx file that you used earlier. This time, however, you are able to read the contents a bit more easily!
We don’t cover the details of adding the event handlers for the Open File dialog, because they are basically the same as those in the earlier BinaryFileReader sample. As with that sample, opening a new file causes the DisplayFile method to be called. The only real difference between this sample and the previous one is the implementation of DisplayFile, and you now have the option to save a file. This is represented by another menu option, Save. The handler for this option calls another method you have added to the code, SaveFile. (Note that the new file always overwrites the original file; this sample does not have an option to write to a different file.)
You look at SaveFile first because it is the simplest function. You simply write each line of the text box, in turn, to a StreamWriter stream, relying on the StreamReader.WriteLine method to append the trailing carriage return and line feed to the end of each line:
      void SaveFile()
      {
         StreamWriter sw = new StreamWriter(chosenFile, false, Encoding.Unicode);

         foreach (string line in textBoxContents.Lines)
            sw.WriteLine(line);

         sw.Close();
      }
chosenFile is a string field of the main form, which contains the name of the file you have read in (just as for the previous example). Notice that you specify Unicode encoding when you open the stream. If you want to write files in some other format, you simply need to change the value of this parameter. The second parameter to this constructor is set to true to append to a file, but you do not in this case. The encoding must be set at construction time for a StreamWriter. It is subsequently available as a read-only property, Encoding.
Now you examine how files are read in. The process of reading in is complicated by the fact that you don’t know how many lines it will contain until you have read in the file. For example, you don’t know how many (char)13(char)10 sequences are in the file because char(13)char(10) is the carriage return–line feed combination that occurs at the end of a line. You solve this problem by initially reading the file into an instance of the StringCollection class, which is in the System.Collections.Specialized namespace. This class is designed to hold a set of strings that can be dynamically expanded. It implements two methods that you will be interested in: Add, which adds a string to the collection, and CopyTo, which copies the string collection into a normal array (a System.Array instance). Each element of the StringCollection object holds one line of the file.
The DisplayFile method calls another method, ReadFileIntoStringCollection, which actually reads in the file. After doing this, you now know how many lines there are, so you are in a position to copy the StringCollection into a normal, fixed-size array and feed it into the text box. Because only the references to the strings, not the strings themselves, are copied when you actually make the copy, the process is reasonably efficient:
      void DisplayFile()
      {
         StringCollection linesCollection = ReadFileIntoStringCollection();
         string [] linesArray = new string[linesCollection.Count];
         linesCollection.CopyTo(linesArray, 0);
         this.textBoxContents.Lines = linesArray;
      }
The second parameter of StringCollection.CopyTo indicates the index within the destination array where you want the collection to start.
The next example demonstrates the ReadFileIntoStringCollection method. You use a StreamReader to read in each line. The main complication here is the need to count the characters read in to ensure that you do not exceed the capacity of the text box:
      StringCollection ReadFileIntoStringCollection()
      {
         const int MaxBytes = 65536;
         StreamReader sr = new StreamReader(chosenFile);
         StringCollection result = new StringCollection();
         int nBytesRead = 0;
         string nextLine;
         while ( sr.Peek != 0 )
         {
            nextLine = sr.ReadLine()
            nBytesRead += nextLine.Length;
            if (nBytesRead > MaxBytes)
               break;
            result.Add(nextLine);
         }
         sr.Close();
         return result;
      }
That completes the code for this sample.
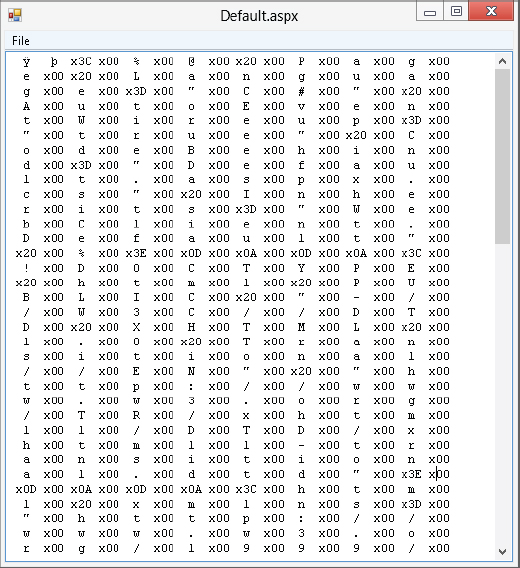
If you run ReadWriteText, read in the Default.aspx file, and then save it, the file will be in Unicode format. You would not be able to discern this from any of the usual Windows applications. Notepad, WordPad, and even the ReadWriteText example will still read the file in and display it correctly under most versions of Windows, but because Windows 9x doesn’t support Unicode, applications like Notepad won’t be able to understand the Unicode file on those platforms. (If you download the example from the Wrox Press website at www.wrox.com, you can try this!) However, if you try to display the file again using the earlier BinaryFileReader sample, you can see the difference immediately, as shown in Figure 24-12. The two initial bytes that indicate the file is in Unicode format are visible, and thereafter every character is represented by 2 bytes. This last fact is obvious because the high-order byte of every character in this particular file is zero, so every second byte in this file now displays x00.
MAPPED MEMORY FILES
If you have been working your entire coding life with only managed code, then mapped-memory files might be a brand-new concept. .NET Framework 4.5 supplies mapped-memory files as part of your toolkit for building applications with the System.IO.MemoryMappedFiles namespace.
It is always possible to use the concept of mapped-memory files by doing some P/Invokes to the underlying Windows APIs, but with of the System.IO.MemoryMappedFiles namespace, you can work with managed code rather than operate in the cumbersome P/Invoke world.
Mapped-memory files and the use of this namespace is ideal when your application requires frequent or random access to files. Using this approach enables you to load part or all of the file into a segment of virtual memory, which then appears to your application as if this file is contained within the primary memory for the application.
Interestingly, you can use this file in memory as a shared resource among more than one process. Prior to this, you might have been using Windows Communication Foundation (WCF) or Named Pipes to communicate a shared resource between multiple processes, but now you can share a mapped-memory file between processes using a shared name.
To work with mapped-memory files, you have to work with a couple of objects. The first is a mapped-memory file instance that loads the file. The second is an accessor object. The following code writes to the mapped-memory file object and then reads from it. The write is also happening when the object is disposed:
using System;
using System.IO.MemoryMappedFiles;
using System.Text;

namespace MappedMemoryFiles
{
    class Program
    {
        static void Main(string[] args)
        {
            using (var mmFile = MemoryMappedFile.CreateFromFile(@"c:usersill
                      documentsvisual studio 11
                      ProjectsMappedMemoryFilesMappedMemoryFilesTextFile1.txt",
                   System.IO.FileMode.Create, "fileHandle", 1024 * 1024))
            {
                string valueToWrite = "Written to the mapped-memory file on " +
                   DateTime.Now.ToString();
                var myAccessor = mmFile.CreateViewAccessor();

                myAccessor.WriteArray<byte>(0,
                   Encoding.ASCII.GetBytes(valueToWrite), 0,
                   valueToWrite.Length);

                var readOut = new byte[valueToWrite.Length];
                myAccessor.ReadArray<byte>(0, readOut, 0, readOut.Length);
                var finalValue = Encoding.ASCII.GetString(readOut);

                Console.WriteLine("Message: " + finalValue);
                Console.ReadLine();
            }
        }
    }
}
In this case, a mapped-memory file is created from a physical file using the CreateFromFile method. In addition to a mapped-memory file, you then need to create an accessor object to this mapping. That is done using the following:
var myAccessor = mmFile.CreateViewAccessor();After the accessor is in place, you can write or read to this mapped-memory location as shown in the code example.
It is also possible to create multiple accessors to the same mapped-memory location as shown here:
var myAccessor1 = mmFile.CreateViewAccessor();
var myAccessor2 = mmFile.CreateViewAccessor();
READING DRIVE INFORMATION
In addition to working with files and directories, the .NET Framework includes the capability to read information from a specified drive. This is done using the DriveInfo class, which can perform a scan of a system to provide a list of available drives and then can dig in deeper, providing a large amount of detail about any of the drives.
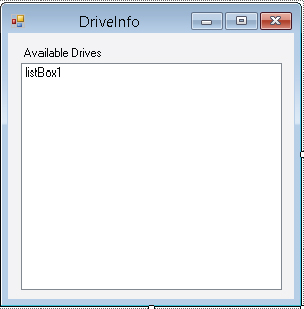
To demonstrate using the DriveInfo class, the following example creates a simple Windows Form that will list all the available drives on a computer and then provide details on a user-selected drive. Your Windows Form will consist of a simple ListBox and should look like Figure 24-13.
When you have the form all set, the code consists of two events — one for when the form loads and another for when the end user makes a drive selection in the list box. The code for this form is shown here:
using System;
using System.IO;
using System.Windows.Forms;

namespace DriveViewer
{
    public partial class Form1: Form
    {
        public Form1()
        {
            InitializeComponent();
        }

        private void Form1_Load(object sender, EventArgs e)
        {
            DriveInfo[] di = DriveInfo.GetDrives();

            foreach (DriveInfo itemDrive in di)
            {
                listBox1.Items.Add(itemDrive.Name);
            }
        }

        private void listBox1_SelectedIndexChanged(object sender, EventArgs e)
        {
            DriveInfo di = new DriveInfo(listBox1.SelectedItem.ToString());

            MessageBox.Show("Available Free Space: "
               + di.AvailableFreeSpace + "
" +
               "Drive Format: " + di.DriveFormat + "
" +
               "Drive Type: " + di.DriveType + "
" +
               "Is Ready: " + di.IsReady + "
" +
               "Name: " + di.Name + "
" +
               "Root Directory: " + di.RootDirectory + "
" +
               "ToString() Value: " + di + "
" +
               "Total Free Space: " + di.TotalFreeSpace + "
" +
               "Total Size: " + di.TotalSize + "
" +
               "Volume Label: " + di.VolumeLabel, di.Name +
               " DRIVE INFO");
        }
    }
}
The first step is to bring in the System.IO namespace with the using keyword. Within the Form1_Load event, you use the DriveInfo class to get a list of all the available drives on the system. This is done using an array of DriveInfo objects and populating this array with the DriveInfo.GetDrives method. Then using a foreach loop, you are able to iterate through each drive found and populate the list box with the results. This produces something similar to what is shown in Figure 24-14.
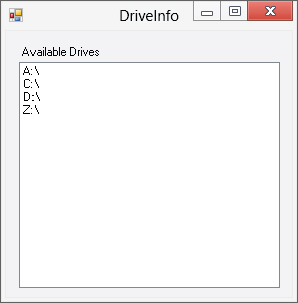
This form enables the end user to select one of the drives in the list. After a drive is selected, a message box appears that contains details about that drive. Figure 29-14 shows a computer with four drives. Selecting a couple of these drives produces the message boxes collectively shown in Figure 24-15.

From here, you can see that these message boxes provide details about three entirely different drives. The first, drive C:, is a hard drive, and the message box shows its drive type as Fixed. The second drive, drive D:, is a CD/DVD drive. The third drive, drive E:, is a USB pen and is labeled with a Removable drive type.
FILE SECURITY
When the .NET Framework 1.0/1.1 was first introduced, it didn’t provide a way to easily access and work with access control lists (ACLs) for files, directories, and registry keys. To do such things at that time usually meant some work with COM interop, thus also requiring a more advanced programming knowledge of working with ACLs.
That changed considerably after the release of the .NET Framework 2.0, which made the process of working with ACLs much easier with a namespace — System.Security.AccessControl. With this namespace, it is possible to manipulate security settings for files, registry keys, network shares, Active Directory objects, and more.
Reading ACLs from a File
For an example of working with System.Security.AccessControl, this section looks at working with the ACLs for both files and directories. It starts by examining how you review the ACLs for a particular file. This example is accomplished in a console application and is illustrated here:
using System;
using System.IO;
using System.Security.AccessControl;
using System.Security.Principal;

namespace ReadingACLs
{
    internal class Program
    {
        private static string myFilePath;

        private static void Main()
        {
            Console.Write("Provide full file path: ");
            myFilePath = Console.ReadLine();

            try
            {
                using (FileStream myFile =
                   new FileStream(myFilePath, FileMode.Open, FileAccess.Read))
                {
                    FileSecurity fileSec = myFile.GetAccessControl();

                    foreach (FileSystemAccessRule fileRule in
                        fileSec.GetAccessRules(true, true,
                           typeof (NTAccount)))
                    {
                        Console.WriteLine("{0} {1} {2} access for {3}",
                           myFilePath,
                           fileRule.AccessControlType ==
                           AccessControlType.Allow
                              ? "provides": "denies",
                              fileRule.FileSystemRights,
                              fileRule.IdentityReference);
                    }
                }
            }
            catch
            {
                Console.WriteLine("Incorrect file path given!");
            }

            Console.ReadLine();
        }
    }
}
For this example to work, the first step is to refer to the System.Security.AccessControl namespace. This gives you access to the FileSecurity and FileSystemAccessRule classes later in the program.
After the specified file is retrieved and placed in a FileStream object, the ACLs of the file are grabbed using the GetAccessControl method now found on the File object. This information from the GetAccessControl method is then placed in a FileSecurity class, which has access rights to the referenced item. Each individual access right is then represented by a FileSystemAccessRule object. That is why a foreach loop is used to iterate through all the access rights found in the created FileSecurity object.
Running this example with a simple text file in the root directory produces something similar to the following results:
Provide full file path: C:Sample.txt
C:Sample.txt provides FullControl access for BUILTINAdministrators
C:Sample.txt provides FullControl access for NT AUTHORITYSYSTEM
C:Sample.txt provides ReadAndExecute, Synchronize access for BUILTINUsers
C:Sample.txt provides Modify, Sychronize access for
      NT AUTHORITYAuthenticated Users
Reading ACLs from a Directory
Reading ACL information about a directory instead of an actual file is not much different from the preceding example, as shown here:
using System;
using System.IO;
using System.Security.AccessControl;
using System.Security.Principal;

namespace ConsoleApplication1
{
    internal class Program
    {
        private static string mentionedDir;

        private static void Main()
        {
            Console.Write("Provide full directory path: ");
            mentionedDir = Console.ReadLine();

            try
            {
                DirectoryInfo myDir = new DirectoryInfo(mentionedDir);

                if (myDir.Exists)
                {
                    DirectorySecurity myDirSec = myDir.GetAccessControl();

                    foreach (FileSystemAccessRule fileRule in
                        myDirSec.GetAccessRules(true, true,
                                                typeof (NTAccount)))
                    {
                        Console.WriteLine("{0} {1} {2} access for {3}",
                           mentionedDir, fileRule.AccessControlType ==
                              AccessControlType.Allow
                              ? "provides": "denies",
                              fileRule.FileSystemRights,
                              fileRule.IdentityReference);
                    }
                }
            }
            catch
            {
                Console.WriteLine("Incorrect directory provided!");
            }

            Console.ReadLine();
        }
    }
}
The big difference with this example is that it uses the DirectoryInfo class, which now also includes the GetAccessControl method to pull information about the directory’s ACLs. Running this example produces the following results when using Windows 8:
Provide full directory path: C:Test
C:Test provides FullControl access for BUILTINAdministrators
C:Test provides 268435456 access for BUILTINAdministrators
C:Test provides FullControl access for NT AUTHORITYSYSTEM
C:Test provides 268435456 access for NT AUTHORITYSYSTEM
C:Test provides ReadAndExecute, Synchronize access for BUILTINUsers
C:Test provides Modify, Synchronize access for
         NT AUTHORITYAuthenticated Users
C:Test provides -536805376 access for NT AUTHORITYAuthenticated Users
The final thing you will look at when working with ACLs is using the new System.Security.AccessControl namespace to add and remove items to and from a file’s ACL.
Adding and Removing ACLs from a File
It is also possible to manipulate the ACLs of a resource using the same objects that were used in earlier examples. The following code changes a previous code example in which a file’s ACL information was read. Here, the ACLs are read for a specified file, changed, and then read again:
try
{
   using (FileStream myFile = new FileStream(myFilePath,
      FileMode.Open, FileAccess.ReadWrite))
   {
      FileSecurity fileSec = myFile.GetAccessControl();

      Console.WriteLine("ACL list before modification:");

      foreach (FileSystemAccessRule fileRule in
         fileSec.GetAccessRules(true, true,
          typeof(System.Security.Principal.NTAccount)))
      {
         Console.WriteLine("{0} {1} {2} access for {3}", myFilePath,
            fileRule.AccessControlType == AccessControlType.Allow ?
            "provides": "denies",
            fileRule.FileSystemRights,
            fileRule.IdentityReference);
      }

      Console.WriteLine();
      Console.WriteLine("ACL list after modification:");

      FileSystemAccessRule newRule = new FileSystemAccessRule(
         new System.Security.Principal.NTAccount(@"PUSHKINTuija"),
         FileSystemRights.FullControl,
         AccessControlType.Allow);

      fileSec.AddAccessRule(newRule);
      File.SetAccessControl(myFilePath, fileSec);

      foreach (FileSystemAccessRule fileRule in
         fileSec.GetAccessRules(true, true,
         typeof(System.Security.Principal.NTAccount)))
      {
         Console.WriteLine("{0} {1} {2} access for {3}", myFilePath,
            fileRule.AccessControlType == AccessControlType.Allow ?
            "provides": "denies",
            fileRule.FileSystemRights,
            fileRule.IdentityReference);
      }
   }
}
In this case, a new access rule is added to the file’s ACL. This is done by using the FileSystemAccessRule object. The FileSystemAccessRule class is an abstraction access control entry (ACE) instance. The ACE defines the user account to use, the type of access to which user account applies, and whether this access is allowed or denied. In creating a new instance of this object, a new NTAccount is created and given Full Control to the file. Even though a new NTAccount is created, it must still reference an existing user. Then the AddAccessRule method of the FileSecurity class is used to assign the new rule. From there, the FileSecurity object reference is used to set the access control to the file in question using the SetAccessControl method of the File class.
Next, the file’s ACL is listed again. The following is an example of what the preceding code could produce:
Provide full file path: C:UsersBillSample.txt
ACL list before modification:
C:Sample.txt provides FullControl access for NT AUTHORITYSYSTEM
C:Sample.txt provides FullControl access for BUILTINAdministrators
C:Sample.txt provides FullControl access for PUSHKINBill

ACL list after modification:
C:Sample.txt provides FullControl access for PUSHKINTuija
C:Sample.txt provides FullControl access for NT AUTHORITYSYSTEM
C:Sample.txt provides FullControl access for BUILTINAdministrators
C:Sample.txt provides FullControl access for PUSHKINBill
To remove a rule from the ACL list, not much needs to be done to the code. In the previous code example, you simply need to change the line
fileSec.AddAccessRule(newRule);to the following to remove the rule that was just added:
fileSec.RemoveAccessRule(newRule);READING AND WRITING TO THE REGISTRY
In all versions of Windows since Windows 95, the registry has been the central repository for all configuration information relating to Windows setup, user preferences, and installed software and devices. Almost all commercial software these days uses the registry to store information about itself, and any COM component must place information about itself in the registry in order to be called by clients. The .NET Framework and its accompanying concept of zero-impact installation has slightly reduced the significance of the registry for applications in the sense that assemblies are entirely self-contained; no information about particular assemblies needs to be placed in the registry, even for shared assemblies. In addition, the .NET Framework uses the concept of isolated storage — applications can store information that is particular to each user in files; and it ensures that data is stored separately for each user registered on a machine.
The fact that applications can now be installed using the Windows Installer also frees developers from some of the direct manipulation of the registry that used to be involved in installing applications. However, despite this, the possibility exists that if you distribute any complete application, the application will use the registry to store information about its configuration. For instance, if you want your application to appear in the Add/Remove Programs dialog in the control panel, that involves appropriate registry entries. You may also need to use the registry for backward compatibility with legacy code.
As you would expect from a library as comprehensive as the .NET library, it includes classes that give you access to the registry. Two classes are concerned with the registry, and both are in the Microsoft.Win32 namespace: Registry and RegistryKey. Before examining these classes, the following section briefly reviews the registry’s structure itself.
The Registry
The registry has a hierarchical structure much like that of the file system. The usual way to view or modify the contents of the registry is with one of two utilities: regedit or regedt32. Of these, regedit is standard with all versions of Windows since Windows 95. regedt32 is included with Windows NT and Windows 2000; it is less user-friendly than regedit but allows access to security information that regedit is unable to view. Windows Server 2003 merged regedit and regedt32 into a single new editor simply called regedit. The following example uses regedit from Windows 7, which you can launch by typing regedit in the Run dialog or at the command prompt.
Figure 24-16 shows the window that appears when you launch regedit for the first time.
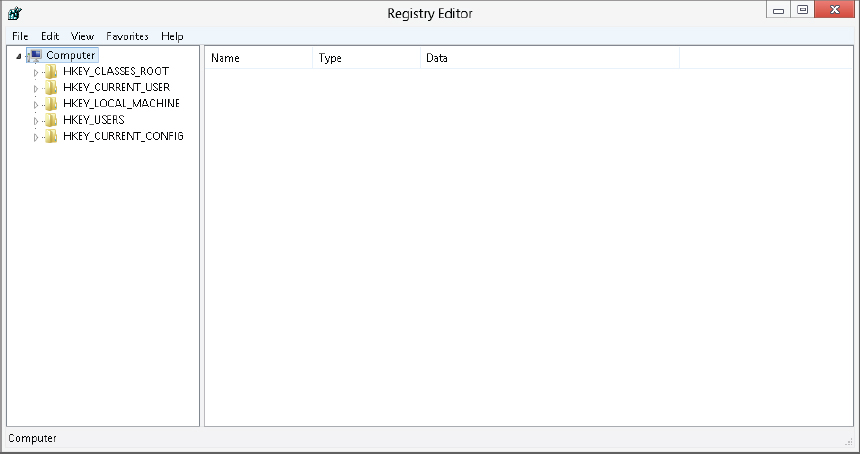
regedit has a tree view/list view–style user interface similar to Windows Explorer, which matches the hierarchical structure of the registry itself. However, you will see some key differences shortly.
In a file system, the topmost-level nodes can be thought of as being the partitions on your disks, C:, D:, and so on. In the registry, the equivalent to a partition is the registry hive. It is not possible to change the existing hives — they are fixed, and there are seven of them, although only five are actually visible through regedit:
- HKEY_CLASSES_ROOT (HKCR) contains details of types of files on the system (.txt, .doc, and so on) and which applications are able to open files of each type. It also contains registration information for all COM components (this latter area is usually the largest single area of the registry because Windows now includes a huge number of COM components).
- HKEY_CURRENT_USER (HKCU) contains details of user preferences for the user currently logged on to the machine locally. These settings include desktop settings, environment variables, network and printer connections, and other settings that define the operating environment of the user.
- HKEY_LOCAL_MACHINE (HKLM) is a huge hive that contains details of all software and hardware installed on the machine. These settings are not user-specific but for all users that log on to the machine. This hive also includes the HKCR hive; HKCR is actually not an independent hive in its own right but simply a convenient mapping onto the registry key HKLM/SOFTWARE/Classes.
- HKEY_USERS (HKUSR) contains details of user preferences for all users. As you might guess, it also contains the HKCU hive, which is simply a mapping onto one of the keys in HKEY_USERS.
- HKEY_CURRENT_CONFIG (HKCF) contains details of hardware on the machine.
The remaining two keys contain information that is temporary and changes frequently:
- HKEY_DYN_DATA is a general container for any volatile data that needs to be stored somewhere in the registry.
- HKEY_PERFORMANCE_DATA contains information concerning the performance of running applications.
Within the hives is a tree structure of registry keys. Each key is in many ways analogous to a folder or file on the file system. However, there is one very important difference: The file system distinguishes between files (which are there to contain data) and folders (which are primarily there to contain other files or folders), but in the registry there are only keys. A key may contain both data and other keys.
If a key contains data, it will be presented as a series of values. Each value has an associated name, data type, and data. In addition, a key can have a default value, which is unnamed.
You can see this structure by using regedit to examine registry keys. Figure 24-17 shows the contents of the key HKCUControl PanelAppearance, which contains details about the chosen color scheme of the currently logged-in user. regedit shows which key is being examined by displaying it with an open folder icon in the tree view.

The HKCUControl PanelAppearance key has three named values set, although the default value does not contain any data. The column in the screenshot marked Type details the data type of each value. Registry entries can be formatted as one of three data types:
- REG_SZ (which roughly corresponds to a .NET string instance; the matching is not exact because the registry data types are not .NET data types)
- REG_DWORD (corresponds roughly to uint)
- REG_BINARY (array of bytes)
An application that stores data in the registry does so by creating a number of registry keys, usually under the key HKLMSoftware<CompanyName>. Note that it is not necessary for these keys to contain any data. Sometimes the very fact that a key exists provides the data that an application needs.
The .NET Registry Classes
Access to the registry is available through two classes in the Microsoft.Win32 namespace: Registry and RegistryKey. A RegistryKey instance represents a registry key. This class implements methods to browse child keys, to create new keys, or to read or modify the values in the key — in other words, to do everything you would normally want to do with a registry key, including setting the security levels for the key. RegistryKey is the class you will likely use for much of your work with the registry. Registry, by contrast, is a class that enables singular access to registry keys for simple operations. Another role of the Registry class is simply to provide you with RegistryKey instances that represent the top-level keys, the different hives, to enable you to navigate the registry. Registry provides these instances through static properties, of which there are seven; they are called, respectively, ClassesRoot, CurrentConfig, CurrentUser, DynData, LocalMachine, PerformanceData, and Users. It should be obvious which property corresponds to which hive.
Therefore, for example, to obtain a RegistryKey instance that represents the HKLM key, you would use the following:
RegistryKey hklm = Registry.LocalMachine;The process of obtaining a reference to a RegistryKey object is known as opening the key.
Although you might expect that the methods exposed by RegistryKey would be similar to those implemented by DirectoryInfo, given that the registry has a similar hierarchical structure to the file system, this actually isn’t the case. Often, the way that you access the registry is different from the way that you would use files and folders, and RegistryKey implements methods that reflect this.
The most obvious difference is how you open a registry key at a given location in the registry. The Registry class does not have any public constructor that you can use, nor does it have any methods that provide direct access to a key, given its name. Instead, you are expected to browse down to that key from the top of the relevant hive. If you want to instantiate a RegistryKey object, the only way is to start off with the appropriate static property of Registry, and work down from there. For example, to read some data in the HKLM/Software/Microsoft key, you would get a reference to it like this:
RegistryKey hklm = Registry.LocalMachine;
RegistryKey hkSoftware = hklm.OpenSubKey("Software");
RegistryKey hkMicrosoft = hkSoftware.OpenSubKey("Microsoft");
A registry key accessed in this way gives you read-only access. If you want to write to the key (which includes writing to its values or creating or deleting direct children of it), you need to use another override to OpenSubKey, which takes a second parameter, of type bool, that indicates whether you want read-write access to the key. For example, in order to be able to modify the Microsoft key (and assuming that you are a system administrator with permission to do this), you would write this:
RegistryKey hklm = Registry.LocalMachine;
RegistryKey hkSoftware = hklm.OpenSubKey("Software");
RegistryKey hkMicrosoft = hkSoftware.OpenSubKey("Microsoft", true);
Incidentally, because this key contains information used by Microsoft’s applications, in most cases you probably shouldn’t be modifying this particular key.
The OpenSubKey method is the one you call if you are expecting the key to be present. If the key isn’t there, it returns a null reference. If you want to create a key, you should use the CreateSubKey method (which automatically gives you read-write access to the key through the reference returned):
RegistryKey hklm = Registry.LocalMachine;
RegistryKey hkSoftware = hklm.OpenSubKey("Software");
RegistryKey hkMine = hkSoftware.CreateSubKey("MyOwnSoftware");
The way that CreateSubKey works is quite interesting. It creates the key if it does not already exist; but if it does exist, it quietly returns a RegistryKey instance that represents the existing key. The reason why the method behaves in this manner is related to how you normally use the registry. The registry, overall, contains long-term data such as configuration information for Windows and various applications. It is not very common, therefore, to find yourself in a situation where you need to explicitly create a key.
What is much more common is for your application to ensure that some data is present in the registry — in other words, create the relevant keys if they do not already exist, but do nothing when they do. CreateSubKey fills that need perfectly. Unlike the situation with FileInfo.Open, for example, there is no chance that CreateSubKey will accidentally remove any data. If deleting registry keys is your intention, you need to call the RegistryKey.DeleteSubKey method. This makes sense given the importance of the registry to Windows. The last thing you want is to completely break Windows accidentally by deleting a couple of important keys while you are debugging your C# registry calls!
After you have located the registry key you want to read or modify, you can use the SetValue or GetValue methods to set or get the data in it. Both methods take a string, giving the name of the value as a parameter, and SetValue requires an additional object reference containing details about the value. Because the parameter is defined as an object reference, it can actually be a reference to any class you want. SetValue determines from the type of class actually supplied whether to set the value as a REG_SZ, REG_DWORD, or a REG_BINARY value. For example, the following code sets the key with two values:
RegistryKey hkMine = HkSoftware.CreateSubKey("MyOwnSoftware");
hkMine.SetValue("MyStringValue", "Hello World");
hkMine.SetValue("MyIntValue", 20);
Here, MyStringValue will be of type REG_SZ, and MyIntValue will be of type REG_DWORD. These are the only two types you will consider here and use in the example presented later.
RegistryKey.GetValue works in much the same way. It is defined to return an object reference, which means that it is free to actually return a string reference if it detects the value is of type REG_SZ, and an int if that value is of type REG_DWORD:
string stringValue = (string)hkMine.GetValue("MyStringValue");
int intValue = (int)hkMine.GetValue("MyIntValue");
Finally, after you finish reading or modifying the data, close the key:
hkMine.Close();RegistryKey implements a large number of methods and properties. The following table describes the most useful properties:
| PROPERTY | DESCRIPTION |
| Name | Name of the key (read-only) |
| SubKeyCount | The number of children of this key |
| ValueCount | How many values the key contains |
The following table describes the most useful methods:
| METHOD | DESCRIPTION |
| Close() | Closes the key |
| CreateSubKey() | Creates a subkey of a given name (or opens it if it already exists) |
| DeleteSubKey() | Deletes a given subkey |
| DeleteSubKeyTree() | Recursively deletes a subkey and all its children |
| DeleteValue() | Removes a named value from a key |
| GetAccessControl() | Returns the ACL for a specified registry key. This method was added in .NET Framework 2.0 |
| GetSubKeyNames() | Returns an array of strings containing the names of the subkeys |
| GetValue() | Returns a named value |
| GetValueKind() | Returns a named value whose registry data type is to be retrieved. This method was added in .NET Framework 2.0 |
| GetValueNames() | Returns an array of strings containing the names of all the values of the key |
| OpenSubKey() | Returns a reference to a RegistryKey instance that represents a given subkey |
| SetAccessControl() | Allows you to apply an ACL to a specified registry key |
| SetValue() | Sets a named value |
READING AND WRITING TO ISOLATED STORAGE
In addition to being able to read from and write to the registry, another option is reading and writing values to and from what is called isolated storage. If you are having issues writing to the registry or to disk in general, then isolated storage is where you should turn. You can use isolated storage to store application state or user settings quite easily.
Think of isolated storage as a virtual disk where you can save items that can be shared only by the application that created them, or with other application instances. There are two access types for isolated storage. The first is user and assembly.
When accessing isolated storage by user and assembly, there is a single storage location on the machine, which is accessible via multiple application instances. Access is guaranteed through the user identity and the application (or assembly) identity. This means that you can have multiple instances of the same application all working from the same store.
The second type of access for isolated storage is user, assembly, and domain. In this case, each application instance works off its own isolation store. In this case, the settings that each application instance records are related only to itself. This is a more fine-grained approach to isolated storage. For an example of using isolated storage from a Windows Forms application (although you can use this from an ASP.NET application just as well), you can use the ReadSettings and SaveSettings methods shown next to read and write values to isolated storage, rather than doing so directly in the registry.
To start, you need to rework the SaveSettings method. In order for this next bit of code to work, you need to add the following using directives:
using System.IO;
using System.IO.IsolatedStorage;
using System.Text;
The SaveSettings method is detailed in the following example:
void SaveSettings()
{
   IsolatedStorageFile storFile = IsolatedStorageFile.GetUserStoreForDomain();
   IsolatedStorageFileStream storStream = new
      IsolatedStorageFileStream("SelfPlacingWindow.xml",

      FileMode.Create, FileAccess.Write);

   System.Xml.XmlTextWriter writer = new
      System.Xml.XmlTextWriter(storStream, Encoding.UTF8);
   writer.Formatting = System.Xml.Formatting.Indented;

   writer.WriteStartDocument();
   writer.WriteStartElement("Settings");

   writer.WriteStartElement("BackColor");
   writer.WriteValue(BackColor.ToKnownColor().ToString());
   writer.WriteEndElement();

   writer.WriteStartElement("Red");
   writer.WriteValue(BackColor.R);
   writer.WriteEndElement();

   writer.WriteStartElement("Green");
   writer.WriteValue(BackColor.G);
   writer.WriteEndElement();

   writer.WriteStartElement("Blue");
   writer.WriteValue(BackColor.B);
   writer.WriteEndElement();

   writer.WriteStartElement("Width");
   writer.WriteValue(Width);
   writer.WriteEndElement();

   writer.WriteStartElement("Height");
   writer.WriteValue(Height);
   writer.WriteEndElement();

   writer.WriteStartElement("X");
   writer.WriteValue(DesktopLocation.X);
   writer.WriteEndElement();

   writer.WriteStartElement("Y");
   writer.WriteValue(DesktopLocation.Y);
   writer.WriteEndElement();

   writer.WriteStartElement("WindowState");
   writer.WriteValue(WindowState.ToString());
   writer.WriteEndElement();

   writer.WriteEndElement();

   writer.Flush();
   writer.Close();

   storStream.Close();
   storFile.Close();
}
It is a bit more code than you might be used to when working with the registry, but that is mainly due to the code required to build the XML document placed in isolated storage. The first important thing happening with this code is presented here:
   IsolatedStorageFile storFile = IsolatedStorageFile.GetUserStoreForDomain();
   IsolatedStorageFileStream storStream = new
      IsolatedStorageFileStream("SelfPlacingWindow.xml",
      FileMode.Create, FileAccess.Write);
Here, an instance of an IsolatedStorageFile is created using a user, assembly, and domain type of access. A stream is created using the IsolatedStorageFileStream object, which creates the virtual SelfPlacingWindow.xml file.
From there, an XmlTextWriter object is created to build the XML document, and the XML contents are written to the IsolatedStorageFileStream object instance:
   System.Xml.XmlTextWriter writer = new
      System.Xml.XmlTextWriter(storStream, Encoding.UTF8);
After the XmlTextWriter object is created, all the values are written to the XML document node by node. When everything is written to the XML document, everything is closed and stored in the isolated storage.
Reading from the storage is done through the ReadSettings method, shown here:
bool ReadSettings()
{
   IsolatedStorageFile storFile = IsolatedStorageFile.GetUserStoreForDomain();
   string[] userFiles = storFile.GetFileNames("SelfPlacingWindow.xml");

   foreach (string userFile in userFiles)
   {
      if(userFile == "SelfPlacingWindow.xml")
      {
         listBoxMessages.Items.Add("Successfully opened file " +
                                    userFile.ToString());

         StreamReader storStream =
            new StreamReader(new IsolatedStorageFileStream("SelfPlacingWindow.xml",
            FileMode.Open, storFile));
         System.Xml.XmlTextReader reader = new
            System.Xml.XmlTextReader(storStream);

         int redComponent = 0;
         int greenComponent = 0;
         int blueComponent = 0;

         int X = 0;
         int Y = 0;

         while (reader.Read())
         {
            switch (reader.Name)
            {
               case "Red":
                  redComponent = int.Parse(reader.ReadString());
                  break;
               case "Green":
                  greenComponent = int.Parse(reader.ReadString());
                  break;
               case "Blue":
                  blueComponent = int.Parse(reader.ReadString());
                  break;
               case "X":
                  X = int.Parse(reader.ReadString());
                  break;
               case "Y":
                  Y = int.Parse(reader.ReadString());
                  break;
               case "Width":
                  this.Width = int.Parse(reader.ReadString());
                  break;
               case "Height":
                  this.Height = int.Parse(reader.ReadString());
                  break;
               case "WindowState":
                  this.WindowState = (FormWindowState)FormWindowState.Parse
                    (WindowState.GetType(), reader.ReadString());
                  break;
               default:
                  break;
            }
         }

         this.BackColor =
            Color.FromArgb(redComponent, greenComponent, blueComponent);
         this.DesktopLocation = new Point(X, Y);

         listBoxMessages.Items.Add("Background color: " + BackColor.Name);
         listBoxMessages.Items.Add("Desktop location: " +
            DesktopLocation.ToString());
         listBoxMessages.Items.Add("Size: " + new Size(Width, Height).ToString());
         listBoxMessages.Items.Add("Window State: " + WindowState.ToString());

         storStream.Close();
         storFile.Close();
      }
   }
   return true;
}
Using the GetFileNames method, the SelfPlacingWindow.xml document is pulled from the isolated storage and then placed into a stream and parsed using the XmlTextReader object:
   IsolatedStorageFile storFile = IsolatedStorageFile.GetUserStoreForDomain();
   string[] userFiles = storFile.GetFileNames("SelfPlacingWindow.xml");

   foreach (string userFile in userFiles)
   {
      if(userFile == "SelfPlacingWindow.xml")
      {
         listBoxMessages.Items.Add("Successfully opened file " +
                                    userFile.ToString());

         StreamReader storStream =
            new StreamReader(new IsolatedStorageFileStream("SelfPlacingWindow.xml",
            FileMode.Open, storFile));
After the XML document is contained within the IsolatedStorageFileStream object, it is parsed using the XmlTextReader object:
         System.Xml.XmlTextReader reader = new
            System.Xml.XmlTextReader(storStream);
It is pulled from the stream via the XmlTextReader, and the element values are then pushed back into the application. You will find — as accomplished in the SelfPlacingWindow sample that used the registry to record and retrieve application state values — that using isolated storage is just as effective as working with the registry. The application remembers the color, size, and position just as before.
SUMMARY
In this chapter, you examined how to use the .NET base classes to access the file system and registry from your C# code. You have seen that in both cases the base classes expose simple but powerful object models that make it very easy to perform almost any kind of action in these areas. For the file system, these actions are copying files; moving, creating, and deleting files and folders; and reading and writing both binary and text files. For the registry, these are creating, modifying, or reading keys.
This chapter also reviewed isolated storage and how to use it from your applications to store information in the application state.
This chapter assumed that you were running your code from an account that has sufficient access rights to do whatever the code needs to do. Obviously, the question of security is an important one, as discussed in detail in Chapter 22.