
Chapter 23
Interop
WHAT’S IN THIS CHAPTER?
- COM and .NET technologies
- Using COM objects from within .NET applications
- Using .NET components from within COM clients
- Platform invoke for invoking native methods
WROX.COM CODE DOWNLOADS FOR THIS CHAPTER
The wrox.com code downloads for this chapter are found at http://www.wrox.com/remtitle.cgi?isbn=1118314425 on the Download Code tab. The code for this chapter is divided into the following major examples:
- COMServer
- DotnetServer
- PInvokeSample
.NET AND COM
If you have Windows programs written prior to .NET, you probably don’t have the time and resources to rewrite everything for .NET. Sometimes rewriting code is useful for refactoring or rethinking the application architecture. A rewrite can also help with productivity in the long term, when adding new features is easier to do with the new technology. However, there is no reason to rewrite old code just because a new technology is available. You might have thousands of lines of existing, running code, which would require too much effort to rewrite just to move it into the managed environment.
The same applies to Microsoft. With the namespace System.DirectoryServices, Microsoft hasn’t rewritten the COM objects accessing the hierarchical data store; the classes inside this namespace are wrappers accessing the ADSI COM objects instead. The same thing happens with System.Data.OleDb, where the OLE DB providers that are used by classes from this namespace do have quite complex COM interfaces.
The same issue may apply to your own solutions. If you have existing COM objects that should be used from .NET applications, or the other way around, if you want to write .NET components that should be used in old COM clients, this chapter is a starter for using COM interoperability (or interop).
If you don’t have existing COM components you want to integrate with your application, or old COM clients that should use some .NET components, you can skip this chapter.
The major namespace for this chapter is System.Runtime.InteropServices.
COM is the predecessor technology to .NET. COM defines a component model in which components can be written in different programming languages. A component written with C++ can be used from a Visual Basic client. Components can also be used locally inside a process, across processes, or across the network. Does this sound familiar? Of course, .NET has similar goals. However, the way in which these goals are achieved is different. The COM concepts became increasingly complex to use and turned out not to be extensible enough. .NET fulfills goals similar to those of COM but introduces new concepts to make your job easier.
Even today, when using COM interop the prerequisite is to know COM. It doesn’t matter whether .NET components are used by COM clients or whether COM components are used by .NET applications — you must know COM. Therefore, this section compares COM and .NET functionality.
If you already have a good grasp of COM technologies, this section may refresh your COM knowledge. Otherwise, it introduces you to the concepts of COM — which now, using .NET, you happily don’t have to deal with anymore in your daily work. However, all the problems that existed with COM still apply when COM technology is integrated into .NET applications.
COM and .NET do have many similar concepts, with very different approaches to using them, including the following:
- Metadata
- Freeing memory
- Interfaces
- Method binding
- Data types
- Registration
- Threading
- Error handling
- Event handling
These concepts, plus the marshaling mechanism, are covered in the following sections.
Metadata
With COM, all information about the component is stored inside the type library. The type library includes information such as names and IDs of interfaces, methods, and arguments. With .NET, all this information can be found inside the assembly itself, as shown in Chapter 15, “Reflection,” and Chapter 19, “Assemblies.” The problem with COM is that the type library is not extensible. With C++, IDL (Interface Definition Language) files have been used to describe the interfaces and methods. Some of the IDL modifiers cannot be found inside the type library, because Visual Basic (and the Visual Basic team was responsible for the type library) couldn’t use these IDL modifiers. With .NET, this problem doesn’t exist because the .NET metadata is extensible using custom attributes.
As a result of this behavior, some COM components have a type library and others don’t. When no type library is available, a C++ header file can be used that describes the interfaces and methods. With .NET, it is easier to use COM components that do have a type library, but it is also possible to use COM components without a type library. In that case, it is necessary to redefine the COM interface by using C# code.
Freeing Memory
With .NET, memory is released by the garbage collector. This is completely different with COM. COM relies on reference counts. The interface IUnknown, which is the interface required to be implemented by every COM object, offers three methods. Two of these methods are related to reference counts. The method AddRef must be called by the client if another interface pointer is needed; this method increments the reference count. The method Release decrements the reference count, and if the resulting reference count is 0, the object destroys itself to free the memory.
Interfaces
Interfaces are the heart of COM. They distinguish between a contract used between the client and the object, and the implementation. The interface (the contract) defines the methods that are offered by the component and that can be used by the client. With .NET, interfaces play an important part, too. COM distinguishes among three interface types: custom, dispatch, and dual.
Custom Interfaces
Custom interfaces derive from the interface IUnknown. A custom interface defines the order of the methods in a virtual table (vtable), so that the client can access the methods of the interface directly. This also means that the client needs to know the vtable during development time, because binding to the methods happens by using memory addresses. As a result, custom interfaces cannot be used by scripting clients. Figure 23-1 shows the vtable of the custom interface IMath, which provides the methods Add and Sub in addition to the methods of the IUnknown interface.

Dispatch Interfaces
Because a scripting client (and earlier Visual Basic clients) doesn’t support custom interfaces, a different interface type is needed. With dispatch interfaces, the interface available for the client is always IDispatch. IDispatch derives from IUnknown and offers four methods in addition to the IUnknown methods. The two most important methods are GetIDsOfNames and Invoke. As shown in Figure 23-2, with a dispatch interface two tables are needed. The first one maps the method or property name to a dispatch ID; the second one maps the dispatch ID to the implementation of the method or property.

When the client invokes a method in the component, it first calls the method GetIDsOfNames, passing the name of the method it wants to call. GetIDsOfNames makes a lookup into the name-to-ID table to return the dispatch ID. This ID is used by the client to call the Invoke method.
Dual Interfaces
As you can imagine, on the one hand, dispatch interfaces are a lot slower than custom interfaces. On the other hand, custom interfaces cannot be used by scripting clients. A dual interface can solve this dilemma. As shown in Figure 23-3, a dual interface is derived from IDispatch but provides the additional methods of the interface directly in the vtable. Scripting clients can use the IDispatch interface to invoke the Add and Sub methods, whereas clients aware of the vtable can call the Add and Sub methods directly.

Casting and QueryInterface
If a .NET class implements multiple interfaces, casts can be done to get one interface or another. With COM, the interface IUnknown offers a similar mechanism with the method QueryInterface. As discussed in the previous section, the interface IUnknown is the base interface of every interface, so QueryInterface is available anyway.
Method Binding
How a client maps to a method is defined with the terms early binding and late binding. Late binding means that the method to invoke is looked for during runtime. .NET uses the System.Reflection namespace to make this possible (see Chapter 15). COM uses the IDispatch interface discussed earlier for late binding. Late binding is possible with dispatch and dual interfaces.
With COM, early binding has two different options. One way of early binding, also known as vtable binding, is to use the vtable directly — this is possible with custom and dual interfaces. The second option for early binding is also known as ID binding. Here, the dispatch ID is stored inside the client code, so during runtime only a call to Invoke is necessary. GetIdsOfNames is called during design time. With such clients, it is important to remember that the dispatch ID must not be changed.
Data Types
For dual and dispatch interfaces, the data types that can be used with COM are restricted to a list of automation-compatible data types. The Invoke method of the IDispatch interface accepts an array of VARIANT data types. The VARIANT is a union of many different data types, such as BYTE, SHORT, LONG, FLOAT, DOUBLE, BSTR, IUnknown*, IDispatch*, and so on. VARIANTs have been easy to use from Visual Basic, but it was complex to use them from C++. .NET has the Object class instead of VARIANTs.
With custom interfaces, all data types available with C++ can be used with COM. However, this also restricts the clients that can use this component to certain programming languages.
Registration
.NET distinguishes between private and shared assemblies, as discussed in Chapter 19. With COM, all components are globally available through a registry configuration.
All COM objects have a unique identifier that consists of a 128-bit number, also known as a class ID (CLSID). The COM API call to create COM objects, CoCreateInstance, just looks into the registry to find the CLSID and the path to the DLL or EXE to load the DLL or launch the EXE and instantiate the component.
Because such a 128-bit number cannot be easily remembered, many COM objects also have a ProgID. The ProgID is an easy-to-remember name, such as Excel.Application, that just maps to the CLSID.
In addition to the CLSID, COM objects also have a unique identifier for each interface (IID) and for the type library (typelib ID). Information in the registry is discussed in more detail later in the chapter.
Threading
COM uses apartment models to relieve the programmer of having to deal with threading issues. However, this also adds some more complexity. Different apartment types have been added with different releases of the operating system. This section discusses the single-threaded apartment and the multithreaded apartment.
Single-Threaded Apartment
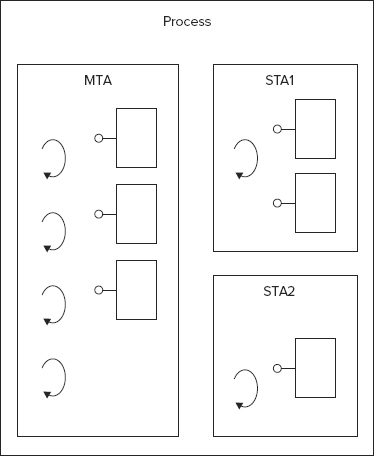
The single-threaded apartment (STA) was introduced with Windows NT 3.51. With an STA, only one thread (the thread that created the instance) is allowed to access the component. However, it is legal to have multiple STAs inside one process, as shown in Figure 23-4.

In this figure, the inner rectangles with the lollipop represent COM components. Components and threads (curved arrows) are surrounded by apartments. The outer rectangle represents a process.
With STAs, there’s no need to protect instance variables from multiple-thread access, because this protection is provided by a COM facility, and only one thread accesses the component.
A COM object that is not programmed with thread safety marks the requirements for an STA in the registry with the registry key ThreadingModel set to Apartment.
Multithreaded Apartment
Windows NT 4.0 introduced the concept of a multithreaded apartment (MTA). With an MTA, multiple threads can access the component simultaneously. Figure 23-5 shows a process with one MTA and two STAs.
A COM object programmed with thread safety in mind marks the requirement for an MTA in the registry with the key ThreadingModel set to Free. The value Both is used for thread-safe COM objects that don’t mind the apartment type.
Error Handling
With .NET, errors are generated by throwing exceptions. With the older COM technology, errors are defined by returning HRESULT values with the methods. An HRESULT value of S_OK means that the method was successful.
If a more detailed error message is offered by the COM component, the COM component implements the interface ISupportErrorInfo, whereby not only an error message but also a link to a help file and the source of the error are returned with an error information object on the return of the method. Objects that implement ISupportErrorInfo are automatically mapped to more detailed error information with an exception in .NET.
Events
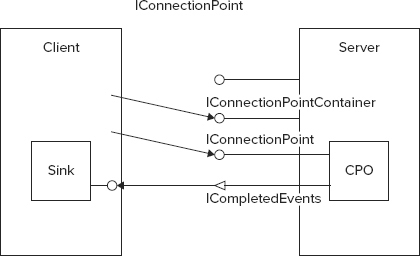
.NET offers a callback mechanism with the C# keywords event and delegate (see Chapter 8, “Delegates, Lambdas, and Events”). Figure 23-6 shows the COM event-handling architecture. With COM events, the component has to implement the interface IConnectionPointContainer and one or more connection point objects (CPOs) that implement the interface IConnectionPoint. The component also defines an outgoing interface — ICompletedEvents in Figure 23-6 — that is invoked by the CPO. The client must implement this outgoing interface in the sink object, which itself is a COM object. During runtime, the client queries the server for the interface IConnectionPointContainer. With the help of this interface, the client asks for a CPO by invoking the method FindConnectionPoint. The method FindConnectionPoint returns a pointer to IConnectionPoint. This interface pointer is used by the client to call the Advise method, where a pointer to the sink object is passed to the server. In turn, the component.
Later in this chapter, you learn how the .NET events and the COM events can be mapped so that COM events can be handled by a .NET client and vice versa.
Marshaling
Data passed from .NET to the COM component and the other way around must be converted to the corresponding representation. This mechanism is known as marshaling. What happens here depends on the data type of the data that is passed: you have to differentiate between blittable and nonblittable data types.
Blittable data types have a common representation with both .NET and COM, and no conversion is needed. Simple data types such as byte, short, int, long, and classes and arrays that contain only these simple data types belong to the blittable data types. Arrays must be one-dimensional to be blittable.
A conversion is needed with nonblittable data types. The following table lists some of the nonblittable COM data types with their .NET-related data types. Nonblittable types have a higher overhead because of the conversion.
| COM DATA TYPE | .NET DATA TYPE |
| SAFEARRAY | Array |
| VARIANT | Object |
| BSTR | String |
| IUnknown* IDispatch* |
Object |
USING A COM COMPONENT FROM A .NET CLIENT
To see how a .NET application can use a COM component, you first have to create a COM component. Creating COM components is not possible with C# or Visual Basic 2012; you need either Visual Basic 6.0 or C++ (or any other language that supports COM). This chapter uses the Active Template Library (ATL) and C++ with Visual Studio 2012.
Here we will begin by creating a simple COM component and use this from a runtime callable wrapper (RCW). We will also use the component with the new C# 4 dynamic language extensions. Threading issues are discussed, and finally COM connection points are mapped to .NET events.
Creating a COM Component
To create a COM component with ATL and C++, create a new ATL Project. You can find the ATL Project Wizard within the Visual C++ Projects group when you select File ⇒ New Project. Set the name to COMServer. Within the Application Settings, select Dynamic Link Library and click Finish.
The ATL Project Wizard just creates the foundation for the server. A COM object is still needed. Add a class in Solution Explorer and select ATL Simple Object. In the dialog that appears, enter COMDemo in the Short name field. The other fields will be filled in automatically, but change the interface name to IWelcome and the ProgID to COMServer.COMDemo (see Figure 23-7). Click Finish to create the stub code for the class and the interface.

The COM component offers two interfaces so that you can see how QueryInterface is mapped from .NET, and just three simple methods so that you can see how the interaction takes place. In class view, select the interface IWelcome and add the method Greeting (see Figure 23-8) with the following parameters:
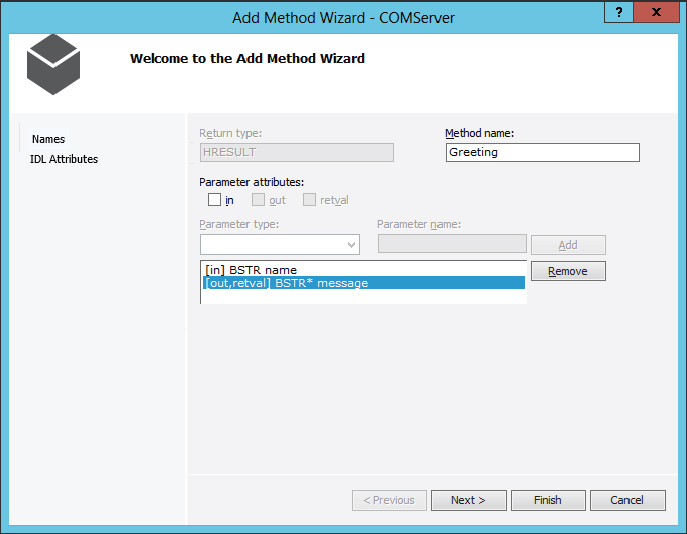
HRESULT Greeting([in] BSTR name, [out, retval] BSTR* message);The IDL file COMServer.idl defines the interface for COM. Your wizard-generated code from the file COMServer.idl should look similar to the following code. The unique identifiers (uuids) will differ. The interface IWelcome defines the Greeting method. The brackets before the keyword interface define some attributes for the interface. uuid defines the interface ID and dual marks the type of the interface (code file COMServer/COMServer.idl):
[
  object,
  uuid(AF05C6E6-BF95-411F-B2FA-531D911C5C5C),
  dual,
  nonextensible,
  pointer_default(unique)
]
interface IWelcome : IDispatch{
  [id(1)] HRESULT Greeting([in] BSTR name, [out,retval] BSTR* message);
};
The IDL file also defines the content of the type library, which is the COM object (coclass) that implements the interface IWelcome:
[
  uuid(8FCA0342-FAF3-4481-9D11-3BC613A7F5C6),
  version(1.0),
]
library COMServerLib
{
  importlib("stdole2.tlb");
  [
    uuid(9015EDE5-D106-4005-9998-DE44849EFA3D)
  ]
  coclass COMDemo
  {
    [default] interface IWelcome;
  };
};Add the custom attribute with the same identifier and the name Wrox.ProCSharp.Interop.Server.IWelcome to the header section of the IWelcome interface. Add the same attribute with a corresponding name to the coclass COMDemo:
[
  object,
  uuid(EB1E5898-4DAB-4184-92E2-BBD8F9341AFD),
  dual,
  nonextensible,
  pointer_default(unique),
  custom(0F21F359-AB84-41e8-9A78-36D110E6D2F9,
  "Wrox.ProCSharp.Interop.Server.IWelcome")
]
interface IWelcome : IDispatch{
  [id(1)] HRESULT Greeting([in] BSTR name, [out,retval] BSTR* message);
};
[
  uuid(8C123EAE-F567-421F-ACBE-E11F89909160),
  version(1.0),
]
library COMServerLib
{
  importlib("stdole2.tlb");
  [
    uuid(ACB04E72-EB08-4D4A-91D3-34A5DB55D4B4),
    custom(0F21F359-AB84-41e8-9A78-36D110E6D2F9,
    "Wrox.ProCSharp.Interop.Server.COMDemo")
  ]
  coclass COMDemo
  {
    [default] interface IWelcome;
  };
};
Now add a second interface to the file COMServer.idl. You can copy the header section of the IWelcome interface to the header section of the new IMath interface, but be sure to change the unique identifier that is defined with the uuid keyword. You can generate such an ID with the guidgen utility. The interface IMath offers the methods Add and Sub:
// IMath
[
    object,
    uuid(2158751B-896E-461d-9012-EF1680BE0628),
    dual,
    nonextensible,
    pointer_default(unique),
    custom(0F21F359-AB84-41e8-9A78-36D110E6D2F9,
    "Wrox.ProCSharp.Interop.Server.IMath")
]
interface IMath: IDispatch
{
    [id(1)] HRESULT Add([in] LONG val1, [in] LONG val2,
                        [out, retval] LONG* result);
    [id(2)] HRESULT Sub([in] LONG val1, [in] LONG val2,
                        [out, retval] LONG* result);
};
The coclass COMDemo must also be changed so that it implements both the interfaces IWelcome and Math. The IWelcome interface is the default interface:
    importlib("stdole2.tlb");
    [
        uuid(ACB04E72-EB08-4D4A-91D3-34A5DB55D4B4),
        helpstring("COMDemo Class"),
        custom(0F21F359-AB84-41e8-9A78-36D110E6D2F9,
        "Wrox.ProCSharp.Interop.Server.COMDemo")
    ]
    coclass COMDemo
    {
        [default] interface IWelcome;
        interface IMath;
    };
Now, you can set the focus away from the IDL file toward the C++ code. In the file COMDemo.h is the class definition of the COM object. The class CCOMDemo uses multiple inheritances to derive from the template classes CComObjectRootEx, CComCoClass, and IDisplatchImpl. The CComObjectRootEx class offers an implementation of the IUnknown interface functionality such as implementation of the AddRef and Release methods. The CComCoClass class creates a factory that instantiates objects of the template argument, which here is CComDemo. IDispatchImpl offers an implementation of the methods from the IDispatch interface.
With the macros that are surrounded by BEGIN_COM_MAP and END_COM_MAP, a map is created to define all the COM interfaces that are implemented by the COM class. This map is used by the implementation of the QueryInterface method (code file COMServer/COMDemo.h):
class ATL_NO_VTABLE CCOMDemo:
   public CComObjectRootEx<CComSingleThreadModel>,
   public CComCoClass<CCOMDemo, &CLSID_COMDemo>,
   public IDispatchImpl<IWelcome, &IID_IWelcome, &LIBID_COMServerLib,
      /*wMajor =*/ 1, /*wMinor =*/ 0>
{
public:
  CCOMDemo()
  {
  }

DECLARE_REGISTRY_RESOURCEID(IDR_COMDEMO)

BEGIN_COM_MAP(CCOMDemo)
   COM_INTERFACE_ENTRY(IWelcome)
   COM_INTERFACE_ENTRY(IDispatch)
END_COM_MAP()

  DECLARE_PROTECT_FINAL_CONSTRUCT()

  HRESULT FinalConstruct()
  {
    return S_OK;
  }

  void FinalRelease()
  {
  }

public:
  STDMETHOD(Greeting)(BSTR name, BSTR* message);
};

OBJECT_ENTRY_AUTO(__uuidof(COMDemo), CCOMDemo)
With this class definition, you have to add the second interface, IMath, as well as the methods that are defined with the IMath interface:
class ATL_NO_VTABLE CCOMDemo:
  public CComObjectRootEx<CComSingleThreadModel>,
  public CComCoClass<CCOMDemo, &CLSID_COMDemo>,
  public IDispatchImpl<IWelcome, &IID_IWelcome, &LIBID_COMServerLib,
      /*wMajor =*/ 1, /*wMinor =*/ 0>
  public IDispatchImpl<IMath, &IID_IMath, &LIBID_COMServerLib, 1, 0>
{
public:
  CCOMDemo()
  {
  }

DECLARE_REGISTRY_RESOURCEID(IDR_COMDEMO)

BEGIN_COM_MAP(CCOMDemo)
  COM_INTERFACE_ENTRY(IWelcome)
  COM_INTERFACE_ENTRY(IMath)
  COM_INTERFACE_ENTRY2(IDispatch, IWelcome)
END_COM_MAP()

  DECLARE_PROTECT_FINAL_CONSTRUCT()

  HRESULT FinalConstruct()
  {
    return S_OK;
  }

  void FinalRelease()
  {
  }

public:
  STDMETHOD(Greeting)(BSTR name, BSTR* message);
  STDMETHOD(Add)(long val1, long val2, long* result);
  STDMETHOD(Sub)(long val1, long val2, long* result);
};

OBJECT_ENTRY_AUTO(__uuidof(COMDemo), CCOMDemo)
Now you can implement the three methods in the file COMDemo.cpp with the following code. The CComBSTR is an ATL class that makes it easier to deal with BSTRs. In the Greeting method, only a welcome message is returned, which adds the name passed in the first argument to the message that is returned. The Add method just does a simple addition of two values, and the Sub method does a subtraction and returns the result (code file COMServer/COMDemo.cpp):
STDMETHODIMP CCOMDemo::Greeting(BSTR name, BSTR* message)
{
  CComBSTR tmp("Welcome, ");
  tmp.Append(name);
  *message = tmp;
  return S_OK;
}

STDMETHODIMP CCOMDemo::Add(LONG val1, LONG val2, LONG* result)
{
  *result = val1 + val2;
  return S_OK;
}

STDMETHODIMP CCOMDemo::Sub(LONG val1, LONG val2, LONG* result)
{
  *result = val1 - val2;
  return S_OK;
}
Now you can build the component. The build process also configures the component in the registry.
Creating a Runtime Callable Wrapper
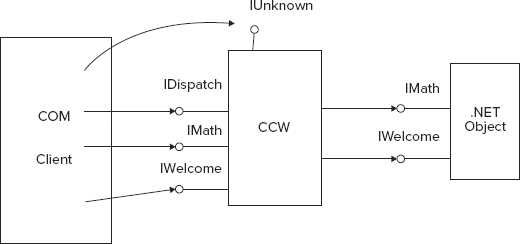
To use the COM component from within .NET, you must create a runtime callable wrapper (RCW). Using the RCW, the .NET client sees a .NET object instead of the COM component; there is no need to deal with the COM characteristics because this is done by the wrapper. An RCW hides the IUnknown and IDispatch interfaces (see Figure 23-9) and deals itself with the reference counts of the COM object.

The RCW can be created by using the command-line utility tlbimp or by using Visual Studio. Starting the command:
tlbimp COMServer.dll /out:Interop.COMServer.dllcreates the file Interop.COMServer.dll, which contains a .NET assembly with the wrapper class. In this generated assembly, you can find the namespace COMWrapper with the class CCOMDemoClass and the interfaces CCOMDemo, IMath, and IWelcome. The name of the namespace can be changed by using options of the tlbimp utility. The option /namespace enables you to specify a different namespace, and with /asmversion you can define the version number of the assembly.
An RCW can also be created by using Visual Studio. To create a simple sample application, create a C# console project. In Solution Explorer, add a reference to the COM server by selecting the COM tab in the Add Reference dialog, and scroll down to the entry COMServerLib. Here are listed all COM objects that are configured in the registry. Selecting a COM component from the list creates an RCW class. With Visual Studio 2012, this wrapper class can be created in the main assembly of the project by setting the property Embed Interop Types to true, which is the default. Setting it to false creates a separate interop assembly that needs to be deployed with the application.
Using the RCW
After creating the wrapper class, you can write the code for the application to instantiate and access the component. Because of the custom attributes in the C++ file, the generated namespace of the RCW class is Wrox.ProCSharp.COMInterop.Server. Add this namespace, as well as the namespace System.Runtime.InteropServices, to the declarations. From the namespace System.Runtime.InteropServices, the Marshal class will be used to release the COM object (code file DotnetClient/Program.cs):
using System;
using System.Runtime.InteropServices;
using Wrox.ProCSharp.Interop.Server

namespace Wrox.ProCSharp.Interop.Client
{
  class Program
  {
    [STAThread]
    static void Main()
    {
Now the COM component can be used similarly to a .NET class. obj is a variable of type COMDemo. COMDemo is a .NET interface that offers the methods of both the IWelcome and IMath interfaces. However, it is also possible to cast to a specific interface such as IWelcome. With a variable that is declared as type IWelcome, the method Greeting can be called:
      var obj = new COMDemo();
      IWelcome welcome = obj;
Console.WriteLine(welcome.Greeting("Stephanie"));If the object offers multiple interfaces, as it does in this case, a variable of the other interface can be declared; and by using a simple assignment with the cast operator, the wrapper class does a QueryInterface with the COM object to return the second interface pointer. With the I Math variable, the methods of the IMath interface can be called:
         IMath math;
         math = (IMath)welcome;
         int x = math.Add(4, 5);
         Console.WriteLine(x);
If the COM object should be released before the garbage collector cleans up the object, the static method Marshal.ReleaseComObject invokes the Release method of the component so that the component can destroy itself and free up memory:
         Marshal.ReleaseComObject(math);
      }
   }
}After releasing the COM object using Marshal.ReleaseComObject, you may not use any variable that references the object. In the example, the COM object is released by using the variable math. The variable welcome, which references the same object, cannot be used after releasing the object. Otherwise, you will get an exception of type InvalidComObjectException.
As you can see, with a runtime callable wrapper, a COM component can be used similarly to a .NET object.
Using the COM Server with Dynamic Language Extensions
Since version 4, C# includes an extension for using dynamic languages from C#. This is also an advantage for using COM servers that offer the IDispatch interface. As you read earlier in the “Dispatch Interfaces” section, this interface is resolved at runtime with the methods GetIdsOfNames and Invoke. With the dynamic keyword and the help of a COM binder that is used behind the scenes, the COM component can be called without creating an RCW object.
Declaring a variable of type dynamic and assigning a COM object to it uses the COM binder, and you can invoke the methods of the default interface as shown. You can create an instance of the COM object without using an RCW by getting the Type object using Type.GetTypeFromProgID, and instantiating the COM object with the Activator.CreateInstance method. You don’t get IntelliSense with the dynamic keyword, but you can use the optional parameters that are very common with COM (code file DynamicDotnetClient/Program.cs):
using System;

namespace Wrox.ProCSharp.Interop
{
  class Program
  {
    static void Main()
    {
      Type t = Type.GetTypeFromProgID("COMServer.COMDemo");
      dynamic o = Activator.CreateInstance(t);
      Console.WriteLine(o.Greeting("Angela"));
    }
  }
}Threading Issues
As discussed earlier in this chapter, a COM component marks the apartment (STA or MTA) in which it should reside, based on whether or not it is implemented as thread-safe. However, the thread has to join an apartment. What apartment the thread should join can be defined with the [STAThread] and [MTAThread] attributes, which can be applied to the Main method of an application. The attribute [STAThread] means that the thread joins an STA, whereas the attribute [MTAThread] means that the thread joins an MTA. Joining an MTA is the default if no attribute is applied.
It is also possible to set the apartment state programmatically with the ApartmentState property of the Thread class. The ApartmentState property enable you to set a value from the ApartmentState enumeration. ApartmentState has the possible values STA and MTA (and Unknown if it wasn’t set). Be aware that the apartment state of a thread can be set only once. If it is set a second time, the second setting is ignored.
Adding Connection Points
To see how COM events can be handled in a .NET application, the COM component must be extended. First, you have to add another interface to the interface definition file COMDemo.idl. The interface _ICompletedEvents is implemented by the client, which is the .NET application, and called by the component. In this example, the method Completed is called by the component when the calculation is ready. Such an interface is also known as an outgoing interface. An outgoing interface must be either a dispatch or a custom interface. Dispatch interfaces are supported by all clients. The custom attribute with the ID 0F21F359-AB84–41e8–9A78–36D110E6D2F9 defines the name of the interface that will be created in the RCW. The outgoing interface must also be written to the interfaces supported by the component inside the coclass section, and marked as a source interface (code file COMServer/COMServer.idl):
library COMServerLib
{
  importlib("stdole2.tlb");
  [
    uuid(5CFF102B-0961–4EC6–8BB4–759A3AB6EF48),
    helpstring("_ICompletedEvents Interface"),
    custom(0F21F359-AB84–41e8–9A78–36D110E6D2F9,
    "Wrox.ProCSharp.Interop.Server.ICompletedEvents"),
  ]
  dispinterface _ICompletedEvents
  {
    properties:
    methods:
      [id(1)] void Completed(void);
  };
  [
    uuid(ACB04E72-EB08-4D4A-91D3-34A5DB55D4B4),
    helpstring("COMDemo Class")
    custom(0F21F359-AB84–41e8–9A78–36D110E6D2F9,
      "Wrox.ProCSharp.COMInterop.Server.COMDemo")
  ]
  coclass COMDemo
  {
    [default] interface IWelcome;
    interface IMath;
    [default, source] dispinterface _ICompletedEvents;
  };
You can use a wizard to create an implementation that fires the event back to the client. Open the class view, select the class CComDemo, open the context menu, and select Add ⇒ Add Connection Point . . . to start the Implement Connection Point Wizard (see Figure 23-10). Select the source interface ICompletedEvents for implementation with the connection point.

The wizard creates the proxy class CProxy_ICompletedEvents to fire the events to the client, and the class CCOMDemo is changed. The class now inherits from IConnectionPointContainerImpl and the proxy class. The interface IConnectionPointContainer is added to the interface map, and a connection point map is added to the source interface _ICompletedEvents (code file COMServer/COMDemo.h):
class ATL_NO_VTABLE CCOMDemo:
  public CComObjectRootEx<CComSingleThreadModel>,
  public CComCoClass<CCOMDemo, &CLSID_COMDemo>,
  public IDispatchImpl<IWelcome, &IID_IWelcome, &LIBID_COMServerLib,
    /*wMajor =*/ 1, /*wMinor =*/ 0>,
  public IDispatchImpl<IMath, &IID_IMath, &LIBID_COMServerLib, 1, 0>,
  public IConnectionPointContainerImpl<CCOMDemo>,
  public CProxy_ICompletedEvents<CCOMDemo>
{
public:
//...
BEGIN_COM_MAP(CCOMDemo)
  COM_INTERFACE_ENTRY(IWelcome)
  COM_INTERFACE_ENTRY(IMath)
  COM_INTERFACE_ENTRY2(IDispatch, IWelcome)
  COM_INTERFACE_ENTRY(IConnectionPointContainer)
END_COM_MAP()
//...
public:
  BEGIN_CONNECTION_POINT_MAP(CCOMDemo)
    CONNECTION_POINT_ENTRY(__uuidof(_ICompletedEvents))
  END_CONNECTION_POINT_MAP()
};
Finally, the method Fire_Completed from the proxy class can be called inside the methods Add and Sub in the file COMDemo.cpp:
STDMETHODIMP CCOMDemo::Add(LONG val1, LONG val2, LONG* result)
{
  *result = val1 + val2;
  Fire_Completed();
  return S_OK;
}

STDMETHODIMP CCOMDemo::Sub(LONG val1, LONG val2, LONG* result)
{
  *result = val1 - val2;
  Fire_Completed();
  return S_OK;
}
After rebuilding the COM DLL, you can change the .NET client to use these COM events just like a normal .NET event (code file DotnetClient/Program.cs):
      static void Main()
      {
        var obj = new COMDemo();

        IWelcome welcome = obj;
        Console.WriteLine(welcome.Greeting("Stephanie"));

        obj.Completed += () => Console.WriteLine("Calculation completed");

        IMath math = (IMath)welcome;
        int result = math.Add(3, 5);
        Console.WriteLine(result);

        Marshal.ReleaseComObject(math);
      }
As you can see, the RCW offers automatic mapping from COM events to .NET events. COM events can be used similarly to .NET events in a .NET client.
USING A .NET COMPONENT FROM A COM CLIENT
So far, you have seen how to access a COM component from a .NET client. Equally interesting is finding a solution for accessing .NET components on an old COM client that is using Visual Basic 6.0, or C++ with Microsoft Foundation Classes (MFC) or the Active Template Library (ATL).
In this section, a COM object is defined with .NET code that is used by a COM client with the help of a COM callable wrapper (CCW). By using the object from a COM client, you will see how to create a type library from the .NET assembly, use different .NET attributes to specify COM interop behaviors, and register the .NET assembly as a COM component. Then, a COM client with C++ is created to use the CCW. Finally, the .NET component is expanded to offer COM connection points.
COM Callable Wrapper
If you want to access a COM component with a .NET client, you have to work with an RCW. To access a .NET component from a COM client application, you must use a CCW. Figure 23-11 shows the CCW that wraps a .NET class and offers COM interfaces that a COM client expects to use. The CCW offers interfaces such as IUnknown, IDispatch, and others. It also offers interfaces such as IConnectionPointContainer and IConnectionPoint for events. Of course, the CCW also provides the custom interfaces that are defined by the .NET class such as IWelcome and IMath. A COM client gets what it expects from a COM object — although a .NET component operates behind the scenes. The wrapper deals with methods such as AddRef, Release, and QueryInterface from the IUnknown interface, whereas in the .NET object you can count on the garbage collector without the need to deal with reference counts.
Creating a .NET Component
In the following example, you build the same functionality into a .NET class that you have previously built into a COM component. Start by creating a C# class library, and name it DotNetServer. Then add the interfaces IWelcome and IMath, and the class DotNetComponent that implements these interfaces. The attribute ComVisible(true) makes the class and interfaces available for COM (code file DotnetServer/DotnetServer.cs):
using System;
using System.Runtime.InteropServices;

namespace Wrox.ProCSharp.Interop.Server
{
  [ComVisible(true)]
  public interface IWelcome
  {
    string Greeting(string name);
  }

  [ComVisible(true)]
  public interface IMath
  {
    int Add(int val1, int val2);
    int Sub(int val1, int val2);
  }

  [ComVisible(true)]
  public class DotnetComponent: IWelcome, IMath
  {
    public DotnetComponent()
    {
    }

    public string Greeting(string name)
    {
      return "Hello " + name;
    }

    public int Add(int val1, int val2)
    {
      return val1 + val2;
    }

    public int Sub(int val1, int val2)
    {
      return val1 - val2;
    }
  }
}
After building the project, you can create a type library.
Creating a Type Library
A type library can be created by using the command-line utility tlbexp. The command:
tlbexp DotnetServer.dllcreates the type library DotnetServer.tlb. You can view the type library with the utility OLE/COM Object Viewer, oleview.exe. This tool is part of the Microsoft SDK, and you can start it from the Visual Studio 2012 command prompt. Select File ⇒ View TypeLib to open the type library. Now you can see the interface definition, which is very similar to the interfaces created with the COM server earlier.
The name of the type library is created from the name of the assembly. The header of the type library also defines the full name of the assembly in a custom attribute, and all the interfaces are forward declared before they are defined:
// Generated .IDL file (by the OLE/COM Object Viewer)
//
// typelib filename: <could not determine filename>

[
  uuid(EEA130ED-40E1-4BF8-B06E-6CCA0FD21788),
  version(1.0),
  custom(90883F05-3D28-11D2-8F17-00A0C9A6186D, "DotnetServer, Version=1.0.0.0,
         Culture=neutral, PublicKeyToken=null")
]
library DotnetServer
{
    // TLib :     // TLib : mscorlib.dll :
      // {BED7F4EA-1A96-11D2-8F08-00A0C9A6186D}
    importlib("mscorlib.tlb");
    // TLib : OLE Automation : {00020430-0000-0000-c260-000000000046}
    importlib("stdole2.tlb");

    // Forward declare all types defined in this typelib
    interface IWelcome;
    interface IMath;
    interface _DotnetComponent;
In the following generated code, you can see that the interfaces IWelcome and IMath are defined as COM dual interfaces. All the methods that have been declared in the C# code are listed here in the type library definition. The parameters changed; the .NET types are mapped to COM types (for example, from the String class to the BSTR type), and the signature is changed, so that an HRESULT is returned. Because the interfaces are dual, dispatch IDs are also generated:
  [
    odl,
    uuid(6AE7CB9C-7471-3B6A-9E13-51C2294266F0),
    version(1.0),
    dual,
    oleautomation,
    custom(0F21F359-AB84-41E8-9A78-36D110E6D2F9,
      "Wrox.ProCSharp.Interop.Server.IWelcome")
  ]
  interface IWelcome : IDispatch {
    [id(0x60020000)]
    HRESULT Greeting(
      [in] BSTR name,
      [out, retval] BSTR* pRetVal);
  };

  [
    odl,
    uuid(AED00E6F-3A60-3EB8-B974-1556096350CB),
    version(1.0),
    dual,
    oleautomation,
    custom(0F21F359-AB84-41E8-9A78-36D110E6D2F9,
      "Wrox.ProCSharp.Interop.Server.IMath")

  ]
  interface IMath : IDispatch {
    [id(0x60020000)]
    HRESULT Add(
      [in] long val1,
      [in] long val2,
      [out, retval] long* pRetVal);
    [id(0x60020001)]
    HRESULT Sub(
      [in] long val1,
      [in] long val2,
      [out, retval] long* pRetVal);
  };
The coclass section marks the COM object itself. The uuid in the header is the CLSID used to instantiate the object. The class DotnetComponent supports the interfaces _DotnetComponent, _Object, IWelcome, and IMath. _Object is defined in the file mscorlib.tlb included in an earlier code section and offers the methods of the base class Object. The default interface of the component is _DotnetComponent, which is defined after the coclass section as a dispatch interface. In the interface declaration, it is marked as dual, but because no methods are included, it is a dispatch interface. With this interface, it is possible to access all methods of the component using late binding:
  [
    uuid(2F1E78D4-1147-33AC-9233-C0F51121DAAA),
    version(1.0),
    custom(0F21F359-AB84-41E8-9A78-36D110E6D2F9,
      "Wrox.ProCSharp.Interop.Server.DotnetComponent")
  ]
  coclass DotnetComponent {
    [default] interface _DotnetComponent;
    interface _Object;
    interface IWelcome;
    interface IMath;
  };

  [
    odl,
    uuid(2B36C1BF-61F7-3E84-87B2-EAB52144046D),
    hidden,
    dual,
    oleautomation,
    custom(0F21F359-AB84-41E8-9A78-36D110E6D2F9,
      "Wrox.ProCSharp.Interop.Server.DotnetComponent")
  ]
  interface _DotnetComponent : IDispatch {
  };
};
There are quite a few defaults for generating the type library. However, often it is advantageous to change some of the default .NET to COM mappings. This can be done with several attributes in the System.Runtime.InteropServices namespaces.
COM Interop Attributes
Applying attributes from the namespace System.Runtime.InteropServices to classes, interfaces, or methods enables you to change the implementation of the CCW. The following table describes these attributes.
| ATTRIBUTE | DESCRIPTION |
| Guid | This attribute can be assigned to the assembly, interfaces, and classes. Using the Guid as an assembly attribute defines the type-library ID, applying it to interfaces defines the interface ID (IID), and setting the attribute to a class defines the class ID (CLSID). You can create the unique IDs that must be defined with this attribute with the utility guidgen. The CLSID and type-library IDs are changed automatically with every build. If you don’t want that behavior, you can change it by using this attribute. The IID is changed only if the signature of the interface changes—for example, if a method is added or removed, or some parameters are changed. Because with COM the IID should change with every new version of this interface, this is a very good default behavior, and usually there’s no need to apply the IID with the Guid attribute. The only time you want to apply a fixed IID for an interface is when the .NET interface is an exact representation of an existing COM interface and the COM client already expects this identifier. |
| ProgId | This attribute can be applied to a class to specify what name should be used when the object is configured in the registry. |
| ComVisible | In the Assembly Information settings of the Project properties you can configure whether all the types of the assembly should be visible by COM. The default setting is false, which is a useful default that makes it necessary to explicitly mark the classes, interfaces, and delegates with the ComVisible attribute to create a COM representation. If the default setting is changed to make all types visible by COM, you can set the ComVisible attribute to false for the types for which a COM representation should not be created. |
| InterfaceType | This attribute, if set to a ComInterfaceType enumeration value, enables you to modify the default dual interface type that is created for .NET interfaces. ComInterfaceType has the values InterfaceIsDual, InterfaceIsIDispatch, and InterfaceIsIUnknown. To apply a custom interface type to a .NET interface, set the attribute like this: InterfaceType(ComInterfaceType.InterfaceIsIUnknown). |
| ClassInterface | This attribute enables you to modify the default dispatch interface that is created for a class. ClassInterface accepts an argument of a ClassInterfaceType enumeration. The possible values are AutoDispatch, AutoDual, and None. In the previous example, the default is AutoDispatch because a dispatch interface is created. If the class should be accessible only by the defined interfaces, apply the attribute ClassInterface(ClassInterfaceType.None) to the class. |
| DispId | This attribute can be used with dual and dispatch interfaces to define the DispId of methods and properties. |
| In Out | With COM the direction of parameter types can be specified. Use the attribute In if the parameter should be sent to the component. For returning a value from the parameter, specify Out. For using both directions, use both attributes In, Out. |
| Optional | Parameters of COM methods may be optional. You can mark optional parameters with the Optional attribute. |
Now you can change the C# code to specify a dual interface type for the IWelcome interface and a custom interface type for the IMath interface. With the class DotnetComponent, the attribute ClassInterface with the argument ClassInterfaceType.None specifies that no separate COM interface will be generated. The attributes ProgId and Guid specify a ProgID and a GUID, respectively (code file DotnetServer/DotnetServer.cs):
  [InterfaceType(ComInterfaceType.InterfaceIsDual)]
  [ComVisible(true)]
  public interface IWelcome
  {
    [DispId(60040)]
    string Greeting(string name);
  }

  [InterfaceType(ComInterfaceType.InterfaceIsIUnknown)]
  [ComVisible(true)]
  public interface IMath
  {
    int Add(int val1, int val2);
    int Sub(int val1, int val2);
  }

  [ClassInterface(ClassInterfaceType.None)]
  [ProgId("Wrox.DotnetComponent")]
  [Guid("77839717-40DD-4876-8297-35B98A8402C7")]
  [ComVisible(true)]
  public class DotnetComponent: IWelcome, IMath
  {
    public DotnetComponent()
    {
    }
Rebuilding the class library and the type library changes the interface definition. You can verify this with OleView.exe. IWelcome is now a dual interface, IMath a custom interface that derives from IUnknown instead of IDispatch, and the coclass section no longer has a _DotnetComponent interface.
COM Registration
Before the .NET component can be used as a COM object, it is necessary to configure it in the registry. Also, if you don’t want to copy the assembly into the same directory as the client application, it is necessary to install the assembly in the global assembly cache. The global assembly cache itself is discussed in Chapter 19.
To install the assembly in the global assembly cache, you must sign it with a strong name (using Visual Studio 2012, you can define a strong name in properties of the solution). Then you can register the assembly in the global assembly cache:
gacutil -i DotnetServer.dllNow you can use the regasm utility to configure the component inside the registry. The option /tlb extracts the type library and configures the type library in the registry:
regasm DotnetServer.dll /tlbThe information for the .NET component that is written to the registry is as follows. The All COM configuration is in the hive HKEY_CLASSES_ROOT (HKCR). The key of the ProgID (in this example, it is Wrox.DotnetComponent) is written directly to this hive, along with the CLSID.
The key HKCRCLSID{CLSID}InProcServer32 has the following entries:
- mscoree.dll — Represents the CCW. This is a real COM object that is responsible for hosting the .NET component. This COM object accesses the .NET component to offer COM behavior for the client. The file mscoree.dll is loaded and instantiated from the client via the normal COM instantiation mechanism.
- ThreadingModel=Both — This is an attribute of the mscoree.dll COM object. This component is programmed in a way that offers support both for STA and MTA.
- Assembly=DotnetServer, Version=1.0.0.0, Culture=neutral, PublicKeyToken=5cd57c93b4d9c41a — The value of the Assembly stores the assembly full name, including the version number and the public key token, so that the assembly can be uniquely identified. The assembly registered here will be loaded by mscoree.dll.
- Class=Wrox.ProCSharp.Interop.Server.DotnetComponent — The name of the class is also used by mscoree.dll. This is the class that will be instantiated.
- RuntimeVersion=v4.0.20826 — The registry entry RuntimeVersion specifies the version of the .NET runtime that will be used to host the .NET assembly.
In addition to the configurations shown here, all the interfaces and the type library are configured with their identifiers, too.
Creating a COM Client Application
Now it’s time to create a COM client. Start by creating a simple C++ Win32 Console application project, and name it COMClient. You can leave the default options selected and click Finish in the Project Wizard.
At the beginning of the file COMClient.cpp, add a preprocessor command to include the <iostream> header file and to import the type library that you created for the .NET component. The import statement creates a “smart pointer” class that makes it easier to deal with COM objects. During a build process, the import statement creates .tlh and .tli files that you can find in the debug directory of your project, which includes the smart pointer class. Then add using namespace directives to open the namespace std, which will be used to write output messages to the console, and the namespace DotnetServer that is created inside the smart pointer class (code file COMClientCOMClient.cpp):
// COMClient.cpp: Defines the entry point for the console application.
//

#include "stdafx.h"
#include <iostream>
#import "./DotNetServer/bin/debug/DotnetServer.tlb" named_guids

using namespace std;
using namespace DotnetServer;
In the _tmain method, the first thing to do before any other COM call is the initialization of COM with the API call CoInitialize, which creates and enters an STA for the thread. The variable spWelcome is of type IWelcomePtr, which is a smart pointer. The smart pointer method CreateInstance accepts the ProgID as an argument to create the COM object by using the COM API CoCreateInstance. The operator -> is overridden with the smart pointer so that you can invoke the methods of the COM object, such as Greeting:
int _tmain(int argc, _TCHAR* argv[])
{
  HRESULT hr;
  hr = CoInitialize(NULL);

  try
  {
    IWelcomePtr spWelcome;

    // CoCreateInstance()
    hr = spWelcome.CreateInstance("Wrox.DotnetComponent");

    cout << spWelcome->Greeting("Bill") << endl;
The second interface supported by your .NET component is IMath, and there is a smart pointer that wraps the COM interface: IMathPtr. You can directly assign one smart pointer to another, as in spMath = spWelcome;. In the implementation of the smart pointer (the = operator is overridden), the QueryInterface method is called. With a reference to the IMath interface, you can call the Add method:
    IMathPtr spMath;
    spMath = spWelcome;   // QueryInterface()

    long result = spMath->Add(4, 5);
    cout << "result:" << result << endl;
  }
If an HRESULT error value is returned by the COM object (this is done by the CCW that returns HRESULT errors if the .NET component generates exceptions), the smart pointer wraps the HRESULT errors and generates _com_error exceptions instead. Errors are handled in the catch block. At the end of the program, the COM DLLs are closed and unloaded using CoUninitialize:
  catch (_com_error& e)
  {
    cout << e.ErrorMessage() << endl;
  }

  CoUninitialize();
  return 0;
}
If you run the application, you will get outputs from the Greeting and the Add methods to the console. You can also try to debug into the smart pointer class, where you can see the COM API calls directly.
Adding Connection Points
Adding support for COM events to the .NET components requires some changes to the implementation of your .NET class. Offering COM events is not a simple matter of using the event and delegate keywords; it is necessary to add some other COM interop attributes.
First, you have to add an interface to the .NET project: IMathEvents. This interface is the source or outgoing interface for the component, and it will be implemented by the sink object in the client. A source interface must be either a dispatch interface or a custom interface. A scripting client supports only dispatch interfaces. Dispatch interfaces are usually preferred as source interfaces (code file DotnetServer/DotnetServer.cs):
  [InterfaceType(ComInterfaceType.InterfaceIsIDispatch)]
  [ComVisible(true)]
  public interface IMathEvents
  {
    [DispId(46200)]
    void CalculationCompleted();
  }
With the class DotnetComponent, a source interface must be specified. This can be done with the attribute [ComSourceInterfaces]. Add this attribute, and specify the outgoing interface declared earlier. You can add more than one source interface with different constructors of the attribute class; however, the only client language that supports more than one source interface is C++. Visual Basic 6.0 clients support only one source interface:
  [ClassInterface(ClassInterfaceType.None)]
  [ProgId("Wrox.DotnetComponent")]
  [Guid("77839717-40DD-4876-8297-35B98A8402C7")]
  [ComSourceInterfaces(typeof(IMathEvents))]
  [ComVisible(true)]
  public class DotnetComponent : IWelcome, IMath
  {
    public DotnetComponent()
    {
    }
Inside the class DotnetComponent, you have to declare an event for every method of the source interface. The type of the method must be the name of the delegate, and the name of the event must be exactly the same as the name of the method inside the source interface. You can add the event calls to the Add and Sub methods. This step is the normal .NET way to invoke events, as discussed in Chapter 8:
    public event Action CalculationCompleted;

    public int Add(int val1, int val2)
    {
      int result = val1 + val2;
      if (CalculationCompleted != null)
        CalculationCompleted();
      return result;
    }

    public int Sub(int val1, int val2)
    {
      int result = val1 - val2;
      if (CalculationCompleted != null)
        CalculationCompleted();
      return result;
    }
}Creating a Client with a Sink Object
After you’ve built and registered the .NET assembly and installed it into the global assembly cache, you can build a client application by using the event sources. Implementing a callback or sink object that implements the IDispatch interface was — using Visual Basic 6.0 — just a matter of adding the With Events keyword, very similar to how Visual Basic deals with .NET events today. It’s more work with C++, but here the Active Template Library (ATL) helps.
Open the C++ Console application created in the section “Creating a COM Client Application” and add the following includes to the file stdafx.h:
#include <atlbase.h>
extern CComModule _Module;
#include <atlcom.h>
The file stdafx.cpp requires an include of the ATL implementation file atlimpl.cpp:
#include <atlimpl.cpp>Add the new class CEventHandler to the file COMClient.cpp. This class contains the implementation of the IDispatch interface to be called by the component. The implementation of the IDispatch interface is done by the base class IDispEventImpl. This class reads the type library to match the dispatch IDs of the methods and the parameters to the methods of the class. The template parameters of the class IDispatchEventImpl require an ID of the sink object (here the ID 4 is used), the class that implements the callback methods (CEventHandler), the interface ID of the callback interface (DIID_IMathEvents), the ID of the type library (LIBID_DotnetComponent), and the version number of the type library. You can find the named IDs DIID_IMathEvents and LIBID_DotnetComponent in the file dotnetcomponent.tlh that was created from the #import statement.
The sink map that is surrounded by BEGIN_SINK_MAP and END_SINK_MAP defines the methods that are implemented by the sink object. SINK_ENTRY_EX maps the method OnCalcCompleted to the dispatch ID 46200. This dispatch ID was defined with the method CalculationCompleted of the IMathEvents interface in the .NET component (code file COMClient/COMClient.cpp):
class CEventHandler: public IDispEventImpl<4, CEventHandler,
    &DIID_IMathEvents, &LIBID_DotnetServer, 1, 0>
{
public:
  BEGIN_SINK_MAP(CEventHandler)
    SINK_ENTRY_EX(4, DIID_IMathEvents, 46200, OnCalcCompleted)
  END_SINK_MAP()

  HRESULT __stdcall OnCalcCompleted()
  {
    cout << "calculation completed" << endl;
    return S_OK;
  }
};
The main method now needs a change to advise the component of the existence of the event sink object, so that the component can call back into the sink. This can be done with the method DispEventAdvise of the CEventHandler class by passing an IUnknown interface pointer. The method DispEventUnadvise unregisters the sink object again:
int _tmain(int argc, _TCHAR* argv[])
{
  HRESULT hr;
  hr = CoInitialize(NULL);

  try
  {
    IWelcomePtr spWelcome;
    hr = spWelcome.CreateInstance("Wrox.DotnetComponent");

    IUnknownPtr spUnknown = spWelcome;

    cout << spWelcome->Greeting("Bill") << endl;

    CEventHandler* eventHandler = new CEventHandler();
    hr = eventHandler->DispEventAdvise(spUnknown);

    IMathPtr spMath;
    spMath = spWelcome;   // QueryInterface()

    long result = spMath->Add(4, 5);
    cout << "result:" << result << endl;

    eventHandler->DispEventUnadvise(spWelcome.GetInterfacePtr());
    delete eventHandler;
  }
  catch (_com_error& e)
  {
    cout << e.ErrorMessage() << endl;
  }

  CoUninitialize();
  return 0;
}
PLATFORM INVOKE
Not all the features of Windows API calls are available from the .NET Framework. This is true not only for old Windows API calls but also for very new features from Windows 8 or Windows Server 2012. Maybe you’ve written some DLLs that export unmanaged methods and you would like to use them from C# as well.
To reuse an unmanaged library that doesn’t contain COM objects, but only exported functions, platform invoke (p/invoke) can be used. With p/invoke, the CLR loads the DLL that includes the function that should be called and marshals the parameters.
To use the unmanaged function, first you have to determine the name of the function as it is exported. You can do this by using the dumpbin tool with the /exports option.
For example, the command:
dumpbin /exports c:windowssystem32kernel32.dll | morelists all exported functions from the DLL kernel32.dll. In the example, you use the CreateHardLink Windows API function to create a hard link to an existing file. With this API call, you can have several filenames that reference the same file as long as the filenames are on one hard disk only. This API call is not available from .NET Framework 4.5, so platform invoke must be used.
To call a native function, you have to define a C# external method with the same number of arguments, and the argument types that are defined with the unmanaged method must have mapped types with managed code.
The Windows API call CreateHardLink has this definition in C++:
BOOL CreateHardLink(
   LPCTSTR lpFileName,
   LPCTSTR lpExistingFileName,
   LPSECURITY_ATTRIBUTES lpSecurityAttributes);
This definition must be mapped to .NET data types. The return type is a BOOL with unmanaged code; this simply maps to the bool data type. LPCTSTR defines a long pointer to a const string. The Windows API uses the Hungarian naming convention for the data type. LP is a long pointer, C is a const, and STR is a null-terminated string. The T marks the type as a generic type, and the type is resolved to either LPCSTR (an ANSI string) or LPWSTR (a wide Unicode string), depending on the compiler’s settings. C strings map to the .NET type String. LPSECURITY_ATTRIBUTES, which is a long pointer to a struct of type SECURITY_ATTRIBUTES. Because you can pass NULL to this argument, mapping this type to IntPtr is okay. The C# declaration of this method must be marked with the extern modifier, because there’s no implementation of this method within the C# code. Instead, the method implementation is found in the DLL kernel32.dll, which is referenced with the attribute [DllImport]. The return type of the .NET declaration CreateHardLink is of type bool, and the native method CreateHardLink returns a BOOL, so some additional clarification is useful. Because there are different Boolean data types with C++ (for example, the native bool and the Windows-defined BOOL, which have different values), the attribute [MarshalAs] specifies to what native type the .NET type bool should map:
[DllImport("kernel32.dll", SetLastError="true",
           EntryPoint="CreateHardLink", CharSet=CharSet.Unicode)]
[return: MarshalAs(UnmanagedType.Bool)]
public static extern bool CreateHardLink(string newFileName,
                                         string existingFilename,
IntPtr securityAttributes);The settings that you can specify with the attribute [DllImport] are listed in the following table.
| DLLIMPORT PROPERTY OR FIELD | DESCRIPTION |
| EntryPoint | You can give the C# declaration of the function a different name than the one it has with the unmanaged library. The name of the method in the unmanaged library is defined in the field EntryPoint. |
| CallingConvention | Depending on the compiler or compiler settings that were used to compile the unmanaged function, different calling conventions can be used. The calling convention defines how the parameters are handled and where to put them on the stack. You can define the calling convention by setting an enumerable value. The Windows API usually uses the StdCall calling convention on the Windows operating system, and it uses the Cdecl calling convention on Windows CE. Setting the value to CallingConvention.Winapi works for the Windows API in both the Windows and the Windows CE environments. |
| CharSet | String parameters can be either ANSI or Unicode. With the CharSet setting, you can define how strings are managed. Possible values that are defined with the CharSet enumeration are Ansi, Unicode, and Auto. CharSet.Auto uses Unicode on the Windows NT platform, and ANSI on Windows 98 and Windows ME. |
| SetLastError | If the unmanaged function sets an error by using the Windows API SetLastError, you can set the SetLastError field to true. This way, you can read the error number afterward by using Marshal.GetLastWin32Error. |
To make the CreateHardLink method easier to use from a .NET environment, you should follow these guidelines:
- Create an internal class named NativeMethods that wraps the platform invoke method calls.
- Create a public class to offer the native method functionality to .NET applications.
- Use security attributes to mark the required security.
In the following example (code file PInvokeSample/NativeMethods.cs), the public method CreateHardLink in the class FileUtility is the method that can be used by .NET applications. This method has the filename arguments reversed compared to the native Windows API method CreateHardLink. The first argument is the name of the existing file, and the second argument is the new file. This is similar to other classes in the framework, such as File.Copy. Because the third argument used to pass the security attributes for the new filename is not used with this implementation, the public method has just two parameters. The return type is changed as well. Instead of returning an error by returning the value false, an exception is thrown. In case of an error, the unmanaged method CreateHardLink sets the error number with the unmanaged API SetLastError. To read this value from .NET, the [DllImport] field SetLastError is set to true. Within the managed method CreateHardLink, the error number is read by calling Marshal.GetLastWin32Error. To create an error message from this number, the Win32Exception class from the namespace System.ComponentModel is used. This class accepts an error number with the constructor, and returns a localized error message. In case of an error, an exception of type IOException is thrown, which has an inner exception of type Win32Exception. The public method CreateHardLink has the FileIOPermission attribute applied to check whether the caller has the necessary permission. You can read more about .NET security in Chapter 22.
using System;
using System.ComponentModel;
using System.IO;
using System.Runtime.InteropServices;
using System.Security;
using System.Security.Permissions;

namespace Wrox.ProCSharp.Interop
{
  [SecurityCritical]
  internal static class NativeMethods
  {
    [DllImport("kernel32.dll", SetLastError = true,
      EntryPoint = "CreateHardLinkW", CharSet = CharSet.Unicode)]
    [return: MarshalAs(UnmanagedType.Bool)]
    private static extern bool CreateHardLink(
      [In, MarshalAs(UnmanagedType.LPWStr)] string newFileName,
      [In, MarshalAs(UnmanagedType.LPWStr)] string existingFileName,
      IntPtr securityAttributes);


    internal static void CreateHardLink(string oldFileName,
                                        string newFileName)
    {
      if (!CreateHardLink(newFileName, oldFileName, IntPtr.Zero))
      {
        var ex = new Win32Exception(Marshal.GetLastWin32Error());
        throw new IOException(ex.Message, ex);
      }
    }
  }

  public static class FileUtility
  {
    [FileIOPermission(SecurityAction.LinkDemand, Unrestricted = true)]
    public static void CreateHardLink(string oldFileName,
                                      string newFileName)
    {
      NativeMethods.CreateHardLink(oldFileName, newFileName);
    }
  }
}
This class can now be used to create hard links very easily (code file PInvokeSample/Program.cs). If the file passed with the first argument of the program does not exist, you will get an exception with the message “The system cannot find the file specified.” If the file exists, you get a new filename referencing the original file. You can easily verify this by changing text in one file; it will show up in the other file as well:
using System;
using System.IO;

namespace Wrox.ProCSharp.Interop
{
  class Program
  {
    static void Main(string[] args)
    {
      if (args.Length != 2)
      {
        Console.WriteLine("usage: PInvokeSample " +
          "existingfilename newfilename");
        return;
      }
      try
      {
        FileUtility.CreateHardLink(args[0], args[1]);
      }
      catch (IOException ex)
      {
        Console.WriteLine(ex.Message);
      }

    }
  }
}
With native method calls, often you have to use Windows handles. A Window handle is a 32-bit value for which, depending on the handle types, some values are not allowed. With .NET 1.0 for handles, usually the IntPtr structure was used because you can set every possible 32-bit value with this structure. However, with some handle types, this led to security problems and possible threading race conditions and leaked handles with the finalization phase. That’s why .NET 2.0 introduced the SafeHandle class. The class SafeHandle is an abstract base class for every Windows handle. Derived classes inside the Microsoft.Win32.SafeHandles namespace are SafeHandleZeroOrMinusOneIsInvalid and SafeHandleMinusOneIsInvalid. As the name indicates, these classes do not accept invalid 0 or –1 values. Further derived handle types are SafeFileHandle, SafeWaitHandle, SafeNCryptHandle, and SafePipeHandle, which can be used by the specific Windows API calls.
For example, to map the Windows API CreateFile, you can use the following declaration to return a SafeFileHandle. Of course, usually you could use the .NET classes File and FileInfo instead.
    [DllImport("Kernel32.dll", SetLastError = true,
                CharSet = CharSet.Unicode)]
    internal static extern SafeFileHandle CreateFile(
      string fileName,
      [MarshalAs(UnmanagedType.U4)] FileAccess fileAccess,
      [MarshalAs(UnmanagedType.U4)] FileShare fileShare,
      IntPtr securityAttributes,
      [MarshalAs(UnmanagedType.U4)] FileMode creationDisposition,
      int flags,
SafeFileHandle template);SUMMARY
In this chapter, you have seen how the different generations of COM and .NET applications can interact. Instead of rewriting applications and components, a COM component can be used from a .NET application just like a .NET class. The tool that makes this possible is tlbimp, which creates a runtime callable wrapper (RCW) that hides the COM object behind a .NET façade.
Likewise, tlbexp creates a type library from a .NET component that is used by the COM callable wrapper (CCW). The CCW hides the .NET component behind a COM façade. Using .NET classes as COM components makes it necessary to use some attributes from the namespace System.Runtime.InteropServices to define specific COM characteristics that are needed by the COM client.
With platform invoke, you’ve seen how native methods can be invoked using C#. Platform invoke requires redefining the native method with C# and .NET data types. After defining the mapping, you can invoke the native method as if it were a C# method.
The next chapter is on accessing the file system with files and streams.