
Chapter 10
Collections
WHAT’S IN THIS CHAPTER?
- Understanding collection interfaces and types
- Working with lists, queues, and stacks
- Working with linked and sorted lists
- Using dictionaries and sets
- Using bit arrays and bit vectors
- Evaluating performance
WROX.COM CODE DOWNLOADS FOR THIS CHAPTER
The wrox.com code downloads for this chapter are found at http://www.wrox.com/remtitle.cgi?isbn=1118314425 on the Download Code tab. The code for this chapter is divided into the following major examples:
- List Samples
- Queue Sample
- Linked List Sample
- Sorted List Sample
- Dictionary Sample
- Set Sample
- Observable Collection Sample
- BitArray Sample
- Pipeline Sample
OVERVIEW
In Chapter 6, “Arrays and Tuples,” you learned about arrays and the interfaces implemented by the Array class. The size of arrays is fixed. If the number of elements is dynamic, you should use a collection class instead of an array.
List<T> is a collection class that can be compared to arrays; but there are also other kinds of collections: queues, stacks, linked lists, dictionaries, and sets. The other collection classes have partly different APIs to access the elements in the collection and often a different internal structure for how the items are stored in memory. This chapter covers all of these collection classes and their differences, including performance differences.
You can also read about bit arrays and concurrent collections that can be used from multiple threads.
COLLECTION INTERFACES AND TYPES
Most collection classes can be found in the System.Collections and System.Collections.Generic namespaces. Generic collection classes are located in the System.Collections.Generic namespace. Collection classes that are specialized for a specific type are located in the System.Collections.Specialized namespace. Thread-safe collection classes are in the System.Collections.Concurrent namespace.
Of course, there are also other ways to group collection classes. Collections can be grouped into lists, collections, and dictionaries based on the interfaces that are implemented by the collection class.
The following table describes interfaces implemented by collections and lists.
| INTERFACE | DESCRIPTION |
| IEnumerable<T> | The interface IEnumerable is required by the foreach statement. This interface defines the method GetEnumerator which returns an enumerator that implements the IEnumerator interface. |
| ICollection<T> | ICollection<T> is implemented by generic collection classes. With this you can get the number of items in the collection (Count property), and copy the collection to an array (CopyTo method). You can also add and remove items from the collection (Add, Remove, Clear). |
| IList<T> | The IList<T> interface is for lists where elements can be accessed from their position. This interface defines an indexer, as well as ways to insert or remove items from specific positions (Insert, RemoveAt methods). IList<T> derives from ICollection<T>. |
| ISet<T> | This interface is implemented by sets. Sets allow combining different sets into a union, getting the intersection of two sets, and checking whether two sets overlap. ISet<T> derives from ICollection<T>. |
| IDictionary<TKey, TValue> | The interface IDictionary<TKey, TValue> is implemented by generic collection classes that have a key and a value. With this interface all the keys and values can be accessed, items can be accessed with an indexer of type key, and items can be added or removed. |
| ILookup<TKey, TValue> | Similar to the IDictionary<TKey, TValue> interface, lookups have keys and values. However, with lookups the collection can contain multiple values with one key. |
| IComparer<T> | The interface IComparer<T> is implemented by a comparer and used to sort elements inside a collection with the Compare method. |
| IEqualityComparer<T> | IEqualityComparer<T> is implemented by a comparer that can be used for keys in a dictionary. With this interface the objects can be compared for equality. Since .NET 4, this interface is also implemented by arrays and tuples. |
| IProducerConsumerCollection<T> | The interface IProducerConsumerCollection<T> is new since .NET 4 to support new thread-safe collection classes. |
LISTS
For dynamic lists, the .NET Framework offers the generic class List<T>. This class implements the IList, ICollection, IEnumerable, IList<T>, ICollection<T>, and IEnumerable<T> interfaces.
The following examples use the members of the class Racer as elements to be added to the collection to represent a Formula-1 racer. This class has five properties: Id, FirstName, LastName, Country, and the number of Wins. With the constructors of the class, the name of the racer and the number of wins can be passed to set the members. The method ToString is overridden to return the name of the racer. The class Racer also implements the generic interface IComparable<T> for sorting racer elements and IFormattable (code file ListSamples/Racer.cs):
  [Serializable]
  public class Racer: IComparable<Racer>, IFormattable
  {
    public int Id { get; private set; }
    public string FirstName { get; set; }
    public string LastName { get; set; }
    public string Country { get; set; }
    public int Wins { get; set; }

    public Racer(int id, string firstName, string lastName,
                 string country)
      :this(id, firstName, lastName, country, wins: 0)
    { }

    public Racer(int id, string firstName, string lastName,
                 string country, int wins)
    {
      this.Id = id;
      this.FirstName = firstName;
      this.LastName = lastName;
      this.Country = country;
      this.Wins = wins;
    }

    public override string ToString()
    {
      return String.Format("{0} {1}", FirstName, LastName);
    }

    public string ToString(string format, IFormatProvider formatProvider)
    {
      if (format == null) format = "N";
      switch (format.ToUpper())
      {
        case "N": // name
          return ToString();
        case "F": // first name
          return FirstName;
        case "L": // last name
          return LastName;
        case "W": // Wins
          return String.Format("{0}, Wins: {1}", ToString(), Wins);
        case "C": // Country
          return String.Format("{0}, Country: {1}", ToString(), Country);
        case "A": // All
          return String.Format("{0}, {1} Wins: {2}", ToString(), Country,
                               Wins);
        default:
          throw new FormatException(String.Format(formatProvider,
                        "Format {0} is not supported", format));
      }
    }

    public string ToString(string format)
    {
      return ToString(format, null);
    }

    public int CompareTo(Racer other)
    {
      if (other == null) return -1;
      int compare = string.Compare(this.LastName, other.LastName);
      if (compare == 0)
        return string.Compare(this.FirstName, other.FirstName);
      return compare;
    }
  }
Creating Lists
You can create list objects by invoking the default constructor. With the generic class List<T>, you must specify the type for the values of the list with the declaration. The following code shows how to declare a List<T> with int and a list with Racer elements. ArrayList is a non-generic list that accepts any Object type for its elements.
Using the default constructor creates an empty list. As soon as elements are added to the list, the capacity of the list is extended to allow four elements. If the fifth element is added, the list is resized to allow eight elements. If eight elements are not enough, the list is resized again to contain 16 elements. With every resize the capacity of the list is doubled.
     var intList = new List<int>();
     var racers = new List<Racer>();
If the capacity of the list changes, the complete collection is reallocated to a new memory block. With the implementation of List<T>, an array of type T is used. With reallocation, a new array is created, and Array.Copy copies the elements from the old array to the new array. To save time, if you know the number of elements in advance, that should be in the list; you can define the capacity with the constructor. The following example creates a collection with a capacity of 10 elements. If the capacity is not large enough for the elements added, the capacity is resized to 20 and then to 40 elements — doubled again:
List<int> intList = new List<int>(10);You can get and set the capacity of a collection by using the Capacity property:
intList.Capacity = 20;The capacity is not the same as the number of elements in the collection. The number of elements in the collection can be read with the Count property. Of course, the capacity is always larger or equal to the number of items. As long as no element was added to the list, the count is 0:
Console.WriteLine(intList.Count);If you are finished adding elements to the list and don’t want to add any more, you can get rid of the unneeded capacity by invoking the TrimExcess method; however, because the relocation takes time, TrimExcess has no effect if the item count is more than 90 percent of capacity:
intList.TrimExcess();Collection Initializers
You can also assign values to collections using collection initializers. The syntax of collection initializers is similar to array initializers, explained in Chapter 6. With a collection initializer, values are assigned to the collection within curly brackets at the time the collection is initialized:
   var intList = new List<int>() {1, 2};
var stringList = new List<string>() {"one", "two"};Adding Elements
You can add elements to the list with the Add method, shown in the following example. The generic instantiated type defines the parameter type of the Add method:
   var intList = new List<int>();
   intList.Add(1);
   intList.Add(2);

   var stringList = new List<string>();
   stringList.Add("one");
   stringList.Add("two");
The variable racers is defined as type List<Racer>. With the new operator, a new object of the same type is created. Because the class List<T> was instantiated with the concrete class Racer, now only Racer objects can be added with the Add method. In the following sample code, five Formula-1 racers are created and added to the collection. The first three are added using the collection initializer, and the last two are added by invoking the Add method explicitly (code file ListSamples/Program.cs):
   var graham = new Racer(7, "Graham", "Hill", "UK", 14);
   var emerson = new Racer(13, "Emerson", "Fittipaldi", "Brazil", 14);
   var mario = new Racer(16, "Mario", "Andretti", "USA", 12);

   var racers = new List<Racer>(20) {graham, emerson, mario};

   racers.Add(new Racer(24, "Michael", "Schumacher", "Germany", 91));
   racers.Add(new Racer(27, "Mika", "Hakkinen", "Finland", 20));
With the AddRange method of the List<T> class, you can add multiple elements to the collection at once. The method AddRange accepts an object of type IEnumerable<T>, so you can also pass an array as shown here:
   racers.AddRange(new Racer[] {
       new Racer(14, "Niki", "Lauda", "Austria", 25),
new Racer(21, "Alain", "Prost", "France", 51)});If you know some elements of the collection when instantiating the list, you can also pass any object that implements IEnumerable<T> to the constructor of the class. This is very similar to the AddRange method:
    var racers = new List<Racer>(
        new Racer[] {
            new Racer(12, "Jochen", "Rindt", "Austria", 6),
            new Racer(22, "Ayrton", "Senna", "Brazil", 41) });
Inserting Elements
You can insert elements at a specified position with the Insert method:
racers.Insert(3, new Racer(6, "Phil", "Hill", "USA", 3));The method InsertRange offers the capability to insert a number of elements, similar to the AddRange method shown earlier.
If the index set is larger than the number of elements in the collection, an exception of type ArgumentOutOfRangeException is thrown.
Accessing Elements
All classes that implement the IList and IList<T> interface offer an indexer, so you can access the elements by using an indexer and passing the item number. The first item can be accessed with an index value 0. By specifying racers[3], for example, you access the fourth element of the list:
Racer r1 = racers[3];Getting the number of elements with the Count property, you can do a for loop to iterate through every item in the collection, and use the indexer to access every item:
     for (int i = 0; i < racers.Count; i++)
     {
       Console.WriteLine(racers[i]);
     }
Because List<T> implements the interface IEnumerable, you can iterate through the items in the collection using the foreach statement as well:
     foreach (Racer r in racers)
     {
       Console.WriteLine(r);
}Instead of using the foreach statement, the List<T> class also offers a ForEach method that is declared with an Action<T> parameter:
public void ForEach(Action<T> action);The implementation of ForEach is shown next. ForEach iterates through every item of the collection and invokes the method that is passed as parameter for every item:
public class List<T>: IList<T>
{
  private T[] items;

  //...

  public void ForEach(Action<T> action)
  {
    if (action == null) throw new ArgumentNullException("action");

    foreach (T item in items)
    {
      action(item);
    }
  }
  //...
}
To pass a method with ForEach, Action<T> is declared as a delegate that defines a method with a void return type and parameter T:
public delegate void Action<T>(T obj);With a list of Racer items, the handler for the ForEach method must be declared with a Racer object as parameter and a void return type:
public void ActionHandler(Racer obj);Because one overload of the Console.WriteLine method accepts Object as a parameter, you can pass the address of this method to the ForEach method, and every racer of the collection is written to the console:
racers.ForEach(Console.WriteLine);You can also write a lambda expression that accepts a Racer object as parameter and contains an implementation to write a string to the console using Console.WriteLine. Here, the format A is used with the ToString method of the IFormattable interface to display all information about the racer:
racers.ForEach(r => Console.WriteLine("{0:A}", r));Removing Elements
You can remove elements by index or pass the item that should be removed. Here, the fourth element is removed from the collection:
racers.RemoveAt(3);You can also directly pass a Racer object to the Remove method to remove this element. Removing by index is faster, because here the collection must be searched for the item to remove. The Remove method first searches in the collection to get the index of the item with the IndexOf method, and then uses the index to remove the item. IndexOf first checks if the item type implements the interface IEquatable<T>. If it does, the Equals method of this interface is invoked to find the item in the collection that is the same as the one passed to the method. If this interface is not implemented, the Equals method of the Object class is used to compare the items. The default implementation of the Equals method in the Object class does a bitwise compare with value types, but compares only references with reference types.
In the following example, the racer referenced by the variable graham is removed from the collection. The variable graham was created earlier when the collection was filled. Because the interface IEquatable<T> and the Object.Equals method are not overridden with the Racer class, you cannot create a new object with the same content as the item that should be removed and pass it to the Remove method:
    if (!racers.Remove(graham))
    {
      Console.WriteLine("object not found in collection");
    }
The method RemoveRange removes a number of items from the collection. The first parameter specifies the index where the removal of items should begin; the second parameter specifies the number of items to be removed:
    int index = 3;
    int count = 5;
    racers.RemoveRange(index, count);
To remove all items with some specific characteristics from the collection, you can use the RemoveAll method. This method uses the Predicate<T> parameter when searching for elements, which is discussed next. To remove all elements from the collection, use the Clear method defined with the ICollection<T> interface.
Searching
There are different ways to search for elements in the collection. You can get the index to the found item, or the item itself. You can use methods such as IndexOf, LastIndexOf, FindIndex, FindLastIndex, Find, and FindLast. To just check whether an item exists, the List<T> class offers the Exists method.
The method IndexOf requires an object as parameter and returns the index of the item if it is found inside the collection. If the item is not found, –1 is returned. Remember that IndexOf is using the IEquatable<T> interface to compare the elements:
int index1 = racers.IndexOf(mario);With the IndexOf method, you can also specify that the complete collection should not be searched, instead specifying an index where the search should start and the number of elements that should be iterated for the comparison.
Instead of searching a specific item with the IndexOf method, you can search for an item that has some specific characteristics that you can define with the FindIndex method. FindIndex requires a parameter of type Predicate:
public int FindIndex(Predicate<T> match);The Predicate<T> type is a delegate that returns a Boolean value and requires type T as parameter. This delegate can be used similarly to the Action delegate shown earlier with the ForEach method. If the predicate returns true, there’s a match and the element is found. If it returns false, the element is not found and the search continues.
public delegate bool Predicate<T>(T obj);With the List<T> class that is using Racer objects for type T, you can pass the address of a method that returns a bool and defines a parameter of type Racer to the FindIndex method. Finding the first racer of a specific country, you can create the FindCountry class as shown next. The FindCountryPredicate method has the signature and return type defined by the Predicate<T> delegate. The Find method uses the variable country to search for a country that you can pass with the constructor of the class.
  public class FindCountry
  {
    public FindCountry(string country)
    {
      this.country = country;
    }
    private string country;

    public bool FindCountryPredicate(Racer racer)
    {
      Contract.Requires<ArgumentNullException>(racer != null);

      return racer.Country == country;
    }
  }
With the FindIndex method, you can create a new instance of the FindCountry class, pass a country string to the constructor, and pass the address of the Find method. In the following example, after FindIndex completes successfully, index2 contains the index of the first item where the Country property of the racer is set to Finland:
    int index2 = racers.FindIndex(new FindCountry("Finland").
                                  FindCountryPredicate);
Instead of creating a class with a handler method, you can use a lambda expression here as well. The result is exactly the same as before. Now the lambda expression defines the implementation to search for an item where the Country property is set to Finland:
int index3 = racers.FindIndex(r => r.Country == "Finland");Similar to the IndexOf method, with the FindIndex method you can also specify the index where the search should start and the count of items that should be iterated through. To do a search for an index beginning from the last element in the collection, you can use the FindLastIndex method.
The method FindIndex returns the index of the found item. Instead of getting the index, you can also go directly to the item in the collection. The Find method requires a parameter of type Predicate<T>, much as the FindIndex method. The Find method in the following example searches for the first racer in the list that has the FirstName property set to Niki. Of course, you can also do a FindLast search to find the last item that fulfills the predicate.
Racer racer = racers.Find(r => r.FirstName == "Niki");To get not only one, but all the items that fulfill the requirements of a predicate, you can use the FindAll method. The FindAll method uses the same Predicate<T> delegate as the Find and FindIndex methods. The FindAll method does not stop when the first item is found but instead iterates through every item in the collection and returns all items for which the predicate returns true.
With the FindAll method invoked in the next example, all racer items are returned where the property Wins is set to more than 20. All racers who won more than 20 races are referenced from the bigWinners list:
List<Racer> bigWinners = racers.FindAll(r => r.Wins > 20);Iterating through the variable bigWinners with a foreach statement gives the following result:
    foreach (Racer r in bigWinners)
    {
      Console.WriteLine("{0:A}", r);
    }

Michael Schumacher, Germany Wins: 91
Niki Lauda, Austria Wins: 25
Alain Prost, France Wins: 51
The result is not sorted, but you’ll see that done next.
Sorting
The List<T> class enables sorting its elements by using the Sort method. Sort uses the quick sort algorithm whereby all elements are compared until the complete list is sorted.
You can use several overloads of the Sort method. The arguments that can be passed are a generic delegate Comparison<T>, the generic interface IComparer<T>, and a range together with the generic interface IComparer<T>:
public void List<T>.Sort();
public void List<T>.Sort(Comparison<T>);
public void List<T>.Sort(IComparer<T>);
public void List<T>.Sort(Int32, Int32, IComparer<T>);
Using the Sort method without arguments is possible only if the elements in the collection implement the interface IComparable.
Here, the class Racer implements the interface IComparable<T> to sort racers by the last name:
    racers.Sort();
    racers.ForEach(Console.WriteLine);
If you need to do a sort other than the default supported by the item types, you need to use other techniques, such as passing an object that implements the IComparer<T> interface.
The class RacerComparer implements the interface IComparer<T> for Racer types. This class enables you to sort by either the first name, last name, country, or number of wins. The kind of sort that should be done is defined with the inner enumeration type CompareType. The CompareType is set with the constructor of the class RacerComparer. The interface IComparer<Racer> defines the method Compare, which is required for sorting. In the implementation of this method, the Compare and CompareTo methods of the string and int types are used (code file ListSamples/RacerComparer.cs):
  public class RacerComparer: IComparer<Racer>
  {
    public enum CompareType
    {
      FirstName,
      LastName,
      Country,
      Wins
    }

    private CompareType compareType;
    public RacerComparer(CompareType compareType)
    {
      this.compareType = compareType;
    }

    public int Compare(Racer x, Racer y)
    {
      if (x == null && y == null) return 0;
      if (x == null) return -1;
      if (y == null) return 1;

      int result;
      switch (compareType)
      {
        case CompareType.FirstName:
          return string.Compare(x.FirstName, y.FirstName);
        case CompareType.LastName:
          return string.Compare(x.LastName, y.LastName);
        case CompareType.Country:
          result = string.Compare(x.Country, y.Country);
          if (result == 0)
            return string.Compare(x.LastName, y.LastName);
          else
            return result;
        case CompareType.Wins:
          return x.Wins.CompareTo(y.Wins);
        default:
          throw new ArgumentException("Invalid Compare Type");
      }
    }
}An instance of the RacerComparer class can now be used with the Sort method. Passing the enumeration RacerComparer.CompareType.Country sorts the collection by the property Country:
    racers.Sort(new RacerComparer(RacerComparer.CompareType.Country));
    racers.ForEach(Console.WriteLine);
Another way to do the sort is by using the overloaded Sort method, which requires a Comparison<T> delegate:
public void List<T>.Sort(Comparison<T>);Comparison<T> is a delegate to a method that has two parameters of type T and a return type int. If the parameter values are equal, the method must return 0. If the first parameter is less than the second, a value less than zero must be returned; otherwise, a value greater than zero is returned:
public delegate int Comparison<T>(T x, T y);Now you can pass a lambda expression to the Sort method to do a sort by the number of wins. The two parameters are of type Racer, and in the implementation the Wins properties are compared by using the int method CompareTo. Also in the implementation, r2 and r1 are used in reverse order, so the number of wins is sorted in descending order. After the method has been invoked, the complete racer list is sorted based on the racer’s number of wins:
racers.Sort((r1, r2) => r2.Wins.CompareTo(r1.Wins));You can also reverse the order of a complete collection by invoking the Reverse method.
Type Conversion
With the List<T> method ConvertAll<TOutput>, all types of a collection can be converted to a different type. The ConvertAll<TOutput> method uses a Converter delegate that is defined like this:
public sealed delegate TOutput Converter<TInput, TOutput>(TInput from);The generic types TInput and TOutput are used with the conversion. TInput is the argument of the delegate method, and TOutput is the return type.
In this example, all Racer types should be converted to Person types. Whereas the Racer type contains a firstName, lastName, country, and the number of wins, the Person type contains just a name. For the conversion, the country of the racer and the number of race wins can be ignored, but the name must be converted:
 [Serializable]
 public class Person
 {
   private string name;

   public Person(string name)
   {
     this.name = name;
   }

   public override string ToString()
   {
     return name;
   }
 }
The conversion happens by invoking the racers.ConvertAll<Person> method. The argument of this method is defined as a lambda expression with an argument of type Racer and a Person type that is returned. In the implementation of the lambda expression, a new Person object is created and returned. For the Person object, the FirstName and LastName are passed to the constructor:
    List<Person> persons =
        racers.ConvertAll<Person>(
            r => new Person(r.FirstName + " " + r.LastName));
The result of the conversion is a list containing the converted Person objects: persons of type List<Person>.
Read-Only Collections
After collections are created they are read/write of course; otherwise, you couldn’t fill them with any values. However, after the collection is filled, you can create a read-only collection. The List<T> collection has the method AsReadOnly that returns an object of type ReadOnlyCollection<T>. The class ReadOnlyCollection<T> implements the same interfaces as List<T>, but all methods and properties that change the collection throw a NotSupportedException.
QUEUES
A queue is a collection whose elements are processed first in, first out (FIFO), meaning the item that is put first in the queue is read first. Examples of queues are standing in line at the airport, a human resources queue to process employee applicants, print jobs waiting to be processed in a print queue, and a thread waiting for the CPU in a round-robin fashion. Sometimes the elements of a queue differ in their priority. For example, in the queue at the airport, business passengers are processed before economy passengers. In this case, multiple queues can be used, one queue for each priority. At the airport this is easily handled with separate check-in queues for business and economy passengers. The same is true for print queues and threads. You can have an array or a list of queues whereby one item in the array stands for a priority. Within every array item there’s a queue, where processing happens using the FIFO principle.
A queue is implemented with the Queue<T> class in the namespace System.Collections.Generic. Internally, the Queue<T> class is using an array of type T, similar to the List<T> type. It implements the interfaces IEnumerable<T> and ICollection; but not ICollection<T>, which is not implemented because this interface defines Add and Remove methods that shouldn’t be available for queues.
The Queue<T> class does not implement the interface IList<T>, so you cannot access the queue using an indexer. The queue just allows you to add an item to it, which is put at the end of the queue (with the Enqueue method), and to get items from the head of the queue (with the Dequeue method).
Figure 10-1 shows the items of a queue. The Enqueue method adds items to one end of the queue; the items are read and removed at the other end of the queue with the Dequeue method. Invoking the Dequeue method once more removes the next item from the queue.

Methods of the Queue<T> class are described in the following table.
| SELECTED QUEUE <T> MEMBERS | DESCRIPTION |
| Count | Returns the number of items in the queue. |
| Enqueue | Adds an item to the end of the queue. |
| Dequeue | Reads and removes an item from the head of the queue. If there are no more items in the queue when the Dequeue method is invoked, an exception of type InvalidOperationException is thrown. |
| Peek | Reads an item from the head of the queue but does not remove the item. |
| TrimExcess | Resizes the capacity of the queue. The Dequeue method removes items from the queue, but it doesn’t resize the capacity of the queue. To get rid of the empty items at the beginning of the queue, use the TrimExcess method. |
When creating queues, you can use constructors similar to those used with the List<T> type. The default constructor creates an empty queue, but you can also use a constructor to specify the capacity. As items are added to the queue, the capacity is increased to hold 4, 8, 16, and 32 items if the capacity is not defined. Similar to the List<T> class, the capacity is always doubled as required. The default constructor of the non-generic Queue class is different, because it creates an initial array of 32 empty items. With an overload of the constructor, you can also pass any other collection that implements the IEnumerable<T> interface that is copied to the queue.
The following example demonstrating the use of the Queue<T> class is a document management application. One thread is used to add documents to the queue, and another thread reads documents from the queue and processes them.
The items stored in the queue are of type Document. The Document class defines a title and content (code file QueueSample/Document.cs):
  public class Document
  {
    public string Title { get; private set; }
    public string Content { get; private set; }

    public Document(string title, string content)
    {
      this.Title = title;
      this.Content = content;
    }
  }
The DocumentManager class is a thin layer around the Queue<T> class. It defines how to handle documents: adding documents to the queue with the AddDocument method, and getting documents from the queue with the GetDocument method.
Inside the AddDocument method, the document is added to the end of the queue using the Enqueue method. The first document from the queue is read with the Dequeue method inside GetDocument. Because multiple threads can access the DocumentManager concurrently, access to the queue is locked with the lock statement.
IsDocumentAvailable is a read-only Boolean property that returns true if there are documents in the queue, and false if not (code file QueueSample/DocumentManager.cs):
  public class DocumentManager
  {
    private readonly Queue<Document> documentQueue = new Queue<Document>();

    public void AddDocument(Document doc)
    {
      lock (this)
      {
        documentQueue.Enqueue(doc);
      }
    }

    public Document GetDocument()
    {
      Document doc = null;
      lock (this)
      {
        doc = documentQueue.Dequeue();
      }
      return doc;
    }

    public bool IsDocumentAvailable
    {
      get
      {
        return documentQueue.Count > 0;
      }
    }
  }
The class ProcessDocuments processes documents from the queue in a separate task. The only method that can be accessed from the outside is Start. In the Start method, a new task is instantiated. A ProcessDocuments object is created to starting the task, and the Run method is defined as the start method of the task. The StartNew method of the TaskFactory (which is accessed from the static Factory property of the Task class) requires a delegate Action parameter where the address of the Run method can be passed to. The StartNew method of the TaskFactory immediately starts the task.
With the Run method of the ProcessDocuments class, an endless loop is defined. Within this loop, the property IsDocumentAvailable is used to determine whether there is a document in the queue. If so, the document is taken from the DocumentManager and processed. Processing in this example is writing information only to the console. In a real application, the document could be written to a file, written to the database, or sent across the network (code file QueueSample/ProcessDocuments.cs):
  public class ProcessDocuments
  {
    public static void Start(DocumentManager dm)
    {
      Task.Factory.StartNew(new ProcessDocuments(dm).Run);
    }

    protected ProcessDocuments(DocumentManager dm)
    {
      if (dm == null)
        throw new ArgumentNullException("dm");
      documentManager = dm;
    }

    private DocumentManager documentManager;

    protected void Run()
    {
      while (true)
      {
        if (documentManager.IsDocumentAvailable)
        {
          Document doc = documentManager.GetDocument();
          Console.WriteLine("Processing document {0}", doc.Title);
        }
        Thread.Sleep(new Random().Next(20));
      }
    }
  }
In the Main method of the application, a DocumentManager object is instantiated, and the document processing task is started. Then 1,000 documents are created and added to the DocumentManager (code file QueueSample/Program.cs):
  class Program
  {
    static void Main()
    {
      var dm = new DocumentManager();

      ProcessDocuments.Start(dm);

      // Create documents and add them to the DocumentManager
      for (int i = 0; i < 1000; i++)
      {
        var doc = new Document("Doc " + i.ToString(), "content");
        dm.AddDocument(doc);
        Console.WriteLine("Added document {0}", doc.Title);
        Thread.Sleep(new Random().Next(20));
      }
    }
  }
When you start the application, the documents are added to and removed from the queue, and you get output similar to the following:
Added document Doc 279
Processing document Doc 236
Added document Doc 280
Processing document Doc 237
Added document Doc 281
Processing document Doc 238
Processing document Doc 239
Processing document Doc 240
Processing document Doc 241
Added document Doc 282
Processing document Doc 242
Added document Doc 283
Processing document Doc 243
A real-life scenario using the task described with the sample application might be an application that processes documents received with a Web service.
STACKS
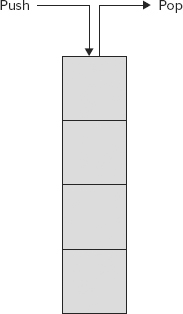
A stack is another container that is very similar to the queue. You just use different methods to access the stack. The item that is added last to the stack is read first, so the stack is a last in, first out (LIFO) container.
Figure 10-2 shows the representation of a stack where the Push method adds an item to the stack, and the Pop method gets the item that was added last.
Similar to the Queue<T> class, the Stack<T> class implements the interfaces IEnumerable<T> and ICollection.
Members of the Stack<T> class are listed in the following table.
| SELECTED STACK<T> MEMBERS | DESCRIPTION |
| Count | Returns the number of items in the stack. |
| Push | Adds an item on top of the stack. |
| Pop | Removes and returns an item from the top of the stack. If the stack is empty, an exception of type InvalidOperationException is thrown. |
| Peek | Returns an item from the top of the stack but does not remove the item. |
| Contains | Checks whether an item is in the stack and returns true if it is. |
In this example, three items are added to the stack with the Push method. With the foreach method, all items are iterated using the IEnumerable interface. The enumerator of the stack does not remove the items; it just returns them item by item (code file StackSample/Program.cs):
    var alphabet = new Stack<char>();
    alphabet.Push('A'),
    alphabet.Push('B'),
    alphabet.Push('C'),

    foreach (char item in alphabet)
    {
      Console.Write(item);
    }
    Console.WriteLine();
Because the items are read in order from the last item added to the first, the following result is produced:
CBAReading the items with the enumerator does not change the state of the items. With the Pop method, every item that is read is also removed from the stack. This way, you can iterate the collection using a while loop and verify the Count property if items still exist:
    var alphabet = new Stack<char>();
    alphabet.Push('A'),
    alphabet.Push('B'),
    alphabet.Push('C'),

    Console.Write("First iteration: ");
    foreach (char item in alphabet)
    {
      Console.Write(item);
    }
    Console.WriteLine();

    Console.Write("Second iteration: ");
    while (alphabet.Count > 0)
    {
      Console.Write(alphabet.Pop());
    }
    Console.WriteLine();
The result gives CBA twice, once for each iteration. After the second iteration, the stack is empty because the second iteration used the Pop method:
First iteration: CBA
Second iteration: CBA
LINKED LISTS
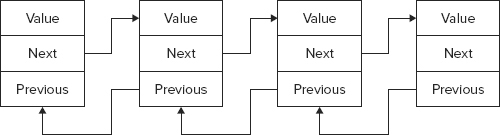
LinkedList<T> is a doubly linked list, whereby one element references the next and the previous one, as shown in Figure 10-3. This way you can easily walk through the complete list forward by moving to the next element, or backward by moving to the previous element.
The advantage of a linked list is that if items are inserted in the middle of a list, the linked list is very fast. When an item is inserted, only the Next reference of the previous item and the Previous reference of the next item must be changed to reference the inserted item. With the List<T> class, when an element is inserted all subsequent elements must be moved.
Of course, there’s also a disadvantage with linked lists. Items of linked lists can be accessed only one after the other. It takes a long time to find an item that’s somewhere in the middle or at the end of the list.
A linked list cannot just store the items inside the list; together with every item, the linked list must have information about the next and previous items. That’s why the LinkedList<T> contains items of type LinkedListNode<T>. With the class LinkedListNode<T>, you can get to the next and previous items in the list. The LinkedListNode<T> class defines the properties List, Next, Previous, and Value. The List property returns the LinkedList<T> object that is associated with the node. Next and Previous are for iterating through the list and accessing the next or previous item. Value returns the item that is associated with the node. Value is of type T.
The LinkedList<T> class itself defines members to access the first (First) and last (Last) item of the list, to insert items at specific positions (AddAfter, AddBefore, AddFirst, AddLast), to remove items from specific positions (Remove, RemoveFirst, RemoveLast), and to find elements where the search starts from either the beginning (Find) or the end (FindLast) of the list.
The sample application to demonstrate linked lists uses a linked list together with a list. The linked list contains documents as in the queue example, but the documents have an additional priority associated with them. The documents will be sorted inside the linked list depending on the priority. If multiple documents have the same priority, the elements are sorted according to the time when the document was inserted.
Figure 10-4 describes the collections of the sample application. LinkedList<Document> is the linked list containing all the Document objects. The figure shows the title and priority of the documents. The title indicates when the document was added to the list: The first document added has the title "One", the second document has the title "Two", and so on. You can see that the documents One and Four have the same priority, 8, but because One was added before Four, it is earlier in the list.
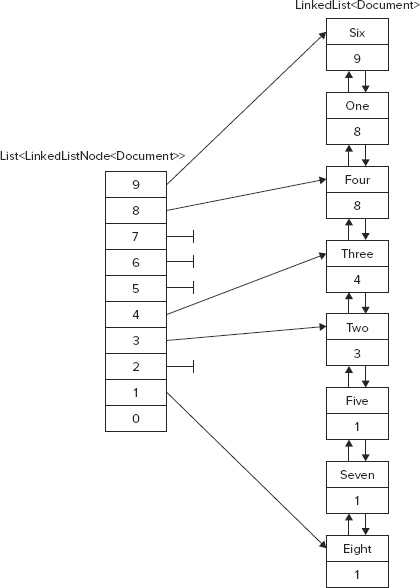
When new documents are added to the linked list, they should be added after the last document that has the same priority. The LinkedList<Document> collection contains elements of type LinkedListNode<Document>. The class LinkedListNode<T> adds Next and Previous properties to walk from one node to the next. For referencing such elements, the List<T> is defined as List<LinkedListNode<Document>>. For fast access to the last document of every priority, the collection List<LinkedListNode> contains up to 10 elements, each referencing the last document of every priority. In the upcoming discussion, the reference to the last document of every priority is called the priority node.
Using the previous example, the Document class is extended to contain the priority, which is set with the constructor of the class (code file LinkedListSample/Document.cs):
  public class Document
  {
    public string Title { get; private set; }
    public string Content { get; private set; }
    public byte Priority { get; private set; }

    public Document(string title, string content, byte priority)
    {
      this.Title = title;
      this.Content = content;
      this.Priority = priority;
    }
  }
The heart of the solution is the PriorityDocumentManager class. This class is very easy to use. With the public interface of this class, new Document elements can be added to the linked list, the first document can be retrieved, and for testing purposes it also has a method to display all elements of the collection as they are linked in the list.
The class PriorityDocumentManager contains two collections. The collection of type LinkedList<Document> contains all documents. The collection of type List<LinkedListNode<Document>> contains references of up to 10 elements that are entry points for adding new documents with a specific priority. Both collection variables are initialized with the constructor of the class PriorityDocumentManager. The list collection is also initialized with null (code file LinkedListSample/PriorityDocumentManager.cs):
  public class PriorityDocumentManager
  {
    private readonly LinkedList<Document> documentList;

    // priorities 0.9
    private readonly List<LinkedListNode<Document>> priorityNodes;

    public PriorityDocumentManager()
    {
      documentList = new LinkedList<Document>();

      priorityNodes = new List<LinkedListNode<Document>>(10);
      for (int i = 0; i < 10; i++)
      {
        priorityNodes.Add(new LinkedListNode<Document>(null));
      }
    }
Part of the public interface of the class is the method AddDocument. AddDocument does nothing more than call the private method AddDocumentToPriorityNode. The reason for having the implementation inside a different method is that AddDocumentToPriorityNode may be called recursively, as you will see soon:
    public void AddDocument(Document d)
    {
      if (d == null) throw new ArgumentNullException("d");

      AddDocumentToPriorityNode(d, d.Priority);
    }
The first action that is done in the implementation of AddDocumentToPriorityNode is a check to see if the priority fits in the allowed priority range. Here, the allowed range is between 0 and 9. If a wrong value is passed, an exception of type ArgumentException is thrown.
Next, you check whether there’s already a priority node with the same priority as the priority that was passed. If there’s no such priority node in the list collection, AddDocumentToPriorityNode is invoked recursively with the priority value decremented to check for a priority node with the next lower priority.
If there’s no priority node with the same priority or any priority with a lower value, the document can be safely added to the end of the linked list by calling the method AddLast. In addition, the linked list node is referenced by the priority node that’s responsible for the priority of the document.
If there’s an existing priority node, you can get the position inside the linked list where the document should be inserted. In the following example, you must determine whether a priority node already exists with the correct priority, or if there’s just a priority node that references a document with a lower priority. In the first case, you can insert the new document after the position referenced by the priority node. Because the priority node always must reference the last document with a specific priority, the reference of the priority node must be set. It gets more complex if only a priority node referencing a document with a lower priority exists. Here, the document must be inserted before all documents with the same priority as the priority node. To get the first document of the same priority, a while loop iterates through all linked list nodes, using the Previous property, until a linked list node is reached that has a different priority. This way, you know the position where the document must be inserted, and the priority node can be set:
    private void AddDocumentToPriorityNode(Document doc, int priority)
    {
      if (priority > 9 || priority < 0)
        throw new ArgumentException("Priority must be between 0 and 9");

      if (priorityNodes[priority].Value == null)
      {
        ––priority;
        if (priority >= 0)
        {
          // check for the next lower priority
          AddDocumentToPriorityNode(doc, priority);
        }
        else // now no priority node exists with the same priority or lower
             // add the new document to the end
        {
          documentList.AddLast(doc);
          priorityNodes[doc.Priority] = documentList.Last;
        }
        return;
      }
      else // a priority node exists
      {
        LinkedListNode<Document> prioNode = priorityNodes[priority];
        if (priority == doc.Priority)
            // priority node with the same priority exists
        {
          documentList.AddAfter(prioNode, doc);

          // set the priority node to the last document with the same priority
          priorityNodes[doc.Priority] = prioNode.Next;
        }
        else // only priority node with a lower priority exists
        {
          // get the first node of the lower priority
          LinkedListNode<Document> firstPrioNode = prioNode;

          while (firstPrioNode.Previous != null &&
              firstPrioNode.Previous.Value.Priority == prioNode.Value.Priority)
          {
            firstPrioNode = prioNode.Previous;
            prioNode = firstPrioNode;
          }

          documentList.AddBefore(firstPrioNode, doc);

          // set the priority node to the new value
          priorityNodes[doc.Priority] = firstPrioNode.Previous;
        }
      }
    }
Now only simple methods are left for discussion. DisplayAllNodes does a foreach loop to display the priority and the title of every document to the console.
The method GetDocument returns the first document (the document with the highest priority) from the linked list and removes it from the list:
    public void DisplayAllNodes()
    {
      foreach (Document doc in documentList)
      {
        Console.WriteLine("priority: {0}, title {1}", doc.Priority, doc.Title);
      }
    }

    // returns the document with the highest priority
    // (that's first in the linked list)
    public Document GetDocument()
    {
      Document doc = documentList.First.Value;
      documentList.RemoveFirst();
      return doc;
    }
  }
In the Main method, the PriorityDocumentManager is used to demonstrate its functionality. Eight new documents with different priorities are added to the linked list, and then the complete list is displayed (code file LinkedListSample/Program.cs):
    static void Main()
    {
      var pdm =  new PriorityDocumentManager();
      pdm.AddDocument(new Document("one", "Sample", 8));
      pdm.AddDocument(new Document("two", "Sample", 3));
      pdm.AddDocument(new Document("three", "Sample", 4));
      pdm.AddDocument(new Document("four", "Sample", 8));
      pdm.AddDocument(new Document("five", "Sample", 1));
      pdm.AddDocument(new Document("six", "Sample", 9));
      pdm.AddDocument(new Document("seven", "Sample", 1));
      pdm.AddDocument(new Document("eight", "Sample", 1));

      pdm.DisplayAllNodes();
    }
With the processed result, you can see that the documents are sorted first by priority and second by when the document was added:
priority: 9, title six
priority: 8, title one
priority: 8, title four
priority: 4, title three
priority: 3, title two
priority: 1, title five
priority: 1, title seven
priority: 1, title eight
SORTED LIST
If the collection you need should be sorted based on a key, you can use the SortedList<TKey, TValue>. This class sorts the elements based on a key. You can use any type for the value, and also for the key.
The following example creates a sorted list for which both the key and the value are of type string. The default constructor creates an empty list, and then two books are added with the Add method. With overloaded constructors, you can define the capacity of the list and pass an object that implements the interface IComparer<TKey>, which is used to sort the elements in the list.
The first parameter of the Add method is the key (the book title); the second parameter is the value (the ISBN number). Instead of using the Add method, you can use the indexer to add elements to the list. The indexer requires the key as index parameter. If a key already exists, the Add method throws an exception of type ArgumentException. If the same key is used with the indexer, the new value replaces the old value (code file SortedListSample/Program.cs):
         var books = new SortedList<string, string>();
         books.Add("Professional WPF Programming", "978–0–470–04180–2");
         books.Add("Professional ASP.NET MVC 3", "978–1–1180–7658–3");

         books["Beginning Visual C# 2010"] = "978–0–470-50226-6";
books["Professional C# 4 and .NET 4"] = "978–0–470–50225–9";You can iterate through the list using a foreach statement. Elements returned by the enumerator are of type KeyValuePair<TKey, TValue>, which contains both the key and the value. The key can be accessed with the Key property, and the value can be accessed with the Value property:
      foreach (KeyValuePair<string, string> book in books)
      {
        Console.WriteLine("{0}, {1}", book.Key, book.Value);
      }
The iteration displays book titles and ISBN numbers ordered by the key:
Beginning Visual C# 2010, 978-0-470-50226-6
Professional ASP.NET MVC 3, 978-1-1180-7658-3
Professional C# 4 and .NET 4, 978-0-470-50225-9
Professional WPF Programming, 978-0-470-04180-2
You can also access the values and keys by using the Values and Keys properties. The Values property returns IList<TValue> and the Keys property returns IList<TKey>, so you can use these properties with a foreach:
      foreach (string isbn in books.Values)
      {
        Console.WriteLine(isbn);
      }

      foreach (string title in books.Keys)
      {
        Console.WriteLine(title);
      }
The first loop displays the values, and next the keys:
978-0-470-50226-6
978-1-1180-7658-3
978-0-470-50225-9
978-0-470-04180-2
Beginning Visual C# 2010
Professional ASP.NET MVC 3
Professional C# 4 and .NET 4
Professional WPF Programming
If you try to access an element with an indexer and passing a key that does not exist, an exception of type KeyNotFoundException is thrown. To avoid that exception you can use the method ContainsKey, which returns true if the key passed exists in the collection, or you can invoke the method TryGetValue, which tries to get the value but doesn’t throw an exception if it isn’t found:
      string isbn;
      string title = "Professional C# 7.0";
      if (!books.TryGetValue(title, out isbn))
      {
        Console.WriteLine("{0} not found", title);
      }
DICTIONARIES
A dictionary represents a sophisticated data structure that enables you to access an element based on a key. Dictionaries are also known as hash tables or maps. The main feature of dictionaries is fast lookup based on keys. You can also add and remove items freely, a bit like a List<T>, but without the performance overhead of having to shift subsequent items in memory.
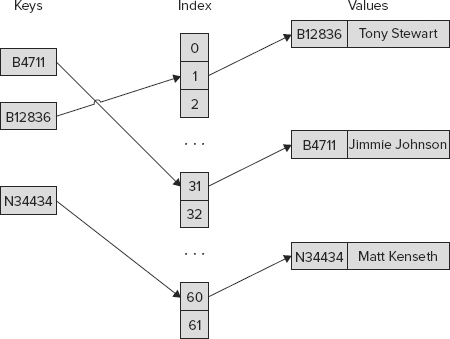
Figure 10-5 shows a simplified representation of a dictionary. Here employee-ids such as B4711 are the keys added to the dictionary. The key is transformed into a hash. With the hash a number is created to associate an index with the values. The index then contains a link to the value. The figure is simplified because it is possible for a single index entry to be associated with multiple values, and the index can be stored as a tree.
The .NET Framework offers several dictionary classes. The main class you to use is Dictionary<TKey, TValue>.
Key Type
A type that is used as a key in the dictionary must override the method GetHashCode of the Object class. Whenever a dictionary class needs to determine where an item should be located, it calls the GetHashCode method. The int that is returned by GetHashCode is used by the dictionary to calculate an index of where to place the element. We won’t go into this part of the algorithm; what you should know is that it involves prime numbers, so the capacity of a dictionary is a prime number.
The implementation of GetHashCode must satisfy the following requirements:
- The same object should always return the same value.
- Different objects can return the same value.
- It should execute as quickly as possible; it must be inexpensive to compute.
- It must not throw exceptions.
- It should use at least one instance field.
- The hash code value should be evenly distributed across the entire range of numbers that an int can store.
- The hash code should not change during the lifetime of the object.
What’s the reason for having hash code values evenly distributed across the range of integers? If two keys return hashes that have the same index, the dictionary class needs to start looking for the nearest available free location to store the second item — and it will have to do some searching to retrieve this item later. This is obviously going to hurt performance. In addition, if a lot of your keys are tending to provide the same storage indexes for where they should be stored, this kind of clash becomes more likely. However, because of the way that Microsoft’s part of the algorithm works, this risk is minimized when the calculated hash values are evenly distributed between int.MinValue and int.MaxValue.
Besides having an implementation of GetHashCode, the key type also must implement the IEquatable<T>.Equals method or override the Equals method from the Object class. Because different key objects may return the same hash code, the method Equals is used by the dictionary comparing keys. The dictionary examines whether two keys, such as A and B, are equal, it invoking A.Equals(B). This means that you must ensure that the following is always true:
If A.Equals(B) is true, then A.GetHashCode and B.GetHashCode must always return the same hash code.
This may seem a fairly subtle point, but it is crucial. If you contrived some way of overriding these methods so that the preceding statement were not always true, a dictionary that uses instances of this class as its keys would not work properly. Instead, you’d find funny things happening. For example, you might place an object in the dictionary and then discover that you could never retrieve it, or you might try to retrieve an entry and have the wrong entry returned.
For System.Object this condition is true because Equals simply compares references, and GetHashCode actually returns a hash that is based solely on the address of the object. This means that hash tables based on a key that doesn’t override these methods will work correctly. However, the problem with this approach is that keys are regarded as equal only if they are the same object. That means when you place an object in the dictionary, you have to hang onto the reference to the key; you can’t simply instantiate another key object later with the same value. If you don’t override Equals and GetHashCode, the type is not very convenient to use in a dictionary.
Incidentally, System.String implements the interface IEquatable and overloads GetHashCode appropriately. Equals provides value comparison, and GetHashCode returns a hash based on the value of the string. Strings can be used conveniently as keys in dictionaries.
Number types such as Int32 also implement the interface IEquatable and overload GetHashCode. However, the hash code returned by these types simply maps to the value. If the number you would like to use as a key is not itself distributed around the possible values of an integer, using integers as keys doesn’t fulfill the rule of evenly distributing key values to get the best performance. Int32 is not meant to be used in a dictionary.
If you need to use a key type that does not implement IEquatable and override GetHashCode according to the key values you store in the dictionary, you can create a comparer implementing the interface IEqualityComparer<T>. IEqualityComparer<T> defines the methods GetHashCode and Equals with an argument of the object passed, so you can offer an implementation different from the object type itself. An overload of the Dictionary<TKey, TValue> constructor allows passing an object implementing IEqualityComparer<T>. If such an object is assigned to the dictionary, this class is used to generate the hash codes and compare the keys.
Dictionary Example
The dictionary example in this section is a program that sets up a dictionary of employees. The dictionary is indexed by EmployeeId objects, and each item stored in the dictionary is an Employee object that stores details of an employee.
The struct EmployeeId is implemented to define a key to be used in a dictionary. The members of the class are a prefix character and a number for the employee. Both of these variables are read-only and can be initialized only in the constructor to ensure that keys within the dictionary shouldn’t change, and this way that is guaranteed. The fields are filled within the constructor. The ToString method is overloaded to get a string representation of the employee ID. As required for a key type, EmployeeId implements the interface IEquatable and overloads the method GetHashCode (code file DictionarySample/EmployeeId.cs):
  [Serializable]
  public class EmployeeIdException : Exception
  {
    public EmployeeIdException(string message) : base(message)  { }
  }

  [Serializable]
  public struct EmployeeId : IEquatable<EmployeeId>
  {
    private readonly char prefix;
    private readonly int number;

    public EmployeeId(string id)
    {
      Contract.Requires<ArgumentNullException>(id != null);

      prefix = (id.ToUpper())[0];
      int numLength = id.Length  1;
      try
      {
        number = int.Parse(id.Substring(1, numLength > 6 ? 6 : numLength));
      }
      catch (FormatException)
      {
        throw new EmployeeIdException("Invalid EmployeeId format");
      }
    }

    public override string ToString()
    {
       return prefix.ToString() + string.Format("{0,6:000000}", number);
    }

    public override int GetHashCode()
    {
      return (number ^ number << 16) * 0x15051505;
    }

    public bool Equals(EmployeeId other)
    {
      if (other == null) return false;

      return (prefix == other.prefix && number == other.number);
    }

    public override bool Equals(object obj)
    {
      return Equals((EmployeeId)obj);
    }

    public static bool operator ==(EmployeeId left, EmployeeId right)
    {
      return left.Equals(right);
    }

    public static bool operator !=(EmployeeId left, EmployeeId right)
    {
      return !(left == right);
    }
  }
The Equals method that is defined by the IEquatable<T> interface compares the values of two EmployeeId objects and returns true if both values are the same. Instead of implementing the Equals method from the IEquatable<T> interface, you can also override the Equals method from the Object class:
   public bool Equals(EmployeeId other)
   {
     if (other == null) return false;
     return (prefix == other.prefix && number == other.number);
   }
With the number variable, a value from 1 to around 190,000 is expected for the employees. This doesn’t fill the range of an integer. The algorithm used by GetHashCode shifts the number 16 bits to the left, then does an XOR with the original number, and finally multiplies the result by the hex value 15051505. The hash code is fairly evenly distributed across the range of an integer:
   public override int GetHashCode()
   {
     return (number ^ number << 16) * 0x15051505;
   }
The Employee class is a simple entity class containing the name, salary, and ID of the employee. The constructor initializes all values, and the method ToString returns a string representation of an instance. The implementation of ToString uses a format string to create the string representation for performance reasons (code file DictionarySample/Employee.cs):
  [Serializable]
  public class Employee
  {
    private string name;
    private decimal salary;
    private readonly EmployeeId id;

    public Employee(EmployeeId id, string name, decimal salary)
    {
      this.id = id;
      this.name = name;
      this.salary = salary;
    }

    public override string ToString()
    {
      return String.Format("{0}: {1, -20} {2:C}",
        id.ToString(), name, salary);
    }
  }
In the Main method of the sample application, a new Dictionary<TKey, TValue> instance is created, where the key is of type EmployeeId and the value is of type Employee. The constructor allocates a capacity of 31 elements. Remember that capacity is based on prime numbers. However, when you assign a value that is not a prime number, you don’t need to worry. The Dictionary<TKey, TValue> class itself takes the next prime number that follows the integer passed to the constructor to allocate the capacity. The employee objects and IDs are created and added to the dictionary with the Add method. Instead of using the Add method, you can also use the indexer to add keys and values to the dictionary, as shown here with the employees Matt and Brad (code file DictionarySample/Program.cs):
    static void Main()
    {
      var employees = new Dictionary<EmployeeId, Employee>(31);

      var idTony = new EmployeeId("C3755");
      var tony = new Employee(idTony, "Tony Stewart", 379025.00m);
      employees.Add(idTony, tony);
      Console.WriteLine(tony);

      var idCarl = new EmployeeId("F3547");
      var carl = new Employee(idCarl, "Carl Edwards", 403466.00m);
      employees.Add(idCarl, carl);
      Console.WriteLine(carl);

      var idKevin = new EmployeeId("C3386");
      var kevin = new Employee(idKevin, "Kevin Harwick", 415261.00m);
      employees.Add(idKevin, kevin);
      Console.WriteLine(kevin);

      var idMatt = new EmployeeId("F3323");
      var matt = new Employee(idMatt, "Matt Kenseth", 1589390.00m);
      employees[idMatt] = matt;
      Console.WriteLine(matt);

      var idBrad = new EmployeeId("D3234");
      var brad = new Employee(idBrad, "Brad Keselowski", 322295.00m);
      employees[idBrad] = brad;
      Console.WriteLine(brad);
After the entries are added to the dictionary, inside a while loop employees are read from the dictionary. The user is asked to enter an employee number to store in the variable userInput, and the user can exit the application by entering X. If the key is in the dictionary, it is examined with the TryGetValue method of the Dictionary<TKey, TValue> class. TryGetValue returns true if the key is found and false otherwise. If the value is found, the value associated with the key is stored in the employee variable. This value is written to the console.
      while (true)
      {
        Console.Write("Enter employee id (X to exit)> ");
        var userInput = Console.ReadLine();
        userInput = userInput.ToUpper();
        if (userInput == "X") break;

        EmployeeId id;
        try
        {
          id = new EmployeeId(userInput);


          Employee employee;
          if (!employees.TryGetValue(id, out employee))
          {
            Console.WriteLine("Employee with id {0} does not exist",
                id);
          }
          else
          {
            Console.WriteLine(employee);
          }
        }
        catch (EmployeeIdException ex)
        {
          Console.WriteLine(ex.Message);
        }
      }
    }
  }
Running the application produces the following output:
Enter employee id (X to exit)> C3386
C003386: Kevin Harwick       $415,261.00
Enter employee id (X to exit)> F3547
F003547: Carl Edwards        $403,466.00
Enter employee id (X to exit)> X
Press any key to continue ...
Lookups
Dictionary<TKey, TValue> supports only one value per key. The class Lookup<TKey, TElement> resembles a Dictionary<TKey, TValue> but maps keys to a collection of values. This class is implemented in the assembly System.Core and defined with the namespace System.Linq.
Lookup<TKey, TElement> cannot be created as a normal dictionary. Instead, you have to invoke the method ToLookup, which returns a Lookup<TKey, TElement> object. The method ToLookup is an extension method that is available with every class implementing IEnumerable<T>. In the following example, a list of Racer objects is filled. Because List<T> implements IEnumerable<T>, the ToLookup method can be invoked on the racers list. This method requires a delegate of type Func<TSource, TKey> that defines the selector of the key. Here, the racers are selected based on their country by using the lambda expression r => r.Country. The foreach loop accesses only the racers from Australia by using the indexer (code file LookupSample/Program.cs):
         var racers = new List<Racer>();
         racers.Add(new Racer("Jacques", "Villeneuve", "Canada", 11));
         racers.Add(new Racer("Alan", "Jones", "Australia", 12));
         racers.Add(new Racer("Jackie", "Stewart", "United Kingdom", 27));
         racers.Add(new Racer("James", "Hunt", "United Kingdom", 10));
         racers.Add(new Racer("Jack", "Brabham", "Australia", 14));

         var lookupRacers = racers.ToLookup(r => r.Country);

         foreach (Racer r in lookupRacers["Australia"])
         {
            Console.WriteLine(r);
}The output shows the racers from Australia:
Alan Jones
Jack Brabham
Sorted Dictionaries
SortedDictionary<TKey, TValue> is a binary search tree in which the items are sorted based on the key. The key type must implement the interface IComparable<TKey>. If the key type is not sortable, you can also create a comparer implementing IComparer<TKey> and assign the comparer as a constructor argument of the sorted dictionary.
Earlier in this chapter you read about SortedList<TKey, TValue>. SortedDictionary<TKey, TValue> and SortedList<TKey, TValue> have similar functionality, but because SortedList<TKey, TValue> is implemented as a list that is based on an array, and SortedDictionary<TKey, TValue> is implemented as a dictionary, the classes have different characteristics:
- SortedList<TKey, TValue> uses less memory than SortedDictionary<TKey, TValue>.
- SortedDictionary<TKey, TValue> has faster insertion and removal of elements.
- When populating the collection with already sorted data, SortedList<TKey, TValue> is faster if capacity changes are not needed.
SETS
A collection that contains only distinct items is known by the term set. The .NET Framework includes two sets, HashSet<T> and SortedSet<T>, that both implement the interface ISet<T>. HashSet<T> contains an unordered list of distinct items; with SortedSet<T> the list is ordered.
The ISet<T> interface offers methods to create a union of multiple sets, an intersection of sets, or to provide information if one set is a superset or subset of another.
In the following sample code, three new sets of type string are created and filled with Formula-1 cars. The HashSet<T> class implements the ICollection<T> interface. However, the Add method is implemented explicitly and a different Add method is offered by the class, as you can see here. The Add method differs by the return type; a Boolean value is returned to provide the information if the element was added. If the element was already in the set, it is not added, and false is returned (code file SetSample/Program.cs):
      var companyTeams = new HashSet<string>()
      { "Ferrari", "McLaren", "Mercedes" };
      var traditionalTeams = new HashSet<string>() { "Ferrari", "McLaren" };
      var privateTeams = new HashSet<string>()
      { "Red Bull", "Toro Rosso", "Force India", "Sauber" };

      if (privateTeams.Add("Williams"))
          Console.WriteLine("Williams added");
      if (!companyTeams.Add("McLaren"))
          Console.WriteLine("McLaren was already in this set");
The result of these two Add methods is written to the console:
Williams added
McLaren was already in this set
The methods IsSubsetOf and IsSupersetOf compare a set with a collection that implements the IEnumerable<T> interface and returns a Boolean result. Here, IsSubsetOf verifies whether every element in traditionalTeams is contained in companyTeams, which is the case; IsSupersetOf verifies whether traditionalTeams has any additional elements compared to companyTeams:
      if (traditionalTeams.IsSubsetOf(companyTeams))
      {
        Console.WriteLine("traditionalTeams is subset of companyTeams");
      }

      if (companyTeams.IsSupersetOf(traditionalTeams))
      {
        Console.WriteLine("companyTeams is a superset of traditionalTeams");
      }
The output of this verification is shown here:
traditionalTeams is a subset of companyTeams
companyTeams is a superset of traditionalTeams
Williams is a traditional team as well, which is why this team is added to the traditionalTeams collection:
      traditionalTeams.Add("Williams");
      if (privateTeams.Overlaps(traditionalTeams))
      {
        Console.WriteLine("At least one team is the same with the " +
            "traditional and private teams");
      }
Because there’s an overlap, this is the result:
At least one team is the same with the traditional and private teams.The variable allTeams that references a new SortedSet<string> is filled with a union of companyTeams, privateTeams, and traditionalTeams by calling the UnionWith method:
      var allTeams = new SortedSet<string>(companyTeams);
      allTeams.UnionWith(privateTeams);
      allTeams.UnionWith(traditionalTeams);

      Console.WriteLine();
      Console.WriteLine("all teams");
      foreach (var team in allTeams)
      {
        Console.WriteLine(team);
      }
Here, all teams are returned but every team is listed just once because the set contains only unique values; and because the container is a SortedSet<string>, the result is ordered:
Ferrari
Force India
Lotus
McLaren
Mercedes
Red Bull
Sauber
Toro Rosso
Williams
The method ExceptWith removes all private teams from the allTeams set:
         allTeams.ExceptWith(privateTeams);
         Console.WriteLine();
         Console.WriteLine("no private team left");
         foreach (var team in allTeams)
         {
            Console.WriteLine(team);
         }
The remaining elements in the collection do not contain any private team:
Ferrari
McLaren
Mercedes
OBSERVABLE COLLECTIONS
In case you need information when items in the collection are removed or added, you can use the ObservableCollection<T> class. This class was defined for WPF so that the UI is informed about collection changes; therefore, this class is defined in the assembly WindowsBase and you need to reference it. The namespace of this class is System.Collections.ObjectModel.
ObservableCollection<T> derives from the base class Collection<T> that can be used to create custom collections and it uses List<T> internal. From the base class, the virtual methods SetItem and RemoveItem are overridden to fire the CollectionChanged event. Clients of this class can register to this event by using the interface INotifyCollectionChanged.
The next example demonstrates using an ObservableCollection<string> where the method Data_CollectionChanged is registered to the CollectionChanged event. Two items are added to the end — one item is inserted, and one item is removed (code file ObservableCollectionSample/Program.cs):
         var data = new ObservableCollection<string>();
         data.CollectionChanged += Data_CollectionChanged;
         data.Add("One");
         data.Add("Two");
         data.Insert(1, "Three");
         data.Remove("One");
The method Data_CollectionChanged receives NotifyCollectionChangedEventArgs containing information about changes to the collection. The Action property provides information if an item was added or removed. With removed items, the OldItems property is set and lists the removed items. With added items, the NewItems property is set and lists the new items:
    static void Data_CollectionChanged(object sender,
                                       NotifyCollectionChangedEventArgs e)
    {
      Console.WriteLine("action: {0}", e.Action.ToString());

      if (e.OldItems != null)
      {
        Console.WriteLine("starting index for old item(s): {0}",
                          e.OldStartingIndex);
        Console.WriteLine("old item(s):");
        foreach (var item in e.OldItems)
        {
          Console.WriteLine(item);
        }
      }
      if (e.NewItems != null)
      {
        Console.WriteLine("starting index for new item(s): {0}",
                          e.NewStartingIndex);
        Console.WriteLine("new item(s): ");
        foreach (var item in e.NewItems)
        {
          Console.WriteLine(item);
        }
      }
      Console.WriteLine();
    }
Running the application results in the following output. First the items One and Two are added to the collection, and thus the Add action is shown with the index 0 and 1. The third item, Three, is inserted on position 1 so it shows the action Add with index 1. Finally, the item One is removed as shown with the action Remove and index 0:
action: Add
starting index for new item(s): 0
new item(s):
One

action: Add
starting index for new item(s): 1
new item(s):
Two

action: Add
starting index for new item(s): 1
new item(s):
Three

action: Remove
starting index for old item(s): 0
old item(s):
One
BIT ARRAYS
If you need to deal with a number of bits, you can use the class BitArray and the struct BitVector32. BitArray is located in the namespace System.Collections; BitVector32 is in the namespace System.Collections.Specialized. The most important difference between these two types is that BitArray is resizable, which is useful if you don’t know the number of bits needed in advance, and it can contain a large number of bits. BitVector32 is stack-based and therefore faster. BitVector32 contains only 32 bits, which are stored in an integer.
BitArray
The class BitArray is a reference type that contains an array of ints, where for every 32 bits a new integer is used. Members of this class are described in the following table.
| BITARRAY MEMBERS | DESCRIPTION |
| Count Length | The get accessor of both Count and Length return the number of bits in the array. With the Length property, you can also define a new size and resize the collection. |
| Item Get Set | You can use an indexer to read and write bits in the array. The indexer is of type bool. Instead of using the indexer, you can also use the Get and Set methods to access the bits in the array. |
| SetAll | The method SetAll sets the values of all bits according to the parameter passed to the method. |
| Not | The method Not generates the inverse of all bits of the array. |
| And Or Xor | With the methods And, Or, and Xor, you can combine two BitArray objects. The And method does a binary AND, where the result bits are set only if the bits from both input arrays are set. The Or method does a binary OR, where the result bits are set if one or both of the input arrays are set. The Xor method is an exclusive OR, where the result is set if only one of the input bits is set. |
The helper method DisplayBits iterates through a BitArray and displays 1 or 0 to the console, depending on whether or not the bit is set (code file BitArraySample/Program.cs):
      static void DisplayBits(BitArray bits)
      {
         foreach (bool bit in bits)
         {
            Console.Write(bit ? 1: 0);
         }
      }
The example to demonstrate the BitArray class creates a bit array with 8 bits, indexed from 0 to 7. The SetAll method sets all 8 bits to true. Then the Set method changes bit 1 to false. Instead of the Set method, you can also use an indexer, as shown with index 5 and 7:
      var bits1 = new BitArray(8);
      bits1.SetAll(true);
      bits1.Set(1, false);
      bits1[5] = false;
      bits1[7] = false;
      Console.Write("initialized: ");
      DisplayBits(bits1);
      Console.WriteLine();
This is the displayed result of the initialized bits:
initialized: 10111010The Not method generates the inverse of the bits of the BitArray:
      Console.Write(" not ");
      DisplayBits(bits1);
      bits1.Not();
      Console.Write(" = ");
      DisplayBits(bits1);
      Console.WriteLine();
The result of Not is all bits inversed. If the bit were true, it is false; and if it were false, it is true:
not 10111010 = 01000101In the following example, a new BitArray is created. With the constructor, the variable bits1 is used to initialize the array, so the new array has the same values. Then the values for bits 0, 1, and 4 are set to different values. Before the Or method is used, the bit arrays bits1 and bits2 are displayed. The Or method changes the values of bits1:
      var bits2 = new BitArray(bits1);
      bits2[0] = true;
      bits2[1] = false;
      bits2[4] = true;
      DisplayBits(bits1);
      Console.Write(" or ");
      DisplayBits(bits2);
      Console.Write(" = ");
      bits1.Or(bits2);
      DisplayBits(bits1);
      Console.WriteLine();
With the Or method, the set bits are taken from both input arrays. In the result, the bit is set if it was set with either the first or the second array:
01000101 or 10001101 = 11001101Next, the And method is used to operate on bits2 and bits1:
      DisplayBits(bits2);
      Console.Write(" and ");
      DisplayBits(bits1);
      Console.Write(" = ");
      bits2.And(bits1);
      DisplayBits(bits2);
      Console.WriteLine();
The result of the And method only sets the bits where the bit was set in both input arrays:
10001101 and 11001101 = 10001101Finally, the Xor method is used for an exclusive OR:
      DisplayBits(bits1);
      Console.Write(" xor ");
      DisplayBits(bits2);
      bits1.Xor(bits2);
      Console.Write(" = ");
      DisplayBits(bits1);
      Console.WriteLine();
With the Xor method, the resultant bits are set only if the bit was set either in the first or the second input, but not both:
11001101 xor 10001101 = 01000000BitVector32
If you know the number of bits you need in advance, you can use the BitVector32 structure instead of BitArray. BitVector32 is more efficient because it is a value type and stores the bits on the stack inside an integer. With a single integer you have a place for 32 bits. If you need more bits, you can use multiple BitVector32 values or the BitArray. The BitArray can grow as needed; this is not an option with BitVector32.
The following table shows the members of BitVector that are very different from BitArray:
| BITVECTOR MEMBERS | DESCRIPTION |
| Data | The property Data returns the data behind the BitVector32 as an integer. |
| Item | The values for the BitVector32 can be set using an indexer. The indexer is overloaded — you can get and set the values using a mask or a section of type BitVector32.Section. |
| CreateMask | CreateMask is a static method that you can use to create a mask for accessing specific bits in the BitVector32. |
| CreateSection | CreateSection is a static method that you can use to create several sections within the 32 bits. |
The following example creates a BitVector32 with the default constructor, whereby all 32 bits are initialized to false. Then masks are created to access the bits inside the bit vector. The first call to CreateMask creates a mask to access the first bit. After CreateMask is invoked, bit1 has a value of 1. Invoking CreateMask once more and passing the first mask as a parameter to CreateMask returns a mask to access the second bit, which is 2. bit3 then has a value of 4 to access bit number 3, and bit4 has a value of 8 to access bit number 4.
Then the masks are used with the indexer to access the bits inside the bit vector and to set the fields accordingly (code file BitArraySample/Program.cs):
      var bits1 = new BitVector32();
      int bit1 = BitVector32.CreateMask();
      int bit2 = BitVector32.CreateMask(bit1);
      int bit3 = BitVector32.CreateMask(bit2);
      int bit4 = BitVector32.CreateMask(bit3);
      int bit5 = BitVector32.CreateMask(bit4);

      bits1[bit1] = true;
      bits1[bit2] = false;
      bits1[bit3] = true;
      bits1[bit4] = true;
      bits1[bit5] = true;
      Console.WriteLine(bits1);
The BitVector32 has an overridden ToString method that not only displays the name of the class but also 1 or 0 if the bits are set or not, respectively:
BitVector32{00000000000000000000000000011101}Instead of creating a mask with the CreateMask method, you can define the mask yourself; you can also set multiple bits at once. The hexadecimal value abcdef is the same as the binary value 1010 1011 1100 1101 1110 1111. All the bits defined with this value are set:
      bits1[0xabcdef] = true;
      Console.WriteLine(bits1);
With the output shown you can verify the bits that are set:
BitVector32{00000000101010111100110111101111}Separating the 32 bits to different sections can be extremely useful. For example, an IPv4 address is defined as a four-byte number that is stored inside an integer. You can split the integer by defining four sections. With a multicast IP message, several 32-bit values are used. One of these 32-bit values is separated in these sections: 16 bits for the number of sources, 8 bits for a querier’s query interval code, 3 bits for a querier’s robustness variable, a 1-bit suppress flag, and 4 bits that are reserved. You can also define your own bit meanings to save memory.
The following example simulates receiving the value 0x79abcdef and passes this value to the constructor of BitVector32, so that the bits are set accordingly:
      int received = 0x79abcdef;

      BitVector32 bits2 = new BitVector32(received);
      Console.WriteLine(bits2);
The bits are shown on the console as initialized:
BitVector32{01111001101010111100110111101111}Then six sections are created. The first section requires 12 bits, as defined by the hexadecimal value 0xfff (12 bits are set); section B requires 8 bits; section C, 4 bits; section D and E, 3 bits; and section F, 2 bits. The first call to CreateSection just receives 0xfff to allocate the first 12 bits. With the second call to CreateSection, the first section is passed as an argument, so the next section continues where the first section ended. CreateSection returns a value of type BitVector32.Section that contains the offset and the mask for the section:
      // sections: FF EEE DDD CCCC BBBBBBBB
      // AAAAAAAAAAAA
      BitVector32.Section sectionA = BitVector32.CreateSection(0xfff);
      BitVector32.Section sectionB = BitVector32.CreateSection(0xff, sectionA);
      BitVector32.Section sectionC = BitVector32.CreateSection(0xf, sectionB);
      BitVector32.Section sectionD = BitVector32.CreateSection(0x7, sectionC);
      BitVector32.Section sectionE = BitVector32.CreateSection(0x7, sectionD);
      BitVector32.Section sectionF = BitVector32.CreateSection(0x3, sectionE);
Passing a BitVector32.Section to the indexer of the BitVector32 returns an int just mapped to the section of the bit vector. As shown next, a helper method, IntToBinaryString, retrieves a string representation of the int number:
      Console.WriteLine("Section A: {0}",
                        IntToBinaryString(bits2[sectionA], true));
      Console.WriteLine("Section B: {0}",
                        IntToBinaryString(bits2[sectionB], true));
      Console.WriteLine("Section C: {0}",
                        IntToBinaryString(bits2[sectionC], true));
      Console.WriteLine("Section D: {0}",
                        IntToBinaryString(bits2[sectionD], true));
      Console.WriteLine("Section E: {0}",
                        IntToBinaryString(bits2[sectionE], true));
      Console.WriteLine("Section F: {0}",
                        IntToBinaryString(bits2[sectionF], true));
The method IntToBinaryString receives the bits in an integer and returns a string representation containing 0 and 1. With the implementation, 32 bits of the integer are iterated through. In the iteration, if the bit is set, 1 is appended to the StringBuilder; otherwise, 0 is appended. Within the loop, a bit shift occurs to check if the next bit is set:
    static string IntToBinaryString(int bits, bool removeTrailingZero)
    {
      var sb = new StringBuilder(32);

      for (int i = 0; i < 32; i++)
      {
        if ((bits & 0x80000000) != 0)
        {
          sb.Append("1");
        }
        else
        {
          sb.Append("0");
        }
        bits = bits << 1;
      }
      string s = sb.ToString();
      if (removeTrailingZero)
      {
        return s.TrimStart('0'),
      }
      else
      {
        return s;
      }
    }
The result displays the bit representation of sections A to F, which you can now verify with the value that was passed into the bit vector:
Section A: 110111101111
Section B: 10111100
Section C: 1010
Section D: 1
Section E: 111
Section F: 1
CONCURRENT COLLECTIONS
Since version 4 of the .NET Framework, .NET offers thread-safe collection classes within the namespace System.Collections.Concurrent. Thread-safe collections are guarded against multiple threads accessing them in conflicting ways.
For thread-safe access of collections, the interface IProducerConsumerCollection<T> is defined. The most important methods of this interface are TryAdd and TryTake. TryAdd tries to add an item to the collection, but this might fail if the collection is locked from adding items. To provide this information, the method returns a Boolean value indicating success or failure. TryTake works the same way to inform the caller about success or failure, and returns on success an item from the collection. The following list describes the collection classes from the System.Collections.Concurrent namespace and its functionality:
- ConcurrentQueue<T> — This class is implemented with a lock-free algorithm and uses 32 item arrays that are combined in a linked list internally. Methods to access the elements of the queue are Enqueue, TryDequeue, and TryPeek. The naming of these methods is very similar to the methods of Queue<T> that you know already, with the difference of the “Try” prefix to indicate the method call might fail.
Because this class implements the interface IProducerConsumerCollection<T>, the methods TryAdd and TryTake just invoke Enqueue and TryDequeue.
- ConcurrentStack<T> — Very similar to ConcurrentQueue<T> but with other item access methods, this class defines the methods Push, PushRange, TryPeek, TryPop, and TryPopRange. Internally this class uses a linked list of its items.
- ConcurrentBag<T> — This class doesn’t define any order in which to add or take items. It uses a concept that maps threads to arrays used internally and thus tries to reduce locks. The methods to access elements are Add, TryPeek, and TryTake.
- ConcurrentDictionary<TKey, TValue> — This is a thread-safe collection of keys and values. TryAdd, TryGetValue, TryRemove, and TryUpdate are methods to access the members in a nonblocking fashion. Because the items are based on keys and values, ConcurrentDictionary<TKey, TValue> does not implement IProducerConsumerCollection<T>.
- BlockingCollection<T> — A collection that blocks and waits until it is possible to do the task by adding or taking the item, BlockingCollection<T> offers an interface to add and remove items with the Add and Take methods. These methods block the thread and wait until the task becomes possible. The Add method has an overload whereby you also can pass a CancellationToken. This token enables cancelling a blocking call. If you don’t want the thread to wait for an endlessly time, and you don’t want to cancel the call from the outside, the methods TryAdd and TryTake are offered as well, whereby you can also specify a timeout value for the maximum amount of time you would like to block the thread and wait before the call should fail.
The ConcurrentXXX collection classes are thread-safe, returning false if an action is not possible with the current state of threads. You always have to check whether adding or taking the item was successful before moving on. You can’t trust the collection to always fulfill the task.
BlockingCollection<T> is a decorator to any class implementing the IProducerConsumerCollection<T> interface and by default uses ConcurrentQueue<T>. With the constructor you can also pass any other class that implements IProducerConsumerCollection<T>, e.g., ConcurrentBag<T> and ConcurrentStack<T>.
Creating Pipelines
A great use for these concurrent collection classes is with pipelines. One task writes some content to a collection class while another task can read from the collection at the same time.
The following sample application demonstrates the use of the BlockingCollection<T> class with multiple tasks that form a pipeline. The first pipeline is shown in Figure 10-6. The task for the first stage reads filenames and adds them to a queue. While this task is running, the task for stage two can already start to read the filenames from the queue and load their content. The result is written to another queue. Stage 3 can be started at the same time to read the content from the second queue and process it. Here, the result is written to a dictionary.
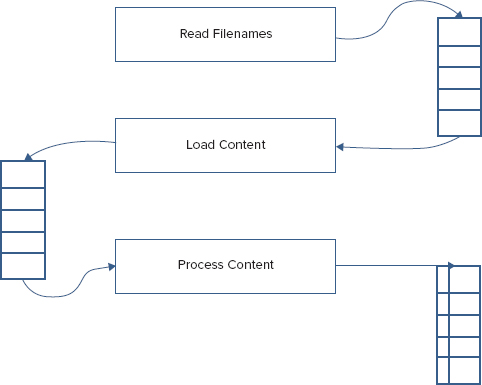
In this scenario, the next stage can only start when stage 3 is completed and the content is finally processed with a full result in the dictionary. The next steps are shown in Figure 10-7. Stage 4 reads from the dictionary, converts the data, and writes it to a queue. Stage 5 adds color information to the items and puts them in another queue. The last stage displays the information. Stages 4 to 6 can run concurrently as well.
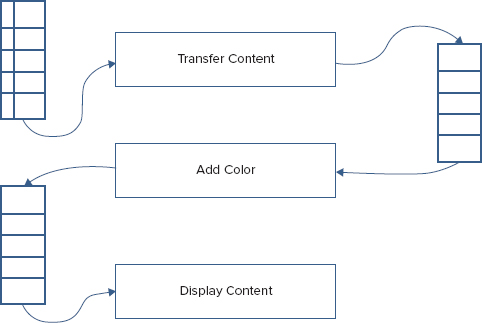
Looking at the code of this sample application, the complete pipeline is managed within the method StartPipeline. Here, the collections are instantiated and passed to the various stages of the pipeline. The first stage is processed with ReadFilenamesAsync, and the second and third stages, LoadContentAsync and ProcessContentAsync, are running simultaneously. The fourth stage, however, can only start when the first three stages are completed (code file PipelineSample/Program.cs):
    private static async void StartPipeline()
    {
      var fileNames = new BlockingCollection<string>();
      var lines = new BlockingCollection<string>();
      var words = new ConcurrentDictionary<string, int>();
      var items = new BlockingCollection<Info>();
      var coloredItems = new BlockingCollection<Info>();

      Task t1 = PipelineStages.ReadFilenamesAsync(@"../../..", fileNames);
      ConsoleHelper.WriteLine("started stage 1");
      Task t2 = PipelineStages.LoadContentAsync(fileNames, lines);
      ConsoleHelper.WriteLine("started stage 2");
      Task t3 = PipelineStages.ProcessContentAsync(lines, words);
      await Task.WhenAll(t1, t2, t3);
      ConsoleHelper.WriteLine("stages 1, 2, 3 completed");

      Task t4 = PipelineStages.TransferContentAsync(words, items);
      Task t5 = PipelineStages.AddColorAsync(items, coloredItems);
      Task t6 = PipelineStages.ShowContentAsync(coloredItems);
      ConsoleHelper.WriteLine("stages 4, 5, 6 started");

      await Task.WhenAll(t4, t5, t6);

      ConsoleHelper.WriteLine("all stages finished");
}The example writes information to the console using the ConsoleHelper class. This class provides an easy way to change the color for console output and uses synchronization to avoid returning output with the wrong colors (code file PipelineSample/ConsoleHelper.cs):
using System;

namespace Wrox.ProCSharp.Collections
{
  public class ConsoleHelper
  {
    private static object syncOutput = new object();

    public static void WriteLine(string message)
    {
      lock (syncOutput)
      {
        Console.WriteLine(message);
      }
    }

    public static void WriteLine(string message, string color)
    {
      lock (syncOutput)
      {
        Console.ForegroundColor = (ConsoleColor)Enum.Parse(
            typeof(ConsoleColor), color);
        Console.WriteLine(message);
        Console.ResetColor();
      }
    }
  }
}
Using BlockingCollection
Let’s get into the first stage of the pipeline. ReadFilenamesAsync receives a BlockingCollection<T> where it can write its output. The implementation of this method uses an enumerator to iterate C# files within the specified directory and its subdirectories. The filenames are added to the BlockingCollection<T> with the Add method. After adding filenames is completed, the CompleteAdding method is invoked to inform all readers that they should not wait for any additional items in the collection (code file PipelineSample/PipelineStages.cs):
using System.Collections.Concurrent;
using System.IO;
using System.Linq;
using System.Threading.Tasks;

namespace Wrox.ProCSharp.Collections
{
  public static class PipelineStages
  {
    public static Task ReadFilenamesAsync(string path,
        BlockingCollection<string> output)
    {
      return Task.Run(() =>
        {
          foreach (string filename in Directory.EnumerateFiles(path, "*.cs",
              SearchOption.AllDirectories))
          {
            output.Add(filename);
            ConsoleHelper.WriteLine(string.Format("stage 1: added {0}",
                filename));
          }
          output.CompleteAdding();
        });
}The next stage is to read the file and add its content to another collection , which is done from the LoadContentAsync method. This method uses the filenames passed with the input collection, opens the file, and adds all lines of the file to the output collection. With the foreach loop, the method GetConsumingEnumerable is invoked with the input blocking collection to iterate the items. It’s possible to use the input variable directly without invoking GetConsumingEnumerable, but this would only iterate the current state of the collection, and not the items that are added afterwards.
    public static async Task LoadContentAsync(BlockingCollection<string> input,
        BlockingCollection<string> output)
    {
      foreach (var filename in input.GetConsumingEnumerable())
      {
        using (FileStream stream = File.OpenRead(filename))
        {
          var reader = new StreamReader(stream);
          string line = null;
          while ((line = await reader.ReadLineAsync()) != null)
          {
            output.Add(line);
            ConsoleHelper.WriteLine(string.Format("stage 2: added {0}", line));
          }
        }
      }
      output.CompleteAdding();
}Using ConcurrentDictionary
Stage 3 is implemented in the ProcessContentAsync method. This method gets the lines from the input collection, and then splits and filters words to and output dictionary. The method AddOrIncrementValue is a helper method implemented as an extension method for dictionaries is shown next.:
    public static Task ProcessContentAsync(BlockingCollection<string> input,
        ConcurrentDictionary<string, int> output)
    {
      return Task.Run(() =>
        {
          foreach (var line in input.GetConsumingEnumerable())
          {
            string[] words = line.Split(' ', ';', '	', '{', '}', '(', ')',
                ':', ',', '"'),
            foreach (var word in words.Where(w => !string.IsNullOrEmpty(w)))
            {
              output.AddOrIncrementValue(word);
              ConsoleHelper.WriteLine(string.Format("stage 3: added {0}",
                  word));
            }
          }
        });
    }
Remember that stage 3 in the pipeline adds a word to the dictionary if it doesn’t exist yet, and increments a value in the dictionary if the word is already in there. This functionality is implemented in the extension method AddOrIncrementValue. Because the dictionary cannot be used with the BlockingCollection<T>, there are no blocking methods that wait until adding values succeeds. Instead, TryXXX methods can be used where it’s necessary to verify if adding or updating the value succeeded. If another thread were updating a value at the same time, updates can fail. The implementation makes use of TryGetValue to check if an item is already in the dictionary, TryUpdate to update a value, and TryAdd to add a value (code file PipelineSample/ConcurrentDictionaryExtensions.cs):
using System.Collections.Concurrent;

namespace Wrox.ProCSharp.Collections
{
  public static class ConcurrentDictionaryExtension
  {
    public static void AddOrIncrementValue(
        this ConcurrentDictionary<string, int> dict, string key)
    {
      bool success = false;
      while (!success)
      {
        int value;
        if (dict.TryGetValue(key, out value))
        {
          if (dict.TryUpdate(key, value + 1, value))
          {
            success = true;
          }
        }
        else
        {
          if (dict.TryAdd(key, 1))
          {
            success = true;
          }
        }
      }
    }
  }
}Running the application with the first three stages, you’ll see output like the following, with one where the stages operate interleaved:
stage 3: added get
stage 3: added set
stage 3: added public
stage 3: added int
stage 3: added Wins
stage 2: added   public static class Pipeline
stage 2: added   {
stage 2: added     public static Task ReadFil
stage 2: added     {
stage 2: added       return Task.Run(() =>
Completing the Pipeline
After the first three stages are completed, the next three stages can run in parallel again. TransferContentAsync gets the data from the dictionary, converts it to the type Info, and puts it into the output BlockingCollectiony<T> (code file PipelineSample/PipelineStages.cs):
    public static Task TransferContentAsync(
        ConcurrentDictionary<string, int> input,
        BlockingCollection<Info> output)
    {
      return Task.Run(() =>
        {
          foreach (var word in input.Keys)
          {
            int value;
            if (input.TryGetValue(word, out value))
            {
              var info = new Info { Word = word, Count = value };
              output.Add(info);
              ConsoleHelper.WriteLine(string.Format("stage 4: added {0}",
                  info));
            }
          }
          output.CompleteAdding();
        });
    }
The pipeline stage AddColorAsync sets the Color property of the Info type depending on the value of the Count property.:
    public static Task AddColorAsync(BlockingCollection<Info> input,
        BlockingCollection<Info> output)
    {
      return Task.Run(() =>
        {
          foreach (var item in input.GetConsumingEnumerable())
          {
            if (item.Count > 40)
            {
              item.Color = "Red";
            }
            else if (item.Count > 20)
            {
              item.Color = "Yellow";
            }
            else
            {
              item.Color = "Green";
            }
            output.Add(item);
            ConsoleHelper.WriteLine(string.Format(
                "stage 5: added color {1} to {0}", item, item.Color));
          }
          output.CompleteAdding();
        });
    }
The last stage writes the resulting items to the console in the specified color:
    public static Task ShowContentAsync(BlockingCollection<Info> input)
    {
      return Task.Run(() =>
        {
          foreach (var item in input.GetConsumingEnumerable())
          {
            ConsoleHelper.WriteLine(string.Format("stage 6: {0}", item),
                item.Color);
          }
        });
    }
Running the application results in the output shown in Figure 10-8.

PERFORMANCE
Many collection classes offer the same functionality as others; for example, SortedList offers nearly the same features as SortedDictionary. However, often there’s a big difference in performance. Whereas one collection consumes less memory, the other collection class is faster with retrieval of elements. The MSDN documentation often provides performance hints about methods of the collection, giving you information about the time the operation requires in big-O notation:
O(1)
O(log n)
O(n)
O(1) means that the time this operation needs is constant no matter how many items are in the collection. For example, the ArrayList has an Add method with O(1) behavior. No matter how many elements are in the list, it always takes the same amount of time when adding a new element to the end of the list. The Count property provides the number of items, so it is easy to find the end of the list.
O(n) means it takes the worst case time of N to perform an operation on the collection. The Add method of ArrayList can be an O(n) operation if a reallocation of the collection is required. Changing the capacity causes the list to be copied, and the time for the copy increases linearly with every element.
O(log n) means that the time needed for the operation increases with every element in the collection,. but the increase of time for each element is not linear but logarithmic. SortedDictionary<TKey, TValue> has O(log n) behavior for inserting operations inside the collection; SortedList<TKey, TValue> has O(n) behavior for the same functionality. Here, SortedDictionary<TKey, TValue> is a lot faster because it is more efficient to insert elements into a tree structure than into a list.
The following table lists collection classes and their performance for different actions such as adding, inserting, and removing items. Using this table you can select the best collection class for the purpose of your use. The left column lists the collection class. The Add column gives timing information about adding items to the collection. The List<T> and the HashSet<T> classes define Add methods to add items to the collection. With other collection classes use a different method to add elements to the collection; for example, the Stack<T> class defines a Push method, and the Queue<T> class defines an Enqueue method. You can find this information in the table as well.
If there are multiple big-O values in a cell, the reason is because if a collection needs to be resized, resizing takes a while. For example, with the List<T> class, adding items needs O(1). If the capacity of the collection is not large enough and the collection needs to be resized, the resize requires O(n) time. The larger the collection, the longer the resize operation takes. It’s best to avoid resizes by setting the capacity of the collection to a value that can hold all the elements.
If the table cell contents is n/a, the operation is not applicable with this collection type.

SUMMARY
This chapter took a look at working with different kinds of collections. Arrays are fixed in size, but you can use lists for dynamically growing collections. For accessing elements on a first-in, first-out basis, there’s a queue; and you can use a stack for last-in, first-out operations. Linked lists allow for fast insertion and removal of elements but are slow for searching. With keys and values, you can use dictionaries, which are fast for searching and inserting elements. Sets are useful for unique items and can be ordered (SortedSet<T>) or not ordered (HashSet<T>). ObservableCollection<T> raises events when items change in the list.
You’ve also looked at several interfaces and classes in this chapter, including how to use them for accessing and sorting collections. Finally, you looked at some specialized collections, such as BitArray and BitVector32, which are optimized for working with a collection of bits.
Chapter 11 gives you details about Language Integrated Query (LINQ).