Chapter 4
Random Thoughts: Building a Simple Game
In This Chapter
![]() Generating random numbers
Generating random numbers
![]() Designing a game
Designing a game
![]() CSS styles through code
CSS styles through code
![]() Building the components
Building the components
![]() Writing the gameplay code
Writing the gameplay code
![]() Testing your game
Testing your game
If you can build an HTML page and write some JavaScript code, you’re almost ready to write a game. (If you aren’t comfortable with those skills, you may want to glance over Chapters 1–3.)
However, a game is more than just code. This chapter explains how to build a complete (if basic) game that involves real-time interaction with the user.
Creating Random Numbers
Random numbers are a key part of game programming. Often you want some kind of random behavior. This is used to mimic the complexity and unpredictability of the universe. Most languages have a random number generator built in. This special function produces some sort of semi-random number. Often you’ll have to do some manipulation to make the number fit the pattern you want.
Figure 4-1 shows a simple page that generates random numbers between 1 and 100.

Figure 4-1: Click the Roll the Dice button and get a random number.
The page in Figure 4-1 seems a little complex, but it describes a powerful and flexible system, once you know how to use it. Here’s what’s happening:
1. JavaScript generates a random number.
Different languages do this in different ways, but JavaScript has a function that creates a random floating point value between 0 and 1. That value is shown in the raw box.
2. Multiply the raw value by 100.
In this example, you want a number between 1 and 100. If you multiply a 0-to-1 by 100, you’ll get 0 to 99.9999 (with a lot of nines) value. That’s getting closer. The times 100 box shows the raw value after it has been multiplied by 100.
3. Convert the large number into an integer.
The user is never going to guess a number with 17 places after the decimal, so you need an integer. JavaScript has a number of ways to convert a float to an integer. To get the 1 to 100 behavior you’re looking for, you use a method called Math.ceil. (Don’t worry, I explain this weird name and how it works in the next section.) The final result is shown in the final box.
When you look over the code for the rand100.html page, you’ll see that it basically does what I just said. Here’s the code in its entirety:
<!DOCTYPE HTML>
<html lang=”en-US”>
<head>
<meta charset=”UTF-8”>
<title>rand100.html</title>
<style type = “text/css”>
fieldset {
width: 600px;
margin-right: auto;
margin-left: auto;
}
label {
float: left;
width: 250px;
text-align: right;
margin-right: 1em;
clear: left;
}
span {
float: left;
}
button {
display: block;
clear: both;
margin: auto;
}
</style>
<script type = “text/javascript”>
function roll(){
//create variables for form elements
var spnRaw = document.getElementById(“spnRaw”);
var spn100 = document.getElementById(“spn100”);
var spnFinal = document.getElementById(“spnFinal”);
//get random number
var raw = Math.random();
spnRaw.innerHTML = raw;
//multiply by 100
var times100 = raw * 100;
spn100.innerHTML = times100;
//get the ceiling
var final = Math.ceil(times100);
spnFinal.innerHTML = final;
} // end roll
</script>
</head>
<body>
<h1>Make random numbers 1 - 100</h1>
<form>
<fieldset>
<label>raw</label>
<span id = “spnRaw”>0</span>
<label>times 100</label>
<span id = “spn100”>0</span>
<label>final</label>
<span id = “spnFinal”>0</span>
<button type = “button”
onclick = “roll()”>
roll the dice
</button>
</fieldset>
</form>
</body>
</html>
Seriously, math can be fun
To make this program work, you need to call in the ultimate weapon of geekiness: Math. (You know, now I’m going to have to write an adventure game just so I can include an “ultimate weapon of geekiness.”)
JavaScript has a wonderful library called Math (I know, I used the words math and wonderful in the same sentence. Keep programming, and you will too, eventually.) The Math library has some really geeky goodness buried in it, like a number of commonly used math functions (you know, cosine, square root, and all that great stuff) as well as constants (like pi) and a few other utility functions for working with numbers. It turns out this library has some features that are extremely useful for the problem at hand (generating random numbers).
First, of course, is the function that generates random numbers. It’s called (wait for it . . .) Math.random().
 You really need to say
 Math.random(). If you call random() all by itself, JavaScript won’t know what you’re talking about. That’s because the random() function is not part of the main body of JavaScript, but part of the special Math library. This is actually a vestige of the object-oriented scheme that underlies JavaScript. Just remember, you need to specify Math.random() to invoke a random number.
The Math.random() function produces a semi-random number. (It isn’t really random but is produced through a complex formula from another number.) The random number will be a floating-point value between 0 and 1. This doesn’t seem helpful, but with a little math, you can convert the 0 to 1 value to any other range you wish.
In addition to the random() function, the Math object has a number of functions that allow you to convert a floating point value (that is, a number with a decimal point) to an integer (you got it — a number without a decimal point). The standard parseInt() method is built into JavaScript, but sometimes you want to do a fancier conversion. The Math library has a number of these tools:
![]()
Math.round(): Converts a number using the standard rounding algorithm. If the decimal part is .5 or less, the smaller integer is chosen; if the decimal part is greater than .5, the larger integer is chosen. This means that 3.1 rounds to 3 and 3.8 rounds to 4.
![]()
Math.floor(): This function always rounds down, so 3.1 and 3.8 both become 3. The parseInt() function is identical to Math.floor().
![]()
Math.ceil(): This function (get it — the ceiling function) always rounds up, so 3.1 and 3.8 both end up as 4.
The function you need depends on the specific circumstances. I show why Math.ceil() makes sense in this project as I discuss the actual code.
Making the HTML form
As always, HTML forms the foundation of any JavaScript program. The main thing here is the form that provides the user interface. This form has some predictable features:
![]() A span to hold the raw data: There’s really nothing for the user to type, so I’m using a span for the various output elements. Spans are a generic inline tag. They’re super for situations like this where you need some simple output element that can be inline with the main flow of the page. The raw data span is called (here you go . . .)
A span to hold the raw data: There’s really nothing for the user to type, so I’m using a span for the various output elements. Spans are a generic inline tag. They’re super for situations like this where you need some simple output element that can be inline with the main flow of the page. The raw data span is called (here you go . . .) spnRaw.
![]() Another span for the
Another span for the times100 data: As the program does the calculations, it will display the output. (Normally, you won’t need to show the user every detail, but this example is really about the calculations, so I want everything to be explicitly displayed.)
![]() A third span for the final output: After all the calculations are finished, you need some way to display your brilliant work.
A third span for the final output: After all the calculations are finished, you need some way to display your brilliant work. spnFinal will serve this purpose.
![]() Labels to make everything clear: Without labels explaining what’s happening, there will just be a bunch of numbers on the screen. Don’t forget to add labels even to simple examples so the user can figure out what’s going on.
Labels to make everything clear: Without labels explaining what’s happening, there will just be a bunch of numbers on the screen. Don’t forget to add labels even to simple examples so the user can figure out what’s going on.
![]() A button to start all the action: Nothing will happen until the user asks for it, so add a button to the form. When the button is clicked, have it call the
A button to start all the action: Nothing will happen until the user asks for it, so add a button to the form. When the button is clicked, have it call the roll() function to roll a number.
![]() CSS to make it all look good: HTML without CSS is ugly, so add enough CSS to make the HTML form look decent. If you need a refresher on the CSS used in this example, please refer to Chapter 3.
CSS to make it all look good: HTML without CSS is ugly, so add enough CSS to make the HTML form look decent. If you need a refresher on the CSS used in this example, please refer to Chapter 3.
Writing the roll() function
When the user clicks the button, the program will do something magical. (Okay, it only looks magical. You know exactly what’s happening.) The code in the roll() function creates a random number in exactly the form you want.
Building the Number Guesser
With random numbers, you can now make interesting games.
Figure 4-2 illustrates a simple game that uses HTML, CSS, and JavaScript together.
This game has a number of interesting features:
![]() It uses the web page as the interface. Like many JavaScript programs, it uses a web page as the user interface. An input element is used for input, a
It uses the web page as the interface. Like many JavaScript programs, it uses a web page as the user interface. An input element is used for input, a div is the main output element, and a button triggers all the actions.
![]() It uses CSS for styling. The various parts of the page are formatted with CSS. The CSS is stored in an external style sheet for convenience and reusability.
It uses CSS for styling. The various parts of the page are formatted with CSS. The CSS is stored in an external style sheet for convenience and reusability.
![]() It tells the user how many turns she has taken. On each pass, the computer reminds the user how many turns have happened.
It tells the user how many turns she has taken. On each pass, the computer reminds the user how many turns have happened.
![]() When the user has guessed correctly, a Restart button appears. This button is hidden at first, and appears only when it is needed.
When the user has guessed correctly, a Restart button appears. This button is hidden at first, and appears only when it is needed.
![]() The right answer is available to programmers through a special debugging feature. While testing the program, the developer can see what the correct answer is, but this information is hidden from the user.
The right answer is available to programmers through a special debugging feature. While testing the program, the developer can see what the correct answer is, but this information is hidden from the user.
![]() An
An init() function begins the game. The init() function initializes the game. It is called when the program first begins and again when the user wants to start over.
![]() Another function is attached to the button. When the user clicks the Check Your Guess button, the current user’s guess is compared to the right answer, and a hint is returned to the user.
Another function is attached to the button. When the user clicks the Check Your Guess button, the current user’s guess is compared to the right answer, and a hint is returned to the user.

Figure 4-2: The program lets you guess a number.
Designing the program
When you build a complex program, you need to begin with a design plan. Figure 4-3 shows the design for this game.
Much of the work in game development happens before you begin programming. If you design the game well, the programming is much easier to do. A game design helps you understand many things about the game before you begin writing code:
![]() General layout: While the layout isn’t completely decided by this drawing, it’s easy to see the general look I’m going for.
General layout: While the layout isn’t completely decided by this drawing, it’s easy to see the general look I’m going for.
![]() Named elements: Every element that needs to have a name has been determined, and the names are written on the document. Some elements (like the first button) do not need names because they won’t be referred to in code.
Named elements: Every element that needs to have a name has been determined, and the names are written on the document. Some elements (like the first button) do not need names because they won’t be referred to in code.
![]() Button functions: Each button will call a function. The diagram indicates which function each button will call.
Button functions: Each button will call a function. The diagram indicates which function each button will call.
![]() Function plans: Every function is planned out with an English-language description of what the function will do.
Function plans: Every function is planned out with an English-language description of what the function will do.
![]() Global variables: The variables that will need to be shared between functions are described.
Global variables: The variables that will need to be shared between functions are described.
It’s actually difficult to create a good design document, but doing so makes the programming quite a bit easier. It’s hard to figure out what you’re trying to do, and it’s also hard to figure out how to do it. Having a design document separates those two processes so you can first concentrate on what you’re doing, and then worry about how you’re going to do it.
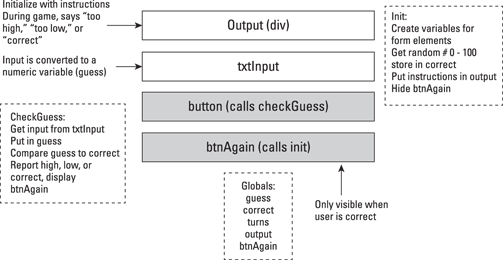
Figure 4-3: The diagram helps you design the game.
Building the HTML for the game
The HTML code for the number-guessing game is pretty easy to write if you’ve designed the game on paper first. Here’s the code:
<!DOCTYPE HTML>
<html lang=”en-US”>
<head>
<meta charset=”UTF-8”>
<title>Number Guesser</title>
<link rel = “stylesheet”
type = “text/css”
href = “numGuess.css” />
<script type = “text/javascript”
src = “numGuess.js”></script>
</head>
<body onload = “init()”>
<h1>Number Guesser</h1>
<form>
<fieldset>
<div id = “output”>
I’m thinking of a number between 0 and 100.
Guess my number, and I’ll tell if you are
too high, too low, or correct.
</div>
<label for = “”>Your Guess</label>
<input type = “text”
id = “txtGuess”>
<button type = “button”
onclick = “checkGuess()”>
check your guess
</button>
<button type = “button”
id = “again”
onclick = “init()”>
try again
</reset>
</fieldset>
</form>
</body>
</html>
It’s nice to separate HTML, CSS, and JavaScript because this practice allows you to “divide and conquer” a big problem into a number of smaller problems. Here are the main features of the HTML document:
1. Link to the CSS in an external file.
At the moment, the CSS isn’t critical, so you move it off into a separate file so you can work with it later.
2. Outsource the JavaScript code.
You also move the JavaScript code into an external file so you don’t have to worry about it yet. In the HTML code, simply make the linkages to the external files.
3. Build a form as the main component of the page.
The most important aspect of this page is the form. Like most forms, it will have a fieldset, labels, input elements, and buttons.
4. Create a div for output.
The output div is just an ordinary div. You put it inside the fieldset so it will maintain a visual link to the rest of the form. You can put default text inside the div (though you will probably change this text later). Because the div will be referred to through code, it needs an id attribute.
5. Make an input area for the user’s guess.
The user will need to type some sort of numeric input. Use an input element for this purpose. Refer to your documentation to remember the id of this element. (You did make a design document, right?) It’s nice to add a label to the input so the user knows what’s expected there.
6. Build a button for checking the guess.
The user doesn’t commit a guess until she clicks the Check Your Guess button. So, you really need to have such a button. This button doesn’t need a name, but it will call the checkGuess() function.
7. Build a second button to start again.
One interesting feature of this program is a button that allows the user to restart. This second button is available only when the user has correctly guessed the answer. You create it with ordinary HTML and use CSS and JavaScript tricks to make it disappear and appear on demand.
Writing the CSS for the number guesser
The HTML provides the foundation, but it needs some CSS code to make it have the look you’re aiming for. The CSS isn’t just for beauty’s sake. It also adds some functionality to the page. Specifically, one of the buttons will appear and disappear on command. The visibility of the button is controlled with a CSS style, which is changed through JavaScript code.
Here is how to build the CSS for the game:
1. Center the headline.
Most of the content of this page will be centered, so center the h1 element. Set the text-align to center.
2. Format the fieldset.
The page consists of a form with a fieldset. Change the fieldset’s width to a fixed size and set the margins to auto. This will center the fieldset in the page.
3. Format the output div.
There is a special div called output that will contain the instructions to the user. The only formatting necessary is to center the text with text-align: center. (Remember, you center the contents of an element with text-align. Center the element itself with margin: auto.)
4. Float the labels and input elements.
This will be a standard form with the label on the left and input elements to the right. Assign the necessary attributes to float and input elements. (Please refer to Chapter 3 for more information on applying float styles.)
5. Center the buttons.
The buttons will look best if they’re centered on the page. Convert buttons to block-level and set the margins to auto for this effect.
The complete CSS code is available here:
h1 {
text-align: center;
}
fieldset {
width: 600px;
margin-left: auto;
margin-right: auto;
}
#output {
text-align: center;
}
label {
float: left;
width: 250px;
clear: left;
text-align: right;
padding-right: 1em;
}
input {
float: left;
}
button {
display: block;
clear: both;
margin-left: auto;
margin-right: auto;
}
Note that the Play Again button is visible. Although CSS code is used to hide and display the button, that code will be generated through JavaScript.
Thinking through the game’s data
Games are ultimately about data. Before writing any code, you should think through the various data elements you’ll need to make the program work. If you did a good job of the design document, you’ve already thought this through. The first few lines of numGuess.js create the variable elements that will be shared throughout the rest of the code.
//from numGuess.js
//page-level variables
var guess;
var correct;
var turns;
//components
var output;
var txtGuess;
var btnAgain;
In JavaScript programming, you typically have two types of page-level variables. Some of these indicate data about the game, and others refer to interface elements. Both are important. First, think through the game variables:
![]()
guess: This will be the number that comes from the user. Remember that data that comes from form elements is usually in string format, and you’ll need an integer.
![]()
correct: This is another integer, but this one is randomly generated by the computer. The random number will need to be in the range from 1 to 100.
![]()
turns: This variable represents the number of guesses the user has made already. A smart user should be able to guess a number between 1 and 100 in 7 or fewer turns.
You’ll also need to create a variable for every form component that will be manipulated through code. This is easy to determine from the diagram:
![]()
output: The output element is the div that will contain instructions and feedback for the user.
![]()
txtGuess: This is a textbox that will hold the user’s name.
![]()
btnAgain: This is a button that will be hidden most of the time. It will be visible only when the user has guessed the correct answer.
Setting up the initialization routine
If you look over the game design document again, it’s clear that the game has two distinct phases: Initialization will happen when the game first begins, and when the user chooses to go again. Another set of actions should happen when the user clicks the Check Your Guess button.
Begin with the code that will happen as part of initialization:
function init(){
//from numGuess.js
//initialize components
output = document.getElementById(“output”);
txtGuess = document.getElementById(“txtGuess”);
btnAgain = document.getElementById(“again”);
//hide again button
btnAgain.style.display = “none”;
//initialize counter
turns = 0;
//initialize output
output.innerHTML = “I’m thinking of a number between 0 and 100. “;
output.innerHTML += “Guess my number, and I’ll tell if you are “;
output.innerHTML += “too high, too low, or correct.”;
//generate random for correct answer
correct = parseInt(Math.random() * 100);
console.log(correct);
//make sure input text gets focus
txtGuess.focus();
} // end init
There is a lot of code in this section, but most of it is pretty obvious from the documentation. Initialization routines are almost always about setting up the data that a game will be about. This one is no different:
![]() Initialize the components. Build JavaScript variables to represent any form elements that will be referred to in code. Normally, these are input fields and
Initialize the components. Build JavaScript variables to represent any form elements that will be referred to in code. Normally, these are input fields and output divs. The btnAgain button will be referred to by code, so it also needs a variable associated with it.
![]() Hide the Play Again button. In this particular program, the Play Again button should appear only when the game is over. Hide the button for now, so you can make it visible at the appropriate time. Set the
Hide the Play Again button. In this particular program, the Play Again button should appear only when the game is over. Hide the button for now, so you can make it visible at the appropriate time. Set the display property to none to hide any HTML element.
![]() Initialize the turn counter. You’ll want to indicate the number of turns the user required. The turn counter is just an integer variable that starts at 0.
Initialize the turn counter. You’ll want to indicate the number of turns the user required. The turn counter is just an integer variable that starts at 0.
![]() Initialize the output. The
Initialize the output. The output div will contain opening instructions to the user. Put the instructions in the div with JavaScript code so that when the game is reset, the instructions reappear.
![]() Generate a random number. The correct answer will be randomly generated once per game. (See the upcoming sidebar about the
Generate a random number. The correct answer will be randomly generated once per game. (See the upcoming sidebar about the console.log() command for information on how the log can be used for debugging.)
![]() Make sure the
Make sure the input text element has the focus. When the user begins the game, she will probably want to type a number. It’s a good idea to ensure that any numbers typed right away will go to the text box. The focus() method is an easy way to place the focus on any form element (as though the user clicked on the text field with the mouse).
Responding to the Button
As in most HTML forms, the real action happens when the user clicks a button. This form has two buttons, but one of them is hidden most of the time. For now, concentrate on the code that happens when the user clicks on the Check Your Guess button.
function checkGuess(){
//from numGuess.js
//increment turns
turns++;
response = turns + “) “;
//get guess from user
guess = parseInt(txtGuess.value);
if (guess < correct){
response += “Too low”;
} else if (guess > correct){
response += “Too high”;
} else if (guess == correct){
response += “Correct!”;
//show again button
btnAgain.style.display = “block”;
} else {
response += “Please enter a number between 1 and 100”;
} // end if
output.innerHTML = response;
} // end checkGuess
Cheat codes and console.log
There’s a particularly interesting line in the init() code that looks like this:
console.log(correct);
This line prints the correct answer! It might surprise you that the game actually gives out its own answer key, but that’s a very common mechanism in game programming. Two interesting things are actually happening here: using a console and adding a cheat feature to a game.
The console.log() command is a special function that allows you to print results to a secret console supported by some browsers. If you right-click on the page in Chrome and choose Inspect Element, you’ll be taken to a special developer’s view. On any other browser, you can use Firebug. (Use the Firebug extension for Firefox or the Firebug Lite for other browsers — all available for free at http://www.getfirebug.com.) The console is a hidden text area simply for programmers. Ordinary users don’t even know it exists, so it’s perfect for putting quick debugging code. The console.log() command does nothing unless there is a console available. If the browser has a console, anything after the console.log() command is printed to the console.
The question is, why would you want to do such a thing? The answer is play testing. You’ll need to play this game a lot while you’re testing it, and in testing, you really want to look for the main cases: What happens when the guess is too large, too small, or perfect? To do this, you need to know what the correct answer is. console.log() prints the answer in a place only the programmer can see, so it’s easier to test your code. Sneaky, huh? The following figure shows the program running in Firefox with the Firebug extension running.
Incidentally, this was the original motivation for cheat codes in games. Most games have mechanisms built in for the convenience of programmers and testers. For example, a special code can allow you to jump directly to a certain level or be invulnerable to damage. Programmers use these features to test the game. Early in the history of gaming, players learned about the existence of these codes. Now the practical test codes are still included in many games, and additional cheat codes are often also included. Today, game companies sometimes hide such features and leak them after a period of time to extend interest in a game.

This function is a real powerhouse, but it isn’t much of a mystery. Again, everything this function does was predicted by the design document. Here are the details:
1. Increment the turn counter.
Every time the user clicks the button, she’s taken a turn, so begin by adding one to the turn counter.
2. Begin building the response.
The main purpose of the checkGuess() function is to get input from the user and return some sort of output. That output will be stored in a string variable called response. Response begins with the turn number and a parenthesis.
3. Get the guess from the text field.
The user should have entered some value in the text box. Grab that value, convert it to an integer, and store it in the guess variable.
4. Check to see if the guess is too low.
Use an if statement to determine if the guess is less than the correct answer. Note how careful variable names make this a very easy line of code to understand. Just tell the user that the guess is too low by adding the message to response.
5. Check to see if the guess is too high.
If the guess is too high, all that’s necessary is to inform the user.
6. Check for a correct guess.
If the user guesses correctly, there’s a little more work to do, but none of it is very difficult.
7. Tell the user she is correct.
Add a congratulation message to the response variable.
8. Show the Play Again button.
If the game is over, you need a way to reset it so the user can play again. Simply show the Play Again button. When this button is clicked, it calls init(), which restarts the entire game (and rehides the Play Again button).
9. Check for errors.
You might think the user’s guess would be too high, too low, or correct, but those aren’t the only options. If the user does something crazy (like types the word “three” or hits the guess button before entering anything at all), the program should do something. The else clause catches any condition that wasn’t caught by the previous tests. Just gently remind the user what input is required, and count it as a turn.