Chapter 12
Ten Concepts Behind simpleGame
In This Chapter
![]() How the canvas forms the basis of the game engine
How the canvas forms the basis of the game engine
![]() Mathematical foundations of gaming like angles and vectors
Mathematical foundations of gaming like angles and vectors
![]() How a game engine manages frame rate
How a game engine manages frame rate
![]() Adding custom event handlers for touch interface
Adding custom event handlers for touch interface
![]() How collisions and boundary events work
How collisions and boundary events work
The simpleGame library is designed to be easy to use. Like most code libraries, it simplifies sometimes complex code. You can use simple Game just fine without understanding how it works, but at some point, you’ll need to know how the various technologies work. In this chapter, I show some of the key concepts used to create the simpleGame engine.
Many of the ideas are code, but some are really math concepts. If you’ve ever asked your math teacher when you would use math, game programming is at least one answer. A game programmer really needs to have a solid grasp of math, at least some algebra, geometry, and trigonometry. It’s even better to have some knowledge of linear algebra, statistics, and calculus. (On my campus, game programming students typically get a math minor.) It’s fine if you don’t understand all the math right now, but be sure to look over these ideas to see how things work.
Feel free to look over the code of simpleGame to see how everything fits together. Throughout this chapter, I provide somewhat simplified versions of the code used in simpleGame, but of course you’re welcome to look over the actual library. A link is available at my website: www.aharrisbooks.net. In fact, you can even make changes in the library if you wish, but you should probably begin by ensuring that you understand how things work.
Some ideas mentioned here use more advanced concepts in programming and mathematics than I expect for the reader of an introductory book, but looking over these ideas gives you an ideal preview of things you can learn as your studies continue.
Using the Canvas Tag
The simpleGame engine’s Scene object uses one of the most exciting new features of HTML5 — the canvas tag. This exciting tag allows you to draw images and other elements directly on a portion of the browser.
Looking at a canvas
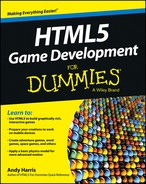
Figure 12-1 shows a basic page displaying a canvas with two rectangles and an image.
<!DOCTYPE HTML>
<html lang = “en”>
<head>
<title></title>
<meta charset = ”UTF-8” />
<style type = ”text/css”>
</style>
<script type = ”text/javascript”>
function draw(){
var canvas = document.getElementById(”surface”);
var imgBall = new Image();
imgBall.src = ”redBall.png”;
if (canvas.getContext){
var con = canvas.getContext(’2d’);
con.fillStyle = ”rgb(255, 255, 0)”;
con.fillRect(40, 140, 150, 50);
con.drawImage(imgBall, 100, 100, 50, 50);
} // end if
} // end draw
</script>
</head>
<body onload = ”draw()”>
<h1>Basic Canvas Demo</h1>
<canvas id = ”surface”
width = ”200”
height = ”200”>
<p>Your browser does not support the canvas tag...</p>
</canvas>
</body>
</html>
Figure 12-1: This page demonstrates the canvas tag.
Basic canvas drawing
The canvas tag is an HTML tag, but it’s mainly used as a placeholder in HTML. The canvas tag has a context attribute, which allows the programmer to draw graphics directly on the page. Here’s how this example works:
1. Add a canvas tag to the HTML.
Normally, you’ll create a canvas tag in the HTML, but the simpleGame library automatically adds a canvas tag and appends it to the end of the page body.
2. Create a function for drawing.
In this example, the canvas is drawn in a function called when the page initially loads. In simpleGame, the drawing function will be called 20 times per second.
3. Get a drawing context.
The canvas tag supports a 2D drawing context (yes, 3D is coming, but it’s not yet widely supported). Use the getContext() method to make a reference to the drawing context.
4. Create a JavaScript Image Object.
Sprite objects in the simpleGame library are based on JavaScript images. Begin by creating an Image object in JavaScript.
5. Set the image’s source attribute.
To link a file to the Image object, set the src property of the Image object to an image file in the same directory as your program. This will associate an image with your document, but the image will not be drawn on the page; instead, it’s stored in memory to be used in code.
6. Set the fill style.
You can draw filled and open drawings with the canvas tag. The fillStyle can be set to colors as well as patterns and gradients.
7. Create rectangles.
You can draw an open rectangle with the strokeRect() method and a solid rectangle with the fillRect() method. In the simpleGame library, the Scene object’s clear() method simply draws a filled rectangle in the scene’s background color.
8. Draw the image in the canvas.
Use the drawImage() method to draw an image inside a canvas. There are many variations of this method, but the one used in simpleGame specifies the image’s position and size.
Of course, there’s a great deal more to the canvas tag than this simple demo. I show a few other features in the section Transformations in Canvas, later in this chapter. For much more information, please see my book HTML5 Quick Reference For Dummies. I have an entire chapter on the canvas tag and its various features in that book. You can view all the examples for that book (and indeed all my books) at my website: www.aharrisbooks.net.
Creating an Animation Loop
If the canvas defines the space in a game, an animation loop defines time. Most JavaScript games use a mechanism called setInterval() to cause repeated behavior. This function takes two parameters: a function name and a delay value.
Here’s some code that simply counts ten times a second:
<!DOCTYPE HTML>
<html lang=”en-US”>
<head>
<meta charset=”UTF-8”>
<title>counting.html</title>
<script type=”text/javascript”>
var counter = 0;
var output;
function init(){
output = document.getElementById(”output”);
setInterval(count, 100);
}
function count(){
counter++;
output.innerHTML = counter;
}
</script>
</head>
<body onload = ”init()”>
<div id = ”output”>
nothing here yet
</div>
</body>
</html>
The process is straightforward, and you can use it any time you want something to happen at regular intervals:
1. Create a function that will be repeated.
In this simplistic example, the function count() will be called ten times per second.
2. In your initialization code, call setInterval().
This will set up the repeated call to the function.
3. Indicate the function that will repeat.
The first parameter is the name of the function that will be repeated. Note that because you’re treating the function as a variable, you do not include parentheses with the function name.
4. Indicate the delay.
The second parameter is a delay value in milliseconds (a millisecond is 1/1000th of a second). This example runs at a delay of 100 milliseconds, which is 10 frames per second. The simpleGame library runs at 20 frames per second.
In simpleGame, when you create a Scene class, in addition to setting up a canvas, you’re also, via the Scene class, creating an interval that repeatedly calls the update() method of your game. This is why you need to have an update() method.
Angles in the Outfield
The simpleGame engine allows you to work with all angles in degrees according to the normal navigational system (0 degrees is straight up; angles increase clockwise). Mathematicians use an entirely different system. Figure 12-2 illustrates the difference.

Figure 12-2: Navigation and mathematics use different angle measurements.
Degrees are a perfectly fine (if made up) unit of measurement, but when it comes to mathematical manipulations, they get messy. Mathematicians use another unit called radians. The best way to describe a radian is with a true story. When we were dating, my wife had an elderly Doberman. The dog was frequently tied to a post with a cable in the backyard. Over the years, the dog inscribed a perfect circle around that post in the backyard. One day I came over and found that the cable had broken loose at the post, but the dog was still walking around in the circle, dragging the cable behind her. The angle inscribed by the cable in the circular groove was exactly one radian! I was immediately thrilled by this unintentional canine math moment. My wife continues to humor my frequent geekiness episodes. We have a puppy now, and I’m working on teaching him trigonometry.
Radians are most easily expressed as a ratio of pi. pi (π) is defined as the ratio between the circumference and the diameter of a circle. Almost all angle calculations in radians use pi as a starting point.
If you want to convert from degrees to radians, you typically use this formula:
radians = (degrees * pi) / 180
If you want to go the other direction, the formula is similar:
degrees = (radians * 180) / pi
JavaScript has a prebuilt constant for pi called Math.pi.
The simpleGame library takes care of all this for you. I designed the library so you can enter angle measurements in degrees, but these measurements are quietly converted to radians for all the internal math. When you ask for an angle (with the Sprite object’s getMoveAngle() method, for example), you’ll get a measurement in degrees, even though the angle is actually stored in radians.
Angle measurements get a little trickier in computing math because radians increase counterclockwise whereas degrees increase clockwise. Also, in most coordinate systems, Y increases upward, but in computer graphics, Y increases downward. The simpleGame library quietly handles these issues for you. Feel free to look over the code to see how I handled these details with a little bit of math.
Transformations in Canvas
The Sprite class has the capability to move and rotate, but these features are not built into normal JavaScript. I used the transformation features of the canvas tag to get this behavior.
Transformations are math operations that can be applied to any drawing or image to change the appearance. There are three major transformations:
![]() translation: Moves a particular amount in X and Y.
translation: Moves a particular amount in X and Y.
![]() rotation: Rotates around a particular point.
rotation: Rotates around a particular point.
![]() scale: Changes the size of the drawing in X and Y.
scale: Changes the size of the drawing in X and Y.
The canvas element allows all these operations on any type of drawing. However, the way the canvas element does this gets a little closer to math than you may have gotten before. Transformations in the canvas element can be hard to understand until you understand a little about how they really work.
Coordinates inside coordinates . . .
In math, you don’t really transform objects. Instead, you modify the coordinate system and draw your image in the newly transformed coordinate system. It’s common in a vector-drawing application to have several hidden coordinate systems working at once. That’s important, because it’s the way canvas transformations work. Essentially, when you want to perform transformations on an object, you do the following:
1. Announce the beginning of a temporary coordinate system.
The main image already has its own coordinate system that won’t change. Before you can transform anything, you need to build a new coordinate system to hold those changes. The (poorly named) save() command indicates the beginning of a new coordinate system definition.
2. Move the center with translate().
The origin (0, 0) starts in the upper-left corner of the canvas by default. Normally, you’ll build your transformed objects on the (new) origin and move the origin to place the object. If you translate (50, 50) and then draw an image at (0, 0), the image will be drawn at the origin of the temporary coordinate system, which will be at (50, 50) in the main canvas.
3. Rotate the coordinate system with rotate().
The rotate() command rotates the new coordinate system around its origin. The rotation parameter is a degree in radians.
4. Scale the coordinate system in X and Y.
You can also alter the new coordinate system by applying X and Y scale values. This allows you to create stretched and squashed images.
5. Create elements in the new coordinate system.
After you’ve applied all the transformations you want, you can use all the ordinary canvas drawing techniques. However, these drawings will be drawn in the virtual coordinate system you just made, not in the canvas’s main coordinate system.
6. Close the temporary coordinate system.
Generally, you’ll want to apply different transformations to different parts of your canvas. When you’re finished with a particular transformation, use the restore() command to close out the new coordinate system. All subsequent drawing commands will use the default coordinate system of the canvas object.
Transforming an image
It can be hard to understand how mathematical transformations work because they seem so simple on the surface. Build a program to see how this all fits together. Pay attention to how I create a temporary coordinate system.
<!DOCTYPE HTML>
<html lang = “en”>
<head>
<title>transform.html</title>
<meta charset = “UTF-8” />
<script type = “text/javascript”>
function draw(){
var drawing = document.getElementById(“drawing”);
var con = drawing.getContext(“2d”);
var car = new Image();
car.src = “car.png”;
con.save();
con.translate(100, 100);
con.rotate(Math.PI / 4);
con.scale(3.0, 1.5);
con.drawImage(car, -25, -25, 50, 50);
con.restore();
//draw a rectangle using the ordinary
//coordinate system
con.strokeStyle = “red”;
con.lineWidth = 5;
con.strokeRect(0, 0, 200, 200);
} // end draw
</script>
</head>
<body onload = “draw()”>
<h1>Transformations</h1>
<canvas id = “drawing”
height = “200”
width = “200”>
<p>Canvas not supported</p>
</canvas>
</body>
</html>
The transformation looks like Figure 12-3.

Figure 12-3: This image has been translated, scaled, and rotated.
This program does the normal canvas setup and then creates a transformation that translates the image to the center of the canvas, rotates the image, and changes the image’s size:
1. Create a page with a canvas.
Normally, simpleGame will create the canvas for you, but in this case, I’m making a canvas element by hand.
2. Do all the normal setup stuff.
This involves the regular housekeeping: getting access to the canvas and its context and creating the image.
3. Begin a new coordinate system.
The save() command doesn’t really save anything. It indicates the beginning of a new coordinate system. Any drawing commands that occur between this save() statement and the matching restore() will follow transformation functions.
4. Translate the new system.
Move the coordinate system to (100, 100), which is the center of the canvas.
5. Rotate the new system.
Rotate the image by pi / 4 radians, which is 45 percent.
6. Scale the new system.
Multiply the X values by 3 and the Y values by 1.5.
7. Draw an image.
Because this image is drawn inside a save() / restore() block, it’s drawn with the transformations intact. Note that I offset the actual drawImage() command by half the original image’s width and height. I do this in the game engine so the x and y properties of the sprite refer to the center of the sprite, rather than the top-left corner.
8. End the subsystem with restore().
The restore() command closes up the temporary coordinate system so all subsequent commands will refer to the parent coordinate system. (If Tim Berners-Lee is reading this: Call me. I’ll help you come up with better names for things next time . . .)
9. Draw a red rectangle in the default system.
The red stroked rectangle is drawn outside the normal coordinate system, so it’s not scaled or rotated.
The main design of the Sprite object is an image surrounded by a transformation. When you create a sprite, it builds the image object, and it defines a transformation with translation, rotation, and scale. As you manipulate the position, angle, and speed of the sprite, you’re really simply changing the values sent to the transform. I offset the image so the (x, y) properties of the sprite specify the center of the sprite. That way, sprites rotate around their center, which gives a more natural appearance.
Vector Projection
The Sprite object stores the sprite’s position as x and y, and motion is stored as dx (difference in x) and dy (difference in y). The computer uses dx and dy to determine how to move a sprite on each frame, but often it’s much easier to think in speed and direction. Wouldn’t it be great if you could figure out the appropriate dx and dy values for any speed and direction? Fortunately, the ancient Greeks came up with a system for solving exactly this kind of problem. Once you understand this technique, called vector projection, you’ll be able to calculate the dx and dy values for any angle, any speed.
Examining the problem
It’s easiest to think about a sprite’s motion in terms of its speed and direction. These two characteristics taken together are called the sprite’s motion vector. A vector is simply a mathematical construct that has a direction and a magnitude. If you want to move a sprite at a certain speed in a certain direction, you need a way to translate the motion vector into dx and dy values so that you know exactly how much to add to x and y during the current frame. (dx and dy are sometimes known as the vector components).
The distance the sprite should travel in a frame is also the speed of that sprite (in pixels-per-frame). Sometimes it’s easier to think of this value as a speed, and sometimes it’s easier to think of it as a distance. It’s really both. Mathematicians sometimes sidestep this issue by simply calling the length r (for radius, like in a circle). You’ll see yet another name for this length (hypotenuse) when you bring in trigonometry. This all seems confusing, but it’s actually one of the nice things about math. There’s often a number of ways to look at a problem, and the different names for things can help you see how a particular kind of problem-solving can help. In math books, you’ll usually see the length/speed marked as r, so that’s what I use.
The angle is a bit more straightforward, as it just indicates the angle. Mathematicians typically use lowercase Greek symbols for angles. The symbol theta (θ) is commonly used for a generic angle. Again, because that’s what you’re likely to see in a math book, I use the same thing here.
Take a look at Figure 12-4 to see some notation commonly used in this kind of problem.

Figure 12-4: Speed and direction are commonly called r and theta.
For the sake of argument, assume that you want to make a sprite travel at a speed called r, in a direction called theta. The symbol θ as it appears on the diagram is pronounced “theta.” It is a letter in the Greek alphabet.
It’s important to notice that the rotation amount is measured from the x axis. In fact, this is one reason mathematicians use this particular kind of angle measurement.
Building a triangle
Given any r and theta values, you can easily make a triangle by drawing horizontal and vertical lines as in Figure 12-5.

Figure 12-5: Draw horizontal and vertical lines (dashed) to make a triangle.
Once you’ve created the triangle, it’s easy to see how dx and dy are related to r and theta. The length of the horizontal line shows exactly how far you have to move in the x axis to get from the beginning to the end of the line. The length of this horizontal line will be the value for dx. The vertical line indicates how far you have to travel in the y axis to get from the beginning to the end of the line, so the length of the vertical line is dy.
Would you like sides with that?
Now comes the clever part: The Greeks noticed that every right triangle preserves certain ratios. For example, if theta is 30 degrees, the ratio between the lengths of dx and r will remain the same, no matter how long they are. If you have access to these ratios and you know one angle and one side length of a right triangle, you can figure out all the other angles and side lengths.
Figure 12-6 shows the notation used to think about triangles in this way.

Figure 12-6: The sides of the triangles have different names in trigonometry.
It’s easier to think about the triangle if you give the sides some new names:
![]() The hypotenuse is the longest side, opposite the right angle. This side is also the length the sprite will move.
The hypotenuse is the longest side, opposite the right angle. This side is also the length the sprite will move.
![]() The adjacent side is the side touching the angle in question. For this problem, the adjacent side is also
The adjacent side is the side touching the angle in question. For this problem, the adjacent side is also dx.
![]() The opposite side is the side opposite theta. For vector projection problems, the opposite side is
The opposite side is the side opposite theta. For vector projection problems, the opposite side is dy.
Math teachers sometimes refer to the mythical term SOHCAHTOA as a mnemonic device for remembering how the various ratios work. Here’s what it means:
![]() SOH: The length of the opposite side divided by the length of the hypotenuse is called the sine of theta. This is abbreviated
SOH: The length of the opposite side divided by the length of the hypotenuse is called the sine of theta. This is abbreviated sin(theta) = opp/hyp or SOH.
![]() CAH: The length of the adjacent side divided by the length of the hypotenuse is called the cosine of theta. This is abbreviated
CAH: The length of the adjacent side divided by the length of the hypotenuse is called the cosine of theta. This is abbreviated cos(theta) = adj/hyp or CAH.
![]() TOA: The opposite side length divided by the adjacent side length is called the tangent of theta. The tangent relationship is sometimes stated
TOA: The opposite side length divided by the adjacent side length is called the tangent of theta. The tangent relationship is sometimes stated tan(theta) = opp/adj or TOA.
Solving for dx and dy
After you have all this notation in place, it’s actually not that difficult to solve for dx. Figure 12-7 shows the formula.

Figure 12-7: Here’s how to solve for dx and dy.
It’s not nearly as frightening as it looks. Here’s what’s going on:
1. Determine the trigonometry function you need.
Cosine of theta is the opposite side divided by the adjacent side (COH = opposite over adjacent.) This will be handy for figuring out the value of dx.
2. Translate to vector terms.
Translate the formula into terms that work for the actual problem: cos(theta) = dx / r.
3. Solve for dx.
With a little algebra, you can transpose the problem so it solves for dx: dx = r * cos(theta). Given any length (r) and angle (theta), you can use this formula to determine dx.
4. Repeat for dy.
The process is almost the same for dy, except the sin function turns out to be more useful.
Converting components back to vectors
It’s also possible to go in the other direction. For example, you might know two points and want to know the angle and direction between them. To calculate the angle, return to SOHCAHTOA. If you divide the opposite side (dy) by the adjacent side (dx), you’ll get the tangent of theta. Using the arctangent function (usually abbreviated atan), you can get the angle between dx and dy in radians. This can then be converted to degrees. Likewise, you can use the famous Pythagorean theorem to determine the distance between any two points. Figure 12-8 illustrates the formulas used to determine the angle and distance between any two points.

Figure 12-8: Given any two points, you can mathematically determine the angle and distance between them.
Using the Sound Object
The Sound object simply encapsulates an HTML5 audio element. The actual code from simpleGame.js is straightforward enough:
function Sound(src){
//sound effect class
//builds a sound effect based on a url
//may need both ogg and mp3.
this.snd = document.createElement(“audio”);
this.snd.src = src;
//preload sounds if possible (won’t work on IOS)
this.snd.setAttribute(“preload”, “auto”);
//hide controls for now
this.snd.setAttribute(“controls”, “none”);
this.snd.style.display = “none”;
//attach to document so controls will show when needed
document.body.appendChild(this.snd);
this.play = function(){
this.snd.play();
} // end play function
this.showControls = function(){
//generally not needed.
//crude hack for IOS
this.snd.setAttribute(“controls”, “controls”);
this.snd.style.display = “block”;
} // end showControls
} // end sound class def
The sound element actually acts in a way similar to the sprite: It creates an object around a standard HTML element and adds a few new features to it. Here’s how I designed this object:
1. Build the sound as an object.
The sound element is actually an object. This allows me to customize the sound and add new methods to it. Check Chapter 6 for more information on building custom objects.
2. Create an audio element.
The document.createElement() command allows you to build any sort of HTML element you might want. In this case, the snd attribute is an audio element.
3. Set the src attribute.
When the programmer creates an instance of the Sound class, she is expected to send a src parameter. This is used to specify the actual sound file that will be played.
4. Try to preload the sounds.
The audio element has a preload property. If it is set to auto, the sound will load before being played the first time. Unfortunately, this feature does not work in the IOS system.
5. Turn off the controls.
A standard audio HTML element contains a control panel with volume, a play button, and a scrub bar. In a game, you typically do not want these features, so I set the controls attribute to none. I also modify the CSS to hide the element.
6. Add the sound to the document.
If you want a created element to appear on the web page (as I sometimes will with the Sound class), you use the body.appendChild() method to attach the element to the visual display.
7. Create a play() method.
The play() method is quite simple. It simply plays the sound.
8. Add showControls as a workaround for IOS.
As mentioned, Apple’s mobile devices do not support audio preloading, so if you want to play sounds on one of these devices, you need to make the controls visible. This is easy to do with the showControls() method.
Reading the Keyboard
The keyboard is a primary input technology, especially for desktop machines. The standard way to read the keyboard is to set up special functions called event-handlers. JavaScript has a number of predefined event-handlers you can implement. The keyDemo.html program illustrates a couple of keyboard handlers in action.
<!DOCTYPE HTML>
<html lang=”en-US”>
<head>
<meta charset=”UTF-8”>
<title>keyDemo.html</title>
<script type=”text/javascript”>
var keysDown = new Array(256);
var output;
function init(){
output = document.getElementById(“output”);
initKeys();
document.onkeydown = updateKeys;
document.onkeyup = clearKeys
} // end init
updateKeys = function(e){
//set current key
currentKey = e.keyCode;
keysDown[e.keyCode] = true;
output.innerHTML = “current key: “ + currentKey;
}
clearKeys = function(e){
currentKey = null;
keysDown[e.keyCode] = false;
output.innerHTML = “current key: None”;
}
initKeys = function(){
//initialize keys array to all false
for (keyNum = 0; keyNum < 256; keyNum++){
keysDown[keyNum] = false;
} // end for
} // end initKeys
//keyboard constants
K_A = 65; K_B = 66; K_C = 67; K_D = 68; K_E = 69; K_F = 70; K_G = 71;
K_H = 72; K_I = 73; K_J = 74; K_K = 75; K_L = 76; K_M = 77; K_N = 78;
K_O = 79; K_P = 80; K_Q = 81; K_R = 82; K_S = 83; K_T = 84; K_U = 85;
K_V = 86; K_W = 87; K_X = 88; K_Y = 89; K_Z = 90;
K_LEFT = 37; K_RIGHT = 39; K_UP = 38;K_DOWN = 40; K_SPACE = 32;
K_ESC = 27; K_PGUP = 33; K_PGDOWN = 34; K_HOME = 36; K_END = 35;
K_0 = 48; K_1 = 49; K_2 = 50; K_3 = 51; K_4 = 52; K_5 = 53;
K_6 = 54; K_7 = 55; K_8 = 56; K_9 = 57;
</script>
</head>
<body onload = ”init()”>
<div id = ”output”>
Press a key to see its code
</div>
</body>
</html>
Managing basic keyboard input
This particular example demonstrates basic keyboard-checking as well as the more sophisticated technique used in simpleGame. Here’s how the basic version works:
1. Assign a function to onkeydown.
The document.onkeydown attribute is a special property. If you assign a function to this property, that function will be automatically called each time the operating system recognizes a key press. In this example, I assign the function updateKeys.
2. Create the function, including an event parameter.
The updateKeys() function will automatically be given an event object (normally called e).
3. Determine which key was pressed.
The e.keyCode property returns a numeric code indicating which key was pressed. In the keyDemo program (as well as simpleGame), the currentKey variable holds this numeric value.
4. Compare the key to one of the keyboard constants.
It’s hard to remember which keys are associated with which numeric values, so keyDemo and simpleGame provide a list of keyboard constants. They’re easy to remember: K_A is the A key, and K_SPACE is the space bar. Of course, you can add other keys if there’s some key you want to use that isn’t available.
Responding to multiple key presses
The currentKey mechanism is simple to use, but it turns out to be less than ideal for gaming situations. Frequently, the player will have multiple keys pressed at once. For this reason, simpleGame uses a more sophisticated technique.
1. Create an array called keysDown.
This array is a global variable with 256 values. Each element of the array will be a Boolean (true or false) value, indicating whether the associated key is currently pressed or not.
2. Initialize the keysDown array.
The default value for each element of keysDown should be false (as presumably no keys are pressed during initialization). This is done in a function with a simple loop.
3. When a key press is recognized, set the corresponding Boolean.
In addition to setting the currentKey variable, set the corresponding value in the keysDown array to true.
4. Make a second event handler for key up conditions.
When the document senses a key being released, a second event-handler sets the appropriate member of keysDown to false.
Managing the Touch Interface
The touch interface is a new feature of HTML5 specifically aimed at mobile browsers. At first glance, it may seem that touch screens act just like the mouse, but this is not the case. A mouse always has a position, and it has multiple buttons that can be pressed. A touch screen device registers a position only when it’s touched, so there is no hover state. Also, many devices allow more than one finger on the screen at a time, so there’s a possibility of multiple positions. Finally, touch screens are frequently read as gestures, so it becomes important to determine (for example) the length of a swipe. The controller.html page illustrated in Figure 12-9 shows how to read a touch interface. It describes a number of touch techniques that are integrated into simpleGame.
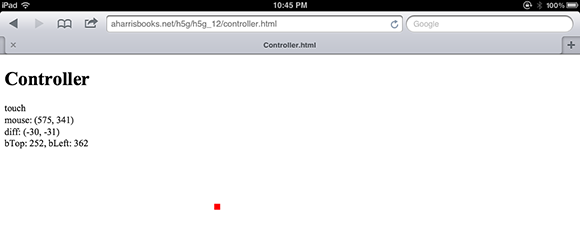
Figure 12-9: When the user touches the screen, the red box moves.
Of course, to get the full effect of this program, you need to view it on a mobile device with a touch interface.
Look over the code to see some of the techniques used to manage touch interfaces.
<!DOCTYPE HTML>
<html lang=”en-US”>
<head>
<meta charset=”UTF-8”>
<title>Controller.html</title>
<script type=”text/javascript”>
var touchable;
var output;
var box;
var result = “No touch”;
var touches = [];
var startX, startY;
var mouseX, mousey
var diffX = 0;
var diffY = 0;
var bTop = 0;
var bLeft = 0;
var SENSITIVITY = 50;
//smaller numbers = more sensitive
function init(){
touchable = ’createTouch’ in document;
output = document.getElementById(”output”);
box = document.getElementById(”box”);
if (touchable){
document.addEventListener(’touchstart’, onTouchStart, false);
document.addEventListener(’touchmove’, onTouchMove, false);
document.addEventListener(’touchend’, onTouchEnd, false);
} // end if
setInterval(update, 10);
} // end init
function onTouchStart(event){
result = ”touch”;
touches = event.touches;
mouseX = touches[0].screenX;
mouseY = touches[0].screenY;
startX = mouseX;
startY = mouseY;
} // end onTouchStart
function onTouchMove(event){
event.preventDefault();
touches = event.touches;
mouseX = touches[0].screenX;
mouseY = touches[0].screenY;
diffX = mouseX - startX;
diffY = mouseY - startY;
} // end onTouchMove
function onTouchEnd(event){
result = ”no touch”;
touches = event.touches;
diffX = 0;
diffY = 0;
} // end onTouchEnd
function update(){
output.innerHTML = result + ”<br />”;
output.innerHTML += ”mouse: (” + mouseX + ”, ” + mouseY + ”) <br />”;
output.innerHTML += ”diff: (” + diffX + ”, ” + diffY + ”) <br />”;
//move box according to controller
bTop += parseInt(diffY/SENSITIVITY);
bLeft += parseInt(diffX /SENSITIVITY);
output.innerHTML += ”bTop: ” + bTop + ”, bLeft: ” + bLeft;
box.style.top = bTop + ”px”;
box.style.left = bLeft + ”px”;
} // end update
</script>
<style type=”text/css”>
#scene {
width: 100px;
height: 100px;
color: white;
background-color: black;
}
#box {
width: 10px;
height: 10px;
background-color: red;
}
/* remove special touch styles */
* {
-webkit-touch-callout: none;
-webkit-text-size-adjust: none;
-webkit-tap-highlight-color: rgba(0, 0, 0, 0);
-webkit-user-select: none;
}
</style>
</head>
<body onload = ”init()”>
<h1>Controller</h1>
<div id = ”box”
style = ”position: absolute; left:0px; top: 0px;”>
</div>
<div id = ”output”>
No touch
</div>
</body>
</html>
Handling touch data and events
As in most interesting problems, the data is really the key. Here is the data you need to keep track of for this problem:
![]()
mouseX and mouseY: At its simplest, a touch interface acts somewhat like a mouse. These variables keep track of where the touch is happening on the screen.
![]()
diffX and diffY: It’s common to treat a touch interface as a virtual joystick. This is accomplished by storing the initial X and Y position of a touch and then comparing those initial values to motion. So, if you touch and slide left, the diffX will register a negative value.
![]()
startX and startY: These variables store the initial position of a touch and are used to calculate diffX and diffY.
![]()
touches[]: Many devices support multi-touch, which means you can touch the screen with more than one finger at a time. The touch mechanism supports this feature by storing all touches as an array of touch objects. The simpleGame library focuses on one touch, which is touches[0].
![]()
SENSITIVITY: This variable is actually treated as a constant. The diffX and diffY values that come from the virtual joystick are too sensitive for real use, so they are divided by a sensitivity constant to give more useful inputs. You can change this value to get a more or less sensitive virtual joystick.
The touch mechanism relies heavily on custom events to do its magic. Here’s how it works:
1. Determine if touch is supported.
If the document object has a createTouch method, the device has touch support. This mechanism is used throughout simpleGame to determine if the device supports touch input.
2. Add event listeners.
When the user touches the screen, three possible events are triggered: touchStart, touchMove, and touchEnd. In the init() function, you can assign functions to each of these events.
3. When a touch starts, register the starting positions.
Record the current position as mouseX and mouseY. Also, copy these values to startX and startY so subsequent movement can be used as the basis of the virtual joystick.
4. When the touch moves, register the difference.
When the user moves a finger after the initial press, the onTouchMove() function will activate. This function records mouseX and mouseY, and also determines the difference between these current values and the startX and startY variables.
5. When the touch ends, reset the joystick.
The diffX and diffY variables act like a joystick, so when the touch is finished, these values should be reset to zero.
6. Disable default touch behavior.
Mobile websites already have default behavior for touches (scrolling and resizing the screen). If you’re using the touch interface as a virtual mouse or joystick, you’ll want to turn off this default behavior. This is done both through the event.preventDefault() method and a few specialty CSS attributes.
Note that this example is a bit simplistic, and the actual behavior in simpleGame is a more sophisticated example of the same principles.
Collision Detection
Collision detection is a major part of game programming because most interesting things in games occur after a collision between sprites. JavaScript does not have a built-in collision routine, so I added one.
Enabling bounding-box collisions
Here’s the basic code for collisions from simpleGame.js:
this.collidesWith = function(sprite){
// a method of the sprite object
//check for collision with another sprite
//collisions only activated when both sprites are visible
collision = false;
if (this.visible){
if (sprite.visible){
//define borders
myLeft = this.x;
myRight = this.x + this.width;
myTop = this.y;
myBottom = this.y + this.height;
otherLeft = sprite.x;
otherRight = sprite.x + sprite.width;
otherTop = sprite.y;
otherBottom = sprite.y + sprite.height;
//assume collision
collision = true;
//determine non-colliding states
if ((myBottom < otherTop) ||
(myTop > otherBottom) ||
(myRight < otherLeft) ||
(myLeft > otherRight)) {
collision = false;
} // end if
} // end ‘other visible’ if
} // end ‘I’m visible’ if
return collision;
} // end collidesWith
The simpleGame library uses a very standard type of collision detection called bounding rectangle detection. Essentially, this works by ignoring the actual pixels of the sprites, but looking instead at the rectangular shapes containing the sprites. This leads to a very fast and efficient (if somewhat inaccurate and inconsistent) collision routine.
The collision routine not only checks for whether two objects are colliding, but it also ignores collisions if either of the sprites is invisible:
1. Set the initial collision value to false.
The collision variable is a Boolean indicating whether the two objects are considered overlapping or not. Initially, the value for collisions is set to false.
2. Ensure that both sprites are visible.
In the simpleGame engine, sprites have a visible property. If this is set to true, the sprite is displayed on the screen and registers collisions. Before checking for collisions, ensure that both sprites are visible with a pair of nested if statements.
3. Determine boundary variables.
The coding is easier to follow if you begin by creating variables to represent the top, bottom, and sides of each sprite.
4. Set collision to true.
It’s easier to find conditions that prove two rectangles do not collide, so begin by assuming they’re colliding.
5. Test for noncolliding states.
If one sprite’s bottom is smaller than the other one’s top, the sprites do not collide. Check the other three conditions that would prevent a collision. If any of these are true, the sprites are not colliding, so set collision to false. Note that the || operator stands for the Boolean operation or. I’m not typically a big fan of Boolean logic in if statements (at least for beginning programmers), but the logic is pretty straightforward in this case.
6. Return the collision state.
The function returns the value of the collision variable. If the sprites are found to be colliding, the function returns the value true. Otherwise, the function will return the value false.
Calculating the distance between sprites
The distanceTo() method of the Sprite object provides an alternative collision mechanism. This technique doesn’t actually check for collisions. Instead, it returns the distance (in pixels) between the centers of the two sprites. You can then check this against some threshold value to determine whether the sprites have collided.
this.distanceTo = function(sprite){
// method of the Sprite object
//get centers of sprites
myX = this.x;
myY = this.y;
otherX = sprite.x;
otherY = sprite.y;
diffX = myX - otherX;
diffY = myY - otherY;
dist = Math.sqrt((diffX * diffX) + (diffY * diffY));
return dist;
} // end distanceTo
Distance is calculated by the old, faithful Pythagorean theorem:
1. Find the differences in X and Y.
This will determine the sides of a right triangle, which can be used to determine the distance between the objects.
2. Use the Pythagorean theorem.
Remember that A squared plus B squared equals C squared, so if diffX is A, diffY is B, and distance is C, you can add the squares of diffX and diffY and then take the square root of the sums to determine the distance.
Using the distance for collisions is about as fast as a bounding-box collision, but has two additional advantages: The collision sensitivity can be adjusted (by picking a larger or smaller threshold), and the distance required for a collision is independent of the image’s size or rotation. See Chapter 6 for a discussion on how to use both techniques in simpleGame.
Boundary Checking
Once sprites begin moving, there is always the possibility they’ll leave the screen. Typically, game developers respond in one of five ways: wrap, bounce, stop, die, or continue. The simpleGame library has a boundary-checking routine that allows you to easily specify which of these default behaviors to use. The sprite’s boundAction property indicates which action should be used. You can use the boundary-checker to do the following:
1. Determine the borders.
The borders are determined by the canvas width. To make things easier, I assigned variables called topBorder, bottomBorder, leftBorder, and rightBorder.
2. Check to see if the user is off a border.
I then made another series of variables that contain Boolean values indicating whether the sprite is off one of the borders: offRight, offLeft, offTop, and offBottom. Use basic if statements to determine if the sprite is off the screen in one of these ways.
3. Determine the boundary action.
Use a simple if statement to determine which boundary action is currently set for the sprite.
4. If the boundAction is WRAP:
Change the x or y variable to the opposite side, but leave the dx and dy values alone.
5. If the boundAction is BOUNCE:
Invert dy if the sprite bounced off the top or bottom, and dx if the sprite bounced off the left or right. It’s not necessary to change x or y directly.
6. If the boundAction is STOP:
Simply set the speed to zero regardless of which boundary was exited.
7. If the boundAction is DIE:
Set the speed to zero and invoke the sprite’s hide() method. This will cause the sprite to disappear and no longer be considered in collision calculations.
8. Any other boundAction is considered CONTINUE.
No action is necessary here because the sprite will continue moving even though it’s not visible. If this is the desired effect, you should somehow indicate to the user where the sprite is, or provide some way for the sprite to return.
Here is part of the code for the collision-checking routine:
offRight = false;
offLeft = false;
offTop = false;
offBottom = false;
if (this.x > rightBorder){
offRight = true;
}
if (this.x < leftBorder){
offLeft = true;
}
if (this.y > bottomBorder){
offBottom = true;
}
if (this.y < 0){
offTop = true;
}
if (this.boundAction == WRAP){
if (offRight){
this.x = leftBorder;
} // end if
if (offBottom){
this.y = topBorder;
} // end if
if (offLeft){
this.x = rightBorder;
} // end if
if (offTop){
this.y = bottomBorder;
}
} else if (this.boundAction == BOUNCE){
if (offTop || offBottom){
this.dy *= -1;
this.calcSpeedAngle();
this.imgAngle = this.moveAngle;
}
if (offLeft || offRight){
this.dx *= -1;
this.calcSpeedAngle();
this.imgAngle = this.moveAngle;
}
} else if (this.boundAction == STOP){
if (offLeft || offRight || offTop || offBottom){
this.setSpeed(0);
}
} else if (this.boundAction == DIE){
if (offLeft || offRight || offTop || offBottom){
this.hide();
this.setSpeed(0);
}
} else {
//keep on going forever
}
} // end checkbounds
If you want to change a sprite’s boundary action in simpleGame, you can use the setBoundAction() method to do so.
Note that a few situations may require different behaviors. For example, you may want to wrap around the sides but stop at the top or bottom. If you need a more specific behavior, just build a new checkBounds() method for your sprite. However, you’ll need to check all boundaries because your new checkBounds() will completely overwrite the one built into simpleGame.