Chapter 3
Coding Like a Pro
In This Chapter
![]() Learning more about variables
Learning more about variables
![]() Making decisions with conditions
Making decisions with conditions
![]() Repeating with loops
Repeating with loops
![]() Debugging your programs
Debugging your programs
![]() Breaking up your code with functions
Breaking up your code with functions
Computer games are complex. They are about a lot of information: scores, maps, characters, and all the data they represent. You also have complicated instructions. Even simple games are complicated enough that you’ll need to break them into smaller segments. You’ll also find that some of your code is repetitive. You’ll also want the computer to make decisions so the enemy characters will appear to think and the game will respond to different circumstances in different ways.
The basic ideas of programming are the same in any language. Programs are about data, which is stored in variables. You’ll sometimes have a chunk of code that you’ll want to combine into functions. Your program needs to do different things in different situations, and sometimes it needs to be able to repeat things. Sometimes you’ll also need more advanced ways to think about information and instructions. Game programming shares these characteristics with every other programming language.
All of these things require the basic elements of programming:
![]() Variables: These are the basic data elements. Everything in your game is housed in one or more variables.
Variables: These are the basic data elements. Everything in your game is housed in one or more variables.
![]() Conditions: A condition is a true or false statement. Conditions are critical in loops and branches.
Conditions: A condition is a true or false statement. Conditions are critical in loops and branches.
![]() Branches: Your code can appear to make decisions. A number of tools help you make decisions well.
Branches: Your code can appear to make decisions. A number of tools help you make decisions well.
![]() Loops: Loops are useful when you have repetitive tasks to perform.
Loops: Loops are useful when you have repetitive tasks to perform.
![]() Arrays: These are “super-variables” that can contain a huge amount of information.
Arrays: These are “super-variables” that can contain a huge amount of information.
![]() Functions: A function is a group of code lines with a single name. Functions help you organize your code.
Functions: A function is a group of code lines with a single name. Functions help you organize your code.
Working with Variables
Variables are a really important part of computer programming. Although JavaScript makes variables pretty easy to use, you still need to keep some very important things in mind when you use a variable:
![]() The
The var statement is preferred but not required. It’s generally considered best to use the var statement to define a variable. Throughout this book, I use the var statement to build every major variable.
![]() Just mentioning a variable creates it. If you leave out the
Just mentioning a variable creates it. If you leave out the var statement, JavaScript tries to create a variable for you. For example, userName = “Andy”; is similar to var userName = “Andy”:.
![]() The variable type is automatically determined by JavaScript. Different kinds of information are stored differently in the computer’s memory. Integers (counting numbers), real numbers (with a decimal point), and text are all stored differently in memory. JavaScript tries to automatically create the right type of variable based on the context.
The variable type is automatically determined by JavaScript. Different kinds of information are stored differently in the computer’s memory. Integers (counting numbers), real numbers (with a decimal point), and text are all stored differently in memory. JavaScript tries to automatically create the right type of variable based on the context.
You’re just my type: Handling different data types
The point about variable types is really important. Different kinds of data are stored in different ways in the computer. Some languages (like C++ and Java) are extremely picky about variable types and require you to think carefully about what type of data goes into what variable. JavaScript is much more easy-going about data types, but it still must figure out how to store the data. When you assign a value to a JavaScript variable, JavaScript turns it into one of these main types:
![]() Integers: Integers are the counting numbers, zero, and negative numbers. Integers do not have a decimal point. They are pretty easy for the computer to work with and rarely cause problems, so they are a favorite data type.
Integers: Integers are the counting numbers, zero, and negative numbers. Integers do not have a decimal point. They are pretty easy for the computer to work with and rarely cause problems, so they are a favorite data type.
![]() Floating point: Numbers with a decimal point are often called
Floating point: Numbers with a decimal point are often called floats. (Some languages have more than one floating type, but JavaScript just has floats.) Floating data requires a lot more memory than integers and can introduce some crazy errors, so JavaScript only stores values with the float mechanism if needed (that is, if a numeric value has a decimal part).
![]() Strings: Text data is a special case. Text is really stored as a bunch of integers in contiguous memory cells. This reminded early programmers of beads on a string, so programmers never say text data, but call text strings instead. Almost all user input and output is done through strings.
Strings: Text data is a special case. Text is really stored as a bunch of integers in contiguous memory cells. This reminded early programmers of beads on a string, so programmers never say text data, but call text strings instead. Almost all user input and output is done through strings.
![]() Boolean: Boolean value is another special case. A Boolean data element only contains the values
Boolean: Boolean value is another special case. A Boolean data element only contains the values true or false. Simple as they are, Booleans are extremely useful.
![]() Objects: JavaScript supports an advanced programming idea called object-oriented programming. A JavaScript object can be a very complex element containing variables and functions. Any element on the web page can be converted into a JavaScript object, and JavaScript supports a rich framework of other types of objects as well.
Objects: JavaScript supports an advanced programming idea called object-oriented programming. A JavaScript object can be a very complex element containing variables and functions. Any element on the web page can be converted into a JavaScript object, and JavaScript supports a rich framework of other types of objects as well.
Using a computer program to do bad math
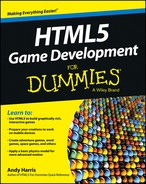
Although JavaScript tries to shield you from worrying about data types, you still have to think about this issue because sometimes it causes you problems. For example, consider the code in typeConv.html (shown in Figure 3-1).
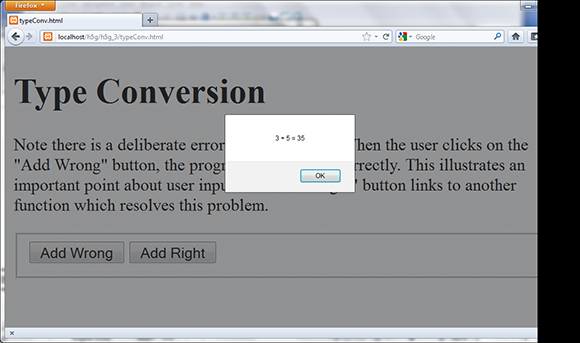
Figure 3-1: 3 + 5 = 35? Something’s not right here.
This program asks the user for two numbers and then tries to add them together. However, it doesn’t do it correctly. If the user inputs 3 and 5, the result is 35. The Add Wrong button calls the cleverly named addWrong() function. Here’s the code for addWrong():
function addWrong(){
//from typeConv.html
//input two numbers
var x = prompt(“X”);
var y = prompt(“Y”);
var sum = x + y;
alert(x + ” + ” + y + ” = ” + sum);
} // end addWrong
The code for addWrong() looks perfectly reasonable. Here’s what you’re doing with it:
1. Ask the user for x and y.
Use the prompt statement to ask the user for two numbers. Store these two numbers in the variables x and y.
2. Add x and y and put the result in sum.
Make a new variable called sum that will contain the sum of x and y.
3. Output the value of sum.
Use the standard alert() statement to output the result.
This code seems completely straightforward, and it ought to work. However, it doesn’t do what you want. It reports that 3 plus 5 equals 35. And here we thought computers were good at math.
Managing data types correctly
The key to fixing the addWrong problem is to understand how the computer is misinterpreting the data. Here’s the underlying problem: The prompt() command is asking for text from the user. That text is stored in a string variable because JavaScript assumes any input from the user is a string. So, the value 3 isn’t stored as the number 3, but as a text variable with the value ‘3.’ (The quotes are important because text values are always encased in quotes and numeric values are not.) The plus sign combines two string values, so if x is ‘3’ and y is ‘5’, x + y means ‘concatenate (or combine) ‘3’ and ‘5’, resulting in an answer of ‘35’. That is not what we want at all.
The way to fix this is to tell the computer that x and y should be interpreted as integers, like this:
function addRight(){
//from typConv.html
//input two numbers
var x = prompt(“X”);
var y = prompt(“Y”);
//force values to integer format
x = parseInt(x);
y = parseInt(y);
var sum = x + y;
alert(x + ” + ” + y + ” = ” + sum);
} // end addRight
This code is very similar to the addWrong() function, but it adds a new section. The parseInt() function accepts a string and converts it to an integer. If it cannot convert the value, it returns the special value NaN (Not a Number).
 There are similar functions for converting data to other types. Use
 parseFloat() to convert a string value to a floating point (decimal) value. The toString() method can be used to convert a number to a string:
x = 5;
alert(x.toString());
However, JavaScript usually converts numbers to strings automatically, so it isn’t usually necessary to use this technique.
This improved version of the adding code still pulls in the values as strings, but it converts them to integer values before doing any calculation. The exact same code is used to add the values (sum = x + y), but this time the values are integers, so the computer knows that the plus sign really means add.
Figure 3-2 illustrates the addRight function working as expected.
 Experienced programmers (especially Java programmers) might be horrified at the cavalier way JavaScript lets you just create and change variable types on the fly. However, it really works pretty well most of the time, so you might just have to relax and appreciate that different languages have different goals. JavaScript tries to do as much automatically as it can, which is nice for beginners. Java (which is an entirely different language) is more focused on protecting you from various kinds of mistakes often brought on by sloppy coding. Java has much stricter rules, but when you follow those rules, you tend to make fewer mistakes.
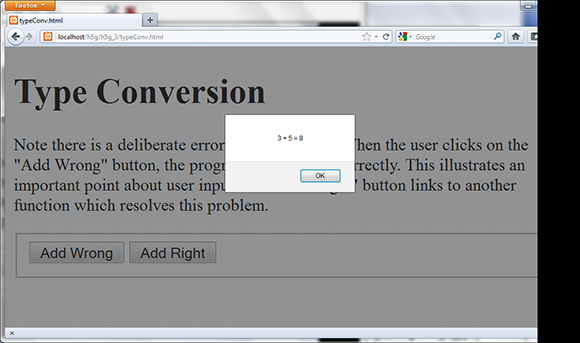
Figure 3-2: The addRight() function converts input to integers before adding them.
Making Choices with if
Sometimes you’ll need your code to make decisions. For example, if somebody famous typed their name in your website, you might want to create a custom greeting for them. (I know this is a goofy example, but stay with me.) Take a look at the ifElse.html site in Figures 3-3 and 3-4.
As you can see, the program looks at the input in the text box and changes behavior based on the value of the text field. The code is quite similar to the code in the hiUser page. The only difference is the way the function is written. Here’s the checkName() function called in ifElse.html:
function checkName()
// from ifElse.html
lblOutput = document.getElementById(“lblOutput”);
txtInput = document.getElementById(“txtInput”);
userName = txtInput.value;
if (userName == “Tim Berners-Lee”){
lblOutput.innerHTML = “Thanks for inventing HTML!”;
} else {
lblOutput.innerHTML = “Do I know you?”;
} // end if
} // end function
Figure 3-3: Tim Berners-Lee gets a special greeting.

Figure 3-4: Apparently, this guy isn’t famous enough.
Changing the greeting with if
This code uses an important idea called a condition inside a construct called an if statement. Here’s what’s happening:
1. Set up the web page as usual.
The HTML code has elements called lblOutput and txtInput. It also has a button that calls checkName() when it’s clicked.
2. Create variables for important page elements.
You’re getting data from txtInput and changing the HTML code in lblOutput, so create variables for these two elements.
3. Get userName from txtInput.
Use the txtInput.value trick to get the value of the input element called txtInput and place it in the variable userName.
4. Set up a condition.
The key to this program is a special element called a condition — an expression that can be evaluated as true or false. Conditions are often (as in this case) comparisons. Note that the double equals sign (==) is used to represent equality. In this example, I’m asking whether the userName variable equals the value “Tim Berners-Lee”.
5. Place the condition in an if structure.
The if statement is one of a number of programming constructs that use conditions. It contains the keyword if followed by a condition (in parentheses). If the condition is true, all of the code in the following set of braces is executed.
6. Write code to execute if the condition is true.
Create a set of squiggly braces after the condition. Any code inside these braces executes if the condition is true. Be sure to indent your code and use the right squiggle brace (}) to end the block of code. In this example, I give a special greeting to Tim Berners-Lee (because he is just that awesome).
7. Build an else clause.
You can build an if statement with a single code block, but often you want the code to do something else if the condition is false. Use the else construct to indicate you will have a second code block that will execute only if the condition is false.
8. Write the code to happen when the condition is false.
The code block following the else clause executes only if the condition is false. In this particular example, I have a greeting for everyone except Tim Berners-Lee.
The different flavors of if
If statements are extremely powerful, and there are a number of variations. You can actually have one, two, or any number of branches. You can write code like this:
if (userName == “Tim Berners-Lee”){
lblOutput.innerHTML = “Thanks for inventing HTML”
} // end if
With this structure, the greeting occurs if userName is “Tim Berners-Lee” and nothing happens if the userName is anything else. You can also use the if-else structure (this is the form used in the actual code):
if (userName == “Tim Berners-Lee”){
lblOutput.innerHTML = “Thanks for inventing HTML!”;
} else {
lblOutput.innerHTML = “Do I know you?”;
} // end if
One more alternative lets you compare as many results as you wish by adding new conditions:
if (userName == “Tim Berners-Lee”){
lblOutput.innerHTML = “Thanks for inventing HTML!”;
} else if (userName == “Al Gore”) {
lblOutput.innerHTML = “Thanks for inventing the Internet”;
} else if (userName == “Hakon Wium Lie”) {
lblOutput.innerHTML = “Thanks for inventing CSS”;
} else {
lblOutput.innerHTML = “Do I know you?”;
} // end if
Conditional operators
The == operator checks to see if two values are identical, but as Table 3-1 shows, JavaScript supports a number of other operators as well.
Table 3-1 Conditional Operators
|
Operator |
Meaning |
|
|
a is equal to b. |
|
|
a is less than b. |
|
|
a is greater than b. |
|
|
a is less than or equal to b. |
|
|
a is greater than or equal to b. |
|
|
a is not equal to b. |
If you’re coming from another programming language like Java, C++, or PHP, you might wonder how string comparisons work because they require different operators in these languages. JavaScript uses exactly the same comparison operators for types of data, so there’s no need to learn different operators. Yeah JavaScript!
Managing Repetition with for loops
Computers are well known for repetitive behavior. It’s pretty easy to get a computer to do something many times. The main way to get this behavior is to use a mechanism called a loop. The for loop is a standard kind of loop that is used when you know how often something will happen. Figure 3-5 shows the most basic form of the for loop.

Figure 3-5: This program counts from one to ten.
Setting up the web page
The same web page is used to demonstrate three different kinds of for loops. As usual, the HTML code sets everything up. Here’s the HTML code that creates the basic framework:
<body onload = “init()”>
<h1>For loops</h1>
<form action = “”>
<fieldset>
<button type = “button”
onclick = “count()”>
count to ten
</button>
<button type = “button”
onclick = “back()”>
count backwards
</button>
<button type = “button”
onclick = “byFive()”>
count by fives
</button>
</fieldset>
</form>
<div id = “output”>Click a button to see some counting...</div>
</body>
</html>
Although the HTML is pretty straightforward, it does have some important features:
1. The body calls an initialization function.
Often you’ll want some code to happen when the page first loads. One common way to do this is to attach a function call to the onload attribute of the body element. In this example, I call the init() function as soon as the body is finished loading. I describe the contents of the init() function in the next section.
2. The page is mostly an HTML form.
The most important part of this page is the form with three buttons on it. Each button calls a different JavaScript function.
3. A special div is created for output.
It’s a good idea to put some default text in the div so you can see where the output should go and so you can ensure the div is actually changing when it’s supposed to.
From this example, it’s easy to see why it’s a good idea to write the HTML first. The HTML code gives me a solid base for the program, and it also provides a good outline of what JavaScript code I’ll need. Clearly this page calls for four JavaScript functions, init(), count(), back(), and byFive(). The names of all the functions are pretty self-explanatory, so it’s pretty easy to see what each one is supposed to do. It’s also clear that the div named output is intended as an output area. When you design the HTML page well, the JavaScript code becomes very easy to start.
Initializing the output
This program illustrates a situation that frequently comes up in JavaScript programming: All three of the main functions refer to the same output area. It seems a waste to create a variable for output three different times. Instead, I make a single global output variable available to all functions and attach the variable to that element once when the page loads.
In order to understand why this is necessary, it’s important to discuss an idea called variable scope. Generally, variables are created inside functions. As long as the function is running, the variable still exists. However, when a function is done running, all the variables created inside that function are instantly destroyed. This prevents functions from accidentally changing the variables in other functions. Practically, it means you can think of each function as a separate program.
However, sometimes you want a variable to live in more than one function. The output variable in the forLoop.html page is a great example because all of the functions will need it. One solution is to create the variable outside any functions. Then all the functions will have access to it.
You can create the output variable without being in a function, but you can’t attach it to the actual div in the web page until the web page has finished forming. The init() function is called when the body loads. Inside that function, I assign a value to the global output variable. Here’s how the main JavaScript and the init() method code looks:
var output;
function init(){
output = document.getElementById(“output”);
} // end init
This code creates output as a global variable, and then attaches it to the output div after the page has finished loading.
Creating the basic for loop
The standard for loop counts the values between 1 and 10. The Count to Ten button triggers the count() function. Here’s the code for count():
function count(){
output.innerHTML = “”;
for (i = 1; i <= 10; i++){
output.innerHTML += i + “<br />”;
} // end for loop
} // end count
Although the count() function clearly prints ten lines, it only has one line that modifies the output div. The main code repeats many times to create the long output.
1. You can use the output var immediately.
Because output is a global variable and it has already been created, you can use it instantly. There’s no need to initialize it in the function.
2. Clear the output.
Set output.value to the empty string (“”) to clear the output. This destroys whatever text is currently in the div.
3. Start a for loop.
The for loop is a special loop used to repeat something a certain number of times. For loops have three components: initialization, comparison, and update.
4. Initialize your counting variable.
A for loop works by changing the value of an integer many times. The first part of a for loop initializes this variable (often called i) to a starting value (usually zero or one).
5. Specify a condition for staying in the loop.
The second part of a for statement is a condition. As long as the condition is true, the loop continues. As soon as the condition is evaluated as false, the loop exits.
6. Change the variable.
The third part of a for statement somehow changes the counting variable. The most common way to change the variable is to add one to it. The i++ syntax is shorthand for “Add one to i.”
7. Build a code block for repeated code.
Use braces and indentation to indicate which code repeats. All code inside the braces repeats.
8. Inside the loop, write to the output.
On each iteration of the loop, add the current value of i to the output div’s innerHTML. Also add a break (<br />) to make the output look better. When you add to an innerHTML property, you’re writing HTML code, so if you want the output to occur on different lines, you need to write the HTML to make this happen. (See the next section on operator shortcuts for an explanation of the += statement.)
9. Close the loop.
Don’t forget to end the loop, or your program won’t run correctly.
Introducing shortcut operators
You might have noticed a couple of new operators in the code for forLoops.html. These are some shortcut tools that allow you to express common ideas more compactly. For example, consider the following code:
i = i + 1;
This means “Add one to i and store the result back in i.” It’s a pretty standard statement, even if it does drive algebra teachers bananas. The statement is so common that it is often abbreviated, like this:
i += 1;
This statement means exactly the same as the last one: Add one to i. You can use this to add any amount to the variable i. Because the + sign is used to concatenate (combine) strings, you can use the += shortcut with string manipulation, so consider this variation:
var userName = “Andy”;
userName += “, Benevolent Dictator for Life”;
The second statement appends my official (I wish) title to the end of my name.
You can also use the -= operator to subtract from a variable. It’s even possible to use *= and /=, but they are not commonly used.
Moving back to numbers — adding one is extremely common. Here’s another shortcut that’s even more brief:
i++;
This statement also means “Add one to i.” In the standard for loop, I use that variation because it’s very easy.
When programmers decided to make a new variation of C, they called the new language C++. Get it? It’s one better than C! Those guys are a hoot!
Counting backward
After you understand basic for loops, it’s not difficult to make a loop that counts backward. Here’s the back() function (called by the Count Backwards button):
function back(){
output.innerHTML = “”;
for (i = 10; i > 0; i--){
output.innerHTML += i + “<br />”;
} // end for loop
} // end back
When the user activates this function, she gets the code shown in Figure 3-6.

Figure 3-6: Now the page counts backward.
This code is almost exactly like the first loop, but look carefully at how the loop is created:
1. Initialize i to a high value.
This time I want to count backward from ten to one, so start i with the value 10.
2. Keep going as long as i is greater than 0.
It’s important to note that the logic changes here. If i is greater than 0, the loop should continue. If i becomes 0 or less, the loop exits.
3. Subtract one from i on each pass.
The -- operator works much like ++, but it subtracts one from the variable.
Counting by fives
Counting by fives (or any other value) is pretty trivial when you know how for loops work. Here’s the byFive() code called by the Count by Fives button:
function byFive(){
output.innerHTML = “”;
for (i = 5; i <= 25; i += 5){
output.innerHTML += i + “<br />”;
} // end for loop
} // end byFive
It is remarkably similar to the other looping code you’ve seen:
1. Initialize i to 5.
The first value I want is 5, so that is the initial value for i.
2. Continue as long as i is less than or equal to 25.
Because I want the value 25 to appear, I set the condition to be less than or equal to 25.
3. Add 5 to i on each pass.
Each time through the loop, I add 5 to i using the += operator.
The Count by Fives code is shown in action in Figure 3-7.

Figure 3-7: Now the page counts by fives.
Building While Loops
for loops are useful when you know how often a loop will continue, but sometimes you need a more flexible type of loop. The while loop is based on a simple idea. It contains a condition. When the condition is true, the loop continues; if the condition is evaluated as false, the loop exits.
Making a basic while loop
Figure 3-8 shows a dialog box asking for a password. The program keeps asking for a password until the user enters the correct password.
function getPassword(){
//from while.html
var correct = “HTML5”;
var guess = “”;
while (guess != correct){
guess = prompt(“Password?”);
} // end while
alert(“You may proceed”);
} // end getPassword

Figure 3-8: This program keeps asking for the password until the user gets it right.
A while loop for passwords is not hard to build:
1. Store the correct password in a variable.
Variable names are important because they can make your code easier to follow. I use the names correct and guess to differentiate the two types of passwords. Beginners often call one of these variables password, but that can be confusing because there are actually two passwords (the correct password and the guessed password) in play here.
2. Initialize the guess to an empty value.
The key variable for this loop will be guess. It starts as an empty string. It’s critical to initialize the key variable before the loop begins.
3. Set up the while statement.
The while statement has extremely simple syntax: the keyword while followed by a condition, followed by a block of code.
4. Build the condition.
The condition is the heart of a while loop. The condition must be constructed so the loop happens at least once (ensure this by comparing the condition to the variable initialization). When the condition is true, the loop continues. When the condition is evaluated to false, the loop exits. This condition compares guess to correct. If guess is not equal to correct, the code continues.
5. Write the code block.
Use braces and indentation to indicate the block of code that will be repeated in the loop. The only code in this particular loop asks the user for a password.
6. Add code to change the key variable inside the loop.
Somewhere inside the loop, you need code that changes the value of the key variable. In this example, the prompt statement changes the password. As long as the user eventually gets the right password, the loop ends.
Getting your loops to behave

While loops can be dangerous. It’s quite easy to write a while loop that works incorrectly, and these can be an exceptionally difficult kind of bug to find and fix. If a while loop is incorrectly designed, it can refuse to ever run or run forever. These endless loops are especially troubling in JavaScript because they can crash the entire browser. If a JavaScript program gets into an endless loop, often the only solution is to use the operating system Task Manager (Ctrl+Alt+Delete on Windows) to shut down the entire browser.
The easy way to make sure your loop works is to remember that while loops need all the same features as for loops. (These ideas are built into the structure of a for loop. You’re responsible for them yourself in a while loop.) If your loop doesn’t work, check that you’ve followed these steps:
![]() Identify a key variable. A
Identify a key variable. A while loop is normally based on a condition, which is usually a comparison (although it might also be a variable or function that returns a Boolean value). In a for loop, the key variable is almost always an integer. While loops can be based on any type of variable.
![]() Initialize the variable before the loop. Before the loop begins, set up the initial value of the key variable to ensure the loop happens at least once.
Initialize the variable before the loop. Before the loop begins, set up the initial value of the key variable to ensure the loop happens at least once.
![]() Identify the condition for the loop. A
Identify the condition for the loop. A while loop is based on a condition. Define the condition so the loop continues while the condition is true and exits when the condition is evaluated to false.
![]() Change the condition inside the loop. Somewhere inside the loop code, you need to have statements that eventually make the condition
Change the condition inside the loop. Somewhere inside the loop code, you need to have statements that eventually make the condition false. If you forget this part, your loop never ends.
This example is a good example of a while loop, but a terrible way to handle security. The password is shown in the clear, and anybody could view the source code to see the correct password. There are far better ways to handle security, but this is the cleanest example of a while loop I could think of.
Managing more complex loops
It won’t take long before you find situations where the standard for or while loops do not seem adequate. For example, consider the password example again. This time, you want to ask for a password until the user gets the password correct or guesses incorrectly three times. Think about how you would build that code. There are a number of ways to do it, but here’s the cleanest approach:
function threeTries(){
//continues until user is correct or has three
//incorrect guesses
//from while.html
var correct = “HTML5”;
var guess = “”;
var keepGoing = true;
var tries = 0;
while (keepGoing){
guess = prompt(”Password?”);
if (guess == correct){
alert(”You may proceed”);
keepGoing = false;
} else {
tries++;
if (tries >= 3){
alert(”Too many tries. Launching missiles...”);
keepGoing = false;
} // end if
} // end if
} // end while
} // end threetries
This code is a little more complex, but it uses a nice technique to greatly simplify loops:
1. Initialize correct and guess.
As in the previous example, initialize the correct and guess passwords.
2. Build a counter to indicate the number of tries.
The tries variable counts how many attempts have been made.
3. Build a Boolean sentry variable.
The keepGoing variable is special. Its entire job is to indicate whether the loop should continue. It is a Boolean variable, meaning it only contains the values true or false.
4. Use keepGoing as the condition.
A condition doesn’t have to be a comparison. It just has to be true or false. Use the Boolean variable as the condition. As long as keepGoing has the value true, the loop continues. Any time you want to exit the loop, set keepGoing to false.
5. Ask for the password.
You still need the password, so get this information from the user.
6. Check to see if the password is correct.
Use an if statement to see if the password is correct.
7. If the password is correct:
Provide feedback to the user and set keepGoing to false. The next time the while statement is executed, the loop ends. (Remember, you want the loop to end when the password is correct.)
8. If the password is incorrect:
If the (guess == correct) condition is false, that means the user did not get the password correct. In this case, add one to the number of tries.
9. Check the number of tries.
Build another if statement to check the number of tries.
If it’s had three tries, provide feedback (threatening global annihilation is always fun) and set keepGoing to false.
The basic idea of this strategy is quite straightforward: Create a special Boolean variable with the singular job of indicating whether the loop continues. Any time you want the loop to exit, change the value of that variable.
If you change most of your while loops to this format (using a Boolean variable as the condition), you’ll generally eliminate most while loop issues. Most beginners (like me, and I’ve been doing this for 30 years) make their loops way too complicated. Using a Boolean variable in your loop can solve a lot of logic problems.
Managing bugs with a debugger
When you’re writing loops and conditions, things can go pretty badly in your code. Sometimes it’s very hard to tell what exactly is going on. Fortunately, modern browsers have some nice tools that help you look at your code more carefully.
A debugger is a special tool that allows you to run a program in “slow motion,” moving one line at a time so you can see exactly what is happening. Google Chrome has a built-in debugger, so I begin with that one.
To see how a debugger works, follow these steps:
1. Load a page into Chrome.
You can add a debugger to most browsers, but Chrome has one built in, so start with that one. I’m loading the forLoops.html page because loops are a common source of bugs.
2. Open the Developer Tools window.
If you right-click anywhere on the page and choose Inspect Element, you get a wonderful debugging tool that looks like Figure 3-9.
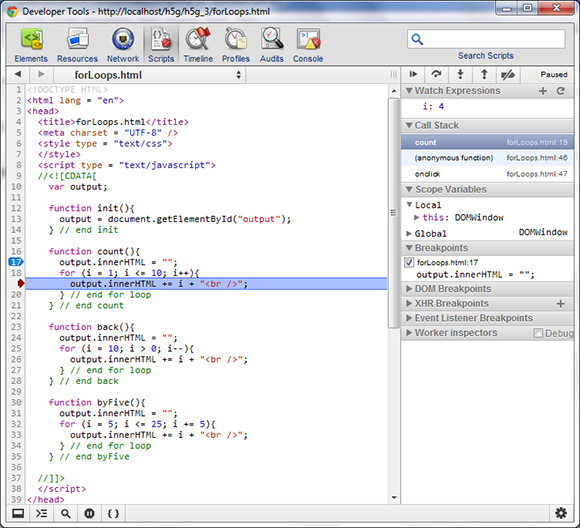
Figure 3-9: The Chrome debugger makes it easy to figure out what’s happening.
3. Inspect the page with the Elements tab.
The default tab shows you the page in an outline view, letting you see the structure of your page. If you click on any element in the outline, you can see what styles are associated with that element. The actual element is also highlighted on the main page so you can see exactly where everything is. This can be very useful for checking your HTML and CSS.
4. Look at the Console tab.
Any time your code is not working as expected, look at the Console tab. Often there will be an error message here that explains what is going wrong.
5. Move to the Scripts tab.
The developer tool has a separate tab for working with JavaScript code. Select the Scripts tab to see your entire code at once. If your page pulls in external JavaScript files, you’ll be able to select them here as well.
6. Set a breakpoint.
Typically, you let the program begin at normal speed and slow down right before you get to a trouble spot. In this case, I’m interested in the count() function, so click on the first line (17) of that function in the code window. (It’s more reliable to click on the first line of the function than the line that declares it, so click line 17 instead of line 16.)
7. Refresh the page.
In the main browser, click the Reload button or press the F5 key to refresh the page. The page may initially be blank. That’s fine — it means the program has paused when it encountered the function.
8. Step into the next line.
On the developer tool are a series of buttons on top of the right column. Click the Step into the Next Line button, which looks like a down arrow with a dot under it. You can also press the F11 key to activate the command.
9. Your page is now running.
If you look back over the main page, you should see it is now up and running. Nothing is happening yet because you haven’t activated any of the buttons.
10. Click the Count button.
The Count button should activate the code in the count function. Click this button to see if that is what happens.
11. Code should now be paused on line 17.
Back in the code window, line 17 is now highlighted. That means the browser is paused, and when you activate the Step button, the highlighted code executes.
12. Step a few times.
Use the F11 key or the Step into the Next Line button to step forward a few times. Watch how the highlight moves around so you can actually see the loop happening. This is very useful when your code is not behaving properly because it allows you to see exactly how the processor is moving through your code.
13. Hover over the variable i in your code.
When you are in debug mode, you can hover the mouse over any variable in the code window, and you’ll see what the current value of that variable is. Often when your code is performing badly, it’s because a variable isn’t doing what you think it is.
14. Add a watch expression to simplify looking at variables.
If you think the loop is not behaving, you can add a watch expression to make debugging easier. Right under the step buttons you’ll see a tab called watch expressions. Click the plus sign to add a new expression. Type i and press Enter.
15. Continue stepping through the code.
Now you can continue to step through the code and see what is happening to the variable. This is incredibly useful when your code is not performing like you want it to.
I personally think the debugger built into Chrome is one of the best out there, but it’s not the only choice. If you’re using Firefox, the excellent Firebug extension adds the same functionality to Firefox (http://getfirebug.com). Safari has a similar Web Inspector tool built in, and even IE9 finally has a decent debugger called F12. All work in roughly the same way. Usually, though, a JavaScript error crashes any browser, so pick one you like for initial testing and then use other browser-specific tools only when necessary.
Sending Data to and from Functions
Functions make your code safe because variables created inside a function are destroyed when the function dies. Sometimes, though, you want data to move from one function to another. One solution is the global variable, but it’s kind of a crude option. A better solution is to allow data to pass into and out of functions. As an example, look at the program in Figure 3-10.

Figure 3-10: This program presents the lyrics to a popular song.
Of course, this program could be written by creating a really long string variable and then copying it to the innerHTML attribute of the output div, but that would be quite inefficient. Instead, I used functions to simplify the work. Begin by looking over the main function: makeSong().
function makeSong(){
//create output variable
//from param.html
var output = document.getElementById(“output”);
output.innerHTML = “”;
output.innerHTML += verse(1);
output.innerHTML += chorus();
output.innerHTML += verse(2);
output.innerHTML += chorus();
} // end makeSong
This code demonstrates one of the primary advantages of functions; they allow you to break a complex problem into a series of smaller problems. A number of interesting things are going on here:
![]() The program writes to a
The program writes to a div called output. I make a variable called output that corresponds to a div called output on the page.
![]() I’m writing text to
I’m writing text to output. That’s not surprising, but it is interesting because there are no text variables or values in the makeSong() function.
![]() All the text is created by other functions. There are two other functions in this program:
All the text is created by other functions. There are two other functions in this program: verse() and chorus(). Both of these functions create string values.
![]() Verse can be “fed” a numeric value. The
Verse can be “fed” a numeric value. The verse function is especially important because it can be passed a value. The verse changes behavior based on the value passed to it.
Returning a value from a function
To truly understand what’s happening here, begin with the chorus() function (because it’s a little simpler than verse()).
function chorus(){
//from param.html
var result = “-and they all came marching down, <br />”;
result += “to the ground, to get out, of the rain. <br />”;
result += “boom boom boom boom <br />”;
result += “boom boom boom boom <br />”;
result += “<br />”;
return result;
} // end chorus
The chorus() function is extremely simple:
1. Create a variable called result.
This variable holds the result of the function’s work (which will be a string value containing the chorus of the song).
2. Append HTML code to the result variable.
This code has several lines that build up the result. Note that I’m using HTML formatting because this code will be printed in an HTML div.
3. Return result.
The last statement of the function is special. The return statement allows you to specify a value that the function returns to whatever code called it.
4. Use the function like a variable.
When a function has a return value, you can treat it like a variable. Because this function returns a string, you can use the function like a string variable in the makeSong() function. In that function, I said output.innerHTML += chorus(). That means “run the chorus() function and then add whatever comes out of that function to the innerHTML of the output element.”
Sending arguments to a function
The verse() function also returns a value, but it has another trick up its sleeve. Although the chorus is always the same, the verse changes a bit each time. The little one (who appears to have attention issues) gets distracted in a different way on every verse.
The verse() function uses an important idea called parameter-passing to allow this variation in behavior. Begin by looking at the code for the function:
function verse(verseNumber){
//from param.html
var distraction = “”;
if (verseNumber == 1){
distraction = “suck his thumb”;
} else if (verseNumber == 2){
distraction = “tie his shoe”;
} else {
distraction = “there’s a problem here...”;
} // end if
var result = “The ants go marching “;
result += verseNumber + “ by “ + verseNumber + “, “;
result += “hurrah, hurrah <br />”;
result += “The ants go marching “;
result += verseNumber + “ by “ + verseNumber + “, “;
result += “hurrah, hurrah <br />”;
result += “The ants go marching “;
result += verseNumber + “ by “ + verseNumber + “<br />”;
result += “The little one stops to “;
result += distraction + “<br /> <br />”;
return result;
} // end verse
The verse() function is very similar to the chorus() function, except it is more flexible because it can accept a parameter.
1. Call the function with a value inside the parentheses.
When a function is intended to accept a parameter, it must be called with a value inside the parentheses. In makeSong(), you see calls to verse(1) and verse(2), but never verse(). That’s because verse is designed to always accept a single integer value.
2. Define the function with a variable name inside the parentheses.
If you look at the function definition for verse(), you see it contains the variable verseNumber between the parentheses. Whenever the verse() function is called, it must be fed a value, and that value is placed in the special variable verseNumber.
3. Use verseNum to find the distraction.
Analyze the verseNumber variable and use it to find the appropriate distraction. Put this in a variable named distraction.
4. Build the verse.
Incorporate the verseNumber and distraction variables in the result variable.
5. Return the result.
The main function uses the returned value as a string, printing out the verse.
Using Arrays to Simplify Data
Computer programs are about data. Often, you’re working with a lot of data. Programmers have a number of tools for managing large amounts of data, but the most basic is the array. JavaScript supports a simple yet very powerful and flexible array mechanism that lets you do plenty with arrays. To see arrays in action, look at Figure 3-11.
An array is actually a very simple idea; it’s simply a list. You’ve already used lists many times in HTML coding, but in programming, lists are called arrays, and have special characteristics. This example features two arrays — a list of books written by a certain charming and devilishly handsome author, and some of the topics said author writes about.

Figure 3-11: Clicking the button produces lists of books and topics.
This page has four main components:
![]() HTML structure: It has a form with two buttons. The
HTML structure: It has a form with two buttons. The body calls an initialization function when it loads, and each button calls its own function. The page also has a div named output.
![]() An
An init() function: This function provides access to the output div, and it also loads up the two arrays described in this example. Arrays usually require some kind of initialization.
![]() The
The showBooks() function: You’ll be amazed and surprised that this function displays a series of book titles.
![]() The
The showTitles() function: This function demonstrates another way to walk through the elements of an array.
Building the arrays
Arrays are frequently created as global variables because they are often used throughout the program (and in some languages, passing an array as a parameter can be kind of complicated).
In this program, I create a number of variables in the global space and initialize them all in the init() function called with body.onload.
var output;
var books;
var topics;
function init(){
//initialize output and arrays
//from basicArrays.html
output = document.getElementById(”output”);
books = Array(”Flash Game Programming for Dummies”,
”Game Programming, the L Line”,
”HTML / XHTML / CSS All in One”,
”JavaScript and AJAX for Dummies”,
”HTML5 Quick Reference”);
topics = Array(5);
topics[0] = ”HTML5”;
topics[1] = ”CSS3”;
topics[2] = ”JavaScript”;
topics[4] = ”AJAX”;
} // end init
Setting up the arrays is the most important part of the process:
1. Create variables for the arrays.
I have two arrays in this example, books and topics. Each is created just like any other variable, with the var statement. I also create an output variable to hold a reference to the output div.
2. Build an init() function to initialize variables.
As programs become more complex, it is common to have an initialization function to set everything up. This function is called with body.onload.
3. Build the output variable.
Because all the other functions will use output, I create it in init().
4. Use the Array() function to create the array of books.
This special function is used to create an array of elements. Note that it uses an uppercase A. (If you must be technical, this is a constructor for an Array object, but in JavaScript, that’s a function, too.)
5. Simply list each book as a parameter in the Array() function.
If you feed the Array function a series of values, they become the values of the array. This technique is great if you already know what will go into each element when you build the array.
6. Build the topics array differently.
The topics array is build with a different technique. In this array, I specified a single integer, which is the number of elements the array will contain.
7. Use the index operator to add elements to the array.
All array elements have the same name, but they have a different number (corresponding to where they fit on the list). Use square braces with an integer to refer to a specific element in the array. Note that array elements always begin with element zero.
If you’ve used arrays in other programming languages, you’ll find JavaScript arrays to be very forgiving. Be careful, though, because arrays are one of those features that every language supports, but they all work a little bit differently. You’ll actually find the JavaScript arrays are more like the ArrayList in Java or the Vector class in C++ than the traditional array in either of these languages.
Stepping through the books array
Arrays are wonderful because they allow you to pack a lot of data into a single variable. Very often when you have an array, you’ll want to do something with each element in the array. The most common structure to do this is a for loop. Look at showBooks() for an example:
function showBooks(){
//from basicArrays.html
output.innerHTML = “”;
for (i = 0; i < books.length; i++){
output.innerHTML += books[i] + “<br />”;
} // end for loop
} // end showBooks
This function steps through the list of books and prints the name of each one in the output area:
1. Clear the output div.
Output has already been defined in the init() function, so it’s pretty easy to clear out its value in the function.
2. Build a loop for the length of the array.
Arrays and for loops are natural partners. In this loop, I have i count from zero to the number of elements in the array.
3. Begin with zero.
Array indices always begin with zero, so your counting variable should also start at zero (in most cases).
4. Use the length property to determine how long the array is.
When you build a for loop to step through an array, what you really want to know is how many elements are in the array. Use arrayName.length to determine the number of elements in the current array, where arrayName is the name of the current array. This way, even if the number of elements in the array changes, the loop still works correctly.
5. Process data inside the loop.
If the counting variable is i, each element of the array is arrayName[i] inside the loop. You can do what you want with the data. In my example, I’m simply printing it out.
Using the for . . . in loop to access array elements
The showTopics() function uses a special variation of the for loop to print out the contents of an array.
function showTopics(){
//from basicArrays.html
output.innerHTML = “”;
for (topicID in topics){
output.innerHTML += topics[topicID] + “<br />”;
} // end for
} // end showTopics
Because loops and arrays are so commonly linked, JavaScript provides a special shortcut version of the for loop just for working with array elements.
1. Clear the output area.
If there’s already data in the output div, clean it out before printing anything new there.
2. Use the for . . . in loop variant.
The for loop in this function is quite a bit simpler than most. It simply has a variable and an array. This loop repeats once per element in the list.
3. Use the topicID variable to refer to each element in the loop.
The topicID variable contains each index used in the array. Use this index to determine the value associated with that index.
The for . . . in loop is really great, and if you know PHP, it looks at first glance just like the PHP foreach loop. However, they are not exactly the same. The JavaScript version returns the key, and the PHP version returns the associated value. I get confused every time I switch between the two languages.
I’ve added another variation of the Ants program to the website that uses arrays. Look over this code (antsArray.html) if you want to see an example of how arrays can further simplify that program.
This chapter covers the basic ideas of JavaScript, but if you’re interested in more depth, please check my book JavaScript & AJAX For Dummies.