
Chapter 10. Printing Documents
Creating documents in Word wouldn’t be very satisfying without the ability to print out your work. Although the invention of computers was touted as leading to a lessening of our reliance on printed materials and paper consumption, the fact is that we will probably always encounter situations in which we need a tangible copy of a document. With Word 2010, it’s easier than ever to print your documents and control the various settings for number of pages printed, collation needs, page orientation, and more. The tasks in this section show you how to view more advanced printing options, print envelopes and labels, and tap into Word’s Mail Merge tools to generate mass mailings.


Viewing Advanced Print Options
You learned the basics of printing a Word document in Chapter 2, “Working with Word Documents.” Now it’s time to view some of the more detailed settings available in Word 2010. As you’ve already learned, the Backstage view (which you access through the File tab on the Ribbon) is the place to go to find all of your document printing options in one convenient spot. You can also use Backstage view to access other printing controls, such as the Printer Properties dialog box and the Page Setup dialog box. The Printer Properties dialog box displays options for the selected printer. The Page Setup dialog box displays options for pages.
![]()

![]() Click the File tab on the Ribbon.
Click the File tab on the Ribbon.
![]() Click Print to view the print settings.
Click Print to view the print settings.
![]() Click here and select the printer you want to use.
Click here and select the printer you want to use.
![]() Click the Printer Properties link.
Click the Printer Properties link.
![]() The dialog box displays properties for the selected printer. You can make changes to the settings as needed.
The dialog box displays properties for the selected printer. You can make changes to the settings as needed.
![]() Click OK to return to Backstage view.
Click OK to return to Backstage view.
Tip: Add a Print Button
![]()
To add a Print button to the Quick Access toolbar, see the task “Customizing the Quick Access Toolbar” in Chapter 1 to learn more about adding a button to the toolbar.

![]() Near the bottom of printing options, click the Page Setup link to open the Page Setup dialog box.
Near the bottom of printing options, click the Page Setup link to open the Page Setup dialog box.
![]() Click the Margins tab to make any changes to the page margins.
Click the Margins tab to make any changes to the page margins.
![]() Click the Paper tab to control paper size and source.
Click the Paper tab to control paper size and source.
![]() Click the Layout tab to make changes to how sections, headers, and footers are printed.
Click the Layout tab to make changes to how sections, headers, and footers are printed.
![]() Click OK.
Click OK.
![]() Click the Print button to print the document.
Click the Print button to print the document.
![]()
Tip: More Print Options
![]()
The Display tab in the Word Options dialog box offers settings for page display as well as printing options, such as printing hidden text and drawings. Click the File tab and click Options to open the box.
Printing an Envelope
You can turn the address data found in a letter into an envelope that you can print out on your printer. Using Word’s Envelopes command, you can quickly whip up an envelope, setting both the sender and delivery addresses, and control how the envelope prints out on your printer. Using the Envelope Options dialog box, you can also change the font, envelope size, and position of the addresses on the envelope, such as moving an address to make way for a pre-printed logo on the envelope.
![]()

![]() Open the letter to which you want to create an envelope.
Open the letter to which you want to create an envelope.
![]() Click the Mailings tab on the Ribbon.
Click the Mailings tab on the Ribbon.
![]() Click Envelopes to open the Envelopes and Labels dialog box.
Click Envelopes to open the Envelopes and Labels dialog box.
![]() Word inserts the default address from the letter. To type another address instead, delete the address and type a new one.
Word inserts the default address from the letter. To type another address instead, delete the address and type a new one.
![]() Click in the Return address box and type the return address.
Click in the Return address box and type the return address.
![]() Click the Options button to open the Envelope Options dialog box.
Click the Options button to open the Envelope Options dialog box.
Tip: Save It
![]()
Word may prompt you to save the return address as your default address. Click Yes to do so or No to disregard.

![]() To change the envelope size, click here and choose a different size.
To change the envelope size, click here and choose a different size.
![]() To change the font for the delivery or return address, click the appropriate Font button and choose another.
To change the font for the delivery or return address, click the appropriate Font button and choose another.
![]() To change the positioning of an address, click here and set new values.
To change the positioning of an address, click here and set new values.
![]() Click OK.
Click OK.
![]() Click Print and insert a blank envelope into your printer.
Click Print and insert a blank envelope into your printer.
![]()
Tip: Finding Addresses
![]()
If you have the recipient’s address or your own return address stored in your Outlook Address Book, you can click the Address Book icon in the Envelopes and Labels dialog box to access your contacts. Click the button to open the Select Name dialog box, and then click the name you want to use. Click OK to add it to the envelope’s address field.
Printing Labels
Like the previous envelopes task, Word also offers a tool for printing labels.
![]()

![]() Select the text you want to turn into labels.
Select the text you want to turn into labels.
![]() Click the Mailings tab.
Click the Mailings tab.
![]() Click Labels to open the Envelopes and Labels dialog box.
Click Labels to open the Envelopes and Labels dialog box.
![]() Make any corrections to the address here, if needed.
Make any corrections to the address here, if needed.
![]() Click the Options button to open the Label Options dialog box.
Click the Options button to open the Label Options dialog box.
Tip: Details
![]()
To examine the details for any label product sheet, select the product vendor and number in the Label Options dialog box, then click the Details button.

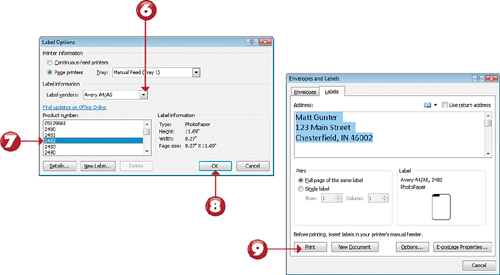
![]() Choose a label vendor from the drop-down list.
Choose a label vendor from the drop-down list.
![]() Choose the label sheet’s product number from the list.
Choose the label sheet’s product number from the list.
![]() Click OK.
Click OK.
![]() Insert the label sheets into your printer and click Print to print the labels.
Insert the label sheets into your printer and click Print to print the labels.
![]()
Tip: Add a Custom Label
![]()
If none of the label vendors or products match what you want to create, you can make a custom label. Click the New Label button in the Label Options dialog box to open the Label Details dialog box. You can define a new label name and dimensions, including inner margins for the label text, page size, and so on.
Using Word’s Mail Merge Tool
You can use Word’s Mail Merge tool to create mass mailings, such as form letters or mass e-mails. The easiest way to create mass mailings is to use the Step-by-Step Mail Merge Wizard. It walks you through each phase of the process. You can type up a letter before you get started, or you can stop and do so when prompted by the wizard. You can also choose to insert contacts and addresses from an existing table, from your Outlook contacts, or start a brand new list. For this task, the form letter is already created and contacts are added from the Outlook address book. If you choose different options, your steps may vary slightly.
![]()

![]() Create the document you want to use as a form letter.
Create the document you want to use as a form letter.
![]() Click the Mailings tab.
Click the Mailings tab.
![]() Click Start Mail Merge.
Click Start Mail Merge.
![]() Click Step by Step Mail Merge Wizard to open the Mail Merge pane.
Click Step by Step Mail Merge Wizard to open the Mail Merge pane.
![]() Click the type of document you are working on for the mass mailing.
Click the type of document you are working on for the mass mailing.
![]() Click Next: Starting Document.
Click Next: Starting Document.

![]() Unless you want to use another file as the form letter, leave the Use the current document radio button selected.
Unless you want to use another file as the form letter, leave the Use the current document radio button selected.
![]() Click Next: Select Recipients.
Click Next: Select Recipients.
![]() Choose which type of recipients you want to use. In this example, Select from Outlook contacts is selected.
Choose which type of recipients you want to use. In this example, Select from Outlook contacts is selected.
![]() Click Choose Contacts Folder.
Click Choose Contacts Folder.
![]() In the Choose Profile dialog box that appears, click OK.
In the Choose Profile dialog box that appears, click OK.
![]() The Select Contacts dialog box appears; select a contact folder and click OK.
The Select Contacts dialog box appears; select a contact folder and click OK.
Tip: Use a Template?
![]()
To use one of Word’s form letter templates, click Start from Template in Step 2 of the Mail Merge Wizard.
A large part of creating personalized mail merge documents is designating merge fields in which Word inserts data from your contacts list into the document. In a form letter, for example, you can insert an Address Block field for the contact’s address, and a Greeting Line field that takes the person’s name and inserts it into the letter’s opening salutations. At the end of the Wizard process, you can preview a sample of what the merged document will look like, and then print your finished form letters when ready.
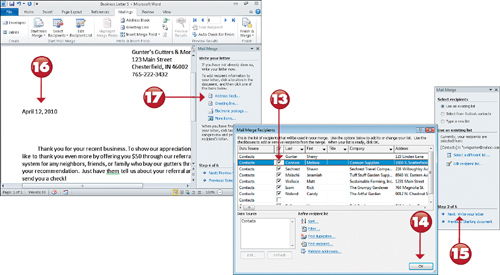
![]() Word opens the Mail Merge Recipients dialog box. Check which recipients you want to use for your mass mailing.
Word opens the Mail Merge Recipients dialog box. Check which recipients you want to use for your mass mailing.
![]() Click OK.
Click OK.
![]() Click Next: Write your letter.
Click Next: Write your letter.
![]() The next part of the process is to identify fields where information from the contacts listed can be inserted into the document. Click where you want to insert a field into the document.
The next part of the process is to identify fields where information from the contacts listed can be inserted into the document. Click where you want to insert a field into the document.
![]() Click the type of field you want to insert.
Click the type of field you want to insert.
Tip: What Are Merge Fields?
![]()
A merge field is preset information for automating parts of a document. Merge fields act like placeholders for information that is inserted later.

![]() A dialog box opens for you to preview what the inserted information from the contacts list will look like and make any changes you deem necessary. In the address block, for example, choose how you want the name and address to be displayed.
A dialog box opens for you to preview what the inserted information from the contacts list will look like and make any changes you deem necessary. In the address block, for example, choose how you want the name and address to be displayed.
![]() Click OK.
Click OK.
![]() Continue adding more fields to the form letter as needed.
Continue adding more fields to the form letter as needed.
![]() Click Next: Preview your letters.
Click Next: Preview your letters.
![]() Word generates a preview of the form letter, filling in the fields with information from your contacts list.
Word generates a preview of the form letter, filling in the fields with information from your contacts list.
![]() Click Next: Complete the merge.
Click Next: Complete the merge.
![]() Click Print to print out the letters.
Click Print to print out the letters.
![]()