
Chapter 8. Using Word’s Document and References Tools
Word offers a wide variety of research and referencing tools you can use with longer or more complex documents you create. If you’re working on a research paper, for example, you can use Word’s References tools to add footnotes, endnotes, cross-references, and even a table of contents. This chapter shows you how to use the various Word features to translate text, look up words in the built-in dictionaries and thesaurus, navigate long documents with the Navigation Pane and bookmarks, and even tap into Excel’s spreadsheet powers to make a chart. You’ll learn how to build a document using Outline View, add captions to graphic elements, and insert comments.

Building Documents with Outline View
If your document is based on headings, subheadings, and body content, you can use Word’s Outline view to create and edit your pages. Outline View lets you focus on the document’s structure rather than on its formatting. You can assign heading levels and change levels as needed as your document develops.
![]()

![]() Click Outline on the status bar, or click the View tab and click Outline.
Click Outline on the status bar, or click the View tab and click Outline.
![]() Click the line of text to which you want to assign an outline level.
Click the line of text to which you want to assign an outline level.
![]() Click the Outline Level drop-down arrow on the Outlining tab.
Click the Outline Level drop-down arrow on the Outlining tab.
![]() Click a level.
Click a level.
![]() Word assigns the level to the text.
Word assigns the level to the text.
Tip: Fast Promote or Demote
![]()
The two double-arrows on the Outlining tab let you quickly promote or demote an outline item to the top of the levels or to the bottom. To quickly promote a line to level 1, click the Promote to Level 1 button. To quickly demote a line to body text, click the Demote to Body Text button.

![]() To demote a heading, click in the line and click Demote.
To demote a heading, click in the line and click Demote.
![]() To promote a heading, click in the line and click Promote.
To promote a heading, click in the line and click Promote.
![]() To collapse or expand levels in your Outline view, click Expand or Collapse.
To collapse or expand levels in your Outline view, click Expand or Collapse.
![]() To move a line up or down in the outline, click the Move Up or Move Down buttons.
To move a line up or down in the outline, click the Move Up or Move Down buttons.
![]() To close Outline view, click Close Outline View on the Outlining tab.
To close Outline view, click Close Outline View on the Outlining tab.
![]()
Tip: Showing Levels
![]()
Aside from expanding and collapsing levels in your outline, you can also designate which levels you want to view using the Show Level feature in the Outlining tab. Simply click the Show Level drop-down arrow and choose which level you want to view.
Navigating Documents with the Navigation Pane
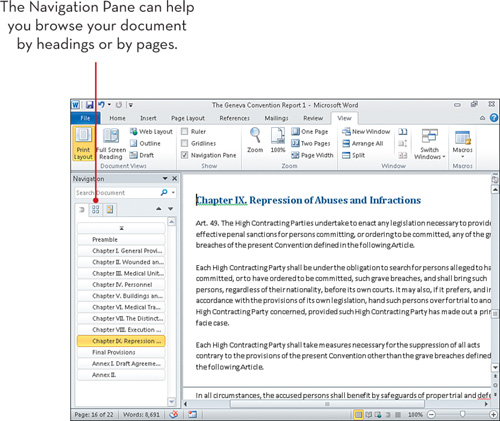
When navigating through longer documents, you can simplify the process of looking through pages and headings by using Word’s Navigation Pane. With the Navigation Pane you can browse your pages by headings or by thumbnail icons, or you can conduct a search for a specific word or phrase.
![]()

![]() Click the View tab.
Click the View tab.
![]() Click Navigation Pane.
Click Navigation Pane.
![]() Word opens the Navigation Pane.
Word opens the Navigation Pane.
![]() Click the Browse the Headings tab.
Click the Browse the Headings tab.
![]() Click a heading.
Click a heading.
![]() Word navigates to the designated spot in the document.
Word navigates to the designated spot in the document.
Tip: Closing Panes
![]()
No check mark in the Navigation Pane checkbox on the View tab indicates the pane is hidden from view. You can also close any open pane by simply clicking its Close button.
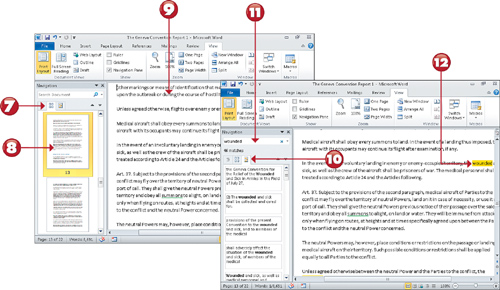
![]() Click the Browse the Pages tab.
Click the Browse the Pages tab.
![]() Click a page thumbnail.
Click a page thumbnail.
![]() Word navigates to the designated spot in the document.
Word navigates to the designated spot in the document.
![]() Click the Browse the Results tab.
Click the Browse the Results tab.
![]() Type the word or phrase you want to search for in the document and press Enter.
Type the word or phrase you want to search for in the document and press Enter.
![]() Word highlights the first occurrence.
Word highlights the first occurrence.
![]()
Tip: Moving Around Headings
![]()
You can click the Previous Heading or Next Heading buttons in the Navigation Pane to jump around from one heading to another.
Translating Words
You can easily translate a word in your document to help you communicate with others around the globe in languages such as Spanish, French, or Arabic. Word installs with several translation tools, such as bilingual dictionaries and access to online translation sites.
![]()

![]() Right-click the word or phrase that you want to translate.
Right-click the word or phrase that you want to translate.
![]() Click Translate.
Click Translate.
![]() Word displays the Research pane.
Word displays the Research pane.
![]() Click the From drop-down arrow and choose a language.
Click the From drop-down arrow and choose a language.
![]() Click the To drop-down arrow and choose a language.
Click the To drop-down arrow and choose a language.
![]() Word displays the translation.
Word displays the translation.

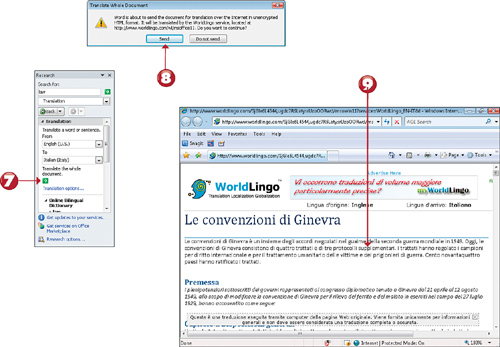
![]() To translate an entire document from the Research pane, click the Translate the whole document arrow button.
To translate an entire document from the Research pane, click the Translate the whole document arrow button.
![]() Click Send.
Click Send.
![]() Your default Web browser opens and displays the translation.
Your default Web browser opens and displays the translation.
![]()
Tip: Translation Options
![]()
You can choose which languages to display among Word’s bilingual dictionaries. Click the Translation Options link in the Research pane to open the Translation Options dialog box and check or uncheck which languages you want available for translation activities.
Tip: Review Tab
![]()
You can also use the Review tab to translate a selected word or phrase in your document. Click the Review tab, click the Translate button, and then click Translate Selected Text. Like the right-click method you learned about in the steps, the Research pane opens and offers you tools for translating the phrase.
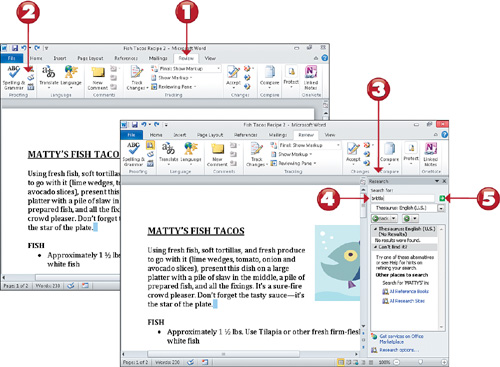
Looking Up Synonyms and Definitions
Another easy task in Word is the ability to look up a synonym or definition. Using Word’s built-in dictionaries, you can quickly find a similar word or look up a word’s meaning with just a click or two.
![]()

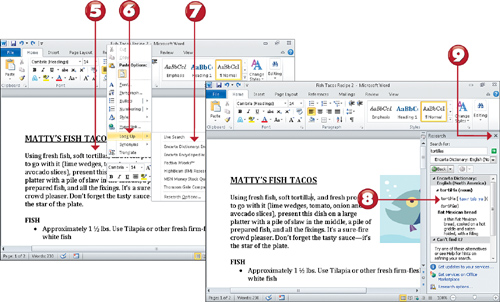
![]() To find a synonym, right-click the word.
To find a synonym, right-click the word.
![]() Click Synonyms.
Click Synonyms.
![]() Click a synonym.
Click a synonym.
![]() Word replaces the text with the synonym.
Word replaces the text with the synonym.
Tip: Research Pane
![]()
You can also open the Research Pane by clicking the Review tab on the Ribbon and then clicking the Research button located in the Proofing tools group.
![]() To look up a word’s meaning, right-click the word.
To look up a word’s meaning, right-click the word.
![]() Click Look Up.
Click Look Up.
![]() Click a reference source, such as Encarta Dictionary.
Click a reference source, such as Encarta Dictionary.
![]() Word opens the Research Pane and displays any matches.
Word opens the Research Pane and displays any matches.
![]() Click here to close the pane.
Click here to close the pane.
![]()
Tip: Change Your Source
![]()
To change the source you use in the Research Pane, click the drop-down arrow under the Search for box and select a new resource.
Using the Word Thesaurus
You can use Word’s built-in Thesaurus feature, along with the Research Pane, to look up words and locate just the word you want to use.
![]()
![]() Click the Review tab on the Ribbon.
Click the Review tab on the Ribbon.
![]() Click the Thesaurus button.
Click the Thesaurus button.
![]() Word opens the Research Pane with the Thesaurus resource already selected.
Word opens the Research Pane with the Thesaurus resource already selected.
![]() Type a word you want to look up.
Type a word you want to look up.
![]() Press Enter or click the Start searching button.
Press Enter or click the Start searching button.

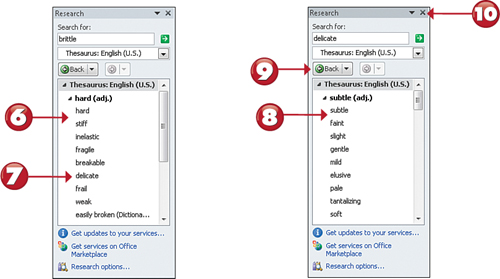
![]() The pane displays any results.
The pane displays any results.
![]() To find more synonyms based on any word in the list, click the word.
To find more synonyms based on any word in the list, click the word.
![]() The pane displays related synonyms.
The pane displays related synonyms.
![]() You can click the Back button to return to the previous list.
You can click the Back button to return to the previous list.
![]() Click Close to exit the Research Pane.
Click Close to exit the Research Pane.
![]()
Tip: More Options
![]()
You can click the Get services on Office Marketplace link at the bottom of the Research Pane to visit the Office Marketplace website and find more resources you can use.
Highlighting Text
Need to bring someone’s attention to text in a document? You can highlight text just like using a highlighter pen on paper. You can use Word’s Highlighter Pen to drag across the text you want to draw attention to, or you can select the text first and then apply a highlighting color.
![]()

![]() Click the Home tab.
Click the Home tab.
![]() Click the Text Highlighter arrow button.
Click the Text Highlighter arrow button.
![]() Click a color.
Click a color.
![]() The cursor becomes a pen icon.
The cursor becomes a pen icon.
![]() Drag across the text you want to highlight.
Drag across the text you want to highlight.
![]() Word highlights the text in the specified color shading.
Word highlights the text in the specified color shading.
![]()
Tip: Toggle On or Off
![]()
The Highlighter Pen stays on until you perform another action or toggle the feature off. To turn it off, simply click the Text Highlighter button on the Ribbon again.
Tip: Remove It
![]()
To remove highlighting, select the text, click the Text Highlighter arrow button to display the menu, then click No Color.
Inserting Comments
You can use comments to add notations to your document that are not meant to be printed. Comments are handy when your document is being edited by multiple users, or when you want to remind yourself to revisit a section to check facts or spelling. When you insert a comment, it appears as a balloon off to the side of the document.
![]()

![]() Click where you want to insert a comment or select the text you want to refer to.
Click where you want to insert a comment or select the text you want to refer to.
![]() Click the Review tab.
Click the Review tab.
![]() Click New Comment.
Click New Comment.
![]() Word inserts a comment balloon that includes your user initials.
Word inserts a comment balloon that includes your user initials.
![]() Type in your comment text.
Type in your comment text.
![]()

Inserting Footnotes and Endnotes
If you’re working on a research paper or other document requiring resource citation, you can insert footnotes and endnotes. A footnote is an explanatory flagged note inserted at the bottom of a page to cite a source. Endnotes appear at the end of a section or document rather than at the bottom of a page.
![]()
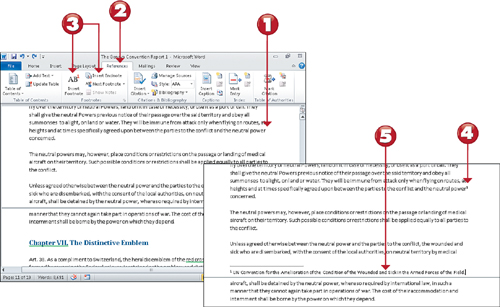
![]() Click where you want to add the numeral or symbol indicating a footnote or endnote.
Click where you want to add the numeral or symbol indicating a footnote or endnote.
![]() Click the References tab on the Ribbon.
Click the References tab on the Ribbon.
![]() Click Insert Footnote or Insert Endnote.
Click Insert Footnote or Insert Endnote.
![]() Word inserts a superscript numeral or symbol. This example shows a footnote added.
Word inserts a superscript numeral or symbol. This example shows a footnote added.
![]() Type your footnote or endnote text.
Type your footnote or endnote text.
Tip: Delete Notes
![]()
You can delete a footnote or endnote, leaving the text in the document to which it refers intact. Start by selecting the superscript numeral or symbol flagging the note and press Delete on your keyboard. Word deletes the flag and the notation.

![]() To edit footnote or endnote placement and settings, click the Footnote and Endnote icon in the corner of the Footnotes group of tools on the Ribbon.
To edit footnote or endnote placement and settings, click the Footnote and Endnote icon in the corner of the Footnotes group of tools on the Ribbon.
![]() The Footnote and Endnote dialog box opens.
The Footnote and Endnote dialog box opens.
![]() To control where on the page the footnote or endnote should appear, click here and make a selection.
To control where on the page the footnote or endnote should appear, click here and make a selection.
![]() To change the number format, click here and select a format.
To change the number format, click here and select a format.
![]() To control numbering, click here and choose whether the numbering should be continuous, restart at the beginning of each section, or restart at the beginning of each page.
To control numbering, click here and choose whether the numbering should be continuous, restart at the beginning of each section, or restart at the beginning of each page.
![]() Click Apply to apply the changes.
Click Apply to apply the changes.
![]()
Inserting Captions
You can add captions to pictures, charts, text boxes, and other graphic objects you place in a document. Word’s captioning feature includes preset captions to use, such as Figure, Equation, or Table. Word also handles the caption numbering for you, such as Figure 1, Figure 2, and so forth.
![]()

![]() Right-click the picture or other object to which you want to add a caption.
Right-click the picture or other object to which you want to add a caption.
![]() Click Insert Caption.
Click Insert Caption.
![]() The Caption dialog box opens.
The Caption dialog box opens.
![]() Click the Label drop-down arrow.
Click the Label drop-down arrow.
![]() Click a caption label.
Click a caption label.
Tip: New Labels
![]()
You can create a new label to add it to the Caption dialog box. To create a new label, click the New Label button and fill out label text. To leave off the label and keep the number only, click the Exclude label from caption check box.
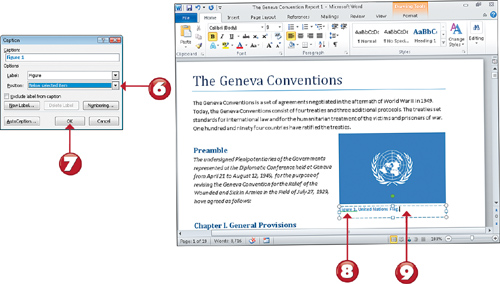
![]() If you want to change the position of the caption, click here and choose another position.
If you want to change the position of the caption, click here and choose another position.
![]() Click OK.
Click OK.
![]() Word inserts the caption.
Word inserts the caption.
![]() Type in any additional text you want the caption to include.
Type in any additional text you want the caption to include.
![]()
Tip: Or Use Text Boxes
![]()
You can also use Word’s text boxes to add captions to graphic objects. This is handy if you only want text captions without all the figure numbering. To add a text box, click the Insert tab on the Ribbon and click the Text Box button. Click and drag where you want to insert a text box, and then type in the text you want to use as your caption.

Inserting Cross-References
You can use cross-references in your documents to refer the reader to another section of the document or refer them to additional information. You can insert cross-references to refer readers to existing text that is styled as a heading, to footnotes or endnotes, to captions and bookmarks, and even to numbered paragraphs.
![]()
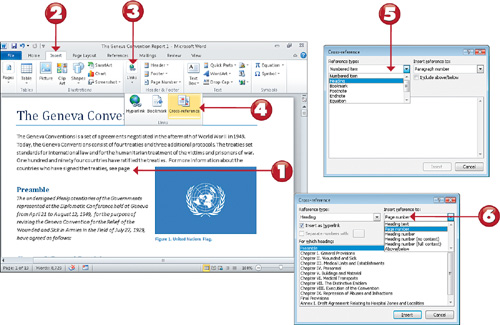
![]() Type any text you want to precede the cross-reference—for example, For more information, see page.
Type any text you want to precede the cross-reference—for example, For more information, see page.
![]() Click the Insert tab on the Ribbon.
Click the Insert tab on the Ribbon.
![]() Click Links.
Click Links.
![]() Click Cross-reference to open the Cross-reference dialog box.
Click Cross-reference to open the Cross-reference dialog box.
![]() Click the Reference type drop-down arrow and select the type of document element to which the cross-reference refers.
Click the Reference type drop-down arrow and select the type of document element to which the cross-reference refers.
![]() Click the Insert reference to drop-down arrow and select what type of information the cross-reference will contain.
Click the Insert reference to drop-down arrow and select what type of information the cross-reference will contain.

![]() Select the specific item to which the cross-reference should refer.
Select the specific item to which the cross-reference should refer.
![]() Leave the Insert as hyperlink check box selected if you want readers to be able to navigate directly to the cross-reference item.
Leave the Insert as hyperlink check box selected if you want readers to be able to navigate directly to the cross-reference item.
![]() Click Insert.
Click Insert.
![]() Word inserts the cross-reference into the document.
Word inserts the cross-reference into the document.
![]() Click Close.
Click Close.
![]()
Tip: Delete It
![]()
You can remove a cross reference you no longer need. Highlight it in the document, and then press the Delete key. The reference is immediately deleted.
Adding an Index
You can create an index that contains all the marked text you want to include from your document. The process starts by marking your index words using a special XE field. Once you’ve marked all the index words you want to include, you can turn them into an index that Word automatically updates for you. Word’s indexing feature allows you to customize your index to include leader characters and preset index designs.
![]()
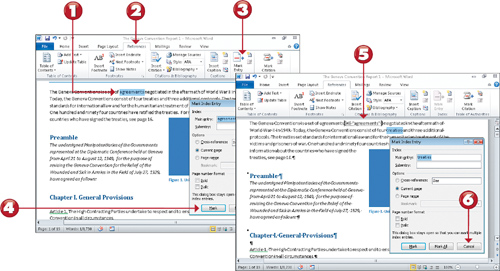
![]() Select text you want to mark for indexing.
Select text you want to mark for indexing.
![]() Click the References tab.
Click the References tab.
![]() Click Mark Entry to open the Mark Index Entry dialog box.
Click Mark Entry to open the Mark Index Entry dialog box.
![]() Click Mark to create an entry for the word or phrase on this page only, or click Mark All to create entries for all occurrences in the document.
Click Mark to create an entry for the word or phrase on this page only, or click Mark All to create entries for all occurrences in the document.
![]() Word adds a special XE indexing field to your document and turns on paragraph marks. You can continue adding more indexing markers as needed.
Word adds a special XE indexing field to your document and turns on paragraph marks. You can continue adding more indexing markers as needed.
![]() When finished marking your document for indexing, click Cancel.
When finished marking your document for indexing, click Cancel.

![]() Click where you want to insert the index.
Click where you want to insert the index.
![]() Click Insert Index on the References tab to open the Index dialog box.
Click Insert Index on the References tab to open the Index dialog box.
![]() Click Right-align page numbers.
Click Right-align page numbers.
![]() Click here and select an index design.
Click here and select an index design.
![]() Click OK.
Click OK.
![]() Word generates an index.
Word generates an index.
![]()
Tip: Remove Indexing Fields
![]()
You can delete an index entry in your document by selecting the entire XE field, including the braces ({}) that surround it, and pressing the Delete key on your keyboard. Then click the Update Index button on the References tab.
Adding a Table of Contents
You can instruct Word to generate a table of contents for your document. If your document uses the predefined heading styles, Word can quickly create a TOC based on the headings, and add page numbers for each.
![]()
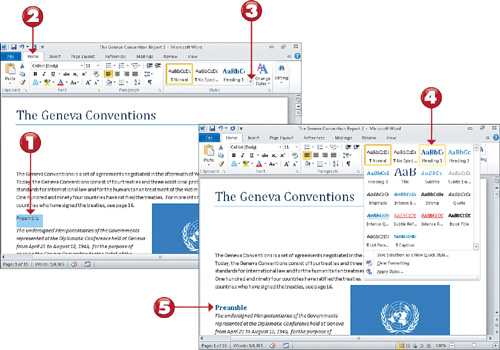
![]() Select text in your document that you want to turn into a heading.
Select text in your document that you want to turn into a heading.
![]() Click the Home tab.
Click the Home tab.
![]() Click the More button to open the Quick Style gallery.
Click the More button to open the Quick Style gallery.
![]() Click a style.
Click a style.
![]() Continue assigning styles throughout the document to include in your TOC.
Continue assigning styles throughout the document to include in your TOC.
Tip: Remove It
![]()
To delete a TOC, click Table of Contents in the References tab’s Table of Contents group and click Remove Table of Contents.

![]() Click where you want to insert a TOC.
Click where you want to insert a TOC.
![]() Click the References tab.
Click the References tab.
![]() Click Table of Contents.
Click Table of Contents.
![]() Click a TOC style.
Click a TOC style.
![]() Word creates a table of contents.
Word creates a table of contents.
![]()
Tip: Update It
![]()
If you make changes to your document’s headings, you can update the table of contents to reflect the new text. On the References tab, click the Update Table button to open the Update Table of Contents dialog box where you can choose to update the entire table or just the page numbers.
Adding Bookmarks
You can use bookmarks to navigate long documents. Digital bookmarks act a lot like actual bookmarks, allowing you to mark a location in a document for easy access later. When naming your bookmark, you must follow strict naming rules. Bookmark names must begin with a letter, and names can include numbers along with letter characters. However, no spaces are allowed in the bookmark name. If you do need to create a space, use an underscore character instead, such as Chapter_2.
![]()

![]() Select the text you want to turn into a bookmark.
Select the text you want to turn into a bookmark.
![]() Click the Insert tab on the Ribbon.
Click the Insert tab on the Ribbon.
![]() Click Links.
Click Links.
![]() Click Bookmark to open the Bookmark dialog box.
Click Bookmark to open the Bookmark dialog box.
![]() Type a name for the new bookmark.
Type a name for the new bookmark.
![]() Click Add.
Click Add.
Tip: Quick Find
![]()
You can also press F5 or Ctrl+G to open the Find and Replace dialog box to the Go To tab.
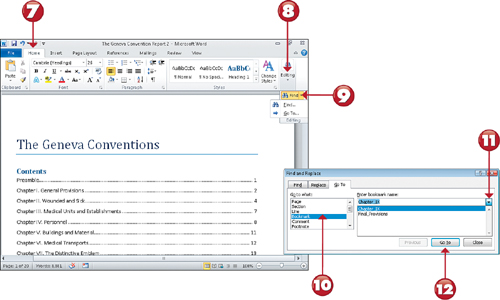
![]() To navigate to a bookmark, click the Home tab.
To navigate to a bookmark, click the Home tab.
![]() Click the Editing button.
Click the Editing button.
![]() Click the Find button’s drop-down arrow and click Go To to open the Find and Replace dialog box.
Click the Find button’s drop-down arrow and click Go To to open the Find and Replace dialog box.
![]() Click Bookmark.
Click Bookmark.
![]() Click the drop-down arrow and select the bookmark you want to navigate to.
Click the drop-down arrow and select the bookmark you want to navigate to.
![]() Click Go To and Word displays the specified location in the document.
Click Go To and Word displays the specified location in the document.
![]()
Tip: Delete It
![]()
To remove a bookmark, open the Bookmark dialog box, select the bookmark name from the list box, and click Delete.
Summarizing Data with a Chart
If you ever need to utilize some spreadsheet data, you can do so without ever leaving your Word document. If you have Excel 2010 installed, you can borrow its tools and features to create a datasheet of facts and figures and turn it into a chart to display in your Word document.
![]()

![]() Click the Insert tab.
Click the Insert tab.
![]() Click Chart to open the Insert Chart dialog box.
Click Chart to open the Insert Chart dialog box.
![]() Click a chart type you want to make.
Click a chart type you want to make.
![]() Click the chart.
Click the chart.
![]() Click OK.
Click OK.
Tip: Edit Your Chart
![]()
You can reopen the datasheet you used to create the chart in Excel and edit the cell data. Any changes you make are immediately reflected in the Word document’s chart. Just click the Design tab in Word’s Ribbon and then click the Edit Data button. This reopens the Excel program window again and you can make changes to the chart data.

![]() The Excel 2010 program window opens to a placeholder datasheet and shares onscreen space with your Word document, showing a placeholder chart.
The Excel 2010 program window opens to a placeholder datasheet and shares onscreen space with your Word document, showing a placeholder chart.
![]() Enter the data you want to chart using the worksheet cells.
Enter the data you want to chart using the worksheet cells.
![]() Word updates the chart in the document as soon as you start entering data in the datasheet.
Word updates the chart in the document as soon as you start entering data in the datasheet.
![]() When done typing in your chart data, click Close to exit the Excel window.
When done typing in your chart data, click Close to exit the Excel window.
![]() You can now move and resize your chart on the document page, as needed.
You can now move and resize your chart on the document page, as needed.
![]()
Tip: No Excel?
![]()
Don’t worry—if you don’t have Excel installed, the Microsoft Graph feature opens instead and you can create a chart using it.
