
As e-mail has become a more important part of many people’s day, the content of e-mail messages has gotten more complex. Whereas text was once adequate, an e-mail message is now likely to contain just about anything: a table, clip art, a photograph, or a link to a Web site. Similarly, the overall look of an e-mail message has evolved with the use of text formatting and stationery. Microsoft® Office Outlook® 2007 has a new native e-mail editor based on Microsoft Office Word 2007 that helps you get your message across clearly and easily.
In this chapter, you’ll discover how to add more than just plain text to your messages by working with graphics, hyperlinks, files, attachments, and electronic business cards. As this chapter explains, you can also spruce up your messages by using themes or stationery, which allows you to apply a customized look to your messages. Office Outlook 2007 provides a choice of themes and stationery, or you can create your own. You’ll also learn how to automatically attach a text signature or an electronic business card to each message you send.
The majority of your messages might consist of unformatted text, but you can use formatted text and other elements to create rich-text and multimedia messages. For example, you might want to use character or paragraph formatting for emphasis, add graphics, or insert hyperlinks to Web sites or other resources. The following sections explain how to accomplish these tasks.
Formatting text in messages is easy, particularly if you’re comfortable with Microsoft Word. Even if you’re not, you should have little trouble adding some snap to your messages with character, paragraph, and other formatting.
Outlook 2007 introduces a native e-mail editor, based on Office Word 2007, with a rich palette of tools for you to use in creating and formatting messages. For example, you can apply paragraph formatting to indent some paragraphs but not others, create bulleted and numbered lists, and apply special color and font formatting. These options are simple to use. Understanding the underlying format in which your messages are sent, however, requires a little more exploration. Outlook 2007 supports three formats for e-mail messages:
HTML format. Lets you create multimedia messages that can be viewed directly in a Web browser and an e-mail client.
Rich-text format (RTF). Lets you add paragraph and character formatting and embed graphics and other nontext media in your message. RTF can be used when sending e-mail to people using Microsoft Exchange Server and earlier versions of Outlook, but it is converted to HTML when sent to an Internet address.
Note
You can specify how Outlook 2007 handles rich-text messages sent to the Internet by choosing Tools, Options. On the Mail Format tab, click Internet Format. In the Internet Format dialog box, under Outlook Rich Text Options, select the format you prefer in the drop-down list. You can choose to have Outlook 2007 send messages as HTML, plain text, or rich text.
Plain-text format. Doesn’t allow any special formatting, but it offers the broadest client support—every e-mail client can read plain-text messages.
By default, Outlook 2007 uses HTML as the format for sending messages. HTML format lets you create multimedia messages that can be viewed directly in a Web browser and an e-mail client. Depending on the capabilities of the recipient’s e-mail client, however, you might need to use a different format.
Note
Using HTML format for messages doesn’t mean that you need to understand HTML to create a multimedia message. Outlook 2007 takes care of creating the underlying HTML code for you.
The Ribbon on the new message form provides many options for formatting messages. To choose the format for the current message, on the Options tab, in the Format group, select Plain Text, HTML, or Rich Text. To set the default message format for all new messages, choose Tools, Options on the Outlook 2007 menu bar, and then click the Mail Format tab in the Options dialog box, as shown in Figure 9-1. Select the format in the Compose In This Message Format drop-down list.

On the Mail Format tab, you can click Stationery And Fonts to display the Signatures And Stationery dialog box, shown in Figure 9-2. Use the options in this dialog box to control which fonts Outlook 2007 uses for specific tasks, such as composing new messages, replying to or forwarding a message, and composing or reading plain-text messages. You can specify the font as well as the font size, color, and other font characteristics. You can also select Pick A New Color When Replying Or Forwarding to have Outlook 2007 choose a color that has not yet been used in that message for text you add to a message when replying or forwarding it. This is useful when you are replying inline to someone else’s message and want your text to be easily distinguishable.

Figure 9-2. Use the Signatures And Stationery dialog box to control the appearance of fonts in Outlook 2007 for specific tasks.
Note
For more information about stationery, see "Customizing the Appearance of Your Messages" later in this chapter.
Outlook 2007 has a number of text formatting controls that are distributed over a number of groups on multiple tabs. The most commonly used formatting commands are on the Message tab, in the Basic Text group, for convenient access, as shown in Figure 9-3. You can specify the font face, size, color, style (bold, italic, or underline), and highlight. Settings for bulleted or numbered lists are also available in this group.

When you select some text in your message, a transparent mini-toolbar pops up next to your mouse pointer, as shown in Figure 9-4. If you move the mouse pointer over the toolbar, it becomes opaque, and you can choose formatting options to apply to the highlighted text.

Figure 9-4. The mini-toolbar gives you immediate access to the most commonly used text formatting options.
Extensive text formatting capabilities are provided on the Format Text tab, shown in Figure 9-5, which has font and paragraph formatting as well as style-related options. In addition to the options found in the Basic Text group on the Message tab, you can apply character formatting such as strikethrough, subscript, and superscript. Finer paragraph control is provided with options such as line spacing, borders, and background shading. More complex multilevel lists are also available on this tab. You can also sort text using the Sort option in the Paragraph group.

Several special text options like WordArt, drop caps, and text boxes are available on the Insert tab, in the Text group, shown in Figure 9-6. You can also insert Quick Parts (prewritten sections of text), text boxes, or the date and time (with optional automatic update).

Themes are configured on the Options tab, in the Themes group, shown in Figure 9-7, where you can select a theme or change individual parts of your current theme. The message format is also set on the Options tab, in the Format group.

Outlook 2007 provides three types of lists: bulleted, numbered, and multilevel. Although each type of list looks different, the basic procedures used to create them are the same. Each type of list has a library of preconfigured styles, and you can define your own list styles if you want. All three types of lists are available in the Paragraph group on the Format Text tab; bulleted and numbered lists are also found on the Message tab, in the Basic Text group.
To format a bulleted list, follow these steps:
With the message open, select the text that you want formatted as a list.
On the Format Text tab, in the Paragraph group, select Bullets. To select a different style for the list, click the arrow next to Bullets, and then select a style from the library.
If you want to change the text to a different level, select Change List Level, and then choose the new level from the menu.
To create a new style for the list, select Define New Bullet to display the Define New Bullet dialog box, shown in Figure 9-8. Click Symbol, Picture, or Font, select the new bullet character in the resulting dialog box, and then click OK. Click OK again to close the Define New Bullet dialog box.

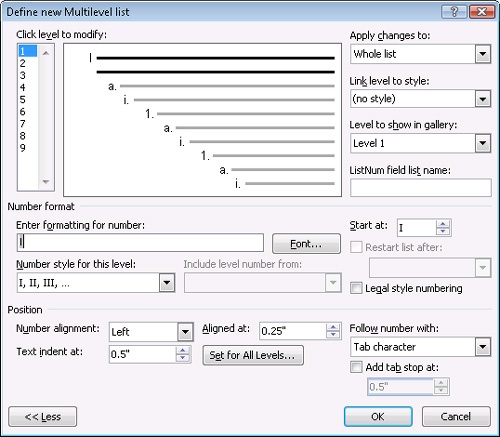
Numbered lists are created in much the same way as bulleted lists, letting you choose the number style (roman, arabic, and so on) and related options. Multilevel lists have many additional options that you can configure, as shown in Figure 9-9, allowing you to create highly customized lists if needed.
You can access only a portion of the text formatting options in the Basic Text group on the Message tab. A number of other options are available on the Format Text tab, including the following:
Character Formatting. Additional character styles include strikethrough, subscript, and superscript.
Shading. This option lets you apply a color to the background of the selected text.
Borders And Shading. You can choose options for adding borders, gridlines, and shading to selected paragraphs.
Line Spacing. You can set the spacing between lines and paragraphs. You can also open the Paragraph dialog box, which has settings for indentation, line breaks, and page breaks, as well as control over text flow over page breaks (widow/orphan control, keeping lines together, and so on).
Sort. Orders the selected paragraphs based on the criteria you specify in the Sort Text dialog box.
Show/Hide. You can toggle the display of normally hidden formatting characters such as paragraph marks.
Outlook 2007 lets you choose from a gallery of styles to easily format text using a number of predefined looks. Each theme has its own complete set of font styles, created based on the colors and fonts that you specify for the theme. You can also define your own custom style sets if you prefer to use styles that are not defined by the current theme.
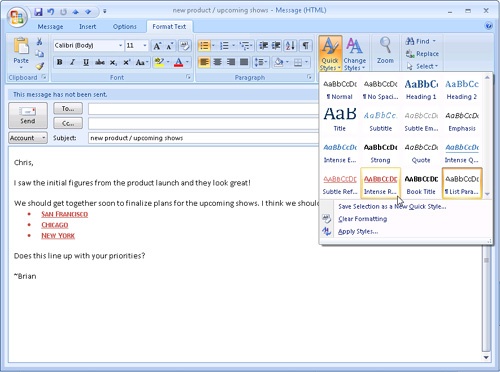
The Quick Styles gallery, shown in Figure 9-10, displays the most commonly used styles, giving you an easy way to format the text in your message. When you define custom styles, they are also displayed in the Quick Styles gallery.
Styles shown in the Quick Styles gallery include:
Normal
List Paragraph
Strong (bold)
Headings (levels 1 and 2)
Titles (title, subtitle, and book title)
Emphasis (several italicized styles)
Quotes (regular and bold)
References (regular and bold)
To apply a style using the Quick Styles gallery, follow these steps:
With a message open, select the text you want to format.
On the Format Text tab, in the Styles group, click Quick Styles to display the Quick Styles gallery.
Point to a style you are considering to see a Live Preview of the style applied to the selected text. In Figure 9-10, the bulleted text has been selected, and Live Preview has applied the Intense Reference Quick Style. Select the style that you want to apply.
You can create new styles that will be available in the Quick Styles gallery. To create a new Quick Style, first format some text as you want the new style to appear. Next, on the Format Text tab, in the Styles group, click Quick Styles, and then click Save Selection As A New Quick Style. The Create New Style From Formatting dialog box is displayed, in which you can give the style a name. You can also click Modify to change the style if you want.
To remove a style from the Quick Styles gallery, right-click the Quick Style in the gallery, and then choose Remove From Quick Styles gallery. The deletion is immediate, without a confirmation message box, but it can be undone using the Undo command.
To display the complete list of styles, on the Format Text tab, in the Styles group, click the Styles dialog box launcher. You can format your message in the same way as with Quick Styles, by selecting some text and then choosing the style to apply from the Styles window.
New styles can be created, and the formatting of text in messages can be examined, by using the Style Inspector from the Styles window. The complete set of styles can be configured by clicking Manage Styles and using the Manage Styles dialog box. (There are approximately 300 styles available!) To configure options for the Styles window, click Options.
Note
When you change the theme, custom fonts are not changed unless they use a theme color—in which case, the color is updated. Resetting font styles is done by reapplying a style set.
You can change the fonts and colors used to determine the current Quick Styles. To change these options, on the Format Text tab, in the Styles group, click Change Styles, and then select one of the following options:
Style Set. This setting specifies the font face used for the Quick Styles. You can choose from several options or create your own style set from the existing message (saved as a Word 2007 template).
Colors. You can select a set of theme colors to use for the font color set or create a custom set of theme colors.
Fonts. This option lets you pick a font set from an existing theme or create your own font set by selecting a body font and a heading font.
Set As Default. Choosing this option sets the current configuration (theme, style set, and any customized settings except background) as the default for new messages.
A style set consists of a number of font styles, initially created from the theme settings, but customizable after that. Style sets can be created, saved, and applied independent of theme-related font changes and will override theme settings.
To work with style sets, with a new message open, on the Format Text tab, in the Styles group, click Change Styles, and then click Style Set. You can then choose from the following actions:
To apply a style set, select the style set from the menu.
To set the font styles back to the new message default, choose Reset To Quick Styles From Template.
To set the font styles back to the Outlook 2007 default font styles, choose Reset Document Quick Styles.
To create a new style set, select Save As Quick Style Set. The Save Quick Style Set dialog box will be displayed, allowing you to name the style set.
To customize font styles, follow these steps:
Type some text, and then format it as you want the updated style text to appear. (In this example, we will change the Title style.) Select the text, and on the Format Text tab, in the Styles group, click Quick Styles (or click More in the Quick Styles gallery).
In the Quick Styles gallery, right-click Title, and then choose Update Title To Match Selection.
Repeat for each font style you want to define.
When you have finished customizing the font styles, delete all of the text in your message. (This leaves the styles you created intact but creates the new message without unwanted text content.)
To save the style set you created, on the Format Text tab, in the Styles group, click Change Styles, Style Set, Save As Quick Style Set.
In the Save Quick Style Set dialog box, specify a file name for the style set, and then click Save. The style set is saved as a Word 2007 template file.