
To be truly useful, your data needs to be portable. You need to be able to move it between applications. For example, maybe you want to copy all of your contacts from Microsoft® Office Outlook® 2007 to Microsoft Office Excel® 2007 or Microsoft Office Access 2007. Maybe you need to bring data from Office Excel 2007 into Office Outlook 2007. Whatever the case, your Outlook 2007 data is portable, thanks to the import and export features built into the program.
This chapter explains the features in Outlook 2007 that enable you to move data out of Outlook 2007 to other programs and to import data into Outlook 2007 from other programs.
Sooner or later, you might want to make copies of part or all of the message store for use in other applications. You can do this by using the export process, in which you save information to a different .pst file or transform data for use in Microsoft Office Word 2007, Access 2007, or other programs. (The reverse process, importing data, is covered in the next section.)
The export process in Outlook 2007 is extremely straightforward. It allows you to use a wizard to send copies of information from the Outlook 2007 message store. This section looks at three export options in some depth: exporting messages, exporting addresses, and exporting data to a file.
You can copy messages and other items into a new or an existing set of personal folders. Unlike backing up, this option lets you choose which items you want to export and which you want to exclude. You can use this method whether your mail is stored in a Microsoft Exchange Server mailbox or in a set of personal folders.
You might already know how to use the AutoArchive feature to move messages out of your message store and into a long-term storage location in another .pst file. You can use the Import And Export Wizard to export messages to a file. Using the Import And Export Wizard to export messages works in a similar way to AutoArchive; the major difference is that when messages in the store are exported, they aren’t removed; instead, they are copied, as they are during backup.
Note
For information about using AutoArchive, see "Archiving Your Outlook Data" in Chapter 31.
To export some or all of your Outlook 2007 data, follow these steps:
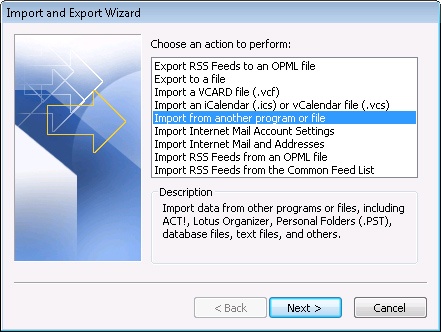
Choose File, Import And Export to start the Import And Export Wizard, as shown in Figure 32-1.
Select Export To A File, and then click Next.
The options available on the next wizard page break down into three basic types: text files, databases, spreadsheets, and a personal folders file. Figure 32-2 shows most of the formats available for exporting. Although you can export your messages in any of these formats, you’ll probably find .pst files the most useful. For this example, select Personal Folder File (.pst), and then click Next.
On the Export Personal Folders page, select the folder you want to export. To include subfolders of the selected folder, select the Include Subfolders option. To export all of your Outlook 2007 data, select the Mailbox or Personal Folders branch, and then select the Include Subfolders option.
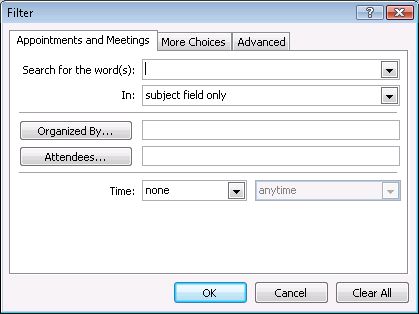
If you want to specify a filter, click Filter. Figure 32-3 shows the Filter dialog box. By using a filter, you can specify that only certain items be exported. This option could be useful, for example, if you need to send all correspondence with representatives of Wingtip Toys to a new sales representative who will be dealing with that firm. You could export the relevant messages to a .pst file that you could send to the new rep, who could then import them. After you’ve specified any needed filters, click OK to close the Filter dialog box and return to the wizard page, and then click Next.
On the final wizard page, specify the location where you want to save exported information, and then specify how duplicate items should be handled. If no export file exists, specify the path and name of the file to be created. If an export file does exist, browse to the file you want to use. When you click Finish, the wizard creates the personal folders file (if it is new), runs the export, and then closes the file.

You can also export address lists out of Outlook 2007 for use elsewhere. Exporting addresses is similar to exporting messages: you use the same Import And Export Wizard. The difference is that addresses are sometimes exported to a database or a spreadsheet to allow easier access to phone numbers, addresses, and other information.
To export the address list to Microsoft Access, for example, first start the Import And Export Wizard. As you work through the wizard, select Export To A File, and then select Microsoft Access. Select the Contacts folder, and then provide a name for the Microsoft Access database that will be created for the exported addresses.
The primary difference between exporting to a personal folders file and exporting to a database lies in mapping out the fields for the database itself. From the wizard, you can click Map Custom Fields to open the Map Custom Fields dialog box, shown in Figure 32-4. If you are mapping to an existing database rather than a new one, you can map fields in Outlook 2007 to specific fields in the database. For example, assume that your existing target database includes fields named fName and lName, and you want to map the First Name field to fName and the Last Name field to lName. The Map Custom Fields dialog box enables you to do just that.

Figure 32-4. Use the Map Custom Fields dialog box to map fields for export into a Microsoft Access database.
After you’ve finished the field mapping, click OK, and then click Finish to create the new database file and export the contact information into it.
Note
When you’re exporting to a database, you don’t have a filter option. Therefore, if you’re exporting only certain records, you should create a subfolder to contain the contacts you want to export. Copy the contacts to this new subfolder, export the subfolder, and then delete the duplicate contacts and the folder containing them.
Occasionally, data in .pst format simply isn’t usable for a particular task. Outlook 2007 gives you a number of options for other export formats, such as Excel, Access, or various text file formats. For example, if you need to export information from Outlook 2007 into a third-party software package, or if you want to use the information in any capacity for which a direct export path is not available, your best option might be to export the needed information to a basic text file, either tab-delimited or comma-delimited. Figure 32-5 shows a text file that was exported from Outlook 2007.

Exporting data to a text file is an easy process:
In Outlook 2007, choose File, Import And Export.
Choose Export To A File, and then click Next.
To export to a comma-delimited file, select Comma Separated Values (Windows). To export to a tab-delimited file, select Tab Separated Values (Windows). Then click Next.
Specify a file name for the export file, and then click Next.
If you want to change the way fields are mapped, click Map Custom Fields (shown earlier in Figure 32-4). When you have finished mapping fields, click OK, and then click Finish.