
Microsoft® Office Outlook® 2007 has an easy-to-use yet powerful interface that serves most users well right out of the box. However, you probably perform certain tasks that are not readily available through the standard Office Outlook 2007 interface. For example, perhaps you use remote mail frequently and want quick access to the remote mail functions rather than having to scroll through menus to find them.
As all 2007 Microsoft Office system applications do, Outlook 2007 provides a way to tailor the interface to your needs. You can customize the Navigation Pane to add your own shortcuts, customize the To-Do Bar, customize Outlook Today view and other standard views, and customize the way Outlook 2007 displays your folders. You can also create custom toolbars.
This chapter focuses on the various ways you can fine-tune Outlook 2007 to the way you work. Some of the changes covered are minor; others are more significant. All of them can enhance your experience with Outlook 2007 and make it a more useful tool for bringing efficiency to your workday.
Most people browse through Outlook 2007 folders using the Navigation Pane. This section explains how you can customize the Navigation Pane to suit your preferences.
The Navigation Pane, which appears on the left side of the Outlook 2007 window, was introduced in Microsoft Outlook 2003 and replaces the Outlook Bar that was a staple of the Microsoft Outlook interface prior to Outlook 2003. The Navigation Pane gives you quick access to all of your Outlook 2007 folders. Outlook 2007 adds a great new feature to the Navigation Pane—the capability to minimize the Navigation Pane to gain more window space for the current folder view but still open the Navigation Pane quickly when you need it.
The Navigation Pane contains buttons that serve as shortcuts to your Outlook 2007 folders, as shown in Figure 26-1. The Navigation Pane also includes shortcuts to a few common items, including Outlook Today view and the Microsoft Office Online Web site. You can access these shortcuts by clicking the Shortcuts icon at the bottom of the Navigation Pane.

You can make several changes to the Navigation Pane, including adding and removing groups, adding and removing shortcuts, and changing the appearance of its icons. The following sections explain these changes.
If you use the Navigation Pane often, you’ll probably want it to remain open all the time, but if you work with a particular Outlook 2007 folder most of the time, you might prefer to have the additional space for your favorite folder view or the Reading Pane. In Outlook 2007, you now have the capability to minimize the Navigation Pane to gain more window space but easily restore it when you need it, as shown in Figure 26-2. To minimize the Navigation Pane, choose View, Navigation Pane, and then choose Minimize. When the Navigation Pane is minimized, you’ll find an Expand The Navigation Pane button in the upper-right corner of the Navigation Pane. Just click this button to expand the Navigation Pane. The button changes to a Minimize The Navigation Pane button, which when clicked minimizes the Navigation Pane.

Outlook 2007 also allows you to turn on or turn off the Navigation Pane as needed. Choose View, Navigation Pane, and then choose Off to turn it off.
Outlook 2007 can display up to eight buttons in the bottom portion of the Navigation Pane, and these include a button for each of the standard Outlook 2007 folders, the Folder List, and Shortcuts. The number of buttons displayed depends on the size of the Outlook 2007 window and how many buttons you choose to show. If you need more space for the Folder List, for example, you can simply drag the bar above the Mail button to resize the lower portion of the Navigation Pane, which changes the number of buttons shown. You can show or hide buttons by clicking the double arrow at the bottom of the Navigation Pane and choosing Show More Buttons or Show Fewer Buttons, as shown in Figure 26-3.
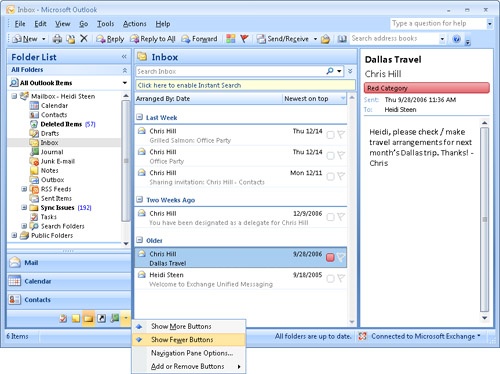
Outlook 2007 does not by default show all of the available buttons in the Navigation Pane. For example, the Journal button doesn’t appear by default in the Navigation Pane. To add or remove buttons, click Configure Buttons (the double arrow) at the bottom of the Navigation Pane, click Add Or Remove Buttons, and then select the button that you want to add or remove.
The Navigation Pane includes buttons for each of the built-in Outlook 2007 folders, and the Folder List provides quick access to all other Outlook 2007 folders and public folders (which are available only with Microsoft Exchange Server). You can easily add shortcuts to any folder by following these steps:
Click the Shortcuts button at the bottom of the Navigation Pane to open the Shortcuts pane.
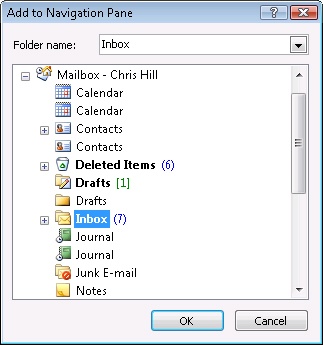
Click Add New Shortcut to open the Add To Navigation Pane dialog box, shown in Figure 26-4.
Select a folder in the list, and then click OK. Outlook 2007 adds the shortcut to the Shortcuts group.
Drag the shortcut to a different group, if desired.
You can create shortcuts to file system folders or Outlook 2007 folders and add them to existing Navigation Pane groups or to new groups that you create. For example, if you use a particular document folder often, you might want to add that folder to one of your Navigation Pane shortcut groups.
The process is similar, regardless of the type of shortcut you’re adding:
In Outlook 2007, open the group in which you want to create the shortcut.
Click the Shortcuts button in the Navigation Pane to open the Shortcuts pane.
In Microsoft Windows®, open the folder containing the folder or file for which you want to create a shortcut, and then position the folder and the Outlook 2007 window so that you can see both, as shown in Figure 26-5.
Drag the folder or document from the folder window to the shortcut group name where you want to add it.

You can add shortcuts to Web sites to the Navigation Pane. This lets you quickly open a site from Outlook 2007 to do research, check stock quotes, view news, and so on.
To add a Web site shortcut to the Navigation Pane, first create the shortcut on the desktop or in another folder. Open the Navigation Pane shortcut group in which you want to place the shortcut, and then simply drag the existing shortcut to the Navigation Pane. You can also copy shortcuts from your Favorites menu easily. Position your Web browser so that you can see it and the Navigation Pane. Open the Favorites menu, and then drag the shortcut from the browser to the shortcut group in the Navigation Pane.
If you decide you no longer want a particular shortcut in the Navigation Pane, you can remove it easily. Simply right-click the shortcut, and then choose Delete Shortcut. Click Yes to remove the shortcut or No to cancel.
In some cases, you’ll want to change the name that Outlook 2007 assigns to a shortcut in the Navigation Pane. For example, when you add a Web site shortcut, its name is the URL, which typically doesn’t fit very well in the Navigation Pane. Perhaps you simply want to change the shortcut’s name to something more descriptive.
To change the shortcut name, right-click the shortcut, and then choose Rename Shortcut. Type the new name, and then press Enter.
Outlook 2007 creates one group by default, named Shortcuts, in the Navigation Pane. You can also add your own groups, remove groups, and rename them. This section explains these tasks.
At some point, you might want to add your own groups of shortcuts to the Navigation Pane to help you reorganize existing shortcuts or organize new shortcuts. For example, you might want to create a group to contain all your Web shortcuts.
Adding a new group is easy. Click the Shortcuts button in the Navigation Pane, and then click Add New Group. Outlook 2007 adds a new group named New Group and highlights the group name so that you can change it, as shown in Figure 26-6. Type the group name, and then press Enter. Then begin adding shortcuts or moving shortcuts to the group from your other groups.

You can rename a group as easily as you rename a shortcut. Start Outlook 2007, right-click the group name in the Navigation Pane, and then choose Rename Group. Type a new name for the group, and then press Enter.
If you decide that you want to remove a group from the Navigation Pane, you can do so at any time. Simply right-click the group name in the Navigation Pane, and then choose Remove Group. Click Yes to remove the group or No to cancel.
Note
If the group you remove contains shortcuts that you’ve copied from other locations (such as the desktop), removing the group does not affect those shortcuts. Only the group is removed from the Navigation Pane; the shortcuts remain in their other locations. Shortcuts that exist only in that group, however, are deleted.