
One of the first tasks you will want to accomplish after installing Business Contact Manager is to add business contacts. It makes sense to add contacts before you add accounts because each account probably has at least one contact associated with it. If the contact has been created, you can simply assign it to an account when you create the account.
Note
Business Contact Manager can import data from several different sources. If you currently use another contact management application and want to move its data to Business Contact Manager, see the section "Importing and Exporting Information" later in this chapter for details.
You can copy existing contacts from your Contacts folder (or other contacts folders) to the Business Contacts folder. To do so, open the folder list, open the Contacts folder, and then scroll down to locate the Business Contacts folder under the Business Contact Manager branch. Right-click a contact from the Contacts folder and drag and drop it on the Business Contacts folder; then choose Copy from the shortcut menu. To move the contact instead of copying it, choose Move from the menu or simply drag the contact to the Business Contacts folder.
A business contact item includes additional fields not found in a standard Outlook 2007 contact item, such as the account they are linked to or the representative in your company to which they are assigned. After you copy or move the item to the Business Contacts folder, you will likely want to edit the contact to include additional information. Double-click the contact to open it; then add or edit information in it according to the information provided in the following section.
Note
See the section "Importing Contacts or Accounts" later in this chapter for details on how to import contacts into Business Contact Manager.
You create a new business contact item in much the same way as you create a standard Outlook 2007 contact item. Double-click a blank area of the Business Contacts folder or open the folder and click New on the toolbar (or choose File, New, Business Contact). Figure 19-14 shows a business contact item with many of its fields filled in.

Most of the fields on the General page are the same as those found in a standard Outlook 2007 contact item.
Note
See Chapter 18, if you need more information on working with contacts and these standard fields.
A new set of fields on the General page for a business contact item is grouped under the Classification section, which provides check boxes and drop-down lists that enable you to specify information about the contact’s status:
Mark As. Use this option to specify whether the contact is a lead for a sales follow-up. This field can be useful in reports to separate active sales leads from other business contacts.
Status. Use this option to specify whether the contact is active or inactive. You can use this field in reports to separate active from inactive contacts.
Payment Status. Use this option to choose between Current and Overdue for the contact’s account status.
Contact Rating. Use this option to select an overall financial rating for the contact from this drop-down list.
Payment Status. Use this option to select the current payment status for the contact from this drop-down list.
There are other new fields on the General page grouped under the Source Information section:
Source. Use this option to specify how the contact was made (Advertisement, Direct Mail, and so on). This field can be useful in reports to assess marketing efforts.
Initiated By. Use this option to select the Account, Business Contact, or Marketing Campaign responsible for initiating the business contact.
Areas Of Interest. Use this option to select interests shared with this business contact, such as products, services, joint marketing efforts, or any other share interest category you have configured.
This section of the chapter focuses on creating and working with business contact items.
Note
See the section "Attaching Items" later in this chapter for details on linking items to your contacts.
The Details page for a business contact item, shown in Figure 19-15, provides several additional fields you can use to track various items of information about a business contact.
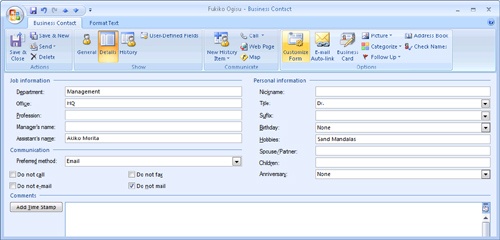
The fields on the Details page are generally self-explanatory. Note that the four check boxes under the Preferred Method drop-down list (Do Not Call, Do Not E-Mail, Do Not Fax, and Do Not Mail) are informational fields only and do not actually prevent these actions. If you select the Do Not E-Mail check box for the contact, for example, Outlook 2007 does not honor that setting if you attempt to send an e-mail. The message will go through without any prompts to the contrary. You can, however, use these fields to filter your contacts list prior to sending an e-mail to the contacts list.
The History page, shown in Figure 19-16, shows all the items that are linked to the contact, including e-mail messages, notes, opportunities, tasks, appointments, phone logs, and files. Some of these items you must link yourself through the contact item, whereas others are linked automatically. For example, if you send an e-mail to a business contact, Business Contact Manager automatically links the e-mail to the contact and includes it in the Communication History list. The View drop-down list enables you to see these History items according to the following sort criteria: By Linked To, Chronological, Communication History Item List, and Created By.

Inside Out: How to use views to honor contact settings
If you want to honor the intent represented by these fields (for example, not calling someone if Do Not Call is selected for their contact item), you should make it a habit of checking them before taking the actions specified by them. An alternative is to create a custom view that filters the items based on the pertinent field. Chapter 27, discusses how to create custom views, but it is briefly discussed here because these fields are user-defined fields, which are not specifically mentioned in Chapter 27.
The following example shows how to create a view that shows only those contacts whose Do Not Call check box is cleared:
In Business Contact Manager, open the Business Contacts folder and click View, Current View, and then Define Views.
In the Custom View Organizer dialog box, click New. Enter the name OK to Call, select Table from the Type Of View list, and click OK.
In the Customize View dialog box, click Filter, and then click Advanced to show the Advanced tab, shown in Figure 19-17.
Click Field, click User-Defined Fields In Folder, and then click Do Not Call. Select a different field if you want to filter based on that field instead.
Make sure that the Condition drop-down list is set to Equals and choose No from the Value drop-down list. Then click Add To List.
Click OK, OK, and Apply View to show the view you just created.

There are several actions you might take with a business contact, including sending an e-mail, calling, faxing, sending a letter, or adding a note. When you perform many of these tasks, Business Contact Manager adds the item to the contact’s history. For example, send an e-mail to a contact, and Business Contact Manager links that e-mail to the contact. This linking happens automatically in most cases. In the case of an e-mail, you don’t even have to go through the Business Contacts folder to have the e-mail linked to the contact. With the Inbox folder open, simply send the contact a message. Outlook 2007 checks the recipient; if it is one of your business contacts, Outlook 2007 automatically links the e-mail to that contact.
Note
In some cases, changing contact information in Business Contact Manager negates this crossover between the Contacts folder and the Business Contacts folder. If you apply a title (Dr., Mr., and so on) to a contact in the Business Contacts folder and then go to your Inbox and send e-mail to the contact (using the Contacts folder addressing), the contact in the Business Contacts folder does not show the e-mail in the History page.
You can initiate actions for a business contact in different ways. For example, select a contact in the Business Contacts folder; choose Actions, Create; followed by the action you want to perform, such as New Business Note For Business Contact. You can also right-click a contact in the folder, click Create, and then click an action from the resulting context menu.
Note
Each of the actions you can perform for a business contact is detailed elsewhere in this book where applicable. For example, the section "Working with Contacts" in Chapter 18 explains several actions such as sending e-mail, calling, and sending a letter. Chapter 20, and Chapter 21, explain how to schedule appointments and meetings with contacts.