
When you look at the Journal folder in a monthly timeline view, you get a good overall picture of your recorded activities, but you must point to an individual icon to identify the activity. (When you point to an icon, a subject label appears.) You can make a few changes to a journal timeline view—for example, you can choose to always display the subject labels for icons in a monthly view, or you can specify a more useful length for the labels. You can also show week numbers in the timeline heading, which is useful for planning in some industries.
Because the Outlook 2007 journal creates a record of your activities, the six standard views available in the Journal folder differ considerably from the views in other types of Outlook 2007 folders. The following sections introduce you to each of the Journal folder views.
Note
You can choose whether to view a timeline in a journal view in day, week, or month increments by clicking the Day, Week, or Month button on the toolbar. These buttons are available only in the journal views that show a timeline and are not available in list views.
The default view for the Journal folder is By Type view, shown in Figure 23-12. In this view, the journal entries are arranged in a timeline and are categorized by the entry type. To select By Type view, choose Current View, By Type in the Navigation Pane.

Each entry type is indicated in a title bar. You can click the small box on the left in the title bar to expand or contract the type. A plus sign (+) in the box means that the type is collapsed, whereas a minus sign (–) indicates that the type is expanded. You might need to use the vertical scroll bar to see the complete list. When you expand a type, you can view any journal entries for that type in the area below the title bar.
Note
If you’re surprised to find no entries when you expand a particular entry type, that’s because Outlook 2007 displays the entries as a timeline. If no entries for the selected entry type were created recently, you might need to use the horizontal scroll bar to find the most recent entries.
By Type view is most useful if you want to find out which documents you worked on during a specific period. This view is not particularly useful for locating documents based on any other criteria. For example, you wouldn’t want to use By Type view to locate all documents relating to a particular contact.
In By Contact view, shown in Figure 23-13, journal entries are also arranged in a timeline and are categorized by the contact associated with the entries.
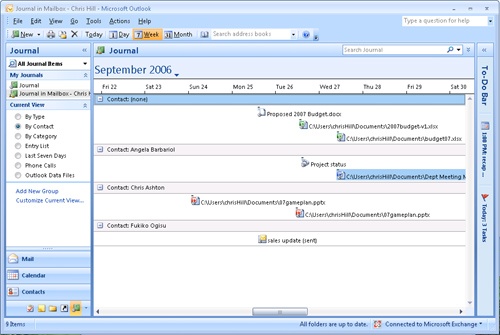
Figure 23-13. Use By Contact view to organize the journal by the contacts associated with each journal entry.
Each contact is indicated by a title bar that shows the contact’s name. Click the small box to expand or collapse the contact. You might also need to use the horizontal scroll bar to view all items from a given contact.
By Contact view makes it easy to find all documents and other journal items related to a specific contact. Any type of document can appear in the list, as can phone calls and other items associated with specific contacts.
In By Category view, shown in Figure 23-14, journal entries are also arranged in a timeline and are organized by the categories you’ve assigned to them.

Figure 23-14. Use By Category view to organize the Journal folder based on the categories assigned to each journal item.
Note
A journal item will appear in more than one location in the list if you assign multiple categories to it.
By Category view can be handy if you create categories that break down journal entries by project. This view can be almost useless, however, unless you take the time to assign categories when you create documents. Outlook 2007 doesn’t assign any categories by default. You can assign categories using the standard list in Outlook 2007, or you can create your own categories.
Note
For information about assigning categories and creating custom categories, see Chapter 5.
Entry List view, shown in Figure 23-15, might be the most useful view of all. This view dispenses with the timeline and instead displays all journal entries in a table.
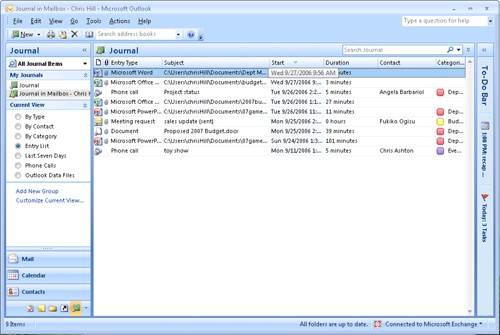
Because Entry List view does not use the timeline to display entries, it’s much easier to view the list of entries—you don’t have to use the horizontal scroll bar to locate the items. By default, this view is sorted in descending order based on the start date, but you can quickly sort the list using any of the column headers. Simply click a column header to sort the list; click the header a second time to reverse the sort order.
The paper clip icon in the second column of Entry List view indicates that an entry is a document. If this icon isn’t displayed, the entry is a log of an activity that occurred within Outlook 2007, such as an e-mail message.
Last Seven Days view resembles Entry List view. This view is useful when you need to locate items you’ve worked on recently—especially if you can’t quite remember the file name, contact, or category.
When you look closely at Last Seven Days view, you might notice that something doesn’t look quite right: the dates shown for the journal entries clearly span much more than a week. The explanation is that the dates shown are the start dates for the journal entries, not the dates when the items were last accessed. Outlook 2007 is displaying the journal entries that have been created, accessed, or modified within the past week. Each entry shown in this view was accessed in some way during the past week, although the original entries might have been created quite some time ago.
Phone Calls view, shown in Figure 23-16, displays only journal items that are associated with phone calls. Tracking phone calls and viewing them in the Journal folder can be extremely helpful. You can, for example, monitor the time you spend on billable calls. Even if you don’t bill for your time, you’ll find that phone call journal entries make it easier to recall phone conversations.

Figure 23-16. Use Phone Calls view to organize the Journal folder according to journal items associated with phone calls.
Outlook 2007 creates journal entries for phone calls automatically only if you use the AutoDialer to begin the call. If you create the journal entry at the time you place the phone call, you can use the Timer to track the time you spend on the phone. Otherwise, you must specify the duration yourself by entering the appropriate time on the phone call journal entry form. You can do so by selecting a time in the Duration drop-down list or by entering a time (in minutes).
All the standard views in the Journal folder are customizable in a variety of ways. The changes you make to these views are persistent, however, so proceed with care. If you end up mangling a standard view beyond repair, it can be restored to its default by using the Reset button in the Define Views dialog box, which you can open by choosing Customize Current View in the Navigation Pane. (No such option exists for custom views.)
Note
For information about creating custom views in Outlook 2007, see Chapter 27.
Displaying the subject line of each journal item in a timeline view gives you additional information about those items without requiring you to point to each item with your mouse to display the ScreenTip-style label.
To display item labels on a monthly timeline, follow these steps:
In a timeline view, right-click in an empty area of the Journal folder, and then choose Other Settings on the shortcut menu.
In the Format Timeline View dialog box, select the Show Label When Viewing By Month check box.
Note
By default, the label width is 80 characters, but if you find that your labels are too short or too long, return to this dialog box and change the number in the Maximum Label Width box. The label width applies to the labels in the day and week timeline as well as the month timeline. To also hide the display of week numbers, you can clear the Show Week Numbers check box.
Click OK to close the dialog box.
In some industries, it’s important to know schedules based on weeks of the year. You can show week numbers in your timeline view by following these steps:
With the journal displayed in a timeline view, right-click in an empty area of the Journal folder, and then choose Other Settings on the shortcut menu.
In the Format Timeline View dialog box, select the Show Week Numbers check box.
Click OK to close the dialog box. In a monthly timeline, week numbers replace dates. In week and day views, both the week number and dates are displayed in the timeline header.