
Microsoft® Office Outlook® 2007 works well as a stand-alone application, but its real strength is realized when you integrate it with other 2007 Microsoft Office system applications. Most of us spend our days working in one or two main programs, such as a word processor or a database program, so most of our information is saved in files designed for those programs. For instance, you probably save letters and other correspondence in Microsoft Office Word 2007 files; save contact information in Office Outlook 2007; and save inventory, invoices, and other data in Microsoft Office Access 2007 or Microsoft Office Excel® 2007. With the Microsoft Office system, you can integrate it all, which enables you to choose the best tool for creating your information and the best tool for sharing or producing your data.
Some of the ways to integrate Outlook 2007 with other Microsoft Office system applications include the following:
Using Outlook 2007 contacts for an Office Word 2007 mail merge
Exporting Outlook 2007 contacts to Word 2007, Office Excel 2007, or Office Access 2007
Importing contacts from Word 2007, Excel 2007, or Access 2007 into Outlook 2007
Using Outlook 2007 notes in other Microsoft Office system applications
In this chapter, you’ll learn about using Outlook 2007 and other Microsoft Office system applications to share information between applications. Instead of employing standard copy-and-paste or cut-and-paste techniques, you’ll find out about ways to reuse your information in Outlook 2007 or another file format without retyping or re-creating the data.
The Outlook 2007 Contacts folder enables you to create contact entries to store information about a person, a group, or an organization. You can then use that contact data to create e-mail messages, set up meetings or appointments, or complete other tasks associated with a contact. Your contacts list can also be used as the data source to provide names, addresses, phone numbers, and other pertinent data to your mail merge documents.
You perform a mail merge in Word 2007 when you want to create multiple documents that are all based on the same letter or document but have different names, addresses, or other specific information (referred to as merge data). For instance, you might perform a mail merge operation when you want to do a mass mailing to your customers about a new product launch.
You begin by creating and saving a standard letter. Next, you place field codes where you want the recipient’s address, the salutation, and other merge data to appear. Field codes are placeholders in documents where data will change. For instance, the name of the recipient should be a field code because it will change for each letter you send out.
You next create or assign a database to populate the field codes (that is, to insert the merge data). Word 2007 uses the database and contact information to create separate letters. You can then save these files or print each letter for your mass mailing.
Note
Before starting to set up a mail merge using your Outlook 2007 contact data, review your contact entries to make sure that the data is complete and current and that you don’t have duplicate entries.
To perform a mail merge using Word 2007, follow these steps:
Start Word 2007.
Note
If you are using Outlook 2007 but are still using Office Word 2003, the initial steps of this procedure are different. To start a mail merge in Word 2003, click Tools, then Letters and Mailings, and then Mail Merge to open the task pane. From that point on (step 5), the wizard proceeds normally.
Click the Mailings tab on the Ribbon.
Click Start Mail Merge.
Click Step By Step Mail Merge Wizard (see Figure 37-1).
In the task pane, select the type of document to create, such as Letters, and then click Next: Starting Document at the bottom of the pane.
Select the document to use—for example, the current document. Click Next: Select Recipients.
Click Select from Outlook Contacts.
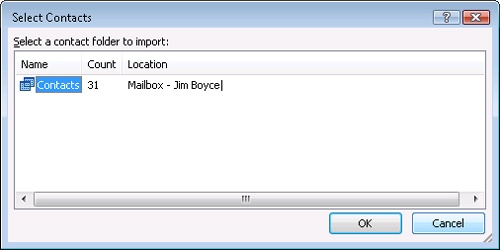
Select the Choose Contacts Folder option to open the Select Contacts dialog box (see Figure 37-2). (If you have configured Outlook 2007 to always prompt you for a profile, and Outlook 2007 is not open, you are asked to select a profile.)
Select the folder that contains the contacts list you want to use, and then click OK to open the Mail Merge Recipients dialog box (see Figure 37-3).
Select the contacts you want to use to populate the mail merge document. All the contacts are selected by default. You can use the following methods to modify the selected list of contacts:
Select the check box in the Data Source column to choose all the contacts in the list (the default), or clear the check box to deselect all the contacts and then select individual contacts.
Click Sort to sort the contact list.
Click Filter to filter the list according to user-specified criteria.
Click Find Duplicates to locate duplicate names to clear them from the mail merge list.
Click Find Recipient to locate a specific name in your contact list.
Click Validate Addresses to use an add-in tool to verify that the addresses are valid.
Clear the check boxes next to the names of those you do not want to include in the mail merge.
Note
If you want to create a mailing list that is a subset of your Contacts folder, you can filter the contacts list with a custom view and then use the custom view to perform a mail merge from Outlook 2007.
Note
See the "Performing a Mail Merge from Outlook" section later in this chapter.
Click OK.
Click Next: Write Your Letter.
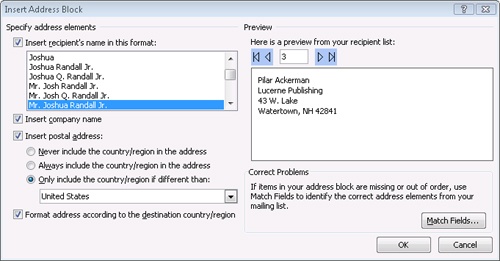
Click Address Block to open the Insert Address Block dialog box (see Figure 37-4).
Using the options in this dialog box, specify the address fields and format you want to include in your letter. Click OK.
Click Greeting Line to insert and format a greeting line from your Contact information.
Click More Items to insert specific fields from your Contact information.
Write the body of your letter. When you finish, click Next: Preview Your Letters to see how the Outlook 2007 contact data looks in your letter. Figure 37-5 shows an example.
In the task pane, click Next: Complete The Merge to finish.


Note
For detailed information about performing mail merges in Word 2007 and using other Word 2007 features, see Microsoft Office Word 2007 Inside Out, by Katherine Murray and Mary Millhollon (Microsoft Press, 2007).
When you perform a mail merge from Word 2007, you can use selection criteria to determine which of the contacts are included in the mail merge set. For example, assume that you want to send a letter to all your contacts who have addresses in California and whose last names begin with the letter R.
In the Mail Merge Recipients dialog box (refer to Figure 37-3), each column includes a drop-down button next to the column heading. To specify selection criteria based on a particular column, click the drop-down button and choose one of the following commands:
All. Do not filter based on the selected column.
Blanks. Include only those contacts for which the selected field is blank. For example, choose this option under the E-Mail Address column to include all contacts who do not have an e-mail address in their contact record.
Nonblanks. Include only those contacts for which the selected field is not blank. For example, select this option under the Last field to include only those contacts whose Last Name field is not blank.
Advanced. Click this button to open the Filter And Sort dialog box, explained next.
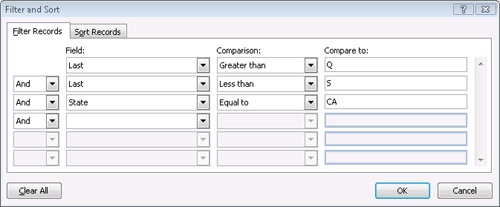
If you click Advanced to open the Filter And Sort dialog box, shown in Figure 37-6, you can specify more-complex selection criteria. The following example includes those contacts whose last names start with R and whose State value equals California:
In the Mail Merge Recipients dialog box, click the drop-down button beside the Last field. Click Advanced.
From the first Field drop-down list, choose Last, choose Greater Than, and then enter Q in the Compare To field.
From the second Field drop-down list, choose Last, choose Less Than, and then enter S in the Compare To field.
Select State from the third Field drop-down list, choose Equal To from the Comparison drop-down list, and enter CA in the Compare To field. The dialog box should look similar to the one shown in Figure 37-6.
Click OK to close the Filter And Sort dialog box. After a few moments, the Mail Merge Recipients list shows only those contacts whose last name begins with R and whose State value is listed as CA.
As you might have guessed from Figure 37-6, you can select OR instead of AND in the dialog box for a particular criterion. For example, you would use OR for the third criterion (step 4) to cause Outlook 2007 to include contacts in the mail merge if their names started with R or if they lived in California. A contact would also be included if both criteria were met.