
You can assign multiple delegates so that more than one individual can access your data with send-on-behalf-of privileges. You might have an assistant who manages your schedule and therefore has delegate access to your calendar and another delegate—your supervisor—who manages other aspects of your workday and therefore has access to your Tasks folder. In most cases, however, you’ll probably want to assign only one delegate.
You can add, remove, and configure delegates for all your Outlook 2007 folders through the same interface.
Follow these steps to delegate access to one or more of your Outlook 2007 folders:
Choose Tools, Options to open the Options dialog box.
Click the Delegates tab, as shown in Figure 35-1.
Click Add to open the Add Users dialog box.
Select one or more users, and then click Add.
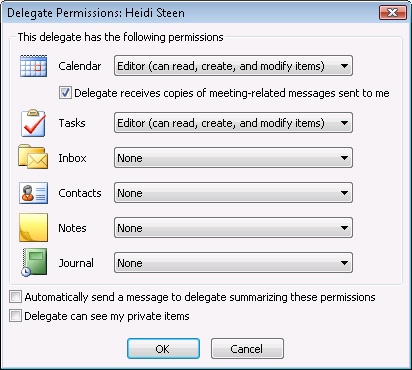
Click OK. Outlook 2007 displays the Delegate Permissions dialog box, shown in Figure 35-2.
For each folder, select the level of access you want to give the delegate based on the following list:
None. The delegate has no access to the selected folder.
Reviewer. The delegate can read existing items in the folder but can’t add, delete, or modify items. Essentially, this level gives the delegate read-only permission for the folder.
Author. The delegate can read existing items and create new ones but can’t modify or delete items.
Editor. The delegate can read existing items, create new ones, and modify existing ones, including deleting them.
Set the other options in the dialog box using the following list as a guide:
Delegate Receives Copies Of Meeting-Related Messages Sent To Me. Sends copies of all meeting-related messages to the delegate.
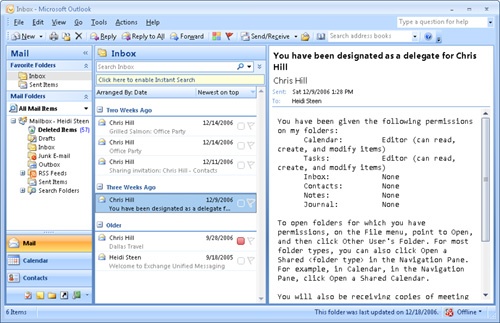
Automatically Send A Message To Delegate Summarizing These Permissions. Sends an e-mail message to the delegate informing him or her of the access permissions you’ve assigned in your Outlook 2007 folders, as shown in Figure 35-3.
Delegate Can See My Private Items. Allows the delegate to view items you’ve marked as private. Clear this option to hide your private items.
Click OK to close the Delegate Permissions dialog box.
Add and configure other delegates as you want, and then click OK.

If you need to modify the permissions for a delegate, select the Delegates tab, select the delegate in the list, and then click Permissions to open the Delegate Permissions dialog box. Change the settings as needed, just as you do when you add a delegate. If you need to remove a delegate, select the delegate on the Delegates tab, and then click Remove.
Note
If the Permissions button appears dimmed or you are unable to assign delegate permissions for some other reason, the problem could be that you have designated a local .pst file as the default delivery location for your profile. Make sure that you configure your profile to deliver mail to your Exchange Server mailbox instead. See "Configuring Online and Offline Data Storage" in Chapter 3 for details.
If your assistant has full responsibility for managing your calendar, you might want all meeting request messages to go to the assistant rather than to you. That way, meeting request messages won’t clog your Inbox.
Taking yourself out of the request loop is easy. Here’s how:
If you are acting as a delegate for another person, you can open the folders to which you’ve been given delegate access and use them as if they were your own folders, subject to the permissions applied by the owner. For example, suppose that you’ve been given delegate access to your manager’s schedule. You can open his or her Calendar folder and create appointments, generate meeting requests, and perform the same tasks you can perform in your own Calendar folder. However, you might find a few restrictions. For example, you won’t be able to view the contents of personal items unless your manager has configured permissions to give you that ability.
Follow these steps to open another person’s folder:
Start Outlook 2007 with your own profile.
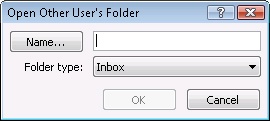
Choose File, Open, Other User’s Folder to display the Open Other User’s Folder dialog box, as shown in Figure 35-4.
Type the person’s name or click Name to browse the address list, and then select a name.
In the Folder Type drop-down list, select the folder you want to open, and then click OK. Outlook 2007 generates an error message if you don’t have the necessary permissions for the folder; otherwise, the folder opens in a new window.
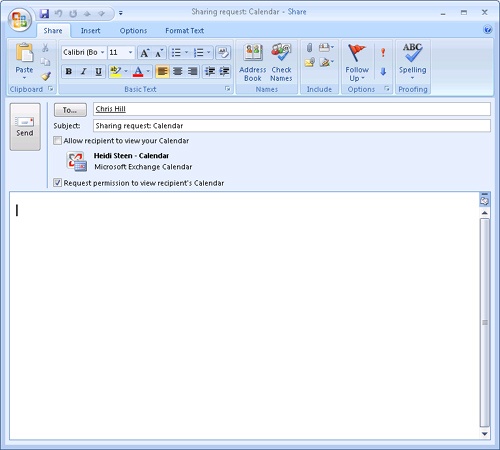
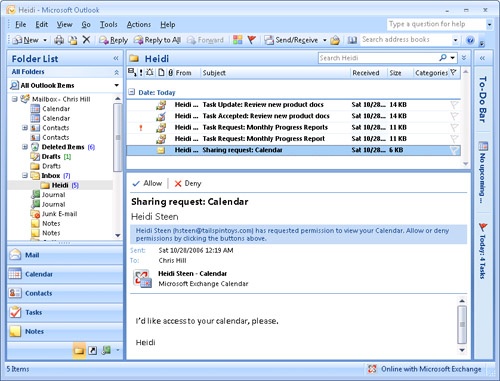
If you don’t currently have access to the selected folder, Outlook 2007 asks whether you want to request access. If you click yes, Outlook 2007 opens the message form shown in Figure 35-5. Add a note to the person whose calendar you want to access, and then click Send. The other person receives the message and can click Allow or Deny to either allow or deny access to his or her calendar, as shown in Figure 35-6.
Note
If you want to share your calendar with the other person, select the Allow Recipient To View Your Calendar option.
Depending on the permissions set for the other person’s folder, you might be able to open the folder but not see anything in it. If someone grants you Folder Visible permission, you can open the folder but not necessarily view its contents. For example, if you are granted Folder Visible permission for a Calendar folder, you can view the other person’s calendar. If you are granted Folder Visible permission for the Inbox folder, you can open the folder, but you can’t see any headers. Obviously, this latter scenario isn’t useful, so you might need to fine-tune the permissions to get the effect you need.
Note
When you click File, Open, the menu lists other users’ folders that you’ve recently opened. You can select a folder from the list to open it.
When you’ve finished working with another person’s folder, close it as you would any other window.
If you’ve been given delegate privileges for another person’s calendar, you can schedule meetings and other appointments on behalf of that person.
To do so, follow these steps:
Start Outlook 2007 with your own profile.
Click File, Open, and then select Other User’s Folder. Type the user name in the text box or click Name and select the user name from the Global Address List (GAL). In the Folder Type drop-down list, select Calendar, and then click OK.
In the other person’s Calendar folder, create the meeting request, appointment, or other item as you normally would for your own calendar.
As mentioned earlier, a meeting request recipient sees the request as coming from the calendar’s owner, not the delegate. When the recipient opens the message, however, the header indicates that the message was sent by the delegate on behalf of the owner. Responses to the meeting request come back to the delegate and a copy goes to the owner, unless the owner has removed himself or herself from the meeting request loop.
Note
For details about how to have meeting request messages go to the delegate rather than to the owner, see "Taking Yourself Out of the Meeting Request Loop" earlier in this chapter.
If you’ve been given Author or Editor permission for another person’s Inbox, you can send messages on behalf of that person. For example, as someone’s assistant, you might need to send notices, requests for comments, report reminders, or similar messages.
To send a message on behalf of another person, follow these steps: