
When you perform an action in Outlook 2007, you do so inside a folder. Outlook 2007 provides a handful of actions that you can perform with folders to change their behavior, location, appearance, and so on, as described in the following sections.
When you’re ready to work with information in Outlook 2007, you first go to the folder in which that information is stored. For example, to read a new e-mail message downloaded to your Inbox folder, you must open the Inbox folder and then select the message to read. To open a folder, click its button in the Navigation Pane or click the folder name in the Folder List.
When you open the folder, its contents are displayed in the main Outlook 2007 window. To see the contents of a particular folder item, you must open the item using one of these methods:
Double-click the item in the main Outlook 2007 window.
Right-click the item, and then choose Open.
Click the item, and then press Enter.
Click the item, and then choose File, Open, Selected Items.
Click the item, and then press Ctrl+O.
Depending on the type of folder you open, the Reading Pane might be available. The Reading Pane displays the contents of the currently selected item without requiring you to open a separate window for the folder item. The Reading Pane is handy because it provides a quick view and can help keep your desktop tidier. To display the Reading Pane, choose View, Reading Pane and then select Right or Bottom, or simply click the Reading Pane button on the Advanced toolbar.
By default, the Reading Pane appears on the right in the main Outlook 2007 window, as shown in Figure 30-2. You can resize this pane by dragging the edge. To see an item in the Reading Pane, simply select the item in the folder.

As you know, Outlook 2007 provides a basic set of folders in which you can store certain types of data, such as the Contacts folder for storing contact information. As you use Outlook 2007 more, you’ll want to add other folders to organize your data. For example, you might add other message folders to store particular kinds of messages.
Each Outlook 2007 folder you add has a specific type based on the type of data it stores. For example, a mail folder differs from a contacts folder because the former stores messages and the latter stores contact entries. Similarly, a calendar folder stores appointments and events, and a notes folder stores notes. When you add a folder, you specify the folder type. You also specify the name of the folder and its location.
Follow these steps to create a folder:
Take one of the following actions to display the Create New Folder dialog box:
Choose File, New, Folder.
Choose File, Folder, New Folder.
Right-click a folder in the Folder List, and then choose New Folder.
Press Ctrl+Shift+E.
Click the arrow next to the New button on the Standard toolbar, and then choose Folder.
In the Name box, type a name for the folder, shown in Figure 30-3.
In the Folder Contains drop-down list, choose the type of item you want to store in this new folder.
In the Select Where To Place The Folder list, select the location for the new folder. Selecting the Inbox, for example, places the new folder as a subfolder of the Inbox.
Click OK.

If you have a frequently used folder that isn’t listed in the Navigation Pane, you can create a shortcut to the folder in the Shortcuts area of the Navigation Pane, as explained here:
At the bottom of the Navigation Pane, click Shortcuts .
In the Shortcuts pane, click Add New Shortcut to display the Add To Navigation Pane dialog box, shown in Figure 30-4.
Select a folder in the list, and then click OK.
You can also create your own shortcut groups. Click the Add New Group shortcut. Outlook 2007 creates a new shortcut and highlights the name so that you can change it. Type a new name, and then press Enter. You can easily move shortcuts from one group to another simply by dragging them.

Note
You can drag folders, documents, and Web shortcuts to a group in the Shortcuts pane to quickly create shortcuts to those items. If you have several URLs in your Microsoft Internet Explorer® Favorites folder that you want to copy to Outlook 2007 shortcuts, open the Favorites folder, and drag the URLs to an Outlook 2007 shortcut group. Internet Explorer running under Windows Vista™ will initially display the Internet Explorer Security dialog box, citing the restriction against dragging Web content outside of Protected Mode without prior approval. Click Allow to let the Web URL be dragged into the Outlook 2007 shortcut group. If you want to allow this to occur every time with prompting, click the Always Allow Web Content To Be Copied To This Program check box before clicking Allow.
When you want to remove a shortcut, right-click it, choose Delete Shortcut, and then click Yes.
Troubleshooting
Folder and content remains when shortcut is removed
When you remove a folder shortcut from the Navigation Pane, you remove only the shortcut. You do not remove the folder from Outlook 2007, nor do you delete the folder’s contents. For information about deleting a folder and its contents, see "Deleting a Folder" later in this chapter.
If you decide that a folder shortcut should be renamed, follow these steps:
A feature in Outlook 2007 is the favorite folders pane in the Navigation Pane for each of the Outlook 2007 folder types. When you click the Mail button in the Navigation Pane, for example, Outlook 2007 displays a Favorite Folders list at the top of the Navigation Pane. This list, by default, includes three of the most commonly used mail folders: the Inbox, Unread Mail, and Sent Items folders, as shown in Figure 30-5.

Note that the naming convention isn’t consistent across Outlook 2007 folder types for the favorite folders pane. The favorite folders panes for the other folders are named My Calendars, My Contacts, My Tasks, My Journals, and My Notes. All but My Calendars appear at the top of the Navigation Pane when you open the folder. My Calendars appears below the Date Navigator in the Navigation Pane when you open the Calendar folder.
You can easily add folders to and remove folders from their respective favorites lists. For example, if you use a separate folder for your personal contacts, you might add the folder to the My Contacts list to make it readily available without the need to open the Folder List. To add a folder to its favorites list, open the Folder List, right-click the folder, and then choose Add To Favorite Folders (for a Mail folder). For other folder types such as Contacts, the folder is placed in your My Contacts list (or My Calendars for Calendar type folders, My Notes for Notes type folders, and so on) automatically. To remove a mail folder from its favorites list, right-click the folder in the Folder List or in the favorites list, and then choose Remove From Favorite Folders. For other folder types, right-click the folder you want to remove, and then select Delete <folder name>, where <folder name> is the name of the folder you created.
You can also change the order of favorite folders in the list. Right-click the folder in the list and choose Move Up In List or Move Down In List, or simply drag the folder to the desired location in the list.
Sometimes you need to change a folder’s name, perhaps as a result of project modifications or a company name change. Unfortunately, you can’t rename the default folders created by Outlook 2007. You can, however, change the names of folders you create. To rename a folder, begin with one of these actions:
Open the Folder List, right-click the folder, and then choose Rename.
Select the folder, and then click the folder name to highlight it.
Select the folder, and then choose File, Folder, Rename.
After taking one of these actions, simply type the new name and then press Enter to have the change take effect.
Another way to change a folder’s name is through its Properties dialog box, as shown in Figure 30-6, which you can display by right-clicking the folder in the Folder List and choosing Properties. On the General tab, type a new name in the top box. Click OK to save the name and to return to the Folder List.

Occasionally, you might need to move or copy a folder from one location to another. For example, suppose that you’ve created some message folders in your Inbox to organize messages, but now you want to move those folders to a folder other than the Inbox. Or maybe you want to copy the Contacts folder from your Exchange Server mailbox to a set of personal folders.
Moving or copying folders is easy. Open the Folder List, right-click the folder you want to move or copy, and choose either Move or Copy on the shortcut menu. Outlook 2007 displays a Move Folder dialog box, as shown in Figure 30-7, or a Copy Folder dialog box. Select the folder in which you want to store the moved or copied folder and click OK, or choose New to create a new folder in which to store the moved or copied folder.

Another way to move a folder is to drag it to a new location. You can copy a folder using a similar technique; just hold down the Ctrl key while dragging.
You can move one type of folder so that it becomes a subfolder of another type of folder. For example, suppose that you receive e-mail messages containing contact information. You can store these messages in a folder named, say, Contact Info. You then can store the Contact Info folder as a subfolder of Contacts. The type of data you can store in the subfolder is the type you originally established for that folder. (For example, when a mail-type folder becomes a subfolder of a contacts-type folder, neither folder changes its type.)
If you want to move or copy a folder to the root of the folder store, move or copy the folder to the topmost folder in the list (such as Personal Folders). If you use the Edit, Cut or Edit, Copy commands to move or copy, select the topmost folder and then choose Edit, Paste.
You can delete an Outlook 2007 folder the same way you delete a folder in Windows Explorer or My Computer. When you delete an Outlook 2007 folder, it’s removed from the Folder List and placed in the Deleted Items folder. This way, if you decide you want the folder back, you can retrieve it from the Deleted Items folder.
When you delete a folder, you delete the contents of the folder as well. The contents move with the folder to the Deleted Items folder and can be retrieved along with the folder later. (The items can be retrieved only until the Deleted Items folder is emptied.) You also can retrieve individual items from the Deleted Items folder, even if those items were deleted as part of a folder deletion. For example, if you delete a message folder named Project Alpha containing three messages, you can retrieve one, two, or all three messages individually without retrieving the Project Alpha folder. To retrieve a folder from the Deleted Items folder, click Deleted Items, and then select the folder to retrieve. Move that folder from the Deleted Items folder to its original location or to another location.
Although you can’t delete any of the default folders (the folders that Outlook 2007 provides), you can delete folders you’ve added.
To do so, follow these steps:
Folders have several properties that control the way they appear and function, as well as others that control archiving, administration, and other activities. To view or set these properties, open the Folder List, right-click the folder, and then choose Properties to open a Properties dialog box for the folder. The following sections explain the options on each of the tabs in the Properties dialog box.
You can use the General tab, shown in Figure 30-8, to locate information about a folder, name the folder, add a descriptive comment, and set other properties.

Figure 30-8. Use the General tab of a folder’s Properties dialog box to view information about the folder and set a few general properties.
The options on the General tab are described in the following list:
Name. In the top box, specify the name for the folder as you want it to appear in Outlook 2007.
Type. This read-only property specifies the type of content the folder contains.
Location. This read-only property specifies the location in the folder hierarchy for the selected folder.
Description. Use this box to type an optional description of the folder. The description appears only in the folder’s Properties dialog box.
Show Number Of Unread Items. Use this option with message folders to cause Outlook 2007 to display, in the Folder List and favorite folders pane, the number of unread messages in the folder. Outlook 2007 displays the folder name in bold if the item contains unread messages and includes the number of unread items in parentheses to the right of the folder name.
Show Total Number Of Items. Use this option with all folder types to show the total number of items in the folder. Outlook 2007 shows the folder name in bold if it contains items and displays the total number of items in parentheses to the right of the folder name. This option can be particularly useful with search folders to show the total number of items that match the search folder’s criteria.
When Posting To This Folder, Use. This drop-down list includes two selections. One is the default type of item you can store in the folder, such as Contacts for a contacts folder. The other is Forms. If you select Forms in the list, Outlook 2007 opens the Choose Form dialog box, shown in Figure 30-9. Here you can select the form that the folder should use for new items added to the folder. For example, you might want to use a custom appointment form for a calendar folder.
Automatically Generate Microsoft Exchange Views. Select this check box to have Outlook 2007 create views of public folders so that Microsoft Exchange Server users can view the folders.
Folder Size. Click this button to view information about the amount of space a folder and its subfolders use.
Clear Offline Items. The Clear Offline Items button removes all items from your offline store.

Troubleshooting
Assigning a form to a folder fails
The option to select Forms in the When Posting To This Folder, Use This drop-down list enables you to select a custom designed form (of the correct type) to control entry of items into the folder. There is a constraint, however—what you select when you choose Forms and then select a form type from the Standard Forms Library or Personal Forms Library has to match the object type of the folder. If you create a new mail folder, for example, the form selected has to also be of the IPM.Post type. Likewise, if you create a calendar folder, the form selected has to be of the IPM.Appointment type. If the type doesn’t match, you get an error message stating, "You cannot create an item of this type in this folder."
The Home Page tab lets you assign a Web page as the default home page for a folder, as shown in Figure 30-10. By default, the Address field is blank and the Show Home Page By Default For This Folder check box is not selected (which is different from how the tab appears in Figure 30-10). The Restore Defaults button resets the selections on the tab to the default values. Once a Web page is assigned, however, the Offline Web Page Settings button is enabled, to check for updates and download the selected pages for offline viewing.

Outlook’s AutoArchive feature automatically archives items after a specified period, which can help you avoid having folders cluttered with old messages, tasks, and so on. You configure archival properties on the AutoArchive tab of a folder’s Properties dialog box. For details, see "Configuring Automatic Archiving" in Chapter 31.
Outlook 2007 provides options for setting administration properties for each folder. To change these properties for a public folder, you must have owner permissions for that folder. In addition, for all but the Initial View On Folder option, you must be running Outlook 2007 with Exchange Server. The following options are available on the Administration tab:
Initial View On Folder. You can specify the view you see when you open a folder. Your choices are Normal, Group By Form, Group By Subject, Group By Conversation Topic, and Unread By Conversation. The default view is Normal.
Drag/Drop Posting Is A. This option lets you specify an item’s format when you drag the item to a public folder.
Add Folder Address To. You can choose to have Outlook 2007 add the folder address to your Personal Address Book. You can then send e-mail directly to the folder.
This Folder Is Available To. You can specify the users who can access the folder. You can select all users who have access permissions, or you can limit access to the owner.
Folder Assistant. While working online, you can modify processing rules for new items posted to the public folder.
Moderated Folder. This option allows you to select moderators for this moderated folder.
Folder Path. You can specify the location of the folder.
Outlook 2007 items are based on forms, which standardize how information is distributed to other users and stored in Outlook 2007. One example of a form is the contact form that Outlook 2007 provides when you create a new contact entry.
Note
For more information about forms, see Chapter 28.
On the Forms tab of the Properties dialog box, you can set or view the following form properties for a folder:
Forms Associated With This Folder. This item shows a list of forms in the Folder Forms Library associated with the folder. By default, this item is blank.
Manage. You can specify a form that you want to move to the Folder Forms Library, thereby listing it in the Forms Associated With This Folder list. You also can click Manage to set up a new form in the Folder Forms Library.
Description. Add a description of a form you select in the Forms Associated With This Folder list. You can change the description by clicking Manage, selecting the form, selecting Properties in the Forms Manager dialog box, and then changing the text in the Comments field in the Form Properties dialog box. Click OK twice to save your changes.
Allow These Forms In This Folder. You can specify the types of forms you allow in the folder. (The folder must be a public folder.) You can specify that only forms from this list (Only Forms Listed Above) be allowed in the folder, or you can specify that Forms Listed Above And The Standard Forms or Any Form be allowed in the folder. If you select the Forms Listed Above And The Standard Forms option, forms such as messages, tasks, and even documents (for example, Microsoft Office Word 2007 files or Microsoft Office Excel® 2007 worksheets) can be stored in the folder.
Note
If you run Outlook 2007 with Exchange Server 2003, your folders might have public folders set up by system administrators or others who have folder creation privileges. In that case, you can administer permissions properties for these folders using the Permissions tab. For information about folder permissions, see "Granting Access to Folders" in Chapter 35.
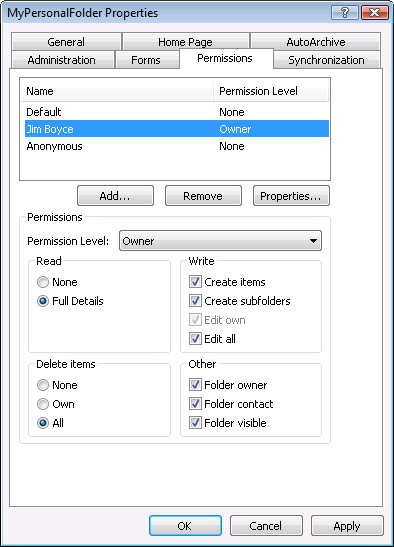
You can control access to folders in Outlook 2007 by selecting the Permissions tab and specifying the users that will be granted access and the type of access they will be granted. The default permissions provide full control to the owner of the folder, as shown in Figure 30-11, and assign no permissions to access or modify content to the Default and Anonymous groups. To add users to the Permissions list, click Add, and then select the user to include in the list. Once a user has been added, select the user, and use the drop-down list next to Permission Level to set the general permission level (Owner, Publishing Editor, Editor, Publishing Author, Author, Non-Editing Author, Reviewer, Contributor, or None). You can further refine the permission level by selecting options in the Read, Write, Delete Items, and Other areas.
The Synchronization tab lets you filter the content that is synchronized with a folder. To establish a filter, click Filter, and in the Filter dialog box, shown in Figure 30-12, configure the criteria that you want the filter to use when downloading new items. The Filter dialog box simply sets the filter criteria; it does not perform the synchronization. To synchronize folder content, click on Send/Receive on the Standard toolbar.

The Contacts folder has additional properties that you can control. When configuring properties for a Contacts folder, you can set the following address book options on the Outlook Address Book tab:
Show This Folder As An E-Mail Address Book. Select this option to have Outlook 2007 display contacts in a way that lets you select e-mail addresses from the Address Book dialog box. (This is automatically selected for the default Contacts folder.)
Name Of The Address Book. Specify the address book name.
You can also configure the default view for the activity items linked to a contact in the Contacts folder by using the Activities tab of the folder’s Contacts Properties dialog box, shown in Figure 30-13. Selecting an option in the Default Activities View drop-down list causes the selected view to appear by default when you click the Activities button in the Show group of a contact. You can also select additional folders that can be chosen dynamically or selected by default for display on a contact’s Activities page.

Figure 30-13. Use the Activities tab settings to set the default view that appears on a contact’s Activities page.
The options on the Activities tab are listed here:
Folder Groups. You can select the group of folders that might contain activities related to contacts.
Copy, Modify, Reset, New. Click the appropriate button to add folder groups to or modify folder groups in the Folder Groups list.
Default Activities View. You can select the default view that appears on the Activities tab of a contact form when you open a contact entry. The other options (that are not the default) can be selected in the Show drop-down list on the contact’s Activities page.