
Chapter 8. Software Upgrade
You receive a bug report that in one of your instant messaging (IM) servers, the euro symbol is reaching its final destination in a garbled form. You find the error in the library module that maps special characters, correct the bug, recompile the code, and test it. When it’s validated, you transfer the patch to the live servers and load it in the Erlang runtime system. The next time a euro symbol is received, the patched module will be used and the euro symbol will be mapped correctly.
You achieve all of this without strange or complex workarounds, without having to restart your system, and most importantly, without affecting any of the other IM-related events currently being handled. If all of this sounds simple, well, it is. And not only is it simple, but it is also really, really cool! Originally inspired by the Smalltalk language, the software upgrade capability is a feature very rarely found in modern programming.
The ability to load new and updated modules during runtime allows systems to run without interruption, not only when errors are being fixed but also when new functionality is added. It also reduces the turnaround time of bugs and facilitates testing, as in most cases, systems do not have to be restarted for patches to be validated and deployed. The software upgrade mechanism relies on a set of simple but powerful constructs on which more powerful tools are built. These upgrade tools are used in pretty much every Erlang-based system where downtime has to be reduced to a minimum.
Upgrading Modules
You have probably come across the loading of new module versions in the
runtime system when trying the examples and working on the exercises in
this book without realizing what was going on. Think of the incremental
approach to software development that we use in Erlang; we’ll go through a
short case study to show update in
practice next, before we cover the details of how it works and other
code-handling features of Erlang in the rest of the chapter.
We start by writing a database module similar to the one described
in Exercise 3-4 in Chapter 3. We will use the
key value dictionary store defined in the dict module to create a
bit of variety, and to have the excuse to introduce a new library. Have a
look at its manual page. We want to create a module that exports two
functions: create/0, which returns
an empty database; and write/3, which inserts a
Key and Element pair into the database.
The code is described in the db module. Remember the
–vsn(1.0) attribute we discussed in
Chapter 2? Even if it is not mandatory, it will help
us keep track of which module version we have loaded in the runtime system
at any point:
-module(db).
-export([new/0,write/3,read/2, delete/2,destroy/1]).
-vsn(1.0).

new()                -> dict:new().

write(Key, Data, Db) -> dict:store(Key, Data, Db).

read(Key, Db) ->
  case dict:fetch(Key, Db) of
    error      -> {error, instance};
    {ok, Data} -> {ok, Data}
  end.

delete(Key, Db) -> dict:erase(Key, Db).

destroy(_Db)    -> ok.
Let’s now compile and test the code we wrote by adding two elements
to the database and looking up one that has not been inserted. The data
structure returned by the dict module
might appear strange at first. It is visible here because we are testing
the module from the shell and
binding the value to a series of variables we pass to the dict functions. In a normal implementation, the
Db variable would be passed around in
the receive-eval loop data, and it would not be
visible:
1>c(db).{ok,db} 2>Db = db:new().{dict,0,16,16,8,80,48, {[],[],[],[],[],[],[],[],[],[],[],[],[],[],[],[]}, {{[],[],[],[],[],[],[],[],[],[],[],[],[],[],[],[]}}} 3>Db1 = db:write(francesco, san_francisco, Db).{dict,1,16,16,8,80,48, {[],[],[],[],[],[],[],[],[],[],[],[],[],[],[],[]}, {{[],[],[],[],[],[],[],[],[],[],[],[],[],[],[], [[francesco|san_francisco]]}}} 4>Db2 = db:write(alison, london, Db1).{dict,2,16,16,8,80,48, {[],[],[],[],[],[],[],[],[],[],[],[],[],[],[],[]}, {{[],[],[],[],[],[],[],[],[],[],[],[],[],[], [[alison|london]], [[francesco|san_francisco]]}}} 5>db:read(francesco, Db2).** exception error: no case clause matching san_francisco in function db:read/2 6>dict:fetch(francesco, Db2).san_francisco
Hold it! Something went wrong. When calling read/2, instead of returning {ok, san_francisco}, we got a case clause error. Looking at our implementation
and the manual page for the dict module, we quickly
realize that we used dict:fetch/2
instead of dict:find/2. A call directly
to dict:fetch/2 confirms that the
function returns Data (not {ok, Data}) if the entry is in the dictionary,
and raises an exception otherwise. The dict:find/2 function, on the other hand, returns
the tuple {ok, Data} if it finds the
entry, or the atom error
otherwise.
Let’s fix the bug, replacing the read function with the
following code, and while doing so, bump up the version of this module to
1.1:
...
-vsn(1.1).
...
read(Key, Db) ->
  case dict:find(Key, Db) of
    error      -> {error, instance};
    {ok, Data} -> {ok, Data}
  end.
...
Before doing anything with the shell, let’s use the module_info/0 function
to get the version of the code, which is 1.0. We’ll save the corrections
to the db module, compile it in the
same shell where we ran the previous iteration, and continue testing the
module with the same entries we previously inserted in the database. The
call to read/2 now works, and when we
do a call to module_info/1, we get the
new module version in the attribute list:
7>db:module_info().[{exports,[{new,0}, {write,3}, {read,2}, {destroy,1}, {delete,2}, {module_info,0}, {module_info,1}]}, {imports,[]}, {attributes,[{vsn,[1.0]}]}, {compile,[{options,[{outdir,"/Users/Francesco/"}]}, {version,"4.5.2"}, {time,{2008,8,11,3,9,42}}, {source,"/Users/Francesco/db.erl"}]}] 8>c(db).{ok,db} 9>db:read(francesco, Db2).{ok,san_francisco} 10>db:read(martin, Db2).{error,instance} 11>db:module_info(attributes).[{vsn,[1.1]}]
In our example, we fixed a bug, but we instead could have added new
functionality, or possibly done both. So, although you might not have
realized it, when developing and testing our code, we were actually using
the software upgrade functionality. When doing so, the data stored by the
process (in our example, the data in the Db variables of the shell) was not affected by
the upgrade and was still available after loading the new module.
Behind the Scenes
So, how does the software upgrade feature work behind the scenes? At any one time, two versions of a module may be loaded in the runtime system. We call them the old and the current versions. Before we explain the details of software upgrade, we’ll quickly go over the ways in which functions in one module can refer to functions in another.
You might not remember, but function calls of the following format:
Module:Function(Arg1, .., ArgN)where the
modulename is prefixed to an exportedFunctionname, are usually referred to as fully qualified function calls. This is one of the ways in which a function in one module (A, say) may refer to a function defined in another (let’s call itB).The other mechanism by which module
Acan refer to functions in moduleBis forAto import some of the functions ofB:-import(B, [f/1]).
Within
Ait is then possible to refer directly tof, as well as toB:f.
Within a module, it is possible to refer to another function in the same module either directly or by a fully qualified name. We’ll come back to this distinction shortly.
Now we’ll explain the software upgrade process, first for intermodule calls, and then for intramodule calls. Each
running process that refers to functions in module A will be linked to a version of module A. When a new version of module A is loaded, that becomes the
current version, and the previous current version
becomes the old version.
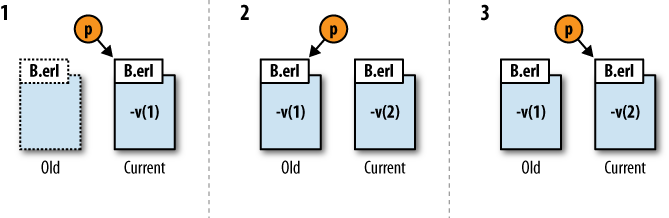
If a process p, defined in module
A, calls a function from module
B, either directly or by a fully
qualified call (see Figure 8-1, 1), and a new
version (version 2) of module B is
loaded, the process will remain linked to the same version of B, which has now become the old version of
B (see Figure 8-1, 2). At the next call of a function from
B, either directly or in fully
qualified form, the link will be switched to the new version, version 2
(see Figure 8-1, 3). This will apply to all
functions from B, and not simply the
function whose call initiated the switch.
The case of a running process whose defining module is upgraded is more complicated, and in particular, it depends on the way in which functions within the module are called, either directly or through fully qualified calls:
If the function call is not fully qualified, the process will continue running the old version of the module.
When a new version is loaded, however, global calls to the old module are no longer possible, whereas local calls can be made only by processes in a recursive loop.
To show this in more detail, let’s look at an example module and the effect of software upgrade on it:
1  -module(modtest2).
2
3  -export([main/0,loop/0,a/1,do/1]).
4
5  main() ->
6   register(foo,spawn(modtest2,loop,[])).
7
8   loop() ->
9     receive
10     {Sender, N} ->
11       Sender ! a(N)
12    end,
13    loop().
14
15   do(M) ->
16    foo ! {self(),M},
17    receive Y ->
18      Y
19    end.
20
21   a(N) -> N+2.
The main program spawns a named process, foo, which runs the loop() function. The effect of this loop is to
serve values of the function a/1:
values are sent to the loop process by
the do/1 function. Here is an example
of the program:
1>c(modtest2).{ok,modtest2} 2>modtest2:main().true 3>modtest2:do(99).101
Suppose you now upgrade the definition of a/1 in line 21 to the following:
a(N) -> N.
and recompile; the effect is as follows:
4>c(modtest2).{ok,modtest2} 5>modtest2:do(99).101
So, it is evident that no change has occurred. If, on the other
hand, you modify the call a(N) to a
fully qualified call, as in the following:
loop() ->
  receive
    {Sender, N} ->
      Sender ! modtest2:a(N)
  end,
  loop().
the effect of the same software upgrade will be evident after recompilation:
6>c(modtest2).{ok,modtest2} 7>modtest2:do(99).99
As a final example, it is possible to upgrade a running loop, when the recursive call is fully qualified:
loop() ->
  receive
    {Sender, N} ->
      Sender ! a(N)
  end,
  modtest2:loop().
If you insert a print statement:
loop() ->
  receive
    {Sender, N} ->
      Sender ! a(N)
  end,
  io:put_chars("boo!~n"),
  modtest2:loop().
you can see the effect of the change in the following interaction:
1>c(modtest2).{ok,modtest2} 2>modtest2:main().true 3>modtest2:do(99).101 4>c(modtest2).{ok,modtest2} 5>modtest2:do(99).101 6>modtest2:do(99).boo! 101
In our earlier database example, we were always running the latest
version of the db module, because all
calls from the shell to the library were fully qualified.
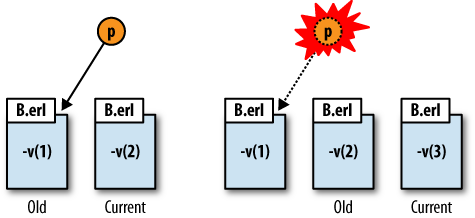
As only two versions of a module may exist in the runtime system at any one time, when a third version is loaded the oldest version is purged (removed) and the current version becomes the old version, as shown in Figure 8-2. Any process running the oldest version of the purged module is terminated. Any process running what has now become the old version will continue doing so until it executes a fully qualified function call.
Loading Code
Code is loaded in the Erlang runtime system in a variety of ways. The first is by calling a function in a module that has not yet been loaded. The code server, a process which is part of the Erlang kernel, will search for the compiled (.beam) file of that module, and if it finds it, it will load it; note that it is not compiled automatically if the beam file is missing. The process that made the call to that module is now able to call the function.
Another way to load a module is by compiling
it. You can use the c(Module) shell
command, the function compile:file(Module), or one of its many
derivatives, all documented in the compile library module.
In our example, we loaded the latest version of the db module in the shell every time it was
compiled.
Finally, you can explicitly load a module
using the code:load_file(Module)
call. This call is useful because it can appear in programs as well as
being used from the shell. From the shell, however, you can use the
equivalent shell command l(Module).
All of these calls result in the oldest version of the module (if
any) being purged, the current version becoming the old one, and the
newly loaded one becoming the current one. Note that the terms
old and current refer not to
the compilation time or to a higher revision in the vsn attribute, but to the order in which you
loaded the modules in the runtime system.
There are also a number of ways to see whether a module is already loaded:
Try typing in part of the module name in the Erlang shell and pressing the Tab key; if the name autocompletes, the module is loaded.
Just pressing the Tab key will list all the modules currently loaded.
Another way to find out whether a module is loaded is to call the function
code:is_loaded(Module), which returns the location of the beam file if theModuleis already loaded; otherwise, it returns the atomfalse.
The Code Server
We briefly mentioned the code server in the preceding
section. Here, we’ll look at it in more detail. The code server’s
primary task is to manage the dynamic loading and purging of modules. A
set of library functions accessible in the code.erl module
provide the programmer with the flexibility needed to manage and
configure the server to handle the system’s code base.
Loading modules
The dynamic loading of code in Erlang will be triggered as a
result of a call to a module that is not loaded, or when it is
explicitly requested to do so through the code:load_file/1
call. The code server will search the directories in the
code search path for a compiled version of the
module, and when the code server finds it, it will load it in the
virtual machine.
The code search path consists of a list of directories. These
directories are sequentially searched for the compiled version of the
module you want to load. Try viewing the default search paths of the
runtime system by using the code:get_path()
call. Default directories will include the current working directory
together with all of the paths to the default library applications
which come as part of the Erlang/OTP distribution. You can find all of
these library applications in the $ERLANGROOT/lib directory. To find out the
Erlang root directory of your installation, use the code:root_dir()
call.
In your code search path, you might have several versions of the same module. When you load a new version, the directories are scanned sequentially, resulting in the first occurrence of the module being picked up. It is thus not uncommon to create a patches directory that appears first in the code search path. Any patches in this directory will be picked up first, overriding the original versions of the module they were trying to patch.
Manipulating the code search path
You can add directories to the code search path by using code:add_patha(Dir)
to add a directory to the beginning of the list, and code:add_pathz(Dir)
to append one to the end. In the following example, note how the
current working directory becomes the second element. The code module
also provides functions to delete, replace, and override
directories:
3>code:add_patha("/tmp").true 4>code:get_path().["/tmp",".","/usr/local/lib/erlang/lib/kernel-2.12.3/ebin", "/usr/local/lib/erlang/lib/stdlib-1.15.3/ebin", "/usr/local/lib/erlang/lib/xmerl-1.1.9/ebin", "/usr/local/lib/erlang/lib/wx-0.97.0718/ebin", "/usr/local/lib/erlang/lib/webtool-0.8.3.2/ebin", "/usr/local/lib/erlang/lib/typer-0.1.3/ebin", ...............]
In the example, we show just some of the library module
directories. Try the command on your machine, and cd into any of the listed directories. When
inspecting the contents, you should find all of the beam files
relating to that particular application.
The explanation in the preceding text of how the code server
looks for modules will hopefully explain why you had to change the
current working directory of the Erlang shell to the directory that
contained your beam files. From the code:get_path/0
example, unless you have modified the code search path structure, you
can see that the current working directory (.) is the first directory the code server
searches when trying to load a module. Finally, you can also add
directories when starting the Erlang shell by passing the erl –pa Path or erl
–pz Path directive to the erl command to add the directory at the
beginning (a) or end (z) of the path.
Purging Modules
The code server can get rid of or purge old versions
of a module by calling code:purge(Module),
but if any processes were running that code, they will first be
terminated, after which the old version of the code is deleted. The
function returns true if any
processes were terminated as a result of the call or false otherwise.
If you do not want to terminate any processes running the old
version of the code, use code:soft_purge(Module). The call will remove
the old version of the module only if there are no processes running the
code. If any processes are still running the code, it will return
false and will do nothing else. If it
was successful in deleting the old module, it will return true.
The OTP framework, which we cover in Chapter 12, provides a supervisor mechanism that is designed to deal with process termination in an organized way; an obvious application of this sort of supervision is for processes that terminate after a software upgrade.
Upgrading Processes
Now that we have looked at software upgrade in more detail, let’s go through a practical example where the format of loop data needs to be changed in a running loop.
We implement a db_server module that
provides a process storing the database in the dictionary format used by
version 1.1 of the db module. Alongside the
exported client functions, pay particular attention to the upgrade/1 function. We
will tell you more about it in just a second.
-module(db_server).
-export([start/0, stop/0, upgrade/1]).
-export([write/2, read/1, delete/1]).
-export([init/0, loop/1]).
-vsn(1.0).

start() ->
  register(db_server, spawn(db_server, init, [])).

stop()->
  db_server ! stop.

upgrade(Data) ->
  db_server ! {upgrade, Data}.

write(Key, Data) ->
  db_server ! {write, Key, Data}.

read(Key) ->
  db_server ! {read, self(), Key},
  receive Reply -> Reply end.

delete(Key) ->
  db_server ! {delete, Key}.

init() ->
  loop(db:new()).

loop(Db) ->
  receive
    {write, Key, Data} ->
       loop(db:write(Key, Data, Db));
    {read, Pid, Key} ->
       Pid ! db:read(Key, Db),
       loop(Db);
    {delete, Key} ->
       loop(db:delete(Key, Db));
    {upgrade, Data} ->
      NewDb = db:convert(Data, Db),
      db_server:loop(NewDb);
    stop ->
      db:destroy(Db)
  end.
The upgrade function takes a
variable as an argument and forwards it on to the db_server process. This variable is passed to
the db:convert/2 function,
which returns the database in a possibly updated format. The convert/2 function was not included in version
1.1 of the db module, as all we did was
fix a bug that did not require us to change the internal format of the
data. Read through the db_server code
and make sure you understand it. If anything is unclear, copy it and test
it from the shell, and read the manual pages for the dict library.
Let’s now create a new db module,
this time basing it on general balanced trees, using the gb_trees library module.
When implementing it, we include a convert/2 function.
Given the data structure returned by the dict module, this
function extracts all of the elements from the dictionary and inserts them
in a binary tree, returning a data structure that the gb_trees module can now use:
-module(db).
-export([new/0, destroy/1, write/3, delete/2, read/2, convert/2]).
-vsn(1.2).

new() -> gb_trees:empty().

write(Key, Data, Db) -> gb_trees:insert(Key, Data, Db).

read(Key, Db) ->
  case gb_trees:lookup(Key, Db) of
    none         -> {error, instance};
    {value, Data} -> {ok, Data}
  end.

destroy(_Db) -> ok.

delete(Key, Db) -> gb_trees:delete(Key, Db).

convert(dict,Dict) ->
  dict(dict:fetch_keys(Dict), Dict, new());
convert(_, Data) ->
  Data.

dict([Key|Tail], Dict, GbTree) ->
  Data = dict:fetch(Key, Dict),
  NewGbTree  = gb_trees:insert(Key, Data, GbTree),
  dict(Tail, Dict, NewGbTree);
dict([], _, GbTree) -> GbTree.
We can now perform an upgrade from version 1.1 to version 1.2 of the
db module, changing the internal format
of the db_server loop data. To do so,
we need a patches directory at the
top of the code search path. We start the Erlang runtime system using the
–pa patches flag (or add the directory
dynamically using code:add_patha/1). Next,
we place the compiled 1.2 version of the db module in the patches directory. Finally, we load the new
db module, (soft) purge the old one,
and call the upgrade client function.
Example 8-1 shows the interaction in
full.
1>cd("/Users/Francesco/database/")./Users/Francesco/database ok 2>make:all([load]).Recompile: db Recompile: db_server up_to_date 3>db:module_info().[{exports,[{new,0}, {write,3}, {read,2}, {destroy,1}, {delete,2}, {module_info,0}, {module_info,1}]}, {imports,[]}, {attributes,[{vsn,[1.1]}]}, {compile,[{options,[]}, {version,"4.5.2"}, {time,{2008,8,11,16,34,48}}, {source,"/Users/Francesco/database/db.erl"}]}] 4>db_server:start().true 5>db_server:write(francesco, san_francisco).{write,francesco,san_francisco} 6>db_server:write(alison, london).{write,alison,london} 7>db_server:read(alison).{ok,london} 8>db_server:read(martin).{error,instance} 9>code:add_patha("/Users/Francesco/patches").true 10>code:load_file(db).{module,db} 11>code:soft_purge(db).true 12>db_server:upgrade(dict).{upgrade,dict} 13>db:module_info().[{exports,[{new,0}, {write,3}, {read,2}, {destroy,1}, {delete,2}, {convert,2}, {module_info,0}, {module_info,1}]}, {imports,[]}, {attributes,[{vsn,[1.2]}]}, {compile,[{options,[{outdir,"/Users/Francesco/patches/"}]}, {version,"4.5.2"}, {time,{2008,8,11,16,30,33}}, {source,"/Users/Francesco/patches/db.erl"}]}] 14>db_server:write(martin, cairo).{write,martin,cairo} 15>db_server:read(francesco).{ok,san_francisco} 16>db_server:read(martin).{ok,cairo}
The server is still up and running, with the same key-element data,
but stored in a different format and using an upgraded version of the
db module. It is as simple as that,
and, as you can see, extremely powerful.
Other important issues to keep in mind when doing a software upgrade include nonbackward-compatible modules, functions for downgrading in case an upgrade fails, and synchronizing upgrades in distributed environments. Although the basics of upgrading your code in runtime are very simple, if your system is complex and upgrades are major, your routines and procedures might not be as simple. Make sure you test the upgrade steps thoroughly and cover all potential scenarios. The SASL application, part of the OTP middleware, has complex tools for handling software upgrades built on the principles we just covered.
The .erlang File
It is time to introduce the .erlang file. This file is placed in the user’s home directory or in the Erlang root directory. It should contain valid Erlang expressions, all of which are read and executed at startup. It is useful for setting paths to the modules and tools of the development environment you are using. For example:
code:add_patha("/home/cesarini/patches").
code:add_patha("/home/cesarini/erlang/buildtools-1.0/ebin").
You also could use the .erlang file for configuration or startup purposes. We will provide more examples in Chapter 11.
Exercise
Exercise 8-1: Software Upgrade During Runtime
Take this chapter’s db.erl module,
based on general balanced trees, and add an extra function
called code_upgrade/1. This function
will take a database of the format used in the lists version of the
database from Chapter 3, Exercise 3-4. It
should create an ETS table and store in it all the elements passed to
it. Its return value should be the table that is created.

Interface:
db:code_upgrade([RecordList]) -> gb_tree().
Test the function in the shell, and place the beam and source code files in a subdirectory called patches. In part 2 of this exercise, continue working in your current working directory where you have stored the
db.erlmodule that uses lists. Be careful with the different compiled versions of the two modules so that you do not mix them up.Add the client function
code_upgrade()to themy_db.erlserver module. This function should send a message to the server which will load the newdbmodule, call thedb:code_upgrade/1function with the old database, and then continue looping with the new ETS database representation, as shown in Figure 8-3. After the code upgrade, all the data that was there prior to the operation should still be available, and the client should be able toinsert,delete, and do queries on elements as though nothing has happened.Test your program by starting it using the lists version of the
dbmodule. Insert a few elements in the database and switch over to the tree version of thedbmodule. To switch over to the new version, you must first load it into the system. (In larger systems, there will be tools to handle upgrades. As this database server is of more modest proportions, you can load it manually.) Once the ETS version of thedb.erlmodule has been loaded, callmy_db:code_upgrade(). Read the elements, write some new ones, and delete the old ones. Make sure the server is stable.
The following interaction gives an example of this in action:
1>my_db:start().ok 2>my_db:write(bob, handyman).ok 3>my_db:write(chris, projectleader).ok 4>my_db:read(bob).{ok,handyman} 5>code:add_patha("/home/cesarini/erlang/patches/").true 6>my_db:code_upgrade().ok 7>my_db:read(bob).{ok,handyman} 8>my_db:delete(bob).ok 9>my_db:write(bob, manager).ok 10>code:soft_purge(db).true