Whatever light you may encounter, the EOS 7D can deliver accurate and pleasing color.
Great color does not come without any effort from the photographer. But with a few adjustments, you can fine-tune color for any scene, regardless of light, and get excellent color from the 7D.
To set the stage for getting great color, it helps to know that there are three settings on the 7D that affect image color: Color Space, White Balance, and Picture Style.

Color space. This determines the breadth of colors that are captured in images. Some color spaces encompass a broad range of colors, and others encompass fewer colors. Choosing a color space also factors into the overall image workflow because it provides a color space that can be used not only for capture an image but also for editing and printing images. The Color Space option is one that most photographers set at once and seldom change.
White Balance setting. This setting is what gets the image color accurate. To get accurate color, the camera must know what kind of light is in the scene. The White Balance setting gives the camera that information so that the camera can, in turn, adjust colors correctly. The White Balance setting is one that changes each time the light in the scene changes.
Picture Styles. These determine whether the image colors are vivid and saturated, or less vivid and more subdued, and they affect image sharpness and contrast. How often you change the Picture Style depends on your preferences and the type of scene or subject that you are photographing.
Each of these settings plays a unique role in determining image color. The following sections provide more detail on using these settings in every day shooting.
A color space defines the range of colors, or gamut, that can be reproduced, and the way that a device such as a digital camera, monitor, or printer reproduces color. In very simple terms, color spaces encompass large to smaller ranges.
When an image moves from a large color space to a smaller color space, the device, a computer or printer, for example, must decide which colors to keep and which to alter or throw out. I want to get all the 7D image data possible, which is, after all, why I bought a high-resolution camera like the 7D, and so I avoid settings that discard image data, including color. And using the same color space on the camera, in your image-editing program, and on the printer helps lessen the changes that colors will be lost or altered in color-space conversions.
The 7D has two color space choices: Adobe RGB and sRGB. Adobe RGB is a color space that supports a wider gamut of colors than sRGB. And, as is true with all aspects of image capture, the more data you capture in the camera, the richer and more robust the image will be. And the more robust the file, the better it can withstand image editing.
Another important consideration when choosing color space is that the 7D has 14-bit files. That translates to color-rich image files that have 16,384 colors for each of the three color channels (Red, Green and Blue) when you shoot in RAW capture. (In contrast, 8-bit files offer only 256 values per color channel.) And even if you shoot JPEG, which automatically converts 14-bit files to 8-bit files in the camera, the conversion to 8-bit files is better because it is based on color-rich, 14-bit files.
Note
The 7D's 14-bit RAW files can be processed in a conversion program, such as Adobe Camera Raw or Lightroom, as 16-bit files that offer robust color data, subtle tonal gradations, and a higher dynamic range.
To illustrate the difference between color spaces, consider Figures 4.1 and 4.2. They show the effect that changing color space has on an image histogram.
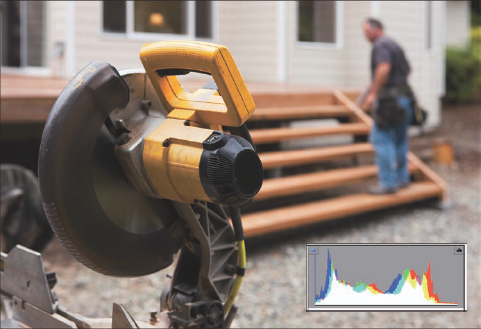
Figure 4.1. This is a RAW image with its histogram as displayed in Adobe Camera Raw. Here the image is shown in the Adobe RGB color space. Exposure: ISO 100, f/4.5, at 1/50 second.
A spike on the right side of the histogram indicates image data that will be clipped or discarded from the image. The higher the spike on the far left and right sides of the histogram, the more color data that will be clipped. Ideally, you do not want colors to clip, or at the very least, you want to reduce clipping as much as possible. The larger the color space, the less clipping that occurs.

Figure 4.2. This is the same image with the histogram as displayed in Adobe Camera Raw and with the color space set to sRGB.
While Adobe RGB is a great color space for capturing a wide range of colors, it isn't the color space that provides the best image color for online display. In fact, when you view an image that's in the Adobe RGB color space outside of an image-editing program or online, the image colors look dull and flat. For online display, the sRGB color space provides the best color. Another important consideration is that some commercial services require the sRGB color space for printing.
For those who shoot RAW, the process is to capture images in Adobe RGB and then convert to sRGB after the images are converted, edited, and sized for Web display. For example, I use Adobe RGB for capture, editing, and printing. And when I need an image for online display, I make a copy of the image and then convert it to sRGB in an editing program such as Adobe Photoshop.
Here are some things to consider when choosing a color space:
You can choose a color space when you are shooting in P, Tv, Av, M, and B shooting modes, and the color space you choose is used for both JPEG and RAW files.
In P, Tv, Av, M, and B shooting modes, files shot with Adobe RGB are appended with _MG.
The 7D does not embed the ICC profile in files. You can embed the ICC profile in Adobe Photoshop 6.0 or later. An ICC profile can be read by monitors and printers that support ICC profiles so that colors are consistent when viewed and printed on different devices.
Note
ICC is an abbreviation for International Color Consortium, an organization that promotes the use and adoption of open, vendor-neutral, cross-platform color management systems.
To choose a color space, follow these steps:
Set the Mode dial to P, Tv, Av, M, or B, and then press the Menu button.
Turn the Main dial to highlight the Shooting 2 menu.
Turn the Quick Control dial to highlight Color space, and then press the Set button. The sRGB and Adobe RGB options appear.
Turn the Quick Control dial to highlight the option you want, and then press the Set button. The color space you choose remains in effect until you change it.
For great out-of-the-camera color, choosing the correct White Balance setting for the light that's in the scene is the best and fastest way to get it. A White Balance setting tells the camera what the color or temperature of the light in the scene is so that the camera accurately reproduces the colors in the scene. The 7D offers seven White Balance settings, including preset options for common light sources, in addition to a Custom White Balance option to set the light temperature to the specific light in the scene, and an option to set a specific color temperature.
Your choice of White Balance options may be affected by the amount of time you have to shoot a scene, the type and consistency of light, and whether your shoot RAW or JPEG capture. Here are some approaches for setting white balance:
Use a preset White Balance option. A preset White Balance setting is a good choice when there is a single light source in the scene that clearly matches one of the preset White Balance options. The preset White Balance options, including Daylight, Cloudy, Fluorescent, and Flash, have good color accuracy and saturation.
You can set the white balance in P, Tv, Av, M, and B shooting modes. However, in Full Auto and Creative Auto shooting modes, the 7D automatically sets the white balance, and you cannot change it. If you are new to using white balance, Figures 4.3 and 4.4 illustrate the difference it makes to have the correct white balance set.
Set a Custom white balance. A Custom white balance sets image color for the specific light in the scene, whether it's a single light source or mixed light. This is the option to use with mixed lighting and when the light source doesn't clearly match one of the preset White Balance options. Setting a Custom white balance takes more time, but it provides very accurate color, and it is worth the extra steps when you are shooting a series of images in the same light, especially if you are shooting JPEG.
If you are shooting RAW, then shooting a white or gray card and balancing images during RAW image conversion is often faster than setting a Custom white balance.
Set a specific color temperature. With this option, you set the specific light temperature on the 7D. This is good for studio shooting when you know the temperature of the strobes or continuous lights. And if you are fortunate enough to have a color-temperature meter, setting the specific color temperature is a good option.


To change to a preset White Balance option such as Daylight, Tungsten, Shade, and so on, follow these steps:
Set the Mode dial to P, Av, Tv, M, or B, and then press the WB-Metering mode button above the LCD panel. The White Balance screen appears.
Turn the Quick Control dial to select a White Balance setting. The White Balance settings are shown with icons that represent different types of lights. The White Balance option that you set remains in effect until you change it or until you switch to CA or Full Auto shooting modes.
Note
Setting a Custom white balance and shooting a white or gray card are similar techniques. The main difference is that you set a Custom white balance while you are shooting. When you shoot a white or gray card, you set the white balance during RAW image conversion on the computer.
Setting a Custom white balance adjusts image color precisely for the light that is in the scene. Thus a Custom white balance is the ticket for getting the most accurate color in scenes with a mix of different types of light, and in scenes where the light doesn't match any of the preset White Balance settings. You can set a Custom white balance in P, Tv, Av, M, and B shooting modes.
By now, you may be asking why you can't just use Auto White Balance (AWB) for all images, particularly in mixed light. Certainly AWB works well for many scenes, but it is not as accurate as Custom white balance, nor is the color as visually pleasing in scenes where a preset White Balance setting clearly matches the light in the scene.
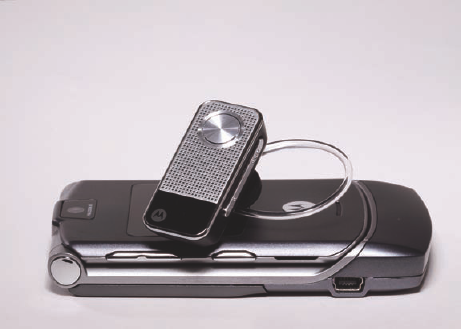
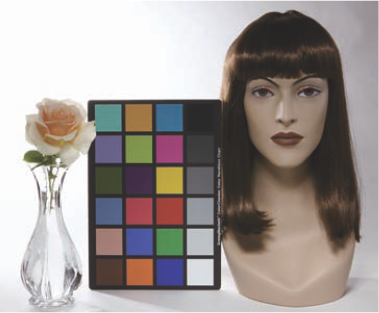
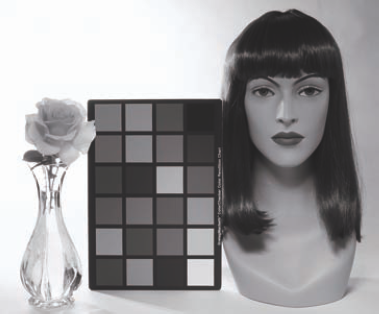
Figure 4.5. This phone and Bluetooth remote were shot for stock submission. In this image, I used studio strobes and set the White Balance setting to Flash. I wanted a neutral gray with no warm overtones, which the color has in this image. Exposure: ISO 100, f/20, at 1/125 second.
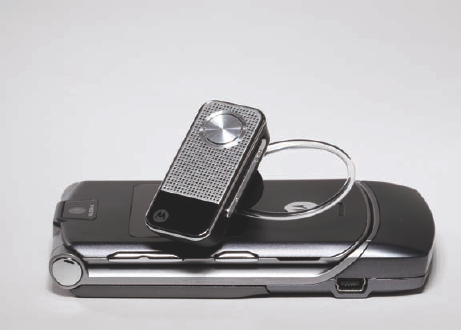
Figure 4.6. In this image, I used a Custom white balance, and the color is neutral and accurate. Exposure: ISO 100, f/20, at 1/125 second.
The following steps show you how to set a Custom white balance. A word of caution is in order, though. You must complete all of these steps to ensure the Custom white balance is used by the camera. Most photographers who are new to this technique forget to complete step 8, in particular.
Set the camera to P, Av, Tv, M, or B, and ensure that the Picture Style is not set to Monochrome. To check the Picture Style, press the Picture Style button on the back of the camera. The Picture Style screen displays. To change from Monochrome, turn the Quick Control dial to select another style, and then press the Set button.
It's best to have the white balance set to anything except Custom white balance when you begin these steps.
In the light that will be used for the subject, position a piece of unlined white paper so that it fills the center of the viewfinder, and take a picture. If the camera cannot focus, switch the lens to MF (manual focusing) and focus on the paper. Also ensure that the exposure is neither under exposed nor overexposed, such as by having Exposure Compensation set.
Press the Menu button, and then turn the Main dial to highlight the Shooting 2 tab.
Turn the Quick Control dial to highlight Custom WB, and then press the Set button. The camera displays the last image captured (the white piece of paper) with a Custom White Balance icon in the upper-left corner of the display. If the image of the white paper is not displayed, turn the Quick Control dial until it is.
Press the Set button again. The 7D displays a confirmation screen asking if you want to use the White Balance data from this image for the Custom white balance.
Turn the Quick Control dial to choose OK, and then press the Set button. A second screen appears, reminding you to set the white balance to Custom.
Press the Set button one last time, and then press the Shutter button to dismiss the menu. The camera imports the white balance data from the selected image and returns to the Shooting 2 menu.
Press the Metering Mode-WB button above the LCD panel, and then turn the Quick Control dial to select Custom White Balance. The Custom White Balance icon is denoted by two triangles on their sides with a black square between them. The Custom white balance remains in effect until you change it by setting another white balance.
When you finish shooting in the light for which you set the Custom white balance, be sure to reset the White Balance option.
Anytime you know the color temperature of the light in the scene, you can set that temperature using the K White Balance option. For example, I know that the temperature of my studio lights is 5300K, and so I use the K White Balance setting to set this temperature. I can continue shooting without further adjustments to the white balance because the light temperature remains constant.
If you have a color temperature meter, you can set the specific color temperature on the 7D. You can set a color temperature in the range of 2500 to 10,000K in 100K increments.
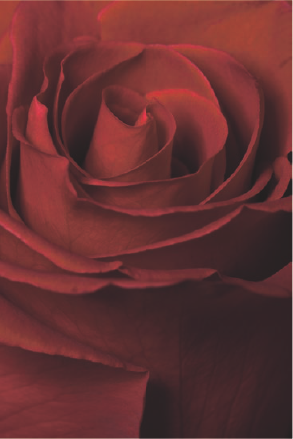
Figure 4.7. In this image, I used the K White Balance setting and set the color to 5300K to match the temperature of my studio strobes. Exposure: ISO 100, f/14, at 1/125 second.
Here is how to set a specific color temperature for the K White Balance setting:
With the camera set to P, Tv, Av, M, or B, press the Menu button.
Turn the Main dial to highlight the Shooting 2 tab, and then turn the Quick Control dial to highlight White Balance.
Press the Set button. The White Balance screen appears.
Turn the Quick Control dial to highlight the K 5200 option. If you have previously changed the temperature for the K setting, the screen reflects the last used temperature.
Turn the Main dial to the left to decrease the color temperature number or to the right to increase it, and then press the Set button. The Shooting 2 menu appears, with the white balance K temperature you set displayed.
If you use a color temperature meter, you may need to do some testing to adjust readings to compensate for differences between the camera's temperature settings and the meter's reading. And if you are setting a known temperature for a venue light, you may need to modify the white balance toward magenta or green using White Balance Correction, which is described in the next section.
With the range of different types of lights both for household use and commercial use, it can be difficult to get color that is accurate. And even in images where the color is accurate, you may want a warmer or cooler rendering than a preset White Balance option provides. To compensate for differences in specific light temperatures and to fine-tune a preset White Balance setting, you can use one of two options: White Balance Auto Bracketing or White Balance Correction.
Both options enable you to bias image color in much the same way that a color-correction filter does when you are shooting film.

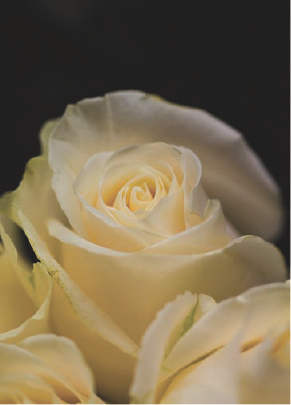
Figure 4.8. This and the next two images were shot with window light and a silver reflector to camera left. I used the Auto White Balance setting and set White Balance Auto Bracketing at a +3 level. This is a standard white balance image with no color bias. Exposure: ISO 100, f/2.8, at 1/200 second.
White Balance Auto Bracketing biases the color toward magenta/green or blue/amber. White Balance Bracketing works much like exposure bracketing does: You take a set of three images that vary the color toward a blue/amber or magenta/green bias at +3 levels in one-step increments.
As you would expect, White Balance Bracketing reduces the camera's maximum burst rate by one-third. In fact, you can combine exposure bracketing with White Balance Bracketing. If you do this, a total of nine images are recorded for each shot. This is a way to not only fill up a memory card quickly, but also to slow down shooting to a crawl. However, in scenes that you can't go back to and where image color is critical, both exposure and White Balance Bracketing can be good insurance. If you are shooting JPEG capture in P, Tv, Av, M, or B modes and use the Standard, Portrait, or Landscape Picture Styles, bracketing can be a good choice to get a visually pleasing color bias in a scene.
Note
White Balance Auto Bracketing and White Balance Correction involve similar steps. See the steps in the next section to set White Balance Auto Bracketing.

White Balance Correction sets a single and specific color bias rather than bracketing in multiple directions as White Balance Bracketing does. This is the technique to use when you know how much bias or shift is needed to get the image color you want. White Balance Correction is similar to using color-compensation and color-correction filters with film, with the advantage of not needing to buy and carry multiple filters.
You can correct color in any of four directions: blue, green, amber, and magenta. Each level of color shift is equivalent of 5 mireds of a color temperature conversion filter. A mired is a unit of measure that indicates the density of a color temperature conversion filter. As you make the shift, you can see on the screen the direction and intensity of the correction.
To set White Balance Auto Bracketing or White Balance Correction, follow these steps:
Press the Menu button, and then turn the Main dial to highlight the Shooting 2 tab.
Turn the Quick Control dial to highlight WB SHIFT/BKT, and then press the Set button. The WB correction/WB bracketing screen appears.
To set White Balance Auto Bracketing, turn the Quick Control dial clockwise to set a blue/amber bias, or counterclockwise to set a magenta/green bias. As you turn the dial, three tick marks appear and separate to indicate the direction and amount of bracketing. The bracketing amount is also displayed on the WB correction/WB bracketing screen under the BKT block.
To set White Balance Correction, tilt the Multi-controller in the direction of the shift you want. The direction and amount of shift is displayed in the SHIFT section on the screen.
Press the Set button. If you change your mind and want to start over, press the INFO. button. Bracketed images are taken with the Standard white balance first, followed by the blue (or magenta) bias, and then the amber (or green) bias. If you set White Balance Correction, a WB+/ icon is displayed in the viewfinder and on the LCD panel as you shoot.
Picture Styles are a digital version of the characteristic "looks" of different films. For example, Kodak's PORTRA film is characterized by its subdued color and contrast. On the other hand, saturated blues and greens and snappy contrast are hallmarks of FujiFilm's Velvia film. Just as films are chosen for their rendering characteristics, you can choose Picture Styles on the 7D for their unique looks.
Behind each Picture Style are parameters that set the tonal curve, color rendering and saturation, and sharpness for the images that you shoot with the 7D. The default Picture Style is Standard, and it is characterized by snappy contrast, vivid colors, and moderate-to-high saturation. Other Picture Styles modify the contrast, color saturation and tone, and sharpness to give images a different look or rendering as described in Table 4.1. Default settings are listed in order of sharpness, contrast, color saturation, and color tone.
Table 4.1. E0S 7D Picture Styles
Picture Style | Description | Contrast | Color saturation | Default settings |
|---|---|---|---|---|
Standard | Vivid, sharp, crisp | Higher contrast | Medium-high saturation | 3, 0, 0, 0 |
Portrait | Enhanced skin tones, soft texture rendering, low sharpness | Higher contrast | Medium saturation, rosy skin tones | 2, 0, 0, 0 |
Landscape | Vivid blues and greens, high sharpness | Higher contrast | High saturation for greens/blues | 4, 0, 0, 0 |
Neutral | Allows latitude for conversion and processing with low saturation and contrast | Subdued contrast | Low saturation, neutral color rendering | 0, 0, 0, 0 |
Faithful | True rendition of colors with no increase in specific colors. No sharpness applied. | Subdued contrast | Low saturation, calorimetrically accurate | 0, 0, 0, 0 |
Monochrome | Black-and-white or toned images with slightly heightened sharpness | High contrast | Yellow, Orange, Red, and Green Filter effects are available. Sepia, Blue, Purple, and Green Toning effects are also available. | 3, 0, NA, NA |
In Full Auto shooting mode, the camera automatically selects the Standard Picture Style, which you cannot change. In CA shooting mode, you can select Standard, Portrait, Landscape, or Monochrome Picture Styles. With the Monochrome Picture Style, only the sharpness and contrast parameters are adjustable, but you can add toning effects, as detailed in the sidebar.
Whether you modify an existing style or create one of your own, the 7D provides good latitude in setting parameters with seven adjustment levels for sharpness, and eight levels of adjustments for contrast, saturation, and color tone. Picture Styles are designed to produce classic looks that need little or not post-processing so that you can print JPEG images directly from the CF card. If you shoot RAW capture, you can't print images directly from the CF card, but you can apply Picture Styles either in the camera or during conversion using the Canon Digital Photo Professional conversion program.
You can also use the Picture Style Editor to modify and save changes to Picture Styles for captured images. The Picture Style Editor is included on the Canon EOS Digital Solution Disk that comes with the camera, and it is described later in this chapter.
To get the color, contrast, and saturation results you want out of the camera, you can customize Picture Styles to best suit your creative vision and needs. The following are parameters that you can modify for each Picture Style in P, Tv, Av, M, and B shooting modes:
Sharpness: 0 to 7. Level 0 (zero) applies no sharpening and renders a very soft look (due largely to the anti-aliasing filter in front of the image sensor that helps ward off various problems, including moiré, spectral highlights, and chromatic aberrations).
At high sharpness levels, images are suitable for direct printing from the memory card. However, if you prefer to edit images on the computer, then a 0–2 level is adequate and helps to prevent sharpening halos when you sharpen images in an image-editing program.
Contrast: −4 to +4. The Contrast parameter represents the image's tonal curve. If the setting is too high, then image pixels can be clipped (discarding highlight and/or shadow pixels). A negative adjustment produces a flatter look but helps to prevent clipping. A positive setting increases the contrast and stretches the tonal range. Higher settings can lead to clipping.
I prefer to get a slightly flatter look out of the camera and reduce clipping, knowing that the highlight data is being preserved. To get snappier contrast, I can always set a curve in Photoshop during image editing. You can evaluate the effect of the tonal curve on RAW images in the histogram shown in the Canon Digital Photo Professional program.
Saturation: −4 to +4. This setting affects the strength or intensity of the color with a negative setting, producing low saturation, and vice versa. As with the Contrast parameter, a high Saturation setting can cause individual color channels to clip. A +1 or +2 setting is adequate for snappy JPEG images destined for direct printing.
For images that you will edit on the computer, a 0 (zero) setting allows ample latitude for post-capture edits.
Color Tone: −4 to +4. This setting modifies the hue of the image. Negative settings produce tones that are more red and more blue, while positive settings produce more yellow tones.
Figures 4.11 through 4.16 show the effect of each Picture Style on color, saturation, and contrast. Exposure for these images is ISO 100, f/18, at 1/80 second.


Note
In CA shooting mode, you can also choose any of four Picture Styles from the Quick Control screen displayed on the LCD. To display the Quick Control screen, set the Mode dial to CA and then press the Q button on the back top left of the camera.
After evaluating and printing with different Picture Styles, you can change the default parameters to get the rendition that you want. You may also want to create your own style. You can create up to three Picture Styles that are based on an existing style.
For most of my photography, I use a modified Neutral Picture Style. I use this modified style for a couple of reasons: First, I always edit images on the computer and this style gives me latitude for interpreting the color tone and saturation of images to my liking; and second, in portraits, it creates subdued, lovely skin tones with a nice level of contrast.

Figure 4.17. This image was taken with my modified Neutral Picture Style. This modified style gives me latitude for interpreting color tone and saturation and creates subdued, lovely skin tones in portraits.
Here is how I set the modified Neutral Picture Style for my work. These settings work best when the lighting isn't flat and the image isn't underexposed. The settings are: Sharpness +2, Contrast +1, Saturation +1, Color tone 0.
To modify a Picture Style, follow these steps:
With the Mode dial set to P, Tv, Av, M, or B, press the Picture Styles button on the back of the camera. The Picture Style selection screen appears.
Turn the Quick Control dial to select the Picture Style you want to modify, and then press the INFO. button. The Detail Set screen for the selected style appears.
Turn the Quick Control dial to select the parameter you want to adjust, and then press the Set button. The camera activates the control.
Turn the Quick Control dial to change the parameter, and then press the Set button. Negative settings decrease sharpness, contrast, and saturation, and positive settings provide higher sharpness, contrast, and saturation. Negative color tone settings provide reddish skin tones, and positive settings provide yellowish skin tones.
Turn the Quick Control dial to select the next parameter, and then press the Set button.
Repeat steps 4 and 5 to change additional parameters.
Press the Menu button. The modifications are saved and remain in effect until you change them. The Picture Style selection screen appears.
If you want a greater range of Picture Styles for your work, you can create three User-Defined styles. Each style is based on one of the Canon Picture Styles, and you can modify the style to suit your preferences. With this approach, you can retain the preset Picture Styles either unchanged or modified, plus you can have three additional modified (or User-Defined) styles to extend your choices.
There are several approaches that you can take to create new styles, depending on your needs. You can use each of the three User-Defined styles for specific venues in which you shoot often. For example, you can set up one style for nature and landscape shooting (a modification of the Landscape or Standard style), one for studio portraits (a modification of the Portrait style), and one for a sports arena (a modification of the Standard style). Or you can use the User-Defined style for a style that you create using the Canon Picture Style Editor, a program included on the EOS Digital Solution Disk that comes with the camera. This technique is described in the next section of this chapter.
Here's how to create and register a User-Defined Picture Style:
With the Mode dial set to P, Tv, Av, M, or B, press the Picture Style button on the back of the camera.
Turn the Quick Control dial to User Def. 1, and then press the INFO. button. The Detail set. User Def. 1 screen appears with the base Picture Style, Standard.
Press the Set button. The camera activates the base Picture Style control.
Turn the Quick Control dial to select a base Picture Style, and then press the Set button. You can select any of the preset Picture Styles, such as Standard, Portrait, and so on, as the base style.
Turn the Quick Control dial to select a parameter, such as Sharpness, and then press the Set button. The camera activates the parameter's control.
Turn the Quick Control dial to set the level of change, and then press the Set button.
Repeat steps 5 and 6 to change the remaining parameters. The remaining parameters are Contrast, Saturation, and Color tone.
Press the Menu button to register the style. The Picture Style selection screen appears. The base Picture style is displayed to the right of User Def. 1. This Picture Style remains in effect until you change it.
You can repeat these steps to set up User Def. 2 and 3 styles.
Choosing and modifying Picture Styles is handy, but it is not especially efficient because it requires experimentation to determine the style and modifications you like best. Canon offers a more efficient approach to fine-turning Picture Styles with the Picture Style Editor, a program included on the EOS Digital Solution Disk.
Canon offers a more efficient approach to fine-tuning Picture Styles with the Picture Style Editor. This program enables you to apply a Picture Style to a RAW image, and then modify the style on the computer, where you can watch the effect of the changes. Once you have perfected your modified style, you can install it in the 7D.
The Picture Style Editor is deceptively simply, but it offers powerful and exact control over the style. For example, you can make color changes and minute adjustments to hue, saturation, luminosity, and gamma (tonal curve) characteristics. You can select up to 100 color points in the color specifications, and three color display modes — HSL (Hue, Saturation, Luminosity), Lab, and RGB — are available. You can also set the color workspace display, such as Adobe RGB.
A histogram shows the distribution of tones and color in the sample image. If you are familiar with the Canon Digital Photo Professional program, then the color tones will be familiar because the Picture Style Editor uses the same algorithms for image processing.
You can set up to ten points anywhere on the tone curve and watch the effect of the change to the image in the main window. In addition, you can compare before and after adjustments in split windows with magnification up to 200 percent.
Because the goal of working with the Picture Style Editor is to create a Picture style file that you can register and use in the camera, the adjustments that you make to the RAW image are not applied to the image. Rather, the adjustments are saved as a file with .pf2 extension, and then you use the EOS Utility to register the file in the camera and apply it to images. You can also apply the style in Digital Photo Professional after saving the settings as a PF2 file. Additionally, if you use more than one Canon EOS dSLR, you can register the style and use it on all your cameras.
Here is a brief introduction to using the Picture Style Editor. Before you begin, be sure you install the program from the EOS Digital Solution Disk.
Choose Start

Click and drag a RAW image onto the main Picture Style Editor window. RAW files have a .CR2 extension. You can also choose File
Click the arrow next to Base Picture Style to select a Picture Style other than Standard.
At the bottom left of the main window, click one of the split screen icons to show the original image and the image with the changes you make side by side. You can choose to split the screen horizontally or vertically. If you want to switch back to a single image display, you can click the icon at the far-left bottom of the window.
Click Advanced in the Tool palette to display the Picture Style parameters for Sharpness, Contrast, Color saturation, and Color tone. These settings that you can change are the same as those on the camera, but with the Picture Style Editor, you can watch the effect of the changes as you apply them.
Make the changes you want, and then click OK.
Adjust the color, tonal range, and curve using the Tool palette controls. If you are familiar with image-editing programs or with Digital Photo Professional, most of the tools will be familiar. Additionally, you can go to the Canon Web site at
web.canon.jp/imaging/picturestyle/editor/functions.htmlfor a detailed description of the functions.


When you modify the style to your liking, you can save it and register it to use in the 7D. However, when you save the PF2 file, I recommend saving two versions of it. During the process of saving the file, you can select the Disable subsequent editing option, which prevents disclosing the adjustments that have been made in the Picture Style Editor.
This is the option to choose when you save a style for use in the 7D and in the Digital Photo Professional Program. However, when you turn on the Disable subsequent editing option, the style file can no longer be used in the Picture Style Editor. For that reason, you may want to save a second copy of the PF2 file without turning on the Disable subsequent editing option in the Save Picture Style File dialog box. That way, if you later decide to modify the style, you can use the Picture Style Editor to make adjustments to this copy of the PF2 file.
To save a Custom Picture Style, follow these steps:
Click the Save Picture Style File icon at the top far right of the Picture Style Editor Tool palette. The Save Picture Style File dialog box appears.
Navigate to the folder where you want to save the file.
To save a file to use in the 7D, click the Disable subsequent editing option at the bottom of the dialog box. To save a file that you can edit again in the Picture Style Editor, do not select this option.
Type a name for the file and click Save. The file is saved in the location you specified, with a .pf2 extension.
To install the Custom Picture Style on the 7D, follow these steps:
Ensure that the EOS Digital Solution Disk programs are installed on your computer, and you have the USB cable that came with the camera handy.
Connect the camera to the computer using the USB cable.
Choose Start
Click Camera settings/Remote shooting under the Connect Camera tab in the EOS Utility. The capture window appears.
Click the camera icon in the red tool bar and then click Picture Style. The Picture Style window appears.
Click User Def. 1, 2, or 3. If a Picture Style file was previously registered to this option, the new style overwrites the previous style. When you choose User Defined, additional options appear.
Click Register User Defined style. The Register Picture Style File dialog box appears.
Click the Open folder icon on the right and then navigate to the folder where you saved the Picture Style file that you modified in the Picture style Editor, click it, and then click Open. The Register Picture Style File dialog box appears.
Click OK. The modified style is registered in the 7D.
It is a good idea to verify that the style was copied by pressing the Picture Style button on the back of the 7D and selecting the User Defined Style you registered to see if the settings match how you adjusted them. In addition to creating your own styles, you can download additional Picture Styles from the Canon Web site at web.canon.jp/imaging/picturestyle/index.html.