Movie mode on the EOS 7D opens a new avenue of creative expression. Now the visual stories that you capture with the 7D can be enriched with high-definition movies.
It is also to your advantage that the 7D's movie quality is among the best available. And it is packaged for you in a lightweight camera that accepts more than 60 lenses to enhance your videos in ways that traditional video cameras cannot.
This chapter is by no means exhaustive, but it is written to be a starting point for you as you explore the world of digital video with the 7D.

For still photographers, videography is like learning a new visual language. The language is different, but video shares with traditional still photography the aspect of creative communication. So with the 7D, you can spend time envisioning ways in which you can use still images with video to create multimedia stories.
If you are new to videography, then it is good to have a basic understanding of digital video and how it relates to the 7D.
In the world of video, there are several industry standards, including the following resolutions: 720p, 1080i, and 1080p.
The numbers 720 and 1080 represent vertical resolution. The 720 standard has a resolution of 921,600 pixels, or 720 (vertical pixels) × 1280 (horizontal pixels). The 1080 standard has a resolution of 2,073,600 pixels, or 1080 × 1920. It seems obvious that the 1080 standard provides the highest resolution, and so you would think that it would be preferable. But that is not the entire story.
The rest of the story is contained in the i and p designations. The i stands for interlaced. Interlaced is a method of displaying video where each frame is displayed on the screen in two passes — first, a pass that displays odd-numbered lines, and then a second pass that displays even-numbered lines. Each pass is referred to as a field, and two fields comprise a single video frame. This double-pass approach was engineered to keep the transmission bandwidth for televisions manageable. And the interlaced transmission works only because our minds automatically merge the two fields, so that the motion seems smooth with no flickering. Interlacing, however, is the old way of transmitting moving pictures.
The newer way of transmitting video is referred to as progressive scan, hence, the p designation. Progressive scan quickly displays a line at a time until the entire frame is displayed. And the scan happens so quickly that you see it as if it were being displayed all at once. The advantage of progressive scanning is most apparent in scenes where either the camera or the subject is moving fast. With interlaced transmission, fast camera action or moving subjects tend to blur between fields. That is not the case with 720p, which provides a smoother appearance. So while 1080i offers higher resolution, 720p provides a better video experience, particularly when there are fast-action scenes.
Another piece of the digital video story is the frame rate. In the world of film, a frame rate of 24 frames per second (fps) provided the classic cinematic look of old movies. In the world of digital video, the standard frame rate is 30 fps. Anything less than 24 fps, however, provides a jerky look to the video. The TV and movie industries use standard frame rates, including 60i that produces 29.97 fps and is used for NTSC; 50i that produces 25 fps and is standard for PAL, which is used in some parts of the world; and 30p that produces 30 fps, which produces smooth rendition for fast-moving subjects.
Note
Videographers who want a cinematic look prefer cameras that convert or pull down 30 fps to 24 fps.
With this very brief background on video, it is time to look at the digital video options on the 7D.
By now, you probably have questions, like how does the 7D compare to industry standards, how long you can record on your CF card, and how big the files are. Following is a rundown of the digital video recording options that you can choose on the 7D.
Full HD (Full High-Definition) at 1920 × 1080p at 30 (actual 29.97), 25 (when set to PAL), or 24 (actual 23.976) fps. You get about 12 minutes of recording time with a 4GB card and about 49 minutes with a 16GB card. The file size is 330MB per minute. Full HD enables you to use HDMI output for HD viewing of stills and video.
HD (High-Definition) at 1280 × 720p at 60 (actual 59.94) and 50 (when set to PAL) fps. You get about 12 minutes of recording time with a 4GB card, and 49 minutes with a 16GB card. The file size is 330MB per minute.
SD (Standard recording) at 640 × 480 at 60 (actual 59.94) or actual 50 fps when set to PAL. You get 24 minutes of recording time with a 4GB card, and 1 hour and 39 minutes with a 16GB card. The file size is 165MB per minute.
There is a 4GB limit to single movie clips, and the clips are H.264-comperessed movie files with a .mov file extension. At 1080p and 720p, clips run approximately 12 minutes depending on ISO and movie content and movement. You can also trim the beginning and end of a clip in the camera. Videos can be viewed in the Apple's QuickTime Player.
Note
NTSC is the standard for North America, Japan, Korea, Mexico and other countries. PAL is the standard for Europe, Russia, China, Australia, and other countries.
So you have two high-quality video options, albeit at different frame rates. The 30 fps option is the traditional recording speed for online use whereas the actual 29.97 speed is the TV standard in North America. As a result, the 30 fps option is suitable for materials destined for DVD or display on a standard definition or HDTV. Although 24 fps may be more film like, it can produce jerky motion for subjects that are moving, and it requires slower shutter speeds of around 1/50 second. In addition, the actual 29.97 frame rate makes it easier to sync audio when it is recorded separately using a video-editing program.
Here are other aspects to consider when shooting video:
Audio. You can use the 7D's built-in monaural microphone, which is adequate if you do not want to invest in a separate audio recorder and microphone. The audio is 16-bit at a sampling rate of 48 kHz and is output in mono. If you use the built-in microphone, be aware that all of the mechanical camera functions are recorded, including the sound of the Image Stabilization function on the lens, and the focusing motor. The microphone features a wind-cut filter that is on at all times when using the internal microphone. You cannot control the recording volume.
Exposure and camera settings. Video exposure offers full manual exposure control with the slowest shutter speed being linked to the frame rate. For example, the slowest frame rate at 60 or 50 fps is 1/60 second. And at all resolutions, the maximum shutter speed is 1/4000 second. ISO can be set automatically or manually. Manual settings range from 100 to 6400. To use manual exposure, set the Mode dial to M.
You can use fully automatic exposure with the 7D setting the aperture, shutter speed, and ISO automatically. You can, as well, use AE Lock and set Exposure Compensation of +/−3 stops. To enable auto exposure, set the Mode dial to any mode except M. You can change the focus mode, Picture Style, white balance, recording quality, and still image quality before you begin shooting in Movie mode.
Battery life. At normal temperatures, you can expect to shoot for 1 hour 20 minutes, with the time diminishing in colder temperatures.
Video capacities and cards. The upper limit is 4GB of video per movie. When the movie reaches the 4GB point, the recording automatically stops. You can start recording again, provided that you have space on the card, but the camera creates a new file. As the card reaches capacity, the 7D warns you by displaying the movie size and time remaining in red. Also, Canon recommends a UDMA card with an 8 MB/sec. or faster write speed. Slower cards may not provide the best video recording and playback.
Focusing. You have the same options for focusing as you have in Live View shooting. In Quick mode, the reflex mirror has to flip down to establish focus, and this blackout is not the best video experience. However Quick mode focusing can be suitable for an interview or other still subject where you can set the focus before you begin recording.
Note
For more details on Live View focusing options, see Chapter 6.
Still-image shots during recording. You can capture, or grab, a still image at any time during video recording by pressing the Shutter button completely. This results in a 1-second pause in the video and a full-resolution still image. The still image is recorded to the card as a file separate from the video. The still image is captured at the image-quality setting that was previously set for still-image shooting, and the camera automatically sets the aperture and shutter speed or manually if you're shooting in M mode, and the built-in flash is not used. The white balance, Picture Style, and quality settings that it is set for shooting in P, Tv, Av, M, and B shooting modes are used for still images.
Frame grabs. You can opt to pull a still image from the video footage rather than shooting a still image during movie recording. If you shoot at 1920 × 1080, frame grabs are limited to approximately 2 million pixels. Also because the shutter speeds during automatic exposure tend to be slow to enhance video movement, frame grabs can appear blurry.
Some of the setup options for Movie shooting are the same as or similar to those offered in Live View shooting. In particular, the focusing modes are the same in both cases.
Before you begin shooting, set up the options you want. When the video is recorded, you have several options for playback, as described in the following sections.
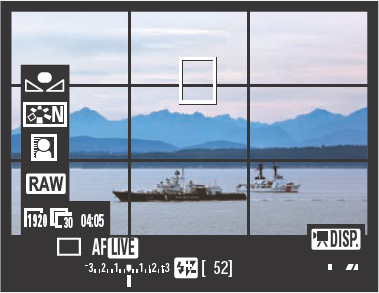
To set up for movie shooting, you can choose the movie recording size, the focusing mode, and whether to record audio using the built-in speaker. As with Live View shooting, you can also display a grid to line up vertical and horizontal lines, set the amount of time the camera retains the last metering for exposure, and whether to use a remote control.

Note
Be sure to review Chapter 6 for details on the focusing modes, grid display, Silent shooting modes, and Metering timer because the same options are used in Movie mode shooting.
To set up options for shooting movies, follow these steps:
With the Mode dial set to P, Tv, Av, M, or B, press the Menu button, set the switch for the START-STOP button to the movie (icon) setting. The reflex mirror flips up and a current view of the scene appears on the LCD.
Press the Menu button, and then turn the Main dial to select the Shooting 4 menu.
On the Shooting 4 menu, turn the Quick Control dial to highlight any of the following options, and then press the Set button to display the settings you can select.
AF mode: Select Live mode, Face Detection Live mode, or Quick mode, and then press the Set button.
Grid display: Select a 3 × 3 or 4 × 6 grid to help you align horizontal and vertical lines in the scene. Or select Off if you do not want to use a grid, and then press the Set button.
Movie rec. size: Choose 1920 × 1080 at 30 fps, 1920 × 1080 at 24 fps, 1280 × 720 at 60 fps, or 640 × 480 at 60 fps. Then press the Set button.
Sound recording: Choose On or Off, and then press the Set button.
Silent shooting: Choose Mode 1, Mode 2, or Disable, and then press the Set button.
Metering timer: Choose 4, 16, or 30 seconds, or 1, 10, or 30 minutes to determine how long the camera retains the exposure. If the light changes often, choose a shorter time. Then press the Set button.
To get a feel for shooting, you may want to record your first movies using automatic exposure, and then move into manual exposure shooting. Preparation is also important. Here are a few things to do before you begin shooting a movie.
Focus on the subject first. While you can reset focus during shooting, it creates a visual disconnect that isn't optimal. This is especially important if you use Quick focusing mode where the reflex mirror flips down to establish focus.
Plan the depth of field. One advantage of movie mode on any digital SLR is that you can create a shallow depth of field that isn't possible with video camera if you are recording with manual exposure. Thus, you can blur the foreground and background for creative effect. Plan ahead for the look you want.
Make camera adjustments before recording. If you're using the built-in microphone, think through camera adjustments that you can make before you begin shooting to keep the camera sounds they produce to a minimum during recording. Be sure to set the Picture Style, white balance, recording quality, and so on before you begin shooting.
Attach and test the accessory microphone. Stereo sound recording with an accessory microphone is possible by connecting the microphone with a 3.5mm-diameter mini plug that can be connected to the camera's external microphone IN terminal.
Stabilize the camera. Use a tripod or specialized holding device for video shooting to ensure smooth movement. And if you stabilize the camera, turn off Image Stabilization (IS) on the lens if the lens has IS.
Note
It's best to use a high-capacity CF card with a write speed of at least 8/MB per second.
Once the camera is set up, you can begin recording by following these steps.
Set the Mode dial to M if you want to manually control the exposure. If you want automatic exposure, set the Mode dial to any setting except M.
Set the switch above the START-STOP button to the movie (icon) setting. The reflex mirror flips up and a current view of the scene appears on the LCD.
Turn the Main dial to set the shutter speed. At 50 or 60 fps, you can choose 1/4000 to 1/60 second. At 24, 25, and 30 fps, you can choose 1/4000 to 1/30 second. For smooth motion of moving subject, shutter speeds 1/30 to 1/125 second are recommended.
With the Quick Control dial switch set to the far left, turn the Quick Control dial to set the aperture. Shooting with the same aperture is best to avoid variations in exposure during the movie.
Press the ISO button above the LCD panel and turn the Main dial to set the ISO between 100 and 6400. If you have Highlight tone priority (C.Fn II-3) enabled, the ISO range is 200 to 6400.
Focus on the subject. Here is how to use the focusing options.
Live mode. Tilt the Multi-controller to move the white magnifying rectangle so that it is over the part of the subject that you want in focus, and then press the AF-ON button or half-press the Shutter button. When focus is achieved, the AF-point rectangle turns green. If focus is not achieved, the AF-point rectangle turns orange. In Live mode, focus takes slightly longer than you are accustomed to.
Face Detection Live mode. The camera looks for a face or faces in the scene, and displays corner marks or corner marks with left and right arrows, respectively, over the face or faces it selects. You can press the left or right cross key to move the focusing frame to another face. To focus, press the AF-ON button or half-press the Shutter button. When focus is obtained, the corner marks appear in green. If the camera cannot find a face in the scene, it displays a solid rectangle and the camera uses the center AF point for focusing.
Quick mode. Press the Q button to display the 19 AF points. Tilt the Multi-controller to activate the AF points, and then select the AF point by turning the Main and Quick Control dials.
Manual focusing. Set the switch on the side of the lens to MF (Manual Focus). Then turn the focusing ring on the lens to focus on the subject. If you have to change focus during shooting, manual focusing avoids the noise of the AF motor being recorded, but the focusing adjustment can be intrusive to the video.
Press the START-STOP button to begin recording the movie. The Movie mode (red) dot appears at the top right of the screen.
Press the Q button one or two times to cycle through the two shooting displays, and press the INFO. button to display more or less shooting and camera setting information.
To stop record, press the START-STOP button.
For a quick preview of your movies, you can play them back on the camera's LCD. Of course, with the high-definition quality, you will enjoy the movies much more by playing them back on a television or computer.
To play back a movie on the camera LCD, follow these steps:
Press the Playback button, and then turn the Quick Control dial until you get to a movie file. Movies are denoted with a movie icon and the word Set in the upper-left corner of the LCD display.
Press the Set button. A progress bar appears at the top of the screen, and a ribbon of controls appears at the bottom of the display.
Press the Set button to begin playing back the movie, or turn the Quick Control dial to select a playback function, and then press the Set button. You can choose from the following:
Exit. Select this control to return to single-image playback.
Play. Press the Set button to start or pause the movie playback.
Slow motion. Turn the Quick Control dial to change the slow-motion speed.
First frame. Select this control to move to the first frame of the movie.
Previous frame. Press the Set button once to move to the previous frame, or press and hold the Set button to rewind the movie.
Next frame. Press the Set button once to move to the next frame, or press and hold the Set button to fast forward through the movie.
Last frame. Select this control to move to the last frame or the end of the movie.
Edit. Select this control to display the editing screen where you can edit out one-second increments of the first and last scenes of a movie.
Volume. This is denoted as ascending gray or green bars; just turn the Main dial to adjust the audio volume.
Turn the Quick Control dial to select Exit. The playback screen appears.
Press the Set button to stop playing the movie.
Press Exit to exit out of the movie.