While the EOS 7D delivers fine images with all of the Canon lenses, it delivers the best images with high-quality lenses. Ultimately, your investment in lenses will far exceed your investment in the camera body.

Most photographers know that "the camera is as good as the lens," and this is no less true for the 7D. With its high resolution and cropped sensor, the 7D demands a lot from lenses. Keep this in mind as you add lenses to your gear bag.
As you consider a new lens, remember that you are building a system of lenses that will last for years to come. So it is a good investment to buy lenses that serve your needs now and in the future.
The 7D is compatible with more than 60 Canon EF and EF-S lenses and accessories. That's a wide range of lenses, and your options are even more extensive when you factor in compatible lenses from third-party companies.
One of the first considerations photographers face is building a lens system. A few basic tips can help you create a solid strategy for adding new lenses to your system. For photographers buying their first and second lenses, a rule of thumb is to buy two lenses that cover the focal range from wide-angle to telephoto. With those two lenses as the foundation of your system, you can shoot 80 to 95 percent of the scenes and subjects that you'll encounter.
Because you'll use these lenses so often, they should be high-quality lenses that produce images with snappy contrast and excellent sharpness, and they should be fast enough to allow shooting in low light scenes. A fast lens is generally considered to be a lens with a maximum aperture of f/2.8 or faster. With a fast lens, you can often shoot in low light without a tripod and get sharp images. And if the lens has Image Stabilization, detailed later in this chapter, you gain even more flexibility.
When I switched to Canon cameras about seven years ago, I bought the Canon EF 24-70mm f/2.8L USM lens and the EF 70–200mm f/2.8L IS USM lens — two high-quality lenses that covered the focal range of 24mm to 200mm. Today these two lenses are still the ones I use most often for everyday shooting. And because I shoot with a variety of Canon EOS cameras, I know that I can mount these lenses on the 7D, the T1i, the 5D Mark II, or the 1Ds Mark III and get beautiful images.
If you bought the 7D as a kit with the EF 28-135mm f/3.5-5.6 IS USM, then you may already have learned that while this lens seems to provide a good focal range, in practice, it falls short of giving a true wide-angle view. The 28-135mm lens falls short on the wide-angle side of the focal range because of the focal length multiplier, which is discussed in the next section.

Figure 9.1. The EF 70–200mm f/2.8L IS USM, the EF 50mm f/1.4 USM, and the 16-35mm f/2.8L USM lenses cover most everyday shooting situations, and they are a good starting point for building a lens system.
Getting a wide-angle view is, of course, important for landscape, cityscape, interior, and architectural shooting as well as for photographing groups of people. On the other hand, if you bought the 7D as a kit with the EF-S 18-135mm f/3.5-5.6 IS lens, you paid more, but you also got a lens that is truly wide-angle.
One of the most important lens considerations for the 7D is its smaller APS-C-size image sensor. APS-C is simply a designation that indicates that the image sensor is 1.6 times smaller than a traditional full 35mm frame. As a result, the lenses you use on the 7D have a smaller angle of view than a full-frame camera. A lens' angle of view is how much of the scene, side-to-side and top-to-bottom that the lens encompasses in the image.
In short, the angle of view for Canon EF lenses that you use on the 7D is reduced by a factor of 1.6x at any given focal length. That means that a 100mm lens is equivalent to a 160mm when used on the 7D. Likewise, a 50mm normal lens is the equivalent to using an 80mm lens — a short telephoto lens.
This focal-length multiplication factor works to your advantage with a telephoto lens because it effectively increases the lens' focal length (although technically the focal length doesn't change). And because telephoto lenses tend to be more expensive than other lenses, you can buy a shorter and less expensive telephoto lens and get 1.6x more magnification at no extra cost.
The focal-length multiplication factor works to your disadvantage with a wide-angle lens; the sensor sees less of the scene because the focal length is magnified by 1.6. However, because wide-angle lenses tend to be less expensive than telephoto lenses, you can buy an ultrawide 14mm lens to get the equivalent of an angle of view of 22mm.
As you think about the focal-length multiplier effect on telephoto lenses, it seems reasonable to assume that the multiplier also produces the same depth of field that a longer lens — the equivalent focal length — gives. That isn't the case, however. Although an 85mm lens on a full 35mm-frame camera is equivalent to a 136mm lens on the 7D, the depth of field on the 7D matches the 85mm lens, not a 136mm lens. This depth of field principle holds true for enlargements. The depth of field in the print is shallower for the longer lens on a full-frame camera than it is for the 7D.
And that brings us to another important lens distinction for the 7D. The 7D is compatible with all EF-mount lenses and with all EF-S-mount lenses. The EF lens mount is compatible across all Canon EOS cameras regardless of image sensor size, and regardless of camera type, whether digital or film. The EF-S lens mount, however, is specially designed to have a smaller image circle, or the area covered by the image on the sensor plane. EF-S lenses can be used only on cameras with a cropped frame such as the 7D, T1i, and 50D among others because of a rear element that protrudes back into the camera body.

Figure 9.2. This image shows the approximate difference in image size between a full-frame 35mm camera and the 7D. The smaller image size represents the 7D's image size.
The difference in lens mounts should also factor into your plan for building a lens system. As you consider lenses, think about whether you want lenses that are compatible with both a full-frame camera and a cropped sensor, or not. Remember that as your photography career continues, you'll most likely buy a second, backup camera body or move from the 7D to another EOS camera body. And if your next EOS camera body has a full-frame sensor, then you'll want the lenses that you've already acquired to be compatible with it.
The most common question that my photography students ask is, "What lens should I buy?" It is virtually impossible to answer that question for someone else. The best advice is to have a strategy based on the scenes and subjects that you shoot, your budget, and your plans for expanding your photography.
With that said, the best starting point for considering new lenses is to gain a solid understanding of the different types of lenses and their characteristics. Only then can you evaluate which types of lenses best fit your needs. The following sections provide a foundation for evaluating lenses by category and by characteristics.
Lenses are categorized by whether they zoom to different focal lengths or have a fixed focal length — known as prime lenses. Then within those two categories, lenses are grouped by focal length (the amount of the scene included in the frame) in three main categories: wide angle, normal, and telephoto. And within those categories are macro lenses that serve double-duty as either normal or telephoto lenses with macro capability.
At the top level of lens groupings are zoom and prime, or single focal-length lenses. The primary difference between zoom and prime lenses is that zoom lenses offer a range of focal lengths in a single lens while prime lenses offer a fixed, or single, focal length. There are additional distinctions that come into play as you evaluate whether a zoom or prime lens is best for your shooting needs.
Because zoom lenses offer variable focal lengths by just zooming the lens to bring the subject closer or farther away, they are very versatile in a variety of scenes. As a result, zoom lenses allow you to carry fewer lenses. For example, carrying a Canon EF-S 17-55mm f/2.8 IS USM lens and a Canon EF 55-200mm f/4.5-5.6 II USM lens, or a similar combination of lenses, provides the focal range needed for most everyday shooting.
Zoom lenses, which are available in wide-angle and telephoto ranges, are able to maintain focus during zooming. To keep the lens size compact and to compensate for aberrations with fewer lens elements, most zoom lenses use a multi-group zoom with three or more movable lens groups.

Figure 9.3. Wide-angle zoom lenses such as the Canon EF 16-35mm f/2.8L USM lens help bridge the focal-length multiplier gap by providing a wide view of the scene.
Most mid-priced and more expensive zoom lenses offer high-quality optics that produce sharp images with excellent contrast. As with many Canon lenses, full-time manual focusing is available by switching the button on the side of the lens to MF (Manual Focusing).
Some zoom lenses are slower than single focal-length lenses, and getting a fast zoom lens means paying a higher price. In addition, some zoom lenses have a variable aperture, which means that the minimum aperture changes at different zoom settings (discussed in the following sections). While zoom lenses allow you to carry around fewer lenses, they tend to be heavier than their single focal-length counterparts.
Other zoom lenses have variable apertures. An f/4.5 to f/5.6 variable-aperture lens means that at the widest focal length, the maximum aperture is f/4.5 and at the longer end of the focal range, the maximum aperture is f/5.6. In practical terms, this limits the versatility of the lens at the longest focal length for shooting in all but bright light or at a high ISO setting. And unless you use a tripod or your subject is stone still, your ability to get a crisp picture in lower light at f/5.6 will be questionable.
More expensive zoom lenses offer a fixed and fast maximum aperture, meaning that with maximum apertures of f/2.8, they allow faster shutter speeds that enhance your ability to get sharp images when handholding the camera. But the lens speed comes at a price: the faster the lens, the higher the price.
While you hear much less about prime or single-focal-length lenses, they are worth careful evaluation. With a prime lens, the focal length is fixed, so you must move closer to or farther from your subject or change lenses to change image composition. Canon's venerable EF 50mm f/1.4 USM and EF 100mm f/2.8 Macro USM lenses are only two of a full lineup of Canon prime lenses.
Unlike zoom lenses, prime lenses tend to be fast with maximum apertures of f/2.8 or wider. Wide apertures allow fast shutter speeds that enable you to handhold the camera in lower light and still get a sharp image. Compared to zoom lenses, single focal-length lenses are lighter and smaller. In addition, single focal-length lenses tend to be sharper than some zoom lenses.

Figure 9.4. Single focal-length lenses such as the EF 50mm f/1.4 USM lens are smaller and lighter and provide excellent sharpness, contrast, and resolution when used on the 7D.
Most prime lenses are lightweight, but you need more of them to cover the range of focal lengths needed for everyday photography. Prime lenses also limit the options for on-the-fly composition changes that are possible with zoom lenses.
Within the categories of zoom and prime lenses, lenses are grouped by their focal length. While some lenses cross group lines, the groupings are still useful for talking about lenses in general. Before going into specific lenses, it is helpful to understand a few concepts.
First, the lens' angle of view is expressed as the angle of the range that's being photographed, and it's generally shown as the angle of the diagonal direction. The image sensor is rectangular, but the image captured by the lens is circular, and it's called the image circle. The image that's captured is taken from the center of the image circle.
For a 15mm fisheye lens, the angle of view is 180 degrees on a full-frame 35mm camera. For a 50mm lens, it's 46 degrees; and for a 200mm lens, the angle of view is 12 degrees. Simply stated, the shorter the focal length, the wider the scene coverage, and the longer the focal length, the narrower the coverage.
The lens' aperture range also affects the depth of field. The depth of field is affected by several factors including the lens' focal length, aperture (f-stop), focus position, camera-to-subject distance, and subject-to-background distance.
Finally, the lens you choose affects the perspective of images. Perspective is the visual effect that determines how close or far away the background appears to be from the main subject. The shorter (wider) the lens, the more distant background elements appear to be, and the longer (more telephoto) the lens, the more compressed the elements appear.
Wide-angle lenses are aptly named because they offer a wide view of a scene. Generally, lenses shorter than 50mm are commonly considered wide angle on full-frame 35mm image sensors. Not including the 15mm fisheye lens, wide-angle and ultra-wide lenses range from 17mm to 40mm on a full-frame camera. The wide-angle lens category provides angles of view ranging from 114 to 63 degrees.
However, on the 7D, the 1.6x focal-length multiplier works to your disadvantage. For example, with the EF 28-135mm f/3.5-5.6 IS lens, the lens translates to only 44mm on the wide end and 216mm on the telephoto end of the lens. The telephoto range is excellent, but you don't get a wide angle of view on the 7D with this lens. Thus, if you often shoot landscapes, cityscapes, architecture, and interiors, a first priority will be to get a lens that offers a true wide-angle view. Good choices include the EF 16-35mm f/2.8L II USM (approximately 26 to 56mm with the 1.6x multiplier), the EF-S 10-22mm f/3.5-4.5 USM lens (approximately 16 to 35mm with the multiplier), or the EF 17-40mm f/4L USM lens (approximately 27 to 64mm with the multiplier).
Wide-angle lenses are ideal for capturing scenes ranging from sweeping landscapes and underwater subjects to large groups of people, and for taking pictures in places where space is cramped.
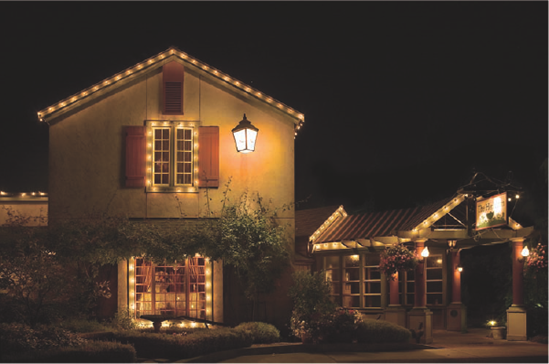
Figure 9.5. To get the wide-angle view on the 7D, you need a wide or an ultra-wide-angle lens such as the EF 16-35mm f/2.8L USM or the EF 24-70mm f/2.8L lens that I used here to photography a well-known restaurant at night. The focal length was set to 32mm. Exposure: ISO 100, f/5.6, 5 sec. using −2/3 stop Exposure Compensation.
When you shoot with a wide-angle lens, keep these lens characteristics in mind:
Extensive depth of field. Particularly at small apertures from f/11 to f/32, the entire scene, front to back, will be in acceptably sharp focus. This characteristic gives you slightly more latitude for less-than-perfectly focused pictures.
Fast apertures. Wide-angle lenses tend to be faster (meaning they have wider apertures) than telephoto lenses. As a result, these lenses are good choices for everyday shooting when the lighting conditions are not optimal.
Distortion. Wide-angle lenses can distort lines and objects in a scene, especially if you tilt the camera up or down when shooting. For example, if you tilt the camera up to photograph a group of skyscrapers, the lines of the buildings tend to converge and the buildings appear to fall backward (also called keystoning). You can use this wide-angle lens characteristic to creatively enhance a composition, or you can move back from the subject and keep the camera parallel to the main subject to help avoid the distortion.
Perspective. Wide-angle lenses make objects close to the camera appear disproportionately large. You can use this characteristic to move the closest object farther forward in the image, or you can move back from the closest object to reduce the effect. Wide-angle lenses are popular for portraits, but if you use a wide-angle lens for close-up portraiture, keep in mind that the lens exaggerates the size of facial features closest to the lens, which is unflattering.
Telephoto lenses offer a narrow angle of view, enabling close-ups of distant scenes. On full 35mm-frame cameras, lenses with focal lengths longer than 50mm are considered telephoto lenses. For example, 80mm and 200mm lenses are telephoto lenses. On the 7D, however, the focal-length multiplier works to your advantage with telephoto lenses. Factoring in the 1.6x multiplier, a 50mm lens is equivalent to 80mm, or a short telephoto lens. And because telephoto lenses are more expensive overall than wide-angle lenses, you get more focal length for your money when you buy telephoto lenses for the 7D.
Telephoto lenses offer an inherently shallow depth of field that is heightened by shooting at wide apertures. Lenses such as 85mm and 100mm are ideal for portraits, while longer lenses (200mm to 800mm) allow you to photograph distant birds, wildlife, and athletes. When photographing wildlife, these lenses also allow you to keep a safe distance.

Figure 9.6. For this foggy farm scene image, I used the EF 70–200mm f/2.8L IS USM lens. I used a 155mm focal length, and Image Stabilization enabled me to handhold the camera and lens at a 1/60-second shutter speed. Exposure: ISO 200, f/4, 1/60 second.
When you shoot with a telephoto lens, keep these lens characteristics in mind:
Shallow depth of field. Telephoto lenses magnify subjects and provide a limited range of sharp focus. At wide apertures, you can reduce the background to a soft blur. Because of the extremely shallow depth of field, it's important to get tack-sharp focus. Many Canon lenses include full-time manual focusing that you can use to fine-tune the camera's autofocus. Canon also offers an extensive lineup of Image Stabilized telephoto lenses.
Narrow coverage of a scene. Because the angle of view is narrow with a telephoto lens, much less of the scene is included in the image. You can use this characteristic to exclude distracting scene elements from the image.
Slow speed. Midpriced telephoto lenses tend to be slow; the widest aperture is often f/4.5 or f/5.6, which limits the ability to get sharp images without a tripod in all but the brightest light unless they also feature Image Stabilization. And because of the magnification factor, even the slightest movement is exaggerated.
Perspective. Telephoto lenses tend to compress perspective, making objects in the scene appear close together.
Normal lenses offer an angle of view and perspective very much as your eyes see the scene. On full 35mm-frame cameras, 50mm to 55mm lenses are considered normal lenses. However, on the 7D, a normal lens is 28mm to 35mm when you take into account the focal-length multiplier. And, likewise, the 50mm lens is equivalent to an 80mm lens on the 7D.

Figure 9.7. The EF 50mm f/1.4 USM lens is a normal lens on a full-frame camera. On the 7D it translates to a short telephoto. Regardless of designation, this lens offers snappy contrast as it did with this puppy that was trying to reach the toy. Exposure: ISO 100, f/18, 1/125 sec.
When you shoot with a normal lens, keep these lens characteristics in mind:
Natural angle of view. On the 7D, a 28 or 35mm lens closely replicates the sense of distance and perspective of the human eye. This means the final image will look much as you remember seeing it when you made the picture.
Little distortion. Given the natural angle of view, the 28-35mm lens retains a normal sense of distance, especially when you balance the subject distance, perspective, and aperture.
Macro lenses are designed to provide a closer lens-to-subject focusing distance than non-macro lenses. Depending on the lens, the magnification ranges from half life-size (0.5x) to 5x magnification. Thus, objects as small as a penny or a postage stamp can fill the frame, while nature macro shots can reveal breathtaking details that are commonly overlooked. Using extension tubes can further reduce the closest focusing distance.

Figure 9.8. Canon offers several macro lenses including the EF 180mm f/3.5L Macro USM (left) that offers 1x (life-size) magnification and a minimum focusing distance of 0.48m/1.6 ft. Also shown here is the older Canon EF 100mm f/2.8 Macro USM lens. Canon updated the 100mm Macro, and I highly recommend the new version of this macro lens.
Normal and telephoto lenses offer macro capability. Because these lenses can be used both at their normal focal length as well as for macro photography, they do double duty. Macro lenses offer one-half or life-size magnification or up to 5X magnification with the MP-E 65mm f/2.8 1-5 Macro Photo lens.

Figure 9.9. The EF 180mm f/3.5L Macro USM lens captured this detail shot of sunflower petals. Exposure: ISO 100, f/16, 1/125 sec.
If you're buying a macro lens, you can choose lenses by focal length or by magnification. If you want to photograph moving subjects such as insects, choose a telephoto lens with macro capability. Moving subjects require special techniques and much practice.
Tilt-and-shift lenses, referred to as TS-E lenses, allow you to alter the angle of the plane of focus between the lens and sensor plane to provide a broad depth of field even at wide apertures and to correct or alter perspective at almost any angle. This allows you to correct perspective distortion and control focusing range.
Tilt movements allow you to bring an entire scene into focus even at maximum apertures. By tilting the lens barrel, you can adjust the lens so that the plane of focus is uniform on the focal plane, thus changing the normally perpendicular relationship between the lens's optical axis and the camera's focal plane. Alternatively, reversing the tilt has the opposite effect of greatly reducing the range of focusing.
Shift movements avoid the trapezoidal effect that results from using wide-angle lenses pointed up to take a picture of a building, for example. Keeping the camera so that the focal plane is parallel to the surface of a wall and then shifting the TS-E lens to raise the lens results in an image with the perpendicular lines of the structure being rendered perpendicular and with the structure being rendered with a rectangular appearance.
TS-E lenses revolve within a range of plus/minus 90 degrees making horizontal shift possible, which is useful in shooting a series of panoramic images. You can also use shifting to prevent having reflections of the camera or yourself in images that include reflective surfaces, such as windows, car surfaces, and other similar surfaces.
All of Canon's TS-E lenses are Manual Focus only. These lenses, depending on the focal length, are excellent for architectural, interior, merchandise, nature, and food photography.
For anyone who has thrown away a stack of images blurred from handholding the camera at slow shutter speeds, the idea of Image Stabilization is a welcome one. Image Stabilization (IS) counteracts some or all of the motion blur from handholding the camera and lens. If you've shopped for lenses lately, then you know that IS comes at a premium price. IS lenses are pricey because they give you from 1 to 4 f-stops of additional stability over non-Image Stabilized lenses — and that means that you may be able to leave the tripod at home.
With an IS lens, miniature sensors and a high-speed microcomputer built into the lens analyze vibrations and apply correction via a stabilizing lens group that shifts the image parallel to the focal plane to cancel camera shake. The lens detects camera motion via two gyro sensors — one for yaw and one for pitch. The sensors detect the angle and speed of shake. Then the lens shifts the IS lens group to suit the degree of shake to steady the light rays reaching the focal plane.
Stabilization is particularly important with long lenses, where the effect of shake increases as the focal length increases. As a result, the correction needed to cancel camera shake increases proportionately.

Figure 9.10. To capture this bird at the birdbath, I used the EF 100-400mm f/4.5-5.6L IS USM lens zoomed to 400mm with Image Stabilization turned on for a handheld shot. Exposure: ISO 200, f/5.6, 1/200 sec.
To see how the increased stability pays off, consider that the rule of thumb for handholding the camera and a non-IS lens is 1/[focal length]. For example, the slowest shutter speed at which you can handhold a 200mm lens and avoid motion blur is 1/200 second. If the handholding limit is pushed, then shake from handholding the camera bends light rays coming from the subject into the lens relative to the optical axis, and the result is a blurry image.
Thus, if you're shooting in low light at a music concert or a school play, the chances of getting sharp images at 200mm are low because the light is too low to allow a 1/200 second shutter speed even at the maximum aperture of the lens. You can, of course, increase the ISO sensitivity setting and risk introducing digital noise into the images. But if you're using an IS lens, the extra stops of stability help minimize ISO increases to get better image quality, and you still have a good chance of getting sharp images by handholding the camera and lens.

Figure 9.11. This 70–200mm f/2.8L IS USM lens offers Image Stabilization in two modes: one for stationary subjects and the second for panning with subjects horizontally.
But what about when you want to pan or move the camera with the motion of a subject? Predictably, IS detects panning as camera shake and the stabilization then interferes with framing the subject. To correct this, Canon offers two modes on IS lenses. Mode 1 is designed for stationary subjects. Mode 2 shuts off image stabilization in the direction of movement when the lens detects large movements for a preset amount of time. So when panning horizontally, horizontal IS stops but vertical IS continues to correct any vertical shake during the panning movement.
Two common lens problems are vignetting and back or front focusing. You can correct these problems yourself with two new 7D features. If you have winced more than once over images where the point of sharpest focus is slightly in front of or behind where you set it, you can now tweak the lens focus in the comfort of your own home or studio. And with the Peripheral Illumination Correction option, you can have the camera automatically correct for vignetting for up to 20 Canon lenses.
In the past, if a lens focused slightly in front of or behind a subject, you'd send the camera to Canon where technicians would carefully make microadjustments to refine the focus. Now, however, Canon puts that ability in your hands — should you decide to accept the assignment. Generally this is not for the faint of heart or for the impatient. In practice, you should seldom need to use Canon's AF Microadjustment option. According to Canon documents on this subject, the adjustment should be made only in two instances. The first instance is if you notice a consistent tendency for the sharpest plane of focus in all of your images to be in front of or behind the actual plane where you focused. This is commonly referred to as front focusing and back focusing. In this case, microadjustment is applied to all lenses. The second instance is if you notice front or back focusing only with specific lenses. In this case, microadjustment is applied only to specific lenses.
When you make microadjustments, the camera's sharpest plane of focus is shifted forward or backward to compensate for front or back focusing. The adjustment is applied within the camera body and its internal AF system. And if you need to, you can store adjustment information for up to 20 lenses.
Canon suggests that you can use something as simple as a 12-inch ruler for making test shots. Also consider the using LensAlign products available at www.lensalign.com. If you notice front or back focusing on one or all lenses, then you can adjust the plane of focus using the new microadjustment function on the 7D. Before you begin, be aware that you cannot make the microadjustments using Live View shooting.
Note
Michael Tapes of RawWorkflow.com offers a video tutorial on setting microadjustment on the LensAlign Web site at this shortened URL: http://bit.ly/1C0kr2
To make the adjustments, follow these steps:
With the 7D mounted on a tripod, shoot a target at a distance similar to what you would normally shoot the subject. The subject should have discernable detail both in front of and behind where you focus. Keep the focus point at the exact same spot for all images in the test.
With the lens at the widest aperture, select the center AF point manually. Do not use Automatic AF-point selection mode. With zoom lenses, zoom the lens to its maximum telephoto focal length. Avoid using wide focal lengths for creating test photos. The adjustment is always based on the lens' maximum aperture, not on the lens' focal length. The camera cannot distinguish between two of the same lenses. In other words, it cannot distinguish between two 70–200mm f/2.8L lenses. But it can distinguish between an EF 70–200mm f/2.8L USM and an EF 70–200mm f/2.8L IS USM lens. You can also do the test with either the 1.4x or 2x tele-extender on the lens.
With the camera set to P, Tv, Av, M, or B shooting mode, press the Menu button and turn the Main dial to select the Custom Functions menu.
Turn the Quick Control dial to select C. Fn III:Autofocus/Drive, and then press the Set button. The last C.Fn that you accessed is displayed.
Turn the Quick Control dial until the number 5 appears in the control at the top right of the screen.
Press the Set button. The options control is activated. One of three options can be selected: Option 0: Disable; Option 1: Adjust all by same amount; and Option 2: Adjust by lens. If all images are front or back focused, then choose Option 1. If only one or two lenses are front or back focused, then choose Option 2.
Turn the Quick Control dial to select the option you want, and then press the INFO. button. The AF Microadjustment screen appears with the currently mounted lens listed on the screen and a scale with plus/minus 20 steps of correction.
Turn the Quick Control dial to the left to adjust focusing forward or to the right to adjust focusing toward the back. Single-step adjustments are very fine, so starting with a large adjustment and progressively narrowing the adjustment from there is recommended.
Take several images at various adjustment positions and view the images at 100 percent enlargement on a high-quality computer monitor. Do not use the LCD monitor to judge the correction levels. When you find the adjustment that is closest to putting the plane of focus where it should be, then shoot some real-world images at the setting, evaluate the sharpness, and adjust if necessary.
If the adjustment does not correct the focus, you can reset the adjustment scale to the zero point.
Depending on the lens that you use on the 7D, you may notice a bit of light falloff and darkening in the four corners of the frame. Light falloff describes the effect of less light reaching the corners of the frame as compared to the center of the frame. The darkening effect at the frame corners is known as vignetting. Vignetting is most likely to be evident in images when you shoot with wide-angle lenses, when you shoot at a lens' maximum aperture or when an obstruction such as the lens barrel rim or a filter reduces light reaching the frame corners.
On the 7D, you can correct vignetting for JPEG shooting. If you shoot RAW images, you can correct vignetting in Canon's Digital Photo Professional program during RAW image conversion. When you turn on Peripheral Illumination Correction, the camera detects the lens that you have mounted, and it applies the appropriate correction level. The 7D can detect 25 lenses, but you can add information for other lenses by using the EOS Utility software supplied on the EOS Solutions Disk.
Note
In the strictest sense, vignetting is considered to be unwanted effects in images. However, vignetting is also a creative effect that photographers sometimes intentionally add to an image during editing to bring the viewer's eye inward toward the subject.
You can test your lenses for vignetting by photographing an evenly lit white subject such as a white paper background or wall at the lens' maximum aperture and at a moderate aperture such as f/8 and examine the images for dark corners. Then you can enable Peripheral Illumination Correction on the camera and repeat the images to see how much difference it makes.
If you use Peripheral Illumination Correction for JPEG images, the amount of correction applied is just shy of the maximum amount. If you shoot RAW images, you can, however, apply the maximum correction in Digital Photo Professional. Also, the amount of correction for JPEG images decreases as the ISO sensitivity setting increases. If the lens has little vignetting, the difference in using Peripheral Illumination Correction may be difficult to detect. If the lens does not communicate distance information to the camera, then less correction is applied. Canon recommends that you turn off correction if you use a non-Canon lens.
Here is how to turn on Peripheral Illumination Correction:
Set the camera to the JPEG image quality setting that you want.
Press the Menu button, and then turn the Main dial to highlight the Shooting 1 menu.
Turn the Quick Control dial to highlight Peripheral illumin. Correct., and then press the Set button. The Peripheral illumin. Correct. screen appears with the attached lens listed, and whether or not correction data is available. If correction data is unavailable, then you can register correction data using the Canon EOS Utility program.
Turn the Quick Control dial to select Enable if it is not already selected, and then press the Set button.
There are a variety of ways to increase the focal range and decrease the focusing distance to provide flexibility for the lenses you already own. These accessories are not only economical, but they extend the range and creative options of existing and new lenses. Accessories can be as simple as a lens hood to avoid flare, a tripod mount to quickly change between vertical and horizontal positions without changing the optical axis or the geometrical center of the lens, or a drop-in or adapter-type gelatin filter holder. Other options include using extension tubes, extenders, and close-up lenses.
For relatively little cost, you can increase the focal length of any lens by using an extender. An extender is a lens set in a small ring mounted between the camera body and a regular lens. Canon offers two extenders, a 1.4x and 2x, that are compatible only with L-series Canon lenses. Extenders can also be combined for even greater magnification.
For example, using the Canon EF 2x II extender with a 600mm lens doubles the lens's focal length to 1200mm before applying 1.6x. Using the Canon EF 1.4x II extender increases a 600mm lens to 840mm.
However, extenders reduce the light reaching the sensor. The EF 1.4x II extender decreases the light by 1 f-stop, and the EF 2x II extender decreases the light by 2 f-stops. In addition to being fairly lightweight, the obvious advantage of extenders is that they can reduce the number of telephoto lenses you carry.

Figure 9.12. Extenders, such as this Canon EF 1.4x II mounted between the camera body and the lens, extend the range of L-series lenses. They increase the focal length by a factor of 1.4x, in addition to the 1.6x focal-length conversion factor inherent in the camera.
The 1.4x extender can be used with fixed focal-length lenses 135mm and longer (except the 135mm f/2.8 Softfocus lens) and the 70–200mm f/2.8L, 70–200mm f/2.8L IS, 70–200mm f/4.0L, 70–200mm f/4.0L IS USM, and 100–400mm f/4.5-5.6L IS zoom lenses. With the EF 2x II, autofocus is possible if the lens has an f/2.8 or faster maximum aperture and compatible IS lenses continue to provide stabilization for two shutter speeds less than 1/focal length in seconds.
Extension tubes are close-up accessories that provide magnification increases from approximately 0.3 to 0.7, and they can be used on many EF lenses, though there are exceptions. Extension tubes are placed between the camera body and lens and connect to the camera via eight electronic contact points. Extension tubes can be combined for greater magnification.
Canon offers two extension tubes, the E 12 II and the EF 25 II. Magnification differs by lens, but with the EF12 II and standard zoom lenses, it is approximately 0.3 to 0.5. With the EF25 II, magnification is 0.7. When combining tubes, you may need to focus manually. Extension tubes are compatible with specific lenses. Be sure to check the Canon Web site for lenses that are compatible with extension tubes.
Additionally, you can use screw-in close-up lenses. Canon offers three lenses that provide enhanced close-up photography. The 27D/500D series uses a double-element design for enhanced optical performance. The 27D/500D series features double-element achromatic design to maximize optical performance. The 500 series has a single-element construction for economy. The working distance from the end of the lens is 25cm for the 27D and 50cm for the 500D.
As you think about the lenses that you want to add to your system, it helps to also understand the language and technologies that apply to lenses. Canon uses several designations and lens construction technologies that are summarized here.
EF lens mount. The designation EF identifies the type of mount that the lens has. The EF lens mount provides not only quick mounting and removal of lenses, but it also provides the communication channel between the lens and the camera body. The EF mount is fully electronic and resists abrasion, play, and shock. The EF system does a self-test using a built-in microcomputer that alerts you to possible malfunctions of the lens via the camera's LCD screen. In addition, if you use lens extenders, the exposure compensation is automatically calculated.
USM. When you see USM it indicates the lens features an ultrasonic motor. A USM lens has an ultrasonic and very quiet focusing mechanism (motor) that is built in. The motor is powered by the camera; however, because the lens has its own focusing motor you get exceptionally fast focus. USM lenses use electronic vibrations created by piezoelectric ceramic elements to provide quick and quiet focusing action with near instantaneous starts and stops.
In addition, lenses with a ring-type ultrasonic motor offer full-time manual focusing without the need to first switch the lens to Manual Focus. This design is offered in the large-aperture and super-telephoto lenses. A second design, the micro ultrasonic motor, provides the advantages of this technology in the less expensive EF lenses.
L-series lenses. Canon's L-series lenses feature a distinctive red ring on the outer barrel, or in the case of telephoto and super-telephoto lenses, are distinguished by Canon's well-known white barrel. The distinguishing characteristics of L-series lenses, in addition to their sobering price tags, are a combination of technologies that provide outstanding optical performance. L-series lenses include one or more of the following technologies and features:
UD/Fluorite elements. Ultralow Dispersion (UD) glass elements help minimize color fringing or chromatic aberration. This glass also provides improved contrast and sharpness. UD elements are used, for example, in the EF 70–200mm f/2.8L IS USM and EF 300mm f/4L IS USM lenses. Fluorite elements, which are used in super-telephoto L-series lenses, reduce chromatic aberration. Lenses with UD or fluorite elements are designated as CaF2, UD, and/or S-UD.
Aspherical elements. This technology is designed to help counteract spherical aberration that happens when wide-angle and fast normal lenses cannot resolve light rays coming into the lens from the center with light rays coming into the lens from the edge into a sharp point of focus. The result is a blurred image. An aspherical element uses a varying curved surface to ensure that the entire image plane appears focused. These types of optics help correct curvilinear distortion in ultrawide-angle lenses as well. Lenses with aspherical elements are designated as AL.
Dust, water-resistant construction. For any photographer who shoots in inclement weather, whether it's an editorial assignment or sports event, having a lens with adequate weather sealing is critical. The L-series EF lenses have rubber seals at the switch panels, exterior seams, drop-in filter compartments, and lens mounts to make them both dust and water resistant. Moving parts including the focusing ring and switches are also designed to keep out environmental contaminants.
Image Stabilization. Lenses labeled as IS lenses offer image stabilization. IS lenses allow you to handhold the camera at light levels that normally require a tripod. The amount of handholding latitude varies by lens and the photographer's ability to hold the lens steady, but you can generally count on 1 to 4 additional f-stops of stability with an IS lens than with a non-IS lens.
Macro. Macro lenses enable close-up focusing with subject magnification of one-half to life size and up to 5X with the MP-E 65mm f/2.8 Macro Photo lens.
Full-time manual focusing. An advantage of many Canon lenses is the ability to use autofocus, and then tweak focus manually using the lens's focusing ring without switching out of autofocus mode or changing the switch on the lens from the AF to MF setting. Full-time Manual Focusing comes in very handy, for example, with macro shots and when using extension tubes.
Inner and rear focusing. Lens's focusing groups can be located in front or behind the diaphragm, both of which allow for compact optical systems with fast AF. Lenses with rear optical focusing, such as the EF 85mm f/1.8 USM, focus faster than lenses that move their entire optical system, such as the EF 85mm f/1.2L II USM.
Floating System. Canon lenses use a floating system that dynamically varies the gap between key lens elements based on the focusing distance. As a result, optical aberrations are reduced or suppressed through the entire focusing range. In comparison, optical aberrations in non-floating-system lenses are corrected only at commonly used focusing distances. At other focusing distances, particularly at close focusing distances, the aberrations appear and reduce image quality.
AF Stop. The AF Stop button allows you to temporarily suspend autofocusing of the lens. For example, you can press the AF Stop button to stop focusing when an obstruction comes between the lens and the subject to prevent the focusing from being thrown off. When the obstruction passes by the subject, the focus remains on the subject provided that the subject hasn't moved so that you can resume shooting. The AF Stop button is available on several EF IS super-telephoto lenses.
Focus preset. This feature lets you program a focusing distance into the camera's memory. For example, if you shoot a bicycle race near the finish line, you can preset focus on the finish line and then shoot normally as riders approach. When the racers near the finish line, you can turn a ring on the lens to instantly return to the preset focusing distance, which is on the finish line.
Diffractive optics. Diffractive optics (DO) are made by bonding diffractive coatings to the surfaces of two or more lens elements. The elements are then combined to form a single multilayer DO element designed to cancel chromatic aberrations at various wavelengths when combined with conventional glass optics. Diffractive optics result in smaller and shorter telephoto lenses without compromising image quality. For example, the EF 70-300mm f/4.5-5.6 DO IS USM lens is 28 percent shorter than the EF 70-300mm f/4.5-5.6 IS USM lens.