When you combine the rich features of the EOS 7D with your creative vision, you have all you need to make stunning nature and landscape images.
Making pictures is the unconscious blending of the technical and creative aspects of photography so they become a synergistic and fluid process — each complimenting the other. In this chapter, both the technical and creative aspects of shooting with the 7D come into play with different approaches to making exposures.

It is a rare photographer who is not lured to places near and far and in all kinds of weather, simply by the call to capture the stunning beauty of creation. And this area of photography encompasses travel, fine-art landscape, seascapes, flora, fauna, wildlife, and birds, as well as close-ups of the smallest structures in the natural world.
All of these areas share commonality in the wide diversity of light, in the goal of capturing the singular beauty, structure, and rhythm of the scenes and subjects, and in the need to creatively interpret what you see and perceive in new and exciting ways.
Tip
Many of the techniques used for nature and landscape photography can also be applied to shooting skyscapes, cityscapes, and, in part, outdoor architectural photography.

Figure 11.1. Stormy weather offers an excellent opportunity to capture dramatic cloud formations and unique lighting on a landscape scene. Exposure: ISO 100, f/4.5, at 1/30 second using an EF 100-400mm f/4.5-5.6L IS USM lens.
The adventure of outdoor photography begins by having a good selection of lenses and filters, as well as other accessories. The lenses and filters that you choose for landscape and nature photography depend on the scenes and subjects that you're shooting or that you're likely to encounter on a hike or trip. Because nature offers such an amazing variety of subjects and because the light can change in minutes, my approach is to be prepared to capture everything, from sweeping landscapes to close-ups of flora and fauna, and to be prepared for any light and weather.
At the top of the packing list are lenses. Here are some lenses to consider packing in addition to other gear that will come in handy.
Wide-angle lenses. To capture truly sweeping landscapes with the 7D, you need a wide-angle and ultra-wide-angle lens such as the EF 16-35mm f/2.8L II USM, EF-S 10-22mm f/3.5-4.5 USM, or the EF 17-40mm f/4L USM lens. If you don't have a wide-angle lens, consider using the lens you have, and shoot a panorama of images that you can later stitch together using the PhotoStitch program that Canon provides on the EOS Digital Solution Disk.
If you shoot panoramas, it's also a good idea to have a monopod or a tripod to keep the image series level. Keeping the images level makes stitching images together easier and more precise.
Telephoto lenses. Your choice of telephoto lenses depends to some extent on what shooting opportunities you'll most likely encounter. For example, if the area has wildlife, then pack the longest telephoto lens that you own, along with the Canon Extender EF 2x II or the Extender EF 1.4x II, to double the focal length or to multiply the focal length by 1.4x, respectively.
In general, a lens in the 70–200mm or 100-400mm range is a good choice for birds and wildlife, and to bring distant landscapes closer.
Note
Lens extenders can be used with all prime (single-focal-length) lenses of 135mm and longer, except the 135mm f/2.8 Softfocus lens. Extenders can also be used with the EF 70–200mm f/2.8L, 70–200mm f/2.8L IS, 70–200mm f/4.0L, 70–200mm f/4.0L IS USM, and 100-400mm f/4.5-5.6L IS zoom lenses. When you use an extender, it reduces the maximum effective aperture. The 1.4x extender reduces the effective aperture by 1 f-stop, and the 2x extender reduces it by 2 f-stops.
Macro lenses. I seldom go anywhere without a macro lens. If I know that I'll be doing a lot of macro shooting, I take both a long and short macro lens. For macro work where you can't or don't want to get close to the subject, the EF 180mm f/3.5L Macro USM lens is ideal. For flowers and plants, either the EF-S 60mm f/2.8 Macro USM or the EF 100mm f/2.8L Macro IS USM les is an excellent choice.
Filters. Standard filters for outdoor shooting include a high-quality circular polarizer, and graduated neutral density filters. Filters are described in the Optional Filters sidebar in this chapter.
Weatherproof camera and lens sleeves. The EOS 7D has more weather sealing than some EOS cameras, but it's not as extensive as the 1Ds Mark III or 1D Mark III. And non-L-series lenses also lack extensive weather sealing. As a result, carrying along a water-repellant bag is good insurance against moisture, as well as dust and sand that can quickly put a camera out of commission. You can buy a wide variety of weatherproof camera protectors from Storm Jacket, Pelican, Aquatec, and Op-Tech. If your lenses are not well sealed, then a good lens sleeve is also in order. I always also have several quart-size plastic bags in my camera bag that I can use to protect accessories during an unexpected shower. Most newer camera bags are water repellent and have overlapping protectors around zippers to keep moisture and dust out of the bag. But if you've left the camera bag in the car and venture out with a spare lens and some filters, the separate camera covers and lens sleeves come in handy.
Additional gear. Because conditions can change quickly, and depending on the time of day and the focal length of your telephoto lenses, you may need a sturdy tripod or a monopod. You also need spare CF cards, charged camera batteries, cell phone, plastic bags, florist's wire (to steady plants), silver reflectors, GPS locator, and water and snacks as necessary. If you're on an extended shooting trip, you'll want to carry a laptop or handheld drive to offload photos at the end of each day's shooting.
While the 7D is a great camera and Canon lenses are among the best on the market, the camera and lens capture only what you see. So keep your photographic eye practiced and sharp and bring along your curiosity and passion.
Different photography subjects require different camera setups. And, if you've read through the book to this point, now is the time to get the most you can from the 7D's rich features and options. After all, why have a full-featured camera and use only a fraction of its power?
So when I get ready to go out shooting, I always think through all of the camera settings that I want to use and set as many options as possible before I leave. Not only does this planning save time when I'm ready to begin shooting, but it also helps avoid oversights that can make a big difference in the quality of the images. By the time I get to the location where I'm shooting, I can get in position and concentrate on evaluating the scene, the light, and the composition.
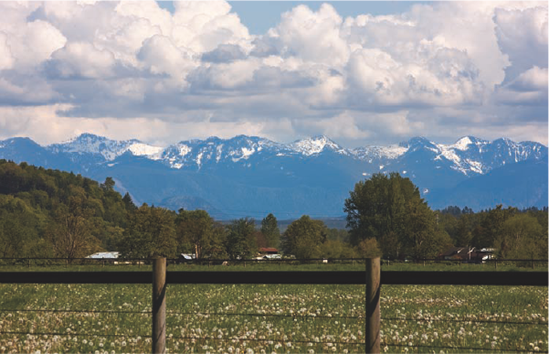
Figure 11.2. For this shot of the Cascade mountains, I was handholding the camera with the lens zoomed to 200mm. I used Av mode, and the shutter speed at 1/100 second normally would not be fast enough to ensure sharp focus, but with Image Stabilization, I was able to get tack-sharp focus. Exposure: ISO 100, f/13, at 1/100 second using the EF 70–200mm f/2.8L IS USM lens.
Speaking of handy 7D features, you can use a C mode to register your preferred settings for the shooting, metering, drive, and autofocus mode, the Custom Functions that you prefer, and the Picture Style you want to use.
Here is a checklist of camera settings that you can set in advance, or register as a C mode.
Av shooting mode. In most outdoor and nature scenes, a primary goal is to control the depth of field. For that reason, many photographers use Av shooting mode because with one adjustment, they can set the aperture while the camera automatically adjusts the shutter speed. If you use Av shooting mode and you're handholding the camera, be sure to continually check the shutter speed. If the shutter speed is too slow, you run the risk of getting an out-of-focus image.
As a rule of thumb, the minimum shutter speed at which you can handhold a non-IS lens is the reciprocal of the focal length. Thus, for a 200mm lens or zoom setting, the minimum shutter speed at which you can handhold the camera and get a sharp image is 1/200 second. For a 300mm lens, the fastest shutter speed is 1/300 second, and so on. If the shutter speed is too slow and you're handholding the camera, then increase the ISO, stabilize the camera on a tripod or monopod, switch to an IS lens if possible. But if you're shooting in lower light such as at dusk, you may want to switch to Tv mode to lock in a fast enough shutter speed to handhold the camera.
One-shot AF mode with manual AF-point selection.I use One-shot AF mode with manual AF-point selection because I always want to control where the point/plane of sharpest focus is in the image. But if you're shooting birds or wildlife, then you may prefer using AF Focus AF, which automatically switches to automatic focus tracking (AI Servo AF mode) if the subject begins to move. And for birds and wildlife, the AF AF-area selection modes discussed in Chapter 3 can work to your advantage. I also like to use the Orientation linked AF point C.Fn III-12. As I change from horizontal to vertical shooting, the AF point I'm most likely to want to use is automatically selected along with the AF selection mode.

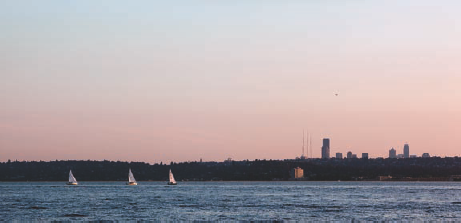
Figure 11.3. In average scenes such as this, the 7D produces very good exposures. However, to keep good detail in the brightest water highlights, I used a −1/3 stop Exposure Compensation setting. Exposure: ISO 100, f/22, at 1/200 second, −1/3 Exposure Compensation using an EF 16-35mm f/2.8L USM lens.
Single or a Continuous Drive mode. The drive mode you choose depends on the scene or subject you're shooting. If I'm shooting in areas where birds and wildlife are common, then I use high-speed continuous shooting. But if I'm shooting only landscapes or other non-moving subjects, then I use Single Drive mode.
Evaluative or Spot Metering mode. Evaluative metering gives good results in a majority of scenes. I also often use AE Lock to meter on midtone areas and lock that exposure. To review how to use AE Lock, go to Chapter 3. You can also switch to Spot metering mode and Manual shooting mode and meter on a middle gray area of the scene.
Picture Style. Because I always edit my images on the computer before displaying them on the Web or printing them, I use my modified Neutral Picture Style for shooting outdoors. This style offers ample room for interpreting the color and contrast during image editing, and the colors are very true to the scene. You can also use Landscape Picture Style with its more vivid greens and blues. If you don't edit images on the computer before printing them, then the Standard Picture Style also produces good prints from the camera.
Note
For more information on modifying Picture Styles, see Chapter 5.
Custom Functions. My choices depend on the scene and subject, but in general, here are some Custom Functions that you may want to consider. If you want to make larger or smaller changes in aperture and shutter speed, then you can set exposure level increments, C.Fn I-1, to 1/2 stop instead of the default 1/3 stop increment. Safety shift (C.Fn I-6) offers some insurance to automatically change the exposure setting if the light suddenly changes. Long exposure and High ISO noise reduction (C.Fn II: 1 and 2) are good choices if you are shooting low light at a high ISO setting and/or using long exposures. If you are using a super-telephoto lens, the C.Fn III-4 will minimize defocusing when the lens is having trouble achieving focus. Finally, you can set C.Fn III-13 to lock up the reflex mirror to prevent blur when you are making long exposures or macro shots, or using a long lens.
Technically, good exposure is one that retains detail in the highlights and shadows, and that has a full range of tones between the brightest highlight and the deepest shadow. In addition to this, the late, great photographer Monte Zucker added this caveat: "A properly exposed digital file is one in which the [tonal range] fits within the range that can be printed on photographic paper and still show the same detail."
Good exposure should happen in the camera rather than in the image-editing phase. Too often, photographers see an exposure problem and think, "I'll fix it in Photoshop." Doubtless, many image problems can be improved with skillful editing in both a RAW conversion program and in Photoshop. But your goal should be to get the best in-camera exposure that the 7D is capable of delivering.
The exposure sections that follow assume that you want the best exposures from the 7D that you can get. At first glance, the advanced exposure approach may seem too complex or too much trouble. In that case, use the basic exposure technique knowing that the 7D will give you consistently good exposures. But the advanced technique is a classic for ensuring good exposure.
You can expect the 7D's onboard reflective light meter, along with Canon's new and improved Evaluative metering, to provide excellent exposures for most scenes. However, in some scenes, you'll want to override the camera's suggested exposure by using Exposure Compensation, Auto Exposure Lock, or Exposure Bracketing.
The camera assumes that all scenes contain a variety of tonal values from the highlights to the shadows. And if all of those values are averaged, they produce a middle-gray tonal value. As a result, if the middle-gray tones are properly exposed, then the tonal values will also be properly exposed in the final image in most scenes. Knowing this, you can correctly expose most nature and landscape scenes.
This basic exposure method, described next, is a popular exposure technique that is bolstered by the 7D's new metering sensor and metering algorithms. The camera takes into account focus, luminance, and color from the 63 zones throughout the viewfinder, and each layer of the dual-layer sensor is sensitive to different wavelengths of light. The combination of the new sensor and algorithms provide very accurate meter readings.

Figure 11.4. This is another average scene where the onboard light meter produces an excellent exposure. Exposure: ISO 100, f/5.6, at 1/100 second using an EF 70–200mm f/2.8L IS USM lens.
For the majority of nature and landscape images, the primary consideration is controlling the depth of field — whether you visualize a final image with extensive depth of field for a stunning sweep of flower-covered hills, or with a shallow depth of field for a selective focus in a macro shot. In any case, the shortest route to controlling the depth of field via aperture changes is Av shooting mode. And for metering, the Evaluative metering mode is a dependable and accurate metering mode, even for backlit subjects.
The usual sequence for the basic exposure approach is to set the aperture or shutter speed, and then make the first exposure using the camera's recommended settings. Then you evaluate the image and histogram to see if exposure modifications are needed. In some scenes, the camera's recommended exposure will need to be modified to preserve highlight detail or to open blocked shadows.
Note
A spike on the right side of the histogram indicates blown highlights, and a spike on the left side indicates blocked shadows — shadows that transition too quickly to black. For more details, see Chapter 3.
Most often, photographers have to deal with high-dynamic range scenes. In practical terms, a high-dynamic range scene is one where the range from highlights to shadows as measured in f-stops is greater than the camera's imaging sensor can handle. In most high-dynamic range scenes, the camera sacrifices the highlights, resulting in blown highlights, although the shadows may also be blocked. If you're not sure whether the scene falls into the high dynamic range category, you can quickly assess the scene brightness range. Just switch to Spot metering mode and take a meter reading on a highlight and another on a shadow area. Then calculate the difference between the two readings.

Figure 11.5. To capture the sun as a starburst, I used a narrow f/22 aperture, and I waited for the sun to just drop past the boat's deck railing to illuminate the bow of the boat. Exposure: ISO 200, f/22, at 1/200 second with −1/3 stop Exposure Compensation. I used an EF 16-35mm f/2.8L USM lens for this image.
If the range is greater than the camera can handle, you have several choices: to properly expose the subject and let the rest of the scene go overexposed or underexposed; to use high-dynamic range imaging; or, if you're shooting RAW images, to process a single RAW file multiple times to make the best of highlights, midtones, and shadows, and then composite the files into an image.
In some scenes, however, you can get better overall exposure by using exposure modification techniques. One of the goals of exposure is to retain highlight detail within the subject, and if possible, to maintain detail in most, if not all, highlight areas. This is especially important if you are shooting JPEG capture because if you don't capture the highlight detail, it cannot be added later. If you're shooting RAW capture, you can recover some highlight detail when you convert the image in a RAW conversion program.
Note
The amount of highlight detail that you can recover depends on different variables, as well as the conversion program you use.
If the highlights are blown when using the camera's suggested exposure, the easiest modification you can use is negative Exposure Compensation to give the image less exposure. The amount of compensation that you set depends on the scene. Every scene is different, but I usually start with 1/2 stop of compensation. Then check the histogram to see if more or less compensation is needed. Experiment with the Exposure Compensation amount until you get an exposure that retains highlight detail in the critical highlight areas. In some scenes, you may have to live with some blown highlights in non-subject-critical areas.
When you set Exposure Compensation in Av shooting mode, the camera changes the shutter speed to achieve the compensation. So always monitor the shutter speed, and use a tripod if the shutter speed is too slow for handholding the camera and lens.
Another exposure modification option is Auto Exposure Bracketing (AEB). Normally, you use AEB to shoot three exposures: one at the camera's recommended exposure, one with more exposure, and one with less exposure. But if the challenge you're trying to solve is overexposed highlights, then shooting the frame with more exposure is pointless. Fortunately, the 7D enables you to shift AEB so that all frames are in the negative exposure range.
Here is how to shift AEB so that all three frames are at negative exposure. If you are in another scene where you want increased exposure, these steps work for that situation as well, with slight modification required to move toward the increased exposure side of the scale.
Set the Mode dial to P, Tv, or Av, press the Menu button, and then turn the Main dial to select the Shooting 2 menu.
Turn the Quick Control dial to highlight Expo. comp./AEB, and then press the Set button. The Exposure comp./AEB screen appears.
Turn the Main dial to the right to display the AEB scale.
Turn the Quick Control dial to shift the bracketing tick marks below or above the zero mark.
Turn the Main dial to the right to set the amount of bracketing difference, and then press the Set button. As you turn the Main dial, the tick marks separate, showing the exposure difference in 1/3 stop increments for the exposures.
To make all three bracketed shots, press the Shutter button three times if you're in One-shot drive mode.

Figure 11.6. I used AE Lock for this shot of a backlit fern frond. I locked the exposure on a midtoned area and used M (Manual) shooting mode to set the exposure based on the light meter reading. Exposure: ISO 400, f/8, at 1/80 second using an EF 100mm f/2.8 Macro USM lens.
You can also use AE Lock. With AE Lock and Evaluative metering, you point the lens so that the currently selected AF point is over a midtone area in the scene. (Midtones are detailed later in this chapter.) Then you press and hold the AE Lock button on the back-right top of the camera to lock in the exposure settings. Move the camera to recompose the image, focus, and shoot.
However, if you use Partial, Spot, or Center-weighted Average metering modes, AE lock is set only at the center AF point, and this is also true if you turn the switch on the lens to MF (Manual Focus). So point the lens so the center AF point is over the midtone area when you use this technique.
Note
With any exposure approach, you may not see any difference in images where you make exposure changes if you have Auto Lighting Optimizer on the Shooting 2 menu set to any setting except Disable. Auto Lighting Optimizer automatically brightens pictures that it detects as being too dark and corrects low contrast. If you are using exposure modification, then turn off Auto Lighting Optimizer so that you can see the effect that the modifications make.
The classic exposure approach for landscape and nature scenes is to set the exposure based on taking a meter reading on a gray card or on a midtone area in the scene. This approach is based on the calibration of the camera's built-in reflective light meter to 18 percent reflectance. Knowing that the meter is calibrated for the middle tonal value, when the midtone values in the image are correctly exposed, the other tonal values are also properly exposed. The caveat is that if you meter from a gray card, the card must be in the same light as the subject.
To use this exposure technique, switch to M (Manual) shooting mode, and then identify an area in the scene that has the same brightness value as middle gray, or 18 percent reflectance. The color may not be gray, but the tonal value should be the same as middle gray.
First set the aperture for the depth of field you want. Then set the 7D to Spot metering mode and select the center AF point. Point the lens so that the center AF point is on top of the middle gray area. Press the Shutter button halfway, and then set the shutter speed from the meter reading; select the AF point you want, compose the image, focus, and make the picture. And if you're handholding the camera, be sure that the shutter speed is fast enough to get a sharp image. If shutter speed is a critical factor, then set it before setting the aperture.
If you are unaccustomed to finding middle gray, it can take some visual training to learn to spot middle gray in a scene that you are viewing in color. Figure 11.7 can be used to help you identify the tonal value to look for and its comparative brightness. Then your task is to be able to translate the middle gray tonal value in a scene that you're viewing in color. With practice, you'll be able to spot middle-tone areas in scenes.

Figure 11.7. In this abbreviated tonal scale, middle gray is the fourth gray square from the left. the far right is a section of a photographic gray card, a copy of which you can find in the back of this book.
You can meter off of a gray card that is placed in the same light as the scene or subject. Or if you have a middle-gray color camera bag, you can meter off it as long as it's in the same light as the subject. If you use a gray card, and a gray card is included in the back of this book, ensure that there are no shadows, glare, or hotspots on the card, and then hold the camera about 6 inches from the card. Press the Shutter button halfway to get the meter reading, and then set the aperture and shutter speed from the meter reading.
An advantage of using a gray card is that you can use it not only to take a meter reading but also to correct color during RAW image conversion.
Because the camera is calibrated to properly expose scenes with an average distribution of tonal values, it follows that scenes with a predominance of light or dark tones will throw off the camera's suggested exposures. Thus it's important to be able to recognize non-average scenes and adjust the exposure appropriately. Non-average scenes include backlit scenes, white-on-white and black-on-black subjects, snow, white sand, large expanses of dark water, and large, black subjects.
When you're presented with a breathtaking snowy landscape or an expanse of white sandy beach, you know by now that if you don't make an exposure modification, the camera will average all of the tones in the scene to middle gray. As a result, you'll get gray snow and gray water if you use the basic exposure approach.
To compensate for the camera's calibration, you can set positive exposure compensation for bright-toned scenes and negative exposure compensation for dark-toned scenes.
Generally, a +1 or +2 exposure compensation for scenes with a predominance of light tones, or −1 to −2 compensation for scenes with a predominance of dark tones produces true whites and blacks. Then check the histogram to ensure that highlights are not blown or the shadows are not blocked. This method is less precise because you have to experiment to find the amount of compensation needed. You can meter on a midtone value in the scene — a tree trunk in a snow scene, a middle-gray cloud, and so on — and then use those exposure settings to make the picture. If the midtones are properly exposed, the rest of the tones will be rendered accurately as well.

Figure 11.9. To keep the pier and the people walking in silhouette, I used a −1/3 stop Exposure Compensation, which also helped retain detail in the bright areas of the sunset. Exposure: ISO 200, f/11, at 1/100 second, −1/3 stop Exposure Compensation, using an EF 16-35mm f/2.8L USM lens.
Note
With a variety of different light sources and light colors in night scenes that include natural and artificial light, I've found the best color using Automatic White Balance when shooting JPEG images. AWB is also a good choice when shooting fair rides, floodlit buildings, and street scenes at dusk and in low light.

Figure 11.10. For this image of a robin, I used the basic exposure technique with AE Lock set on the bright area of the birdbath. Exposure: ISO 200, f/5.6, at 1/800 second using an EF 100-400mm f/4.5-5.6L IS USM lens.

Figure 11.11. For this shot of a sailboat on Lake Washington, I metered off a midtone in the lake. Exposure: ISO 100, f/8, at 1/200 second with −1.33 Exposure Compensation using the EF 70–200mm f/2.8L IS USM lens.

Figure 11.12. Exposure Compensation of +1.33 stops helped render the snow in this scene as white instead of middle gray. Exposure: ISO 100, f/8, 1/50 second, using an EF 24-70mm f/2.8L USM lens.
If you are shooting into the bright sun, the camera meter tries to bring the foreground elements to middle-gray tonal values, and, in the process, it often overexposes the brighter sky. In these scenes, take a meter reading on a part of the sky that you want to be rendered as middle gray, to keep the sky from being too bright. Or if you want a partial silhouette that retains some detail in the foreground objects, then meter on a cloud that is slightly brighter than middle gray.
In low light and night scenes that include buildings or structures, you can meter bricks, stones, or concrete in the scene. And if you're photographing buildings or structures lit by artificial light, then meter on an area that is lit by the light, but not the light source itself. In scenes lit by both artificial and ambient (natural) light, you can take a meter reading from the sky just after sunset.

As with each area of photography in this chapter, countless other books have been written specifically on these topics. In my experience, however, all the tips in the world cannot make great images if the photographer doesn't constantly practice seeing and appreciating everything in nature. I've irritated more people on the highway than I can count because I routinely slow down to appreciate a stunning mountain lit by that rare and incomparable light that happens only occasionally. Slowing down is something that will help you get great landscape and nature shots.
Keep your eye in practice. Photography is like any other skill: The more you practice it, the more finely tuned your eye becomes and the more you will look for unique and unusual scenes and approaches. For example, when I spend long stretches writing at the computer, and then go out shooting, it takes a while to see with a practiced eye again.
Look for the light. Light, especially beautiful light, is transitory and fleeting, but this is the light you desire. Maybe the light illuminates a mountainside forest with gold and purple hues, or maybe a small shaft of light pierces through the forest trees to spotlight a tiny frog or wild mushroom, but whatever the light, look with an acute eye for the stunning light. And be ready to shoot, regardless of whether or not the right lens is on the camera. Don't let stunning light opportunities pass you by.
Image composition is very important. Many books have been written on composition, but you'll do well to study nature itself. For me, nature is the ultimate field guide to good composition.
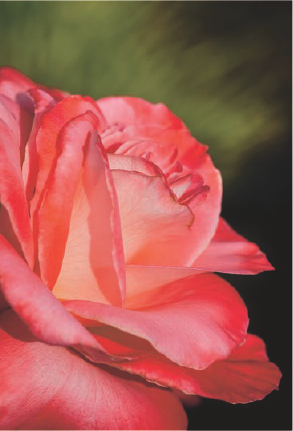
Figure 11.14. Some of the best images are found in your own yard, as was the case with this rose. Exposure: ISO 100, f/8, at 1/250 second using an EF 100mm f/2.8 Macro USM lens.
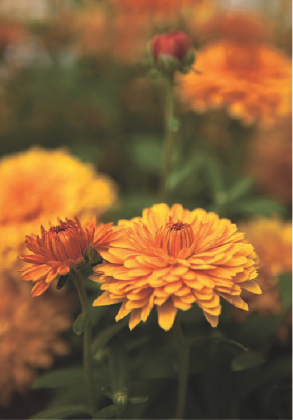
Figure 11.15. In this image, I wanted to bring the flower visually forward in the frame, so I chose a wide aperture of f/2.8. The resulting shallow depth of field retains the context of the surrounding flowers and foliage without having them distract from the main blossom. Exposure: ISO 100, f/2.8, at 1/1000 second using an EF 24-70mm f/2.8L USM lens.
