One of the best ways to increase your shooting efficiency and enjoyment with the EOS 7D is to customize it for your everyday shooting as well as for specific shooting situations. The 7D offers three major categories of customization:
Custom Functions. These enable you to change camera controls and behavior as well as to set up the camera for both general and venue-specific shooting situations.
C modes or Camera User Settings. These enable you to set up virtually everything on the camera and then save all the settings as C1 or C2 shooting mode.
My Menu. This is a menu tab where you can place your six most frequently used menu items for quick access.
I can tell you from personal experience that all three features will save you time and offer shooting advantages that are well worth the time it takes to make the adjustments.

The major advantage of Custom Functions is that they enable you to customize camera controls and operation to suit your shooting style. As a result, they save you time and make shooting more enjoyable. For example, you can change the pattern for selecting AF points manually using Custom Function III-7 to suit your preferences.
Before you begin, you should know that Custom Functions can be set only in P, Tv, Av, M, and B shooting modes. Also, after you set a Custom Function option, it remains in effect until you change it.
Note
Canon refers to Custom Functions using the abbreviation C.Fn [group Roman numeral]-[function number]; for example, C.Fn II-3.
The 7D offers 25 Custom Functions. Some Custom Functions have a broad range of uses, and others are useful for specific shooting specialties or scenes.
Canon organized the 25 Custom Functions into four groups denoted with Roman numerals, all of which are listed on the Custom Function camera menu. The following tables delineate the groupings and the C.Fns that fall within each group. It is worthwhile to become familiar with the groupings because you must choose a group from the Custom Functions menu to find and change a specific function.
Custom Function Group I: Exposure. Detailed in Table 5.1, this group essentially sets any function that has to do with exposure settings and flash sync speed.
Table 5.1. Custom Function Group I: Exposure
Option number
Function name
1
Exposure level increments
2
ISO speed setting increments (available in Movie mode only with manual exposure)
3
ISO expansion
4
Bracketing auto cancel (unavailable in Movie mode)
5
Bracketing sequence (unavailable in Movie mode)
6
Safety shift (unavailable in Movie mode)
7
Flash synchronization speed in Av mode (unavailable in Movie mode)
Custom Function Group II: Image. I think of this group, shown in Table 5.2, as the NR (noise reduction) and dynamic range group.
Custom Function group III: Autofocus/Drive. The majority of functions in this group are related to working with autofocus and it includes Mirror lockup. See Table 5.3.
Table 5.3. Custom Function Group III: Autofocus/Drive
Option number
Function name
1
AI Servo tracking sensitivity[a]
2
AI Servo 1st/2nd image priority[a]
3
AI Servo AF tracking method[a]
4
Lens drive when AF impossible (available in Live View and Movie shooting when using AF Quick focusing mode)
5
AF microadjustment (available in Live View and Movie shooting when using AF Quick focusing mode)
6
Select AF area selection mode (available in Live View and Movie shooting when using AF Quick focusing mode)
7
Manual AF point selection pattern (available in Live View and Movie shooting when using AF Quick focusing mode)
8
VF display illumination[a]
9
Display all AF points[a]
10
Focus display in AI SERVO/MF[a]
11
AF-assist beam firing (available in Live View shooting when using AF Quick focusing mode, unavailable in Movie mode)
12
Orientation linked AF point (available in Live View and Movie shooting when using AF Quick focusing mode)
13
Mirror lockup[a]
[a] Functions marked with an * are not available for Live View and/or Movie shooting.
Custom Function Group IV: Operation/Others. I think of this group as "everything else." If I can't find what I want in the other groups, I choose this option on the Custom Function menu. See Table 5.4.
Table 5.4. Custom Function Group IV: Operation/Others
This section includes a description of each Custom Function and the options that you can set. I will provide instances where the C.Fn would be useful in general, but also consider how you could use them to simplify or customize your specific shooting situations.
I encourage you to use Custom Functions to the fullest extent. I think that you will be pleasantly surprised at how much more you will enjoy the 7D after you customize it for your shooting needs.
Tip
If you set Custom Functions and later want to return to the camera defaults, you can do that easily by using the Clear all Custom Func. (C.Fn) option on the Custom Functions camera menu.
The Exposure Custom Functions are described here followed by the options that you can choose for each function.
With this function, you can set the increment that is used for shutter speed, aperture, exposure compensation, and Auto Exposure Bracketing (AEB) changes. The exposure increment you choose is displayed in the viewfinder and on the LCD as marks at the bottom of the Exposure-level Indicator.
Option 0: 1/3 stop. By default, the 7D uses 1/3 stop as the exposure-level increment for changes in shutter speed, aperture, exposure compensation, and AEB.
Option 1: 1/2 stop. This option sets 1/2 stop as the exposure-level increment for shutter speed, aperture, exposure compensation, and AEB changes. It gives you a larger exposure change and is useful when you bracket images for later compositing in an image-editing program.
With this function, you can set the increment level that is used when you change the ISO sensitivity setting.
Option 0: 1/3 stop. This is the default increment. With this option set, the ISO speeds are Auto, 100,125, 160, 200, 250, 320, 400, 500, 640, 800, 1000, 1250, 1600, 2000, 2500, and 3200, as well as H (12800) when C.Fn I-3 is set to On.
Option 1: 1 stop. This option sets 1 f-stop as the ISO adjustment-level increment. With this option set, the ISO speeds are the traditional settings of Auto, 100, 200, 400, 800, 1600, 3200, as well as H (12800) when C.Fn I-3 is set to On.
With this function, you can choose the additional ISO sensitivity setting of H, which is equivalent to ISO 12800. To determine if you want to use the high ISO setting, including the expansion setting of 12800, be sure to shoot test shots at the high level, and then examine the images to ensure that you can get good prints with acceptable noise levels at the size you most often use to make prints. And even then, to always get the highest image quality in terms of color, fine detail, and smooth tones, I recommend shooting at the lowest possible ISO setting given light, lens, and other factors.
Option 0: Off. At this default setting, you cannot select the expanded ISO setting of H (12800).
Option 1: On. You can select the expanded ISO setting of H (12800). With this option set, you can select H as an ISO option in the same way that you select other ISO settings.
With this function, you can choose when AEB and White Balance Bracketing (WB-BKT) are cancelled. Very often, AEB and WB-BKT are specific to a scene, and, therefore, not settings that you want to retain. It is also easy to forget that you have set either bracketing option, and you end up shooting with the bracketing inadvertently set. Unless you most often shoot with AEB and WB-BKT, I recommend using the default option 0.
Option 0: On. Both AEB and WB-BKT are cancelled when you turn the camera power switch to Off, when you have the flash ready to fire, and if you clear camera settings.
Option 1: Off. Choosing this option retains AEB and WB-BKT settings even after you turn off the camera. When the camera's flash is ready, the bracketing is cancelled, but the camera remembers the AEB amount for use after you use the flash.
Use this function when you want to change the sequence of images that are bracketed by shutter speed or aperture. It also enables you to change the sequence for WB-BKT. For exposure bracketing, I find that the Option 1 sequence makes it much easier to identify which image is which in a series of bracketed images after I download them to the computer.
Option 0: 0 (Standard exposure or standard white balance), − (Decreased exposure or less blue or less magenta white-balance bias), + (Increased exposure or more amber and more green white-balance bias)
Option 1: − (Decreased exposure, or less blue or less magenta white-balance bias), 0 (Standard exposure or standard white balance), + (Increased exposure or more amber and more green white-balance bias)
If you enable this function, the camera automatically shifts the aperture or shutter speed in both Shutter-priority AE (Tv) and Aperture-priority AE (Av) shooting modes if there is a sudden shift in lighting that would cause an improper exposure at the current settings.
While photographers are watchful for lighting changes, this function can be very helpful in stage and theater lighting venues where overhead spotlights can dramatically shift as speakers or actors move around the stage in and out of spot-lit areas.
Option 0: Disable. This option maintains the exposure you have set even if the subject brightness changes.
Option 1: Enable (Tv/Av). In Shutter-priority AE (Tv) and Aperture-priority AE (Av) shooting modes, the shutter speed or aperture automatically shifts if the subject brightness suddenly changes so that you get an acceptable exposure.
This function provides options for setting the flash sync speed automatically, to 1/250–1/60 second, or to a fixed 1/250 second in Av mode. With these options, you can control whether the flash light balances with existing light or provides primary illumination for the scene. It can also help ensure a fast enough camera handholding speed.
Option 0: Auto. This option automatically syncs Speedlites at 1/250 second or slower. This option uses both existing light and the flash to illuminate the scene.
Option 1: 1/250-1/60 sec. auto. This option provides a fast enough shutter speed in Av mode to handhold the camera and get a sharp image depending on the lens you're using. This option does not balance the flash with existing light, so the background will be dark.
Option 2: 1/250 sec. (fixed). Automatically sets the highest flash sync speed of 1/250 second in Aperture-priority AE (Av) mode. With this option, less existing light is used for the exposure and more of the flash light is used. As a result, the background goes darker than with Option 1.
This group of functions enable you to set noise reduction for long exposures and high ISO sensitivity settings. And you can choose to use Highlight Tone Priority as well.
This function offers options to turn noise reduction on or off, or to set it to automatic for long exposures. With noise reduction turned on, the reduction process takes the same amount of time as the original exposure. In other words, if the original image exposure is 1.5 seconds, then noise reduction takes an additional 1.5 seconds. This means that you cannot take another picture until the noise reduction process finishes.
I keep the 7D set to Option 1 to automatically perform noise reduction if it is detected in long exposures, which I consider to be good insurance.
Option 0: Off. No noise reduction is performed.
Option 1: Auto. The camera automatically performs noise reduction when it detects noise from 1-second or longer exposures.
Option 2: On. The camera performs noise reduction on all exposures of 1 second or longer regardless of whether the camera detects noise. Obviously, the second exposure duration reduces the continuous shooting burst rate dramatically. But this is a good option for night scenes and lowlight still-life subjects. If you're shooting at a low-light music concert or a sports event, this option slows down shooting too much for it to be a practical option.
Note
If you use Live View and you have Option 2 set, then the current view on the LCD is suspended during the time that the camera performs the noise reduction.
With this function, you can choose to apply more aggressive noise reduction to shadow areas in particular when you shoot at high ISO sensitivity settings. (The camera applies some noise reduction to all images.) If you turn this option on, noise in low-ISO images is further reduced.
Because Canon has a good noise-reduction algorithm, this setting is more likely to retain fine image details, and reducing shadow noise is advantageous. However, it pays to check your images to ensure that the blurring of fine image detail resulting from noise reduction is not too heavy handed.
Option 0: Standard. This is the default setting that applies some color (chroma) and luminance noise reduction to images shot at all ISO sensitivity settings. If you seldom use high ISO settings, this is a good option to choose, and it is effective even at relatively high ISO sensitivity settings.
Option 1: Low. The camera performs noise reduction on all images, not just high-ISO images. You may not see much difference between this option and Option 0: Standard.
Option 2: Strong. More aggressive noise reduction is applied, and a loss of fine detail may be noticeable. In addition, the burst rate in Continuous drive mode is reduced.
Option 3: Disable. No noise reduction is applied.
One of the most interesting and useful functions is Highlight Tone Priority, which helps ensure good detail in bright areas such as those on a bride's gown. With the function turned on, the high range of the camera's dynamic range (the range measured in f-stops between deep shadows and highlights in a scene) is extended from 18 percent gray (middle gray) to the brightest highlights.
Further, the gradation from middle gray tones to highlights is smoother with this option turned on. The downside of enabling this option is increased digital noise in shadow areas and not being able to select ISO 100.
But if you are shooting weddings or any other scene where it is critical to retain highlight detail, then the tradeoff is worthwhile. If noise in the shadow areas is objectionable, you can apply noise reduction in an editing program.
However, if you turn on Highlight Tone Priority, the default ISO speed range is reduced to 200 to 6400 so that you lose the ISO 100 and (H) 12,800 settings. The ISO display in the viewfinder, on the LCD panel, and in the Shooting information display adds a D+ to indicate that this option is in effect.
Option 0: Disable. This is the default setting with no highlight tone expansion.
Option 1: Enable. This option turns on Highlight Tone Priority, improving the detail in bright highlights and in gradation of detail from middle gray to the brightest highlights. The lowest ISO setting available is 200 and the highest is 6400. With Auto Lighting Optimizer turned on, the 7D applies an automatic correction to images that are too dark and/or have flat contrast. This option turns off the automatic optimization.
This group of functions enables you to control various lens and camera autofocusing tasks. This is also where you can set mirror lockup.
This function enables you to set focus tracking (AI Servo autofocus mode) so that when obstructions come between the camera and the subject, the focus is less easily thrown off making subject tracking easier. If you choose a fast setting, it's more difficult for the autofocus system to track a specific subject, but it is easier to switch focus to a subject that comes into the frame from the side. Conversely, a slow setting makes it easier to track a single subject.

Slow to Fast. Tilt the Multi-controller to move the tick mark to the position you want on the scale.
This function is useful when you use AI Servo autofocus mode (focus tracking) and a Continuous shooting drive mode. With that combination, you can prioritize subject focusing, shutter release, focus tracking, or shooting speed for the first image during continuous shooting. And you can set the priorities for the second and subsequent images.
Your choice depends on your priorities and on the subject. If the subject is moving across the frame at approximately the same distance through the series, then you may choose to give priority to subject focus for the first shot and shooting speed for the second shot. But if the subject distance varies, then you may want subject focus as the first shot priority and focus tracking to be the priority for subsequent shots.
Option 0: AF priority/Tracking priority. For the first image, subject focus is the priority. For subsequent shots, shooting speed and focus tracking are given priority.
Option 1: AF priority/Drive speed priority. Focusing is the priority in the first image, and shooting speed gets the priority over focus tracking of the subject for the second image.
Option 2: Release/Drive speed priority. For the first image, shutter release has priority over focusing. For the second and subsequent images, shooting speed has priority.
Option 3: Release/Tracking priority. Shutter release has priority for the first shot while focus tracking is the priority for the subsequent images.
Use this function to set AI Servo AF mode to focus-track a subject — the camera identifies the subject by the focus point that started the focusing or the active focus point — or to switch to tracking a subject that enters the frame and that is closer than the first subject. Your choice depends on the subject and situation. If you are focusing on a specific athlete in a game, then you can choose to maintain focus on the athlete regardless of players who are closer to the camera. Alternately if you are shooting a flock of birds, then you may prefer to have the camera switch focus to the closest bird.
Note that with 19-point AF auto selection and with AF point expansion, the main focus point is the first AF point that started focus tracking. With Zone AF, the main focus point is the active AF point. Autofocus modes and AF areas/zones are detailed in Chapter 3.
Option 0: Main focus point priority. The camera switches the active AF point to focus on the closest subject.
Option 1: Continuous AF track priority. If another subject enters the frame and is closer than the target subject, this additional subject is ignored and focus continues on the target subject. If necessary, the camera switches to an adjacent AF point (with AF point expansion) based on the preceding focusing result/pattern. In short, this option prevents focus switching off the subject when an obstruction comes between the camera and the subject.
This is a handy function to explore if you often shoot in scenes where the lens simply cannot focus. You have likely been in situations where the lens seeks focus seemingly forever and goes far out of focus range while attempting to find focus, particularly with telephoto and super-telephoto lenses. Setting this function to Option 1 stops the lens from seeking to find focus and going into an extensive defocus range.
Option 0: Focus search on. The lens continues to seek focus.
Option 1: Focus search off. This stops the lens drive from going into extreme defocus range.
This function is designed to overcome the frontand back-focusing tendencies of some lenses. Using microadjustment shifts the camera's sharpest plane of focus forward or backward and applies the adjustment to the internal AF system to compensate for front or back focus.
The camera identifies lenses by their focal length and maximum aperture, and up to 20 lenses can be adjusted. Until now, lens adjustments were made by the factory or by Canon, but this function enables you to approximate that tuning. The process for making microadjustments requires using a target pattern, and the process is not for the faint of heart. If you choose to use AF Microadjustment, then you can set the microadjustment in plus or minus 20 steps forward or backward and register the adjustments.
Option 0: Disable. No adjustment is used.
Option 1: Adjust all by same amount. This option adjusts all lenses by the same amount. If you find that all lenses are off by the same amount, then this is the option to select.
Option 2: Adjust by lens. With this option, you can test a single lens, make the adjustment, and then register the results in the camera. Then when you mount a lens that has a registered adjustment, the camera automatically applies the focus adjustment and shifts the point of focus per the adjustment.
Note
You can learn more about AF Microadjustment in Chapter 9.
In broad terms, AF area selection modes determine where, how many, and which of the 19-point AF points are used for focusing. The 7D has three default AF area selection modes, and with this function, you can add two more: Spot AF for pinpoint focusing, and AF point expansion. Chapter 3 details AF area selection modes and includes steps for making selections on this Custom Function screen.
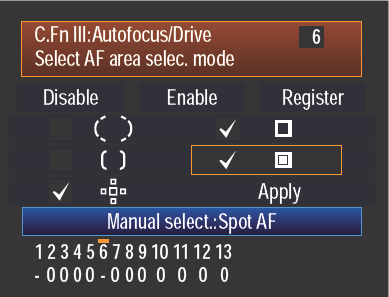
This function enables you to register, and then include or exclude AF areas selection modes. The modes that you enable are available for you to select when you are shooting. The AF area selection modes you can enable or disable are:
Auto select: 19 point AF. In this mode, the camera automatically selects the AF point or points for focusing.
Manual select: Zone AF. In this mode, you can manually select five different AF zones based on the subject position and orientation.
Man. Select: AF point expansion. This mode enables the 7D to use AF points that are adjacent to the manually selected AF point to focus.
Manual select: Single point AF. This is the standard AF point selection method where you can manually select any one of the 19 AF points.
Manual select: Spot AF. This option enables pinpoint focusing using an area that is smaller than the size of the AF point shown in the viewfinder.
Use the options of this function to set whether the manual AF point selection pattern stops at the outer edge or moves to the opposite AF point. If the AF point selection pattern stops at the outer edge, then you have to turn the Main or Quick Control dial (depending on the direction of AF-point selection) to move the AF point to the next row of AF points.
If you choose Continuous, then turning the Main or Quick Control dial moves the AF point from the top or bottom AF point to the opposite AF point on the same row. Options that you choose here don't apply when you're using the 19-point AF auto selection and Zone AF area selection modes.
Option 1: Stops at AF area edges. Prevents the AF point from jumping from one side of a row to the opposite side of the same row of AF points. If you are selecting an AF point within an area of the screen, this option keeps you in the same area.
Option 2: Continuous. When you reach the edge of an AF row and turn the Main or Quick Control dial (depending whether you're selecting in the horizontal or vertical direction), the AF point jumps to the opposite side of the same row.
These options determine whether and when the viewfinder elements including the AF point, grid, and so on are lit in red.
Option 1: Auto. Viewfinder elements are automatically illuminated in low light.
Option 2: Enable. Viewfinder illumination is always on.
Option 3: Disable. Viewfinder elements are never illuminated.
You can chose to have the 19 AF points displayed during AF-point selection and have only the active AF point displayed during shooting, or have all AF points displayed during shooting.
With this function, the AF point or points that achieve focus will track focus on the subject when you are using AI Servo AF mode with Zone AF and 19-point AF auto selection. However, no focus confirmation can be selected.
Option 0: Enable. In AI Servo AF mode using Zone AF or 19-point AF auto selection, the AF point or points that achieve(s) focus will track focus on the subject. If you're using Manual Focus, the focus confirmation indication will be the same as with autofocus.
Option 1: Disable. No focus indication is displayed when focus is achieved even with Manual Focus. With AI Servo AF and AF point expansion, Zone AF, or 19-point AF auto selection, the AF point or points that are tracking subject focus are not displayed.
With this function you control whether the 7D's built-in flash or an accessory EX Speedlite's autofocus assist light is used to help the camera establish focus. The AF-assist beam is very helpful in speeding up focusing and in ensuring sharp focus.
Option 0: Enable. The camera uses the built-in flash or an accessory Canon EX Speedlite's AF-assist beam to establish focus. This beam helps the camera establish focus in low light or when the subject contrast is low. The flash also fires.
Option 1: Disable. The AF-assist beam is not used.
Option 2: Enable external flash only. Only the Speedlite's AF-assist beam is used to help establish focus.
Option 3: IR AF assist beam only. This option limits use of the assist beam firing to only Canon Speedlites that feature an infrared AF-assist beam. This option also prevents external Speedlites that use a series of quick assist beams from firing the assist beams.
This is one of the coolest and most useful of the new Custom Functions related to focusing. With Option 2, you can set a specific AF selection mode and AF point for the camera to use in horizontal orientation and another when the camera is in vertical orientation.
Thus, if you're shooting a wedding ceremony in landscape orientation, and then turn the camera to portrait orientation to shoot a portrait of the bride and groom, the AF point and AF selection mode are automatically chosen when you turn the camera vertically. And when you return to horizontal orientation, the AF selection mode and AF point that you preset are automatically chosen.
Option 0: Same for both vertical/horizontal. In this default setting, the camera maintains the same AF selection mode and AF point regardless of camera orientation.
Option 1: Select different AF points. With this option, you can set up different AF selection modes and AF points for horizontal and vertical camera orientation. The camera recognizes these orientations:
Horizontal
Vertical with the camera grip at the top
Vertical with the camera grip at the bottom
To use Option 1, you have to set up the AF point and Area selection mode for each of the three orientations in the order above, and then choose Option 1. The steps for setting Custom Functions are detailed later in this chapter.
Option 1 for this function prevents blur that can be caused in close-up and telephoto shots by the camera's reflex mirror flipping up at the beginning of an exposure. For nature and landscape photographers who often use mirror lockup, you can make this function more accessible by adding this Custom Function to My Menu. Customizing My Menu is detailed later in this chapter.
Option 0: Disable. This prevents the mirror from being locked up.
Option 1: Enable. This option locks up the reflex mirror for close-up and telephoto images to prevent mirror reflex vibrations that can cause blur. When this option is enabled, you press the Shutter button once to swing up the mirror, and then press it again to make the exposure.
The mirror remains locked for 30 seconds and then automatically flips down if you do not press the Shutter button to make the image. If you combine mirror lockup with the 10and 2-second Self-timer modes, the optional Timer Remote Controller TC-80N3 or the Remote Switch RS-80N3, and a tripod, you can ensure rock-solid shooting.
When you use mirror lockup with bright subjects such as snow, bright sand, the sun, and so on, be sure to take the picture right away to prevent the camera curtains from being scorched by the bright light.
This group of functions enables you to change the functionality and behavior of some camera buttons. It also includes options for adding image verification data and aspect ratio information.
For any photographer who wants to customize virtually everything on the camera, this function is a wish come true. With a diagram of the camera provided on this Custom Function screen, you can change the function of AF, exposure, image, and operation buttons on the camera at will.

Following are brief descriptions of the changes you can make. The 7D Instruction Manual provides more detail and a chart that is useful in reassigning button functions.
Because this screen is different from the majority of other Custom Function screens, here are the steps for making choices for Custom Control:
Set the Mode dial to P, Tv, Av, M, or B, and then press the Menu button.
Turn the Main dial to highlight the Custom Functions tab, turn the Quick Control dial to highlight C.FnIV:Operation/Others, and then press the Set button. The last Custom Function you accessed in this group is displayed.
Turn the Quick Control dial until the number 1 is displayed in the number control box in the upper right corner of the screen. The C.FnIV:Operation/Others Custom Controls screen appears.
Press the Set button to activate the Custom Controls. A camera diagram with controls and functions is displayed.
Turn the Quick Control dial to highlight the name of the button or dial you want to customize, and then press the Set button. The camera button or dial screen appears with the functions that you can assign to the button or dial.
Turn the Quick Control dial to select the function you want to assign to the button or dial, and then press the Set button.
If the INFO. button appears, press the INFO. button on the back of the camera to display a second screen with additional options you can set.
On the second screen, select the options you want, and then turn the Quick Control dial to select OK. If the OK button displays a right-pointing arrow, select the OK button by pressing the Set button to display a third screen with additional options that you can set. Repeat this process until the OK button no longer displays a right-pointing arrow.
Press the Set button to exit the screen and continue setting additional Custom Controls.
Here are the Custom Controls that you can reassign and the functions that you can assign to them:
Shutter button half-press (Metering and AF start). Instead of metering and focusing when you half-press the Shutter button, you can assign a half-press of the Shutter button to only meter, or to set AE Lock. You can also add the function to switch to a registered AF point (detailed later in this section).
AF-ON button. Instead of metering and focusing when you press the AF-ON button, you assign the AF-ON button functionality to AE lock, AF-OFF, FEL (Flash Exposure Lock), or OFF (disable the button use). If you choose metering and AF start, you can press the INFO. button to set the AF start point as either a manually selected AF point or the registered AF point. To set a registered AF point, see the sidebar in this chapter.
AE Lock button. Instead of setting AE Lock when you press the AE Lock button, you can assign the AE Lock button functionality to start metering and focusing, AF stop, Flash Exposure Lock, or choose OFF to disable the button entirely.
Depth of field preview. Instead of previewing the depth of field (DOF) when pressing the Depth of field button, you can assign this button to AF-OFF (AF stop), AE Lock, One Shot/AI Servo switching, IS (Image Stabilization) start, or to switch to the registered AF func. (function).
Note
If you assign One-shot/AI Servo functionality to a button, you can hold down the button to switch from the current autofocus mode to the other mode. If you're in AI Servo mode, the camera switches to One-shot AF only while the button is depressed.
If you choose to switch to a Registered AF function, then press the INFO. button to register one of the following AF functions: Manual select.: Spot AF; Manual select.: Single point AF; Man. Select.: AF point expansion; Manual select.: Zone AF, or Auto select.: 19 point AF.

When you choose OK, you can continue by setting the AI Servo tracking sensitivity to Slow, Medium slow, Standard, Medium fast, or Fast. Choose OK, and then you can set AI Servo 1st/2nd img (image) priority. The options you can choose are AF priority/Tracking priority, AF priority/Drive speed prio (priority), Release/Drive speed priority, or Release/Tracking priority. Click OK, and then you can set the AI Servo AF tracking method to either Main focus point priority or Continuous AF track (tracking) priority. Then click OK to return to the DOF preview button screen

Lens AF Stop button. The AF stop button is found only on super telephoto IS lenses. You can change the default AF-OFF button functionality to metering and AF start, AE Lock, to switch between One Shot/AI Servo focusing modes, to start IS (Image Stabilization on the lens), or to switch to a registered AF function. If you choose to switch to a registered AF function, you can press the INFO. button to register AF functions as well as the additional options that are described in the previous depth of field preview description.
M-Fn (Multi-function) button. You can assign the M-Fn (Multi-function) button to AE lock, (One-touch) RAW-JPEG, or VF electronic level.
Set. You can assign the Set button to display the Image quality screen, Picture Styles screen, camera menu, begin image playback, or to display the Quick Control screen (the Q button functionality).
Main dial. You can change the function of the Main dial in Manual mode from setting the shutter speed to setting the aperture.
Quick Control dial. You can change the function of the Quick Control dial in Manual mode from setting the aperture to setting the shutter speed or to select the AF point manually.
Multi-controller. You can set the Multi-controller to use it for selecting an AF point without first pressing the AF-point selection/Enlarge button. If you choose AF point selection, then press the INFO. button to display options for the functionality of the Multi-controller when you press the center of the controller. You can choose to have it switch to the center AF point or to the registered AF point. See the sidebar in this section to register an AF point.
This function offers options that allow you to reverse the direction for setting shutter speed and aperture in Tv and Av modes. And in Manual mode, you can reverse the dial direction of both the Quick Control and Main dials.
Option 0: Normal. When you turn the Main dial clockwise in Tv or Av mode, the shutter speed or aperture increases. In Manual mode, the Main dial changes the shutter speed and the Quick Control dial changes the aperture.
Option 1: Reverse direction. In Tv and Av shooting modes, the Main dial direction is reversed for setting shutter speed and aperture. In Manual mode, the directions of the Main and Quick Control dials are reversed. In other shooting modes, the Main dial direction is reversed. However, the Quick Control dial direction is not changed in Manual mode and for setting Exposure Compensation.
When this option is turned on, data is appended to verify that the image is original and has not been changed. This is useful when images are part of legal or court proceedings. The optional Data Verification Kit OSK-E3 is required.
Option 0: Disable. No verification data is appended.
Option 1: Enable. This option appends data to verify that the image is original or not. During image playback, a lock icon denotes verification data. To verify the image originality, the optional Original Data Security Kit OSK-E3 is required.
This function allows you to set an aspect ratio to images shot in Live View to simulate mediumand large-format film sizes. As a composition aid for the selected aspect ratio, the camera displays vertical lines on the LCD Live View image. The vertical lines also display during image playback. If you choose to add aspect ratio information, images are not altered, but when you open them in Canon's Digital Photo Professional program, it will display the image in the selected aspect ratio.
Note
Live View shooting is detailed in Chapter 6.
After reviewing the functions and options, there may be specific functions that you can identify immediately as being helpful for your daily shooting. Other functions such as mirror lockup are ones that you will use in scene-specific shooting. Still others you can set and forget about, or change based on specific shooting circumstances.
You may also find that combinations of functions are useful for specific shooting situations. Whether used separately or together, Custom Functions can significantly enhance your use of the 7D.
To set a Custom Function, follow these steps:
Set the Mode dial to P, Tv, Av, M, or B.
Press the Menu button, and then turn the Main dial to display the Custom Functions menu.
Turn the Quick Control dial to highlight the Custom Functions (C.Fn) group you want, and then press the Set button. The Custom Functions screen with the function group that you selected appears.
Turn the Quick Control dial until the Custom Function number you want is displayed in the number control box at the top right corner of the screen, and then press the Set button. The first Custom Function option is activated.
Turn the Quick Control dial to highlight the option you want, and then press the Set button. You can refer to the descriptions earlier in this chapter to select the function and option number that you want. Repeat steps 3 and 4 to select other Custom Function groups, functions, and options.
If you want to reset one of the Custom Functions, repeat these steps to change it to another setting or the default setting.
However, if you want to restore all the Custom Functions to the default settings, repeat steps 1 and 2, and in step 3, highlight Clear all Custom Functions (C. Fn), press the Set button, and then choose OK. All Custom Functions are restored to their defaults.
With Camera User Settings, denoted as C1, C2, and C3 on the Mode dial, you can preset the EOS 7D with your favorite shooting mode, exposure settings, drive and autofocus modes, and Custom Functions, and then make only minimal adjustments when you are ready to start shooting. The C modes enable you to use those specific settings by simply switching to the C1, C2, or C3 mode on the Mode dial. And you are not locked into the setting that you register because you can still change the settings as you shoot.
It does not take long to think of a plethora of ways to use C modes. For example, C1 mode could be set up for shooting nature and landscape with the camera preset to Av mode, exposure bracketing, mirror lockup, as well as to your favorite drive, autofocus, and exposure modes, and Picture Style. Then C2 mode is open for presetting the camera for portraits, weddings, concerts — you name it. Without question, C modes offer a way to spend less time adjusting camera settings and more time shooting.
Tip
If you have forgotten what settings you registered for any of the C modes, just press the INFO. button to display the current camera settings.
When you register camera settings, the following settings are saved and recalled when you set the Mode dial to the C mode under which you registered them:
Shooting settings. These shooting settings are saved in C modes:
Shooting mode, ISO, aperture, shutter speed, AF mode, AF point, AF area selection mode and setting, AF-point Selection mode, metering and drive mode, exposure compensation, and flash exposure compensation. Menu settings. These menu settings are saved in C modes:
Image quality, red-eye setting, beep, release shutter without card, review time, Peripheral illumination correction, flash control settings, exposure compensation, AEB, Auto Lighting Optimizer, white balance, Custom White Balance, white balance shift and bracketing, color space, Picture Style, One-touch RAW+JPEG, highlight alert, AF point display, histogram, slide show, image jump settings, auto power off, auto rotate, file numbering, LCD brightness, sensor cleaning, VF grid display, INFO. button display options, and Custom Function settings. Live View shooting settings. These menu settings are saved in C modes:
Live View shooting, AF mode, Grid display, exposure simulation, Silent shooting, and metering timer Movie mode settings. These settings are saved in C modes:
AF mode, Grid display, movie recording size, sound recording, Silent shooting, and metering timer
Here is how to register camera user settings to C1 or C2 mode:
With the camera set to P, Tv, Av, M, or B mode, choose all the settings on the camera that you want to register. In addition to shooting, exposure, metering, focus, drive, and menu settings, you can set Custom Functions for specific shooting scenarios as detailed previously in this chapter.
Press the Menu button, and then turn the Main dial to highlight the Setup 3 tab.
Turn the Quick Control dial to highlight Camera user setting, and then press the Set button. The Camera User setting screen appears.
Turn the Quick Control dial to highlight Register, and then press the Set button. The Register screen appears.
Turn the Quick Control dial to highlight the Mode dial option you want. Your options are Mode dial: C1, Mode dial: C2, or Mode dial: C3.
Press the Set button. A second Register screen appears.
Turn the Quick Control dial to highlight OK, and then press the Set button. The Set-up 3 menu appears. The camera registers the settings except for the My Menu settings. Lightly press the Shutter button to dismiss the menu.
To shoot with the registered settings, turn the Mode dial to the C1, C2, or C3 mode depending on the option you selected in step 5. When you shoot in a C mode, neither the clear all Camera settings on the Set-up 3 menu nor the clear all Custom Func. (C.Fn) option on the Custom Function menu can be used. To use these menu options, switch to P, Tv, Av, M, or B shooting mode first.
If you want to clear the registered user settings, follow these steps:
Set the camera to P, Tv, Av, M, or B shooting mode, and then repeat steps 2 to 3 in the previous set of steps.
Turn the Quick Control dial to highlight Clear settings, and then press the Set button. The Clear settings screen appears.
Turn the Quick Control dial to highlight the C mode that you want to clear, and then press the Set button. For example, select Mode dial: C2 to clear the C2 Mode dial settings. The Clear settings screen appears.
Turn the Quick Control dial to highlight OK, and then press the Set button. The camera clears the registered settings for the C mode that you selected.
Customization of the 7D includes the ability to set up My Menu with your most frequently used six menu items and options. In addition to frequently used menu items, you can also add your most-often used Custom Functions to My Menu. This will save you a lot of time.
In addition to adding and deleting items to and from My Menu, you can change the order of registered items by sorting them. You can also set the 7D to display My Menu first when you press the Menu button. The only drawback to My Menu is that you can only register six items. So before you begin registering, evaluate the menu items and Custom Functions and carefully choose your six favorite items.
As an example, here is what I have registered on My Menu: Custom WB, Format, Grid display, Flash control, Camera user settings, and High ISO speed noise reduction. I have also set up My Menu as the first menu that is displayed when I press the Menu button.
Here is how to add items to My Menu:
With the camera in P, Tv, Av, M, or B mode, press the Menu button, and then turn the Main dial to highlight the My Menu tab. The My Menu tab is the last tab.
If necessary, turn the Quick Control dial to highlight My Menu settings, and then press the Set button. The My Menu settings screen appears.
Turn the Quick Control dial to highlight Register, and then press the Set button. The My Menu registered item screen appears. This screen is a scrollable list of all menu items available on the camera. You can scroll through the list by turning the Quick Control dial.
Turn the Quick Control dial to highlight the menu item you want to register, and then press the Set button. The My menu registered item screen appears.
Turn the Quick Control dial to highlight OK, and then press the Set button. The My Menu registered item screen reappears so that you can select the next item. To find individual Custom Functions, keep scrolling past the C.Fn group names, and you see the individual Custom Functions by name (the function numbers are not listed).
Repeat step 5 until all the menu items you want are registered, and then press the Menu button. The My Menu settings screen appears. If you want to sort your newly added items, jump to step 2 in the following set of steps.
To sort your registered camera Menu items and Custom Functions, follow these steps:
Repeat steps 1 and 2 in the previous list if necessary.
On the My Menu settings screen, turn the Quick Control dial to highlight Sort, and then press the Set button. The Sort My Menu screen appears.
Press the Set button if you want to move the first menu item to a different position in the list. The camera activates the sort control represented by a arrows to the right side of the menu item.
Turn the Quick Control dial to move the item's placement within the menu, and then press the Set button. Turn the Quick Control dial to move the selected item up or down in the list.
Repeat steps 3 and 4 to move other menu items in the order that you want.
Press the Menu button twice to display your customized menu. Or lightly press the Shutter button to dismiss the menu.
You can follow these general steps to access My Menu settings where you can delete one or all items from the menu, and to have My Menu displayed each time you press the Menu button.
Now you have a good idea of how you can set up the 7D not only to make it more comfortable and efficient for your preferences, but also to have the camera ready in advance for different shooting scenes and subjects.