Live View shooting enables you to view, compose, and focus using a real-time view of the scene on the camera's 3-inch LCD monitor. Alternately, you can shoot with the 7D connected (tethered) to the computer, and then control image settings ranging from focus and exposure to white balance and Picture Style on the computer by using the EOS Utility program from Canon. Live View and tethered shooting give you added flexibility in shooting scenarios that normal shooting doesn't provide.
Live View offers a view that can be magnified up to 10x to ensure tack-sharp automatic or Manual Focus as well as a face-detection focusing option. Live View also offers two Silent modes to reduce shutter noise. While Live View shooting is not the best choice for all shooting scenes, it is a good choice in controlled and close-up shooting scenarios such as macro and still-life shooting as well as in scenes where you cannot get the shot by looking through the viewfinder.

With tethered shooting, you have the advantage of using a large computer monitor to view and control the exposure and color of the image as you shoot. In addition, you can monitor the histogram to ensure that pixels aren't being clipped, or discarded, as you change the lighting. The Live View shooting function is also useful when shooting tethered or wirelessly in the studio.
While Live View shooting is a staple feature on point-and-shoot digital cameras, it is a relatively new feature for digital SLR cameras such as the 7D. In fact, the concept of a digital SLR being able to hold the shutter open to give you a real-time view of the scene and yet pause long enough to focus is impressive. Normally, the camera can't see the live scene because the shutter and reflex mirror block the view to the image sensor. The 7D overcomes this blind spot with a mechanical shutter that stays completely open during Live View shooting.
Live View offers some advantages that you don't get with non-Live View shooting. For example, because the first-curtain shutter is electronic, the shutter cocking noise can be reduced. Live View also offers face detection that automatically identifies faces in the scene and focuses on one of the faces. If it focuses on the wrong face, you can shift the selection by using the Multi-controller to choose the correct subject. And you can use the supplied or an accessory cable to connect the 7D to a TV and see Live View on the TV screen.
Although Live View shooting has high coolness factor, it comes at a price with a few side effects:
Temperature affects the number of shots you can get using Live View. With a fully charged LP-E6 battery, you can expect 230 shots without flash use and approximately 220 shots with 50 percent flash use in 73-degree temperatures. In freezing temperatures, expect 220 shots without flash use and 210 shots with 50 percent flash use per charge. With a fully charged battery, you get approximately one-and-a-half hours of continuous Live View shooting before the battery is exhausted.
High ambient temperatures, high ISO speeds, and long exposures can cause digital noise or irregular color in images taken using Live View. Before you start a long exposure, stop shooting in Live View and wait several minutes before shooting. With continual use of Live View, the sensor heats up quickly. Both high internal and external temperatures can degrade image quality and cause Live View to automatically shut down until the internal temperature is reduced.
An icon that resembles a thermometer is displayed on the LCD when internal and/or external temperatures are high enough to degrade image quality. If the icon appears, it's best to stop shooting until the temperature cools down. Otherwise, the camera will automatically stop shooting if the internal temperature gets too high. Additionally, high ISO settings combined with high temperatures can result in digital noise and inaccurate image colors.
The Live View may not accurately reflect the captured image in several different conditions. Image brightness may not be accurately reflected in low-and bright-light conditions. If you move from low to a bright light and if the LCD brightness level is high, the Live View may display chrominance (color) noise, but the noise will not appear in the captured image. Suddenly moving the camera in a different direction can also throw off accurate rendering of the image brightness. If you capture an image in magnified view, the exposure may not be correct. And if you focus and then magnify the view, the focus may not be sharp.
While some key aspects of Live View shooting differ significantly from standard shooting, other aspects carry over to Live View shooting. For example, you can use the LCD panel functions during Live View shooting to change White Balance settings, Drive modes, ISO sensitivity settings, and so on. Likewise, you can press the INFO. button one or more times to change the display to include more or less shooting information along with a Brightness histogram or RGB histograms. The following sections give you a high-level view of setting up for and using Live View shooting.
With the 7D's large and bright LCD monitor, you can use Live View shooting to get tack-sharp focus. Here is an overview of the Live View focusing options so that you can decide in advance which is best for the scene or subject that you are shooting:
Live mode. With this focusing option, the camera's image sensor detects subject contrast to establish focus. This focusing mode keeps the reflex mirror locked up so that the Live View on the LCD is not interrupted during focusing. However, focusing takes longer with Live mode. To focus in this mode, tilt the Multi-controller to move the focusing point over the subject, and then press the Shutter button halfway to focus. The AF point turns green when focus is achieved.
Face Detection Live mode. This is the same as Live mode except that the camera automatically looks for and focuses on a human face in the scene. If the camera does not choose the face of the subject you want, you can tilt the Multi-controller to move the focusing frame to the correct face. If the camera cannot detect a face, then the AF point reverts to the center AF point, and you can manually move the AF point to a face.
If the person is a long way from the camera, you may need to manually focus enough to get the subject in reasonable focus range, and then focus by half-pressing the Shutter button. Face detection does not work with extreme close-ups of a face, if the subject is too far away, too bright or dark, partially obscured, or is tilted horizontally or diagonally. In Face Detection Live mode, you can't magnify the image on the LCD using the AF-point selection/Magnify button. In both Live and Face Detection Live modes, focus at the edges of the frame is not possible and the face focusing frame is grayed out.
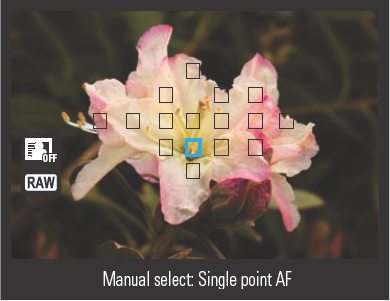
Quick mode. This focusing mode uses the camera's autofocus system. In this mode, the Live View on the LCD is suspended as the reflex mirror drops down long enough for the camera to establish focus. With Quick mode focusing, you can activate the 19 AF points by tilting the Multi-controller. You can use the M-Fn button to select an AF area selection mode, and then select an AF point by turning the Main or Quick Control dials or using the Multi-controller. Then half-press the Shutter button to focus and make the picture.
Manual Focus. This focusing option is the most accurate, and you get the best results when you magnify the image. Another advantage is that Live View is also not interrupted during focusing. To focus manually, set the lens switch to MF (Manual Focus), and then move the focusing frame wherever you want by tilting the Multi-controller. Turn the focusing ring on the lens to focus.
Note
If you use Live View with Continuous shooting, the exposure is set for the first shot and is used for all images in the burst.
Live View shooting provides exposure simulation that replicates what the final image will look like at the current shutter speed, aperture, and other exposure settings on the LCD during Live View display. You can turn on Exposure Simulation on the Shooting 4 menu. Exposure simulation is nice, but the image may be easier to see at standard brightness without using Exposure Simulation.
For Live View, the camera uses Evaluative metering. Unlike standard shooting, the most recent meter reading is maintained for a minimum of 4 seconds even if the lighting changes. You can set how long the camera maintains the current exposure by setting the Live View Metering timer from 4 seconds to 30 minutes. If the light or your shooting position changes frequently, set a shorter meter time. Longer meter times speeds up Live View shooting operation, and longer times are effective in scenes where the lighting remains constant.
Note
Auto Lighting Optimizer automatically corrects underexposed and low-contrast images. If you want to see the effect of exposure modifications, then turn off Auto Lighting Optimizer on the Shooting 2 menu.
Live View shooting offers two Silent shooting modes. In either Silent mode 1 or 2, the shutter noise is noticeably reduced. Following is a summary of the two Silent shooting modes and the Disable option:
Mode 1. In this mode, the shutter cocking noise is reduced significantly when using the Live focus mode. This mode enables high-speed continuous shooting at 7 fps by holding down the Shutter button completely.
Mode 2. This mode delays shutter noise as long as you keep the Shutter button pressed, thus delaying the re-cocking sound of the shutter. If the camera is in Continuous drive mode, only one image is made because the shutter does not re-cock until you release the Shutter button.
Disable. This is the setting to choose if you use a tilt-and-shift (TS-E) lens and make vertical shift movement, or if you use an extension tube on the lens. Pressing the Shutter button sounds like two images are being taken, but only one image is made. Choose this option if you are using a non-Canon flash, otherwise the flash will not fire.
When shooting in Live View with the built-in flash, the shooting sequence (after fully pressing the Shutter button) is for the reflex mirror to drop to allow the camera to gather the preflash data. The mirror then moves up out of the optical path for the actual exposure. As a result, you hear a series of clicks, but only one image is taken. Here are some things you should know about using Live View shooting with a flash unit:
With an EX-series Speedlite, FE Lock, modeling flash, and test firing cannot be used except for wireless flash shooting.
Flash Exposure Lock cannot be used with the built-in or an accessory Speedlite.
If you are using a Canon Speedlite and have the camera set to Silent mode 1 or 2, the camera automatically switches to the Disable option. Non-Canon flash units do not automatically switch to Disable, so you must manually set the camera to Disable.
The settings on the Shooting 4 menu not only activate Live View shooting, but they also enable you to set your preferences for shooting in this mode, including enabling Live View shooting, displaying a grid in the LCD, setting up Silent modes, and setting the Exposure metering timer.

To set up the 7D for Live View shooting and to set your preferences, follow these steps:
With the Mode dial set to P, Tv, Av, M, or B, press the Menu button, and then turn the Main dial to select the Shooting 4 tab.
Turn the Quick Control dial to highlight Live View shoot., and then press the Set button. The Live View shooting options appear.
Turn the Quick Control dial to select Enable, and then press the Set button. The Shooting 4 menu is displayed.
On the Shooting 4 menu, turn the Quick Control dial to highlight any of the following options, and then press the Set button to display the settings you can select.
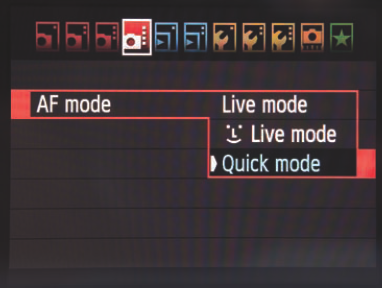
AF mode: Select Live mode, Face Detection Live mode, or Quick mode, and then press the Set button.
Grid display: Select a 3 × 3 or 4 × 6 grid to help you align horizontal and vertical lines in the scene. Or select Off if you do not want to use a grid, and then press the Set button.
Exposure simulation: Choose Enable to see an approximation of the final exposure on the screen. Otherwise, choose Disable, and then press the Set button.
Silent shooting: Choose Mode 1 to reduce the sound of the shutter. Choose Mode 2 to delay the sound of the shutter until you release the Shutter button. Choose Disable if you are using a non-Canon flash unit, a tilt-and-shift lens, or a lens extender. Then press the Set button.
Metering timer: Choose 4, 16, or 30 seconds, or 1, 10, or 30 minutes to determine how long the camera retains the exposure. If the light changes often, choose a shorter time. Then press the Set button.
Now that you've chosen the focusing mode and selected the shooting options, you're ready to begin shooting. Here are a few tips to get you started:
For still life and macro shooting, manual focusing with the image enlarged to 5 or 10x helps ensure tack-sharp focus.
For a really large view, tether the camera to your laptop using the supplied USB cable, or use the Wireless File Transmitter WFT-ED/WFT-E3A/B/C/D. Or you can hook up the camera to the TV and use the TV screen as a monitor.
Note
See Chapter 2 for details on connecting the 7D to a TV.
Just a few minutes of watching the real-time view will convince you that a tripod is necessary for Live View shooting. With any focal length approaching telephoto, Live View provides a real-time gauge of just how steady or unsteady your hands are.
The operation of the camera during Live View shooting differs from traditional still shooting, but the following steps guide you through the controls and operation of the camera.

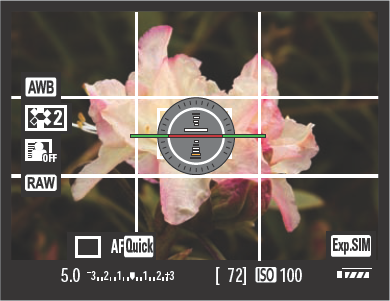
Figure 6.3. The Live View screen displays whether exposure simulation is active, as well as the focus mode, white balance, current Picture Style, the Auto Lighting Optimizer setting, and the image-recording quality. Exposure information is along the bottom of the frame. Here the large 3 × 3 grid is displayed.
To shoot in Live View using auto-focus, follow these steps:
With the camera set to any shooting mode, turn the START-STOP switch to the camera icon (Live View setting), and then press the START-STOP button. A current view of the scene appears on the LCD.
Press the Q button to display the Information display. You can press the Q button a second time to display options to change the image quality and to change the Auto Lighting Optimizer setting by using the Multi-controller. Press the Q button again to return to the Live View with the information display.
Press the INFO. button one or more times to display to show more or less information, and to display the electronic level, the histogram, or the grid.
Press any of the buttons above the LCD panel to display the screen to display screens where you can change the white balance, drive mode, AF mode, and ISO. However, Evaluative metering is automatically set for Live View shooting, and you can't change it. The camera controls and buttons that you use in still shooting can be used during Live View shooting. For example, to set Exposure Compensation, press the Shutter button halfway, and then turn the Quick Control dial to set the amount of compensation. If you access the camera menus, then lightly press the Shutter button to restore the Live View on the LCD.
Compose the image by moving the camera or the subject. As you move the camera, the exposure changes and is displayed in the bottom bar under the Live View display.
If you are using Quick mode to focus, turn the Main or Quick Control dial to select the AF point that you want. You can also press the M-Fn button to change the AF area selection mode.
Press the AF-point Selection/Magnify button on the top far-right corner of the camera to magnify the view. The first press of the button enlarges the view to 5x, and a second press enlarges the view to 10x. The magnifications are shown on the LCD as X5 and X10. You cannot magnify the image if you're using Face Detection Live mode focusing.
Press the AF-ON button to focus. If you are using Quick mode to focus, when you press the AF-ON button, you hear the sound of the reflex mirror dropping down to focus and Live View is suspended. If you are using Live focusing mode, focus takes longer, and it is a good idea to magnify the image to verify sharp focus. In all focus modes, when the camera achieves sharp focus, the AF focus rectangle turns red.
Press the Shutter button completely to make the picture. The shutter fires to make the picture, the image preview is displayed, and then Live View resumes.
Press the Start-Stop button to go back to standard shooting mode. If you do not do this step, the camera automatically closes the shutter when the camera Auto Power Off (Set-up 1 menu) delay elapses.
One of the most useful ways to use Live View shooting is for studio work, particularly when you shoot still-life subjects such as products, food, stock shots, and portraits. You can set up with the 7D connected to a computer using the USB cable supplied with the camera. The extra-long cord allows a good range of movement, particularly if the computer is on a wheeled or swivel table.
You can also shoot with the accessory Wireless File Transmitter WFT-E3/WFT-E3A/B/C/D. For the following illustration, I use the supplied USB cable.

Before you begin, install the EOS Digital Solution Disk on the computer to which you are connecting the camera. To shoot in Live View with the 7D tethered to the computer, follow these steps:
Turn off the camera and attach the USB cord to the Digital terminal located under the terminal cover on the side of the camera. Be sure that the icon on the cable connector faces the front side of the camera.
Connect the other end of the USB cable to a USB terminal on the computer.
Turn on the power switch on the camera. If this is the first time you've connected the camera to the computer, then the computer installs the device driver software and identifies the camera.
Click Camera settings/Remote shooting in the EOS Utility window. The EOS 7D control panel appears. You can use the panel to control exposure settings, set the white balance, set the Picture Style, and set White Balance Shift.
Click Preferences to set the options you want, such as choosing the destination folder in which to save captured images and whether to save the images both on the computer and on the CF card.
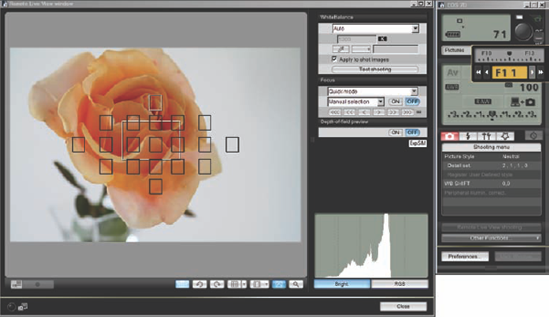
Click Remote Live View Shooting toward the bottom of the Remote Shooting control panel. The Remote Live View window appears and the camera reflex mirror flips up to preview the scene on the computer screen. In this window, you can set the white point by clicking a white area or neutral gray area in the scene, use the controls to set the focus, preview the depth of field by clicking the On button, and switch between the Brightness and RGB histograms as well as monitor the histogram as the camera moves or as lighting changes.
Press the Shutter button completely to take the picture. The Digital Photo Professional main window opens with the image selected.
When you finish, turn off the camera and disconnect the USB cable from the camera.