One of the most rewarding and challenging areas of photography is people photography.
There is a never-ending source of great subjects, and you can unleash your creative ideas for locations, sets, lighting, clothing, and subject action and position.
But even better than the creative opportunities is the opportunity to work with people — to get to know them, to coax out the best in them, and to make images that both they and you will enjoy for years to come.

In almost all people-shooting situations, your primary work is to establish and maintain rapport with the person or people you're photographing. Establishing rapport takes time — sometimes a lot of time. Unlike nature and landscape shooting, where you can set the pace and face snafus with equanimity, people photography, whether it's a structured portrait session or street shooting, demands more of your time and attention.

Figure 12.1. Regardless of where I'm shooting, I take advantage of making people pictures with almost anyone who agrees to let me photograph them. This biker agreed to let me make a few quick images just before he left the area. Exposure: ISO 100, f/3.5, at 1/1000 second with −2 Exposure Compensation using an EF 24-70mm, f/2.8L USM lens.
When you photograph people, you have to maintain an ongoing conversation, provide direction, change lenses, and, in a portrait session, you have to coordinate clothing, lighting, and background changes. Given these demands, the last thing that you have time to worry about is the camera's performance, and with the 7D, you can depend on the camera to perform when you need it to. And if you plan carefully for session, your odds of having a smooth and fluid session are greatly increased.
Planning includes having the camera, lenses, and accessories that you want within easy reach, knowing in advance the range of setups or locations you want, and knowing the lighting you'll use, whether it's studio strobes, flash units, reflectors, or supplementing outdoor light.
The type and amount of gear that you use for photographing people depends on whether you shoot in your studio or home where your gear is conveniently close by, or if you shoot at a different location. Another aspect that influences gear selection is whether you're photographing a single person or a group, and, if a group, how large the group is.
Consider the following additions and accessories, and make adjustments according to your specific portrait session.
Two 7Ds or a 7D and a backup EOS camera body. In almost all shooting situations, having a backup camera is important for all the reasons mentioned in previous chapters.
One or more fast wide-angle and short telephoto lenses. For portraits, I most often use the EF 24-70mm f/2.8L USM, the EF 70–200mm f/2.8 IS USM, and the EF 85mm f/1.2L II USM lens. In particular, the 24-70mm is very versatile — you can shoot individual subjects at the 70mm focal length or at a wider focal length for groups of up to five or six people.
The EF 70–200mm f/2.8L IS USM, or the lighter-weight but slower EF 70–200mm f/4L IS USM is also a good choice to increase background softness, particularly at wide apertures. As well, a short telephoto between 85 and 50mm minimizes the characteristic telephoto lens compression, while still providing a shallow depth of field that's characteristic of telephoto lenses.
Reflectors. I can't imagine shooting a portrait session indoors or outdoors without using one, two, or more silver, white, or gold reflectors. Reflectors are small, lightweight, collapsible, and indispensable for everything, from redirecting the main light or filling shadow areas to adding catchlights to the subject's eyes. Reflectors are easier to manipulate than flash (and much less expensive), and silver and white reflectors retain the natural color of the ambient light. A gold reflector adds appealing warmth to skin tones.
EX-series flashes, light stands, umbrellas or softboxes. You can create a nice portrait with a single flash unit mounted off-camera on a flash bracket. But you'll have a lot more creative control if you use two to three Speedlites mounted on stands with either umbrellas or softboxes, and fired wirelessly from the 7D that has a built-in wireless Speedlite transmitter. The light ratios can be easily controlled, while the Speedlites can be placed around the set to replicate almost any classic lighting pattern. Best of all, this system is portable and lightweight.
Tripod, monopod, CF cards, and spare batteries. These are obvious items to have on hand, but they bear mentioning.
Brushes, combs, cosmetic blotters, lip gloss, concealer, safety pins, and anything else you can think of. The subject will likely forget to bring one of these items, a garment will tear, or a button will pop off. Have a small emergency kit at the ready. The kit will often contain just what you need to keep the session going with minimal stress and interruption.
If you primarily shoot portraits, then devoting one of the C modes to your portrait settings saves you time setting up for the session. And if you shoot both outdoor and studio portraits, then you can set up a C mode for each location. The choice is yours, but having the camera set up and ready to shoot saves making adjustments for different locations.
Here are suggestions for setting up the 7D for portrait shooting.
Av shooting mode. Av shooting mode is a natural choice for people shooting because it offers quick control over the depth of field by changing the aperture and/or the lens. If you use Av shooting mode, always keep an eye on the shutter speed to ensure it's fast enough to handhold the camera.
I don't recommend riding the edge of handholding shutter speeds. With people photography, you have to consider the potential that the people or person you're photographing may also move. So if you err, err on the side of getting a faster rather than a slower shutter speed. If you shoot with studio strobes, then Manual shooting mode is the best option to sync the camera to the strobes while adjusting the aperture as necessary.
Note
As a rule of thumb, the minimum shutter speed at which you can handhold a non-IS lens is the reciprocal of the focal length. Thus, if your lens is set to 100mm, the minimum shutter speed at which you can handhold the camera and get a sharp image is 1/100 second. That's the minimum shutter speed. But I also factor in the potential that the subject may move, so a safer shutter speed is 1/200 second or faster.
One-shot AF mode, and Spot AF with manual selection. Unless the portrait subject is a young child who moves unexpectedly, One-shot AF mode is a good choice. If you are photographing a young child, then you can use AI Focus AF. In AI Focus AF mode, you can focus on the child and if the child begins to move, the 7D switches automatically and tracks the child to maintain focus. In addition, I also always use manual AF-point selection with the AF area mode set to Spot AF. Spot AF area selection mode provides pinpoint focusing so that I can focus precisely on the subject's eye. In Single-point AF selection mode, the focus can drift to the eyelashes or even the eyebrows. A portrait isn't successful if the point of sharpest focus is anywhere except on the subject's eyes, and the best way to ensure sharp focus on the eyes is to manually set the AF point with the critical focusing that Spot AF provides.
Low-speed Continuous drive mode. This mode allows a succession of shots at a reasonably fast 3 fps shooting speed. If you are photographing children in ambient light, then switching to High-speed Continuous mode enables you to keep shooting fast-moving youngsters.
Evaluative metering mode. Evaluative metering is both fast and accurate for portraits. However, you may want to switch to Spot metering mode to take an area-specific meter reading. If you're shooting in the studio, you can use a handheld flash meter if you have one, or simply make test shots, examine the images and histograms, and then set the exposure for the best test shot exposure.
Picture Style. The Portrait Picture Style produces lovely skin tones and renders colors faithfully and with subdued saturation, which is appropriate for portraits. I also use a modified Neutral Picture Style. If you are shooting where the lighting is flat, then Standard produces a more vibrant rendering. Be sure to test these Picture Styles well before the session and evaluate the prints so that you know which style works best for the lighting and the printer that you'll use.
Custom Functions. For flash portraits, consider whether you want to use a fixed 1/250-second sync speed to make flash the primary illumination, or to sync at shutter speeds slower than 1/250 second to allow more of the ambient light to figure into the exposure. If you're shooting scenes with bright tones, such as a bride in a white dress, you can enable C.Fn II-3, Highlight tone priority, to expand the top half of the tonal dynamic range. Also, if you want to use Spot AF area selection mode, you can enable it using C.Fn III-6. I also use Orientation linked AF points that you can set in C.Fn III-12. And if you opt to use AI Servo AF mode, then be sure to set up the tracking sensitivity image priorities, and tracking method using C.Fn III-1-3.

The goal of any portrait is to capture the spirit of the subject. When you capture the spirit of the person, the subject's eyes are engaged with you, and they are vibrant and compelling, drawing the viewer into the image. No amount of skillful lighting, posing, or post-capture editing can substitute for this. And that's why establishing rapport is so important.
Other factors including lighting, exposure, and color are also important in getting stunning portraits. With the plethora of options that the 7D offers, you can get excellent results whether you are making outdoor or indoor natural-light portraits.
There are many times during the day, and many types of outdoor light, that is lovely portrait light. With that said, I can think of no one who is flattered in bright, overhead, unmodified midday sunlight. Nor can I think of any subject who is comfortable looking into the sun. So if you have a portrait session outside on a sunny afternoon and you can't reschedule, then move the subject to an area that is shaded from the top, such as by a roof, an awning, or a tree. Or in an open area with overhead sunlight, use a scrim — fabric or other material stretched over a frame — and hold it over the subject to diffuse the strong sunlight. If the subject is in the shade, use a reflector to direct light onto the frontal plane of the face. Then you can move the subject and use reflectors to create and control shadow areas.
The most desired outdoor portrait light is during and just after sunrise, just before and during sunset, and, if you use reflectors or fill flash skillfully, the light of an overcast day.
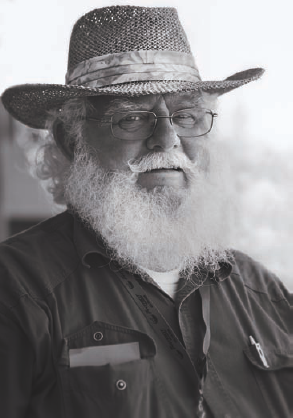
Figure 12.4. This was a mid-afternoon street portrait. With bright sunlight all around, I decided to move the man to shade on a nearby sidewalk. The bright background burned out, but I softened it in Photoshop using a Gaussian blur to tone down the brightness. After comparing the color and black-and-white renderings, I felt that the black-and-white rendering best reflected the man's character. Exposure: ISO 160, f/2.8, at 1/200 second using an EF 24-70mm f/2.8L USM lens.
In any type of outdoor light, watch how the shadows fall on the face. If unflattering shadows form under the eyes, nose, and chin, then you can bounce fill light into those areas using a silver or gold reflector. I prefer a silver reflector for the neutral light that it reflects. If I want to diminish the light that's reflecting onto the subject, I use a white reflector because it scatters light and decreases the intensity.
If you're shooting a head-and-shoulders portrait, you can ask the subject to hold a reflector at waist level, and then watch as the subject tilts the reflector to find the best position to fill in facial and chin shadow areas. Also ensure that catchlights appear in the subject's eyes. In overcast light, in particular, you may need to use a reflector to create the catchlights. The ideal positions for catchlights are at the 10 and 2 o'clock positions. The size and shape of the catchlight reflects the light source. If you use the built-in flash for fill light and to create catchlights, the catchlights will be unattractive pinpoints of white. I prefer the larger size and shape of catchlights created by the skillful use of a reflector.
To get the best color in overcast or cloudy light, use a Custom White Balance. At sunrise or sunset, you can use either the Daylight or Cloudy White Balance setting. Or if you're shooting RAW, you can shoot a gray card in one frame and use that image to color-correct images as a batch during RAW image conversion, as described in Chapter 4. If you don't want a completely neutral color — and generally you don't want perfectly neutral color — then adjust the temperature and tint controls during RAW image conversion to warm up or cool down the color.

Without question, window light is one of the most beautiful of all natural light options for portraits, and it offers exceptional versatility. If the light is too bright, you can simply move the subject farther from the window or put a fabric over the window. Window light provides ample light to bounce into the shadow side of the subject using a reflector. For window-light portraits, try to shoot when the sun is at a mid to low angle above the horizon. However, strong midday sunlight can also be quite usable if you cover the window with a lightweight fabric, such as a sheer curtain.
A good starting point for window light portraits is to place the subject so that one side of their face is lit and the other side is in shadow. Then position a silver or white reflector so that it bounces light into the shadow side of the face and creates a catchlight in the eye on the shadow side.
To meter window light, it's important to meter for the skin midtones. Evaluative metering and Spot metering both produce excellent metering results. Just move in close or zoom in on the subject's face and meter a middle tone skin-tone area, or you can meter a gray card that is in the same light as the subject's face. Then you use Manual shooting mode to shoot with the resulting exposure settings. In Manual shooting mode, you can maintain the metered exposure, even if you change the image composition slightly. In other modes, such as Av, Tv, or P, the shutter speed will change as you vary the image composition slightly. Of course, the metered skin-tone exposure is good to shoot with as long as the light level and the subject position does not change.

For portrait shooting, you can often get excellent exposures out of the camera with no exposure modifications. However, if there are hot spots on the subject's skin that you can't eliminate with lighting modifications, or if there are blocked shadows, you can use any of the exposure techniques described in Chapter 11.
Some portraits can fall into the non-average categories. For example, if you're photographing a man in dark clothing against a dark background, then the camera will tend to render the dark tones as middle gray. The same exposure error can happen with a subject such as a bride in a white dress against a light background. You can use two approaches to correct the exposure error: You can set Exposure Compensation, or you can meter from a gray card and set the metered exposure in Manual shooting mode.
On the topic of exposure, my preference for portraits is to ensure very fine detail and the lowest level of digital noise possible in the images. For me, that means shooting between ISO 100 and 400, 99 percent of the time.
If you're shooting in low light scenes, increasing the ISO to 800 provides good prints; however, you need to examine the shadow areas carefully for noise. If the noise is obvious, apply noise reduction during either RAW image conversion or JPEG image editing, particularly on facial shadow areas. There is nothing that spoils an otherwise beautiful portrait more quickly than seeing a colorful scattering of digital noise in facial shadows and in skin areas.

Figure 12.7. There are so many reasons not to shoot in bright sunlight, but once in awhile you have no choice. This 90-year-old man had won a best display trophy for his immaculate Model T pickup in a vintage car show. Because he was about to leave, I grabbed the shot despite the harsh light. Exposure: ISO 100, f/5, at 1/400 second using an EF 24-70mm, f/2.8L USM lens.
To control depth of field, many photographers rely solely on f-stop changes. Certainly, aperture changes render the background differently, and wide apertures from f/5.6 to f/1.4 are common in portraiture. However, don't overlook the other factors that affect depth of field:
Lens. A telephoto lens has an inherently shallow depth of field, and a wide-angle lens has an inherently extensive depth of field.
Camera-to-subject distance. The closer you are to the subject, the shallower the depth of field, and vice versa.
Subject-to-background distance. The farther the subject is from the background, the softer the background details appear, and vice versa.
Whether you have one or multiple studio lights such as strobes, continuous lights, or even Speedlites, you have the opportunity to make portraits using classic lighting patterns. And if you combine the lighting with modifiers such as umbrellas, softboxes, barn doors, beauty dishes, reflectors, and other accessories, you can control the light to get just about any type of lighting that you envision.
It's beyond the scope of this book to provide a guide to portrait lighting in the studio or to provide setup instructions for a studio lighting system. But whether you have one, two, three, or more lights, you can count on excellent studio portraits from the 7D. With multiple-light studio systems, you can use the PC sync terminal and set the sync speed on the camera at 1/60 to 1/30 second, which is what Canon recommends. However, I use the 7D with my four Photogenic strobes, and I sync at 1/125 second with no problem and with excellent exposures.

Figure 12.8. When I needed a promotional portrait, I set up the studio lighting, and my daughter took this portrait of me. The 7D performs like a champ in the studio. This set was lit with four Photogenic studio strobes; with two strobes lighting the white seamless background, two to camera left, and a large silver reflector to camera right. Exposure: ISO 100, f/20, at 1/125 second, using an EF 24-70mm, f/2.8L USM lens.
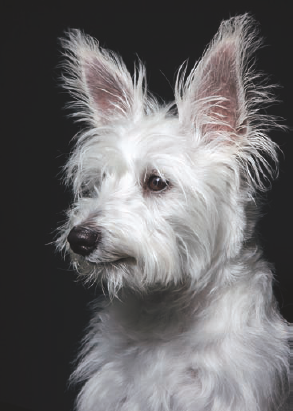
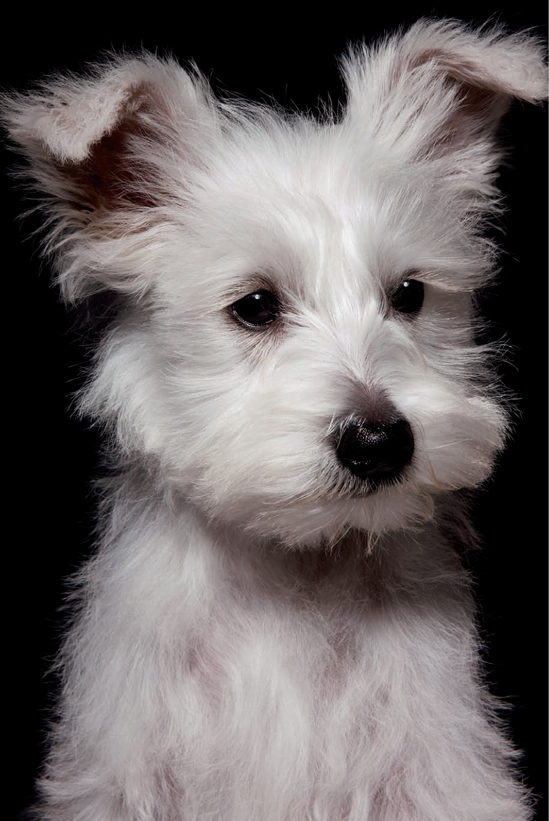
Figure 12.9. While this image obviously doesn't fit within the people category, I include it to illustrate that the same techniques that you use for people can be applied to pets and other animals. Exposure: ISO 100, f/16, at 1/125 second using an EF 24-70mm, f/2.8L USM lens.
It takes only one or two studio sessions to determine the correct light temperature, if you don't already know it. For my studio system, I use the K White Balance setting, and set it to 5300. This setting gives me a clean, neutral white with no further adjustments during shooting or in image conversion or editing. In addition, if I'm shooting JPEG, which is seldom, I use the Portrait Picture Style. This style produces the subdued color and pleasing skin tones of classic portraiture. If you think that the color rendition and contrast are too subdued, you can modify the style parameters by bumping both settings to a higher level.
A library of books has been written on portrait and people photography. If you want to specialize in people photography, read the books, practice the classic techniques, and keep practicing until they become second nature.
But when the time comes to start shooting, relax and keep it simple. At a minimum, here are the basic guidelines that I keep in mind for every portrait session.
Connect with the person, couple, or group. Engage them in conversation about themselves. When you find a topic that lights up their eyes, start shooting and keep talking with them.
Focus on the eye that is closest to the camera. If the eyes are not in tack-sharp focus, reshoot.
Keep the subject's eyes in the top third of the frame.
The best pose is the pose in which the subject feels comfortable and relaxed.
Be prepared. Be unflappable. Back up everything. And check the histograms as you shoot.