
Chapter 12
Visual Reproduction

Photograph by Sarah Priestap, Photojournalism student, Rochester Institute of Technology.
Post-Stimulus Perception
Some of the light now reaching the earth from distant stars and galaxies originated millions and even billions of years ago. Events being observed through powerful telescopes are not happening now but actually occurred long ago. Our visual system does not operate on real time even for events viewed at small distances. The delay between when light falls on the retina in the eye and the perception, although measurable, is extremely short and is of little importance. Perceptions that occur after light stops falling on the retina, however, are of considerable importance. Poststimulus perceptions can be divided into categories including persistent images, afterimages, aftereffects, eidetic images, visual memory, and imagination imagery.
Laboratory studies indicate that persistent images last an average of approximately one-quarter second after the stimulus has been removed. If a slide of the letter A, for example, is projected on a screen in a darkened room and the presentation time is controlled with a shutter, the time cannot be made so short that the image cannot be seen, provided the luminance is increased proportionally so that the same total amount of light is available to the viewer. Bloch's law predicts that the visual effect will be the same for different combinations of luminance (I) and time (t) as long as the product (k) remains the same (Eq. 12-1). Like the photographic reciprocity law, however, Bloch's law is not valid for high- and low-values. Perception occurs with short exposure times because the persistent image keeps the image available to the viewer for somewhat longer than the actual presentation time.
Persistent images prevent us from seeing that motion-picture screens are dark when the projector moves the film from one frame to the next.
Bloch's law states the visual effect will be the same for different combinations of luminance and time assuming their product remains the same.
Persistent images are essential to the perception of realistic motion-picture and television pictures. When motion-picture films are projected, it is necessary to darken the screen with a rotating shutter when the film is being moved from one frame to the next. The persistent image prevents the viewer from seeing the dark intervals, which would appear as flicker. Early motion pictures were sometimes referred to as “flicks" because they were shown at sixteen frames per second and flicker was obvious. Even at the current twenty-four-frames-per-second sound motion-picture speed, flicker would be objectionable without the use of a chopper blade, which produces three flashes of light for each frame, or seventy-two flashes of light per second.
Anyone who has photographed a television screen at a high shutter speed realizes that there is never a complete picture on the screen. The image is constructed sequentially with a scanning electron beam taking advantage of the effect of persistent images so the viewer sees a complete picture. Duration of the persistent image can vary depending upon several factors, including the image luminance level and whether removal of the stimulus is followed by darkness or by another image.
It would be reasonable to speculate that increasing image luminance would produce a stronger effect on the visual system, which would increase the duration of the persistent image, but the effect is actually the reverse. The increase in persistent image duration with decreasing luminance can be explained by comparing the visual effect with capturing a digital image at low light levels. If the sensor does not receive sufficient exposure at a selected shutter speed and a particular aperture setting, the exposure time must be increased in order to obtain a satisfactory image. The visual system in effect compensates for the lower image luminance by sacrificing temporal resolution and increasing the duration of the persistent image, which is the equivalent of increasing the exposure time.
We can illustrate this effect with motion-picture film being projected on a screen. If flicker of the intermittent image is just noticeable at a certain luminance level, reducing the luminance will increase the duration of the persistent image to include the time the screen is dark between flashes, and the flicker will disappear. In this example, the decrease in luminance can be in several ways, a smaller projector bulb can be used, the projector-to-screen distance can be increased, a gray screen can be substituted for the white screen, or the screen can be viewed through a neutral-density filter.
Whereas a persistent image cannot be distinguished from the image seen while the stimulus is still present, afterimages are recognized by the viewer as a visual anomaly. Afterimages are most evident when the eye is exposed to an intense flash of light. Looking directly at a flashtube when it is fired usually causes the viewer to see a vivid afterimage spot for some time. An afterimage can be formed with a stimulus having lower luminance, such as a white circle on a black background, by staring at it for a long time and then looking at a uniform surface (see Figure 12-1). One should never look at the sun, arc lights, UV sources, lasers, or other sources of radiation that can damage the retina.

Figure 12-1 Afterimage. Stare at the isolated white X for about one minute. Then shift your gaze to the middle square and win the game of tic-tac-toe.
Afterimages can be either negative or positive, but after looking at a bright stimulus, such as a lightbulb, the afterimage is typically dark (negative) if one looks at a white surface, and light (positive) if one looks at a black surface or closes and covers the eyes. Negative afterimages can be attributed to local bleaching of the visual pigments in the retina's receptors, positive afterimages to a continuation of the firing of the visual nerve cells. Negative afterimages of colored stimuli tend to be approximately complementary in color—a yellow lightbulb or other stimulus would tend to produce a bluish afterimage, for example. Colored afterimages can also be seen after looking at a white light source. If the red, green, and blue visual pigments in the cones are not bleached and regenerated at the same rate, a sequence of different colors may result, usually in the order of blue, green, and red. Figure 12-2 provides a demonstration of a color afterimage
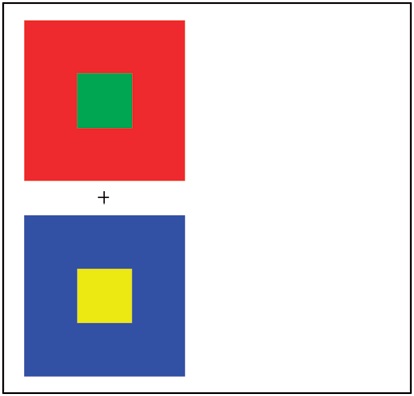
Figure 12-2 Color afterimages. Stare at the plus sign in the center of the two squares for about 60 seconds. Shift your gaze to the white adjacent area and see the squares' complimentary colors.
Color afterimages can often be seen after looking at a bright white light source.
In contrast to persistent images, which contribute to the effectiveness of motion pictures by eliminating flicker, afterimages tend to interfere with subsequent perceptions. For example, an attempt to read immediately after looking directly at a flashtube when it is fired can be frustrated by the afterimage. When a visual perception is altered by a preceding visual experience, the alteration is referred to as an aftereffect. Whereas the afterimage of a yellow lightbulb tends to appear blue when the gaze is shifted to a gray surface, it tends to appear magenta when the gaze is shifted to a red surface. The perceptual result of mixing a blue afterimage with a red stimulus is similar to that produced by physically mixing blue and red light. If such an experiment is conducted to demonstrate an aftereffect, the viewer will be aware of the altered perception, but viewers are not commonly aware of aftereffects that occur in everyday life. Brightness adaptation to daylight alters the subsequent perception of the light level in a dimly-lit interior, and it is only when the interior begins to lighten as the visual system adapts to the lower-light level that the viewer is aware of the aftereffect.
Aftereffects can alter the perception of other subject attributes besides color and lightness. Watching continuous motion in one direction, such as a waterfall, can cause stationary objects to appear to move in the opposite direction due to the aftereffect. Similarly, a rotating spiral design that appears to be expanding will appear to shrink when the rotation is stopped after prolonged viewing. Figural aftereffects are changes in the size, shape, or orientation of a perception as the result of a preceding visual experience. Fixating on a set of curved lines for a minute or so will tend to make straight lines appear to be curved in the opposite direction. The reader can experience a figural aftereffect with the drawing in Figure 12-3. After looking steadily at the X above the curved lines for a minute or so and then shifting the gaze to the X above the straight lines, the straight lines tend to appear to be curved in the opposite direction.
According to one study, approximately one in 12 young children has photographic memory capabilities.
Eidetic imagery, which is sometimes referred to as photographic memory, is an ability to retain a visual image for half a minute or longer after a stimulus has been removed from view. A 1968 study by Haber and Haber indicated that approximately 16 of 200 elementary schoolchildren experienced eidetic imagery. Since eidetic imagery is rare in mature adults, it is believed to decrease with increasing age. Eidetic imagery enables the viewer to read a printed page word-for-word and to see details in a complex picture for some time after removal of the printed page or picture. Whereas afterimages move with the eye, eidetic images remain stationary so that they can be scanned. Some persons who do see eidetic images are not aware of this capability because the experience seems normal to them, and they assume that everyone has the same experience.

Figure 12-3 Figural aftereffect. After looking steadily at the X above the curved lines for a minute or so and then shifting the gaze to the X above the straight lines, the straight lines tend to appear curved in the opposite direction.
Visual memory shares many characteristics with other types of memory, but it consists of an ability to retain or to recall a visual image that is distinct from persistent images, afterimages, aftereffects, and eidetic images. Visual memories are usually divided into two categories—short-term and longterm. Just as a new telephone number can be remembered long enough to dial it by repeating it and keeping it in the conscious mind, so can a visual image be remembered for a short time by keeping it in the conscious mind. Experiments indicate that most people cannot retain more than five to nine independent pieces of information, such as numbers in random order, in short-term memory.
A person should not expect to remember, even for a short time, all of the details in a complex picture. Instead, a person tends to remember the details that attract the most attention or hold the most interest. Shortterm visual memory is used even as someone scans a picture and fixates different parts of the image, and this enables the viewer to create a composite perception of the total picture.
Once the attention is allowed to go on to other things, long-term memory is required to revive an earlier visual image. If people are asked to indicate how many windows are in their home or apartment, they will use visual memory to form an image of the interior and then mentally move around it and count the windows. Some visual memories can be recalled easily, but those stored in the subconscious mind are more elusive and may require the use of special techniques such as hypnosis or association. Various procedures for testing visual memory include the use of recognition, where the subject selects the one picture of several that most closely resembles the original stimulus. Another procedure, known as the recall method, is to ask the person to describe the original scene from memory or to draw a picture of it. Visual memory can be improved by several methods, such as using attention to produce a more vivid perception, keeping short-term memories in consciousness longer through rehearsal, and practicing making sketches from memory.
Except for simple stimuli such as a circle or a square, visual-memory images generally are not facsimile representations of the original scene, but rather they usually contain just the more important details.
Imagination imagery, on the other hand, may bear no resemblance to any single earlier visual experience. Just as a writer can write a fictional story, so can a person create a fictional visual image that is as vivid as a visual memory of an actual object, scene, or event. Artists use imagination imagery when they draw or paint pictures of something that does not exist—a pocket watch flowing over the edge of a table in a surrealistic Salvador Dali painting is a dramatic example.
Film editors depend heavily on both short-term and longterm memory.
Photographers also use imagination imagery when they previsualize a finished picture, possibly even including a subject, props, background, arrangement, lighting effect, and colors (see Figure 12-4). Imagining impossible images has been recommended as an exercise for developing creative imagination, such as visualizing a large building jumping around like a bird, the water in Niagara Falls moving up rather than down, or a full moon shrinking in size and then disappearing.

Figure 12-4 Previsualizing a finished photograph, such as this one, before making it, involves imagination imagery. (Photograph by Les Stroebel.)
Photographers make use of imagination imagery whenever they previsualize a finished picture.
Perception of Stimulus Attributes
If one were required to describe precisely to another person the appearance of an object, using only words, it would be necessary to analyze the object's appearance in terms of attributes such as shape, color, and size. Different authorities on visual perception often disagree about the critical stimulus attributes for visual perception, the relative importance of each, and even the definitions of the terms. For example, the word form generally implies different object qualities to artists and photographers. Six attributes considered especially important to photographers will be discussed here: color, shape, depth, size, sharpness, and motion.
White, gray, and black are colors that are properly identified as neutral colors.
Color photography is based on the subtractive primaries: cyan, magenta, and yellow.
Color television is based on the additive primaries red, green, and blue.
Color Hue
To accurately describe or identify a color, three different qualities of the color must be considered—hue, lightness, and saturation. Hue is the quality associated with color names such as red, green, blue, cyan, magenta, and yellow. White, gray, and black are also colors, but they are all neutral—without hue. Neutral colors are sometimes referred to as achromatic colors.
Color hues are commonly associated with names, such as red or green. Problems in communicating specific information about colors will occur unless everyone uses the same names for the same colors. Unfortunately, many children have learned that the names of the primary colors of water-colors used for painting are blue, red, and yellow, rather than the correct names of cyan, magenta, and yellow. Advertisers have not helped matters by using exotic-sounding or unusual names for colors rather than more common and descriptive names. Color-notation systems such as the Munsell system have done much to bring order to the identification of colors. The Munsell system uses five basic hues: red, yellow, green, blue, and purple. The complete Munsell hue circle, which includes subtle transitions between adjacent hues, has 100 hues, which is about the maximum a person with normal color vision can distinguish in side-by-side comparisons.
Much of the discussion about color as it relates to color photography can be accomplished with combinations of the three additive primary colors: red, green, and blue. Combinations of pairs of these colors of light produce cyan, magenta, and yellow, which are called additive secondary colors or subtractive primary colors. The relationship of these six hues is often represented in the Maxwell triangle, shown in Figure 12-5.
Red, green, and blue are identified as additive primary colors because by combining red, green, and blue light in different proportions it is possible to produce almost any color, including neutral colors. Cyan, magenta, and yellow are identified as subtractive primary colors because dyes and other colorants in these hues absorb red, green, and blue light, respectively, from the white viewing light. Perceptually, however, primary colors are defined as those hues that appear to be pure rather than a mixture of other hues. In this sense, red, green, blue, and yellow are primary colors, and they are identified as psychological primary colors. Including the neutral pure colors of black and white increases the number of perceptual primary colors to six.

Figure 12-5 The Maxwell color triangle.
Persons having normal color vision are identified as normal trichromats, based on the three types of cones in the retina, which are sensitive to red, green, and blue light. Not all normal trichromats, however, respond to colors in exactly the same way. For this reason, scientific studies of color vision make use of the average response of a number of persons having normal color vision.
There are a number of types of defective color vision. A person who is missing one of the three types of cone pigments is known as a dichromat. Monochromats are missing two of the three cone pigments (or possibly have rhodopsin, the rod photopigment, in the cones). Dichromats have difficulty distinguishing between red and green, or more rarely between blue and yellow. There are very few monochro-mats, but their vision is the equivalent of black-and-white photography.
The red, green, and blue cone sensitivities suggest a simple trichromatic theory of color vision, but much of the experimental evidence supports the opponents' theory of color vision, whereby information from the red-, green-, and blue-sensitive cones is thought to be transmitted in combi-nations—specifically red-green, blue-yellow, and black-white—through three separate channels.
Other than missing one or two of the three types of cone photopigments, defective color vision can also be associated with reduced sensitivity of one or two of the three cone types, or with a shift in sensitivity along the spectrum for one or more of the cone types. People who have all three types of cone photopigments but who do not have normal color vision for either of the reasons cited are referred to as anomalous trichromats—as distinct from the conventional trichromats, dichromats, and monochromats.
Additive primaries are red, green, and blue.
Subtractive primaries are cyan, magenta, and yellow.
A person with normal color vision may have inaccurate perception of stimulus colors under certain conditions. Some of these conditions are (a) when the image is formed near the periphery of the retina, (b) when the light level is very low or very high, (c) when the stimulus is very small in area, (d) when the stimulus is presented for a very short time, (e) when the stimulus is illuminated with other than white light, and (f) when the viewer is adapted to a different color. Accurate color identification requires normal color vision, standard viewing conditions, and the opportunity to make side-by-side comparisons with standard colors.
Heredity is responsible for most cases of defective color vision, although it can result from other causes such as the use of certain drugs, excessive use of alcohol, and brain damage. About 8 percent of white males and 0.4 percent of females of all races have some form of defective color vision. There is no cure for congenital defective color vision. Some people whose occupations require being able to discriminate between certain colors have been helped by using filters of different colors over the left and right eyes. Photographers with defective color vision are able to make color prints that are acceptable to themselves, but the prints often do not appear correct to people with normal color vision.
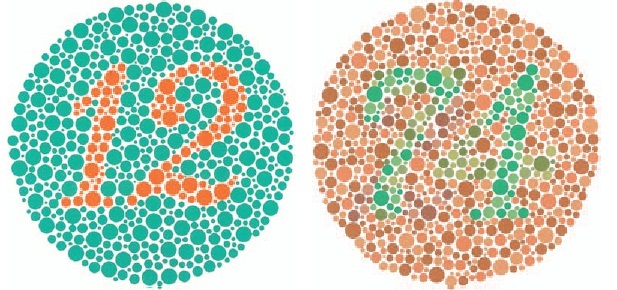
Figure 12-6 Ishihara color plates: A person with normal color vision or a color blind person will see "12" in the plate on the left, whereas a person with normal color vision will see "74" on the right and a dichromat or anomalous trichromat will see a "21."
Defective color vision can be detected with various types of tests. One test, the Ishihara pseudoisochro-matic plate test, contains either simple geometric designs or numbers made up of colored circles against a background of gray circles (see Figure 12-6). People with defective color vision are unable to see some of the designs that are visible to persons with normal color vision. Another test, the Munsell 100-Hue test, requires the subject to arrange color samples that vary in hue in the correct order to provide a consistent transition. This test can also determine how well people with normal color vision can make small discriminations between colors. With this test, defective color vision is revealed by large errors with certain hues, whereas low discrimination is revealed by randomly distributed errors with all hues.
A glossy photographic print has a density range of about 2.0. This is a luminance ratio of 100:1.
Everyone is color blind under certain conditions, such as when the light level is very low.
Color Lightness
Luminance ratios as low as 100:1 in a photographic print can create the perception of tonal differences of white and black. This fact is misleading with respect to the ability of the visual system to detect differences in lightness (reflected light) or brightness (light sources) over a wide range.
Viewing transparencies or projected slides in a darkened room requires a somewhat greater luminance ratio to produce the perception of a range of tones from white to black—approximately 500:1 (see Figure 12-7). Since reversal color films typically produce a maximum density of over 3, it is possible to obtain a luminance ratio of 1000:1 in the image, compared to a maximum density of approximately 2 in typical photographic papers. Placing one gray scale in direct sunlight and a second gray scale in the shade on a clear day when the lighting ratio is about 8:1 produces a luminance ratio of approximately 800:1 between the light end of the gray scale in sunlight and the dark end of the gray scale in the shade. A person may be able to see the separation between all steps on both gray scales caused by local adaptation, whereby sensitivity of the visual system is increased in darker areas and decreased in lighter areas.

Figure 12-7 Curves representing the perception of brightness in relation to subject luminance with a bright surround (top) and dark surround (bottom). The difference in the log luminance ranges indicates that higher contrast photographic images are required for projection viewing in an otherwise darkened room than for viewing with normal room illumination.
When general adaptation is taken into account, the ratio of luminances over which the visual system responds is truly amazing. A white object in sunlight has a luminance of approximately 100 million times that of a white object in starlight, and yet both can be seen quite easily when a person is fully adapted to each light level. Under optimum laboratory conditions, a person can detect a flash of light having a luminance of only 1/100 that of white paper in starlight, and when adapted to bright light a person can detect luminance differences up to 1000 times that of white paper in sunlight, which is approaching luminances that can be damaging to the retina. Thus the total response range of the visual system is approximately 10 trillion: 1, or a log luminance difference of 13.
To appear correct in contrast, slides and transparencies viewed in a darkened room must have higher contrast than photographs viewed under normal room illumination.
It is important to make a distinction between luminance, which is psychophysical and measurable with a light meter, and the perception of brightness (or lightness), which is influenced by physiological and psychological factors and is not directly measurable. The eye is not a dependable instrument for measuring luminance values. For example, it is difficult for a person to judge whether a black surface in direct sunlight is reflecting more or less light than a white surface illuminated with lower-level incandescent light indoors, because of two variables—reflectance of the two surfaces and the amount of light falling on them. The adaptation level of the visual system can affect perception in that a surface with a fixed luminance will appear lighter when the eye is dark adapted than when it is light adapted. Also, a gray tone appears lighter in front of a black background than in front of a white background, an effect known as lateral adaptation or simultaneous contrast.
The eye, however, is very good as a null instrument where very small luminance differences can be detected in side-by-side comparisons. Thus, visual densitometers can be quite accurate where the sample being measured is seen in a circle surrounded by a ring that can be adjusted to match the inner circle in brightness (see Figure 12-8).
It is more difficult to match the brightness or lightness of two areas if they differ in hue. If, for example, the inner circle in a visual densitometer is red and the outer ring is blue, the operator will have more trouble judging when the two match in brightness.
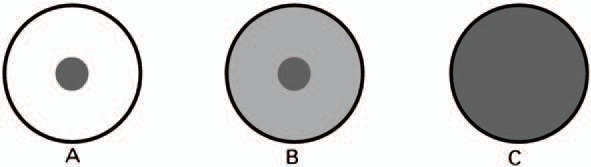
Figure 12-8 Field of view in a visual densitometer. (A) Dark small circle is the unknown density of the sample. The larger circle is the matching field set at 0 density. (B) The density of the matching field is increased but is insufficient to match the density of the sample. (C) More density is added to the matching field and it now matches the density of the unknown sample. The known density of the matching field now becomes the density of the sample.
The human eye is a good measuring instrument only when making comparisons.
A Wratten 90 filter is used for visualization by Zone System photographers.
When it is important to match the brightness of samples having different hues, a device called a flicker photometer can be used to present the two fields to the viewer alternately in rapid succession. When the two do not match closely in brightness, a flicker is seen. It is important for photographers to develop some skill in judging the lightness of subject colors so that they can anticipate whether there will be tonal separation in black-and-white photographs, such as in a photograph of a red object in front of a blue background made on panchromatic film. Some photographers use viewing filters in an effort to deemphasize hues and thereby make lighting effects easier to see.
Color saturation is the extent to which a color differs from gray.
Equal amounts of light of different wavelengths do not generally appear equally bright. With light levels high enough for the retinal cones to function— photopic vision—the greatest sensitivity is at a wavelength of approximately 555 nm, which is usually identified as green-yellow (see Figure 12-9). Since there is some variation among persons with normal vision, the luminosity function curve, or the American Standard Observer, is based on the average of a number of observers with normal color vision. With low light levels where only the rods function—scotopic vision—peak sensitivity shifts to a wavelength of about 507 nm. This change is known as the Purkinje shift, and can cause two colors, such as blue and red, that match in lightness when viewed in bright light to appear different in lightness when viewed in dim light, with the blue appearing lighter.

Figure 12-9 Photopic (P) and scotopic (S) response curves for the human eye.
It is convenient to think of the limits of the visual system's response to electromagnetic radiation as being 400 nm and 700 nm. Although responses beyond these values are somewhat limited, 380 nm and 770 nm are more accurate limits, and responses have been detected as low as 300 nm and as high as 1050 nm. The cutoff on the low end tends to increase with age as the transparent material in the eye becomes more yellow and absorbs more ultraviolet and blue radiation.
Color Saturation
Saturation is the third dimension of color. It is defined as the extent to which a color departs from neutral. Thus grays have no saturation, and spectral colors have high saturation. The saturation of pure blue light can be reduced by adding either white light or yellow (the complementary color of blue) light, and the saturation of a blue dye or other colorant can be reduced by adding a gray or yellow colorant.
It is difficult for a person to judge the saturation of a color seen in isolation except in general terms such as low, moderate, and high saturation. In side-by-side comparisons, where the eye functions as a null instrument, it is easy to detect small differences in saturation provided the two samples match in the other two attributes—hue and brightness/lightness. The smallest difference that can be detected in saturation, or any attribute, is called a just-noticeable difference (JND).
Whereas there are upper and lower limits to the ability of the eye to detect changes in brightness, and limits at both ends of the visible spectrum with respect to seeing different wavelengths of electromagnetic radiation or hues, there are no limitations of the visual system at the lower and higher ends of the range of saturations of stimulus colors. Indeed, it has been a problem over the years to obtain primary-color dyes, inks, and other colorants with sufficient saturation to reproduce subject colors satisfactorily in photographic, photomechanical, and other images. Color masks in negative color films and black ink images in four-color photomechanical reproductions are compensations for the limited saturation of the dyes and the inks. The most saturated color of a specific hue and lightness that can be reproduced with a given system is called a gamut color. Gamut is also used to identify the full range of colors that can be produced with different combinations of the primary colors with a given system.
The perceived saturation of a given color sample can vary depending upon a number of factors. A blue sample will appear more saturated when viewed in front of a yellow background than in front of a gray background, and it will appear less saturated when viewed in front of a blue background of higher saturation. Whereas large juxtaposed areas of yellow and blue enhance one another's perceived saturation—an effect known as simultaneous contrast— the opposite effect can result when small areas of the same two colors are closely spaced in a picture or design. In this configuration, the colors tend to neutralize each other, an effect known as assimilation. Viewing large areas of complementary colors, such as blue and yellow, in sequence rather than simultaneously will also increase the perceived saturations, an effect known as successive contrast. Prolonged viewing of a color sample will decrease the retina's sensitivity to that color and cause it to appear less saturated, an effect known as chromatic adaptation. Shifting the gaze to a neutral surface will tend to produce an after-image that is approximately complementary in hue.
Under the proper conditions, hues such as blue and yellow can be seen when looking at a black-and-white image that is illuminated with white light.
Color-temperature variations in viewing lights can produce either an increase or a decrease in the perceived saturation of colors. A decrease in the illumination level can produce a decrease in the appearance of saturation, and in dim light where only the rods function, even saturated colors tend to appear neutral. For the same reason, colors appear most saturated when viewed directly so that the images fall on the fovea of the retina, where the concentration of cones is highest.
It is also possible to induce the perception of hues with low to high saturation in neutral subjects. The color afterimage produced with prolonged viewing is one example. Chromatic sensations can also be produced when black-and-white images are presented to a viewer intermittently at frequencies of about five per second, when certain black-and-white designs are rotated at appropriate speeds, and even with certain stationary black-and-white designs that are viewed continuously, where the involuntary small-scale nystagmus movements of the eyes produce the necessary interactions in the visual response mechanism. These perceptions of colors in neutral stimuli are known as subjective colors or Fechner's colors.
Shape
The word shape, as applied to an object, refers to its outline. Silhouettes emphasize shape and eliminate or de emphasize other attributes such as color, form, and texture. We depend heavily upon the attribute of shape for the identification of many objects, and often that is the only attribute needed for a viewer to be able to recognize the object in a drawing or photograph.
Three-dimensional objects actually have many shapes because each can be viewed from many different angles. The choice of viewpoint selected by a photographer to provide the best shape for an object being photographed is important even when the object is lit to provide detail, but it becomes critical in a silhouette. Silhouettes of people are commonly recognizable only in a full left or right profile view; thus profile views are normally used for the images of famous people on coins. Figure 12-10 shows an early American print in which George Washington is memorialized with an embedded profile between two trees.
Photographers can control the emphasis on object shapes by controlling the separation or contrast between object and background. The term figure-ground is commonly used to refer to the subject of a picture and the surrounding area. Figure-ground is an important concept in Gestalt psychology, where the emphasis is on the perception of the whole rather than an analysis of the parts. Experienced photographers have little difficulty separating an object from the background (figure from ground) in a photograph by means of choice of background, lighting, depth of field, etc. In military camouflage the objective is to conceal the shapes of objects so that they appear to be part of the background and therefore escape detection. In pictorial photography it is often just as important to de-emphasize shape in certain areas of a photograph as it is to emphasize it in other areas, and the principle of camouflage can be used for this purpose.
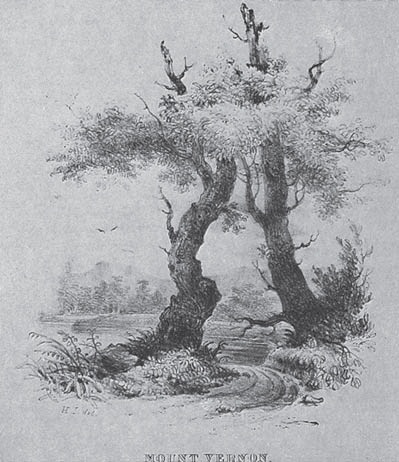
Figure 12-10 The profile of George Washington, even though camouflaged, is easily recognized in this picture by Henry Inman. (Courtesy of the Metropolitan Museum of Art, New York City, New York.)
Although it is sometimes difficult to see the shape of an object clearly when it is not well separated from the background, we are seldom confused as to which is the object and which is the background when we can see both, either with actual objects or in photographs of objects. It is not difficult, however, to make simple drawings in which a given area can be seen alternately as figure and as ground. In a famous Rubin ambiguous picture, for example, the center area can be seen either as a vase (figure) or as a background for two profiles (see Figure 12-11).

Figure 12-11 Rubin's figure, an ambiguous picture where the center area can be seen either as a vase or as a background for two profiles.
It is usually unnecessary to see the entire outline shape of a familiar object in order to be able to identify it and to visualize its entire shape. Most people, for example, perceive the moon as being round, not only when there is a full moon but also when there is a half-moon or quarter-moon and the shadow side cannot be separated from the background (see Figure 12-12). One can conduct a simple experiment by looking at objects outdoors through Venetian blinds, starting with the slats in the full open position and then gradually closing them to determine how small the openings can become before encountering difficulty in identifying the objects. A small number of dots arranged in a circular pattern can easily be seen as representing a circle. In Gestalt psychology, this effect is known as the principle of closure, in which the viewer mentally fills in the spaces between the picture elements. A distinction should be made, however, between closure, and fusion, where the optical-retinal system in the eye cannot resolve the small discrete elements as in a halftone reproduction or a photographic image at a small to moderate magnification.
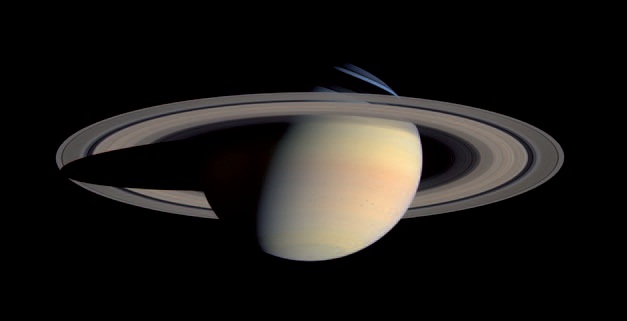
Figure 12-12 This photograph was taken by the Cassini Orbiter on October 10, 2006 from a distance of 3.9 millions miles. (Courtesy of NASA.)
Reading provides an excellent example of how the mind fills in spaces between fixation points. The area of sharpest vision represented by the fovea of the retina is very small, so that when a person fixates one letter in a line of type, only a few letters on each side can be seen clearly. The reason it is possible to read rapidly with only two or three fixations per line is that the reader recognizes groups of letters as familiar words without examining each letter, and can understand the meaning of a sentence without examining each word. Printed material that contains unfamiliar words and a high concentration of factual information requires more fixations per line. Eye-motion studies have provided valuable information concerning reading, and how we look at photographs and other pictures. Viewers of pictures rarely scan them as thoroughly as they would a printed page, but rather fixate a few points in the picture and let the mind fill in the shapes and details between the fixation points.
Figure and ground can be seen to switch places in certain so-called "ambiguous" images.
The accuracy with which we perceive shapes is important in the study of visual perception, but it is not considered as critical in our daily lives as normal color vision and good acuity— which are usually tested before a person can obtain a driver's license or be permitted to perform certain occupational tasks. It has been demonstrated that it is easy to deceive a viewer about shape under certain conditions, A straight line, for example, can be made to appear curved, as shown in Figure 12-13. Under normal conditions, however, we are best able to detect changes in images having simple geometrical shapes such as straight lines, squares, circles, and triangles (see Figure 12-14). We are also better at making comparisons with superimposed or side-by-side images than with images that are separated in time or space, where memory becomes involved.
Shape constancy causes tilted circles to be perceived as tilted circles rather than as ellipses.
The perception of shapes is complicated by the fact that image shape changes with the angle and distance of the object relative to the eye or the camera lens. Parallel subject lines are imaged as converging lines except when viewed or photographed perpendicularly, and tilted circles are imaged as ellipses. Through experience we have learned that the parallel lines and circles do not change shape with a change in viewing angle, so we mentally compensate for linear perspective effects. Shape constancy refers to this stability of the perceived shape of objects as the viewing or camera angle changes.

Figure 12-13 Illusory figures. The long straight lines tend to appear curved because of the influence of the diagonal lines.

Figure 12-14 Which is the perfect square?
Shape generalization is the tendency to perceive an irregular shape as a simpler shape—obtuse and acute angles seen in perspective may be perceived as right angles, and an ellipse seen in perspective may be perceived as a circle (see Figures 12-15 and 12-16). Memories of perceived shapes can also change with time. The simplification of irregular shapes because of memory is called leveling; the exaggeration of a distinctive feature, such as a small gap in an otherwise continuous line, is called sharpening.

Figure 12-15 The principle of shape generalization causes the ellipses in this image to be generally perceived as perspective views of circles. (Photography by Jessica L. Scott, Imaging and Photographic Technology student, Rochester Institute of Technology.)

Figure 12-16 When the sheet of film in the top photograph is viewed obliquely, it is perceived as being rectangular, because of shape generalization, even though the perpendicular view in the bottom photograph reveals that the film has only one 90° corner.
Size
The perceived size of an object has little relationship to the size of the image on the retina (or the size of the image in a photograph of the object). An automobile, for example, is judged to be about the same size when viewed over a wide range of distances—an effect known as size constancy. Experiments have demonstrated that the accuracy of judging the size of an abstract shape, such as a circle, depends greatly upon being able to estimate the distance. As distance cues are systematically eliminated, the accuracy decreases.
The perceived size of an object has little relationship to the size of the image on the retina.
When the precise size of an object must be known, a ruler or other measuring instrument is used for a direct side-by-side comparison. As with the perception of other object attributes, the eye is most precise when used as a null instrument in making comparisons between adjacent stimuli. It is sometimes necessary to include a ruler beside an object in a photograph when it is important to be able to determine the size of the object, as in some forensic photographs. In pictorial photographs, it is usually sufficient to include an object of known size with the unfamiliar object, and to provide good distance cues.
It is not difficult to deceive a viewer about the size of objects represented in photographs. Use of a short focal-length camera lens tends to make foreground objects appear larger than normal and background objects appear smaller than normal when the photograph is viewed at a comfortable distance, and long focal-length camera lenses have the reverse effect. Line drawings can also cause viewers to misjudge the relative length of lines or size of images. The Muller-Lyer arrow illusion and the Ponzo railway lines illusion both contain lines of equal length that are perceived as being unequal (see Figure 12-17).
The moon is commonly perceived as being larger when it is near the horizon than when it is overhead.
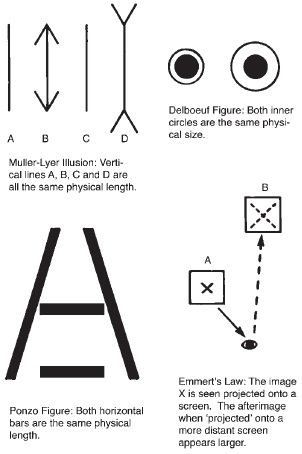
Figure 12-17 Size/distance constancy. For familiar objects, size and distance are inseparable. For an object to be the same actual size at a farther distance it has to be larger, and therefore it appears to be larger. (The moon illusion is yet another example of this phenomenon.)
In nature, the moon is commonly perceived as being larger when it is near the horizon than when it is overhead. Various explanations of this illusion have been offered, but the most acceptable one is that the moon is thought of as being farther away when it is near the horizon, as an airplane would be, so that when the retinal image remains the same size as the moon moves toward the horizon from overhead it is perceived as being a larger object farther away. Emmert's law—that the size of an afterimage increases in proportion to the distance to the surface onto which the image is projected—supports this explanation.
Visual Acuity
As an object of moderate or small size is moved farther away from a viewer and the retinal image decreases in size, a point is reached where the viewer is no longer able to see the object. Visual acuity is a measure of the ability of a person to see detail. Visual acuity tasks are commonly classified as detection, localization, recognition, and resolution, with different types of test targets used for each task. A black dot or a black line on a light background can be used to measure detection. It is usual to measure the visual angle subtended by the appropriate dimension of the test target, rather than specify both the target dimension and the distance. A person with normal vision may be able to detect a black line having a width that represents a visual angle of only 1/120 of a minute (1/7200 of a degree). Visual acuity is the reciprocal of this angle in minutes, or 120. This value corresponds to a 1/4-inch black line, the thickness of a lead pencil, at a distance of 4/5 of a mile.
Localization is the ability to see where the opening in a Landolt C or the vernier displacement between two straight lines is located. Maximum acuity for the vernier lines is about 30, or about one-fourth the acuity for the detection of a black line.
Snellen eye charts containing letters of the alphabet of varying size are commonly used for eye examinations to test vision. Maximum acuity for this visual task is about 2.
Resolution can be tested with a target having parallel black bars separated by spaces equal to the width of the bars, similar to targets used for measuring the resolution of photographic systems or components. The maximum acuity for this task is also about 2. Keep in mind that an image can have high resolution yet have poor sharpness and vice versa. Resolution is reported differently for film (lines pairs per inch) than for digital systems. Digital systems use pixels per inch.
Sharpness (acutance) refers to the apparent abruptness of the change in density that occurs at the very edge of an image. (Using an unsharp mask in Photoshop increases sharpness this way.)
Visual acuity can be affected by other factors such as the illumination level, where acuity increases steadily with the illumination level over a wide range. Pupil size also affects acuity, with the maximum being obtained at an opening of approximately f/4. At the maximum opening of f/2, aberrations lower the acuity, and at the smallest opening of f/8 diffraction lowers the acuity.
Motion
Motion refers to a change in position of an object, and the rate of motion is identified as speed. The speed of a moving object may be either too fast to be detected (a speeding bullet) or too slow (the moon, from moonrise to moonset). Slow movement can be detected more easily when the movement takes place in front of stationary objects. One experiment revealed that when a reference grid was removed, the rate of movement of a spot had to be increased 10 times to be detectable. In fact, a stationary spot of light in an otherwise darkened room is commonly perceived as moving—an effect known as the wandering-light phenomenon. Although the speed of a moving object can be measured in units such as miles per hour, viewers in general are not very accurate in estimating the rate of movement. Such ability improves with experience when subjective judgments can be compared to objective measurements—an experienced batter in a baseball game, for example, can detect the difference between an 80 mph pitch and a 90 mph pitch.
The human visual system is designed to detect motion over the entire area of the retina, so that moving objects in the periphery of the field of view, up to 90° to the side, can be detected. If identifying the moving object is important, a semi-reflexive movement of the eyes enables the viewer to position the image of the object on the fovea of the retina, where visual acuity is highest. Once the object is fixated, the visual system is very good in tracking the movement unless the speed is very high and the direction of movement is erratic. Strangely, it is almost impossible to pan the eyes smoothly except when tracking a moving object. Instead, the eyes tend to move in quick jumps, called saccades. By closing the eyes, the viewer may be able to pan the eyes smoothly by visualizing tracking a moving object. Skill in tracking rapidly moving objects is important for both motion-picture and still photographers, as well as for participants (and spectators) in many sports and other recreational and occupational activities.
A person can detect movement of an object that is 90 degrees off to one side, but it might be difficult for the person to identify the color of the object.
With current technology, it is impossible to accurately recreate motion photographically. In a single still photograph, it is necessary to rely upon implied motion. A blurred image of a bicycle is generally perceived as representing a rapidly moving object (see Figure 12-18). Similarly, a sharp image of a bicycle with a blurred background implies motion. Motion can also be implied without blur, such as a sharp image of a skier going down a steep slope or suspended in air. With two or more still photographs viewed side-by-side, a change in position of an object is perceived as representing movement. A series of such still photographs viewed sequentially in the same position produces a more realistic perception of motion, and if the amount of change in position of the images and the rate of presentation of the still photographs is appropriate the viewer accepts the images as representing smooth and continuous movement, as with contemporary motion pictures.

Figure 12-18 Blurring the image is one of several methods of representing motion in a still photograph. (Photograph by Natalie Sinisgalli, www.nataliesinisgalliphotography.com.)
The phi phenomenon accounts for the realistic perception of motion when looking at a series of still photographs in a motion picture.
This perception of motion—when the image of an object appears in different positions in a sequence of still pictures presented in rapid succession—is known as the phi phenomenon. The phi phenomenon can be demonstrated in a darkened room with as few as two flashes of light, provided the separation in time and space are appropriate. In sound motion pictures, a projection rate of 24 frames per second produces generally acceptable results, although rapid panning of the motion-picture camera can produce an unrealistic jumpy effect. Early 8-mm motion pictures used a projection rate of 16 frames per second, which was increased to 18 frames per second for super-8 motion pictures.
The phi phenomenon can be demonstrated effectively by illuminating a moving object with a variable-speed stroboscopic light where the flash frequency can be altered from approximately one flash per second to a frequency that produces the perception of a continuous light source (see Figure 12-19). A black circle with a white radial line rotated on a motor will appear to be standing still when the light flashes once per revolution. Slowing down the frequency of the stroboscopic light so that the disk makes a little more than one complete revolution between flashes will make it appear to be rotating in the correct direction. Speeding up the frequency so that the disk does not quite complete a full revolution between flashes will make it appear to be rotating in the reverse direction. This explains why wagon wheels sometimes appear to be turning backward in cowboy movies.

Figure 12-19 A variable-speed stroboscopic light source was used to record 24 images of a dancer in a single photograph to produce a perception of implied motion. In a sound motion picture, 24 still photographs are projected in rapid sequence to produce a perception of realistic motion because of the phi phenomenon. (Photograph by Andrew Davidhazy.)
Motion-picture photography offers the advantage over direct vision of being able to speed up or slow down motion by altering the rate at which the individual pictures are exposed in the camera. In time-lapse photography, a flower can change from a bud to full bloom in seconds by exposing the film at a rate of about one frame per hour. Conversely, motion that is too rapid to be seen with the eye can be slowed down by using a high-speed motion-picture camera that can expose film at rates up to approximately 10,000 frames per second. If a film exposed at 10,000 frames per second is projected at a rate of 24 frames per second, the rate of movement is reduced to approximately 1/400 the original speed.
Depth
The perception of depth is important to photographers in two different contexts—how depth is perceived when viewing the three-dimensional world, and how depth is perceived when viewing photographs and other two-dimensional representations of the real world. Binocular vision, whereby objects are viewed from slightly different positions with the left and right eyes, is commonly given much of the credit for the perception of depth in everyday life. The fact that a threedimensional scene does not suddenly appear two-dimensional when we close one eye is evidence that there are other depth cues besides those provided by binocular vision.
Wagon wheels can appear to be turning backwards in motion pictures even though the wagon is moving forward.
When an object in a threedimensional scene is fixated with both eyes, the images formed in the two eyes are for the most part identical. To the extent that they are identical, the mind can fuse them into a single image. The inability to fuse the two images in certain areas, because of differences in viewpoint of the two eyes, is referred to as disparity, and the disparity provides the mind with important depth information (see Figure 12-20).
Disparity can be demonstrated very easily by looking at a fairly close object, then covering the left and right eyes alternately and noting how objects in the background seem to change position. If the background jumps when the right eye is covered but not when the left eye is covered, the indication is that the right eye is the dominant eye. Photographers usually feel more comfortable when they use the dominant eye for operations that can be done with only one eye, such as using a camera viewfinder or a focusing magnifier'.
Three-dimensional scenes do not suddenly appear flat when one eye is closed.
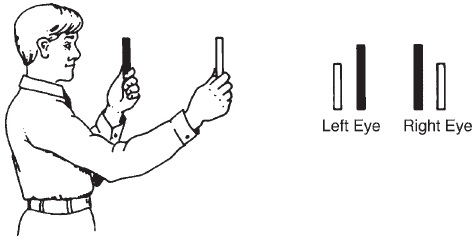
Figure 12-20 Binocular disparity.
Disparity becomes so slight with objects at distances greater than approximately 450 feet that binocular vision contributes little to depth perception. Since the pupils in the eyes are separated, on the average, by 2.5 inches, at a distance of 450 feet the ratio of distance to separation is approximately 2000:1. Conversely, at very close distances the disparity increases, and it is even possible to see opposite sides of one's hand when it is placed in a thumbing-the-nose position. When completely different images are presented to the two eyes with an optical device, so that no fusion is possible, the mind tends to reject one image or the other, sometimes both on an alternating basis.
Photographers tend to use their dominant eye when looking through a viewfinder.
There is no disparity when a person looks at a photograph or other two-dimensional image with both eyes. Thus, the perception of depth in photographs must be due to cues other than binocular vision. On the other hand, the absence of disparity in twodimensional pictures may remove a minor source of tension that makes some realistic pictures more satisfying to look at than the original scenes they represent.
Stereopsis, the perception of depth due to binocular vision, can be created in photographs. By taking two photographs of the same scene from slightly different positions, separated horizontally by about 2.5 inches, and presenting them so that each eye sees only the photograph taken from the corresponding position, the same disparities are produced as when looking at the original scene. Various methods have been used to present the two images to the appropriate eyes. With the stereoscope, the pictures are placed side by side and the lenses make it possible for each eye to view the corresponding image. Viewing specially colored superimposed images with glasses that have different-color filters or polarizing filters that are rotated at right angles to each other can eliminate the need for stereoscope lenses. The two images can also be presented as alternating narrow strips covered with transparent lenticular embossings that present each set of strips to the appropriate eye. With holography, there is a single photographic image, but different interference patterns are presented to the two eyes so that the reconstructions constitute different images.
Convergence of the two eyes is stronger when viewing a close-up object than a distant object, thereby providing the mind with additional binocular information about depth (see Figure 12-21). Also, the focus of the eyes changes with object distance, although this is not a binocular function and the viewer is usually aware of the effect only when the object distance approaches the near point—the shortest distance the eye can focus on without strain. The near point varies among individuals, and increases with age from a minimum of approximately 3 inches to a maximum of approximately 84 inches.
Although the eyes have a limited depth of field, like photographic lenses, the depth of field of the eyes tends to be relatively large because of the short focal length (17 mm). In addition, since the focus changes automatically as we look at different parts of a three-dimensional scene, and the angle of critical vision is very narrow, depth of field plays a much smaller role in the perception of depth in the real world than it does in photographs.

Figure 12-21 Convergence.
Perspective
Remembering that perspective refers to the appearance of depth when a threedimensional scene is represented in a two-dimensional image such as a photograph or drawing, or when a scene is viewed directly. Photographers have a number of additional cues or methods that create the appearance of depth in photographs, including the following:
Depth of Field. Use of a limited depth of field, so that the objects in front of and behind the point of focus in the image are unsharp, creates a stronger appearance of depth or perspective than when the entire scene appears sharp.
Lighting. Depth can be emphasized with lighting that produces a gradation of tones on curved surfaces, that produces a separation of tones between the planes of box-shaped objects and between objects and backgrounds, and that casts shadows of objects on the foreground or background.
Overlap. Arranging a scene so that a nearby object obscures part of a distant object provides the viewer with powerful clues as to the relative distances of the objects.
Aerial Haze. The scattering of light that occurs in the atmosphere makes distant objects appear lighter and less contrasty than nearby objects. Thick fog and smoke can create the illusion of depth with relatively small differences in distance.
Color. Red is referred to as an advancing color and blue as a receding color. In the absence of conflicting depth clues, a blue surface tends to appear farther away than a red surface at the same distance.
The perceived size of an object has little relationship to the size of the image on the retina.
Stereophotography. Viewing two photographs taken from slightly different positions so that the left eye sees one and the right eye sees the other produces a realistic effect with strong depth clues similar to those produced with binocular vision and three-dimensional objects.
Photographers have many different ways of representing threedimensional depth in two-dimensional photographs.
Holography. With a single photographic image, holograms present different images to the left and right eyes, as with stereo pairs, but they also produce motion parallax for objects at different distances when the viewer moves laterally.
Image size is directly proportional to focal length and is inversely proportional to object distance.
Linear Perspective. Linear perspective is exemplified by the convergence of parallel subject lines, and thedecrease in image size as the object distance increases. Linear perspective is so effective in representing depth in two-dimensional images that it is often the only type of depth clue provided by artists when making simple line drawings. Figure 12-22 provides examples of some of the above methods.
Moving a camera farther away from a subject weakens the linear perspective.
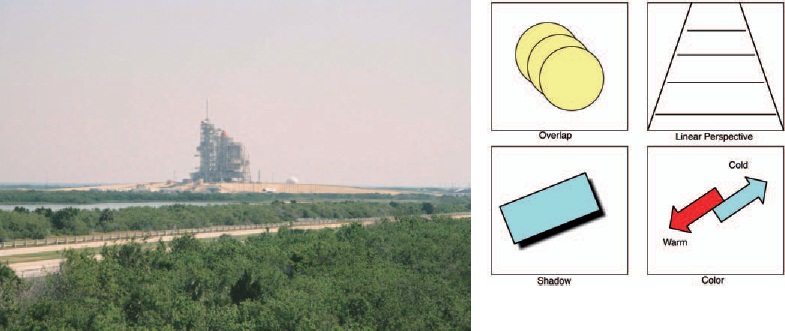
Figure 12-22 Some depth cues include haze, overlap, linear perspective, shadow, and color.

Figure 12-23 Three-dimensional form in the original scene is represented by the different planes of the ceiling, wall, and floor; the bench; and even the protruding bricks that make up the triangular designs in the wall. The pattern of the protruding bricks is reduced in size sufficiently so that the viewer can visualize feeling the roughness of the pattern with the fingertips, a characteristic of texture. (Photograph by James Craven.)
So far, the emphasis in the discussion of depth has been on the perception of distance, but the term depth properly includes two other important categories—form and texture. Form refers to the three-dimensional quality of objects, as distinct from the two-dimensional outline shape (see Figure 12-23). Form is the quality that can be determined through the sense of touch with the eyes closed, such as the spherical form of a baseball or the cubical form of a pair of dice. Effective representation of form in two-dimensional photographs depends largely upon the choice of an appropriate viewpoint and the use of light to reveal the different planes and curved surfaces with highlights, shadows, and appropriate gradations of tone.
Texture refers to the small-scale depth characteristics of a type that might be felt with the fingertips, such as the roughness of a wood file or the smoothness of window glass. Effectively rep-resentating texture in two-dimensional photographs depends largely upon using an appropriate scale of reproduction, as well as lighting that produces shadows in the recessed areas and highlights in the raised areas. Photographs made through optical and electron microscopes reveal that many surfaces thought of as being smooth, such as writing paper, appear to have a rough texture or even form and distance when magnified sufficiently. Conversely, the mountains on the moon appear to have a finger-touching type of texture when photographed from a distance with a small scale of reproduction.
Linear Perspective
Now that we have discussed many of the aspects of perception, let's explore how we can control perspective in photography. In photographs, changes in linear perspective are commonly associated with changes in camera position and the focal length of camera lenses. If the definition of linear perspective were limited to the relative image size of objects at different distances (or the angle of convergence of parallel subject lines) the photographer's control would be limited to the choice of camera position (that is, object distance). If changes in the appearance of linear perspective were included even when there is no change in the relative image sizes of objects at different distances, then lens focal length would have to be included as a control.
Two basic assumptions important to an understanding of the control of linear perspective are the following:
- Image size is directly proportional to focal length.
- Image size is inversely proportional to object distance.
Object Distance and Image Size
Placing two objects of equal size at distances of 1 foot and 2 feet from a camera lens produces images that vary in size in a 2:1 ratio. Recalling that image size is inversely proportional to object distance, the smaller of the two images corresponds to the object at the larger distance. Actual image sizes could be determined given the object size, focal length, and object distances with either graphical drawings or lens formulas as discussed in the Optics chapter, but for now we will be concerned only with relative image sizes.
Strong perspective makes a room appear larger in a photograph, but it is inappropriate for a formal portrait of a person.
Linear perspective is based on the ratio of image sizes for objects at different distances. Figure 12-24 shows two objects of equal size at distance ratios of 1:2, 1:3, and 1:4. The sizes of the resulting images are in ratios of 2:1, 3:1, and 4:1. Thus, with movable objects the relative image sizes and linear perspective can be controlled easily by changing the positions of the objects. Most of the time, however, we photograph objects that cannot be moved easily, and therefore the options available to control perspective or alter image size are either moving the camera or changing the focal length of the lens.

Figure 12-24 Image size is inversely proportional to object distance. The ratios of the object distances from top to bottom are 2:1, 3:1, and 4:1.
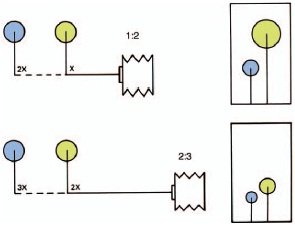
Figure 12-25 Doubling the distance from the camera to the near object changes the ratio of distances to the two objects from 1:2 to 2:3.

Figure 12-26 Space appears to be compressed in the bottom photograph, made with a 150-mm lens, compared to the top photograph, made with an 18-mm lens from a closer position.
Let's start with two objects that are at a distance ratio of 1:2 from the camera. Next we will move the camera away to double the distance from the closer object. Doing this does not double the distance to the farther object. Therefore, the ratio of the image sizes will not remain the same. The ratio of object distances changes from 1:2 to 2:3 by moving the camera, the ratio of image sizes changes from 2:1 to 3:2 (or 1.5:1) (see Figure 12-25). Moving the camera farther away from the subjects reduces the size of both images and also makes them appear nearly equal in size. The two images will never be equal in size, no matter how far the camera is moved away, but with very large object distances the differences in size can become insignificant.
The linear perspective produced by moving the camera farther from the objects is referred to as a weaker perspective than that produced with the camera in the original position. Thus, weak perspective is an attribute in a picture in which image size decreases more slowly with increasing object distance than expected. Another aspect of weak perspective is that space appears to be compressed, as though there were less distance between nearer and farther objects than actually exists (see Figure 12-26).
Conversely, moving a camera closer to the two objects increases the image size of the nearer object more rapidly than that of the farther object, producing a stronger perspective. For example, with objects at a distance ratio of 1:2, moving the camera in to one-half the original distance to the near object doubles its image size but reduces the distance to the farther object from 2 to 1.5, therefore increasing the image size of the farther object to only 1 1/3 times its original size. Strong perspective is especially flattering to architectural photographs of small rooms because it makes the rooms appear more spacious.
A word of caution about the assumption that image size varies inversely with object distance. This relationship holds as long as the lens-to-image plane distance remains the same for the two objects. It will not hold when the back of a view camera is swung or tilted. Indeed, one purpose of these adjustments is to control the shape of the image. Neither will the relationship hold when separate photographs are made of each of the two objects and the camera is focused in turn on each object distance, which changes the lens-to-image plane distance. This is significant mostly with close-up photography. For example, with objects at distances of 8 inches and 16 inches from a camera equipped with a 4-inch focal length lens, the ratio of image sizes is 2:1 when the objects are photographed together but 3:1
when they are photographed separately and the camera is refocused. To solve this problem for other object distances, use the lens formula R = f/(u — f).
Focal Length and Image Size

Figure 12-27 Photographs made from approximately the same position with 400-mm (left), 200-mm (middle), and 100-mm (right) focal length lenses. Image size changes in proportion to focal length, but relative sizes for objects at different distances remain constant. (Images by Trevor Clement and Robert Weber.)
Serious photographers have more than one focal-length lens per camera in order to control image size and the corresponding angle of view. As stated above, image size is directly proportional to focal length. Thus, if an image of a building is 1/2 inch high in a photograph made with a 50-mm focal length lens on a 35-mm camera, substituting a 100-mm focal length lens will produce an image of the building that is 1 inch high. Since this is a direct relationship, doubling the focal length will double the image size. Also, since doubling the focal length will double the size of all parts of the image, it will not change the ratio of image sizes for objects at different distances (see Figure 12-27). This can be demonstrated convincingly with a camera equipped with a zoom or variable focal length lens. As the focal length is changed, one can see the overall image change in size, but the relative sizes of images of objects at different distances remain the same. (Although the relative sizes remain the same, the linear perspective may appear to change, a phenomenon we will examine in the section on viewing distance.)

Figure 12-28 Image size is proportional to lens focal length with distant objects (top). With small object distances the ratio of the image sizes is larger than the ratio of the focal lengths (bottom).
There is an exception to the assumption that image size is directly proportional to focal length. The assumption holds when the image distance is approximately equal to the focal length—that is, when photographing objects at moderate to large distances. When photographing objects at close distances, the lens-to-film distance must be increased to focus the image, and the size relationship with different focal-length lenses deviates from that predicted by the assumption. For example, with an object at a distance of 16 inches from a camera equipped first with an 8-inch focal length lens and then with a 4-inch focal length lens, the ratio of image sizes will be 3:1, rather than the expected 2:1. The same lens formula R = f/(u — f) is used to solve this problem (see Figure 12-28).
The camera-to-subject distance, not focal length of the lens, determines linear perspective.
Changing the viewing distance of a photograph can make the perspective appear stronger or weaker.
Changing Object Distance and Focal Length
Photographers commonly change focal length and object distance simultaneously to control linear perspective and overall image size. For example, if the perspective appeared too strong and unflattering in a portrait made with a normal focal-length lens, the photographer would substitute a longer focal-length lens and move the camera farther from the subject to obtain about the same size image but one with weaker perspective. Because short focal length wide-angle lenses tend to be used with the camera placed close to the subject, and long focal-length telephoto lenses tend to be used with the camera at relatively large distances, strong perspective is often associated with wide-angle lenses and weak perspective is similarly associated with telephoto lenses, although it is the camera position and not the focal length or type of lens that produces the abnormal linear perspective.
The change in linear perspective with a change in object distance is seen most vividly when a corresponding change is made in the focal length to keep an important part of the scene the same size. In Figure 12-29, for example, the focal length of the lenses and the camera positions were adjusted to keep the images of the nearer object the same size, and the difference in linear perspective is revealed by the difference in size of the images of the farther object.

Figure 12-29 Photographs made with a 200-mm focal length lens (left) and a 100-mm focal length lens (right) with the camera moved closer to match the image size of the foreground object. The change in the relative sizes of the two objects is due to the change in the camera position.
In situations in which a certain linear perspective contributes significantly to the photograph's effectiveness, the correct procedure is first to select the camera position that produces the desired perspective, and then to select the focal length lens that produces the desired image size. For example, if the photographer wants to frame a building with a tree branch in the foreground, the camera must be placed in the position that produces the desired size and position relationships between the branch and the building. The lens is then selected that forms an image of an appropriate size. A zoom lens offers the advantage of providing any focal length between the limits. With fixed focal-length lenses, if the desired focal length is not available, and changing the camera position would reduce the effectiveness because of the change in perspective, the best procedure is to use the next shorter focal-length lens available and then enlarge and crop the image.
Cameras cannot always be placed at the desired distance to achieve the linear perspective wanted. Whenever photographs are made indoors, there are physical limitations on how far away the camera can be placed from the subject because of obstacles, such as walls. Fortunately, the strong perspective that results from using short focal length wide-angle lenses at the necessarily close camera positions enhances rather than detracts from the appearance of many architectural and other subjects. There are also many situations in which the camera must be placed at a greater distance from the subject than would be desired. For example, cameras often cannot be located close to sporting activities as they may interfere with the athletes, block the view of spectators, or endanger the photographer.
Not all subjects will experience a change in perspective with a change of object distance. For example, a twodimensional object has no depth. Photographs of such an object will not reveal a change in the relative size of different parts of the image with changes in camera distance. Therefore, photographic copies of paintings, photographs, printed matter, etc., made from a close position with a short focal length wide-angle lens, and from a distant position with a long focal length telephoto lens, should be identical.
Viewing Distance
It would seem that the distance at which we view photographs should have no effect on linear perspective, because an image size ratio of 2:1 of objects at different distances will not be altered by changes in the viewing distance. In practice, however, changes in viewing distance can significantly affect the perspective, provided the photographs contain good depth clues. Photographs of two-dimensional objects appear to change little with respect to linear perspective when viewing distance is changed, whereas those containing dominant objects in the foreground and background or receding parallel lines can change dramatically.
We seldom experience unnatural-appearing linear perspective in real life. Abnormally strong or weak perspective tends to occur only when we look at photographs or other two-dimensional representations of three-dimensional objects or scenes such as on a television or computer screen. The reason perspective appears normal when we view a three-dimensional scene directly is that as we change the viewing distance, the perspective and the image size change simultaneously in an appropriate manner. We also normally know whether we are close or far away from the scene we are viewing, so the corresponding large or small differences in apparent size of objects at different distances seem normal for the viewing distance. (It is possible to deceive viewers about the size or shape of objects or their distances, but we will discuss such illusions later.)
The correct viewing distance of a photograph for a normal-appearing perspective is equal to the camera lens focal length multiplied by the negative-to-print magnification.
To illustrate how the situation changes when we view photographs rather than actual three-dimensional scenes, assume that two photographs are made of the same scene, one with a normal focal length lens and the other with a short focal length lens with the camera moved closer to match the image size of a foreground object (see Figure 12-29). Looking at the two photographs, viewers suppose that they are at the same distance from the two scenes because the foreground objects are the same size, but if the perspective appears normal in the first photograph, the stronger perspective in the second photograph will appear abnormal for what is assumed to be the same object distance. Viewers can make the perspective appear normal in the second photograph, however, by reducing the viewing distance. The so-called “correct" viewing distance is equal to the focal length of the camera lens (or, more precisely, the image distance) for contact prints, or the focal length multiplied by the magnification for enlarged prints.
The correct viewing distance for a contact print of an 8 X 10-inch negative exposed with a 12-inch focal length lens is 12 inches. Observers tend to view photographs from a distance about equal to the diagonal causing the perspective to appear normal to most viewers. If the 12-inch lens were replaced with a 6-inch focal-length lens, the print would have to be viewed from a distance of 6 inches for the perspective to appear normal. When the print is viewed from a comfortable distance of 12 inches, the perspective will appear too strong. Conversely, the perspective in a photograph made with a 24-inch focal length lens would appear too weak when viewed from a distance of 12 inches. It is fortunate that people tend to view photographs from standardized distances rather than adjusting the viewing distance to make the perspective appear normal, for that would deprive photographers of one of their most useful techniques for making dramatic and effective photographs.
The Wide-Angle Effect
Closely related to the way a change in viewing distance can change the perspective of photographs is the influence of viewing distance on the so-called wide-angle effect. The wide-angle effect is characterized by what appears to be distorted image shapes for threedimensional objects near the corners of photographs. This effect is especially noticeable in group portraits, where heads appear to be stretched out of shape in directions radiating away from the lens axis or the center of the photograph. Thus, heads near the sides seem to be too wide, those near the top and bottom seem to be too long, and those near the corners appear to be stretched diagonally (see Figure 12-30).
This stretching occurs because rays of light from off-axis objects strike the image plane at oblique angles rather than at a right angle, as occurs at the lens axis. If the subject consists of balls or other spherical objects, the amount of stretching can be calculated in relation to the angle formed by the light rays that form the image and the lens axis. Thus, at an off-axis angle of 250 the image is stretched about 10%, and at 45° the image is stretched about 42%. (The image size of off-axis objects changes in proportion to the secant of the angle formed by the central image-forming ray of light with the lens axis. The reciprocal of the cosine of the angle may be substituted for the secant.) Normal focal length lenses, where the focal length is about equal to the diagonal of the film, have an angle of view of approximately 50°, or a half angle of 25°.
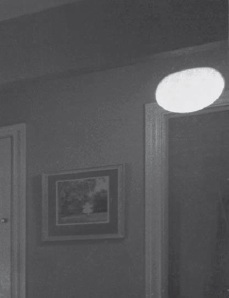
Figure 12-30 The image of a spherical light globe in this cropped section of photograph taken with a short focal length lens is stretches approximately 60% in a direction away from the lens axis.
The wide-angle effect refers to elongated images of objects near the edges of photographs made with short focal-length wide-angle lenses.
Why don't we notice the 10% stretching that occurs with normal focal length lenses? It is not because a 10% change in the shape of a circle is too small to be noticed, but rather that when the photograph is placed at the correct viewing distance, the eye is looking at the images at the edges at the same off-axis angle as the angle of the light rays that formed the image in the camera. Thus, the elliptical image of the spherical object is seen as a circle when the ellipse is viewed obliquely. The effect would be the same even with the more extreme stretching produced with short focal length wide-angle lenses if the photographs were viewed at the so-called correct viewing distance. Since the correct viewing distance is uncomfortably close for photographs made with short focal length lenses, people tend to view them from too great a distance, where the stretching is apparent.
One might question why the wide-angle effect does not occur when photographing circles drawn on paper as it does when photographing threedimensional objects. The distinction is that if one looks at a row of balls from the position of the camera lens, the outline shape of all of the balls will appear circular, whether they are on or off axis, but off-axis circles drawn on paper will appear elliptical in shape because they are viewed obliquely. The compression that produces the ellipse when the circle is viewed from the lens is exactly compensated for by stretching when the image is formed because the light falls on the image plane at the same oblique angle at which it leaves the drawing (see Figure 12-31).
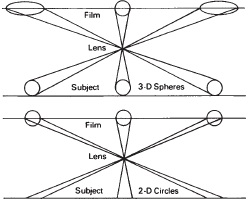
Figure 12-31 The wide-angle effect results in elongation of off-axis images of three-dimensional objects (top). Images of two-dimensional objects such as circles in a painting or photograph are not affected (bottom).
REVIEW QUESTIONS
- Persistent images last . . .
- approximately 1/100 second
- approximately 1/4 second
- approximately 5 seconds
- as long as the viewers concentrate on the images
- With respect to the perception of realism when viewing motion pictures, persistent images . . .
- contribute to the perception
- interfere with the perception
- have no effect on the perception
- If a slight amount of flicker is apparent when viewing a motion picture, reducing the projector-to-screen distance to obtain a smaller and brighter image will . . .
- decrease the flicker
- increase the flicker
- have no effect on the flicker
- The "spots" one sees after looking directly at a flash tube when it is fired are properly identified as . . .
- persistent images
- afterimages
- aftereffects
- eidetic images
- memories
- To recall a visual image from a motion picture viewed an hour earlier would be identified as . . .
- an afterimage
- a short-term memory image
- a long-term memory image
- arerun
- The difference between the red and the blue in the U.S. flag is primarily in . . .
- saturation
- hue
- value
- chroma
- lightness
- Persons having normal color vision are identified as normal . . .
- monochromats
- dichromats
- trichromats
- stereomats
- The percent of Caucasian [EO8]males who have defective color vision is approximately . . .
- 0.4
- 2
- 4
- 8
- 16
- The maximum response range of the visual system to luminance variations is approximately . . .
- 100 to 1
- 10,000 to 1
- 1 million to 1
- 10 trillion to 1
- The perceptual phenomenon of seeing yellow on a television screen in an area of red and green pixels is identified as . . .
- simultaneous contrast
- successive contrast
- local adaptation
- Assimilation
- The fact that the image of a tilted circle in a photograph is generally perceived as a tilted circle rather than its actual elliptical shape is attributed to . . .
- shape constancy
- shape generalization
- sharpening
- leveling
- closure
- Binocular vision contributes most strongly to the perception of depth when viewing . . .
- photographs close up
- photographs at a distance
- three-dimensional objects close up
- three-dimensional objects at a distance
- The moon tends to appear larger when it is near the horizon than when it is overhead because of . . .
- differences in refraction of light by the atmosphere
- differences in perceived distances of the moon
- size constancy
- size adaptation
- The perception of motion when viewing a series of still photographs in a motion picture in rapid succession is identified as . . .
- a persistent image
- the gamma effect
- fusion
- motion adaptation
- the phi phenomenon