
Chapter 4
Policy Management
Policies, guardrails, and definitions. Many ambiguous terms are used synonymously when describing the same topic: a set of rules used to define the boundaries in which an environment can be configured. Since Microsoft Defender for Cloud’s beginnings, the Cloud Security Posture Management capability has been built upon Azure Policy, which is a Microsoft Azure service used to technically define a company’s governance concept.
In this chapter, you will learn about policies and assessments within the scope of Microsoft Defender for Cloud, and you’ll learn about regulatory compliance standards and how to customize the experience in hybrid and multi-cloud environments.
Introduction to Azure Policy
We remember the days when IT environments were made up of server racks within office rooms or corporate datacenters. In those days, IT security mainly meant physical security and security in operations. It was a reactive process that could easily be done as a manual task.
Today, with cloud computing being the most popular operations model, we are facing ever-changing environments, which is both a benefit and a challenge. Cloud environments are meant to be solution-focused instead of resource-focused, which means that once your solution needs more compute power, there ideally is a process in place to spin up new machines once needed (and remove them if they’re not needed). Or, if you move one abstraction layer higher, you don’t even care about infrastructure resources because you are using PaaS (Platform as a Service) offerings. You can easily create new Storage Accounts or remove Azure Key Vaults from your environments within seconds. But, from an operational perspective, it is impossible to keep track of all these dynamic changes manually.
It is well known that there is no such thing as total security, which means there will always be a chance of being successfully attacked. But, more importantly, without rules, there is no security at all! Therefore, rules are important not only for security but also for compliance and governance purposes. In real life, rules are called laws defined by a government, and there is an instance to control and enforce these laws, called the police. From a technical perspective within Microsoft Azure, this is when Azure Policy comes into play. Azure Policy is that instance to control and enforce the rules that an authority in your company has defined.
Azure Policy is a service that consists of definitions and assignments, both of which can apply to policies and initiatives.
Definitions Definitions are the configurations that you set up within a policy or initiative. They can be referred to as a template, which can later be applied to resources within your environment. Definitions can be compared with your current configuration, and any resources that do not meet the requirements of your policy are determined to be out of compliance. You can then focus on the out-of-compliance assets and bring them into compliance. All policy definitions are created in JavaScript Object Notation, or JSON.
Assignments Assignments are definitions that are assigned to a specific scope within your Azure environment. This scope can vary from management groups, over subscriptions, and down to a single resource group. By default, an assignment will be inherited top-down, which means that if you assign a policy definition on a subscription, its settings will apply to all resources within the subscription. However, when creating the assignment, you can also exclude a particular scope from applying your policy or initiative definition. For example, you might use definitions that are supposed to apply to most subscriptions within your Azure environment, but not for particular resources. Let’s say you have test resources in one or several resource groups. In this case, you could create an assignment on your management group and exclude this particular resource group so resources within that scope would not apply the definition’s settings.
When creating a new definition, you need to be careful with the definition location, which can either be a management group or a subscription. The location will determine to what scope the definition can be assigned later. For example, if you create the definition on a management group, you can assign it to this management group and all child management groups and subscriptions, whereas if you create a definition on a subscription, you can only assign it to this particular subscription and its resources and resource groups.
An initiative definition is a collection of policy definitions that is tailored toward achieving a singular overarching goal. Initiative definitions simplify the management and assignment of policy definitions by grouping a set of policies into a single item. Each policy definition contains a policy rule that defines in which case the policy definition will assess a resource, and what effect the policy assessment will have. Figure 4-1 shows these components.
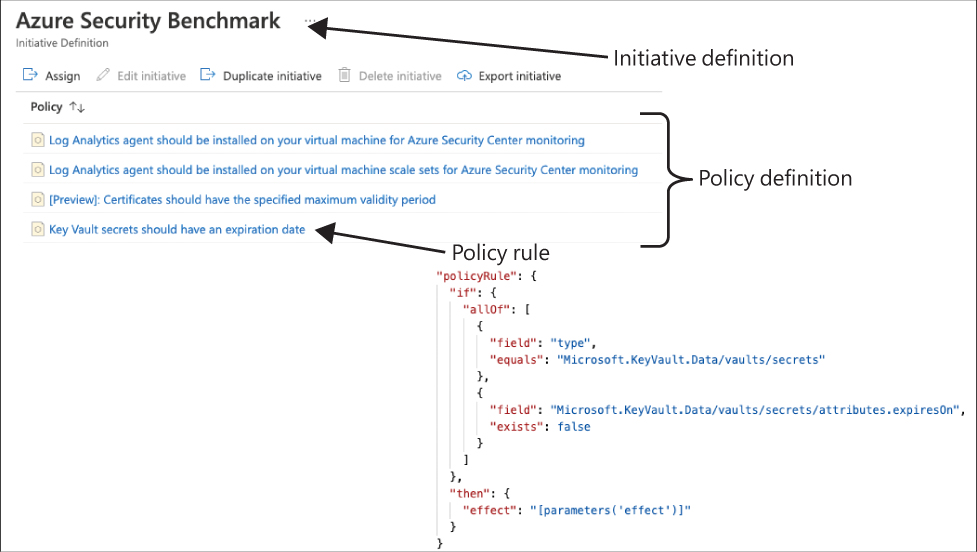
FIGURE 4-1 Azure Policy components
Important
When working with Azure Policy and automation, you will not find the word initiative. You should look for policy set instead.
A policy definition can have different effects to the scope it is assigned to. The append mode is used to add additional fields to a resource when it is created or updated. For example, you can use append to add a list of allowed IP addresses to a storage resource. A policy definition in audit mode will report resources that are non-compliant regarding the settings within your definition. For example, if you have an internal agreement that organizational resources are only deployed to Azure regions within Europe, you can use an audit policy to report resources that are deployed in a US region. A similar effect is auditifnotexists, which will report resources that do not have a particular configuration or setting. For example, you would use auditifnotexists if you want to see resources that do not have a particular tag configured.
If you configure a definition in deployifnotexists (DINE) mode, once you deploy a resource, a particular setting or configuration is automatically remediated if it has not already been defined when configuring the resource to be deployed. For example, you can use a DINE policy to ensure that the Azure Monitoring Agent is installed on all VMs created within your Azure environment.
A definition that is configured in deny mode will prevent the deployment of resources that are non-compliant regarding a particular setting. In the first example with the Azure regions, you can use a deny policy to not only audit but also prevent the deployment of resources to a US region. Finally, there is the modify mode, which is used to add, update, or remove properties or tags on a resource when it is created or updated. This effect is commonly used to update tags on resources. Also, with modify, you can remediate existing resources using remediation tasks.
While having this core understanding of Azure Policy is important, you don’t need to create any initiative or policy when using security policy integration with Azure Policy because Defender for Cloud will automatically create it for you. All security controls and recommendations are based on this default policy initiative, called Azure Security Benchmark, which is maintained by Microsoft. This initiative includes a curation of audit and auditifnotexists policies that are automatically assigned to your subscriptions. If there are changes to existing policy definitions, definitions are removed, or new policy definitions are created and added to the Azure Security Benchmark initiative, these changes will automatically apply to Microsoft Defender for Cloud.
You can also leverage Azure Policy for deployment, remediation, and protection at scale. So, Azure Policy is not only a random governance tool within the Microsoft Azure ecosystem, but it’s also an important service you need to understand to implement the best CSPM concept for your organization.
Policy exemptions
Policy exemptions (announced at Microsoft Ignite 2020) are an exciting new feature within the context of Azure Policy. Although it might seem similar to the exclusion scope you can define when assigning a definition, it is way more than that. With policy exemptions, you can exclude a management group, subscription, resource group, or a particular resource from an assignment. Additionally, you can configure an expiration date for the exemption or enter a justification for the exemption. You can select waiver as the exemption category if you decide to temporarily accept the non-compliance state of a resource, or you can select mitigated if the policy’s intent was met through a different method or process.
More Info
To learn more about policy exemptions, see https://docs.microsoft.com/en-us/azure/governance/policy/concepts/exemption-structure.
When you configure an exclusion scope, you need to do it within the assignment, and doing so is a static decision, whereas when you create a policy exemption, the policy assignment itself is not changed. As you can see in Figure 4-2, there is an Exemptions button in the left navigation pane within Azure Policy. This figure shows an exemption that has been created from within Defender for Cloud for the subscription’s default assignment.

FIGURE 4-2 Policy exemption in the Azure Policy dashboard
You will learn more about how to create an exemption in Defender for Cloud in the next chapter, though you can also create policy exemptions directly from the Azure Policy dashboard. That is useful if you do not want to create an exemption for the Azure Security Benchmark policy initiative, but you want to do so for other policies that are not necessarily related to Defender for Cloud.
Follow these steps to create a new policy exemption:
Open the Azure portal and sign in with a user who has Resource Policy Contributor or Security Admin privileges.
In the search bar, type Policy and click the Policy service; the Policy blade appears, as shown in Figure 4-3.
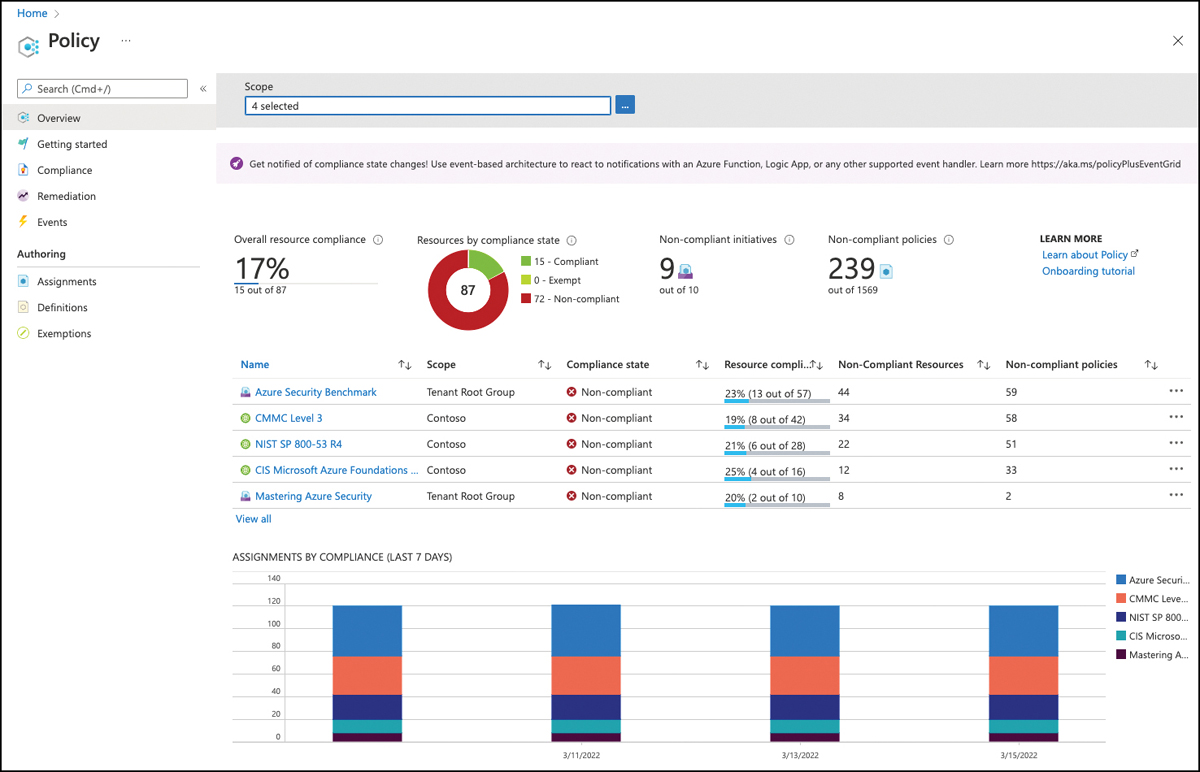
FIGURE 4-3 Azure Policy dashboard
The Exemptions view, as shown in Figure 4-2, only shows existing exemptions, so to create a new exemption through Azure Policy, visit the Authoring section of the Policy navigation pane and select Assignments.
Select the assignment for which you want to create a policy exemption and click the [...] menu on the right side. Select Create Exemption, as shown in Figure 4-4. The Create Exemption window appears.
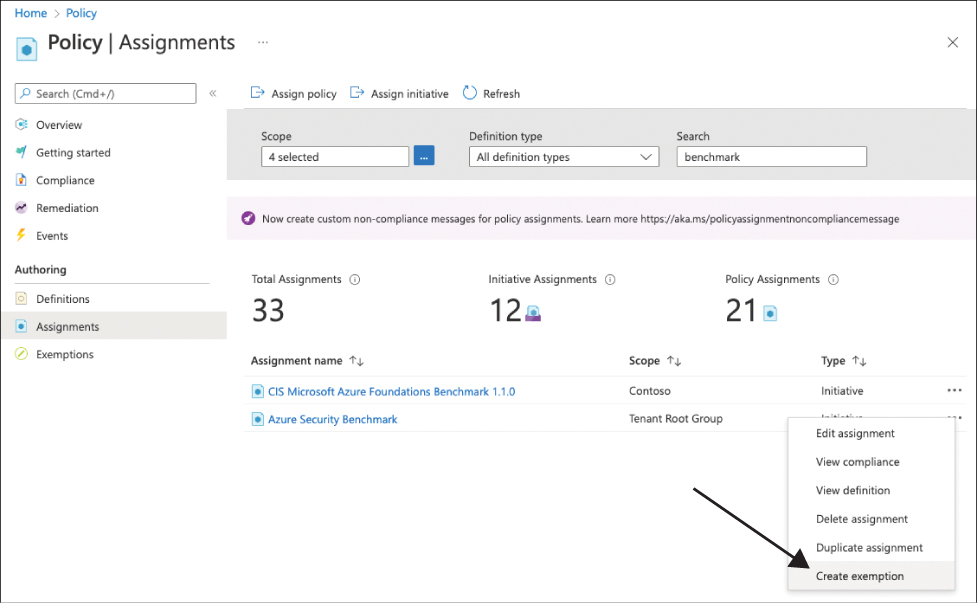
FIGURE 4-4 Create a new policy exemption
In the Basics section, define the Exemption Scope (Management Group, Subscription, Resource Group, or Resource), the Exemption Name, the Exemption Category (Waiver or Mitigated), and an Exemption Expiration Setting, as shown in Figure 4-5. Also, make sure to add a description that helps you understand why the exemption had been created once you come back in the future.
If you only want to create an exemption for some policies within an initiative assignment instead of exempting the whole initiative assignment, click Policies, set the Policy Definition Reference switch to Off, and select the policy definitions for which you want to create the exemption. Then, click Review + Create, followed by Create. Once the exemption has been created, it will show up in the Exemption view you saw earlier in Figure 4-2.

FIGURE 4-5 Create a new policy exemption
Understanding Azure Security Benchmark
Azure Security Benchmark, the default policy initiative that comes with Microsoft Defender for Cloud, contains all security policies. At the time of publication, the default policy initiative contained 205 separate policy definitions. The number of policies will keep growing as the Defender for Cloud engineering team continues adding new services to monitor and creating new recommendations, which will be reflected as new policy definitions. As you learned in Chapter 3, “Onboarding Microsoft Defender for Cloud,” the Azure Security Benchmark initiative is either automatically assigned to all subscriptions onboarded to Defender for Cloud or manually assigned to a management group to cover all (existing and future) subscriptions.
Tip
Security policies in Microsoft Defender for Cloud can only be assigned at the subscription or management group levels. This is an important observation because if you look at the Azure Policy itself, it can be assigned to a resource group. However, this capability is not available for Defender for Cloud.
The Azure Security Benchmark (ASB) is a curation of security best practices that are aligned with industry-wide security standards, such as those from the National Institute of Standards and Technology (NIST) and the Center for Internet Security (CIS). All policy definitions that are part of the ASB reflect as a recommendation in Defender for Cloud. Also, the ASB will show up as a regulatory standard in Defender for Cloud’s Regulatory Compliance view, which we cover later in this chapter. It is important to understand that while the Azure Security Benchmark comprises audit policies, not all are used to assess resource compliance. While Azure Policy can only audit resources and their configuration if information is accessible through Azure Resource Manager (ARM), Microsoft Defender for Cloud and the Azure Security Benchmark contain recommendations for non-Azure settings, such as Azure Active Directory Multi-Factor Authentication (MFA). Because Azure Policy cannot assess these types of settings, Defender for Cloud uses intelligent background assessments and will only reflect the assessment status to Azure Policy.
Also, Azure Policy only has two different compliance states (compliant and non-compliant), while Microsoft Defender for Cloud has three different health states for assessed resources (Healthy, Unhealthy, NotApplicable). That’s why assessments will run in Defender for Cloud’s back end and then the assessment status code for a particular resource is audited by a particular policy in the ASB. That way, if an assessment status is Healthy or not applicable, a resource will be flagged as being compliant in Azure Policy. The resource will show as non-compliant in Azure Policy only if the assessment status code is Unhealthy.
Figure 4-6 shows the Secure Score Recommendations view in Microsoft Defender for Cloud, including the Enable MFA security control. This control contains several recommendations for enabling multi-factor authentication on accounts with access rights to an Azure subscription.

FIGURE 4-6 Secure Score recommendations in Microsoft Defender for Cloud
For these recommendations, the assessed resource type is a subscription, but the setting cannot be checked via ARM, which would be mandatory for Azure Policy to audit a resource. For example, consider the first recommendation in Figure 4-6, MFA Should Be Enabled On Accounts With Owner Permissions On Subscriptions. The actual assessment for creating this recommendation on a subscription will run in Defender for Cloud’s back end, and the policy definition will then check for each subscription in scope. This check is done to identify whether a Microsoft.Security/assessments resource named 94290b00-4d0c-d7b4-7cea-064a9554e681 exists in that subscription, based on the information contained in the Microsoft.Security/assessments/status.code field. As long as the status code is Healthy or NotApplicable, the subscription that’s been assessed will be shown as compliant in Azure Policy’s compliance dashboard. Figure 4-7 shows the actual policy rule.
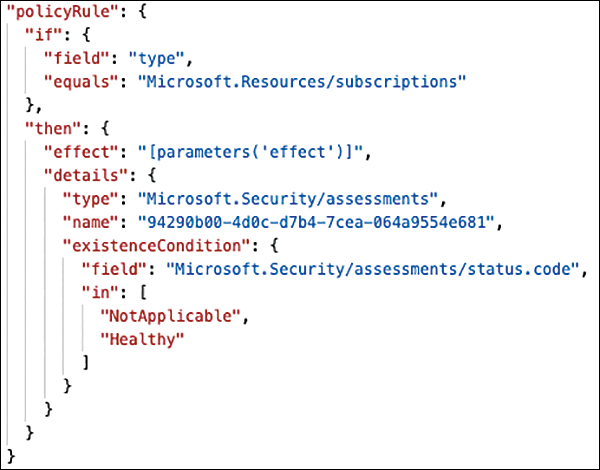
FIGURE 4-7 Policy rule of a recommendation in Azure Security Benchmark
Each assessment has a unique name that is a Globally Unified Identifier (GUID). This GUID is a unique number that can be used to identify anything in the universe, which makes it a great fit for creating unique names that can be used across different environments. Therefore, the assessment name is predefined and the same in each customer’s Azure environment. With that, it’s possible to have the same (built-in) policy definition that will audit the same assessment in each environment.
Fine-tuning policies in Defender for Cloud
It is important to have full visibility of your workloads in Azure and ensure that you are using the security best practices available for all resources that you are monitoring. As you already learned, security policies in Azure Security Benchmark reflect Defender for Cloud’s security assessments for all monitored resources. Each assessment is a recommendation for a particular resource, and assessment results and recommendations will vary according to the type of resources that a subscription has.
There are situations where a recommendation might not apply to your scenario. For example, Defender for Cloud might recommend that you enable MFA, but this wouldn’t be helpful if you are already using a third-party MFA provider in your environment. Because Defender for Cloud doesn’t consider the third-party implementation of MFA, this recommendation becomes a false-positive. To completely disable a particular recommendation, follow the steps below:
Open the Azure portal and sign in with a user who has Security Admin privileges.
Open Microsoft Defender for Cloud.
In the left navigation pane, click Environment Settings.
Depending on the scope to which you have assigned the Azure Security Benchmark, select a management group or subscription. Then, in the left navigation pane, click Security Policy.
On the Security Policy blade, select the policy assignment in the Default Initiative section, as shown in Figure 4-8.

FIGURE 4-8 Default initiative assignment in Defender for Cloud
After clicking the assignment, the Edit Initiative Assignment page appears. Click the Parameters tab.
Deselect the Only Show Parameters That Need Input Or Review checkbox, which makes all parameters appear. These parameters correspond to each recommendation (Azure policies). Look for the recommendation that you want to disable, click the dropdown, and click Disabled, as shown in Figure 4-9.
After selecting Disabled for the recommendation that is not applicable to your scenario, click the Review+Save button, which is located at the bottom of the page, and then click Save.
Once the change is committed, go back to Defender for Cloud’s Overview page.

FIGURE 4-9 Disabling a recommendation that is not relevant to your scenario
Now that the recommendation has changed, you need to wait for the dashboard to refresh. Changes to the initiative might take up to 48 hours to be re-assessed.
More Info
Each recommendation in Defender for Cloud has its own Freshness Interval which indicates how often an assessment will run. If the Freshness Interval is set to 24 hours, the assessment will run once every 24 hours. If you want to know how long it will take for the recent change to your policy to reflect in your recommendations, the Freshness Interval is a good indicator.
Because each subscription has its own policy assignment, there will be scenarios for which you want to deploy a single assignment for multiple subscriptions. When this occurs, you can use Azure management groups. The idea is that you can organize subscriptions into containers (called management groups) and apply your governance conditions to the management groups, as shown in Figure 4-10. For more information on how to manage policy at scale, see Chapter 3 and Chapter 10, “Deployment at scale.”

FIGURE 4-10 Security policies assigned at the management group level
Each directory is given a single top-level management group called the Root Management Group. Unlike other management groups, the Root Management Group cannot be moved or deleted. For more information on how to create Azure management groups, see http://aka.ms/azuremgroup.
Creating custom policies in Microsoft Defender for Cloud
Using the built-in policy initiative in your Defender for Cloud deployment has several advantages. Most obvious is the fact that you don’t need to care about enabling recommendations because they will automatically apply to every subscription you enroll to Defender for Cloud. Less obvious, but as important nonetheless, both the built-in policy and initiative definitions are maintained by Microsoft. In other words, if there are changes to the resource providers used within these policy definitions, if new definitions are created, or if existing recommendations are changed, these changes will automatically be incorporated into the built-in initiative definition. However, there are cases when you still want to have additional custom policies in your environment, either because you want to tailor an existing policy, or because you want to add more assessments to your environment.
To add a custom policy initiative to Microsoft Defender for Cloud, follow these steps:
Open the Azure portal and sign in with a user who has Security Admin privileges.
Open Microsoft Defender for Cloud.
In the left navigation pane, click Environment Settings.
Depending on the scope to which you want to assign a custom initiative, select a management group or subscription. Then, in the left navigation pane, click Security Policy.
At the bottom of the Security Policy blade, in the Your Custom Initiatives section, click the Add A Custom Initiative button. The Add Custom Initiatives blade appears, as shown in Figure 4-11.
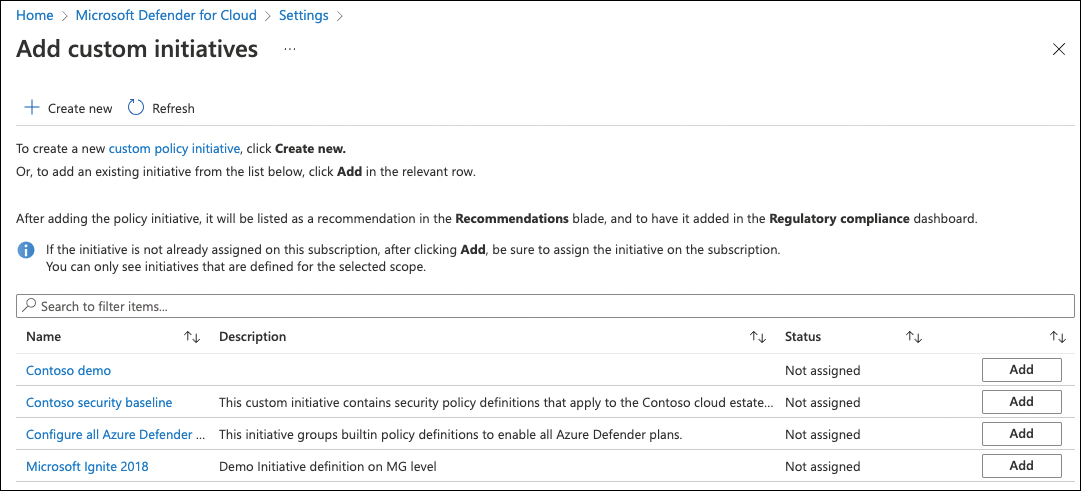
FIGURE 4-11 Adding a custom policy initiative to Microsoft Defender for Cloud
You can either click Add to assign an existing custom initiative or + Create New to start building a new custom initiative definition from scratch and assign it to your subscription.
You can add a combination of existing custom and built-in policy definitions to your custom initiative. Once you’ve created an initiative, click Save and then Add to assign it to your subscription.
When assigning the custom initiative from Defender for Cloud, you can assign it to a management group, subscription, or a particular resource group within that subscription. (Remember, the Azure Security Benchmark initiative can only be assigned on management groups and subscriptions.) At the same time, you can define an exclusion for either a resource group or a particular resource so the policies won’t apply to the excluded scope, as shown in Figure 4-12.
Click the Review + Create button, and then click Create.

FIGURE 4-12 Assign a custom policy definition with scope and exclusions
Custom policy definitions within your custom initiative will be shown in Defender for Cloud’s All Recommendations tab, as shown in Figure 4-13. To narrow down the results, you can filter the Recommendation Type for custom recommendations only.

FIGURE 4-13 Custom recommendations based on a custom policy initiative
As mentioned before, you can use both custom and built-in policy definitions within your custom initiative definition. If you choose to use built-in policies, they still are maintained by Microsoft, whereas custom policy definitions are not automatically updated. So, if you are using custom policies in a custom initiative, you need to establish a process that helps you keep track of back-end changes related to the policies’ intentions and update your custom policies accordingly.
Policy enforcement and governance
With cloud computing, there is no security without governance. Cloud environments are too dynamic to manually make sure that infrastructure and platform resources are protected and configured correctly (whatever that means for your particular environments), so you need a robust end-to-end governance concept which includes Azure Policy as one of its main components.
Governance is defined as the “Establishment of policies, and continuous monitoring of their proper implementation, by the members of the governing body of an organization [...].” That’s a great definition, as it contains very important parts.
More Info
To read the full definition, see https://businessdictionary.info/definition/governance/.
You already know that policies are rules that apply to your environment. These rules can apply to your organization because of legal restrictions, regulatory compliance, or because your organization simply decides to go one way versus another.
The second part of the definition, monitoring, is a very important one because it applies to rules and policies, as well as to everything in the cloud. Without proper monitoring, you are blind, and being blind means that you will never know what exactly is going on in your cloud environment. If you don’t know what is going on, you will never have a chance to react or proactively change anything.
And then there is implementation. The definition means “implementation of policies,” but you can expand its scope to security implementation and resource deployment. In other words, we need to talk about deployment processes, continuous integration and continuous deployment (CI/CD), DevOps, and so on.
When you take a closer look at Microsoft Defender for Cloud, you will realize that all of the definition’s aspects are already incorporated in the product. Defender for Cloud comes with its own security policy initiative, enables visibility (monitoring) into resource compliance and, therefore, the policies’ proper implementation. Also, Defender for Cloud helps you to understand which changes are necessary in your deployment processes to be—and stay—compliant.
In Chapter 5, “Strengthening your security posture,” we take a closer look at the Secure Score as the main KPI (key performance indicator) to measure your security posture, but it is also important to understand how resource deployments can negatively affect your resources’ security within the context of policy enforcement and governance.
The Secure Score is calculated based on resources and their compliance with the Azure Security Benchmark policy definitions, which security recommendations rely on. In short, the higher your Secure Score, the more resources are compliant with your security policies and the more secure your resources are. Figure 4-14 shows an ideal Secure Score trend for a fictive Azure environment. The trend starts low and increases over time, which is an indicator of security and compliance improvements.
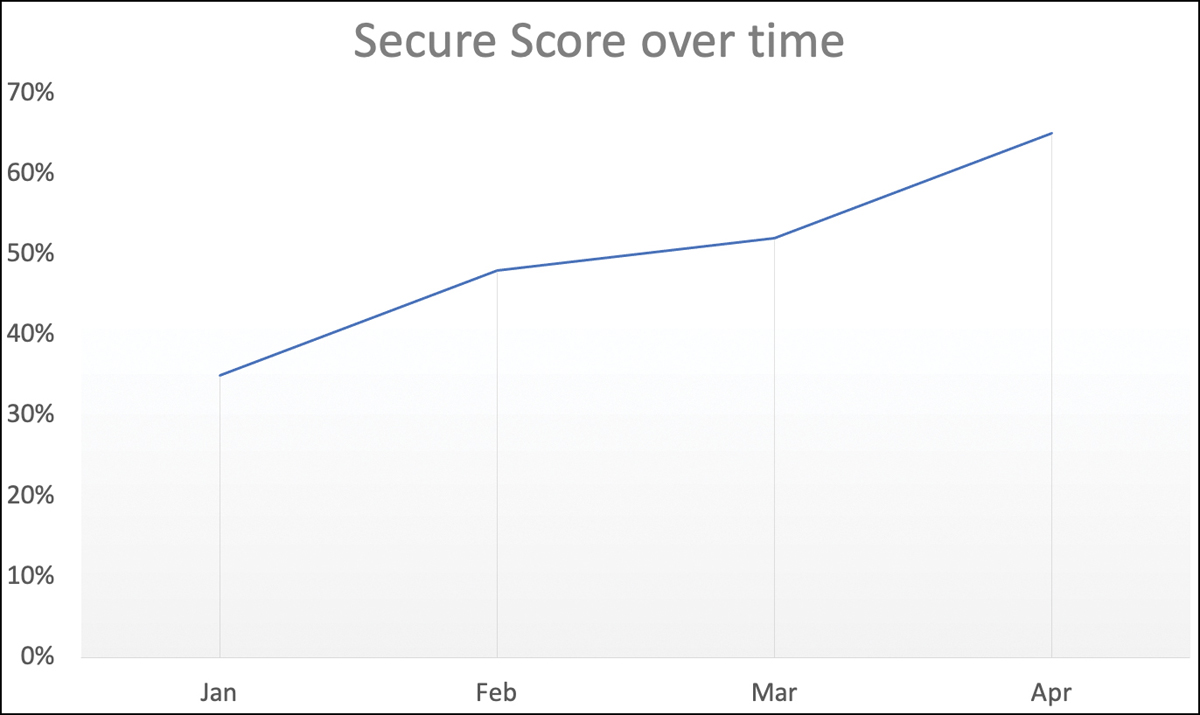
FIGURE 4-14 Azure Secure Score over time improvement
In this scenario, someone has taken care of remediating security recommendations that count toward the organization’s Secure Score. Once security issues and recommendations are remediated, the Secure Score will increase. However, this is reactive security management. Reactive means that you take care of security once a resource is non-compliant with a given security recommendation, and you will learn why this is not sufficient while continuing with the demo scenario in this chapter. Figure 4-15 shows a similar curve, but in May you see that the Secure Score dropped to an even lower percentage than you saw in January. But why?
As discussed in Chapter 2, “Planning Microsoft Defender for Cloud adoption,” when managing security reactively, once new resources are deployed, your Secure Score will drop. This is when your resources are not deployed securely by default. In this case, you would need to take care of remediating configuration issues and security recommendations reactively again. This means on the one hand, it will require a lot of effort after every resource deployment, but on the other hand, your cloud environment will be more vulnerable immediately after new resources have been deployed. So, reactively managing security comes with several drawbacks. Don’t get us wrong: Hands-on mentality is great because it means that people want to roll up their sleeves and get things done, but in this case, the same mentality also needs to be projected onto security management.
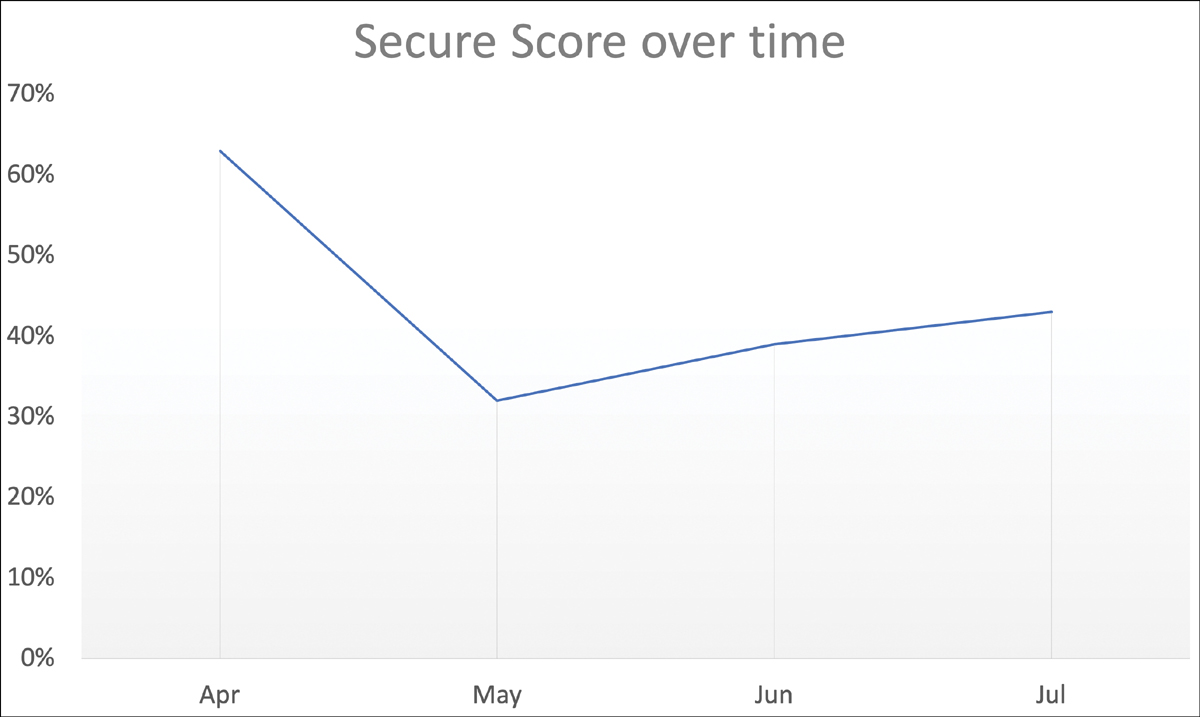
FIGURE 4-15 Secure Score over time when not taking care of governance
How to overcome reactive security management
IT security has always been an important part of IT operations. The problem with that approach is that security comes last—at the end of the deployment process—instead of being integrated into it. With ever-changing cloud environments, increasing sophistication of cyber threats and the lack of security specialists in many organizations, it is no longer enough to react to issues. However, you need to make sure to proactively integrate security into the build pipeline and your deployment processes. The earlier you care for security in these processes, the easier it is to align with corporate rules and restrictions.
Once your cloud environment grows, you will automatically want to enforce policies across a broad set of resources, resource groups, or even subscriptions so you can make sure that all these resources will automatically adhere to your corporate rules, instead of having to take care of remediation manually.
Prevent security misconfigurations with Defender for Cloud
Security misconfigurations are one of the main reasons organizations get compromised, and the good news is that Defender for Cloud leverages Azure Policy to prevent misconfigurations. With this integration, you can make sure you keep your resources secure and that you have already stabilized your Secure Score when/before resources are deployed (proactively), instead of taking care of security afterward (reactively). You can use Defender for Cloud to enforce a secure configuration with two effects:
With the
denyeffect in Defender for Cloud’s recommendations, you can prevent unsecure resources from being created. This effect will use thedenyeffect from Azure Policy.The
enforceeffect in Defender for Cloud’s recommendations will leverage Azure Policy’sDeployIfNotExistseffect to automatically remediate resources from an unsecure configuration.
You can create a deny or enforcement recommendation directly from a recommendation’s blade in Microsoft Defender for Cloud, following these steps:
Open the Azure portal and sign in with an account that has Security Admin privileges.
In the search bar, type Defender, then select Microsoft Defender For Cloud.
In Defender for Cloud’s left navigation pane, click Recommendations.
Open a security control and select a recommendation within. In this example, you are using the
Encrypt data in transitsecurity control and theSecure transfer to storage accounts should be enabledrecommendation.Click the Enforce or Deny button within the recommendation as shown in Figure 4-16.

FIGURE 4-16 Create a deny recommendation
Select the subscription or subscriptions for which you want to change the policy effect from
audittodenyand click the Change To Deny button, as shown in Figure 4-17.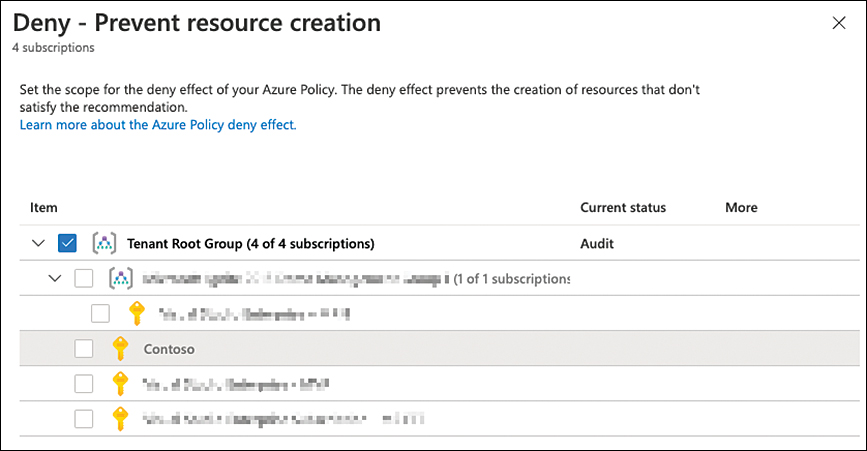
FIGURE 4-17 Change a policy effect from audit to deny in Microsoft Defender for Cloud
Be aware that depending on the scope you assigned the Azure Security Benchmark to, you can either create the deny or enforcement policy on a subscription, or on the management group only.
More Info
To learn for which recommendations you can create a deny or enforcement policy, see https://aka.ms/MDFCEnforceDeny.
Denying resource creation or enforcing auto-remediation on some subscriptions is good, but wouldn’t it be even better to have an option for large-scale deployments, too? Here we go!
Large-scale provisioning with Azure Blueprints
Microsoft Defender for Cloud is a subscription-based service, which means that any configuration you want to enforce, deny, or activate is always done on a particular subscription unless you have assigned the Azure Security Benchmark on a management group. That might be good for existing environments, but what about new subscriptions under the same Azure AD tenant? Or what if your organization has a large cloud estate with more than 1,000 subscriptions?
Azure Blueprints is a service that brings together all the goodness of several important governance services within Microsoft Azure. One could say that with Azure Blueprints, you have a way to automate governance across your entire cloud estate. Similar to policies, Blueprints divide between definitions and assignments, as shown in Figure 4-18.
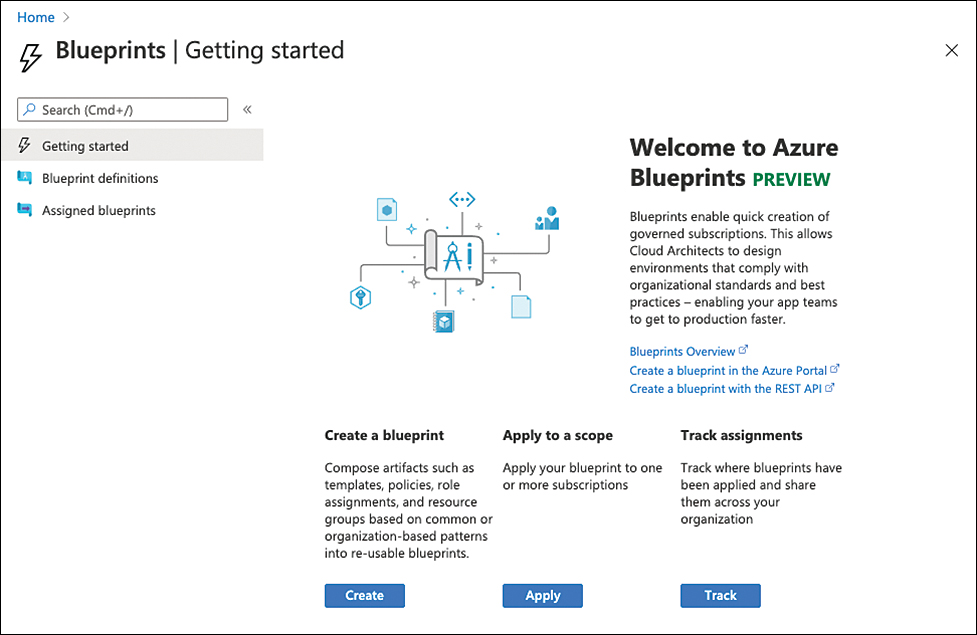
FIGURE 4-18 Getting started with Azure Blueprints
A Blueprint definition can be created on management groups and subscriptions. It contains artifacts that are supposed to be applied to a particular scope. Artifacts can be policy and initiative assignments, as well as role assignments, resource groups, and even ARM Templates. So, with a Blueprint definition, you can apply policies and initiatives to a subscription, and you can also create resource groups and resources, and grant access rights to users and/or groups. The definition is saved in either a management group or a subscription. The location will determine to which scope the definition can be assigned. For example, if you create a Blueprint in only one subscription, you cannot assign it to another subscription, whereas if you store it in a management group, you can assign it to all subscriptions in that scope (and it will also automatically be assigned to new subcriptions within that management group). Other than policies and initiatives, a Blueprint definition can be stored in a draft before publishing it. Once a definition is published, it will get a new version. With that, you can assign the same definition in different versions to different scopes, such as when you want to test a new Blueprint definition on a small scope before rolling it out to your entire environment.
A Blueprint Assignment is similar to a policy or initiative assignment, meaning it’s a Blueprint definition assigned to a subscription, but there is an important difference: Blueprint assignments can be locked using the Azure Resource Lock capability. With this option set to Do Not Delete, you can make sure that artifacts deployed by the Blueprint assignment cannot be deleted, even by resource or subscription owners. If you set the option to Read Only, resources that have been deployed cannot be changed at all, even by the resource or subscription owner.
To start creating and assigning a new Blueprint definition, follow these steps:
Open the Azure portal and sign in with an account that has Owner privileges on the management group in which you want to save the definition.
Select Blueprints from the left navigation pane. This will open the Getting Started view you saw in Figure 4-18.
Click the Create button. You can now either select a Blueprint sample from the list or start with a blank Blueprint. For this exercise, select Start With Blank Blueprint.
Enter a name for the Blueprint definition and decide where to store it. Remember, if you want the definition to be assigned to more than one subscription, store the definition in a management group. Click the Next: Artifacts >> button, as shown in Figure 4-19.

FIGURE 4-19 Create a Blueprint definition
Click the + Add Artifact button and select the artifact type you want to add to your Blueprint definition. Depending on the artifact type, fill in the necessary information and then click the Add button to add the artifact to your definition. Repeat this step for every other artifact you want to add to your Blueprint.
Important
For some artifact parameters, you will see a This Value Should Be Specified When The Blueprint Is Assigned checkbox. If you deselect this checkbox, you define the parameter in the definition, so it is the same value for every assignment. If you select the checkbox, the parameter is set per assignment.
Click the Save Draft button.
You are now redirected to the Getting Started page again. Your Blueprint definition is now saved but not published. To publish its first version, click Blueprint Definitions in the navigation pane and select the definition you just created from the list.
Click Publish Blueprint, as shown in Figure 4-20, enter a version, and click the Publish button.

FIGURE 4-20 Publish your Blueprint definition
You are now redirected to the Create Blueprint page shown previously in Figure 4-18, and you can assign the Blueprint definition to one, some, or all existing subscriptions underneath the management group in which you created the definition. To assign the definition, click Assign Blueprint.
Fill out all mandatory fields, such as Subscriptions, Assignment Name, Location, and Blueprint Version. Also, make sure to enter values for all parameters that have not already been defined in the Blueprint definition. Also, decide if you want to lock your resources with a Do Not Delete, or a Read Only lock. Then click Assign.
More Info
To learn more about Azure Blueprints, see https://docs.microsoft.com/azure/governance/blueprints/overview.
Policy deployment and best practices
You have already learned that policies, initiatives, and Blueprints are a great way to make sure your cloud estate will automatically align with your corporate rules. But in order to get the best out of policies, there are some best practices to consider.
Get yourself familiar with ARM Templates, PowerShell, and Azure CLI When working with policy definitions, there is no way around JavaScript Object Notation, or JSON. As you learned at the beginning of this chapter, policy definitions are always created in JSON syntax. The good news is that ARM Templates as a declarative deployment language are also based on JSON, so once you know how to create a policy definition, the path to creating an ARM Template is short. ARM Templates are a very efficient way of deploying policies and initiatives versus using the Azure portal. For example, you can use ARM Templates within your building pipeline based on Azure DevOps, but you can also run a deployment using PowerShell and Azure CLI. Also, when running a deployment, you can reference the template file directly from a repository, such as GitHub or Azure Repos.
Assign definitions top-down Policy settings are inherited from a higher to a lower scope. In other words, if you assign an initiative definition on your Root Management Group, its policy settings will apply to all subscriptions within that scope. Therefore, the settings you want to apply to all your resources should be assigned on the highest possible scope; settings that only apply to some subscriptions (or resources within them) should be assigned on a lower level of scope. The higher you assign a policy, the less restrictive it usually is, whereas the lower the assignment is created, the more restrictive it might be.
Avoid layering and overriding policy settings Although possible, you should not override settings from one assignment by those of another because it might lead to unexpected results. Every resource individually evaluates all policy assignments to make sure that no resource will accidentally bypass the evaluation, and the result of layering assignments is considered to be cumulatively most restrictive. See the following example:
Policy 1:
Assigned to Subscription A
Allows resource creation only in the
westusAzure regionDenyeffect
Policy 2:
Assigned to Resource Group B in Subscription A
Allows resource creation only in the
eastusAzure regionDenyeffect
The deny effect in Policy 1 will deny all resources which are created in any Azure region other than West US. This setting applies to Subscription A. Policy 2 will deny resource creation in all Azure regions except East US. If you create a resource in Resource Group A in Subscription A, the resource can be created in the West US Azure region. In Resource Group B of Subscription A, any new resource is denied. In other words, with this set of policy assignments, you entirely deny resource creation in Resource Group B because the policy effects are cumulative. In this scenario, you would have to work with notScope, or policy exemptions to make sure that Resource Group B is exempted from the policy setting of Policy 1.
Also, overriding a policy setting with another setting might also lead to unexpected results. See the following example:
Policy 1:
Assigned to Subscription A
Set the tag
Resource Ownerto the valueITModifyeffect
Policy 2:
Assigned to Resource Group B
Set the tag
Resource Ownerto the valueSOCModifyeffect
If you create a resource in Resource Group A of Subscription A, the resource will automatically get the tag Resource Owner set to IT. If you create the same resource in Resource Group B, the tag’s value could be either IT or SOC, depending on which assignment is evaluated first/last.
More Info
To learn more about scopes in Azure Policy, see https://docs.microsoft.com/azure/governance/policy/concepts/scope.
Regulatory standards and compliance
Governance might be one of the most important topics when it comes to security hygiene. You already learned that, with Azure Policy, you have a great tool to create guardrails within which your developers and resource administrators are allowed to move when it comes to resource creation.
Also, there might be legal restrictions and regulatory standards that apply to your organization, such as the Payment Card Industry Data Security Standard (PCI DSS) for organizations that handle credit cards, or ISO27001, an international standard on how to manage information security. Azure Policy contains several built-in initiative definitions, which can be used to determine your resources’ compliance with particular compliance standards, as shown in Figure 4-21.

FIGURE 4-21 Regulatory Compliance policy initiatives in Azure Policy
You can assign these definitions directly to your management groups or subscriptions to see the results in the Azure Policy compliance dashboard, or you can leverage Microsoft Defender for Cloud to assess your resources’ compliance with the standards that apply to your organization. Figure 4-22 shows the new Defender for Cloud main dashboard, with Regulatory Compliance as one of the four main tiles in the upper-right corner.

FIGURE 4-22 Regulatory Compliance in the main Defender for Cloud dashboard
Regulatory compliance in Microsoft Defender for Cloud
Under the hood, Defender for Cloud leverages the built-in policy initiatives to automatically assess resource compliance with a given compliance standard whenever possible. Azure Policy will only show resources as being compliant or non-compliant regarding a particular policy or initiative definition, but there are parts of the compliance standards that cannot automatically be assessed and therefore, are not represented in the respective initiative definition. Defender for Cloud adds more context to these standards, so you see both assessment results and the category in which these assessments belong.
Tip
Regulatory Compliance is part of Microsoft Defender for Cloud’s enhanced capabilities. In order to get access to it, you need to enable Microsoft Defender for Cloud plans.
Figure 4-23 shows the Defender for Cloud regulatory compliance dashboard. The PCI DSS 3.2.1 standard is selected in this screenshot, and the compliance controls at the bottom of the page reflect this standard.
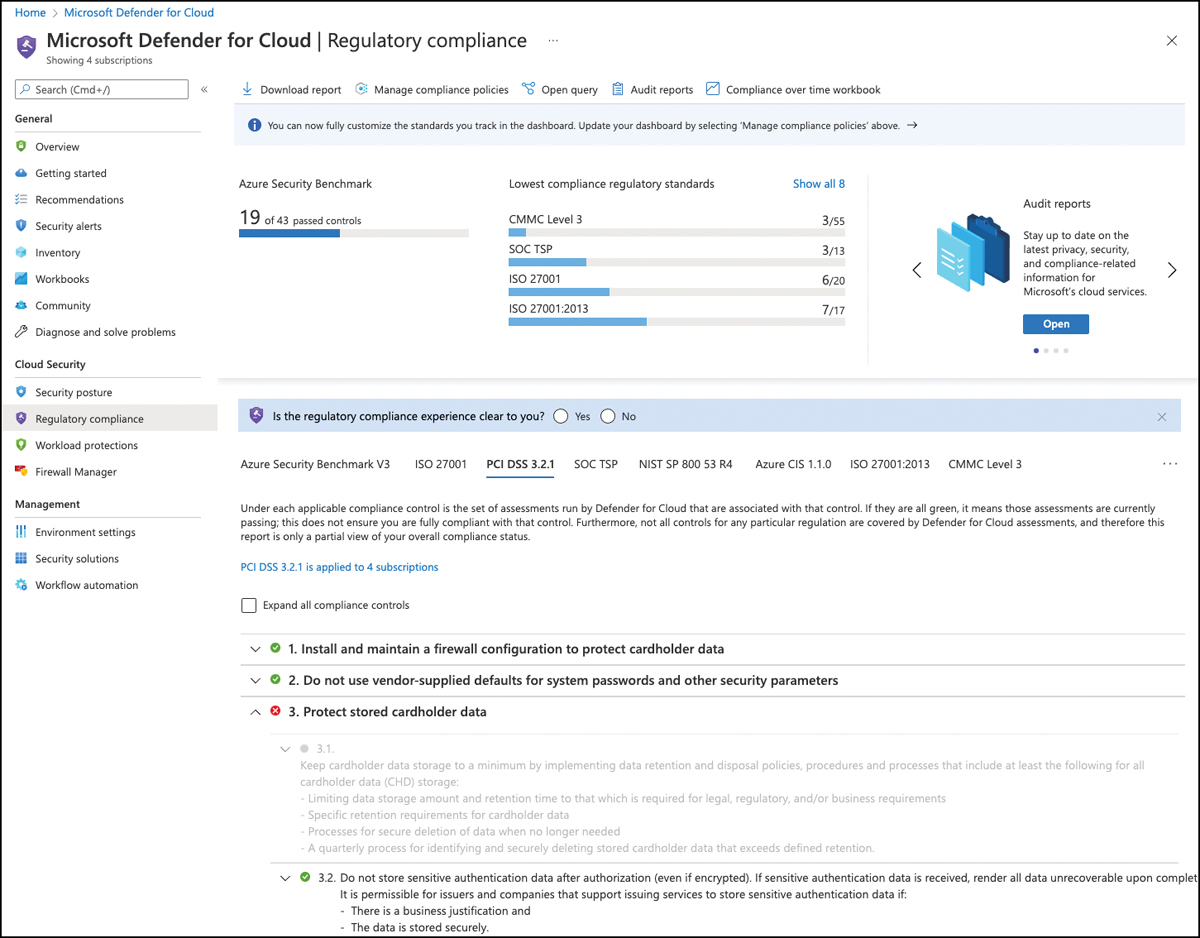
FIGURE 4-23 Regulatory Compliance dashboard in Defender for Cloud
If you open the compliance controls, you will see that each of these controls contains several sub-controls. Compliance controls can have three different states:
Green circle with a checkmark This state shows that all resources within the scope are compliant with this particular control.
Red circle with a cross This state shows that resources are non-compliant with regard to this particular control.
Unavailable Some controls and sub-controls are unavailable (grayed-out). These controls are the ones that currently cannot automatically be assessed and, therefore, Defender for Cloud cannot decide whether a particular rule is met. For instance, this might happen if a compliance control is focused on processes rather than resource configurations.
Moving a step deeper into the sub-controls, you will find the assessments that belong to the control. These assessments are based on the policies that are part of the respective regulatory compliance initiative definition. Figure 4-24 shows an assessment that is part of sub-control 3.2 in the PCI DSS 3.2.1 compliance standard, which is part of the main control 3. Protect stored cardholder data.

FIGURE 4-24 Assessment as part of a regulatory compliance sub-control in the PCI DSS 3.2.1 standard
If you compare the policies within the built-in compliance initiatives with the policies that are part of the Azure Security Benchmark initiative, you will see that some of these policies are the same, whereas others are different.
The Azure Security Benchmark is a curation of security best practices that will directly influence your Secure Score. In other words, if you take care of remediating recommendations generated based on these policies, your Secure Score will increase.
Regulatory compliance in Defender for Cloud offers another perspective. With regulatory compliance, you get a tool that helps you to focus on remediating findings that block you from achieving a particular compliance certification. If you remediate all findings within a compliance standard, your Secure Score might not even be touched, depending on which findings you are remediating. Also, remediating all findings within a particular compliance standard does not automatically mean that you will receive the respective certification. As you already learned, Defender for Cloud can only determine your environment’s compliance if a compliance rule can automatically be assessed. However, the result that Defender for Cloud shows can be taken as evidence for your environment being compliant with the parts of the standard that can be determined automatically.
Defender for Cloud offers an easy way to create a report for any compliance standard that you have activated in your environment. To download the report, follow these steps:
Open the Azure portal and sign in with an account with Security Admin privileges.
Select Defender For Cloud from the navigation pane.
From the Defender For Cloud main dashboard, select Regulatory Compliance in the navigation pane. The compliance view you saw previously in Figure 4-23 appears. In the top menu, click the Download Report button.
Select the compliance standard for which you want to download a report from the list and click the Download button, as shown in Figure 4-25.
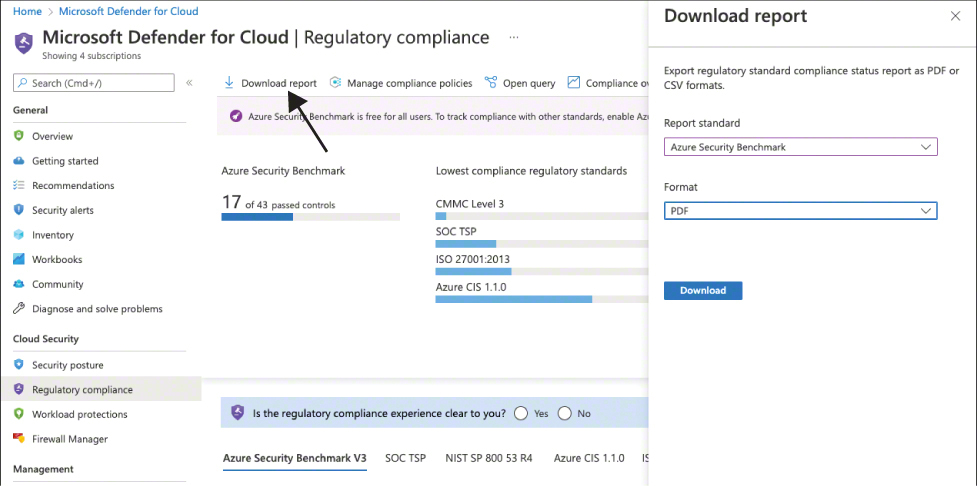
FIGURE 4-25 Downloading a compliance report from Azure Security Center
Customize your regulatory compliance experience
Microsoft Defender for Cloud will automatically activate the following four compliance standards in every subscription (or management group in case that’s the scope of your Azure Security Benchmark assignment):
Azure Security Benchmark
PCI DSS 3.2.1
ISO 27001
SOC TSP
The decision has been made to activate these versus others because these four standards apply to most customers’ environments. However, what’s true for most environments is not necessarily true for your particular environment. That is why you can select the compliance standard(s) that should apply to your subscriptions. To customize this experience, follow these steps:
Open the Azure portal and sign in with an account that has Subscription Owner privileges.
Select Defender For Cloud from the navigation pane.
From the Defender For Cloud main dashboard, select Environment Settings in the navigation pane. Select your management group or subscription, then select Security Policy in the left navigation pane.
Click the Disable button for all standards you want to disable. If you want to add more built-in standards, click the Add More Standards button, as shown in Figure 4-26.

FIGURE 4-26 Customize regulatory standards
Select the compliance standard you want to add to your subscription and click the Add button, as shown in Figure 4-27.
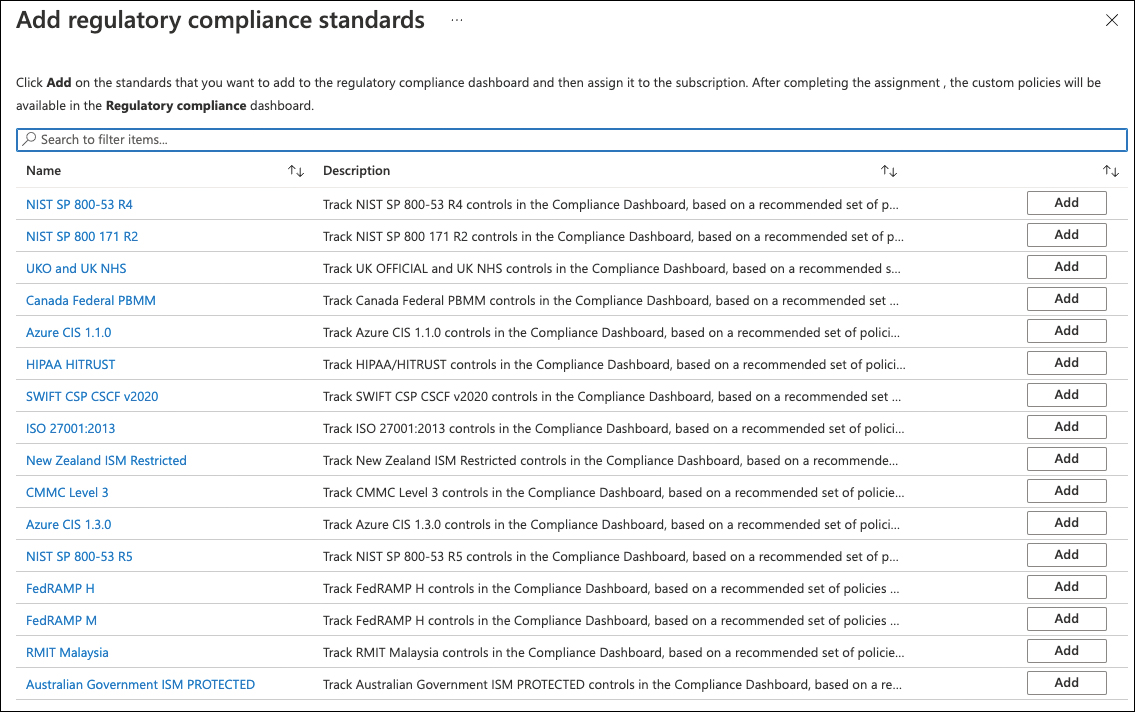
FIGURE 4-27 Select a compliance standard to add to your subscription
The Policy Assignment window appears. Make sure to fill in all information relevant to your environment, such as exclusions or parameters, and then click Review+Create > Create.
Tip
It may take a few hours for a new compliance standard to appear in the regulatory compliance dashboard.
Build your own compliance initiative
You already learned how to add a custom policy initiative to Defender for Cloud to generate custom recommendations. This custom initiative will also show up in the regulatory compliance view, enabling you to get a more structured view of your policies. With a custom initiative in regulatory compliance, you can make sure you get a condensed view of only the policies that you want to focus on. Of course, you should always try to enhance your Secure Score by focusing on the most impactful recommendations. (This is covered in more detail in Chapter 5. However, if your governance concept demands further restrictions, building your own custom initiative is a great idea. To do that, follow these steps:
Open the Azure portal and sign in with an account that has Subscription Owner privileges.
In the search bar, type Policy, and then select Policy.
In the Azure Policy blade, select Definitions in the left pane.
From the top menu, click + Initiative Definition.
Select the Initiative Location button. Remember: The initiative assignment is only available to resources at or below this location in the hierarchy.
Provide a Name and an informative Description, so others can easily figure out what is the purpose of your new initiative.
Select a Category. It is best practice to create a custom category, such as Contoso, so you can easily filter initiative and policy definitions if needed.
Set the Version of your initiative. Your configuration should now look similar to Figure 4-28. Then click Policies in the top menu.
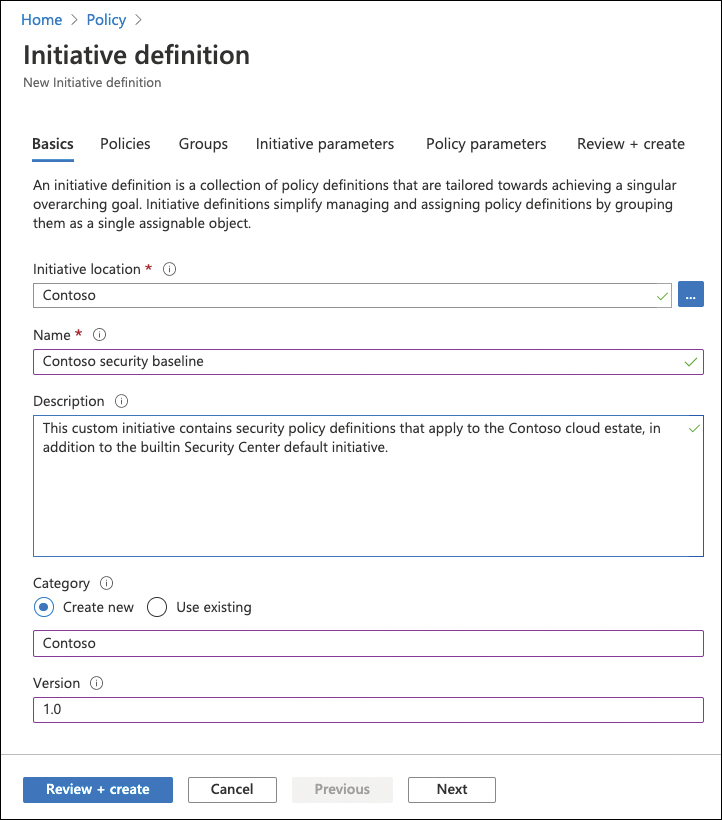
FIGURE 4-28 Basic configuration when creating a new initiative definition
Click the Add Policy Definition(s) button on the Policies page. Select all the policy definitions you want to add to your custom initiative. Once you have added all relevant policy definitions, select Groups from the top menu.
Groups help you to organize policies within an initiative. Furthermore, groups are used to reflect the different settings in the regulatory compliance dashboard within Defender for Cloud. Create as many groups as you need within your initiative definition. Make sure to use informative names and descriptions because this information is shown in the Regulatory Compliance dashboard that helps others understand how you have grouped your policy definitions.
Then navigate back to Policies in the top menu.
Select all policy definitions that you want to add to one group. Then click the Add Selected Policies To A Group button and select the particular group(s). You can add every policy definition to one or several groups. Go ahead with the rest of your policy definitions until you have added all of them to at least one group. Your view should now look similar to Figure 4-29.

FIGURE 4-29 Policy definitions added to groups
You can now add Initiative Parameters and Policy Parameters by clicking the respective menu if needed, or you can click Review+Create > Create.
Now, you can assign the new initiative in Defender for Cloud, following the steps outlined earlier in this chapter.
The assignment is now created, but it may take a few hours until you will see its results as custom recommendations in the All Recommendations blade and as a new compliance standard in the Regulatory Compliance dashboard, as shown in Figure 4-30.
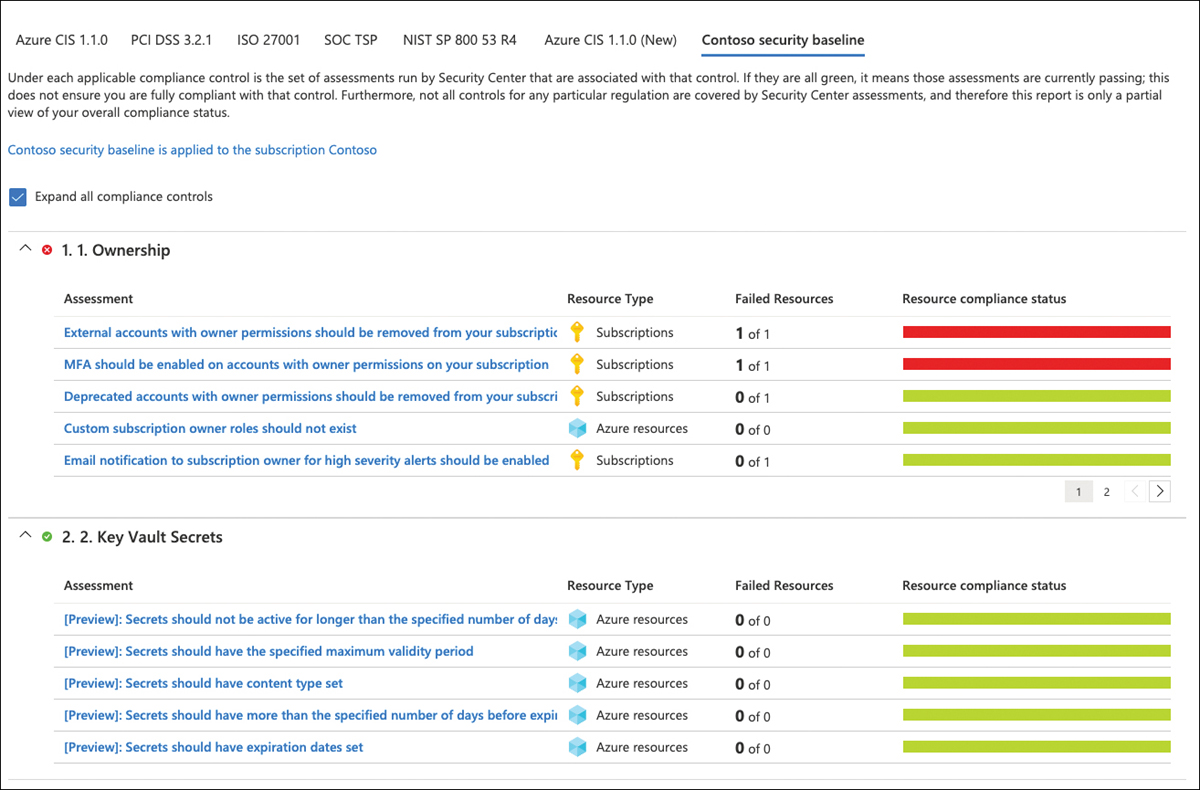
FIGURE 4-30 Your custom initiative in the Regulatory Compliance dashboard
More Info
To learn more about custom security policies, see https://aka.ms/MDFCCustomPolicies.
Creating custom assessments for AWS and GCP
Other than Azure resources, AWS and GCP do not rely on Azure Resource Manager. With that, there is no way to leverage Azure Policy for auditing resources from other clouds for resource compliance. That’s why the new AWS and GCP connectors have a new capability that lets you build custom assessments via the Azure Resource Graph, which is KQL (Kusto Query Language).
When leveraging Azure Policy to assess Azure resources for compliance, there are three different configurations that need to be created:
Policy definition A policy definition contains one or several rules to define resource compliance.
Initiative definition An initiative definition contains one or several policy definitions.
Initiative assignment An initiative assignment will assign the initiative definition to a scope.
For custom assessments in AWS and GCP, there also are three different configurations that need to exist:
Assessment An assessment contains assessment details, such as name description, severity, the assessment logic in KQL, and information about the standard it belongs to.
Standard A standard groups several assessments.
Standard assignment A standard assignment defines the scope the standard will evaluate, which can be AWS accounts or GCP projects.
As you will see, a standard within the scope of Defender for Cloud’s multi-cloud capabilities is similar to an initiative, whereas an assessment will contain the actual “audit rule” to assess a resource for compliance, so it’s comparable to a policy definition. Figure 4-31 shows built-in standards for AWS that will automatically be available once you create a new AWS connector.

FIGURE 4-31 Built-in standards for AWS resources
The AWS Foundational Security Best Practices standard is automatically enabled once you create a new AWS connector. It is the standard that is used for creating CSPM recommendations and will influence an AWS account’s Secure Score. AWS CIS 1.2.0 and AWS PCI DSS 3.2.1 are regulatory compliance standards that, once enabled, will reflect their status in Defender for Cloud’s Regulatory Compliance dashboard.
Tip
Compliance standards in AWS and GCP are part of Defender for Cloud’s enhanced capabilities. Although they are available once a connector has been created, you need to enable an additional Defender plan besides security posture management on the connector to assign compliance standards.
On a GCP connector, you will find similar default and compliance standards, as shown in Figure 4-32. GCP Default is the standard that is being used similarly to Azure Security Benchmark and AWS Foundational Security Best Practices. It contains all assessments that will create security recommendations and influence Secure Score. GCP CIS 1.1.0 and GCP CIS 1.2.0 are compliance standards that can be assigned to the GCP connector to reflect in Defender for Cloud’s Regulatory Compliance dashboard.

FIGURE 4-32 Built-in standards for GCP resources
Besides these built-in standards, which contain a variety of built-in assessments, you can also build your own standards and assessments. To start, follows these steps:
Open the Azure portal and sign in with a user who has Security Admin privileges.
Open Microsoft Defender For Cloud.
In the left navigation pane, click Environment Settings.
Select the AWS account or GCP project you want to create a custom assessment for.
In the left navigation pane, select Standards.
In the top navigation, select + Add, and then select Assessment.
In the Add Assessment view, select the New Assessment option button.
At the least, you need to enter mandatory information, such as a Name and Severity. Also, you can select an Assessment Template, which will then show the underlying Query, as shown in Figure 4-33.
You can now adjust the query according to your needs and test it with dummy data in Azure Data Explorer by clicking the corresponding link underneath your query. Once you’re done, click Save. You will now be back in the Standards view.
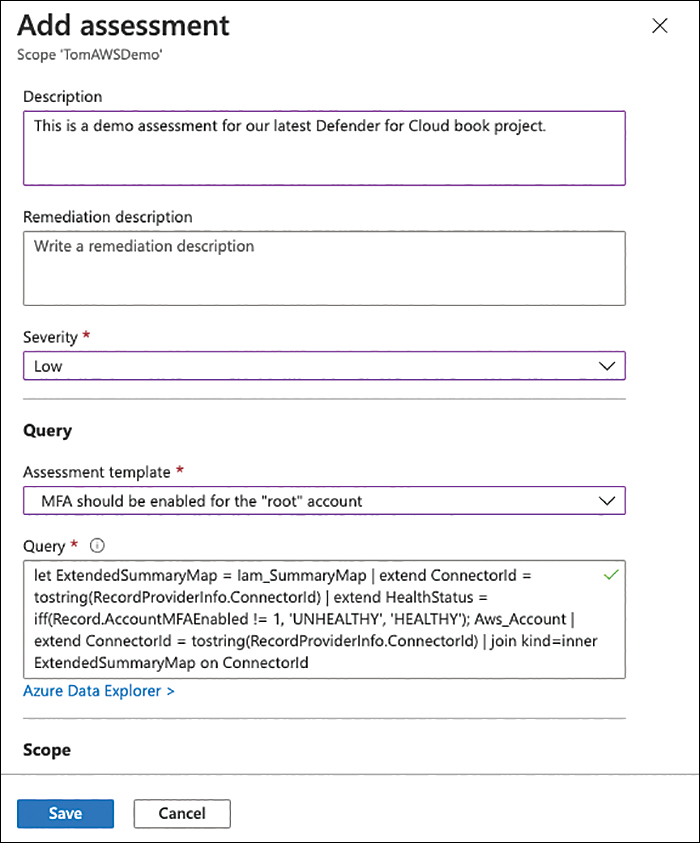
FIGURE 4-33 A KQL query in a custom assessment
Once your assessment has been created, you can go ahead and add it to a new standard. To do so, follow these steps:
In the top navigation pane, select + Add, and then select Standard.
In the Add Standard view, select New Standard and enter a Name and Description.
Select the custom assessment you just created from the Assessments dropdown.
Click Save.
You can now assign your custom standard to your account/project. To do so, right-click the standard and select Assign Standard, as shown in Figure 4-34. Confirm your selection by clicking Yes.
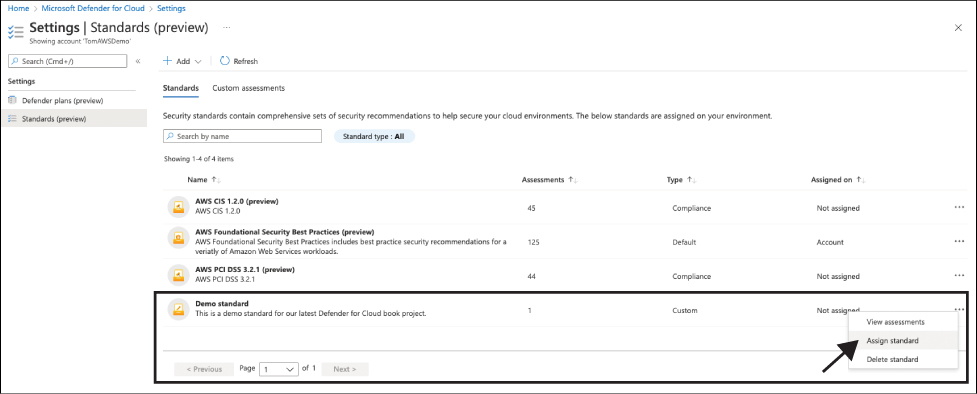
FIGURE 4-34 A custom standard being assigned
Once assigned, all assessments in your custom standard will start to evaluate AWS (or GCP) resources and then create security recommendations in Defender for Cloud. The data source for the underlying KQL query is Azure Data Explorer. When creating the AWS or GCP connector, Microsoft Defender for Cloud will start retrieving information from the third-party cloud’s REST APIs and store it in an Azure Data Explorer instance. When creating an assessment query, this query will work against this instance.
Tip
To learn more about how to create custom assessments in GCP, see https://aka.ms/MDFCGcpCustomAssessments.
Now that you know how recommendations are created in Defender for Cloud, we will focus on improving your security posture in the next chapter.