
Chapter 2
Planning Microsoft Defender for Cloud adoption
Given the threat landscape presented in Chapter 1, it is clear that there is a need for a system that can both unify security management and provide advanced threat protection for workloads running in Azure, on-premises, and on other cloud providers.
Microsoft Defender for Cloud gives organizations complete visibility and control over the security of cloud workloads located in Azure, on-premises, or another cloud provider. By actively monitoring these workloads, Defender for Cloud enhances the overall security posture of the cloud deployment and reduces the exposure of resources to threats. Defender for Cloud also uses intelligent threat detection to assist you in protecting your environment from rapidly evolving cyberattacks.
Defender for Cloud also assesses the security of your hybrid cloud workload and provides recommendations to mitigate threats. In addition, it provides centralized policy management to ensure compliance with company or regulatory security requirements.
In this chapter, you will learn more about Defender for Cloud architecture, use cases, and key considerations for adoption.
Deployment scenarios
As enterprises start their journey to the cloud, they will face many challenges trying to adapt their on-premises tools to a cloud-based model. In a cloud environment, where there are different workloads to manage, it becomes imperative to have ongoing verification and corrective actions to ensure that the security posture of those workloads is always at the highest possible quality. Defender for Cloud has a variety of capabilities that can be used in two cloud solution categories:
Cloud Security Posture Management (CSPM) Enables organizations to assess their cloud infrastructure to ensure compliance with industry regulations and identify security vulnerabilities in their cloud workloads.
Cloud Workload Protection Platform (CWPP) Enables organizations to assess their cloud workload risks and detect threats against their Server (Infrastructure as a Service [IaaS]), containers, databases (Platform as a Service [PaaS]), and storage. It also allows organizations to identify and remediate faulty configurations with security best-practice recommendations.
It is always recommended to start your cloud security journey by ensuring that you have visibility across all workloads, and once you have this visibility, you want to understand the security state of these workloads. With the free tier of Microsoft Defender for Cloud enabled on the subscription, you can obtain this information and start working on remediating security recommendations that will improve your overall security posture. That’s the scenario for CSPM.
After improving the security hygiene of the environment, you also want to be aware of potential threat actors trying to compromise your workloads, and that’s where CWPP capabilities will come into play. An important factor of threat detections that were tailored specifically for a particular workload is that you are only monitoring threats that are truly relevant for that workload. Microsoft Defender for Cloud has different plans that will vary according to the supported workloads.
Tip
You can also follow along with the implementation steps of this book by provisioning a trial Azure subscription and following the labs available at http://aka.ms/MDFCLabs.
Understanding Defender for Cloud
Because Defender for Cloud is an Azure service, you must have an Azure subscription to use it, even if it’s just a trial subscription.
When you enable Defender for Cloud in an Azure subscription, you will initially experience the benefits of the free tier. This free tier provides security policy, security assessment, security recommendations, and Secure Score. In addition to the free tier, Defender for Cloud offers an option to upgrade to enhanced security. This option offers a complete set of security capabilities for organizations that need more control and threat detection. The capabilities will vary according to which plan you enabled. For example, if you enable Defender for Servers, you will get the following features:
Security event collection
Network Map
Just-in-time VM Access
Adaptive application controls
Adaptive network hardening
Regulatory compliance reports
File integrity monitoring
Security alerts
Integration with Microsoft Defender for Endpoint (MDE)
Multi-cloud support for Amazon Web Services (AWS) and Google Cloud Platform (GCP)
Capability to monitor on-premises resources
Vulnerability assessment integration with Qualys and Microsoft Threat and Vulnerability Management (TVM)
In addition to Defender for Servers, you have other plans that offer tailored threat detection for specific workloads. The list below provides the other plans available:
Defender for Storage
Defender for SQL
Defender for Open Relational Database
Defender for Azure Comos DB
Defender for Key Vault
Defender for DNS
Defender for App Services
Defender for Resource Manager
Defender for Containers
When you upgrade to a Defender for Cloud plan, you can use it free for 30 days. This is a good opportunity to evaluate these features, see how your current environment will benefit from them, and decide whether they’re worth the investment.
Tip
For the latest information about pricing, see http://aka.ms/ascpricing.
Defender for Cloud architecture
To better understand how Defender for Cloud communicates with different resources, it is important to understand its core architecture. Figure 2-1 shows the Defender for Cloud architecture and how it interacts with external components.
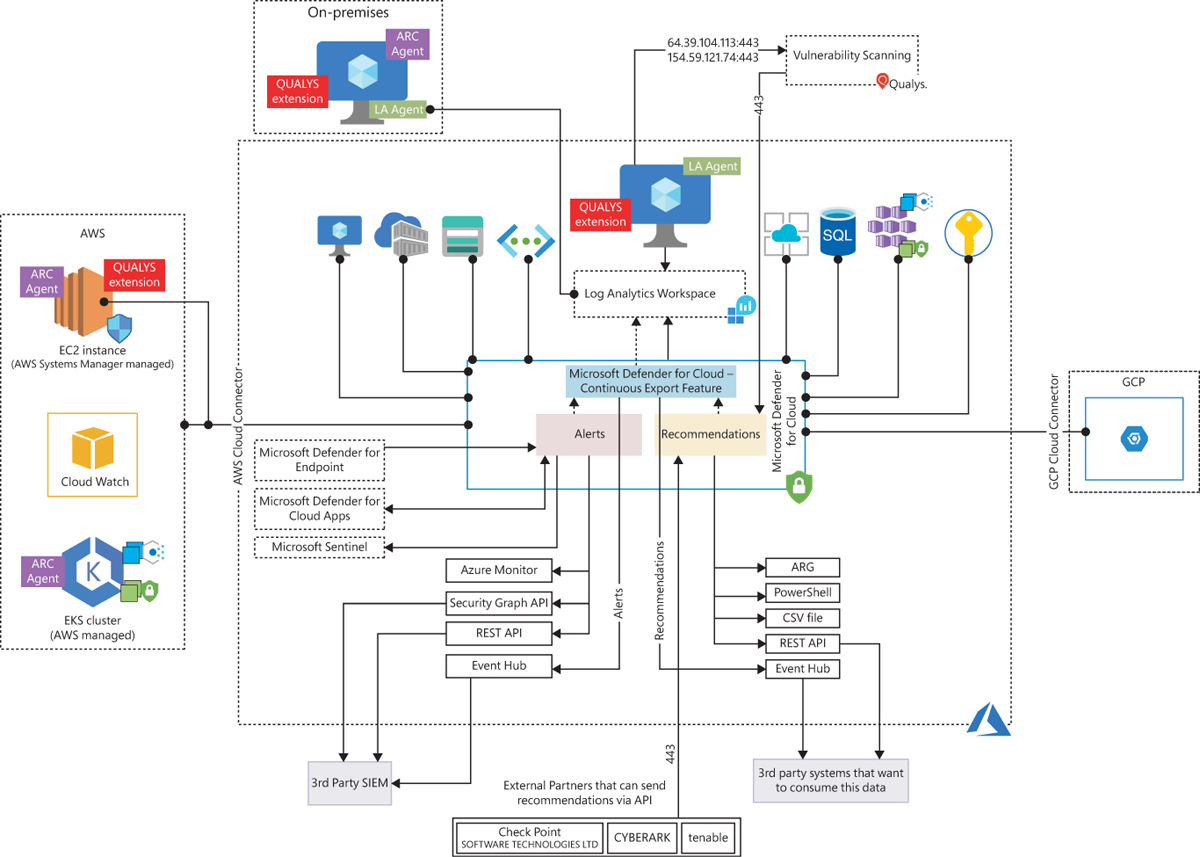
FIGURE 2-1 Defender for Cloud architecture
Tip
If you want to download the latest version of this diagram to better visualize the details, visit http://aka.ms/MDCDataFlow.
In Figure 2-1, if you look at the core diagram representing Defender for Cloud, you will see three major boxes: Recommendations, Alerts, and Continuous Export. The recommendations are an important component of the CSPM scenario because it is via the remediation of these security recommendations that you will enhance your security posture. Alerts contain the security alerts that are triggered when suspicious activities are identified. Alerts are based on a variety of threat detections, which are enabled when you enable a Defender for Cloud plan. Recommendations and alerts can be streamed to the Log Analytics workspace of your choice using the Continuous Export feature, and they can also be streamed to an Event Hub to be consumed by a third-party Security Information and Event Management (SIEM) system.
Recommendations can also be received based on the connectivity with other cloud providers such as AWS and GCP, which you will learn how to onboard in the next chapter. Another form of ingesting external recommendations is via third-party partners, which usually sends those recommendations via the Application Program Interface (API). By the time this chapter was written, the partners available were Tenable, Cyberark, and Checkpoint.
Defender for Cloud uses the Log Analytics Agent, which is configured to send information to a particular Log Analytics workspace. Regardless of the VM location (in Azure or not), the agent must always be installed to enable Defender for Cloud to have more visibility about the machine’s security events. In Windows systems, Defender for Cloud installs the Log Analytics Agent. In addition to the agent for Linux, Defender for Cloud also creates the omsagent daemon, which runs under the omsagent account. This account is automatically created during agent installation.
In Linux systems, Defender for Cloud collects audit records from Linux machines using the auditd framework. (It doesn’t require the auditd daemon to be running.) The auditd system consists of two major components:
First is a set of user-space utilities offering a wide collection of operations allowing administrators to better adjust rules, analyze audit log files, or troubleshoot if things are misconfigured.
Second is a kernel-level subsystem that is responsible for monitoring system calls, filtering them by a given rule set, and writing match messages to a buffer.
Both components are communicating through a netlink socket. Auditd records are collected, aggregated into events, and enriched using the latest version of the Log Analytics Agent for Linux.
In Windows systems, the Log Analytics Agent scans for various security-related configurations and events in Event Tracing for Windows (ETW) traces. Also, this agent collects the following:
Operating system logs, such as Windows events
Operating system type and version
Running processes
Machine name
IP addresses
Logged in user (username)
Tenant ID
User mode crash dump created by Windows Error Reporting (WER)
This information is sent to your workspace, which is an Azure resource used as a container to store your data. A workspace provides a geographic location for data storage, granularity for billing and data isolation, and helps you to better scope the configuration.
If you are using Azure Log Analytics, and you already have a Log Analytics workspace, this workspace can be used by Defender for Cloud to store data coming from the agent. If you are not using Azure Log Analytics, a new workspace will be automatically created when you start using Defender for Cloud. When using the default workspace provisioning configuration, the location of the workspace created by Defender for Cloud is based on the geolocation of the VM.
If you are a global company and need to store data in specific regions for data sovereignty or compliance reasons, you might consider creating multiple workspaces. Another scenario that might call for multiple workspaces is if you want to isolate various users. For example, you might want each customer, department, or business group to see its own data but not the data of others. There will also be scenarios where you may want to utilize a centralized workspace, for example when all subscriptions want to consolidate the recommendations and alerts exported by the continuous exported feature in a single location.
Tip
You need to use Log Analytics to create multiple workspaces. If you need to perform this operation, see https://aka.ms/ascworkspaces.
By default, only VM-Based alerts are stored in the workspace; in other words, only alerts generated by Defender for Servers are stored in the workspace. This means even if you have multiple Defender for Cloud Plans enabled, such as Defender for Storage and Defender for Key Vault, the alerts generated are not stored in the workspace. If you need to store the alerts in the workspace, you need to use the Continuous Export feature.
An important point shown in Figure 2-1 is the vulnerability assessment integration with Qualys. When you enable this integration, the agent installed in the VM needs to have access (TCP 443—the default for HTTPS) to Qualys data centers in the United States and Europe (hence the IP addresses shown in the diagram). Another important point about this architecture is the integration with Azure Arc. Figure 2-1 shows some examples of the scenarios where Azure Arc is needed, such as when you are onboarding VMs and Kubernetes located in AWS, GCP, or on-premises infrastructure.
Tip
For more information about Azure Arc, see https://azurearcjumpstart.io.
Defender for Cloud dashboard
To access the Defender for Cloud dashboard, sign in to the Azure portal (https://portal.azure.com) and click the Microsoft Defender For Cloud icon in the left pane. What happens the first time you open the Defender for Cloud dashboard may vary according to the types of workloads that you have on your Azure subscription. For the purposes of this example, the dashboard is fully populated with resources, recommendations, and alerts, as shown in Figure 2-2.
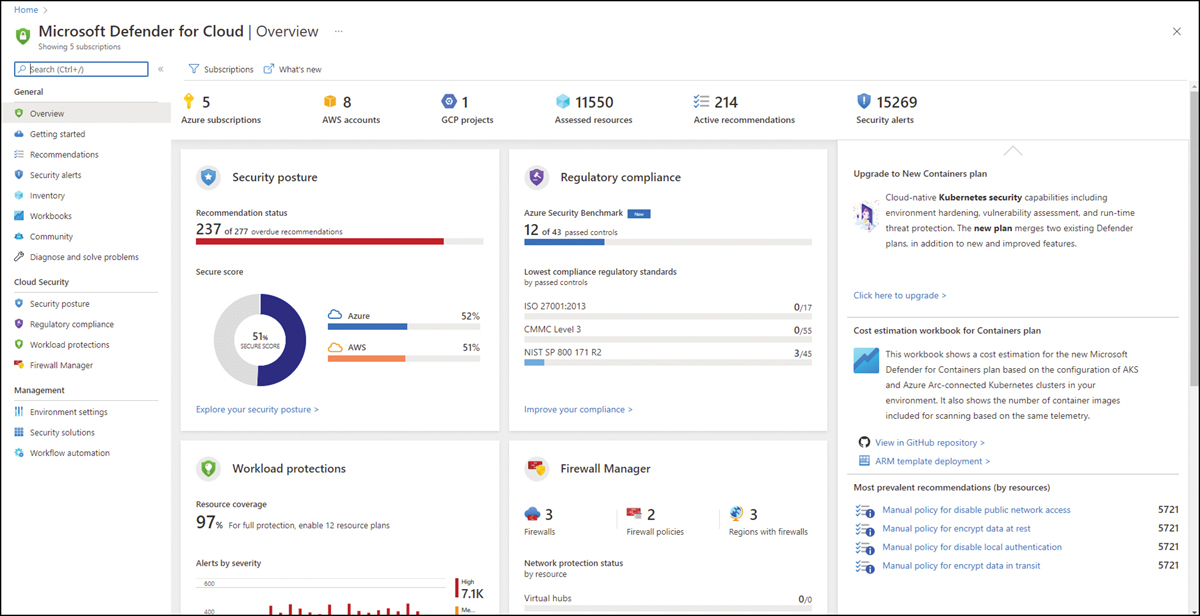
FIGURE 2-2 Overview page in Defender for Cloud dashboard
By default, the Overview page is highlighted when you open the Defender for Cloud dashboard. This page brings a comprehensive layout that enables you to quickly see important indicators. From the top down, you will see which cloud providers you are connected with (Azure subscriptions, AWS account, and GCP Projects), followed by the number of assessed resources, the total of active recommendations, and security alerts.
Below that are a series of tiles; the first one is the Security Posture, which you will learn more about in Chapter 5, “Strengthening your security posture.” This tile lets you quickly see the Secure Score for your Azure subscription. In addition, if you are connected with AWS and GCP, you will also see the Secure Score for those cloud providers.
The next tile is Regulatory Compliance, which shows some statistics about your journey to compliance with different industry standards. The main statistic is the Azure Security Benchmark, which is the foundation of Defender for Cloud recommendations. Besides that, you also see the lowest compliance based on different industry standards.
Below the Regulatory Compliance tile is the Firewall Manager tile, which brings a summary of Azure network security-related products that are enabled on this Azure subscription. The content of this tile may vary according to the available Azure network security products that are currently in use on the selected subscription. If multiple subscriptions are selected, this tile will show the aggregated result.
Below the Security Posture tile is the Workload Protections tile, which contains a brief description of the current number (in percentage format) of resources covered in the selected subscription and a timeline chart with the alerts by severity. The entire right side of the page contains dynamic content that will be refreshed as necessary. This includes insights about alerts, quick access to see which workloads are not protected, and top recommendations.
Planning adoption
When planning to adopt Defender for Cloud, you first need to consider the adoption scope; in other words, are you going to adopt this product to be the centralized dashboard for cloud security in Azure only, or do you plan to connect with other cloud providers? One of the challenges of multi-cloud adoption is ensuring that you have security posture visibility for all clouds in a single dashboard—and that is a big advantage of using Defender for Cloud.
Once you define the scope of the adoption, you need to start thinking about the use-case scenario. Are you planning to use Defender for Cloud as your cloud security posture management and workload protection platform? Remember, there are two major use-case scenarios: CSPM and CWPP. If you plan to use Defender for Cloud for both scenarios, you should always start with CSPM because you first need to ensure that you have good security hygiene and a high Secure Score. In this case, a high Secure Score means reaching 100 percent on your score. You should not leave security recommendations open without remediation, and if you intentionally plan not to follow a security recommendation, make sure you have good justification for assuming this risk.
During this initial phase, you should also ensure that you have the right stakeholders for this project. You need to have members of the following teams involved:
Cloud security Some organizations aggregate CSPM-related tasks in a team called Cloud Security. Other organizations refer to this team as the CSPM team, so make sure you have the right team that is responsible for managing the cloud’s security hygiene.
Cloud governance Often, the team responsible for establishing security policies and adding guardrails at the beginning of the pipeline are part of the Governance team. Therefore, make sure you have representatives from this area.
Security Operations Center (SOC) The SOC Team will need data from Defender for Cloud when it comes to alerts related to threat detection for the different workloads. You need to ensure that this team knows how to interpret the alerts generated by Defender for Cloud and how they will consume these alerts. Usually, they will stream the alerts to their preferred Security Information and Event Management (SIEM) platform.
Compliance Because Defender for Cloud maps to many regulatory compliance standards, it is very common for the compliance team to want to know the level of compliance of the workloads located in different cloud providers. Make sure to have representatives of this team so that you better understand which regulatory standard is more important to them and how they want to consume this information. You can send them a compliance report in PDF format or provide access to the dashboard or a compliance workbook.
While these are the most common teams that should be engaged in this initial conversation to establish the adoption plan, you might need to add other teams or individuals according to your organization’s needs. Therefore, you should use those as a starting point and adjust as needed.
Before enabling Defender for Cloud in your subscription, you must also ensure you have the proper privilege level. Review the roles and permissions requirements in Chapter 3, “Onboarding Microsoft Defender for cloud.”
Considerations for CSPM
One of the challenges that many organizations face when trying to improve the security hygiene of their cloud workloads is the lack of privileges available to harden workloads based on the recommendations provided by Defender for Cloud. For example, let’s use a scenario where the Contoso CSPM team is reviewing the security recommendations for a SQL Database, and they identify the recommendation shown in Figure 2-3, which has a list of unhealthy resources that needs attention.
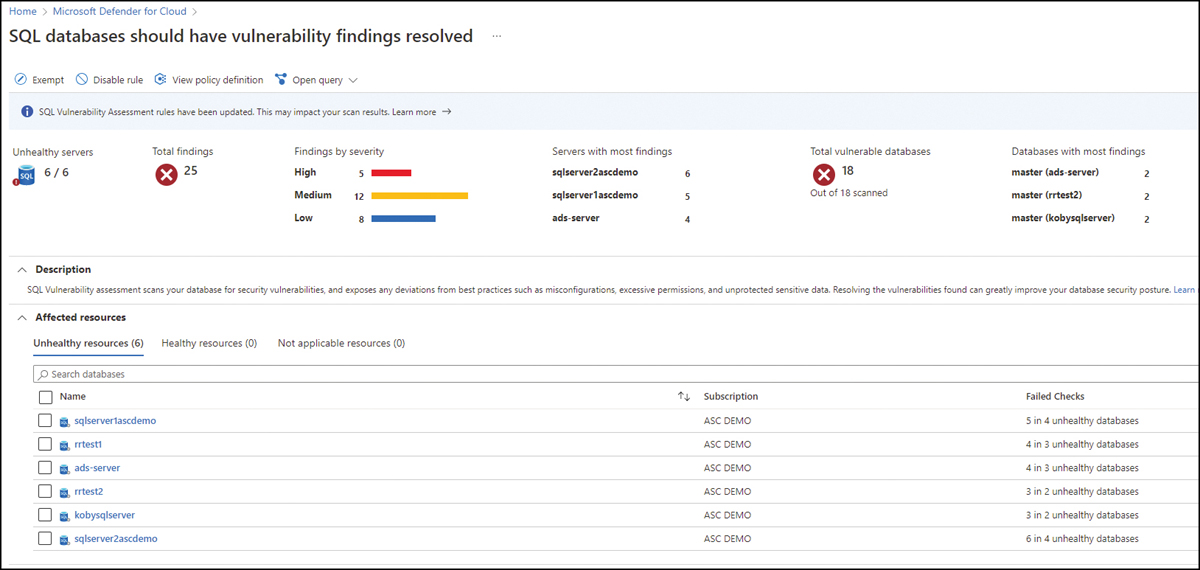
FIGURE 2-3 Security recommendations for SQL databases
When the Contoso CSPM team tried to remediate the recommendation, they received a message saying that they didn’t have the necessary privileges to remediate this resource. Now the questions are: Who should they contact to remediate this resource? Who is the owner of this resource? Is the owner the same person who maintains this database? That’s when the CSPM team starts putting aside recommendations they can’t remediate and focuses on the ones they can remediate. The problem with this approach is that the recommendations are not prioritized by level of criticality or potential improvement to the Secure Score.
For this reason, it is imperative to establish a workflow of actions that must be followed to ensure that the workload owner is notified when there are open security recommendations that must be remediated. Consider the following actions (in this order) as part of your plan:
Identify the workload owners.
Train the workload owners to learn how to use Defender for Cloud (100-level basic training is enough). The goal is to help them at least navigate through the recommendations and follow the remediation steps.
Create governance rules for these owners and establish a timeline for remediation. This is an important step to ensure accountability.
Create automations to notify workload owners that new recommendations are open.
As you continue this journey to improve your security hygiene, you will notice that the Secure Score will continue to grow. To avoid sudden drops in Secure Score, ensure the CSPM team relates closely with the cloud governance team. The goal is to ensure that all recommendations that can be implemented at the beginning of the pipeline to enforce compliance are in place, even before a resource is provisioned, as shown in Figure 2-4.
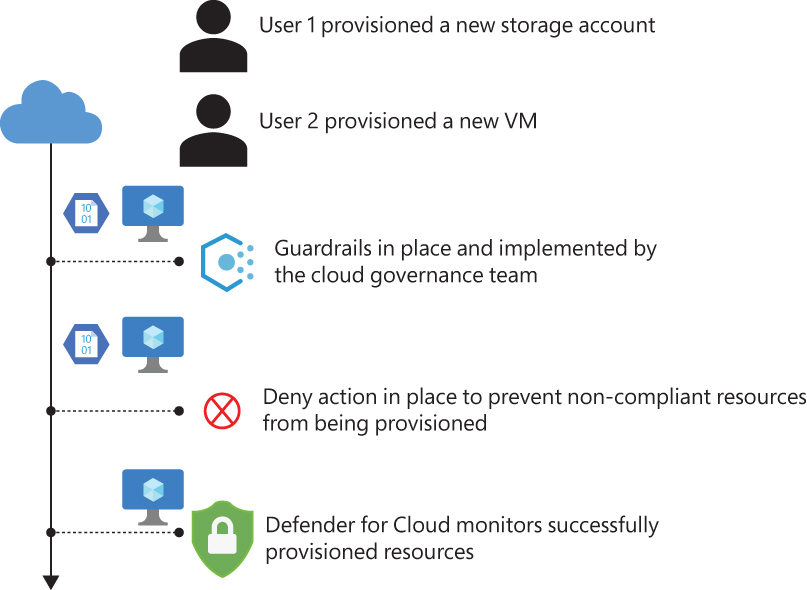
FIGURE 2-4 Governance and security monitoring working together
In Figure 2-4, two users are provisioning new resources. User 1 provisioned a storage account that is not compliant with the policies established by the cloud governance team. As a result, the resource won’t be allowed to be provisioned. User 2 provisioned a VM that is fully compliant with the established policies. This VM will be successfully provisioned and will appear in the Defender for Cloud dashboard as healthy.
Now, let’s look at a scenario in which the cloud governance team doesn’t have the right guardrails in place, and they are learning from the findings exposed by Defender for Cloud. For example, let’s say the Contoso CSPM team determined that every time a new storage account is provisioned, the Secure Score drops. They determined this happens because the Secure transfer to storage accounts should be enabled recommendation is triggered, as shown in Figure 2-5.

FIGURE 2-5 Security recommendations for storage account
During the weekly meeting, a member of the Contoso CSPM team asked the Contoso cloud governance team lead to create a Deny rule in Azure Policy to prevent new storage accounts from being created if they are not using Secure Transfer. By implementing this rule at the beginning of the pipeline, the cloud governance team ensured that users will not provision a storage account that doesn’t follow this recommendation.
That’s why the cloud governance team must be engaged in the project from the beginning, so they have a fundamental role in keeping the environment secure by default. While the synchronization of these teams is imperative for the project, you also need upper-management sponsorship to ensure that the entire organization is working toward improving the overall security posture. Based on our observations over the years, the companies that saw a bigger increase in their Secure Score were the ones that had upper-management sponsorship.
To finalize the CSPM considerations, ensure that you have a clear answer to the following questions:
Do we have upper-management approval for this project?
Which teams are involved?
What are the measurements of success?
Who is going to manage Defender for Cloud?
Who is the subscription owner?
Who has administrative privilege at the tenant level?
Who are the workload owners?
Which team manages the overall cloud governance?
Is the governance team effectively using Azure Policy for governance?
Who has the privileges to change those policies?
Does the governance team have preventative measures to avoid provisioning new resources that don’t comply with pre-established standards?
Does the cloud governance team partner with the CSPM team to improve their controls?
What’s the current level of Defender for Cloud knowledge across all workload owners?
Does the company have security awareness training?
How are workload owners trained to maintain the security of their resources?
Does the company have any ongoing security campaigns to educate employees?
How do you triage recommendations to decide which ones will be included at the beginning of the pipeline as policy enforcement?
What’s the process for feeding the governance team with lessons learned from the CSPM team?
How are you revisiting changes in the environment to adjust the security policies?
How are you controlling exemptions for those policies?
Considerations for CWPP
At this point, you should have a good idea about which workloads are available and need active monitoring. The next step is to plan the enablement of the appropriate Defender for Cloud plan to provide threat detection capabilities for the workload.
Let’s use the following scenario as an example: In a meeting between the cloud security and SOC teams, it was agreed that it is imperative to have threat detection for storage accounts because of the growing number of attacks against cloud-based storage. The SOC team wants visibility if threat actors try to scan storage accounts and perform any suspicious operation. The cloud security team knows the price for Defender for Storage is based on transactions, and they want an estimate of how much it will cost to enable this plan.
In this scenario, they can use the Defender for Cloud GitHub repository at http://aka.ms/MDFCWorkbooks and import the Microsoft Defender for Storage Price Estimation Workbook. This will help them calculate how much it will cost to enable Defender for Storage at the subscription level and cover all storage accounts. In Chapter 6, “Threat detection,” we will cover each Defender for Cloud plan in more detail.
It is very important to emphasize that each Defender for Cloud plan has a 30-day free trial, which means you can enable the plan in the subscription, perform a proof of concept (PoC) to validate the use-case scenarios, and then decide if you want to keep the plan enabled. You can use the Workload Protections dashboard in Defender for Cloud to see which workloads have the plan enabled, as shown in Figure 2-6.

FIGURE 2-6 Workload Protections dashboard with the overall coverage
Note
You can use the guidelines from the article at http://aka.ms/MDFCPoC to prepare a PoC that fits your needs.
Another important point to consider is how the SOC team currently ingests and aggregates the alerts. Most likely, they are using a SIEM solution, such as Microsoft Sentinel, which means you need to consider how the plans you enabled for Defender for Cloud will stream those alerts to the SIEM. In Chapter 7, “Better together,” you will learn how to integrate Defender for Cloud with Microsoft Sentinel.
To finalize the CWPP considerations, ensure that you have a clear answer to the following questions:
Which team handles alerts?
How are alerts ingested now?
Which tools are utilized to aggregate alerts?
Which tools are utilized to orchestrate and automate response to alerts?
Considerations for multi-cloud
Multi-cloud deployments continue to grow as many organizations start to adopt different cloud providers to store different workloads. Defender for Cloud supports integration with AWS and GCP, which allows the CSPM team to have full visibility of the security posture of Azure, AWS, GCP, and on-premises resources in a single dashboard.
When planning for multi-cloud adoption, you need to ensure that you have the right teams engaged because in many organizations, the team that manages Azure is not the same as that of AWS and GCP. If this is the case, you need to make sure everyone is on the same page regarding security posture management across different cloud providers. In Chapter 3 you will learn how to connect with AWS and GCP.
To finalize the multi-cloud considerations, ensure that you have a clear answer to the following questions:
What are the current cloud providers that are used in the organization?
Who manages each cloud provider account?
Who owns the workloads on each cloud provider?
Which workloads are deployed on each cloud provider?
Is there any tool currently in use that provides centralized management of all cloud providers?
Considerations for vulnerability assessment
Vulnerability assessment (VA) is another key area for security posture improvement, and the only reason this was not covered in the CSPM section of this chapter is that large organizations usually will have a separate team that handles vulnerability assessment across endpoints and servers. This means the CSPM team needs to engage with the VA Team to ensure that they can take advantage of Defender for Cloud–native VA solutions, which can be either based on Qualys or Microsoft Threat Vulnerability Management (TVM).
Suppose the organization is already using Qualys as its main VA solution. In that case, it can also use the bring your own license (BYOL) model to deploy the Qualys agent to all VMs in Azure via Defender for Cloud. However, suppose the organization wants to use its current Qualys VA to monitor only endpoints and take advantage of the free VA integration for servers enabled by Defender for Cloud. In that case, it will have to manage two different dashboards. This is because the results for Qualys VA in Defender for Cloud are exposed as security recommendations and will not integrate with the Qualys VA dashboard used by the endpoints. Figure 2-7 shows an example of how the vulnerability assessment is presented in a recommendation.
As shown in Figure 2-7, the results presented in the recommendation will list the findings, and once you click a finding—ID 91785—another blade opens up on the right side showing more details about that finding, which VA found it (Qualys or TVM), and the vulnerable machines.
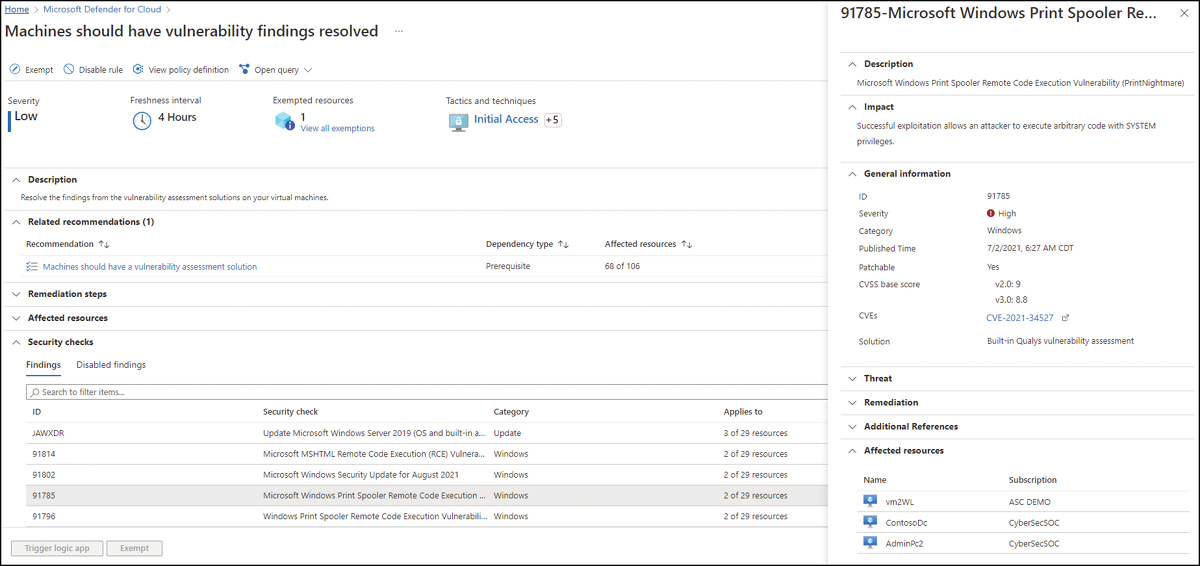
FIGURE 2-7 Recommendation to remediate vulnerability found by Qualys
If the organization does not already have a VA solution, the decision will be between deploying Qualys or TVM. Both are fully integrated with Defender for Cloud, though one major difference is that TVM doesn’t require an additional agent because it is part of MDE (in other words, it requires MDE), while Qualys does require the installation of an additional agent. However, the deployment experience is similar because Defender for Cloud will flag machines that don’t have a VA installed. From there, you can deploy the desired solution, as shown in Figure 2-8.
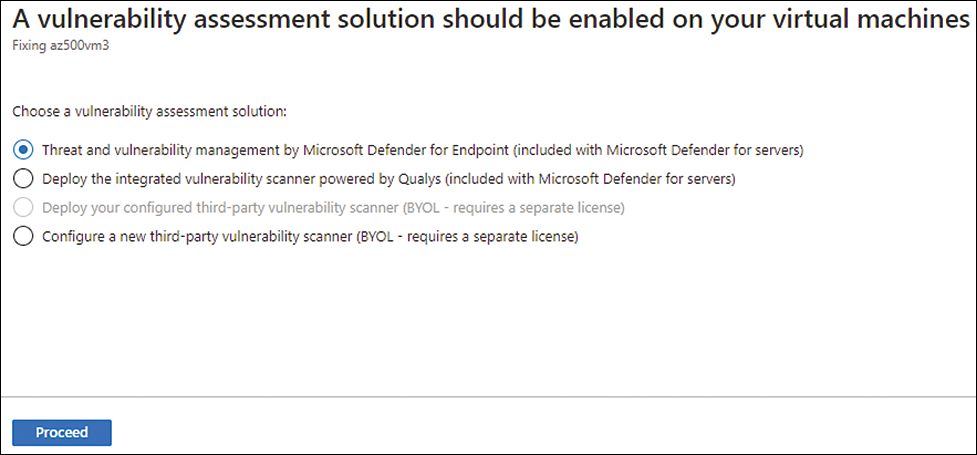
FIGURE 2-8 Selecting the appropriate VA solution to deploy
While the example shown in Figure 2-8 shows the deployment for just one VM, you can select multiple VMs and deploy them simultaneously. If you plan to deploy at scale for the entire subscription, you can also use Azure Policy. In Chapter 5 you will learn more about the deployment and operations of VA.
To finalize the VA considerations, ensure that you have a clear answer to the following questions:
Is there any VA solution already deployed and operational in the company?
Which team manages the current VA solution?
Which VA solution is in use today?
Is it a constraint to have another agent installed on the VM?
Do you need to deploy the VA at scale?
Considerations for EDR
Defender for Cloud has native integration with Microsoft Defender for Endpoint (MDE) on Windows and Linux Servers. This means that if you use the default setting, MDE will be automatically deployed to your Servers, and with that, you will also have an endpoint detection and response (EDR) solution installed on your server. In the list below, you have the main advantages of this integration:
No additional charges for MDE because the Defender for Server plan already includes MDE integration
Automatic deployment of MDE across all supported servers in the subscription
Synchronization of alerts, meaning the alerts generated by MDE will appear in the MDE dashboard, as well as in the Defender for Cloud Security Alerts dashboard
One important consideration in this integration is whether the servers you will onboard already have an EDR solution installed. For example, some organizations want to keep a single EDR solution across client endpoints and servers, so they might not want to have MDE automatically deployed to their servers residing in Azure. If that’s the case, you need to disable MDE integration at the subscription level, as shown in Figure 2-9.
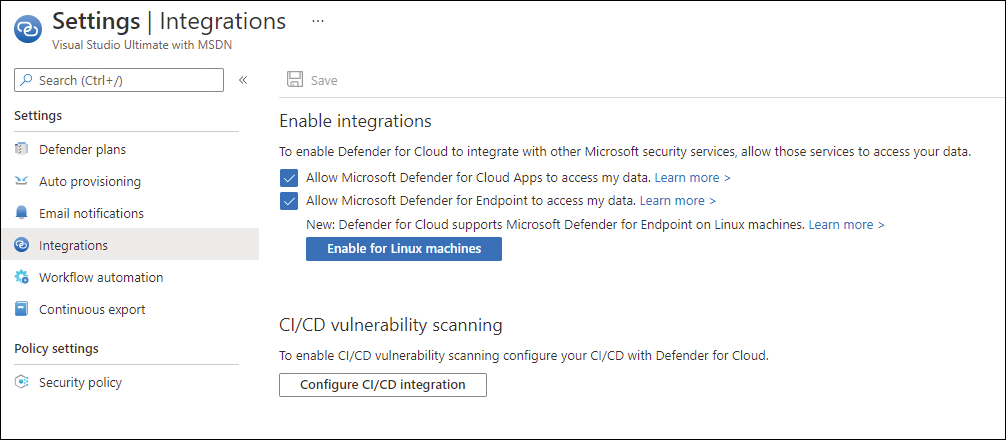
FIGURE 2-9 Integrations that are automatically configured in Defender for Cloud
In Chapter 6 you will learn more about MDE deployment for Windows and Linux via Defender for Servers.
Considerations for multi-tenant
Defender for Cloud is an Azure subscription-based service, which means that the deployment and configuration are always done at the subscription level. This means that if you have multiple subscriptions under a single tenant, each subscription will have its own settings and deployment options by default.
When you need to centralize the deployment for the entire tenant, you can create a management group (MG) in Azure, move your subscriptions to this MG, and assign a single policy to this MG. You will learn more about this scenario and its considerations in Chapter 10.
When you need centralized visibility across multiple tenants, you must first configure Azure Lighthouse to grant multi-tenant access. Once you do that, the Defender for Cloud dashboard will seamlessly show the results for all selected tenants and subscriptions.
Note
For more information about Azure Lighthouse, see https://docs.microsoft.com/en-us/azure/lighthouse/overview.