
Chapter 3
Onboarding Microsoft Defender for Cloud
To plan first and act second is one of the most important aspects of enabling Microsoft Defender for Cloud in an environment. While it seems easy, some considerations need to be made before actually starting to have your resources and subscriptions properly onboarded to Defender for Cloud. It is a common misconception that Microsoft Defender for Cloud is automatically enabled on all Azure subscriptions. Also, people tend to overlook planning for governance, including management groups, subscriptions, and Log Analytics workspace designs.
In this chapter, we will dive into the technical aspects of onboarding Microsoft Defender for Cloud, and you will learn what it takes to have the right setup in place for your environment.
Planning your Azure environment for Defender for Cloud
Microsoft Defender for Cloud is a subscription-based service. Once enabled, it will cover all supported resources in a particular subscription, provide security recommendations, and calculate the Secure Score. To monitor servers, it needs to have the Log Analytics agent deployed and connected to a Log Analytics workspace. Creating some recommendations will leverage guest configuration policies, which demand an extension to be deployed to all machines in question. As an Azure service, Defender for Cloud relies on an Azure resource provider for a subscription that needs to be registered. This is not enough, though, as there also needs to be the Azure Security Benchmark assigned, a Log Analytics workspace deployed, and more. Whenever you create a new subscription, you must ensure it is onboarded to Microsoft Defender for Cloud. There is an automated process that will do the following:
Register the Microsoft.Security resource provider to the new subscription
Automatically assign the Azure Security Benchmark initiative, which we will cover in more detail in Chapter 4, “Policy management”
Deploy one or more default Log Analytics workspaces, depending on your configuration
But this process does not automatically start—it needs to be triggered. For example, this happens when you create a new subscription, select it, and open Microsoft Defender for Cloud with that subscription selected. You will then see the message indicating that Defender for Cloud is getting things ready for your subscriptions, as shown in Figure 3-1.
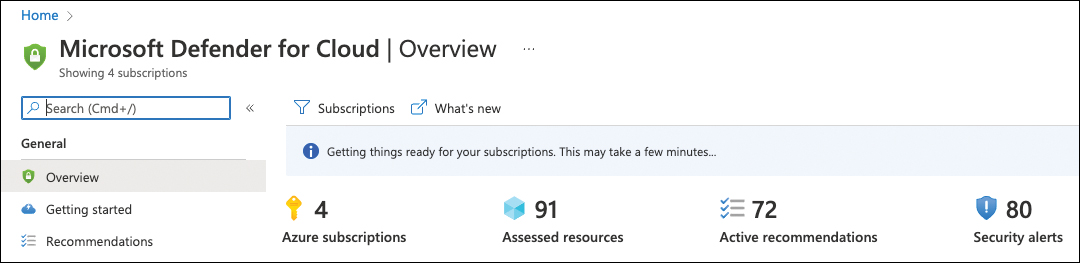
FIGURE 3-1 A subscription being onboarded to Microsoft Defender for Cloud
While this process runs smoothly whenever you open Defender for Cloud with a new subscription selected, it is important to understand what happens from a technical perspective. This will allow you to plan your deployment at scale and help you understand what design considerations you need to make before starting.
If you don’t have a process in place that will automatically onboard your whole environment at scale—a topic which we will cover in Chapter 10, “Deployment at scale”—Defender for Cloud will start with some defaults:
The onboarding process will register the
Microsoft.Securityresource provider to the new subscription. This mandatory step will trigger the back-end assessments to analyze your resource configuration, which relies on the Azure Security Benchmark.When opening a new subscription in Defender for Cloud for the first time, the Azure Security Benchmark is automatically assigned to the new subscription once the resource provider has been registered. The Azure Security Benchmark is the security policy Defender for Cloud will leverage to create security recommendations for all resources within the new subscription.
The onboarding process will create one or more default Log Analytics workspaces, one for each region in which your subscription hosts VM resources. These workspaces can be used to connect your machines’ Log Analytics agents to them, and Defender for Cloud will use them to store VM-related security alerts once relevant.
As you can see, a lot is happening in the back-end when onboarding Defender for Cloud, so let’s take a look at design considerations first.
Designing your environment
While registering the resource provider and assigning the Azure Security Benchmark to a subscription does not require too many considerations (besides the fact that it needs to happen), Log Analytics design is a bit more complex. Since the beginning of Microsoft Defender for Cloud, it has been relying on monitoring solutions on the workspace to enable data collection from machines based on the Log Analytics agent. That’s why the automated onboarding process will create default workspaces whenever you do not leverage an existing one. The process, in this case, will create one default workspace for each Azure geolocation that you have machines deployed to, using the DefaultWorkspace-<subscriptionId>-<regionShortName> name schema.
For example, if you have virtual machines in West Europe and North Europe, you might get one workspace in West Europe and machines from both regions connected to it. Figure 3-2 shows an example of two default workspaces that have been created in the Central US and East US because this particular subscription had machines deployed to both regions before enabling Defender for Cloud.
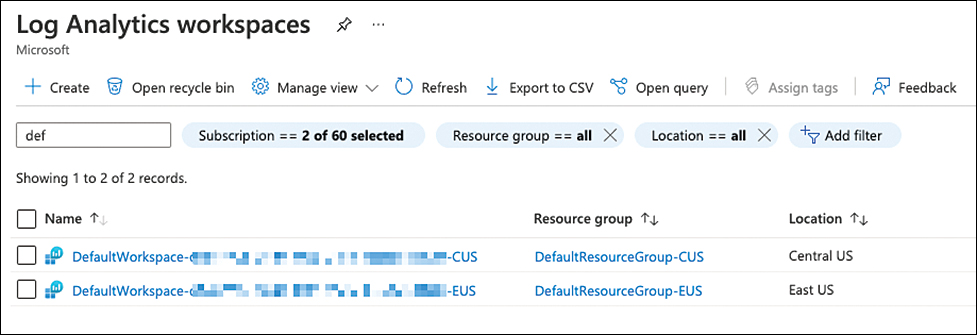
FIGURE 3-2 Default workspaces created by Microsoft Defender for Cloud
The advantage of leveraging default workspaces is that they will automatically have the security solution enabled. However, using them comes with a lot of disadvantages, too, including but not limited to the following:
Using one or several default workspaces per subscription will quickly become hard to manage.
Default workspaces do not align with your organization’s naming schema.
Default workspaces might not adhere to your (regulatory) compliance standards.
Default workspaces cannot be used for Microsoft Sentinel.
From a management perspective, it is best to only use a single Log Analytics workspace for all resources in your organization, while from a governance and data cost perspective, you might want to use one workspace per Azure region. If it comes to leveraging Microsoft Sentinel as your SIEM/SOAR solution, you might even want to divide security logs from performance logs and then end up with two workspaces per region or geolocation, such as Europe, Asia, or America. There are many considerations, and later in this chapter, you will learn how to leverage both the default and custom workspaces with Microsoft Defender for Cloud.
The next aspect to focus on is your role-based access control (RBAC) model. Who should be able to manage Microsoft Defender for Cloud? Who is supposed to review recommendations and security alerts? Who is allowed to change your security policy or add or remove regulatory compliance standards from your subscriptions? Microsoft Azure comes with a variety of different built-in role definitions, some of which are relevant for Microsoft Defender for Cloud:
Security Reader and Reader roles can be used to view security alerts and recommendations. While the Reader role will allow a user to view anything within the role assignment’s scope (resource group, subscription, or management group), the security reader role is limited to security-related information. Viewing security alerts and recommendations is part of all additional roles we will cover below.
The Security Admin role allows you to dismiss security alerts, enable/disable Microsoft Defender for Cloud plans, and edit the security policy that has been assigned to a subscription.
The Contributor and Owner roles assigned to a particular resource let you apply and remediate security recommendations for this resource. When assigned to the subscription, these roles also allow you to dismiss alerts, enable or disable Defender for Cloud plans, edit an existing security policy, or create and assign additional policy initiatives, including regulatory compliance standards.
While Defender for Cloud is a subscription-based service, assigning roles to resources or resource groups only will provide a subset of information for this particular scope. For example, if you have one subscription with several resource groups—and each resource group is a representation of a service or project—you might want to grant access rights to resource owners on the resource group only, not on the whole subscription. In this case, these resource owners will only be able to see security alerts and recommendations for their resources, while your subscription’s security admin might be able to see the Secure Score, alerts, and recommendations for all resources in this particular subscription.
Note
Secure Score is calculated per subscription. If an account only has access rights granted to a scope below a subscription, such as a single resource or resource group, this account will not see a Secure Score calculation in Microsoft Defender for Cloud.
When it comes to the advanced capabilities of Microsoft Defender for Cloud, you need to enable Defender for Cloud plans, such as Microsoft Defender for Containers or Microsoft Defender for Storage. We will provide more details about these plans in Chapter 6, “Threat detection,” but two of these plans are special within the scope of the Log Analytics workspace and the subscription design: Microsoft Defender for Servers and Microsoft Defender for SQL on machines.
There is a common misconception that enabling Defender for Servers (or SQL on machines) on a Log Analytics workspace, not on the subscription (or the other way round), is enough. However, in order to get the full feature coverage these plans need to be enabled on both your subscription and the Log Analytics workspace to which your machines’ agents are reporting. As long as you intend to enable these plans for all servers and SQL installations across your whole estate, this is not a big deal, but it becomes a challenge when you only want a subset of resources to be covered, or if you if you not only connect servers to your Log Analytics workspace but also to user devices, such as Windows 10/11 machines.
Once you enable Defender for Servers on your subscription, it is enabled for all Azure VMs and non-Azure machines that are connected to this subscription. For example, if it is enabled on the Log Analytics workspace, it will cover all agents that are connected to this workspace (regardless of the OS). That said, some cases might influence your subscription and workspace design. These considerations apply to both Microsoft Defender for Servers and Microsoft Defender for SQL on machines:
You want to connect Windows 10/11 devices to a Log Analytics workspace In this case, you should consider working with two different workspaces, one that is being used by Microsoft Defender for Cloud and one that does not have the security solution enabled. This applies to any situation in which you want to connect agents that are not supposed to be protected by Defender for Servers. Be aware that if you connect these machines to a subscription that has Defender for Servers enabled, charges will still apply.
You want to connect Windows 10 devices to an Azure subscription via Azure Arc In this case, you should consider providing a separate subscription for these devices on which you do not enable Microsoft Defender for Servers. This applies to any situation in which you want to connect machines that are not supposed to be protected by Defender for Servers.
You want to connect Windows 10 devices through Azure Arc and connect them to Log Analytics In this case, you should consider using two workspaces and two subscriptions to make sure these devices are not considered for Defender for Cloud billing.
After you decide on your design, you can start onboarding your subscription(s) to Defender for Cloud.
Onboarding VMs from an Azure subscription
Once Defender for Cloud has been enabled on a subscription, it will assess your resources for security (mis)configurations and then provide recommendations on how to remediate them. With PaaS resources such as Storage Accounts, there is nothing you need to do. However, Azure VMs and non-Azure machines require additional steps so that Defender for Cloud can assess the operating systems.
In general, you need to make sure these machines have a Log Analytics agent installed that is connected to a Log Analytics workspace that at least has the SecurityCenterFree solution enabled. While this solution is automatically enabled on a default workspace created by Defender for Cloud, you might need to manually enable it on a custom workspace. This is why Defender for Cloud recently got two new recommendations that give you visibility into this type of misconfiguration. To enable Defender for Cloud solutions on your Log Analytics workspace, follow these steps:
Navigate to https://portal.azure.com and log in with a user account that has Contributor access rights on the subscription that contains your Log Analytics workspace.
In the search bar on top of the portal, enter Defender and click Microsoft Defender For Cloud.
In the left navigation pane of Microsoft Defender for Cloud, click Environment Settings. Navigate to the subscription that hosts your Log Analytics workspace and select the workspace.
In the Defender plans section, set Security Posture Management to On to enable the SecurityCenterFree solution, as shown in Figure 3-3.
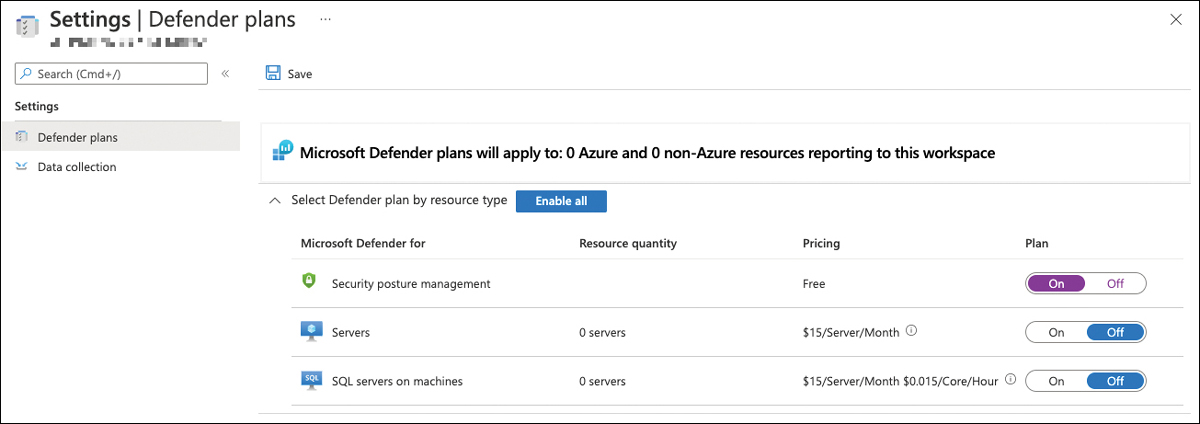
FIGURE 3-3 Enabling Defender for Cloud on a Log Analytics workspace
Then click Save.
Tip
If you want to enable Microsoft Defender for Servers and Defender for SQL servers on machines instead, you can do so by selecting the Enable all button, or by switching either plan to On.
You can confirm that your workspace has been Defender for Cloud-enabled by following these steps:
In the Azure portal’s top search bar, enter Log Analytics and select Log Analytics Workspaces.
Click the workspace you have just enabled for Defender for Cloud.
In the left navigation pane, select Solutions.
The Solutions overview will appear and show SecurityCenterFree(<yourLogAnalyticsWorkspaceName>), as shown in Figure 3-4.
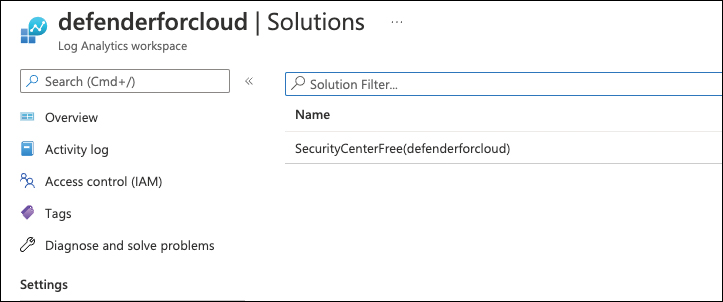
FIGURE 3-4 Microsoft Defender for Cloud has been enabled on a custom Log Analytics workspace
Tip
If you have enabled Microsoft Defender for Servers and Defender for SQL on machines instead of switching enhanced security off on your workspace, it will have the solutions Security (Defender for Servers), SQLAdvancedThreatProtection, and SQLVulnerabilityAssessment enabled.
After enabling Microsoft Defender for Cloud on your custom Log Analytics workspace, you can now go ahead and connect your Log Analytics agents to it. You can either manually install the agent on your machines and connect them to your workspace, or you can leverage Defender for Cloud’s auto-provisioning capability, which we will cover in the following section.
Understanding auto-provisioning
Once enabled, Microsoft Defender for Cloud will start assessing all resources in your Azure subscription. However, in order to provide recommendations and security alerts from both an Azure resource view and from inside the operating system, you must have the Log Analytics agent installed and connected to the Defender for Cloud-enabled Log Analytics workspace. Also, there are other agents and machine extensions that need to be deployed to enrich the experience with Microsoft Defender for Cloud. This is when auto-provisioning comes into play.
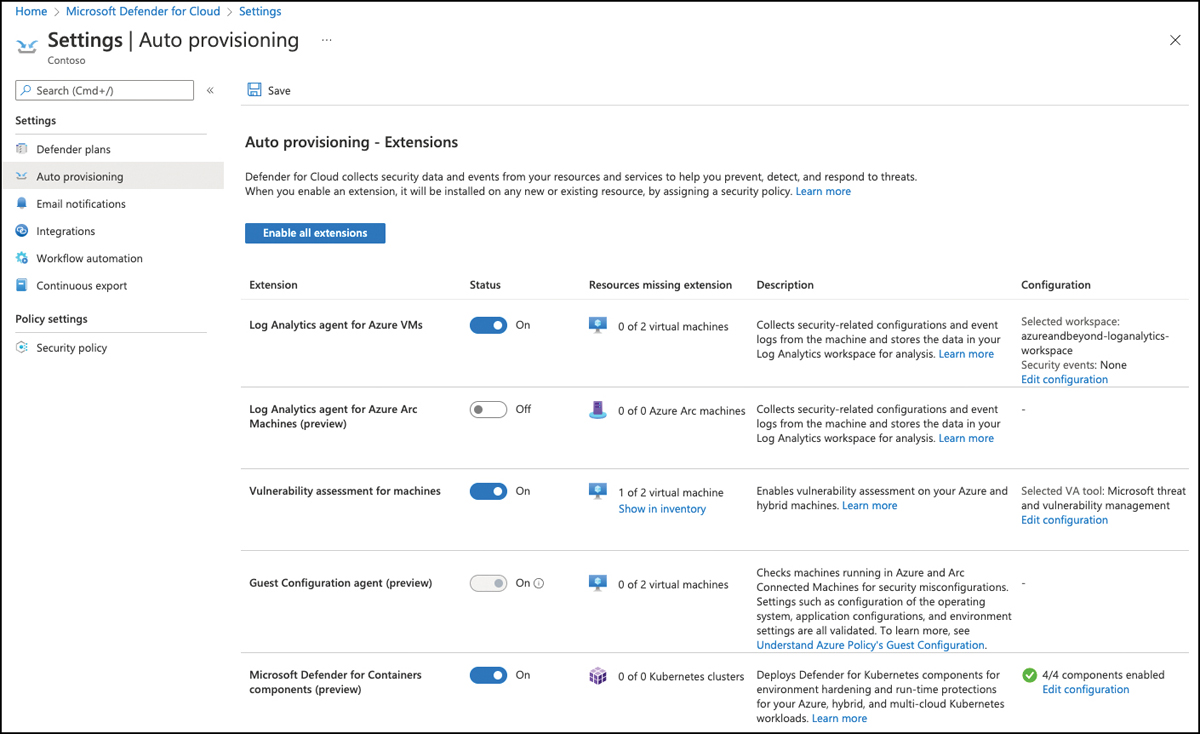
FIGURE 3-5 Auto-provisioning view in Microsoft Defender for Cloud
With auto-provisioning, Microsoft Defender for Cloud helps you easily deploy and configure mandatory and optional agents to Azure VMs and non-Azure machines connected through Azure Arc. Also, it leverages Azure policy definitions and assignments to ensure all relevant resources are automatically covered once they are created in or connected to the subscription on which you configure auto-provisioning.
Tip
Microsoft Defender for Cloud will not leverage policy assignments for deploying the Log Analytics agent to Azure VMs; instead, it only leverages policy assignments for the other agents and extensions. However, there are two built-in policy definitions that can be leveraged, which will be covered later in this chapter.
Auto-provisioning provides deployment and configuration options for the agents and extensions discussed in the following sections.
Auto provision the Log Analytics agent for Azure VMs
The Log Analytics agent creates security recommendations and alerts for servers. The Log Analytics agent has always been an important part of Microsoft Defender for Cloud because it allows you to analyze the operating system configuration and processes. Microsoft Defender for Cloud offers an auto-provisioning capability that allows you to automatically deploy the Log Analytics extension to all Azure VMs in a subscription and connect them either to their default workspaces or to a custom workspace that you can configure for each subscription. When using a custom workspace, this workspace can (but does not need to) be the same across all subscriptions. However, it’s a subscription-based configuration that needs to be enabled on each subscription separately.
Tip
Later in this chapter, we will cover onboarding Defender for Cloud at scale across all your subscriptions.
Follow these steps to configure the auto-provisioning of the Log Analytics extension for Azure VMs:
Log in to the Azure portal with a user account that has Security Admin, Contributor, or Owner access rights on your subscription, and then open Microsoft Defender For Cloud.
In the left navigation pane, select Environment Settings and select the subscription from your environment hierarchy on which you want to enable auto-provisioning.
In the Settings section, select Auto-Provisioning. The Auto-Provisioning window appears, as shown in Figure 3-5.
Switch the toggle for Log Analytics Agent For Azure VMs to On. Then, in the configuration column, click the Edit Configuration link. The Extension Deployment Configuration window opens, as shown in Figure 3-6.
You can choose either Connect Azure VMs To The Default Workspace(s) Created By Defender For Cloud or Connect Azure VMs To A Different Workspace. If you select the second option, as shown in Figure 3-6, the dropdown allows you to see all Log Analytics workspaces in your tenant (which means all workspaces in all subscriptions you have access to).

FIGURE 3-6 Extension Deployment Configuration blade
If you select a Log Analytics workspace that has the security solution registered to it (meaning Microsoft Defender for Servers Plan 2 has been enabled on that workspace), you can choose to store additional raw event information from the Windows Security Event Log on this Log Analytics workspace.
Tip
Raw event logging is not mandatory for Microsoft Defender for Servers to create security alerts for protected machines, and it never was. You can set this setting to None and still get all the value from Microsoft Defender for Cloud and Microsoft Defender for Servers. This option, however, can be useful if you connect Microsoft Defender for Cloud with Microsoft Sentinel or another SIEM solution, so you can bring security alerts into context with raw event information coming from protected servers.
Click Apply.
At the top of the page, click Save.
Microsoft Defender for Cloud will now leverage a back-end process to deploy the Log Analytics agent extension to all Azure VMs in this particular subscription and connect these agents to the workspace you selected. As mentioned before, this process is not based on an Azure policy, but there are two built-in policy definitions that you can leverage for the same purpose:
Enable Security Center’s Auto-Provisioning Of The Log Analytics Agent On Your Subscriptions With Default WorkspaceEnable Security Center’s Auto-Provisioning Of The Log Analytics Agent On Your Subscriptions With Custom Workspace
By assigning one of these policy definitions to a subscription, you will achieve the same result as turning on auto-provisioning in the UI, but the advantage is that with the policy, you can deploy the same setting to a particular subscription, or you can scale your configuration across all subscriptions in your management group. To assign the policy that will connect agents to a custom workspace, follow these steps:
Log in to the Azure portal with a user account that has Resource Policy Contributor, or Owner access rights on your subscription, enter Policy in the search bar at the top of the portal, and then click Policy.
In the left navigation pane, select Definitions.
At the top of this page, select Security Center as the Category, and in the Search field, enter auto-provisioning.
Choose the
Enable Security Center’s Auto-Provisioning Of The Log Analytics Agent On Your Subscriptions With Custom Workspacedefinition.You will now see the policy definition, including its JSON representation. At the top of that page, click the Assign button.
On the Basics page, select the Scope (Subscription or Management Group) for your assignment and click Parameters.
In the Parameters section, select the Log Analytics workspace to which you want your machines to connect. If you selected a subscription or management group on the previous page and your workspace resides in a different subscription, make sure to click the [...] button to select the workspace’s subscription first, followed by your workspace of choice.
If you want to remediate existing machines and not only future VMs, you need to create a remediation task. You can do so by navigating to the Remediation tab and selecting the corresponding check box.
Click Review + Create and then click Create.
The policy definition will now be assigned to your selected scope and, depending on your configuration, auto-remediate all existing or future VMs only.
In addition to deploying the extension to Azure VMs, you can also leverage auto-provisioning for Azure Arc-connected servers, a process we will cover in the next section.
Deploy the Log Analytics agent to Azure Arc machines
Azure Arc-connected servers are the vehicle Microsoft Defender for Cloud leverages to treat and manage non-Azure machines similar to Azure-native virtual machines. It allows the use of Azure Policy, RBAC, and other governance features provided by the platform and, therefore, is Microsoft’s tool of choice when it comes to managing and protecting non-Azure machines.
More Info
We do not cover Azure Arc onboarding to your machines in this book. For more information on Azure Arc-enabled servers, see https://docs.microsoft.com/azure/azure-arc/servers/overview.
In order to deploy the Log Analytics agent to your Azure Arc-enabled servers, follow these steps:
Log in to the Azure portal with a user account that has Owner access rights on your subscription, and then open Microsoft Defender For Cloud. Other than deploying the Log Analytics agent to Azure VMs, deploying it to Azure Arc-enabled servers will leverage Azure Policy-based deployments and, therefore, needs another level of access.
In the left navigation pane, select Environment Settings and select the subscription on which you want to enable auto-provisioning from your environment hierarchy.
In the Settings section, select Auto-Provisioning. The Auto-Provisioning window will appear.
Switch the toggle for Log Analytics Agent For Azure Arc Machines (Preview) to On. Then, in the Configuration column, click the Edit Configuration link. The Extension Deployment Configuration window opens, as shown in Figure 3-7.
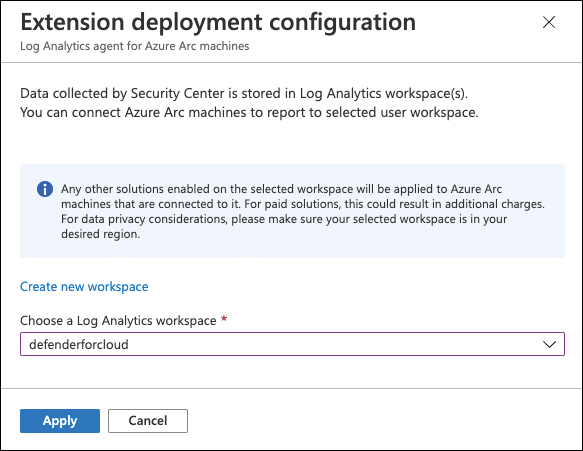
FIGURE 3-7 Log Analytics extension deployment configuration for Azure Arc-enabled servers
You can either create a new workspace by clicking the Create New Workspace link or selecting an existing workspace from the Choose A Log Analytics Workspace dropdown menu.
Once done, click Apply.
At the top of the page, click Save.
Microsoft Defender for Cloud will now assign two built-in policy definitions to the subscription you selected:
Configure Log Analytics Extension On Azure Arc Enabled Linux ServersConfigure Log Analytics Extension On Azure Arc Enabled Windows Servers
As shown in Figure 3-8, the following two policy assignments will be created: ASC Provisioning LA Agent Linux Arc and ASC Provisioning LA Agent Windows Arc, as shown in Figure 3-8.

FIGURE 3-8 Policy Assignments for Log Analytics auto-provisioning on Azure Arc machines
Next, let’s take a look at the auto-provisioning of vulnerability assessment solutions.
Auto-provisioning of vulnerability assessment solutions
With Microsoft Defender for Servers Plan 2, you can leverage two integrated vulnerability assessment solutions for your machines: Microsoft Defender for Endpoint’s Threat and Vulnerability Management (TVM) or the integrated Qualys Vulnerability Assessment solution. While we will cover these solutions in more detail in Chapter 5, “Strengthening your security posture,” they need to be mentioned in this section because they can be auto-provisioned. Similar to Log Analytics extensions for Azure VMs and non-Azure machines connected through Azure Arc-enabled servers, provisioning for vulnerability assessment solutions is configured in the Auto-Provisioning window.
After you have logged in with an account that has Owner permissions on a particular subscription and navigated to the Auto-Provisioning view in Microsoft Defender for Cloud, follow these steps to enable auto-provisioning for a vulnerability assessment solution of your choice:
Toggle the Vulnerability Assessment For Machines switch to On, and then click the Edit Configuration link in the Configuration column.
Choose the desired vulnerability assessment solution.
Click Apply.
At the top of the page, click Save. See Figure 3-9.
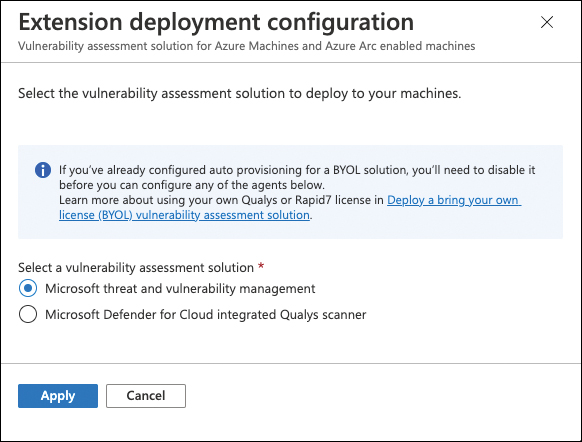
FIGURE 3-9 Extension Deployment Configuration blade for vulnerability assessment solutions
Once applied, Microsoft Defender for Cloud will assign the Configure Machines To Receive A Vulnerability Assessment Provider policy definition to your subscription.
Auto-deployment of guest configuration agent
The guest configuration agent is a rather new development that is being used for Azure Policy’s guest configuration capability. Historically, Microsoft Defender for Cloud has leveraged the Log Analytics agent to gather information about processes and system configuration that could be transformed into recommendations, such as an operating system security baseline recommendation. The guest configuration offers a more modern option to retrieve information from inside the OS and check it for OS misconfigurations, application configuration, or environment settings. The Microsoft Defender for Cloud development team has already created some preview recommendations that leverage this new agent, with more to come.
To automatically deploy the guest configuration agent to your Azure VMs and your non-Azure machines connected through Azure Arc-enabled servers, follow these steps:
Log in with an account that has Owner permissions to your Azure subscription and navigate to Microsoft Defender for Cloud’s Environment Settings page, as explained in the previous set of steps.
Select the subscription on which you want to deploy the guest configuration agent.
In the left navigation pane, select Auto-Provisioning.
Toggle the Guest Configuration Agent (Preview) status to On.
At the top of the page, click Save.
Microsoft Defender for Cloud will now create two policy assignments that will take care of deploying the guest configuration agent to all existing and future Azure VMs and Azure Arc-connected servers: ASC Provisioning Machines With No MI For GC Agent and ASC Provisioning Machines With User Assigned MI For GC Agent.
Deploy Microsoft Defender for Containers components
Microsoft Defender for Containers is one of the latest additions to Microsoft Defender for Cloud. While we cover it in-depth in Chapter 6, it comes with some components that can be automatically deployed to all Kubernetes clusters in Microsoft Defender for Cloud’s scope.
Microsoft Defender for Containers has two main categories of components:
A daemon set running inside a Kubernetes cluster that replaces the Log Analytics agent at the host level
An Azure Policy add-on for Kubernetes that allows you to extend Gatekeeper v3 so that it is integrated with Azure policy
Both components can be deployed to Azure Kubernetes Services (AKS) and non-Azure Kubernetes clusters that are connected by Azure Arc-enabled Kubernetes, which makes a total of four different settings.
Follow these steps to configure auto-provisioning for these components:
Log in with a user account that has Owner access rights on your subscription, and then navigate to the Microsoft Defender for Cloud’s Auto-Provisioning–Extensions page, as explained in the previous steps.
Toggle the Microsoft Defender For Containers Components (Preview) status to On, and then click the Edit Configuration link in the Configuration column.
In the Advanced configuration blade, toggle each switch that applies to your environment to On, as shown in Figure 3-10.
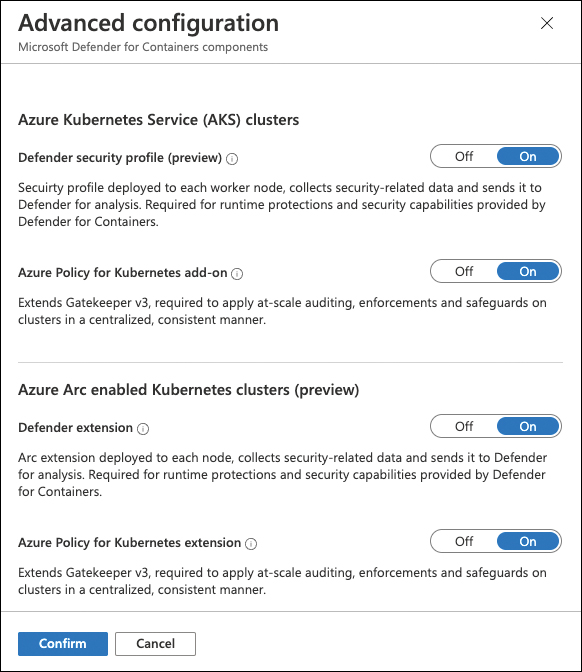
FIGURE 3-10 Advanced configuration for Microsoft Defender for Containers components
Click Confirm.
At the top of the page, click Save.
Microsoft Defender for Cloud will now automatically assign up to four Azure Policy definitions to your subscription, with the following assignment names:
Defender for Containers provisioning AKS Security ProfileDefender for Containers provisioning Azure Policy Addon for KubernetesDefender for Containers provisioning ARC k8s EnabledDefender for Containers provisioning Policy extension for Arc-enabled Kubernetes
Connecting to Amazon Web Services (AWS)
Microsoft Defender for Cloud offers Cloud Security Posture Management (CSPM) for Azure resources or on-premises machines, and it can also connect to Amazon Web Services (AWS) and Google Cloud Platform (GCP). While there have been multi-cloud capabilities in Defender for Cloud as of Microsoft Ignite 2020, Microsoft recently changed the experience to agent-less, native connectors. Once a connector has been created, Microsoft Defender for Cloud will start assessing resources and provide recommendations based on its findings. In addition, you can enable one of the Microsoft Defender for Servers plans and Microsoft Defender for Containers on top of the connector to enable threat detection for virtual machines and Kubernetes clusters running in the other cloud environment.
To start with onboarding your AWS accounts to Microsoft Defender for Cloud, follow these steps:
Log in to the Azure portal with a user account that has Owner access rights. Then navigate to Microsoft Defender For Cloud.
In the left navigation pane, open Environment Settings.
In the top navigation bar, click + Add Environment, and then select Amazon Web Services (Preview), as shown in Figure 3-11.
Enter a Connector Name for the AWS connector and decide if you want to onboard a Single Account or a Management Account (see Figure 3-12). Using a management account, you can onboard all subordinary AWS accounts at scale.
Select the Subscription, Resource Group, and Location in which you want to store the connector resource.
Enter your AWS Account ID.

FIGURE 3-11 Creating a new Amazon Web Services connection

FIGURE 3-12 AWS Account details
Click Next: Select plans >.
Security Posture Management is automatically enabled on your connector, which ensures that all AWS resources in your particular account will be assessed and security recommendations are created. Optionally, you can switch the Servers and Containers plans to On to enable threat detection for EC2 instances and EKS clusters.
Click Next: Configure Access >.
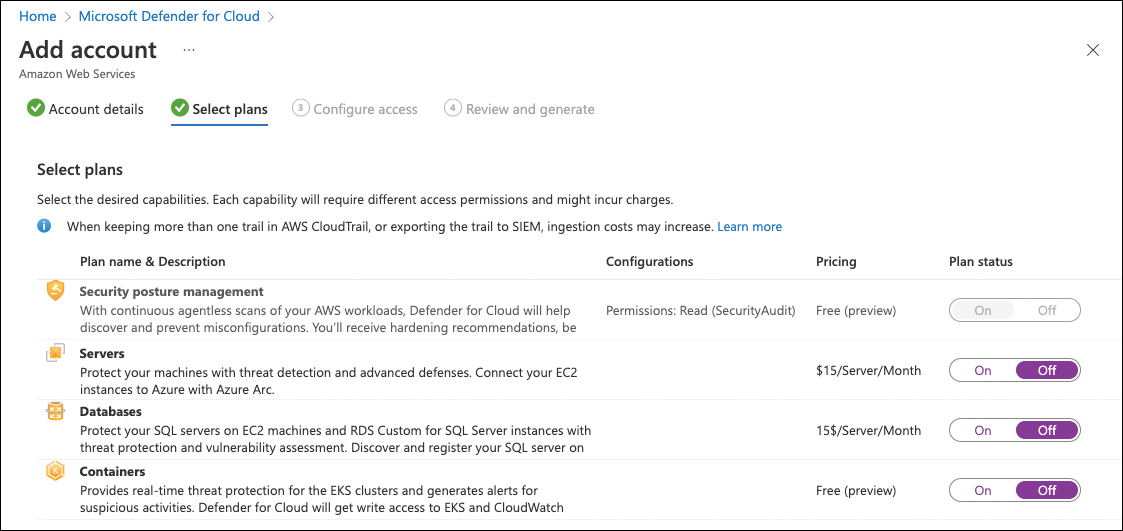
FIGURE 3-13 Select Defender for Cloud plans to be enabled on AWS resources
On the Configure Access tab, you can download a CloudFormation template. Then click the Go To AWS button.
In AWS, click Choose File and select the downloaded template.
Click Next > Create Stack.
Once done, back in Defender for Cloud, click Next: Review And Generate >.
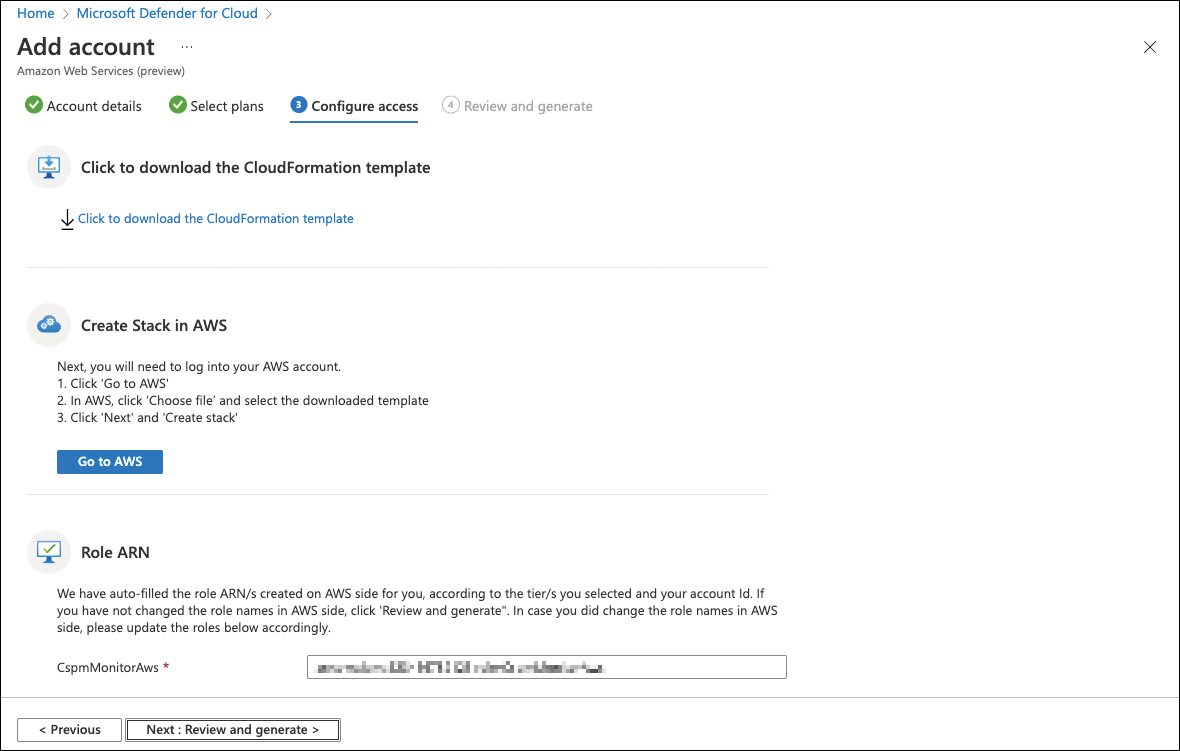
FIGURE 3-14 Configure access to your AWS account
Confirm all settings and click Create. See Figure 3-15.
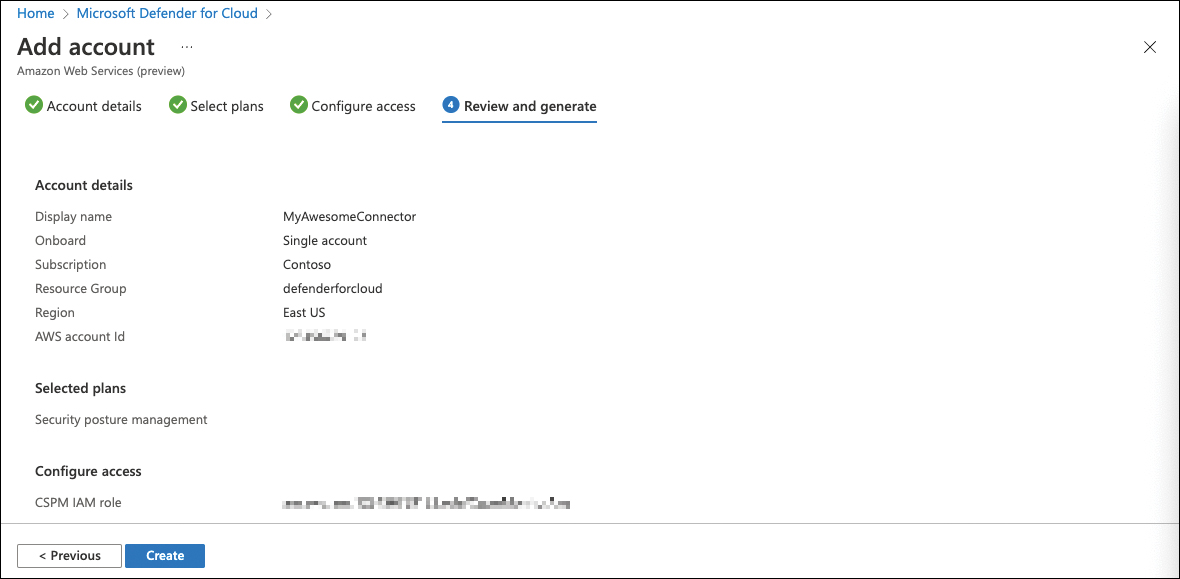
FIGURE 3-15 Configuration summary
Microsoft Defender for Cloud will now onboard your AWS account(s) and enable plans according to your configuration.
Onboard AWS VMs
As mentioned earlier, Microsoft Defender for Cloud leverages Azure Arc-enabled servers for connecting non-Azure machines to Azure, which also applies to AWS EC2 instances. To onboard these machines, you need to enable one of the Microsoft Defender for Servers plans on your AWS connector.
Tip
In order to connect non-Azure machines to Microsoft Defender for Cloud, one of the Microsoft Defender for Servers plans (Plan 1 or Plan 2) needs to be enabled. For on-premises machines, you will enable the plan on the Azure subscription to which you connect these machines. For AWS (and GCP), this is done on the corresponding multicloud connector.
To connect AWS EC2 instances, you either must have already created a connector on which you then enable Defender for Servers, or you enable the plan during the connector creation process that is explained in the previous section. To enable the Defender for Servers plan on an existing connector, follow these steps:
Log in to the Azure portal with a user account that has Owner access rights, and then navigate to Microsoft Defender For Cloud.
In the left navigation pane, open Environment Settings.
Select your AWS Connector.
Toggle the Servers Plan to On.
In the pricing column, click the Select tier link, then select one of the two Defender for Servers plans to be enabled and click Confirm.
In the Configurations column, click the Configure > link for the Servers Plan.
Make sure to switch the Azure Arc Agent toggle to On. Also, in the Additional Agents For Arc Connected Machines section, enable the Log Analytics Agent, and, if you want to integrate your EC2 instances with the Microsoft Defender for Endpoint Agent, switch the corresponding toggle to On.
Click Save.
Click Next: Configure Access >, then click Next: Review And Generate > and Update.
Microsoft Defender for Cloud will now automatically onboard your EC2 instances to Azure Arc-enabled servers, deploy the Log Analytics extensions, and, depending on your configuration, onboard your machines to Microsoft Defender for Servers.
How to onboard subscriptions at scale
As you already learned throughout this chapter, there are several technical aspects that need to be considered when onboarding resources and subscriptions to Microsoft Defender for Cloud. In general, there are four steps that need to be taken (or at least considered):
Register the
Microsoft.Securityresource provider.Assign the Azure Security Benchmark policy initiative.
Configure auto-provisioning.
Optionally, enable Microsoft Defender for Cloud plans.
Because registering the resource provider happens when enabling Defender for Cloud plans, we cover both topics in the following section.
Registering the Microsoft.Security resource provider
The Microsoft.Security resource provider needs to be registered on a subscription to “enable” Microsoft Defender for Cloud. While this happens automatically when you open Defender for Cloud for the first time after creating a new subscription, it is not automatically registered on any new subscription before doing so. That means that, as long as you do not open that subscription in Defender for Cloud, no recommendations will apply to its resources, and no security alerts will be created.
For enabling Microsoft Defender for Cloud on a subscription, Microsoft Azure comes with a built-in policy definition called Enable Azure Security Center on your subscription. This policy definition will—once assigned to a subscription—set the Microsoft.Security/pricings setting for VirtualMachines to free, in case no Defender for Cloud plan has been enabled on that subscription. Figure 3-16 shows the corresponding code snippet taken from this definition.

FIGURE 3-16 Enabling the Microsoft.Security resource provider
This built-in definition can be assigned on top of your (root) management group, so it applies to all subscriptions (existing and future ones) in this scope. Also, you can see that the Microsoft.Security/pricing setting is used to register the resource provider. By taking the same code and changing the pricingTier value from free to standard, Microsoft Defender for Cloud plans are enabled. Again, Microsoft Azure has built-in policy definitions that can enable Defender for Cloud plans on all subscriptions within a management group (see Figure 3-17).
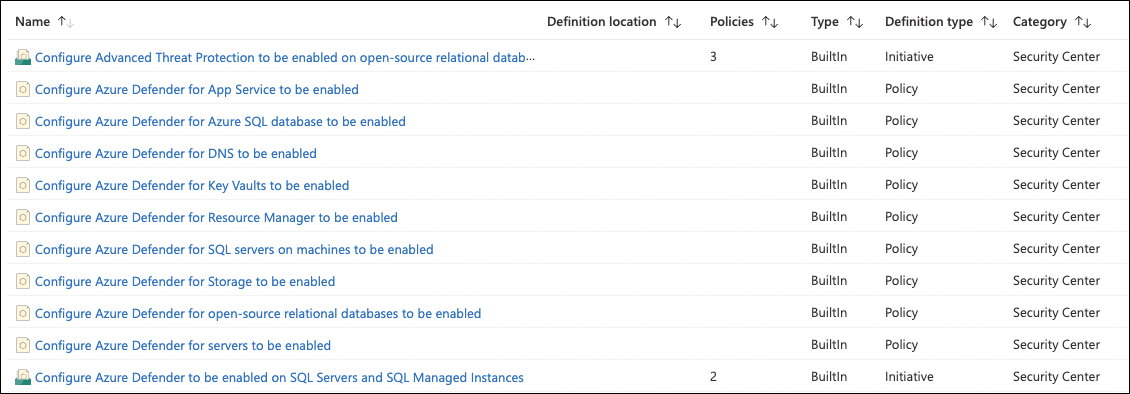
FIGURE 3-17 Built-in policy definitions to enable Defender for Cloud plans
As you will realize when learning more about Defender for Cloud plans in Chapter 6, the list shown in Figure 3-17 is not complete. However, you can build your own definition by taking one of the existing ones and replacing the name value with one from Table 3-1.
TABLE 3-1 Defender for Cloud pricing tier names according to Defender plans
Defender for Cloud plan | Pricing tier name |
|---|---|
Defender for Servers: | “name”: “VirtualMachines” |
Defender for SQL | “name”: “SqlServers” |
Defender for App Services | “name”: “AppServices” |
Defender for Storage | “name”: “StorageAccounts” |
Defender for SQL on machines | “name”: “SqlServerVirtualMachines” |
Defender for Key Vault | “name”: “KeyVaults” |
Defender for DNS | “name”: “Dns” |
Defender for Resource Manager | “name”: ”Arm” |
Defender for OSRDB | “name”: “OpenSourceRelationalDatabases” |
Defender for CosmosDB | “name”: ”CosmosDbs” |
Defender for Containers | “name”: “Containers” |
Assign the Azure Security Benchmark
The Azure Security Benchmark is a policy initiative that can be assigned to each subscription or to a management group. By default, Defender for Cloud will automatically assign the initiative to a subscription once it is opened in Defender for Cloud’s portal for the first time. However, you can also manually assign the initiative from Microsoft Defender for Cloud to a management group. This is a great way to make sure the benchmark will automatically be assigned to any subscription without having to open it in Defender for Cloud’s portal. To manually assign the Azure Security Benchmark to a management group, follow these steps:
Log in to the Azure portal with an account that has Contributor or Owner rights on a particular management group.
Navigate to Microsoft Defender For Cloud.
In the left navigation pane, select Environment Settings.
Select the management group to which you want to assign the Azure Security Benchmark.
In the Default Initiative section, click the Assign Policy button, as shown in Figure 3-18.
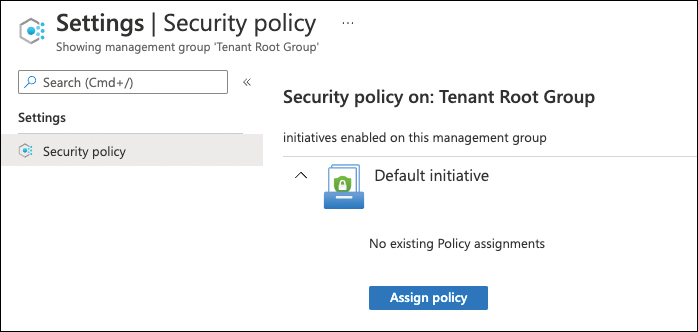
FIGURE 3-18 Assigning the Azure Security Benchmark on a management group
If you don’t want to create an exclusion or disable a particular recommendation, click Review + Create, and then Create.
The assignment is now being created. If you already had the Security Benchmark assigned to your existing subscriptions before, make sure to remove these assignments now. To do so, select a subscription instead of the management group from the Environment Settings page and then, in the left navigation pane, select Security Policy.
In the Default Initiative section, look for the assignment that is assigned on your subscription. Then, on the right side, click [...] and Delete Assignment.
Confirm the Delete Assignment dialog by clicking Yes.
Repeat steps 8 and 9 on all subscriptions in the scope.
Configure auto-provisioning at scale
As you learned earlier in this chapter, when configuring auto-provisioning from the Defender for Cloud portal, the back-end will create policy assignments on a particular subscription. Also, for a Log Analytics agent on Azure VMs, there are built-in policy definitions, too. With that being said, all you need to do is assign these policies to your management group instead of subscriptions, as explained earlier in this chapter.