
Chapter 10
Deploying Microsoft Defender for Cloud at Scale
In this fast-evolving cloud world in which threats are constantly changing, security deployment at scale, orchestration, and automated response are mandatory qualities a modern security solution needs to bring so it can help security administrators and SOC analysts react to the challenges they are facing today. In this book, you have already learned how to deploy Microsoft Defender for Cloud to your subscriptions, how to harden your environments, and how to react to alerts. Now, let’s bring it all together and see how you can deploy and manage Defender for Cloud at scale. Limitless cloud speed and scale allow you to create as many Azure subscriptions as you like. However, what is a great feature and value proposition of cloud computing also brings manageability and compliance challenges. How can you enforce and achieve compliance across your tenants and potentially, across hundreds of subscriptions in an efficient and automated way? Key concepts to achieve this goal are Azure Resource Manager (ARM) Templates, Azure Policy, and Management Groups.
The three cornerstones of deployment at scale
ARM templates are a declarative way of describing a deployment result in the form of a JSON document, which contains information about the resources (which, in this case, equates to objects) that you want to deploy. It contains the type of resources, names, and their properties. The JSON file can be checked into a source control solution, supports versioning, and enables you to deploy Azure “infrastructure as code.”
The two deployment types, incremental and complete, enable you to only deploy what is declared in the template (complete) or to add/update additional resources (incremental). The complete deployment mode deletes all the resources not specified in the template. Therefore, incremental is the default deployment type. This safeguards you from unintentionally deleting resources. An ARM template is idempotent, meaning that either a resource will be created if it does not exist, or an existing resource will be updated. Idempotency allows you to repeatedly deploy the same template without breaking something. Upon deployment of an ARM template, the JSON file is consumed by the Azure Resource Manager API that has a contract with its resource providers. A resource provider is a trusted HTTPS RESTful API Azure endpoint that can provision, delete, and manage services on a user’s behalf. Figure 10-1 shows an example of an ARM template for deploying or updating a Log Analytics workspace.
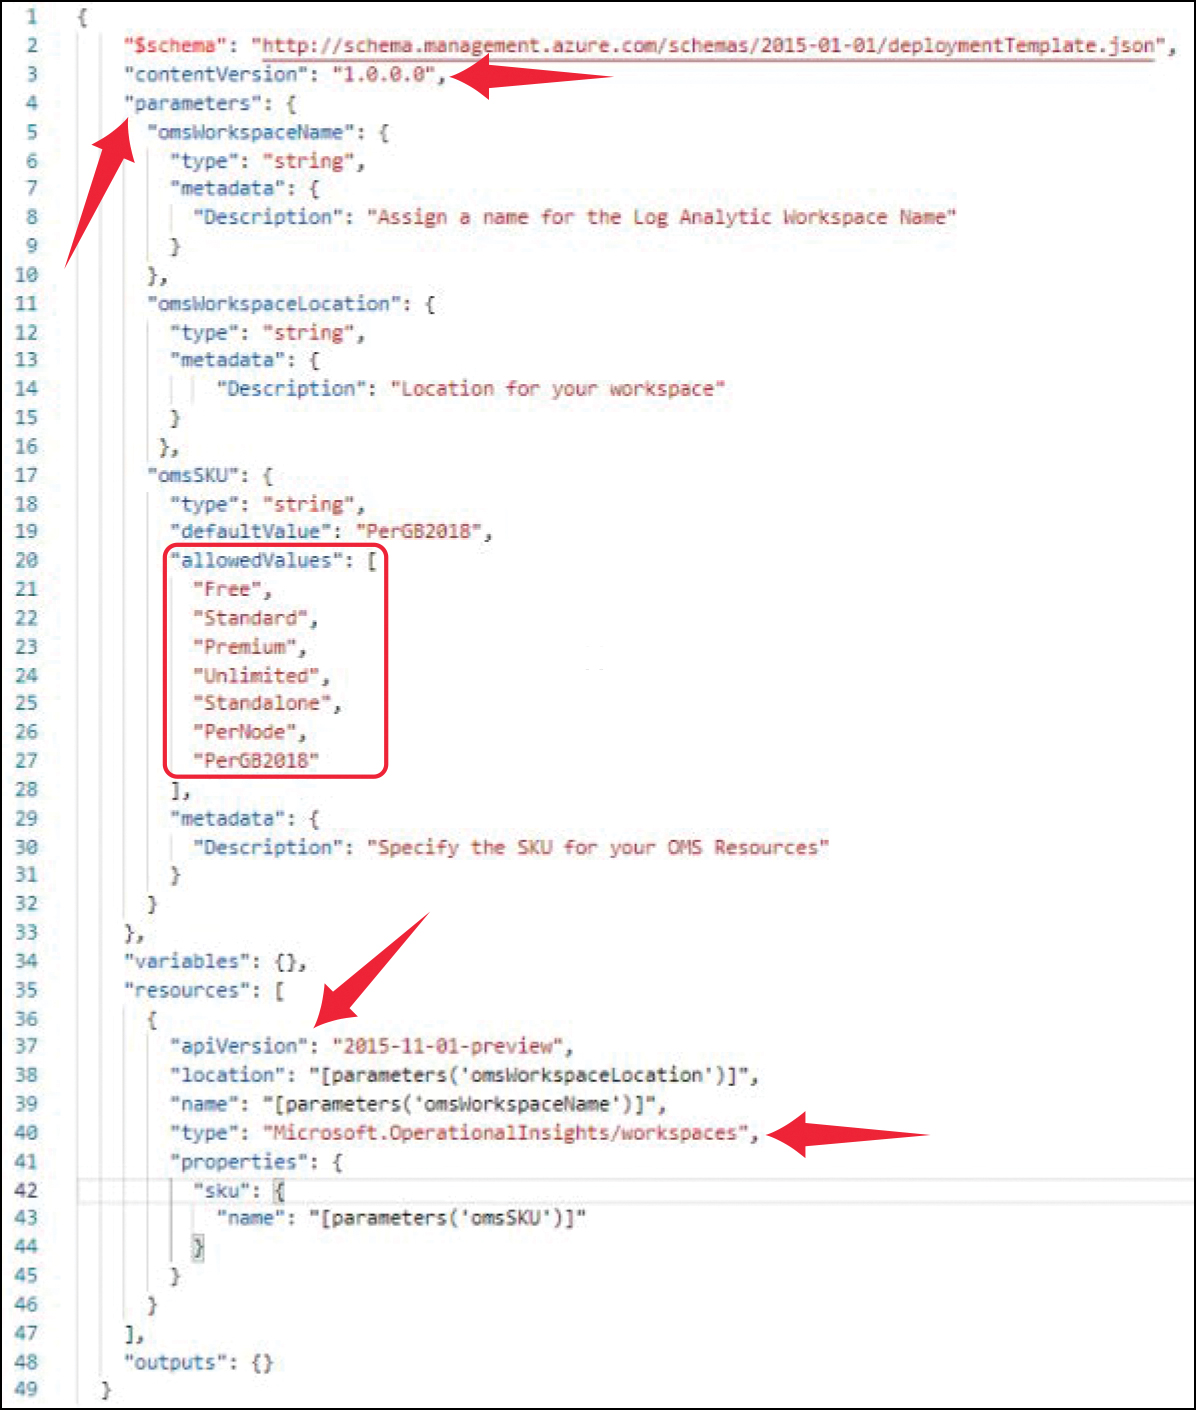
FIGURE 10-1 Example of an ARM template with its main sections
The sections highlighted in the template shown in Figure 10-1 are explained below:
Line 3 (
contentVersion) contains the template version to allow source control integration for a CI/CD pipeline.The parameters section, starting with line 4, contains parameters that can be used throughout the template. Contrary to variables, parameters in ARM templates are meant to be filled with custom values once the deployment starts. If you deploy an ARM template through Azure portal, the parameters section will be used to fill in custom values during the deployment, such as if you need to provide an email address for an automation artifact to send messages to, or if you define a custom workspace name. As opposed to parameters, variables are only used within the template to define properties; they are not exposed outside the template to be filled with custom values during the deployment.
The
allowedValuesarray, starting with line 20, is a definition of which values are allowed for a particular parameter. During deployment in Azure portal, you will be able to pick one of these values from a dropdown, instead of manually entering a value.The
resourcessection contains the declaration of the Azure resource that is supposed to be created based on an ARM template. Line 37 specifies the API version for a resource provider.Lines 38 and 39 show how a parameter is used.
Locationandnameattribute values are references to the corresponding parameter values.Line 40 specifies the resource provider type.
Azure Policy is one of the most important governance controls for an Azure environment. It can prevent (deny) you from creating non-compliant resources, it can audit resource compliance (audit and auditIfNotExists), and even remediate non-compliant resources (deployIfNotExists), either upon creation or for existing resources. Make sure to also read Chapter 4, “Policy management,” for a deep dive into Azure Policy. The Azure Policy example shown in Figure 10-2 will prevent the creation of websites in Azure for which HTTPS connections are not enforced.
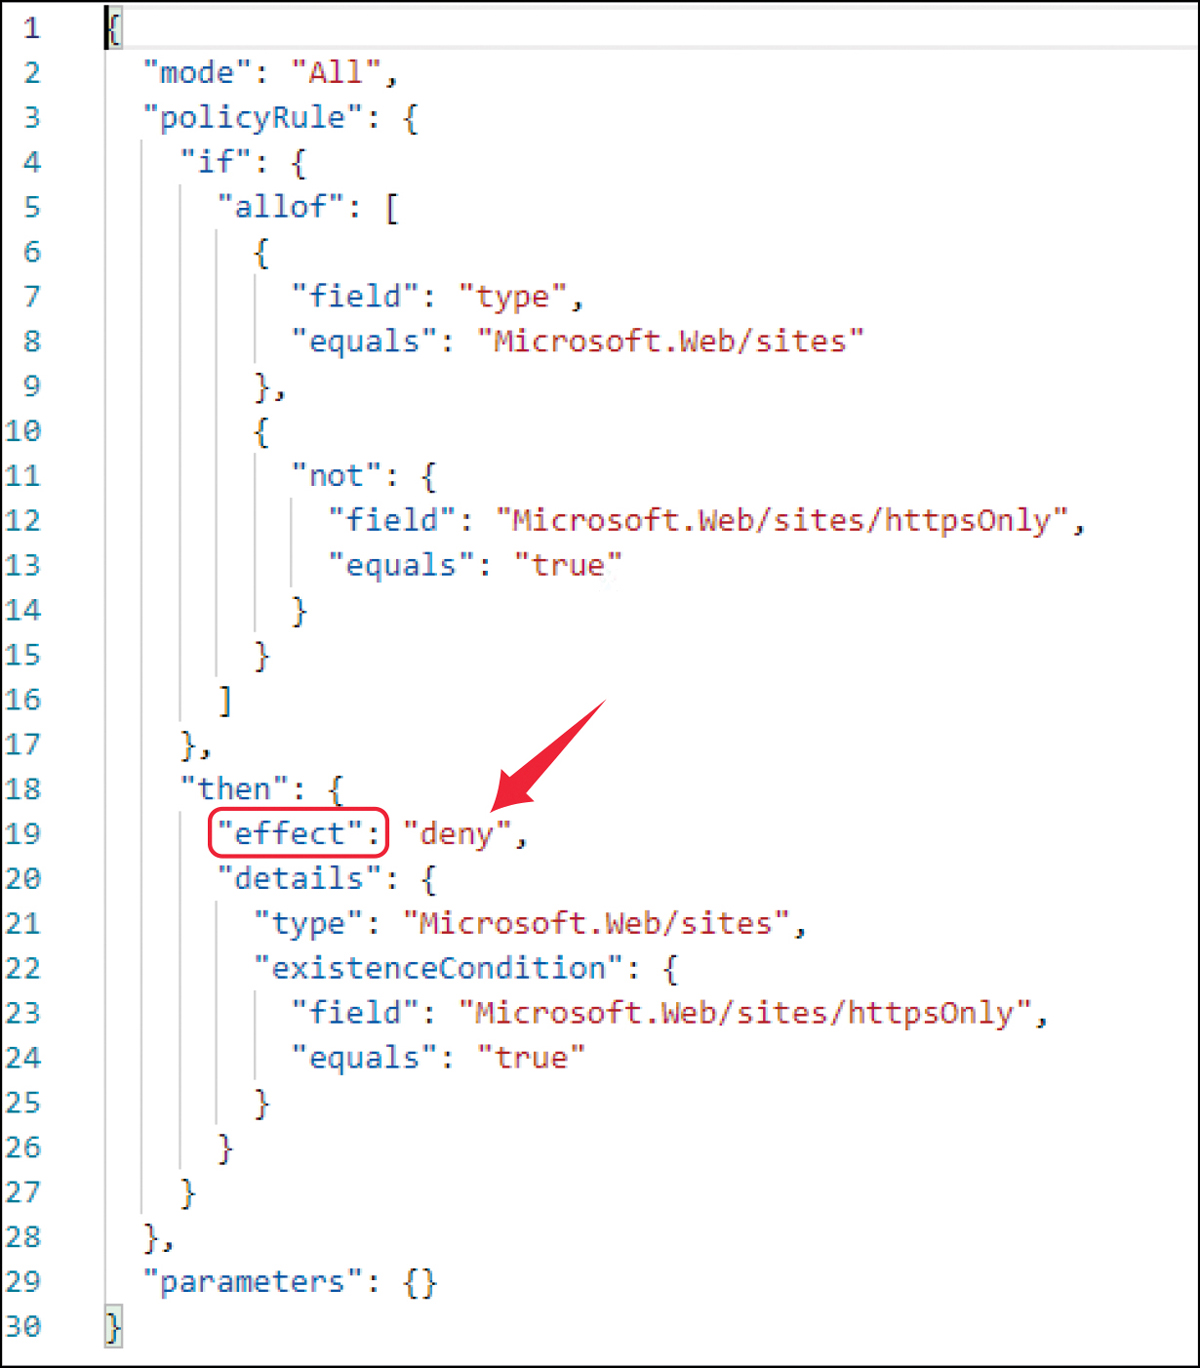
FIGURE 10-2 Example of a policy definition that will prevent the creation of non-compliant resources
As you already learned in Chapter 4, policy definitions can be grouped with initiative definitions, both of which can be assigned to a scope within a policy assignment. The highest scope within this context are management groups which build the third cornerstone for supporting management at scale. They provide a level of scope above subscriptions and, therefore, are great for configuring the same settings on numerous subscriptions at the same time. When you organize subscriptions into a management group, you can apply governance conditions in a single place. All the subscriptions in a management group inherit the conditions applied to that management group. You can also build a hierarchy of management groups, with a root management group at the top of each directory. Conditions applied to the root management group or to a management group flow down to lower management groups and subscriptions. An example of a management group hierarchy is shown in Figure 10-3.
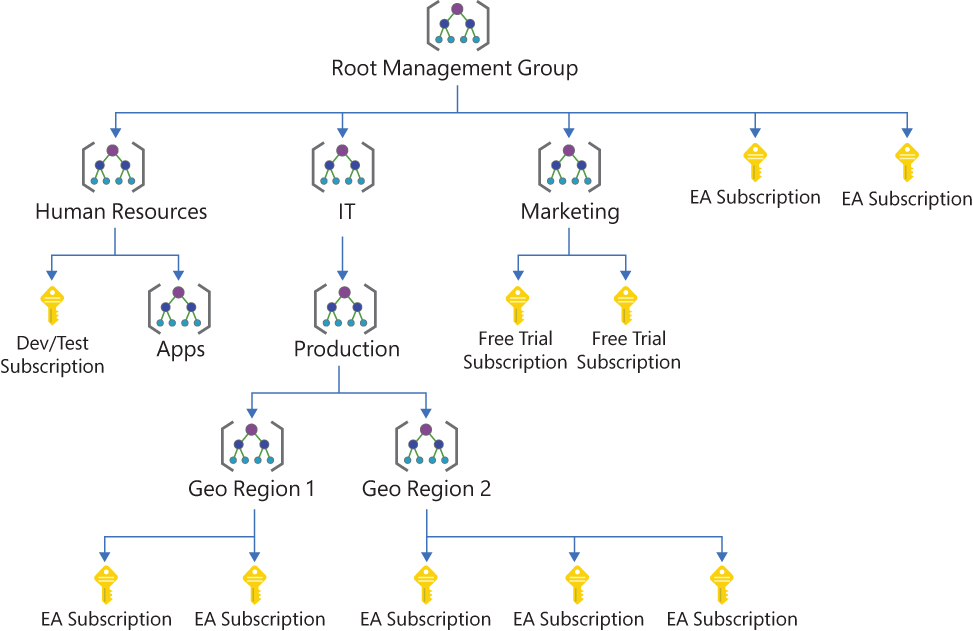
FIGURE 10-3 Example of a management group hierarchy
Defender for Cloud, Azure Policy, and Management Groups-better together
When a new subscription is created and the subscription is registered with the Microsoft Security Resource Provider (RP), the default behavior is that the Azure Security Benchmark policy initiative is provisioned and assigned at the subscription level. The exception is if the subscription resides in a Management Group that already has the Azure Security Benchmark initiative assigned. In this case, the initiative will not be re-assigned to any of the subscriptions within that management group. This approach has several advantages:
You define your governance conditions in a single place, either at the Root Management Group or at the lower management groups.
You can assign deny policies at a high-level that cannot be overridden at a lower level.
There is a clear view of your compliance state across your management groups and subscriptions.
More Info
In case you have the Azure Security Benchmark policy initiative assigned to a management group other than the tenant root management group, and if someone creates a new subscription without moving it to the correct subordinate management group, Defender for Cloud might not be enabled on this subscription. For identifying subscriptions that are not managed by Defender for Cloud within this context, you can find an automation artifact at https://aka.ms/MDfCSubMgmt.
As you have learned throughout this book, Defender for Cloud has grown into a very mature security management platform with many tuning capabilities to change its behavior according to your needs. Now, let’s take a look at how to bring them all together so you can make it the best tool for managing your environment’s security posture at scale.
Best practices for managing Defender for Cloud at scale
The best approach for managing Defender for Cloud at scale is to define compliance conditions that apply to your organization, group them in an Azure Policy initiative, and assign them at the highest level in your management group hierarchy. For most organizations, it is the best approach to use the built-in Azure Security Benchmark policy initiative definition and assign it to the organization’s root management group. It is best to use the built-in definition, because Microsoft will maintain the initiative and all its policy definitions, so you can make sure to always get the latest changes and recommendations for your environment. In addition to that, make sure to follow these best practices:
Tailor the Azure Security Benchmark according to your needs. Make sure to leverage resource exemptions on resources, resource groups, or subscriptions to exempt them from being assessed toward a particular recommendation, or completely disable a particular assessment in case it does not apply to your environment at all.
Create additional custom initiative definitions to add custom recommendations if needed. Also, make sure to create custom policy definitions according to your compliance needs, such as
denyordeployIfNotExistsrules.Do not remove the Azure Security Benchmark assignment and only work with custom initiatives as you will lose access to secure score calculation and will have to manually watch out for future additions and changes toward recommendations.
Deploy and maintain policy and initiative definitions using ARM templates as Infrastructure as Code (IaC). That way, you can make sure to have a documented process, tests, and documentation for any change that is made.
Don’t be tempted to manually configure Defender for Cloud. Instead, make sure to leverage Azure Policy and ARM templates whenever possible.
Ask yourself if you can provision a new tenant or subscription with automation only. That way, you can be sure that every resource, scope, or subscription will exactly adhere to your organization’s governance rules.
First, test with
auditorauditIfNotExistspolicies before using thedenyeffect to prevent breaking changes to your environment and to see if the policy definition will have the expected result.
How to get started with ARM templates
Using ARM templates as a declarative language for describing IaC deployments has a lot of advantages compared to imperative languages, such as PowerShell. With ARM templates, you just have to define (declare) the deployment result—what your environment is supposed to look like, once it is deployed—whereas, with PowerShell, you would have to define settings, sub-resources, and resources themselves in the correct order so the deployment will succeed. ARM templates can be used in a CI/CD pipeline to deploy resources, which makes it a great tool for modern DevOps deployments. But, compared to PowerShell, the learning curve might be slightly higher as ARM templates are using JSON syntax. With this last section, we want to provide you with some guidance on how to learn using ARM templates.
Export templates from the Azure portal
The easiest way to create your first ARM template is using the Azure portal for creating and deploying Azure resources. When you move through the portal, no matter if you are looking at a resource group or at a particular resource, the toolbar on the left side will provide you with a section called Automation in which you find the Export Template option. Once you select that option, an ARM template is generated that will contain all resources with its dependencies, as shown in Figure 10-4.
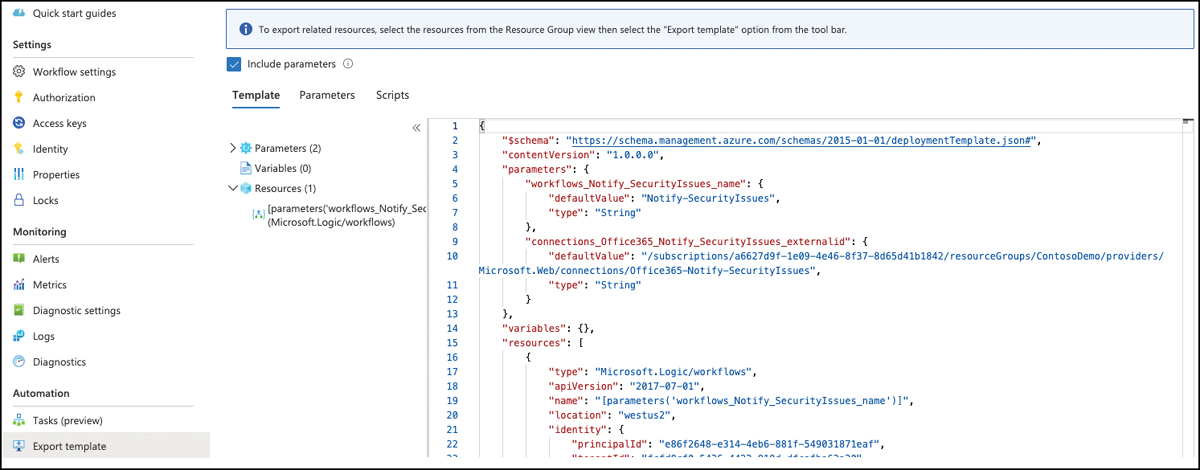
FIGURE 10-4 Export an ARM template from Azure portal
Depending on the scope you have been navigating, the ARM template will contain a single resource or the complete content of a resource group. Using the Export Template option is a great way to familiarize yourself with ARM templates because it is based on the resources you have already created and so you can cross reference the template to the existing resource and its settings and configurations. You can also use the Export Template feature to export and generalize resources which you then can make available for further deployments. For example, you can use this option to export an existing resource, make sure to change every static value, such as "location":"westus2" to dynamic values, such as "location":"[resourceGroup(). location]" and then publish the object as an ARM template on GitHub.
Use Visual Studio Code to create ARM templates
Visual Studio Code (VSCode) is a free code editor that runs on Windows, Linux, and macOS operating systems. With the Azure Resource Manager Tools extension, it provides language support, resource snippets, and resource autocompletion, making your life as an IaC developer easy. To start with VSCode and ARM templates, follow these instructions. (Make sure to have the Azure Resource Manager Tools extension [https://aka.ms/MDfC-VSCodeArmTools] installed in VSCode.)
Open Visual Studio Code, create a new file, and store it as
myTemplate.json.Enter arm in the code editor, as shown in Figure 10-5.
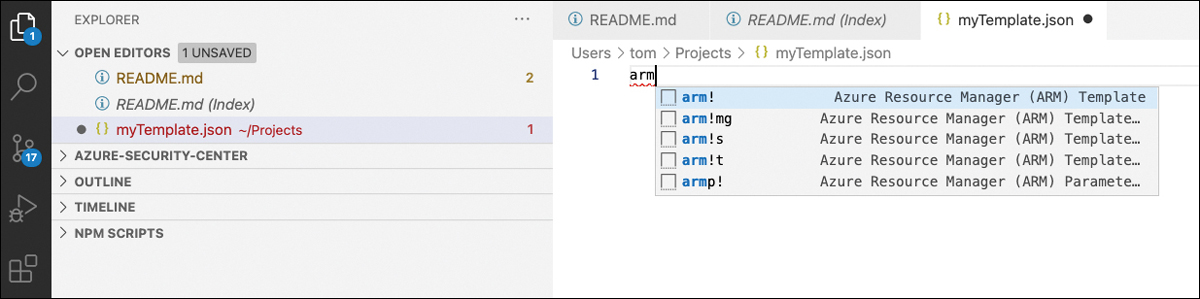
FIGURE 10-5 Start a new ARM template in Visual Studio Code
Autocompletion will immediately display valid commands. Select arm!, so a new template structure is created in the code section, as shown in Figure 10-6.
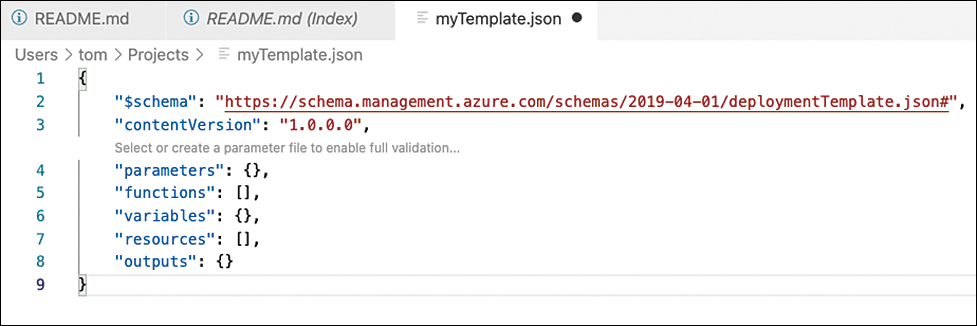
FIGURE 10-6 An empty ARM template is created
You can now continue with creating parameters and resources. Functions, variables, and outputs are optional and can be removed if they are not used within the template.
Make sure to leverage the ARM Tools extension’s autocompletion capabilities. For example, when you navigate to the resources section and enter “work”, it will propose
arm-log-analytics-workspaceas a resource template. Once you select the item, it will add necessary information to the resources section, as shown in Figure 10-7.
FIGURE 10-7 Add a Log Analytics workspace to your ARM template
You can now change the workspace’s static name value to a parameter value, which will allow you to define the workspace name during deployment, not when creating the template. To do so, declare a new parameter in the
parameterssection and then add it as a reference to the workspace’snamevalue, as shown in Figure 10-8.
FIGURE 10-8 Change a static name value to a dynamic parameter
Once you have created your ARM template, you have several options of deploying it. You can either use Azure CLI or PowerShell or create a custom deployment in the Azure portal. You also can attach the template to your deployment pipeline.
More Info
For more information about using Visual Studio Code to create ARM templates, see https://aka.ms/MDfC-VSCode.
ARM templates provide adaptability, and they are a great way to deploy resources to Azure. You can leverage ARM templates to basically deploy any type of resources that can be created using the Azure Resource Manager, which includes Log Analytics workspaces, policy and policy set (initiative) definitions, policy assignments, Defender plans, and much more. So, with ARM templates, you have a great tool to deploy governance—and security-related resources at scale.
Now that you know how to integrate Microsoft Defender for Cloud into your environment, tune the tool according to your needs, and deploy relevant guardrails and security configurations at scale, we look forward to seeing your security posture increase.