
Chapter 9
Accessing Defender for Cloud from APIs
Although Microsoft Defender for Cloud has its own dashboard where you can visualize all security alerts, there are some specific scenarios in which you may want to consume the alert via API. This is a common scenario among organizations that want to build their own dashboards and programmatically manipulate all alerts.
In this chapter, you will learn how to leverage the built-in Defender for Cloud Representational State Transfer (REST) API and the Intelligent Security Graph API to retrieve information using HTTP requests.
Understanding REST API
Representational State Transfer (REST) APIs are service endpoints that support sets of HTTP operations (methods), which provide create, retrieve, update, or delete access capabilities to the service’s resources. A REST API request/response pair can be separated into five components: three for the request and two for the response as shown in Figure 9-1.

FIGURE 9-1 REST API components
The first part of the request is the request URI, which is the main address. This address is made up of the following parts:
Structure
{URI-scheme} :// {URI-host} / {resource-path} ? {query-string}Example
https://management.azure.com/subscriptions/{subscriptionID}/providers/Microsoft.Security/alerts?api-version=2021-11-01
The second part is the HTTP request message header, which is composed of the required HTTP method, such as GET, HEAD, PUT, or POST. Also, you can have other optional headers, such as authentication.
The third part, the optional HTTP request message body, contains supplementary information that may vary according to the method used. For example, a POST method can contain MIME-encoded objects. MIME (Multipurpose Internet Mail Extension) is an Internet standard that initially extended the format of mail messages to support text in character sets other than ASCII. This format is being used in REST APIs, as well. For example, an API call can contain a JSON body. The message body, in this case, would be a JSON representation of a particular setting or resource. When using the request message body, you also need to specify the Content-type request header (in this example: application/JSON).
Below is an example of a POST request against the Microsoft.ResourceGraph/resources API provider:
API Method: Post
API URI: https:/management.azure.com/providers/Microsoft.ResourceGraph/
resources?api-version=2021-06-01-preview
Application/JSON body: {"query": "securityresources | where type =~ ’microsoft.security/
assessments'"}
In this example, the KQL query securityresources | where type =~ 'microsoft.security/assessments' is submitted to the Azure Resource Graph REST API provider and then executed. The response from this API call will result from the KQL query.
In the response section of Figure 9-1, the first part is the HTTP status code, which can also vary according to how the back end is responding to your request. If everything is working properly and this is a successful request, you should receive an HTTP 200 status code. Also, the second response field is optional, and it is there to support the main response. In the Azure Resource Graph example above, the response body will be a MIME-encoded object of the application/JSON type that contains the KQL query result.
Accessing alerts using the Defender for Cloud REST API
Defender for Cloud has its own set of REST API providers, which are divided in to operation groups. Because the list has grown to more than 40 different operation groups, we can only take a look at some of them in this chapter.
Alerts This operations group represents security alerts that are created in Defender for Cloud.
Assessments Manage security assessments on your subscriptions that result in Defender for Cloud recommendations.
Auto Provisioning Settings You can use this operation group to specify provisioning configuration for a subscription.
Locations This retrieves details of specific locations.
Operations All available operations.
Pricing Pricing tiers that represent Defender for Cloud plans.
Secure Scores Get the Secure Score information for a specific security control or list the Secure Score for your subscription.
Security Contacts You can use this operation group to retrieve and manage the security contact information for a subscription.
Settings Configuration settings for Defender for Cloud.
Workspace Settings Settings about where your security data and logs are stored (meaning Log Analytics workspace-related settings).
More Info
To learn more about the variety of REST API operation groups that Defender for Cloud offers, see https://aka.ms/MDfC-APIs.
As you can see, a variety of information and settings can be accessed via API, though this chapter will mainly focus on alerts. The Alert operations group has several operations that can be performed, including getting alerts for a resource associated with a resource group or a subscription. For example, to list all the alerts that are associated with a subscription, you can conduct a GET call against the following example URI:
https://management.azure.com/subscriptions/{subscriptionID}/providers/Microsoft.Security/
alerts?api-version=2021-11-01
The response for this HTTP GET request should be an HTTP 200 header, followed by the body in JSON format, similar to Listing 9-1.
LISTING 9-1 Result of a REST GET request against the Microsoft.Security/alerts API provider
{
    "value": [
        {
            "id": "/subscriptions/{subscriptionId}/resourceGroups/ContosoDemo/providers/
Microsoft.Security/locations/westeurope/alerts/2517574460241069999_f6627635-ee1c-46b8-
8899-45bbeedcb396",
            "name": "2517574460241069999_f6627635-ee1c-46b8-8899-45bbeedcb396",
            "type": "Microsoft.Security/Locations/alerts",
            "properties": {
                "status": "Active",
                "timeGeneratedUtc": "2022-02-14T17:11:44.5482146Z",
                "processingEndTimeUtc": "2022-02-14T17:11:42.6273927Z",
                "vendorName": "Microsoft",
                "productName": "Microsoft Defender for Cloud",
                "alertType": "VM_SshBruteForceFailed",
                "startTimeUtc": "2022-02-14T16:06:15.893Z",
                "endTimeUtc": "2022-02-14T16:08:44.243Z",
                "severity": "Medium",
                "isIncident": false,
                "systemAlertId": "2517574460241069999_f6627635-ee1c-46b8-8899-45bbeedcb396",
                "intent": "Probing",
                "resourceIdentifiers": [
                    {
                        "$id": "westeurope_1",
                        "azureResourceId": "/subscriptions/{subscriptionId}/
resourceGroups/ContosoDemo/providers/Microsoft.Compute/virtualMachines/Contoso-Linux-VM",
                        "type": "AzureResource",
                        "azureResourceTenantId": "{tenantId}"
                    },
                    {
                        "$id": "westeurope_2",
                        "workspaceId": "{workspaceId}",
                        "workspaceSubscriptionId": "{subscriptionId}",
                        "workspaceResourceGroup": "{workspaceResourceGroup} ",
                        "agentId": "{agentId}",
                        "type": "LogAnalytics",
                        "workspaceTenantId": "{tenantId}
                    }
                ],
                "compromisedEntity": "Contoso-Linux-VM",
                "alertDisplayName": "Failed SSH brute force attack",
                "description": "Failed SSH brute force attacks were detected on
Contoso-Linux-VM",
                "remediationSteps": [
                    "1. In case this is an Azure virtual machine, add the source IP to
NSG block list for 24 hours (see https://azure.microsoft.com/en-us/documentation/articles/
virtual-networks-nsg/) ",
                    "2. Enforce the use of strong passwords and do not re-use them
across multiple resources and services (see http://windows.microsoft.com/en-us/Windows7/
Tips-for-creating-strong-passwords-and-passphrases)",
                    "3. In case this is an Azure virtual machine, Create an allow list for
SSH access in NSG (see https://azure.microsoft.com/en-us/documentation/articles/
virtual-networks-nsg/) "
                ],
                "extendedProperties": {
                    "number of failed authentication attempts to host": "54",
                    "accounts used on failed sign in to host attempts": "["postgres","an
sible","zabbix","root","public","odoo12","a","csgo","azureuser","mc","20 additional
usernames"]",
                    "was SSH session initiated": "No",
                    "resourceType": "Virtual Machine",
                    "end Time UTC": "2022-02-14T16:08:44.2430000Z",
                    "killChainIntent": "Probing"
                },
                "entities": [
                    {
                        "$id": "westeurope_3",
                        "hostName": "Contoso-Linux-VM",
                        "azureID": "/subscriptions/{subscriptionId}/resourceGroups/
ContosoDemo/providers/Microsoft.Compute/virtualMachines/Contoso-Linux-VM",
                        "omsAgentID": "{agentId}",
                        "type": "host"
                    },
                    {
                        "$id": "westeurope_4",
                        "address": "209.141.xx.xxx",
                        "location": {
                            "countryCode": "US",
                            "countryName": "United States",
                            "state": "Nevada",
                            "city": "Las Vegas",
                            "longitude": {longitudeInfo},
                            "latitude": {latitudeInfo},
                            "asn": 53667
                        },
                        "type": "ip"
                    },
                    {
                        "$id": "westeurope_5",
                        "name": " postgres",
                        "ntDomain": " postgres",
                        "host": {
                            "$ref": "westeurope_3"
                        },
                        "isDomainJoined": false,
                        "type": "account"
                    },
                    [...]
                    {
                        "$id": "westeurope_15",
                        "sourceAddress": {
                            "$ref": "westeurope_4"
                        },
                        "type": "network-connection"
                    }
                ],
                "alertUri": {alertDeepLink}
            }
       }
    ]
}
There is a lot of information that can be consumed when retrieving an alert via REST API. The example above shows an alert that has automatically been fired as a result of a failed SSH brute-force attack on February 14, 2022. The attack was conducted from Las Vegas, Nevada, and the alert contains information about the attacker’s IP address, longitude/latitude, accounts that have been used, and much more. While the alert dashboard in Defender for Cloud provides important details about each alert, the REST API brings a different perspective to consuming the same set of data.
In Chapter 5, “Strengthening your security posture,” you learned about Logic Apps that can stimulate REST APIs to consume and process data from these APIs. In addition to that, you learned about the Workflow Automation capability within Defender for Cloud. With that knowledge, you can now start building your own automations that are triggered once a new alert is created. In other words, Defender for Cloud comes with its own little SOAR (Security Orchestration, Automation, and Response) capability, at least when it comes to automated reaction on alerts.
For example, if Defender for Cloud detects a brute-force attack against one of your virtual machines, you could automatically block the attacking IP address(es) in the machine’s Network Security Group (NSG). The information provided by Defender for Cloud will include details that are also published through the Alerts API, as shown in the example above.
More Info
In the Defender for Cloud GitHub repository, the community has published a variety of workflow automations and remediation scripts to react on alerts and recommendations. One of these artifacts is an ARM (Azure Resource Manager) template that will create a Logic App to automatically react on brute-force attacks within the scope of Workflow Automation. You can find this artifact at https://aka.ms/BlockBruteForce.
To make yourself familiar with the different APIs that come with Defender for Cloud, Microsoft has added a nice feature to the API reference you already know; see https://aka.ms/MDfC-APIs. The API reference is made up of different operation groups and in every operation group, the documentation gives you an overview about the methods that you can use to interact with the respective API provider. In addition to that, you can test all APIs in your own environment directly from the documentation. For that purpose, follow these steps:
In the Alerts-List, click the Try It button shown in Figure 9-2.
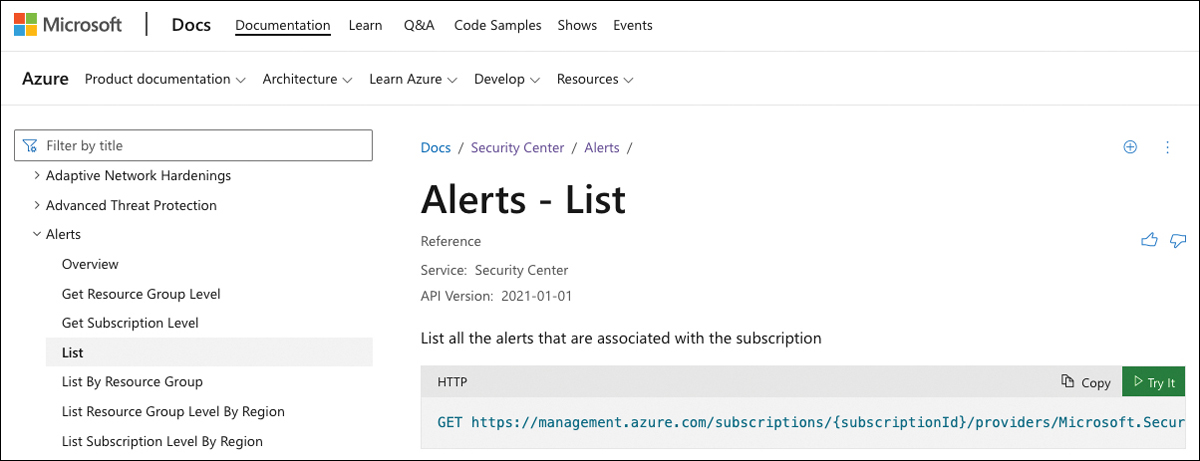
FIGURE 9-2 Explanation of how to list alerts in the DefeAPI reference
After clicking the Try It button, you are asked to authenticate against Azure Active Directory so you can retrieve information from the API for your environment.
Depending on the operation group and method, you might be asked to enter additional information, such as scope (resource group), alert name, or IDs. Figure 9-3 shows how to list alerts for the Contoso subscription in our environment.
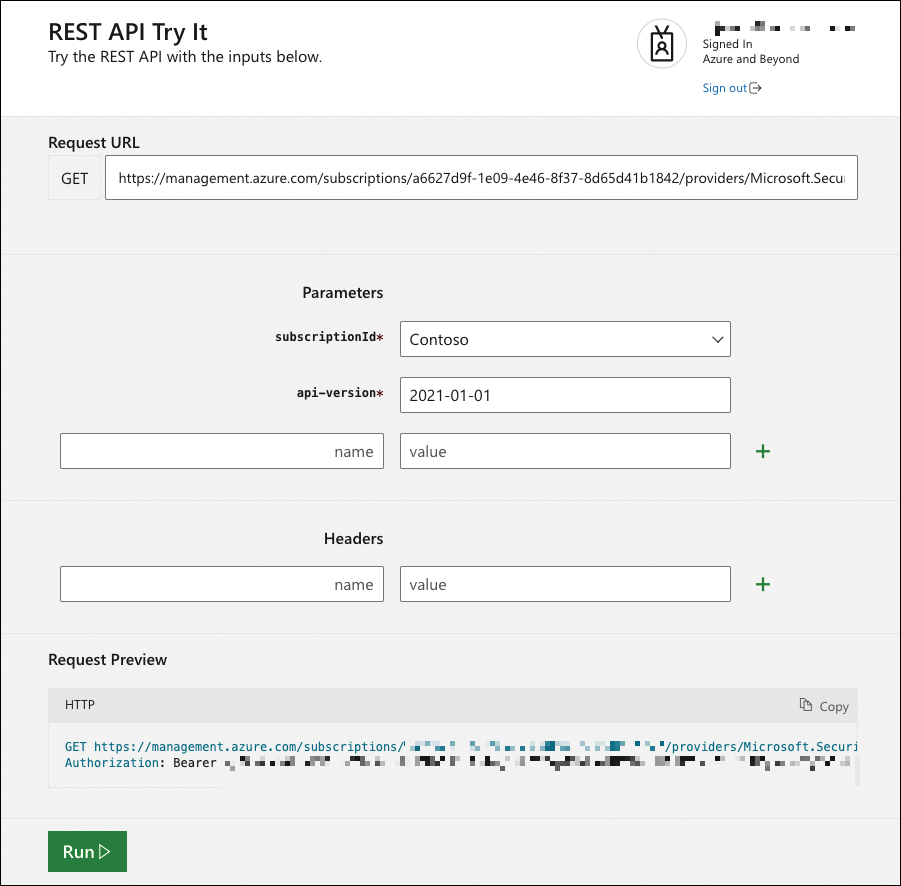
FIGURE 9-3 Defender for Cloud alerts in the Contoso subscription
Click the Run button.
You should now see the response code 200, which indicates that the API request has been successfully processed, followed by header information and the response body, both in JSON format, as explained earlier in this chapter.
The Try It capability is very handy when working with Defender for Cloud API providers because it allows you to learn about the body’s schema, which you can then use within your automations, such as Logic Apps. Also, you can easily learn which API versions you can use to retrieve information or manage security settings. API versions reflect different management capabilities over time. If new features are published to an API, or if there are changes in the back end, Microsoft usually does not change existing API versions; instead, Microsoft adds a new one. This allows you to first test and change your automations around existing APIs, instead of being impacted by breaking changes. Unfortunately, if you take a look at the API reference, you will see that there is no dropdown menu to select a valid API version, and there is no information about which API versions exist at all for a particular operation group. But you can use the Try It capability to figure that out by simply entering an invalid API version, such as 2020-01-02 in the configuration blade. After executing the API request, you will get a response body that contains the following information:
{"error":{"code":"InvalidResourceType","message":"The resource type 'alerts' could not be
found in the namespace 'Microsoft.Security' for api version '2020-01-02'. The supported
api-versions are '2015-06-01-preview,2019-01-01,2020-01-01,2021-01-01,2021-11-01'."}}
It will tell you that, for the Alerts operation group, only API versions 2015-06-01-preview, 2019-01-01, 2020-01-01, 2021-01-01, and 2021-11-01 are supported. Now, go ahead and play around with the API reference and your environment.
Accessing alerts using the Graph Security API
The Microsoft Graph (graph.microsoft.com) is a unified interface to access information from Microsoft online services, such as Azure Active Directory, Microsoft 365, and others. The Graph Security API is based on Microsoft Graph, and can be defined as a unified REST API for integrating security products.
When you make calls to the Graph Security API, they will be federated to all supported Microsoft security products, services, and partners. The results are aggregated in a common schema, which makes correlating alerts from multiple data sources easier. The idea is that when you connect and enrich the alerts, you will be able to easily understand the scope and impact of an attack.
Figure 9-4 shows an easy representation of the different components that can be used with the Graph Security API.
Looking at this diagram from the top, you see that Microsoft 365, Azure, and partner solutions can be Graph Security providers. All Microsoft security products, such as Microsoft 365 Defender, Defender for Cloud, or Microsoft Sentinel, are security providers within this scope. They all integrate with the Graph Security API and will send data to and consume data from it. Graph Security API has many capabilities other than retrieving alerts, including setting actions to alerts or storing information about Microsoft Secure Score (not Secure Score from Defender for Cloud, though). These options are beyond the scope of this chapter, but if you want to learn more about the use of Graph Security API, visit https://aka.ms/graphsecuritydocs. Results from the Graph Security API are then exposed so they can be consumed by authenticated applications, such as Microsoft Graph Explorer.

FIGURE 9-4 Graph Security API architectural diagram
After reviewing this diagram, you can also say that the Graph Security API is an intermediary service (or broker) that provides a single programmatic interface to connect multiple security providers (Microsoft and Partners). When planning to build your own application to use the Graph Security API, make sure to cover the following points:
Register your application with Microsoft Graph Log in to portal.azure.com to add the app to your Azure AD tenant.
Specify permissions and secrets You can use Delegated if your app accesses the API as a signed-in user, or you can use Application if your app has its own Role Base Access Control (RBAC).
Write your code You can start by leveraging the sample codes at http://aka.ms/graphsecurityapicode.
Get consent from the organization using your app In this step, the Azure AD Admin needs to grant consent for the organization (tenant) to use the app.
More Info
To learn more about registering your application with Azure AD, see the steps at https://aka.ms/MDfC-AppRegistration.
Using the Graph Security API
The Graph Security API is accessible through the Microsoft Graph; in other words, it uses the single point of connection (https://graph.microsoft.com) with the same REST API syntax and response in JSON format. Security data accessible via the Graph Security API is protected using permissions and Azure AD (AAD) roles. To retrieve alerts from the Graph Security API, including Defender for Cloud alerts, you need to use the HTTP GET request similar to the example below:
https://graph.microsoft.com/v1.0/security/alerts
One important aspect of this GET request is that it will retrieve all alerts from the service providers that you may have in your tenant, which includes Defender for Cloud, Azure Active Directory Identity Protection, Microsoft Cloud App Security, Microsoft Defender for Endpoints, Microsoft Defender for Identities, Office 365, Cloud App Security, Microsoft Information Protection, Microsoft Sentinel, and other partner providers to which you may have access.
Depending on the number of service providers you have, the amount of data that returns with a simple GET request for all alerts can be substantial. It is a good idea to use filters to target the information that you really want to see. For example, if you want to see only the top 10 high-severity alerts, you can use the GET request below:
https://graph.microsoft.com/v1.0/security/alerts?$filter=Severity eq 'High' and $top eq 10
The part of the URL in bold represents the filter that was created to retrieve only the information that you needed. If you want to validate your GET request before you start writing your own app, you can use the Microsoft Graph Explorer (https://developer.microsoft.com/en-us/graph/graph-explorer) to test the URL. For this example, you would get a result that lists the top 10 high-severity alerts. While this filter helps, it will still show the top 10 high-severity alerts for all security providers to which you have access. If you want to see only alerts generated by Defender for Cloud, you can filter the vendor provider by using the vendorInformation property, as shown in the example below:
https://graph.microsoft.com/v1.0/security/alerts?$filter=vendorInformation/provider eq 'ASC'
If you use Microsoft Graph Explorer to run this GET request while logged in to a tenant that has Defender for Cloud enabled, this request will retrieve only alerts from Defender for Cloud (see Figure 9-5).
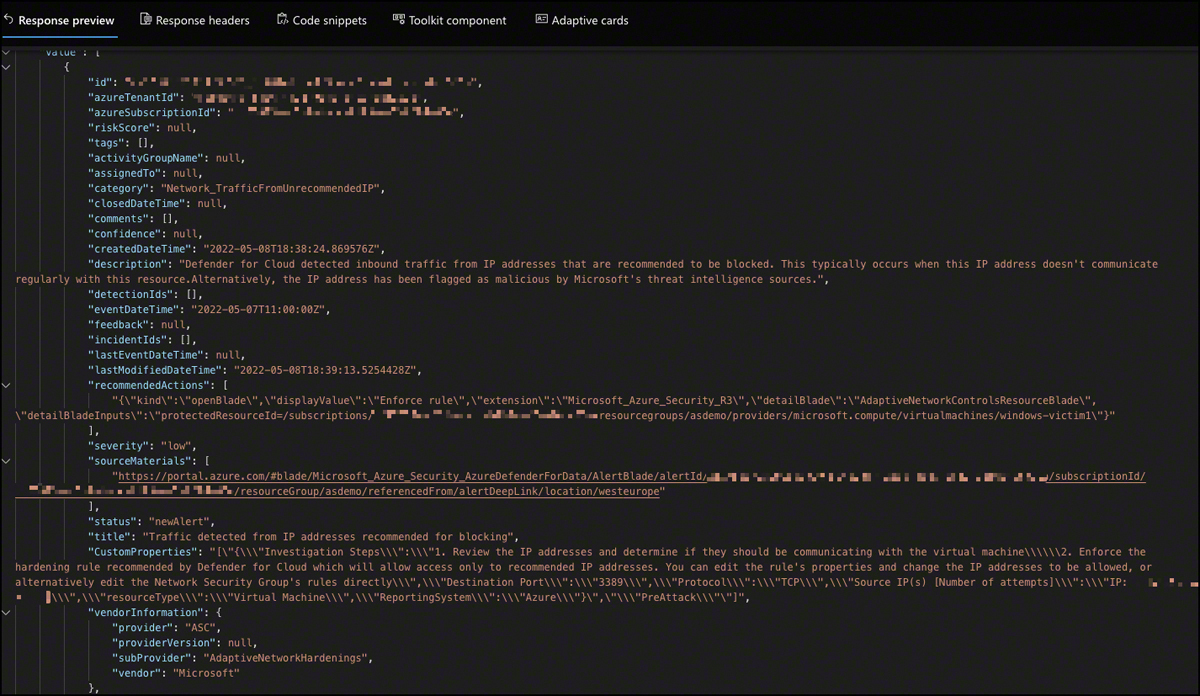
FIGURE 9-5 Graph Explorer
You can also use logical operators to expand your query. For example, if you want to see only high-severity alerts generated by Defender for Cloud, you can use the following GET request.
https://graph.microsoft.com/v1.0/security/alerts?$filter=vendorInformation/provider eq 'ASC'
and severity eq 'high'
More Info
You can find the Graph Security API reference, including information about alert security providers and common use cases, at https://aka.ms/SecGraphAPI.
In this chapter, we incorporated the most important resources and API references for both Defender for Cloud’s REST APIs and the Graph Security API. If you have read the book until this point, you already have a great overview of Defender for Cloud and all its capabilities. Now, let’s move on to the last chapter, where you will learn how to deploy Defender for Cloud at scale.