
7. Sending Email and Instant Messages

Your Galaxy Tab A makes it easy for you to read and respond to email and instant messages when you’re on the go. This chapter covers the following topics:
![]() Sending and receiving instant messages
Sending and receiving instant messages
![]() Configuring Google Hangouts settings
Configuring Google Hangouts settings
![]() Reading email messages in the Email widget
Reading email messages in the Email widget
The built-in Email app on your Galaxy Tab A makes it easy for you to check email messages from various accounts on the device. Before you start, though, you need to configure your email account(s) and then figure out how to use the built-in Email app.
Email isn’t the only way to communicate. The Galaxy Tab A also contains the built-in Google Hangouts app so you can chat in real time using text and/or audio and video with other Google+ users.
Configuring Email
Following is a complete list of the information you need to set up your Galaxy Tab to use a traditional email account. If you have an email service such as Exchange, Google Gmail, or Yahoo!, you don’t need all this. However, if you don’t configure the email settings, you can’t use webmail services in other apps (such as Gmail) to email web page links or photos, for example, so you need some of the following information no matter what:
• Email address
• Account type (POP or IMAP)
• Incoming mail server address
• Incoming mail user ID
• Incoming mail password
• Outgoing mail server address
• Outgoing mail user ID
• Outgoing mail password
When you have the information you need to add your email account, you can open the Email app. The Set Up Account window appears automatically the first time you start the app so you can begin configuring your email account.
1. On the Home screen, tap Apps.

2. In the Apps screen, tap Email.

3. Type the email address in the highlighted Email Address field using the keyboard at the bottom of the screen.
4. Tap Next on the keyboard.

5. Type the password for your email account in the Password field. As you type in the password characters, they become dots so that the password is hidden right away.
6. Tap Done on the keyboard.

7. Tap the button that corresponds to the account type you have.

8. Type the incoming server settings into the appropriate fields.
9. Tap Next.

10. After the Galaxy Tab A checks your incoming server settings, type the outgoing server settings into the appropriate fields.
11. Tap Next.

12. You can uncheck the Notify Me When Email Arrives check box if you don’t want to be notified when you have new messages.
13. Tap the Period to Sync Email field to change the amount of time the Email app keeps messages on your Tab A. The default time is 2 weeks, but you can have the Tab keep messages on the Tab A for 1 day, 3 days, 1 week, or 1 month. You can keep all messages on your Tab A by tapping All.
14. Tap the Sync Schedule field to change the checking frequency at which your Tab A checks for new messages. The default frequency is to check your inbox every 15 minutes. You can have the Tab check for new email automatically when new messages are received. If that’s too often, you can have the Tab check every 10 minutes, 15 minutes, 30 minutes, every hour, every 2 hours, every 4 hours, or once per day. You can set the time yourself by tapping Manual.

Watch Your Memory Storage
If you have more than one email account and you keep messages from all the accounts for a long period of time (1 to 2 weeks or longer), you will take up more memory on your Tab A. This may affect your ability to store data and run apps on your device.
15. Tap the checking frequency in the list.
16. Tap Next.

What’s the Peak Schedule?
The Peak Schedule field reflects how often the Email app checks for new messages. The default frequency is 15 minutes during working hours, which are from 8:00 a.m. to 5:00 p.m. The “Configuring Email Settings” section, later in this chapter, explains how to change the working hour start and stop times.
17. Type an optional name into the Account Name (Optional) field.
18. Type your name as you want it to be displayed in outgoing messages.
19. Tap Done. A list of your email messages appears in your Inbox screen.

What Happens If the Settings Won’t Verify?
If your settings don’t verify, a dialog box displays, asking you to tap the Edit Details button to return to the previous screen and double-check all the information you entered. When something is wrong, it often comes down to misspelled information, such as a misspelled word or a letter that needs to be capitalized, or other incorrect information, such as a different outgoing server port number.
Can I Add a Gmail Account to the Email App?
The Gmail app is preinstalled on your Tab A, but you can still add one or more Gmail accounts in the Email app if you prefer to check all your accounts from one app. Before you add a Gmail account, be sure to set up your Gmail password within your Google account at https://myaccount.google.com/ and then tap the Password in the Account Settings list. Note that you won’t see some of the steps listed in this section when you configure a Gmail account, such as incoming and outgoing server settings.
Reading Email
You use the Email app to navigate, read, and type your email messages.
1. Open the Email app, as described earlier in this chapter.
2. The Inbox folder name for the selected email account appears at the top-left corner of the screen. The number of new messages appears below the Inbox folder name.
3. New, unread messages appear in the list with a white background; read messages have a gray background.
4. Close the Tips tile by tapping the Close icon in the upper-right corner of the tile.
5. Tap a message in the list to view the entire message on the screen.

6. The message includes the sender information and message subject at the top of the screen and the body of the message in the center of the screen.

How Do I Get Back to the Message List?
Tap the Back icon at the top-left corner of the screen to return to your list of messages.
7. Tap the sender’s name at the top of the page.

8. Tap Create Contact to add the sender to your list of contacts.

9. Tap the account to which you want to add the contact. This example uses Device. Note that if you see an Attention window that says sync is not available, tap OK in the window.

10. Type information into the fields of the Create Contact window if you want. (Chapter 13, “Using Productivity Apps to Simplify Your Life,” covers more about adding a contact.) Tap Save to save the new contact and return to the message list.

11. Tap the Back icon at the top-left corner of the screen to return to your list of messages and folders.

12. View another account (if you have more than one account in the Email app) by tapping the Inbox folder name in the upper-left corner of the screen.

13. In the Mailbox window, tap the account name in the list. Open the Mailbox window again by tapping the Inbox folder name again to view the list of mailboxes and folders.

14. If there are new messages in a folder, the number of new messages appears in an orange circle to the right of the folder name.

15. Scroll down the folder list to view folders within the Inbox and tap a folder to view messages within that folder.

16. The number of unread messages in the folder appears below the folder name.
17. Tap the folder name in the upper-left corner of the screen.

18. Swipe down within the folder list until you see the Inbox folder. Tap it.

19. The Email app automatically searches for any new messages. Any new messages that have come in appear at the top of the list.

How Do I Combat Spam?
The Galaxy Tab A has no spam filter built in. However, most email servers filter spam at the server level. If you use a basic POP or IMAP account from an ISP, unfortunately you might not have any server-side spam filtering. If you use an account at a service such as Gmail, you get spam filtering on the server, and spam mail goes to the Spam folder, not your Inbox.
Composing a New Message
The processes for composing a new message and for composing a reply to a message are similar. This section covers composing a message from scratch.
1. Tap the New Mail icon at the lower-right corner of the screen.

2. Type the recipient’s address in the To field.
3. Tap the Contacts button to select the recipient(s) from your list of contacts.
4. Tap in the Subject field and then type a subject for the email.
5. Tap below the Subject field in the body of the email and then type your message.
6. Tap Send.

Add Attachments
You can add a file to an email as an attachment, just as you can with any email program on your computer. Just tap Attach in the menu bar at the top of the screen. Then you can pick your text, image(s), contacts, or location from the Attach drop-down list.
How Do I Reply or Forward a Message?
When you’re reading a message, you can choose to reply to the sender or forward the message to another recipient.
In the menu bar at the bottom of the screen, you see a series of four icons. The Reply icon appears as an arrow pointing left. After you tap the icon, you see the reply message screen so that you can type your response to the message. The Subject field contains the “RE:” prefix that denotes you’re replying to the original message. View the original message by swiping down the screen. Send the message by tapping Send in the menu bar.
The Forward icon appears as an arrow pointing right. After you tap the icon, you see the forward message screen. You can type the recipient in the To field. Tap the down arrow at the right side of the To field to add any recipients you want to copy or blind copy in the Cc/Bcc field. You can also type a message to the recipient within the body of the email. Any attachments that came with the original message are also attached to the forwarded message. You can view the original message by swiping down the screen. When you finish composing your forwarded message, tap Send in the menu bar.

Creating Your Own Signature
You can create a signature that automatically appears at the end of your messages. You create your signature in the Email app.
1. Open the Email app, as described earlier in this chapter.
2. Tap More in the menu bar.

3. Tap Settings in the menu.

4. In the Email Settings screen, tap your account name in the list.

5. Tap Signature.

6. You can disable the signature field in your email messages by moving the slider from right to left. The slider and slider button turn gray, which signify the feature is off. You can turn the feature back on by sliding the bar to the right so the slider and slider button turn green.
7. The existing signature appears under the Signature heading. Edit the signature by tapping Signature.

8. Type what you want the signature to say (such as your full name) in the Edit Signature screen. You may want to select the entire existing signature and then type the new signature.
9. Tap Done.

10. The signature as it will appear in your Message Composition field appears under the Signature heading.
11. Tap the Back icon to return to the Account Settings screen.

12. Tap the Back icon in the Account Settings screen to return to the Email Settings screen.

13. Tap the Back icon to return to the message list.

Can I Have Multiple Signatures?
You can have only one signature per email account on your Galaxy Tab A, so technically you can’t have multiple signatures. However, the signature is placed in the editable area of the Message Composition field, so you can edit it like the rest of your message and create multiple signatures that way.
Deleting Messages
When you view a message, you can tap the Delete icon and move the message to the trash.
1. In the Email app, open the Mailbox window, as described earlier in this chapter.
2. Go to any mailbox and any subfolder, such as your Trash folder.

3. In the Trash folder message list, tap More.

4. Tap Edit in the menu.

5. Tap a check box at the left side of the message entry that you want to delete. You can select multiple check boxes if you want to delete multiple messages.
6. Delete the messages by tapping Delete.

Searching Through Email
By default, the Galaxy Tab A doesn’t let you search through your email messages. You can change this setting quickly and then search text in your email messages.
1. Open the Email app and then open the Mailbox window, as described earlier in this chapter.
2. Open a folder or subfolder and then tap Search.

3. Type the search term(s) into the Search field.
4. As you type, the parts of messages in the list that match your search term appear highlighted in orange. In my example, I opened the BCG.Marketing subfolder and typed econ into the field, and portions of messages that contain “econ” appear in red.
5. If you don’t find the search results you want after you scroll to the bottom of the message list, tap More.

6. Search the mail server for any messages that might not have been downloaded to your Tab A by tapping Search Server.
7. Continue searching for messages that match your search term(s) on all connected devices by tapping Search All Folders on Device.

8. Close the menu by tapping the Back touch button (not shown).
9. When you finish typing your search term(s), tap the Search button in the keyboard.

10. The message list displays all recent email messages in this folder that match your search term. Messages appear in the list so you can read a message by tapping it. Note that it might take a few seconds for all folder messages to appear in the list.
11. Tap the Back icon to return to the folder message list.

Configuring Email Settings
The Galaxy Tab A enables you to update your email account settings as needed.
1. Follow the steps from earlier tasks in this chapter to open the Email app if you aren’t there already.
2. Tap More.

3. Tap Settings.

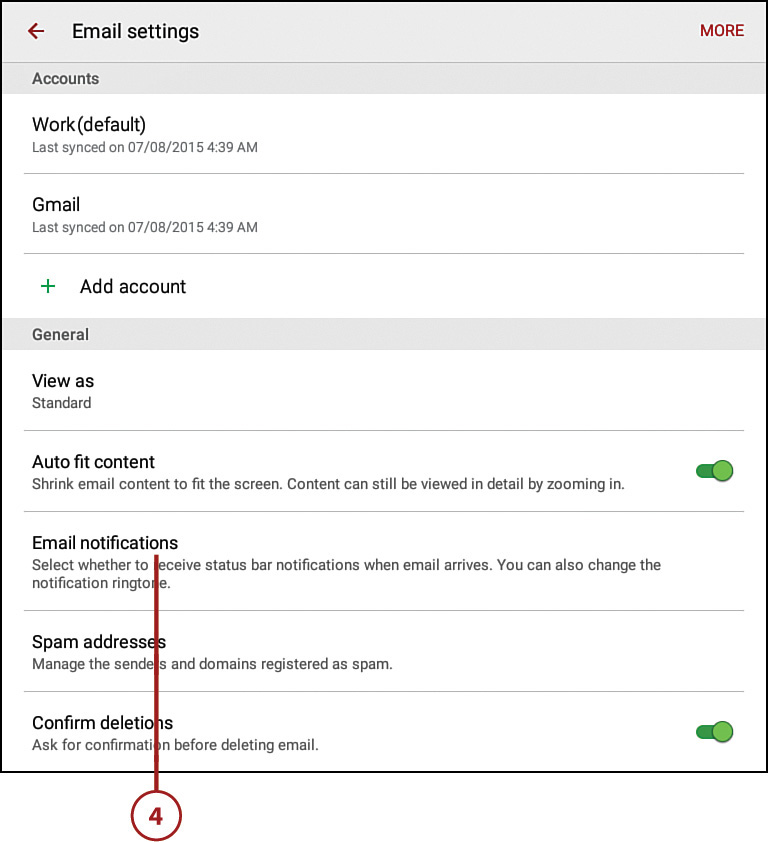
4. Tap Email Notifications to specify whether the Galaxy Tab A should notify you when email arrives for one or more of your email accounts. This feature is activated for all email accounts by default.
5. Tap the email address for which you want to set notifications; you can also change how you want the Email app to notify you when you receive an email message from a sender you’ve identified as a priority sender.

How Do I Add a Priority Sender?
When you read a message on the screen, as described earlier in this chapter, you can tap More in the upper-right corner of the screen. In the menu that appears, tap Add to Priority Senders. Messages from your priority senders appear at the top of the Inbox folder message list.
6. You can disable email notifications by moving the slider from right to left. The slider and slider button turn gray, which signify the feature is off. You can turn the feature back on by sliding the bar to the right so the slider and slider button turn green.
7. Tap Notification Sound to select a ringtone or to designate that there should be no ringtone at all. Select the ringtone from the Notification Sound pop-up window. The default ringtone is Postman.
8. Tap the Back icon.

9. Tap the Back icon in the Email Notifications screen.

10. Tap the email account for which you want to change settings.

11. Tap Sync Schedule.

12. Tap Set Sync Schedule and then select the time interval in the Sync Schedule window as described in the “Configuring Email” section earlier in the chapter.
13. Slide the Peak Schedule slider button from right to left if you don’t want to set a separate email syncing schedule. When the slider and slider button turn gray, the app disables all the options in the Peak Schedule Settings section underneath the Peak Schedule setting.
14. Tap Set Peak Schedule to change the peak schedule syncing interval in the Set Peak Schedule window. Tap the appropriate interval for syncing during the peak schedule. (Each interval is the same as in the Sync Schedule field.)
15. By default, the peak days are Monday through Friday, and the peak days are highlighted in green. Tap a day to select or deselect it to add or delete it from the peak schedule, respectively.
16. Change the peak start time by tapping the From button.

17. Change the time by tapping on the up and down arrows above or below (from left to right) the hour, minute, and AM/PM settings.
18. Tap Keypad to use a numerical keypad to enter the hour and minute.
19. When you finish setting the time, tap Set.

20. Your new peak start time appears. Change the peak end time by tapping the To button.
21. Change the peak end time in the window as you did with the peak start time and then tap Set. The new peak end time appears.
22. Go back to the main Settings screen by tapping the Back icon in the menu bar.


23. Tap Limit Retrieval Size.

24. In the Limit Retrieval Size screen, you can change the default amount of data you can receive in an email message. When you receive messages, the Email app downloads all the data in a message by default. You can choose from 2KB to 300KB, limit the size to headers only, or have no size limits to messages and file attachments. If the message has more than the allotted amount of data, then at the bottom of the message the app asks if you want to download the rest of the message.
25. Return to the account settings screen by tapping the Back icon in the menu bar.

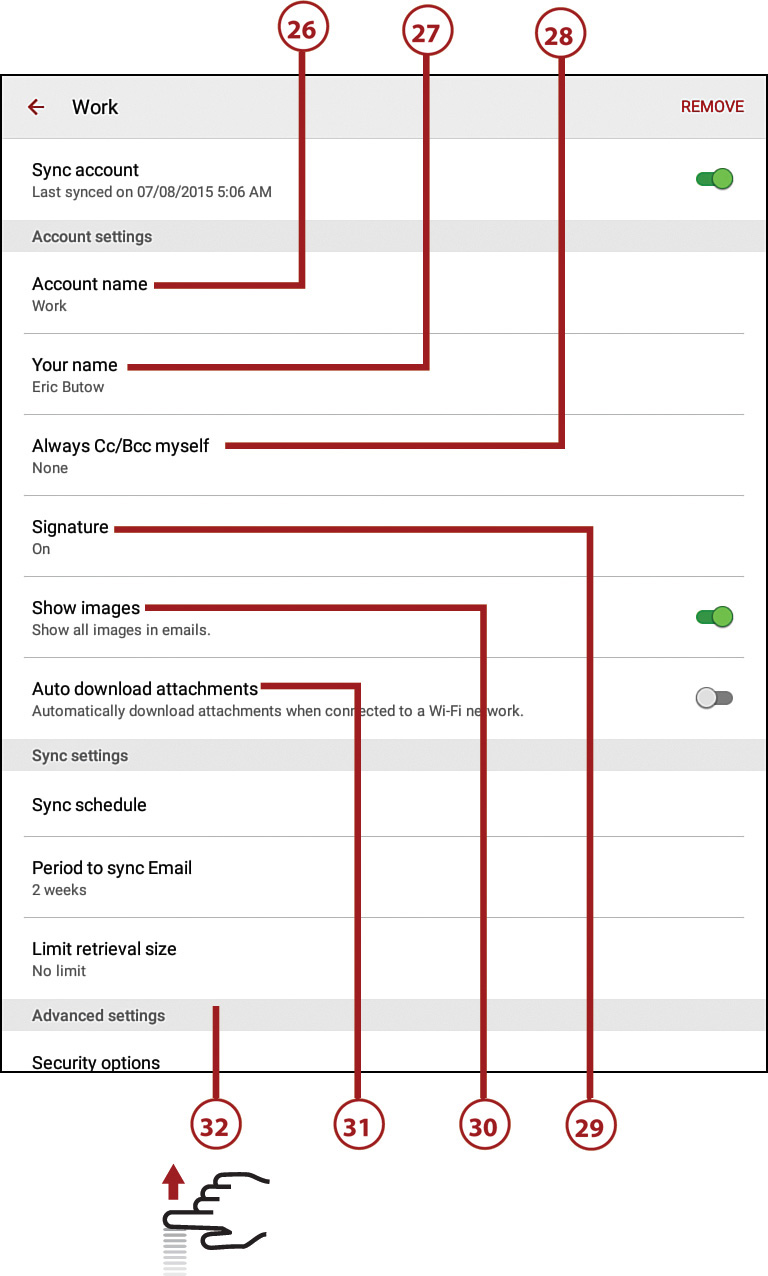
26. Tap Account Name to change your account name.
27. Tap Your Name to add or change your name.
28. Tap Always Cc/Bcc Myself and then select Cc or Bcc in the pop-up window if you always want to add your email address in the Cc or Bcc box.
29. Tap the Signature field to change your signature. Read the “Creating Your Own Signature” task earlier in this chapter for more information about signatures.
30. Tap Show Images to stop showing images automatically in a message when you view it. After you tap Show Images, the slider and slider button are gray to signify the feature is off. Turn the feature on again by tapping Show Images.
31. Tap Auto Download Attachments to download file attachments in a message to the app automatically. After you tap Auto Download Attachments, the slider and slider button are green to signify the feature is on.
32. Swipe up in the screen to view more settings.
33. Set advanced security options by tapping Security Options. In the Security Options screen that appears, you can encrypt all outgoing email, sign all outgoing email, and create and manage encryption keys for keeping your email messages private.
34. Change your incoming server settings (as you did with a new account earlier in this chapter) by tapping Incoming Server Settings.
35. Change your outgoing server settings (as you did with a new account earlier in this chapter) by tapping Outgoing Server Settings.

36. Go back to the main Settings screen by tapping the Back icon in the menu bar.

37. The word Default appears next to the account that sends your email messages automatically. If you don’t want to send email from that account, tap More in the upper-right corner of the screen.

38. Tap Set Default Account.

39. Tap the account you want as the default.
40. Tap Done.

41. The word Default now appears next to the account you selected as your default.
42. Return to the message folder list screen by tapping the Back icon.

Sending and Receiving Instant Messages
You can send and receive instant messages using the built-in Hangouts app from Google.
You Need a Google+ Account
You need to have an existing Google+ account that is tied to your primary Gmail account. If you don’t have a Google+ account, Google Hangouts has you set up your Google+ account before you continue setting up Google Hangouts.
1. On the Home screen, tap the Google icon.

2. Tap Hangouts in the Google pop-up window.

3. If you see a window in the center of the screen inviting you to use Hangouts Dialer to make free phone calls, tap Skip in the window (not shown).
4. If you see a window telling you about what’s new in Hangouts, tap “Okay, Got It” in the window (not shown).
5. Close the menu window on the left side of the screen by tapping outside the window.

6. Tap the plus icon to select the circles or names with which you want to connect in the Contacts window.

7. Tap the recipient field and then type the name of the person with whom you want to chat.
8. As you type, matches appear in the drop-down list above the field. Tap the name of the person with whom you want to chat.

9. Add more people you want to include in the conversation by tapping Anyone Else? Then scroll down the list of users or Google+ groups in the window and add the user or group to the recipient field by tapping the user or group name.

10. Type your message in the Send Hangouts Message field.
11. Add an emoticon to better convey the meaning of your message by tapping the Emoticon icon to the right of the Send Hangouts Message field.

12. Swipe down the section of emoticons and then tap the emoticon you want. The emoticon appears at the end of your message.
13. Return to the keyboard by tapping the ABC key.

14. Tap the Send icon to send your message.

15. Your message appears above the Send Hangouts Message field. If you receive a message from the recipient, your message will be moved up and you will see the recipient’s response above the Send Hangouts Message field.

What If I Don’t Use Either Google+ or Google Hangouts for Instant Messaging?
If you use a different instant messaging service, then visit the Google Play Store by tapping Play Store on the Home screen. Then search for the instant messaging app you’re looking for. If you use Skype, for example, there is a Skype app for Android available that you can download free of charge. You discover more about downloading apps in Chapter 15, “Finding and Managing Apps.”
Configuring Google Hangouts Settings
You can change your Google Hangouts settings so you can manage your messages to your liking, determine how you want to be notified of new messages that come into your message Inbox, and change your Google+ profile.
1. On the Home screen, tap the Google icon.

2. Tap Hangouts in the Google pop-up window.

3. Tap the Menu icon in the menu bar.

4. Tap Settings.

5. Tap your Google account email address in the list, if necessary.
6. Tap Profile Photo to change your Google+ profile photo. You can take a photo using the Camera app or you can choose a photo within the Gallery app.
7. Tap Share Your Status if you want to let everyone in your Google+ circles who use Hangouts know what you’re doing.

8. Tap the Show My Last Seen check box if you don’t want people in your Google+ circles to see when you last used Hangouts.
9. Tap the Device check box to have Google Hangouts tell people in your Google+ circles what device you’re currently using: a smartphone, tablet, or computer.
10. Tap the In Call check box to have Google Hangouts tell people in your Google+ circles when you’re currently busy with a video or phone call on one of your devices.

11. Return to the main Settings screen by tapping the Back touch button (not shown).
12. Tap Hangouts Messages & Invites to change what happens when you get messages and invites, and tap Video Calls to change what happens when you get video calls. The options in subsequent steps in this section are the same when you tap Hangouts Messages & Invites or Video Calls.

13. The Notifications and Vibrate check boxes are checked by default so you receive notifications about new Google Hangouts (which are live video chats) started by one of your contacts and when you receive a request to join a Google Hangout. If you don’t want to be notified about any Hangouts, tap Notifications to clear the check box.
14. Tap Vibrate if you don’t want the Tab A to vibrate when you receive a message or invite, or if you receive a video call, depending on the screen you’re in. You can turn on vibrations by tapping Vibrate again.
15. Tap Sound to open the Sound window and set a tone that notifies you when someone has joined your Hangout or you have received a request for someone to join your Hangout. By default, you will feel the Tab A vibrate and see a message on the screen.

16. Select from the preselected Hangouts Message ringtone, silent mode, or a number of other ringtones. Scroll up and down the list to view the entire list and tap the button to the right of the tone so you can listen to the sound.
17. Tap OK when you’ve selected a sound. The name of the selected sound appears within the Sound entry in the Hangout Notifications section.

18. Return to the main Hangout Settings screen by tapping the Back touch button (not shown).
19. Tap Customize Invites to determine who can join your Hangouts.

20. In the Customize Invites screen, you can determine the circles that can join a Hangout with you or request that you accept them as a Hangout participant. Circles include ones that you created in Google+ as well as the default Public circle that includes all Google+ users. Change how users in each circle can request Hangout participation by tapping the circle name in the list.

21. In the circle window, the default request option is selected by default, which in this example is Can Contact You Directly in the Family circle. You can also tap Can Send You an Invite or Can’t Contact You. Tap the request option you want for members of this circle.

22. After you change the request type, the type appears underneath the circle name.
23. Return to the main Hangout Settings screen by tapping the Back icon.

24. Tap Google+ Profile to change your Google+ profile settings within the Internet browser app.
25. Tap Hidden Contacts to view a list of Google+ contacts you’re connected with but who aren’t visible on your Google+ profile page.
26. Tap Sign Out to sign out of Google Hangouts and close the Hangouts app.
27. Tap Improve Hangouts to remove the check mark if you don’t want to report your usage data to Google to help improve the Hangouts app.

28. Return to the Hangouts screen by tapping the Back icon at the left side of the menu bar.

Reading Email Messages in the Email Widget
Chapter 4, “Adding Widgets to Your Home Screen,” explains how to add a widget to a Home screen. In this task, you find out how to view your latest email messages in your Inbox folder within the Email widget instead of within the Email app.
1. Tap and hold on a blank area within the Home screen.

2. Tap Widgets.

3. Add the Email widget to a Home screen. If you’re not sure how to add a widget, bookmark this page and review Chapter 4.

4. In the Select Account screen, tap the account with the email messages you want to view. If you want to view all messages in all accounts’ Inbox folders, tap Combined Inbox.

5. Tap Done in the lower-right corner of the screen.
6. The widget appears on the Home screen with a blue box around it. Blue circles, or handles, appear on all four sides of the box.
7. Resize the widget by tapping and holding one of the handles and then dragging left and right or up and down, depending on the handle you’re moving. For example, if you drag the bottom handle up and down, then you change the height of the widget. If your widget size is too large for the available area on the Home screen, then the box and handles turn red to tell you that the widget is too large for the available space.

8. After you resize the widget, tap the Back touch button (not shown).
9. Within the Email widget, the Combined Inbox shown in this example displays five messages in the list. Each message tile shows the name of the sender, the message subject, and the first 15 to 25 words of the message.
10. Tap the star outline icon to mark the message as a favorite. After you tap the star icon, the star turns solid gold to signify the message is a favorite. If you don’t want the message as a favorite anymore, tap the gold star; the star becomes an outline again.
11. Swipe up and down to view the messages in the list.
12. Open the message and read it in its entirety within the Email app by tapping the message tile.

13. The message screen opens within the Email app so you can swipe up and down and read the message as well as reply, forward, and delete the message.
14. Return to the Combined Inbox message list screen by tapping the Back icon.

15. Return to the Home screen that contains the Email widget by pressing the Home button (not shown).
Can I Go Back to the Email App to Read Messages?
When you return to the Home screen that contains the Email widget after viewing a message in the Email app, the Email app remains open. You can return to the Email app to view messages by tapping the Recent touch button and then tapping the Email tile in the Recent Apps screen.
16. Tap the New Mail icon to write a new message in the Email app, as described earlier in this chapter.
17. Tap the Refresh icon to have the widget check for new messages in the Combined Inbox folder.
