
6. Browsing the Web

The Galaxy Tab A comes with two built-in browsers: Google Chrome and Samsung’s Internet app. This chapter shows you how to browse the Web using the Samsung Internet app, which is designed specifically so you can get the most from the Web on your Tab A. This chapter covers the following topics:
![]() Returning to previously visited pages
Returning to previously visited pages
![]() Copying text and images from web pages
Copying text and images from web pages
The Galaxy Tab A is a great tool for viewing web pages, whether you’re at home or you’re on the go. No matter which Galaxy Tab A model you use, the screen is much larger than a mobile phone, so you can see more on the Galaxy Tab A’s screen. Because you can touch the screen, you can interact with web content in ways that a computer typically cannot.
Browsing to a URL
It’s likely that you already know how to browse to different web pages in your favorite web browser on your computer. The Internet app on the Galaxy Tab A works much the same as the browser on your computer, but there are some differences.
1. On the Home screen, tap Apps.

2. Tap Internet.

3. Tap the Address field at the top of the screen. The keyboard opens at the bottom of the screen so you can type a uniform resource locator (URL), which can be a website name or a specific page in a website.

4. Start typing a URL, such as samsung.com or play.google.com. You can also select from one of the sites in the list that appears below the Address field.

5. Tap Go on the keyboard when you finish typing.

Tips for Typing a URL
The Internet app doesn’t require you to type the “http://” or the “www.” at the beginning of the URL. For example, if you type samsung.com or www.samsung.com, you still go to the Samsung Home web page. However, there might be some instances when you need to type in “http://” or even “https://” (for a secure web page) at the beginning of the URL. If you do, the Internet app lets you know so that you can type in the “http://” or “https://” in the Address field.
Searching the Web
The Internet app makes it easy for you to search the Web, so you don’t need to know every URL of every web page out there (which is good considering there are literally billions of web pages). As you type, the Internet app suggests search terms you’ve used in the past as well as search terms you might be looking for.
1. On the Home screen, tap Apps.

2. Tap Internet.

3. Tap the Address field at the top of the screen. The keyboard opens at the bottom of the screen so you can type the URL. Start typing your search term. As you type, a list appears underneath the address bar with suggestions. You can stop typing at any time and scroll down the list to find your search term; tap the search term to select it and start the search.

4. If you haven’t found what you’re looking for, open the Google search page by tapping Go in the keyboard.

5. The results display in a Google search results page. Tap any link to go to a page; you can also tap one of the links at the bottom of the screen to view more results.

Tips for Searching the Web
You can search deeper within Google itself. For example, if you put a + in front of a search term, you’re telling Google that you require the word in the search results. If you put quotes around a search term (“term”), you’re telling Google that you want to search for results that contain that term. Scroll to the bottom of the search page and then tap Help to get more information about how you can get the most from your Google searches.

If you look at the top of Google’s search results page, you see links so you can search for more than text terms, including Images and Videos. If you click the More link, a pop-up list displays so you can search a variety of other areas within Google.

Viewing Web Pages
After you open a website, you can control what you view on the web page in several ways. These techniques enable you to access the entire web page and navigate between web pages in the Internet app.
1. Navigate to a web page using one of the two methods described in the previous tasks in this chapter (not shown).
2. As you view a page, you can drag up and down the page with your finger. You can also flick with your finger to scroll quickly. After you flick, the screen scrolls, decelerates, and then comes to a stop.

3. Zoom in by double-tapping an area on the screen. Zoom out by double-tapping again.

4. While you’re zoomed in, you can touch and drag left and right to view different parts of the web page.
5. Move to another web page from a link in the current web page by tapping a link. Links are usually an underlined or colored piece of text, but they can also be pictures or images that look like buttons.

Hunting for Links
Unfortunately, it isn’t always easy to figure out which parts of a web page are links and which ones aren’t. Back in the early days of the Web, all links were blue and underlined. As web page elements have become more enhanced over time, it’s now more common to find links in any color and any text style. What’s more, graphics that are links aren’t underlined, either.
On a computer’s web browser, it’s easy to find out which element is a link when you move the mouse pointer over the link because the pointer changes shape. In Android, there is no cursor, so you can’t find out if a web page element is a link unless you tap it and see what happens.
Bookmarking Websites
As you browse websites, you might want to save some of the websites in a list of your favorites so you can go back to them later. In browser parlance, this saving process is called bookmarking.
1. Navigate to any page in the Internet app (not shown).
2. Tap Bookmarks at the top of the page. If you see the Sync Bookmarks window, tap Done in the window.

3. The Bookmarks window opens on the right side of the screen. Tap Add.

4. Edit the title of the bookmark. The official title of the web page is filled in and highlighted for you, but you can change the name by typing the new name using the keyboard. To change the folder in which the bookmark is stored, proceed with step 5. Otherwise, skip to step 12.
5. To change the folder in which the bookmark is stored, tap the folder name, which is My Device in this example.

6. Create a new bookmarks subfolder by tapping Create.

7. Tap the Enter Folder Name field and then type the name of your new subfolder.
8. Tap the parent folder into which your new subfolder will reside. The default is My Device, but you can also save the new subfolder within your Samsung Account folder.
9. Tap Save.

10. Tap the name of the folder into which you want to place the bookmark.

11. Tap Save.

12. Tap the folder name that contains the new subfolder.

Should I Edit a Bookmark Title?
Because the titles of web pages are usually long and descriptive, it’s a good idea to shorten the title to something you can recognize easily in your bookmarks list. Every bookmark also includes a thumbnail picture of what the web page looks like so you can identify the bookmark more easily. If you would rather view your bookmarks by title, tap the Edit button at the bottom of the Bookmarks window. In the Bookmarks screen, tap the Menu icon at the right side of the menu bar and then tap List View in the menu.
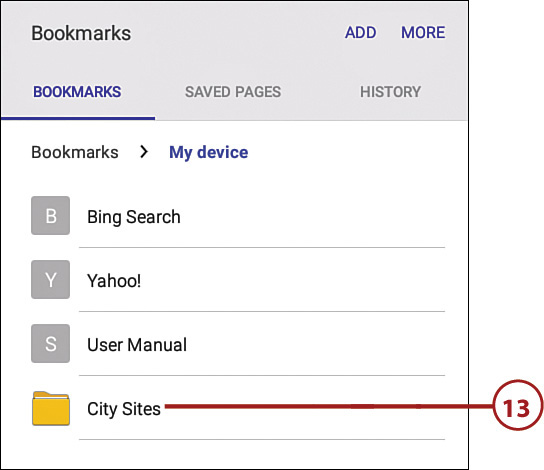
13. Tap the subfolder name within the list.
14. The new bookmark appears within the subfolder list.
15. Tap Bookmarks above the subfolder list to return to the main Bookmarks folder.

Returning to Previously Visited Pages
It’s easy to return to the last page you visited in the Internet app—just press the Back button. As you keep pressing the Back button, you keep going back to pages you visited. In the History page, the Internet app also keeps a list of all web pages you’ve visited during your browsing session.
Browsing Forward
Like with any web browser, you can browse more recent pages you’ve viewed in your current browsing session by tapping the Forward button, which is the right-arrow button immediately to the right of the Back button.
1. Visit several web pages in the Internet app if you haven’t done so already (not shown).
2. Tap Bookmarks.

3. Tap the History tab in the Bookmarks window.

4. The list of web pages you visited for the current date appears under the Today heading.

Tips for Using History
If you want to hide the history for a specific day so you can see history for another day, tap the header for the specific day. For example, if you want to hide all the web pages for today, click the Today heading above the first web page in the Today list. The Today heading is still visible, but you won’t see the web pages. You can view the web pages again by tapping the Today heading.
You can also clear the entire history database by tapping More above the History tab. Within the menu, tap Clear History. After you tap the icon, all websites in the History tab disappear.
Deleting Bookmarks
If you find there are websites that you don’t visit anymore or that go to obsolete or missing web pages, you need to cull your bookmark list. You can delete a bookmark from the Bookmarks list or from the History list.
1. Tap Bookmarks at the top of the Internet app screen as you learned to do earlier in this chapter. The bookmarks you added most recently appear. If you haven’t added a bookmark, you see bookmarks and subfolders within the main Bookmarks folder.
2. Tap More.

3. Tap Edit.

4. Tap the check box to the left of the bookmark name. The check box turns green and a white check mark appears within the check box.
5. Delete the bookmark by tapping Delete. The Internet app deletes the bookmark instantly.

Delete from the History List
The second method uses the History list to delete a bookmark.
1. Tap the Bookmarks button at the top of the Internet screen, as you learned to do earlier in this chapter. The bookmarks you added most recently appear.

2. Tap the History tab. This brings up a list of web pages you’ve viewed recently.
3. Tap More.

4. Tap Edit.

Sync Your Bookmarks
You can sync the bookmarks in your favorite web browser on your desktop or laptop computer with the Internet app so you have maximum control over your bookmarks. You can read more about syncing your Galaxy Tab A in Chapter 2, “Setting Up the Galaxy Tab A.”
5. Tap the check box to the left of the bookmark name. The check box turns green and a white check mark appears within the check box.
6. Tap Delete. The website no longer appears in the list of web pages.

Filling in Web Forms
On many web pages, you are asked to fill in forms, such as for signing up for a company’s email newsletter or to get more information about a product. Filling out web forms on your Galaxy Tab A is similar to filling out forms on a computer’s web browser, but there are differences.
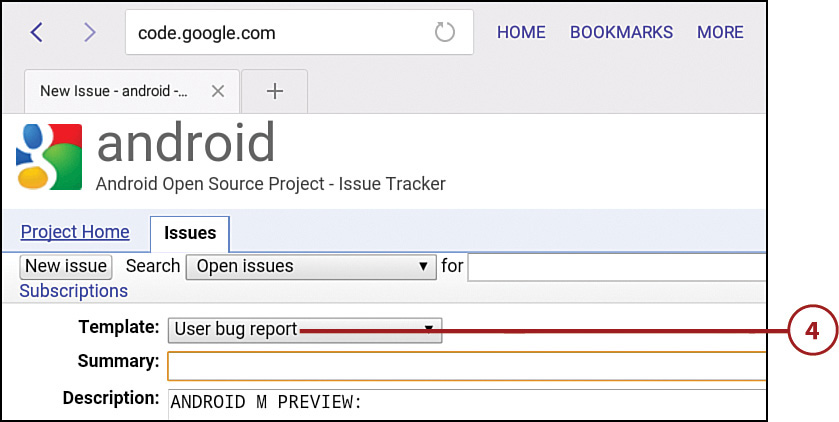
1. Navigate to a page that you know contains a form. (The sample page is at http://code.google.com/p/android/issues/entry.)
2. Tap in a text box.

3. The keyboard appears at the bottom of the screen. Use the keyboard to type text into the box; the screen enlarges so you can see the text box more easily. Tap the Go button when you finish typing.

4. Select an item in a pull-down menu by tapping the box.
5. Tap an item in the menu to select it. If the menu list is long, touch and drag up and down to view more selections.
6. The selected item appears in the field.

Special Menus
Some websites use special menus that are built from scratch. In these cases, the menu looks exactly like the one you get when you view the web page on a computer. If the web page is well constructed, it should work fine on the Galaxy Tab A. However, it might be a little more difficult to make a selection.
Copying Text and Images from Web Pages
The Internet app treats web pages like other documents. That is, you can copy text and images from a web page you view in a browser to another app.
Copy a Block of Text
You can select text from web pages to copy and paste into other documents, such as email messages or your own text documents.
1. Navigate to a web page in the Internet app if you haven’t done so already (not shown).
2. Hold down your finger on the first word in the block of text and then release your finger. The first word is highlighted in green with blue “handles” at the beginning and end of the word.

3. Hold down your finger on the bottom handle (the one on the right side of the word) and drag over the text you want to copy. When you are finished, release your finger. The selected text is highlighted in green.
4. In the pop-up menu that appears above the selected text, tap the Copy icon. Android informs you that the text has been copied to the Clipboard. You can now go to another application, such as Email (or an email form on another web page), and paste the text into a text area. For example, in the Email app, you tap and hold on the cursor in the message for a second or two and then tap Paste in the pop-up menu that appears above the cursor.

Copy an Image
In addition to being able to copy and paste text from the Internet app, you can also copy images from a web page and save them to an email message or a photo collection.
1. Go to a web page that includes an image on the page (not shown).
2. Tap and hold your finger on that image for a couple of seconds and then release your finger. The image menu window appears on the screen.
3. Tap Save. This saves your image to the Galaxy Tab A so you can view and use it in any app where you select images from your photo albums. Note that the menu options may differ depending on the image you select.

4. As the file downloads, the download icon appears in the status bar. When the file finishes downloading, the status bar disappears.

5. Return to the Home screen by pressing the Home button (not shown).
6. Hold your finger on the status bar and swipe down to open the Quick Settings and Notifications screen.

7. Tap the image filename to open the file in the Gallery or Photos app.
