
3. Customizing Android to Your Liking

In this chapter, you discover how to change how the Galaxy Tab A behaves, looks, and works. This chapter covers the following topics:
![]() Password-protecting the Galaxy Tab A
Password-protecting the Galaxy Tab A
![]() Changing keyboard and voice settings
Changing keyboard and voice settings
Your Galaxy Tab A isn’t just a static system that forces you to work with it. It’s malleable, so you can change many attributes of the system to work the way you prefer.
Password-Protecting the Galaxy Tab A
One of the first things you should do when you set up your Galaxy Tab A is to password-protect it so that unauthorized persons can’t use it or gain access to the data stored on it:
1. On the Home screen, swipe from right to left to view the second Home screen and then tap Settings.

2. Tap Lock Screen and Security in the settings list.
3. Tap Other Security Settings.

4. Tap Encrypt Device.

5. The Encrypt Device page on the screen reminds you that the encryption process takes an hour or more, that the device must be plugged in during the entire encryption process, and that interrupting the process risks the loss of some or all of the data stored on the Tab A. When you’re finished reading these reminders, tap Set Screen Lock Type.

6. Tap Password.

7. Type your password in the Set Password screen. The password must have at least four characters. One of those characters has to be a letter (either lowercase or uppercase). A couple of seconds after you tap the letter or number, the letter or number turns into a dot to hide what you just entered. Tap Continue.

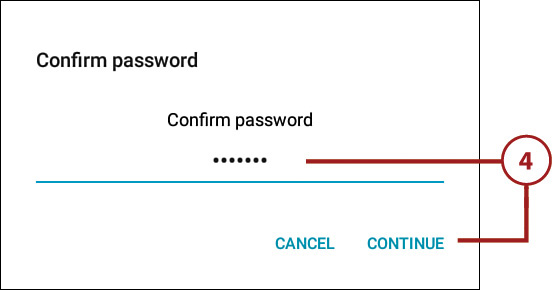
8. Retype the password in the Confirm Password field and then tap OK.

9. By default, the Tab A shows notification content on the Lock screen. If you want to hide the content of these notifications but show the notification title, tap Hide Content.
10. Tap Do Not Show Notifications if you don’t want to show notifications.
11. Tap Done after you select the notification option you want.

12. The next time you log in to your Galaxy Tab A, you are prompted to type in your password in the password box.

Changing Your Password
It’s a good idea to change your password regularly so you have the peace of mind of knowing that you’re keeping one step ahead of potential thieves:
1. On the Home screen, swipe from right to left to view the second Home screen and then tap Settings.

2. Tap Lock Screen and Security in the settings list.
3. Tap Screen Lock Type.

4. Type your password in the Confirm Password screen and then tap Continue.
5. Tap Password.

6. Type your password in the Set Password screen. The password must be at least four characters, including at least one letter (either uppercase or lowercase). A couple of seconds after you tap the letter, the letter turns into a dot to hide what you just entered. Tap Continue.

7. Retype the password in the Confirm Password field and then tap OK. The next time you log in to your Galaxy Tab A, you are prompted to type in your new password.

8. By default, the Tab A shows notification content on the Lock screen. If you want to hide the content of these notifications but show the notification title, tap Hide Content.
9. Tap Do Not Show Notifications if you don’t want to show notifications.
10. Tap Done after you select the notification option you want.

Setting Parental Restrictions
Android 5.0 doesn’t include parental restriction settings for specific applications aside from the pattern, PIN, or text password, or the Finger Scanner, used for full access to the Galaxy Tab A.
However, you can find parental control apps in the Google Play Store. Search for “parental control” or “parental controls,” read the user reviews for each app, and then decide whether you want to download an app to see if it works for you.

Content Filter Settings in the Google Play Store
You can determine what types of apps are shown to anyone who uses your Galaxy Tab A by setting the content filtering settings within the Google Play Store. You can show all apps or you can show apps by maturity level. You find out more about how to do this in Chapter 15, “Finding and Managing Apps.”
Changing the Date and Time
You can set the date and time for your Galaxy Tab A, change the time zone, change the date format, and choose whether you want to display the time as standard 12-hour or 24-hour (military) time:
1. On the Home screen, swipe from right to left to view the second Home screen and then tap Settings.

2. Swipe down in the settings list on the left side of the screen and then tap Date and Time.
3. Slide the Automatic Date and Time slider from right to left so the Tab A does not use the network-provided time.

4. The Automatic Date and Time slider and slider button turn gray to let you know the feature is off.
5. Tap Set Date.

6. Set the date by tapping the date within the calendar month on the left side of the Set Date window. Swipe left and right within the calendar to see past, current, and future months. The current date is highlighted with a blue circle.
7. Tap the year to select a new year from the menu.
8. Tap Done.

10. Tap the hour and/or minute to change the time information. You can also tap the up or down arrow button above and below the hour or minute to move the hour or minute by one hour or one minute, respectively.
11. Tap the AM or PM box to change the time of day between AM and PM.
12. Tap Keypad to open the keypad below the clock, tap the hour or minute, and then type the hour or minute number in the keypad.
13. Tap Done.
14. Tap Select Time Zone to change the current time zone in the Select Time Zone list.
15. Slide the Use 24-Hour Format slider from left to right to change the format to 24-hour time. The slider and slider button turn green to signify the feature is on and the time on the Notification bar reflects the change to 24-hour time. You can return to 12-hour time by sliding the slider from right to left.
16. Tap Select Date Format.


17. Tap one of the four format options to change the date format. If you don’t want to change the date format, tap Cancel.

Modifying Your Wallpaper
The standard wallpaper appears behind both the Lock screen and the Home screen. Android makes it easy for you to change the wallpaper to whatever you want:
1. Hold your finger down on the Home screen for a couple of seconds (not shown).
2. Tap Wallpapers.

3. Tap Home Screen, Lock Screen, or Home and Lock Screens depending on where you want to display your wallpaper. This example uses the Home and Lock Screens option.
4. Scroll through the thumbnail images of wallpapers. If you want to preview a wallpaper on the screen, tap the thumbnail image. The current thumbnail image appears above the Set As Wallpaper button and a larger version of the image appears above the thumbnail images.
5. Tap the From Gallery thumbnail image to open the Gallery app and select a photo stored on your Tab A as your wallpaper.
6. When you find wallpaper you want, tap Set As Wallpaper. The new wallpaper appears on your Home and Lock screens.

Setting Alert Sounds
If you want the Galaxy Tab A to make noise when you perform different actions, such as when you tap something on the screen, you can change the alert sounds. If you prefer, you can turn them off entirely.
1. On the Home screen, swipe from right to left to view the second Home screen and then tap Settings.

2. Tap Sounds and Notifications in the settings list.
3. You can mute the Tab A by tapping Sound Mode and then tapping Mute in the pop-up menu.
4. Tap Volume.

5. Change the volume for music, video, games, and other media, notifications, and system sounds by dragging the appropriate slider bar to the left (lower volume) or right (higher volume).
6. Tap the Back icon in the menu bar.


8. Tap Default Notification Sound.

9. Set the notification sound from the menu. This sound plays whenever you receive a notification.
10. Tap OK.

11. Tap Touch Sounds to turn off the feature that plays a sound when you make a screen selection. After you tap Touch Sounds, the slider and slider button turn gray to remind you the feature is off. Turn on this feature again by tapping Touch Sounds.
12. Tap Screen Lock Sounds to stop playing sounds when you lock and unlock the screen. After you tap Screen Lock Sounds, the slider and slider button turn gray to remind you the feature is off. Turn on this feature again by tapping Screen Lock Sounds.
13. Tap Keyboard Sound to stop the Tab A from making a sound when you tap keys on the keyboard and some other user interface features such as the Back touch button.

Changing Keyboard and Voice Settings
The Galaxy Tab A gives you two input options: the Samsung keyboard and Google Voice Typing so you can speak commands to the Tab A.
The examples in this book use keyboard settings for the Samsung keyboard, which is the default keyboard the Galaxy Tab A uses when you type text, as well as built-in keyboard settings that apply to all keyboards.
1. On the Home screen, swipe from right to left to view the second Home screen and then tap Settings.

2. Swipe down the settings list on the left side of the screen and then tap Language and Input.
3. Because the default is the Samsung keyboard, open the Samsung Keyboard Settings screen by tapping Samsung Keyboard.

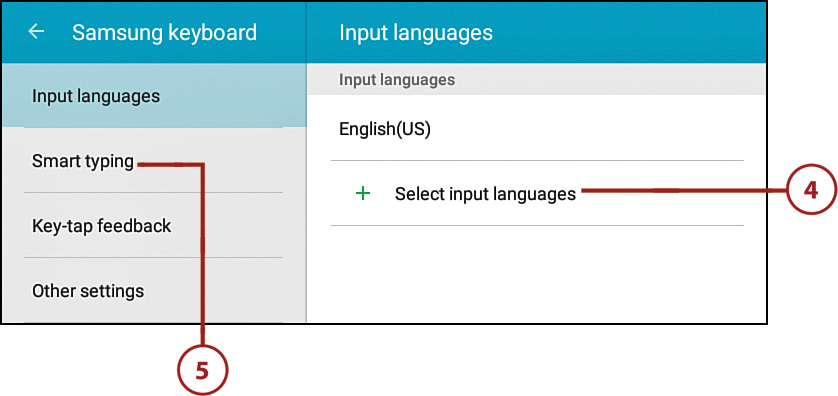
4. Tap Select Input Languages if you want to change the default keyboard input language.
5. Tap Smart Typing.
6. Tap Predictive Text if you don’t want the Galaxy Tab A to guess what you’re typing and provide suggestions for words. This is similar to the auto-complete feature in word processors.
7. Tap Auto Replace so the Tab A will guess the word you’re typing when you tap the spacebar after typing a word.
8. Tap Auto Check Spelling to underline words you type (such as in an email message) with possible spelling errors in red so you can check and fix those errors if necessary.
9. Tap Text Shortcuts to create one or more shortcuts for a phrase that you type often. When you type the shortcut in the app, such as in an email message, the Tab A automatically replaces the shortcut with the phrase you associated with the shortcut.

10. Tap Auto Capitalize to turn off auto-capitalization for words; the slider and slider button turn gray to signify the feature is off. By default, the Galaxy Tab A auto-capitalizes the first word in a sentence. If the Galaxy Tab A recognizes a sentence-ending punctuation mark—that is, a period, question mark, or exclamation mark—followed by a space, the next letter is capitalized automatically unless you tap the Shift key to turn it off. (There are exceptions to this rule, such as when you type in the To box when you compose a new email message.) You can turn the feature back on by tapping Auto Capitalization.
11. Tap Auto Spacing to turn off the automatic insertion of a space between words; the slider and slider button turn gray to signify the feature is off. By default, the Galaxy Tab A monitors your words as you type and automatically inserts a space between words. Turn the feature back on by tapping Auto Spacing.
12. Tap Auto Punctuate to automatically insert a period after a word by double-tapping the spacebar. The slider and slider button turn green to signify the feature is on.
13. Tap Keyboard Swipe to either enter text by sliding your finger across the keyboard or sliding your finger across the keyboard to move the text cursor on the screen.

14. Tap Key-Tap Feedback in the list.
15. Slide the Sound slider from right to left so the Galaxy Tab A makes no sound each time you press a key. The slider and slider button turn gray to signify the feature is off. Turn on the key-tap sound feature by sliding the Sound slider from left to right.
16. Slide the Character Preview from left to right to display the character you’re typing on the keyboard in a box above the key for about a second after you tap the key. The slider and slider button turn green to signify the feature is on.

17. Tap Other Settings in the list.
18. If you have the Tab A with S Pen, tap Pen Detection to view the handwriting pad so you can write instead of type, such as when you compose an email message. The slider and slider button turn green to signify the feature is on.
19. Tap Adjust Keyboard Size to adjust the size of the keyboard on the screen so the keyboard is slightly larger or slightly smaller than the default size.
20. Tap Reset Settings if you change your mind after you make settings and decide you want the default settings instead.
21. Tap the Back icon at the left side of the menu bar to return to the Samsung Keyboard Settings screen.

Modifying More Settings
There are too many settings in Android to cover in this book, but here are some of the more important settings that you should know about:
1. On the Home screen, swipe from right to left to view the second Home screen and then tap Settings.

2. Tap Display in the settings list.
3. Set the brightness level by moving the slider in the Brightness area to change the brightness level.
4. Change the brightness to its default level by tapping the Auto check box.
5. Tap Screen Timeout.
6. Select the period of inactivity after which the screen times out and goes dark. The default is 5 minutes. If you don’t want to change the time interval, tap Cancel.


Powering Up Your Screen
After the screen goes dark, you can easily start it again by pressing the Home button or Power button. If your Galaxy Tab A is password-protected (or PIN- or pattern-protected), you must type your password (or PIN or pattern) to start using the Galaxy Tab A again. If the Tab A requires you to scan your finger, you need to place the appropriate finger on the Finger Scanner area so the device can scan it and give you access to the system.
8. Set the font style by tapping the button to the left of the style name. When you select the font style, you can choose from the built-in fonts or you can search for, purchase, and download fonts from the Google Play Store.
9. If you find that the text isn’t legible enough, you can enhance clarity of the text by moving the slider from left to right to make the text smaller or larger, respectively.
10. The text above the slider shows you what the text looks like so you can decide if the font size and/or style you selected is right for you.
11. When you select a new font size and/or style, tap OK.

12. After you change the font size and/or style, the new font style and/or size appears within the Settings page after a second or two. If you want to change the font size again, tap Font in the menu and then change the style and/or size in the Font window.