
Chapter 14. Raspberry Pi Minecraft Server
Minecraft, a sandbox construction game originally created by the Swedish programmer Markkus “Notch” Persson (http://is.gd/Y7W6Gy) and later absorbed by Notch’s company Mojang AB (http://is.gd/07x9Au), is more than a game: It is a phenomenon. In a gaming context, “sandbox” means that the game has no defined storyline; instead, players can roam around the game world and do pretty much whatever they want (see Figure 14.1).

As a game developer you know you are onto something when your product is used in school as well as home, and gamers collaborate with each other and lose sleep playing it.
Retro video game nerds such as myself deeply appreciate the chunky 8-bit graphics. In fact, the visual presentation of Minecraft reminds me of a cross between Super Mario Brothers for the Nintendo Entertainment System and Doom for the PC.
As the game title suggests, the two main tasks in Minecraft are mining, which involves breaking various and sundry ore blocks in search of useful raw materials, and crafting, which means taking mined raw materials and fashioning tools, weapons, furniture, food...you name it.
Minecraft includes two primary game modes:
![]() Survival: The player’s avatar can die, and the world is inhabited by enemy nonplayer characters (NPCs) called mobs that can destroy the player. The player also starts with no tools or raw materials but can install other user-made modifications (mods) to change how the game world works. The focus on this mode is on exploration, combat, resource gathering, and construction.
Survival: The player’s avatar can die, and the world is inhabited by enemy nonplayer characters (NPCs) called mobs that can destroy the player. The player also starts with no tools or raw materials but can install other user-made modifications (mods) to change how the game world works. The focus on this mode is on exploration, combat, resource gathering, and construction.
![]() Creative: The player’s avatar cannot die and is capable of flight. No mobs exist in this world. The player’s inventory includes all items found in the game, including materials, eggs, potions, and so forth. Because Creative mode involves no combat and has no need to forage for tools and resources, the focus here is on creative construction.
Creative: The player’s avatar cannot die and is capable of flight. No mobs exist in this world. The player’s inventory includes all items found in the game, including materials, eggs, potions, and so forth. Because Creative mode involves no combat and has no need to forage for tools and resources, the focus here is on creative construction.
Minecraft includes two additional gameplay modes, Adventure and Hardcore, that aren’t completely fleshed out as of this writing in summer 2013. You can read more about Minecraft game modes by visiting the Minecraft Wiki at http://is.gd/8kEFWj.
Note: Learn How to Play Minecraft
In this chapter, I provide only the most cursory of introductions to Minecraft and assume you have at least a passing familiarity with its gameplay. For a complete introduction to the game, please read my Pearson colleague Stephen O’Brien’s excellent book (which I tech-edited it, in fact), The Ultimate Player’s Guide to Minecraft (http://is.gd/yvXXbl).
In general, I think the main reasons why Minecraft is so popular are the following:
![]() Players can assert and flex their creativity.
Players can assert and flex their creativity.
![]() The game enables players to create objects and share them with other players around the world.
The game enables players to create objects and share them with other players around the world.
![]() The game is extensible, allowing proficient players to broaden and deepen the game world.
The game is extensible, allowing proficient players to broaden and deepen the game world.
Minecraft is also used in primary, secondary, and higher education. Why? Let’s count some of the ways:
![]() The game teaches problem-solving skills in a manner that is engaging and fun.
The game teaches problem-solving skills in a manner that is engaging and fun.
![]() It teaches players how to use code to modify the behavior of a system (modding; more on that subject later).
It teaches players how to use code to modify the behavior of a system (modding; more on that subject later).
![]() The game itself can be used as an instructional tool. For instance, a teacher can build lessons inside a shared Minecraft game world, and the students can interact with the lesson as avatars.
The game itself can be used as an instructional tool. For instance, a teacher can build lessons inside a shared Minecraft game world, and the students can interact with the lesson as avatars.
The Mojang business model for Minecraft is to give players what they want and port the game to as many different computing platforms as possible. Check it out:
![]() Minecraft: The original game is coded in Java and runs on Windows, OS X, and Linux.
Minecraft: The original game is coded in Java and runs on Windows, OS X, and Linux.
![]() Minecraft-Pocket Edition: This is a heavily scaled-back edition of Minecraft that is coded in C++ and runs on iOS (iPhone, iPod touch, iPad) and Android.
Minecraft-Pocket Edition: This is a heavily scaled-back edition of Minecraft that is coded in C++ and runs on iOS (iPhone, iPod touch, iPad) and Android.
![]() Minecraft: Xbox 360 Edition: This is not only the full version of Minecraft, but the game also includes several features that are specific to the Xbox 360 port, such as simpler crafting mechanics, in-game tutorials, and robust split-screen and Internet multiplayer gaming.
Minecraft: Xbox 360 Edition: This is not only the full version of Minecraft, but the game also includes several features that are specific to the Xbox 360 port, such as simpler crafting mechanics, in-game tutorials, and robust split-screen and Internet multiplayer gaming.
![]() Minecraft: Pi Edition: This is an educational Minecraft port that is largely unlocked and allows the gamer much greater control over the game world compared to the other editions of the game.
Minecraft: Pi Edition: This is an educational Minecraft port that is largely unlocked and allows the gamer much greater control over the game world compared to the other editions of the game.
Naturally, this book is all about the Raspberry Pi, so I am constraining the discussion in the remainder of this chapter to Minecraft: Pi Edition.
The Minecraft server forms the basis of the multiplayer aspect of the game. Therefore, I also cover how to build a Raspberry Pi-powered Minecraft game server.
Let’s get to work!
Installing Minecraft Pi
According to the documentation at the Minecraft Pi website (http://is.gd/ORylMx), Minecraft Pi has been optimized to run under the official Raspbian Linux distribution. Therefore, if you haven’t already flashed your SD card and gotten your Raspbian-based Pi up and running, please do that first before proceeding. Remember that we learned how to flash SD cards in Chapter 4, “Installing and Configuring an Operating System.”
Before you begin, it’s important to note that Minecraft Pi doesn’t work over a VNC connection, so make sure you boot your Pi with a monitor, keyboard, and mouse attached.
Notice that in Linux, you run executable programs from the current working directory using the dot slash notation. This shorthand notation enables you to run programs without (a) having to supply the entire path to the executable, or (b) having to put the app path in the system’s PATH environment variable.
Minecraft’s Home menu screen is displayed in Figure 14.2.

To play, click Start Game and click Create New to build a new world. Here are your basic controls (you can also read ~/Minecraft/mcpi/CONTROLS.txt):
![]() Mouse: Turn your avatar.
Mouse: Turn your avatar.
![]() Left Mouse Button: Remove block.
Left Mouse Button: Remove block.
![]() Right Mouse Button: Place/hit block.
Right Mouse Button: Place/hit block.
![]() Mouse Wheel: Select inventory item.
Mouse Wheel: Select inventory item.
![]() W, A, S, D: Move your avatar forward, backward, left and right, respectively.
W, A, S, D: Move your avatar forward, backward, left and right, respectively.
![]() SPACE: Jump.
SPACE: Jump.
![]() E: Open inventory.
E: Open inventory.
![]() 1-8: Select inventory slot to use.
1-8: Select inventory slot to use.
![]() ESC: Show or hide game menu.
ESC: Show or hide game menu.
![]() TAB: Release mouse.
TAB: Release mouse.
Minecraft Pi Edition is built from the Minecraft Pocket Edition code base, so if you played Minecraft on your iOS or Android device, then you pretty much understand how the game works on the Raspberry Pi. One significant limitation of the Minecraft Pi Edition, at least in the initial 0.1.1 release, is that the game supports only the Creative game mode.
Accessing the Python API
An application programming interface (API) is a set of rules that define how a user can access and potentially modify the default code base for an application. As I said earlier, Minecraft Pi Edition was developed as a way to teach people how to learn computer programming in the context of game development. Accordingly, the good people at Mojang include class libraries for both Python (located in ~/Minecraft/mcpi/api/python/mcpi) and Java (located in ~/Minecraft/mcpi/api/java) programming languages.
Note: Head of the Class
In object-oriented programming (OOP) terminology, you can look at a class as a template that describes the attributes (properties) and behaviors (methods) of an object. All objects in Minecraft are originally defined as classes. A class library is simply a code file that is filled with class (object) definitions.
The Python class libraries are Python 2, not Python 3, but don’t worry about that; everything you learned in Chapters 10, “Programming Raspberry Pi with Python—Beginnings,” and 11, “Programming Raspberry Pi with Python—Next Steps,” still applies. I’m just speculating, but I believe that Mojang chose Python 2 over Python 3 because they wanted the class libraries to reach the widest possible audience. After all, most OS X and Linux distributions include Python 2 by default.
In short, you have a handful of Python and Java scripts that provide the Minecraft player with tools to control the game world. This is pretty cool stuff, so let’s dive right in, shall we?
Task: Loading the Minecraft Python Libraries
1. Run Minecraft Pi Edition and start a new game. You must be in world to see any results of your API programming.
2. Press the TAB key to escape the game and free you up to go elsewhere in LXDE.
3. Open an LX Terminal session and create a working directory for your scripts and copy the API files into the new folder:
cd
mkdir Minecraft-magpi
cp -r Minecraft/mcpi/api/python/mcpi/ Minecraft-magpi/Minecraft
I’m assuming that Minecraft Pi exists in the path ~/Minecraft. Also note that the API library files need to be stored in a subdirectory called Minecraft.
4. Let’s create a new script file:
sudo nano Minecraft-magpi/mctest.py
5. Populate the file like so:
#!usr/bin/env python
import Minecraft.Minecraft as Minecraft
import Minecraft.block as block
import time
mc = Minecraft.Minecraft.create()
mc.postToChat("Hello, World of Minecraft!")
time.sleep(5)
Whew—that is a lot of code. Let’s take it line by line:
1: This is the traditional “shebang” line that gives the operating system direction for finding the Python interpreter
2–4: Import relevant modules. The first two calls pull two classes from the API libraries; one for the Minecraft world itself, and the second one for the Minecraft block. The time module is built into the Python default class libraries.
5: Instantiate (or bring into being) an instance of the Minecraft world, packed into a variable named mc. This code essentially connects you to the running Minecraft instance on the Pi.
6: Use the postToChat method of the Minecraft object to send a chat message to the game session.
7: The sleep function controls how long you want your chat message to stay on screen.
Save your work and close the script file when you’re finished.
6. Now let’s test by running the script. Make sure to switch focus back to the game screen to get the full effect.
python Minecraft-magpi/mctest.py
You can view the output in Figure 14.3.

The overall Minecraft Pi Edition Python API specs can be found in the file ~/Minecraft/mcpi/api/spec/mcpi_protocol_spec.txt. This file explains how all of the API functions work. It’s recommended reading, for sure.
How about another example? Note that the player’s avatar coordinates are displayed in the upper-left corner of the screen. Check out Figure 14.4 for a visual explanation of what these coordinate values mean.

FIGURE 14.4 Minecraft Pi Edition displays the player’s location onscreen by using x, y, and z coordinates.
As you can see by studying Figure 14.4, coordinates denote an object’s specific location within the Minecraft world.
Task: Making Your Player Jump High!
1. Reopen the mctest.py script file you created in the previous exercise and open it up in nano or your favorite text editor.
2. Make the code in your script file look like mine:
#!usr/bin/env python
import Minecraft.Minecraft as Minecraft
import Minecraft.block as block
import time
playerPos = mc.player.getPos()
mc.player.setPos(playerPos.x, playerPos.y + 100, playerPos.z)
mc.postToChat("You are gonna fall!")
time.sleep(5)
There are two new lines of code here (lines 5 and 6) relative to the previous task:
![]() Define a variable that stores the player’s current onscreen position (x, y, and z coordinates)
Define a variable that stores the player’s current onscreen position (x, y, and z coordinates)
![]() Adjust the player’s position 100 blocks along the y (vertical) axis. This has the effect of boosting the avatar high into the air.
Adjust the player’s position 100 blocks along the y (vertical) axis. This has the effect of boosting the avatar high into the air.
3. When you run the script, be sure to take control of the game within five seconds because your avatar is going to typify the old law “What goes up must come down!”
How about we do one more quick example, this one demonstrating how you can alter the mining and crafting aspects of the game.
1. Again, open up your previous mctest.py script file, this time editing the contents to match the following:
#!usr/bin/env python
import Minecraft.Minecraft as Minecraft
import Minecraft.block as block
import time
PlayerPos = mc.player.getPos()
PlayerTilePos = mc.player.getTilePos()
mc.setBlocks(playerTilePos.x - 25, playerTilePos.y - 1, playerTilePos.z - 25, playerTilePos.x + 25, playerTilePos.y -1, playerTilePos.z + 25, block.DIAMOND_BLOCK)
mc.postToChat("Now thats a big diamond floor!")
2. Switch to your game screen to verify that the code has gone into effect. The stunning, valuable result is shown in Figure 14.5.
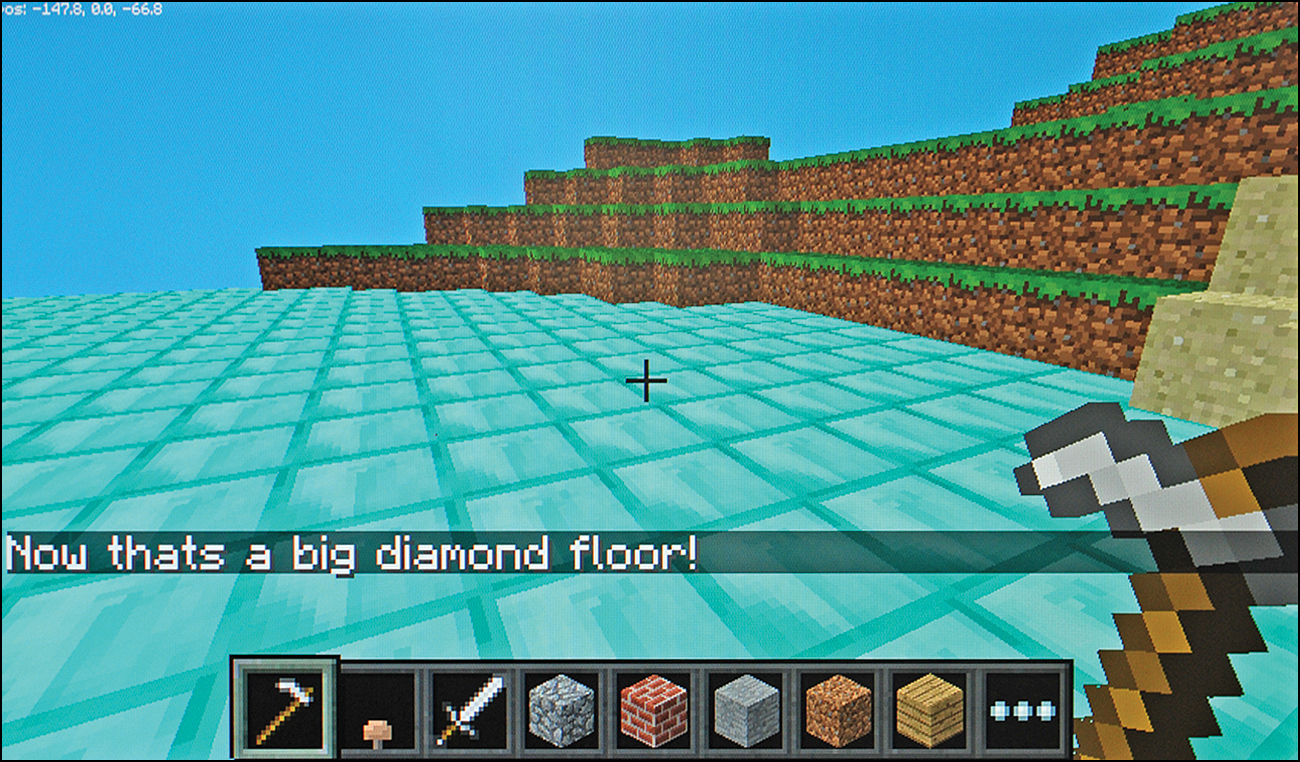
You learned in the previous example that mc.player.getPos() determines the current coordinates of the player.
The PlayerTilePos variable determines which tile the player is currently standing on.
The setBlocks function is pretty robust; be sure to read the documentation to get the names of all the block types. The generic formulation of the function is
setBlocks(x1, y1, z1, x2, y2, z2, blockType, blockData),
This code takes two sets of coordinates and fills the gap between them with a particular block type. In this case it creates 25 diamond blocks in front of, behind, to the left, and to the right of the player, which places the player directly in the center of a big, diamond square. Pretty cool, eh?
Building a Minecraft Server
At its core, Minecraft is a single-player game. However, multiplayer functionality is built into the platform, which enables more than one player to coexist in the same game world. What’s different about Minecraft multiplayer from, say, Call of Duty, is that in Minecraft players tend to work cooperatively in building things rather than against each other.
Numerous public Minecraft servers are available for connection, and you can always download the free Minecraft Multiplayer Server software for Windows, OS X, or Linux at http://is.gd/Scuod8.
The challenge to making your Raspberry Pi a Minecraft server is, naturally, the board’s hardware resource limitations, but also the heaviness of Java. As it happens, the multiplayer server software is a Java server application, so you need to do some extra homework to make this happen using your battle-weary Pi.
To prepare your Pi for duty as a Minecraft server, make the following tweaks to your system:
![]() If you can, use your Ethernet cable to connect to your local area network instead of a Wi-Fi dongle. You’ll get more reliable data transmission and speed.
If you can, use your Ethernet cable to connect to your local area network instead of a Wi-Fi dongle. You’ll get more reliable data transmission and speed.
![]() Run sudo raspi-config and adjust the CPU/GPU memory split in favor of the CPU. Some server operators suggest setting the GPU to only 16MB. Then overclock the Pi as much as you dare.
Run sudo raspi-config and adjust the CPU/GPU memory split in favor of the CPU. Some server operators suggest setting the GPU to only 16MB. Then overclock the Pi as much as you dare.
I cover the CPU/GPU split and overclocking in detail in Chapter 18, “Raspberry Pi Overclocking.”
![]() Make sure your system is current by running
Make sure your system is current by running
sudo apt-get update && sudo apt-get upgrade
![]() If you’ve installed applications and services that run in the background, consider reflashing that SD card or loading up another card with a pristine install of Raspbian. You don’t need unwanted cruft slowing down your Minecraft server.
If you’ve installed applications and services that run in the background, consider reflashing that SD card or loading up another card with a pristine install of Raspbian. You don’t need unwanted cruft slowing down your Minecraft server.
You have the decision whether to install a stock Minecraft server using the installer provided by Mojang or to install a modified version. The two most popular Minecraft server alternatives are
![]() CraftBukkit (http://is.gd/Dpm6VE): Modified version of the Mojang Minecraft server file; allows for plugins and various other extensions to the Minecraft server environment. Specifically, CraftBukkit is the Bukkit server executable, and Bukkit represents the programming API.
CraftBukkit (http://is.gd/Dpm6VE): Modified version of the Mojang Minecraft server file; allows for plugins and various other extensions to the Minecraft server environment. Specifically, CraftBukkit is the Bukkit server executable, and Bukkit represents the programming API.
![]() Spigot (http://is.gd/Nj654R): Modified version of the Bukkit API; optimized for smaller servers (like the Raspberry Pi!).
Spigot (http://is.gd/Nj654R): Modified version of the Bukkit API; optimized for smaller servers (like the Raspberry Pi!).
In this chapter I take you down the Spigot route. That won’t exempt you from the Java requirement, but you’ll have a much leaner, cleaner, meaner, and better performing Minecraft server.
Task: Installing Java and the Minecraft Server
1. From a shell prompt, verify that you don’t have Java installed:
java -version
This command should throw an error if Java is not present on the system.
2. Pull down and install an appropriate Java distribution now, after first ensuring that your Pi has the appropriate certification authority (CA) certificates:
sudo apt-get install ca-certificates
sudo wget http://www.java.net/download/JavaFXarm/jdk-8-ea-b36e-linux-arm-hflt-29_
nov_2012.tar.gz
This installs a version of Java that Oracle developed expressly for the Raspberry Pi; read more about it at the Java.net website: http://is.gd/L8T7fJ.
3. That Java package name is huge, so rename it to make it more manageable:
mv jdk-8-ea-b36e-linux-arm-hflt-29_nov_2012.tar.gz jdk.tar.gz
Note: Tab Completion Rocks
I know that I’ve mentioned this before, but it bears repeating: You can double, triple, or quadruple your Linux command-line navigation if you get into the habit of pressing Tab after typing the first few characters of a folder or file name. Tab completion works; it really does!
4. Perform some housekeeping and actually install Java:
mkdir -p /opt
sudo tar zxvf jdk.tar.gz /opt
rm jdk.tar.gz
5. Verify you have Java installed:
sudo /opt/jdk1.8.0/bin/java –version
6. Cool! With Java installed, you’re halfway home. Let’s now install Spigot:
cd
sudo wget http://ci.md-5.net/job/Spigot/lastBuild/artifact/Spigot-Server/target/
spigot.jar
By the time you read this, md-5 will have released a newer build of Spigot. Thus, keep the website http://is.gd/3nF2tr bookmarked and edit the URL just given to reference the latest and greatest build.
7. It’s time to start the Minecraft server. Doing so creates the server.properties file from which you can tweak the server’s behavior.
sudo /opt/jdk1.8.0/bin/java -Xms128M -Xmx256M -jar /home/pi/spigot.jar nogui
In this statement, you start the Java virtual machine using a RAM footprint of between 128MB on the low end and 256MB on the high end. The nogui parameter is important because, of course, you need to run your server as lean and mean as possible to conserve system resources.
Expect it to take several minutes for the server to fully generate the Minecraft environment. While the server bootstraps, you see hundreds of lines of output scroll in your Terminal window. Do not be alarmed.
8. To test the server, start Minecraft from a remote system, click Multiplayer in the splash screen (Join Game in Minecraft Pi Edition), and select your Raspberry Pi server from the server list (see Figure 14.6).

Note: Version Control Again, and Yet Again
If you see the “Server Outdated” error message when you try to connect to the server from the Minecraft client, you should download the latest version of the Spigot software. You can keep abreast of version releases at the Spigot website at http://is.gd/3nF2tr.
9. Double-click the Pi server in the list, and you’re logged in!
Note that if you want to advertise your Minecraft Pi Server to the Internet, you need to configure your router to forward traffic on Transmission Control Protocol (TCP) port 25565. You can learn how to configure an internal network device with a public IP address by reading Chapter 15, “Raspberry Pi Web Server.” You can learn how to configure port forwarding on your router by visiting PortForward.com (http://is.gd/ttSr5H).
Administering a Minecraft Server
Minecraft server administration is an art and science unto itself and is therefore far outside the scope of this book. Nevertheless, I want to give you the core need-to-know information.
In the Terminal window from which you started the Minecraft server, type help to get a list of Minecraft server commands.
A Minecraft server operator is known as an op (pronounced op or oh-pee, and sometimes stylized as OP). Before you start issuing online commands, however, you should learn how to modify the Minecraft server configuration file.
Type stop in the Minecraft Server console to stop the server. Next, open the config file, which is located by default in your home directory:
sudo nano server.properties
The server.properties file consists of simple key/value pairs; the trick is learning what each property means. I suggest you review the list at the Minecraft Wiki (http://is.gd/awZBsZ).
Visually, the file isn’t much to look at; it’s just a typical plain text configuration file. For instance, here are the first few lines of a sample server.properties file:
#Minecraft server properties
#Wed May 22 21:15:19 EDT 2013
generator-settings=
allow-nether=true
level-name=world
enable-query=false
Note: Operating a Minecraft Server
In Minecraft server nomenclature, an operator, or OP (oh-PEE, or ohp) is a superuser who has full control over the entire server. Obviously, you as the server owner should have OP privileges, but you should be very careful before assigning OP to any other Minecraft users.
Make your Minecraft user an OP by typing the following command in the server console:
op <username>
You see this feedback display onscreen directly in your game session. To issue a server command in the game, precede the command with a slash (/). For instance
/me <message>
This command sends a status message to all connected players on the server. You can use /tell to send private messages to individual users. The in-game multiplayer experience is represented in Figure 14.7.

If you find the Minecraft server command syntax similar to that of Internet Relay Chat (IRC), then good for you—that’s exactly what it feels like.
As an OP, you have godlike control over the server-spawned Minecraft world. For instance, if it’s nighttime and you want to jump time to dawn, try this from the game:
/time set 0
A time value of 12000 takes you to dusk.
MinecraftServerHost.net provides a good, comprehensive list of Minecraft player and op server commands at http://is.gd/ttSr5H. The trusty Minecraft Wiki is also helpful (http://is.gd/ax3Lrr).
Minecraft Plugins
Finally, we come to the subject of plugins, which are add-ons to the Minecraft server that enable you to vastly extend your control over the multiplayer gaming environment. Many Minecraft OPs search for plugins by browsing the Bukkit website at http://is.gd/P6l0Rs. Here is the high-level installation overview:
![]() Download the plug-in .JAR file to your server.
Download the plug-in .JAR file to your server.
![]() Place the .JAR file in your plugins directory.
Place the .JAR file in your plugins directory.
![]() Stop and start the server.
Stop and start the server.