
6. Panels
In This Chapter
The Photoshop panels that are used in this book
Managing presets via the pickers and panels
Exporting and importing presets
You will accomplish most of your editing work in Photoshop using the panels, which are the focus of this chapter, as well as the Options bar and various editing tools.
To become a Photoshop speed demon, avoid using the menu bar except to choose commands that aren’t available elsewhere in the interface. The panels are opened individually via the Window menu.
In the preceding chapter, you learned how to arrange the panels onscreen (see pages 93–95). Here you will learn more about their specific functions. After a quick view of the panel icons and instructions for using the Tools panel, you will find illustrations and a brief summary (in alphabetical order) of all the panels that are used in this book. You can browse through the descriptions with or without glancing at or fiddling with the panels onscreen. Then, as you become more acquainted with Photoshop, you can revisit this chapter and use it as a reference guide. (This chapter is just an introduction to the panels. In other chapters, you will find detailed instructions for specific panels and put them to lots of practical use.)
The final section of this chapter gives steps for managing and saving presets (predefined settings), which are stored and accessed via Photoshop panels and pickers. Some examples of presets are solid colors on the Swatches panel, styles on the Styles panel, and shapes on the Custom Shape picker.
The Photoshop panel icons
Each panel in Photoshop has a unique icon that displays when the panel is either fully or partially collapsed. Until you learn to identify collapsed panels by their icons, you may want to keep your panel docks only partially collapsed (so the names display) rather than fully collapsed to just icons.A You can identify the panels via Tool Tips (see the sidebar on this page).

A Eventually, you will be able to quickly identify the panels by their icons.
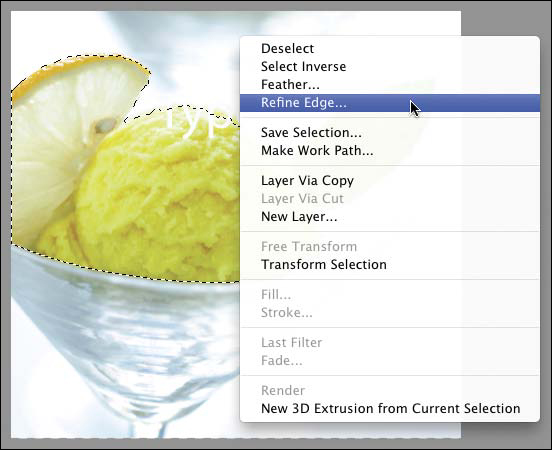
This is the context menu for a selection.
Using Tool Tips

This Tool Tip is listing a tool name and shortcut.

This Tool Tip is identifying a panel.
The Photoshop panels that are used in this book*
*The 3D tools, and the 3D, Animation, Measurement Log, Notes, and Paths panels aren’t covered in this book, so they are not discussed in this chapter.
Using the Tools panel
To display the Tools panel if it’s hidden, choose Window > Tools (the panel is illustrated on the next three pages). To select a tool, do one of the following:
• If the desired tool is visible on the Tools panel, just click it.
• To cycle through related tools in the same slot, hold down Alt/Option and click the visible one.
• To choose a hidden tool, click and hold on the visible tool, then click a tool on the menu.
• To select a tool quickly, press its designated letter shortcut (don’t do this if your cursor is inserted in type). The shortcuts are shown on the next three pages, as well as in the Tool Tips. If the Use Shift Key for Tool Switch option is unchecked in Edit/Photoshop > Preferences > General, you can simply press the designated letter to cycle through related tools in the same slot (e.g., press L to cycle through the three lasso tools). If the preference option is checked, you have to press Shift plus the designated letter (e.g., Shift-L).
• To spring-load (access) a tool temporarily while another tool is selected, press and hold down its assigned letter key. See the sidebar on this page.
To see information pertaining to the current tool (called a tool hint), look at the bottom of the Info panel. If you don’t see the tool hint, choose Panel Options from the Info panel menu (upper-right corner of the panel), then check Show Tool Hints (see page 110).
Before using a tool that you’ve selected, you need to choose settings for it on the Options bar. For example, for the Brush tool, you would choose a brush preset, as well as diameter, hardness, blending mode, and opacity settings. If the Options bar is hidden, show it by choosing Window > Options (see page 98).
The current Options bar settings for a specific tool remain in effect until you change them, reset that tool, or reset all tools. To restore the default settings to the current tool, right-click the thumbnail for the Tool Preset picker (located at the left end of the Options bar) and choose Reset Tool from the context menu.A To restore the default settings to all tools, choose Reset All Tools from the same menu, then click OK in the alert dialog.
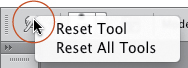
A To access these two commands, right-click the Tool Preset picker thumbnail, which is located at the left end of the Options bar.
In Edit/Photoshop > Preferences > Cursors, you can control whether the pointer displays as cross-hairs or as the icon of the current tool or, for some tools, as a circle either the size or half the size of the current brush diameter, with or without crosshairs inside it (see page 440).
For editing tools — such as the Brush, Pencil, Clone Stamp, Pattern Stamp, History Brush, Art History Brush, Blur, Sharpen, Smudge, Dodge, and Burn tools — you can choose from hundreds of brush tips, and you can also change many brush characteristics, such as size, hardness, and opacity (see page 272).
Tools panel
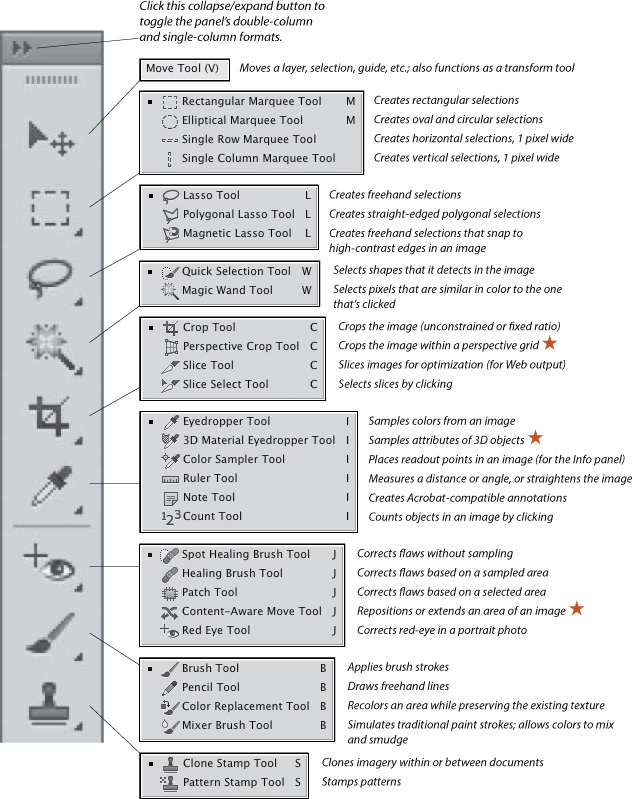
The upper part of the Tools panel
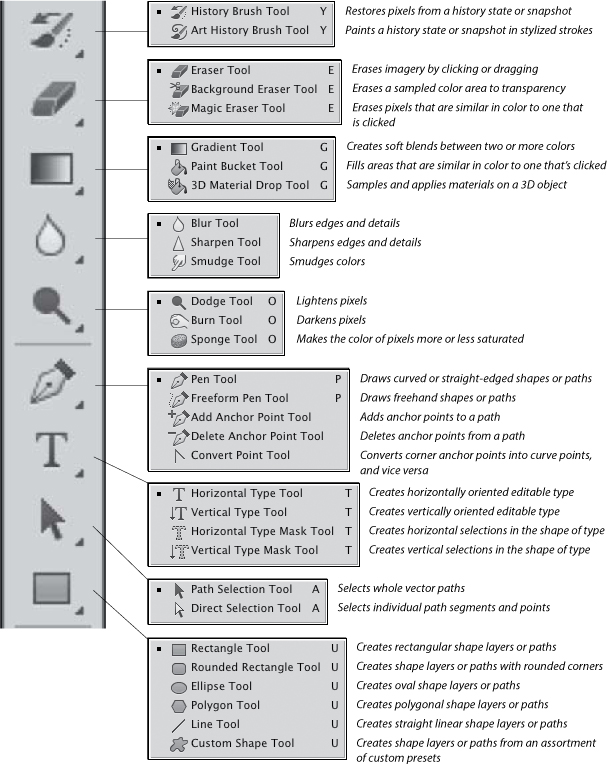
The midsection of the Tools panel

The lower part of the Tools panel
Actions panel 
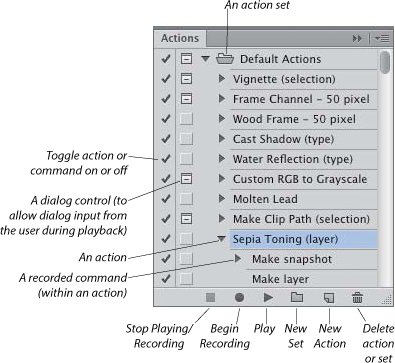
An action is a recorded sequence of commands that can be replayed on one image or on a batch of images. For instance, you could use an action to save a copy of a document (or multiple documents) in a different format or color mode, or to apply filters for a special effect, such as to add a texture or frame. Using the Actions panel, you can record, store, edit, play, delete, save, and load actions. See Chapter 22.
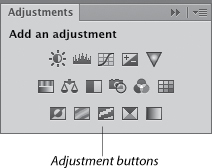
Adjustments panel 
Each button on the Adjustments panel produces a different kind of adjustment layer, which you can use to apply flexible color and tonal edits and corrections to an image (the buttons are identified on page 202). Adjustment layers are listed on the Layers panel, but you choose and edit settings for them on the Properties panel. See Chapter 12.
Brush panel 
You will use the Brush panel to choose brush tips and custom brush settings for tools, such as the Art History Brush, Blur, Brush, Burn, Clone Stamp, Dodge, Eraser, History Brush, Mixer Brush, Pattern Stamp, Pencil, Sharpen, or Smudge tool. Using this panel, you can also choose special options for a graphics tablet and stylus.

If you click an options set name on the left side of the panel, the current settings for that set display on the right side. At the bottom of the panel, an example of a brush stroke made with the currently selected tip and settings displays in a preview. See Chapter 14.
Note: You can open this panel in several different ways: by choosing the panel name from the Window menu; by clicking the Toggle Brush Panel button ![]() on the Brush Presets panel; or if a tool that uses a brush is selected, by clicking the Toggle Brush Panel button
on the Brush Presets panel; or if a tool that uses a brush is selected, by clicking the Toggle Brush Panel button ![]() on the Options bar.
on the Options bar.
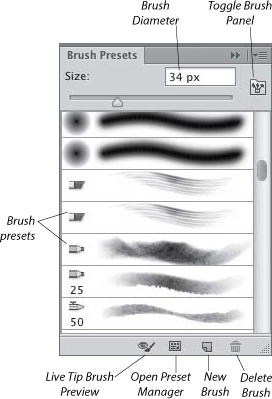
Brush Presets panel 
Use the Brush Presets panel to store, display, and choose from an assortment of predefined and user-created brush presets (tips and settings), for use with various editing tools. You can also use this panel to change the size of any brush preset temporarily, and to save a brush that you have customized as a new preset.
Via buttons at the bottom of the panel, you can turn the Live Brush Tip Preview on or off, and also access the Preset Manager dialog. This panel can be opened from the Window menu or by clicking the Brush Presets button on the Brush panel. See page 277.
Channels panel 
The Channels panel lists and displays the thumbnails for all the color channels in the current document. To show an isolated channel in the document window, click the channel name or press the keystroke that is listed on the panel. To redisplay the composite image (all the channels combined, such as RGB or CMYK), click the topmost channel on the panel or press Ctrl-2/Cmd-2. See pages 2–4.
You can also use this panel to save and load alpha channels, which are saved selections (see page 164). And you can use it to create and store spot color channels, which commercial print shops use to print mixed ink colors (such as those in the PANTONE PLUS family).

Using Scrubby and Pop-Up Sliders in Photoshop
• For a fast way to change numerical values on the Options bar, on some panels (such as the Layers and Character panels), and in some dialogs, use the scrubby slider: Drag slightly to the left or right across the option name or icon.
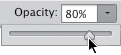
• To access a pop-up slider (e.g., to choose an Opacity percentage on the Layers panel), click the arrowhead. To close a slider, click anywhere outside it or press Enter/Return. Tip: If you click an arrowhead to open a slider, you can press Esc to close it and restore its last setting.
• To change a value incrementally, click in a field in a dialog or panel (such as on the Character panel), then press the up or down arrow key on the keyboard.
Character panel 
You can choose attributes for the type tools on the Character panel, which is shown here, or on the Options bar (see page 356). Open this panel from the Window menu, or when a type tool is selected, by clicking the Toggle Character and Paragraph Panels button ![]() on the Options bar. See Chapter 19.
on the Options bar. See Chapter 19.

Character Styles panel 
Using type styles, you can format and style your text more efficiently than by choosing individual type attributes, and you also ensure that your type has a consistent look throughout your document and among related documents. When you edit a style, all the text to which the style is linked updates automatically to reflect those changes.
Use character styles to apply unique attributes (e.g., a boldface font style, larger size, or different color) in order to accentuate key characters or phrases. Using the Character Styles panel, you can create and edit character styles and apply them to your text. To style entire paragraphs, use the Paragraph Styles panel. See page 365.

Clone Source panel 
The Clone Source panel lets you keep track of up to five different source documents when cloning pixels with the Clone Stamp tool. The sources are represented by a row of buttons at top of the panel. You can also use this panel to hide, show, and control the opacity and mode of the clone overlay, and flip, scale, rotate, invert, or reposition the source pixels before or as you clone them. See pages 262–263.

Color panel 
There are several ways to choose colors in Photoshop, including via the Color panel. After selecting a color model from the panel menu, you can either mix a color via the sliders or quick-select a color by clicking in the color ramp. See page 188. Colors are applied to an image by various tools (e.g., the Brush tool or Pencil tool) and commands (e.g., Edit > Fill, Image > Canvas Size).
To open the Color Picker (or interchangeably, the Color Libraries dialog), which are other methods for choosing colors, click once on the Foreground Color or Background Color square on the Color panel if it’s already selected (has an outer white border), or double-click the square if it’s not selected.

Histogram panel 
On the Histogram panel, you can view a graph of the distribution of tonal (light and dark) values in the current image, and compare them with modified tonal values as you apply color and tonal adjustments.
Via the Channel menu, you can opt to have the panel display data for the composite channel (all the channels combined, as shown at right) or for just a single channel. You can also expand the panel to display a separate histogram for each channel. See pages 208–209.

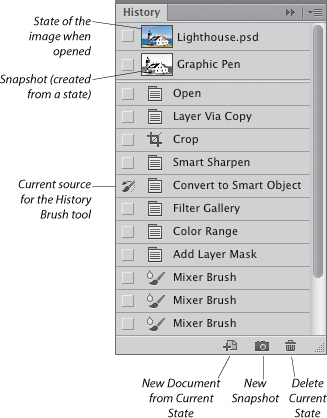
History panel 
Each edit that is made to a document during the current work session (e.g., the use of a filter, tool, or command; the creation of a shape, type, or image layer; the application of a layer or layer comp) is listed as a separate state on the History panel, from the “Open” unedited state of the document at the top to the most recent state at the bottom. The most recent (last) edit keeps changing as you continue editing your document. If you click a prior state, the document is restored to that stage of editing. See Chapter 10.
The oldest history states are deleted from the panel as new edits are made — that is, when the maximum number of history states is reached (as specified in the History States field in Edit/Photoshop > Preferences > Performance). All states are deleted when you close your document.
The New Snapshot command creates states that remain on the panel until you close your document, regardless of the current History States preference setting or the number of edits you apply.
The History Brush tool works in conjunction with the History panel to restore areas within your brush strokes to a state or snapshot that you designate as a source (see pages 283–284).
Info panel 
The Info panel provides up-to-the-minute data about your document. For example, it displays a color breakdown of the pixel under the pointer at its current location. As you apply color corrections, the panel displays the post-edit percentages, too. If you need yet more color data, you can place up to four color samplers in your document, and the Info panel will display readouts for those locations. The panel also lists the current coordinates of the pointer on the x/y axes.
Additional data may display on the Info panel depending on which tool is being used, such as the angle (A) and distance (L) between points as you use the Ruler tool; the dimensions (W and H) of a rectangular or elliptical selection or of a crop box; or the width (W), height (H), angle (A), and horizontal skew (H) or vertical skew (V) values of a layer or selection as you apply a transform edit.

Press a mini arrowhead for a color readout on the panel to choose a color model (it can differ from the current document color mode). If you prefer to do this via a dialog, choose Panel Options from the panel menu, then select a Mode for the First Color Readout and the Second Color Readout (see the dialog below).
In the Info Panel Options dialog, you can also choose Ruler Units for Photoshop (including the rulers in the document window), check which categories of Status Information you want to view in the lower part of the panel, and check Show Tool Hints to have the panel display helpful tips about the current tool. You can also choose a unit of measurement for Photoshop via the menu in the X and Y readout area on the Info panel.

Use the Info Panel Options dialog to control which features are displayed on the panel.
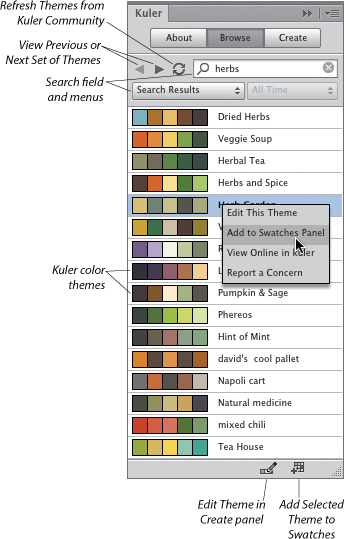
Kuler panel 
Kuler (pronounced “cooler”) is a free, Web-hosted Adobe application that lets users create and upload color groups, called color themes. By using the Kuler panel in Photoshop, you can access and browse those themes. To use this panel, choose Window > Extensions > Kuler, and also make sure Allow Extensions to Connect to the Internet is checked in Edit/Photoshop > Preferences > Plug-Ins.
To use the Kuler panel efficiently, take advantage of its search field and menus. Enter a theme or creator name, or search by choosing ratings criteria from the menus. To add the currently selected theme to the Swatches panel in Photoshop, from the menu on the right side of that theme, choose Add to Swatches Panel. To save your favorite parameters for future searches, choose Custom on the first menu, enter one or more search terms, then click Save; those terms will be listed on the menu. To learn more about Kuler, go to kuler.adobe.com.
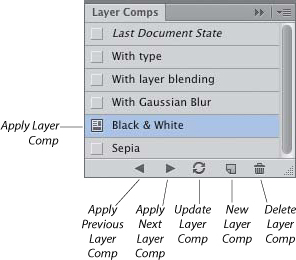
Layer Comps panel 
When you create a layer comp (short for “composition”), it includes, collectively, any of the following document characteristics: the current layer Visibility settings (which layers are showing and which are not), the Position of imagery on each layer, and Appearance (layer styles, including the layer blending mode and opacity settings, and any layer effects). Via the Layer Comp Options dialog, you can decide which document attributes will be included in a comp, as well as add explanatory comments for the viewer. Layer comps save automatically with the document in which they’re created.
Layer comps are useful if you’re weighing the pros and cons of multiple versions of a document or if you need to present versions to a client for review. For example, say you’ve created a few designs for a book cover. You could create a layer comp of each one (e.g., the image with and without type, or with type in two different colors). When presenting your ideas, instead of having to open and close each separate file, you could simply display each version of the same file sequentially by clicking individual Layer Comp icons on and then off. See pages 422–424.
Layers panel 
At minimum, every image contains either a solid-color Background or a transparent layer. Above that, you can add various kinds of layers:
• Image layers are created when you open a digital photo or paint a picture. See Chapter 8.
• Adjustment layers apply editable and removable adjustments to underlying layers. See Chapter 12.
• Fill layers apply an editable color, gradient, or pattern to underlying layers. See pages 193–195.
• Smart Objects are created when you place an Illustrator or PDF file, another Photoshop file, or a Camera Raw file into a Photoshop document; you can also convert an existing layer to a Smart Object. To learn about Smart Objects and their unique role in Photoshop, see pages 248-255.
• Editable type layers are created by the Horizontal Type or Vertical Type tool. See pages 356–357.
• Shape layers are produced by a shape tool, and contain vector shapes. See Chapter 21. ![]()
Using the Layers panel, you can create, hide, show, duplicate, restack, group, link, lock, merge, flatten, and delete layers. You can also use this panel to change the blending mode, opacity, or fill opacity of a layer; attach a mask to a layer; and apply layer effects.
You’ll be using this panel in every work session!
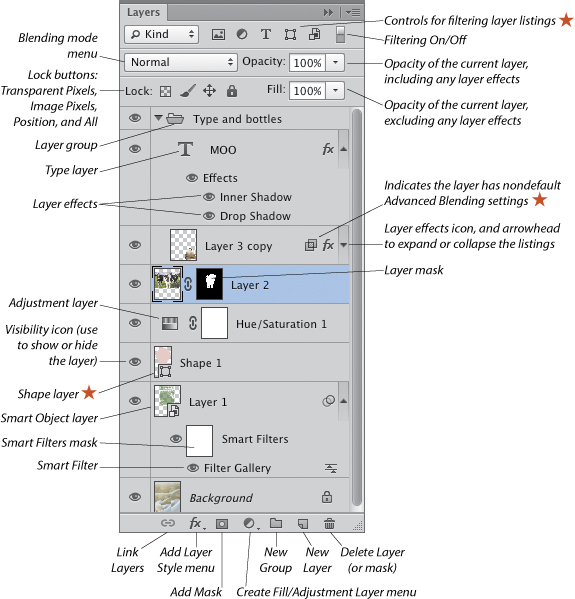

The Layers panel for this image is shown at left.
For the Mini Bridge panel, ![]() see pages 48–49.
see pages 48–49.
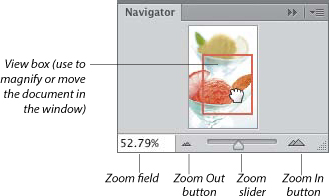
Navigator panel 
Using the Navigator panel, you can move a magnified image in the document window, change the document zoom level, or target an area for magnification. See page 90. (To zoom or move the image in the window by using tools or keyboard shortcuts instead, see pages 89–91.)
Paragraph panel 
When creating or editing paragraph type, you can use the Paragraph panel to apply paragraph-level settings, including horizontal alignment, indentation, spacing before, spacing after, and automatic hyphenation. From the panel menu, you can access other type formatting commands (such as hanging punctuation and line-composer options), and open the Justification and Hyphenation dialogs. See page 364.

Paragraph Styles panel 
Using paragraph styles, you can format and style whole paragraphs of text more efficiently than by choosing individual settings, and also ensure that your type looks consistent. When you edit a style, all the text to which the style is linked updates automatically. Using the Paragraph Styles panel, you can create and edit paragraph-level styles and apply them to your text. See page 365.

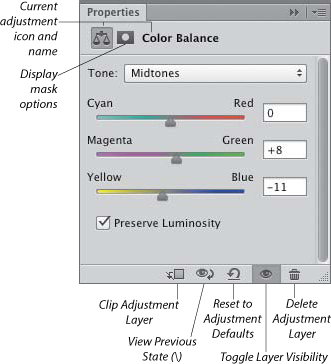
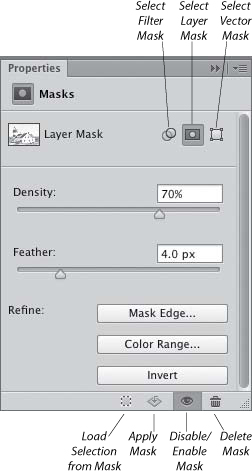
Properties panel 
Adjustment layer options on the Properties panel
Tonal and color corrections that you apply directly to a layer via the Image > Adjustments submenu commands are permanent, whereas corrections that you apply to underlying layers via an adjustment layer remain editable and reversible.
To create an adjustment layer, you can use either the Adjustments panel or a menu on the Layers panel. To choose and edit adjustment settings, you use the sliders and fields on the Properties panel (the options are different for each kind of adjustment layer). Via buttons on the Properties panel, you can clip (limit) the adjustment effect to just the underlying layer, view the previous state of the adjustment, restore the default settings, hide and show the current adjustment effect, or delete the current adjustment layer. See Chapter 12.
Mask options on the Properties panel
In Photoshop, you can use a mask to hide areas of a layer. A mask is created for every adjustment layer automatically; you can also add a mask to other kinds of layers, such as image and type layers.
When you click the Select Filter Mask, Select Layer Mask, or Select Vector Mask button on the Properties panel or click a mask thumbnail on the Layers panel, options for editing the mask display on the Properties panel (this replaces the Masks panel from earlier versions of Photoshop).
The nondestructive controls on the Properties panel include a Density slider for adjusting the overall opacity of a layer mask and a Feather slider for softening its edges. The Mask Edge button opens the Refine Mask dialog, which provides the same controls for refining a mask as the Refine Edge dialog does for a selection (see page 175). The Color Range button opens the Color Range dialog, which you can use to redefine the black and white areas in the mask. The Invert button swaps the black and white areas in the mask. Via other buttons on this panel, you can load a mask as a selection, apply a mask to a layer permanently, disable or enable the mask effect, or delete the mask.
For layer masks, see pages 172–176; for filter masks, see pages 344–348; and for vector masks, see pages 392–394.
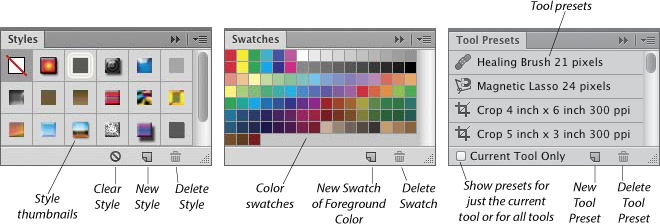
Styles panel 
Each style in Photoshop is a unique collection of layer settings. It may include the settings for layer effects (e.g., Drop Shadow, Outer Glow) and/or the settings for blending options (e.g., layer visibility, opacity, and blending mode). In addition to using the Styles panel to apply a style to a layer, you can also use it create custom styles, which can be used in any document. Via commands on the panel menu, you can save, load, and append style libraries (collections of styles). See pages 382–383.
Swatches panel 
The Swatches panel stores predefined and user-defined solid color swatches, which are applied by various tools, filters, and commands. Via commands on the panel menu, you can save, load, and append swatch libraries. See page 189.
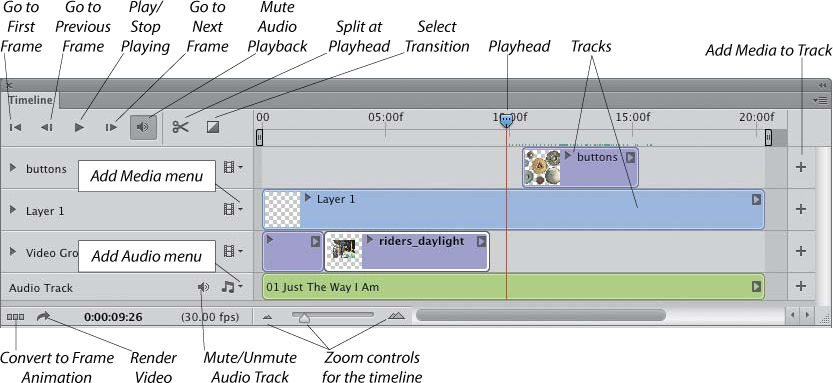
Timeline panel 
Using the Timeline panel, you can compose a sequence using audio clips and video files (including those from a camera that captures digital video). Imported clips display as tracks on the Timeline. You can alter the duration of a clip, apply a filter or adjustment effect to all or part of a clip, apply preset transition effects, then render a group of tracks into a choice of video file formats. See pages 425–432.
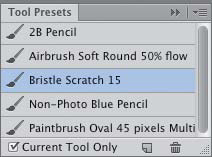
Tool Presets panel 
A tool preset is a collection of settings for a particular tool that has been saved to, and can be accessed from, the Tool Presets panel. By using this panel (or the Tool Preset picker, which opens from the Options bar), you can create, save, load, sort, rename, reset, and delete presets for any Photoshop tool. See page 120.
Managing presets via the pickers and panels
Photoshop presets are predefined items that you choose from a picker, such as brushes on the Brush Presets panel or picker or swatches on the Swatches panel. Other presets are found in less obvious locations, such as on the Contour pickers in some panels of the Layer Style dialog and on the Gradient picker in the Gradient Fill dialog. The preset categories include brushes, swatches, gradients, styles, patterns, contours, custom shapes, and tools. A collection of saved presets that can be loaded onto a picker is called a library.
New presets are created in various ways, such as when you define a pattern via the Define Pattern command, add a swatch to the Swatches panel, add a style to the Styles panel, create a gradient in the Gradient Editor dialog, or create a tool preset or brush (see the sidebar on this page).
Unsaved presets are stored in the Adobe Photoshop Preferences file temporarily. They stay on the picker when you relaunch Photoshop, but will be discarded if you replace them with another library or restore the default library to the picker. Thankfully, you can save your custom presets as a library, either via an individual picker (see the steps on the next page) or via the Preset Manager dialog (see page 119). You can load a saved library of presets onto its related picker at any time, and you can share preset libraries with other Photoshop users.
When you use the Preset Manager to create a library, you can pick and choose which presets are included. When you create a library from a panel or a preset picker, all the presets currently on the picker are included — you can’t pick and choose. In the latter case, you should delete the presets that you want to exclude from the library first.
Note: When you delete a preset from a picker or panel, no documents are altered and no existing presets are deleted from any libraries.
To delete presets from a panel or picker
1. Display the picker or panel from which you want to delete presets, such as the Brush Presets panel or picker, the Custom Shape picker, or the Styles, Swatches, or Tool Presets panel.
2. Do either of the following:
Alt-click/Option-click a preset (scissors pointer).A

A Alt-click/Option-click a swatch to delete it.
Right-click a preset and choose Delete [preset name]. If an alert dialog appears, click OK.
• Customize a brush using the Brush panel, then click the New Brush button ![]() on the Brush or Brush Presets panel, or on the Brush Preset picker, which opens from the Options bar.
on the Brush or Brush Presets panel, or on the Brush Preset picker, which opens from the Options bar.
• Click the New Swatch of Foreground Color button ![]() on the Swatches panel to add the current Foreground color as a swatch.
on the Swatches panel to add the current Foreground color as a swatch.
• Create a tool preset by clicking the New Tool Preset button ![]() on the Tool Presets panel or the Tool Preset picker (see page 120).
on the Tool Presets panel or the Tool Preset picker (see page 120).
• Create a gradient by clicking New in the Gradient Editor, which opens if you select the Gradient tool, then click the Gradient thumbnail on the Options bar, in the Gradient Fill dialog, or in the Layer Style dialog (for a Gradient Overlay effect).
• Create a style by clicking the New Style button ![]() on the Styles panel or by clicking New Style in the Layer Style dialog.
on the Styles panel or by clicking New Style in the Layer Style dialog.
• Create a pattern via Edit > Define Pattern.
• Create a custom shape by drawing a path or shape then choosing Edit > Define Custom Shape.
To save the presets currently on a picker as a library
1. Make sure the preset picker or panel contains only the presets to be saved in a library (see the preceding page).
2. Do one of the following:
From the Brush Presets, Swatches, Styles, or Tool Presets panel menu, ![]() or from the Brush Presets or Custom Shape picker menu,
or from the Brush Presets or Custom Shape picker menu, ![]() choose Save [preset type].A
choose Save [preset type].A

A To save the brushes that are currently on the Brush Presets panel as a library, we’re choosing Save Brushes from the panel menu.
For a gradient, in the Gradient Editor, click Save; or choose Save Gradients from the Gradient picker menu ![]() in the Gradient Fill dialog (for a gradient fill layer) or on the Gradient picker (Options bar, with the Gradient tool chosen).
in the Gradient Fill dialog (for a gradient fill layer) or on the Gradient picker (Options bar, with the Gradient tool chosen).
For a pattern, choose Save Patterns from the Pattern picker menu ![]() in the Layer Style dialog for the Pattern Overlay effect, in the Edit > Fill dialog (Pattern chosen on the Use menu), or in the Pattern Fill dialog (for a fill layer).
in the Layer Style dialog for the Pattern Overlay effect, in the Edit > Fill dialog (Pattern chosen on the Use menu), or in the Pattern Fill dialog (for a fill layer).
3. In the Save dialog, enter a name, keep the default extension and location, then click Save.
4. Relaunch Photoshop to make your new library appear on the panel and/or preset picker menu and on the menu in the Preset Manager.
• To replace an existing library, in step 2 above, click the library name in the scroll window, click Save, then click Replace in the alert dialog.
To load a library of presets onto a panel or picker via an individual panel or picker, follow the steps below; to load presets via the Preset Manager, see page 119.
To load a library of presets
1. Choose a preset library name in one of these locations:
The menu on the Brush Presets, Styles, Swatches, or Tool Presets panel. ![]()
The Custom Shape picker menu ![]() on the Options bar (the Custom Shape tool must be selected first); see page 387.
on the Options bar (the Custom Shape tool must be selected first); see page 387.
The Gradient picker menu ![]() in the Gradient Editor dialog (the Gradient tool must be selected first, then the Gradient thumbnail clicked on the Options bar); see pages 196–197.
in the Gradient Editor dialog (the Gradient tool must be selected first, then the Gradient thumbnail clicked on the Options bar); see pages 196–197.
The Gradient picker menu ![]() in the Gradient Fill dialog (for a gradient fill layer); see pages 194–195.
in the Gradient Fill dialog (for a gradient fill layer); see pages 194–195.
The Custom Pattern picker menu ![]() in the Edit > Fill dialog (choose Pattern from the Use menu); see page 199.
in the Edit > Fill dialog (choose Pattern from the Use menu); see page 199.
The Pattern picker menu ![]() in the Pattern Fill dialog (for a pattern fill layer).
in the Pattern Fill dialog (for a pattern fill layer).
The Styles, Contour, Gradient Overlay, or Pattern Overlay picker menu ![]() in the Layer Style dialog (see pages 371–372 and pages 378–379).
in the Layer Style dialog (see pages 371–372 and pages 378–379).
The Tool Preset picker menu ![]() on the Options bar (see page 120).
on the Options bar (see page 120).
2. In the alert dialog, click Append to add the chosen library of presets to the currents ones on the panel or picker, or click OK to replace the current presets with those in the library.
Note: If the panel or picker contains unsaved presets, another alert dialog will appear, giving you the option to save the existing presets as a library. Click Don’t Save or Save.
• If the library you want to load isn’t in the default location (and therefore isn’t listed on its related panel or picker menu), choose Load [preset name] from the menu, locate the library, then click Open.
You can restore the default library to any panel or picker.
To restore the default presets to a panel or picker
1. From a panel or picker menu, choose Reset [preset name].
2. When the alert dialog appears, click OK to replace the existing presets on the panel or picker with the default ones.
Note: If you made changes to the current presets, another alert dialog will appear. Click Don’t Save; or click Save, then use the Save dialog to save the current presets as a library.
Exporting and importing presets
Using the Export/Import Presets dialog, it’s easy to export and import preset libraries and share them among Photoshop users on your network.
To export preset libraries
1. Choose Edit > Presets > Export/Import Presets.
2. Click the Export Presets tab, click a preset library to be exported, then click the right arrowhead. ![]()
Repeat for other libraries. (To remove a selected preset from the list, click the left arrowhead.A To remove or add all the presets on the list, click Remove All or Add All.)
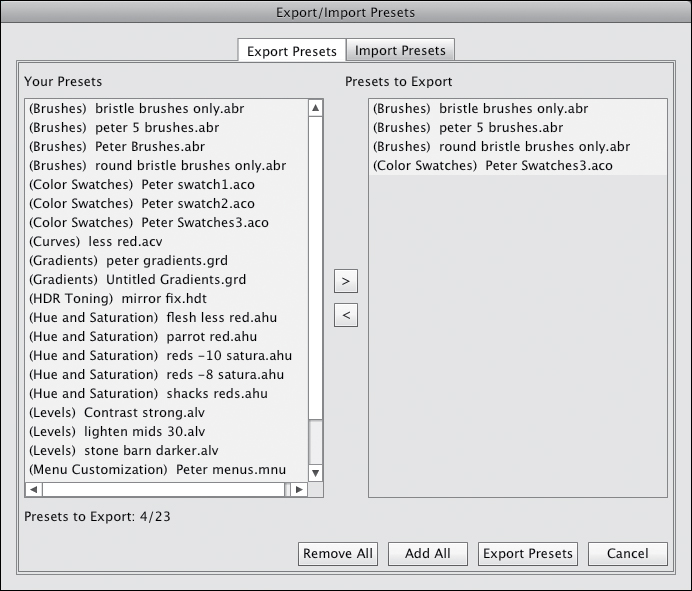
A In the Export/Import Presets dialog, for each selected library we decided to export, we clicked the right arrowhead. (Our next step will be to click Export Presets.)
3. Click Export Presets.
4. In the Choose a Folder dialog, choose a location, then click Open.
To import preset libraries
1. Choose Edit > Presets > Export/Import Presets.
2. Click the Import Presets tab, click Select Import Folder, locate and click the folder containing the desired preset library or libraries, then click Open.
3. Click a preset library to be imported, then click the right arrowhead. ![]() Repeat for other libraries. (To remove a selected preset from the list, click the left arrowhead. To remove or add all the presets on the list, click Remove All or Add All.)
Repeat for other libraries. (To remove a selected preset from the list, click the left arrowhead. To remove or add all the presets on the list, click Remove All or Add All.)
4. Click Import Presets.
• To import presets from an earlier version of Photoshop into Photoshop CS6, choose Edit > Presets > Migrate Presets, then click Yes in the alert dialog.
Using the Preset Manager
Using the all-inclusive Preset Manager dialog, you can save and load Photoshop presets of any variety.
To save presets as a library via the Preset Manager
1. To open the Preset Manager, do one of the following:
Choose Edit > Presets > Preset Manager. ![]()
Choose Preset Manager from the menu of any picker or panel (e.g., the Custom Shape picker or the Swatches or Styles panel).
On the Brush or Brush Presets panel, click the Open Preset Manager button. ![]()
2. From the Preset Type menu, choose the category of presets for which you want to create a library, or press the shortcut that is listed on the menu.
3. From the menu in the dialog, ![]() choose a view option for the scroll window (such as Small Thumbnail or Small List). For Brushes, you can choose Stroke Thumbnail view to display a sample of the brush stroke alongside each thumbnail.
choose a view option for the scroll window (such as Small Thumbnail or Small List). For Brushes, you can choose Stroke Thumbnail view to display a sample of the brush stroke alongside each thumbnail.
4. Shift-click or Ctrl-click/Cmd-click the presets to be saved in a library, then click Save Set.A

A In the Preset Manager dialog, choose a category from the Preset Type menu, select all the presets to be saved in a library, then click Save Set.
5. In the Save dialog, enter a name for the new library, keep the default extension and location, then click Save.
6. Click Done to exit the Preset Manager.
7. Relaunch Photoshop.
• To rename a preset when the Preset Manager is in a thumbnail view, double-click the thumbnail, then change the name in the dialog. If the Preset Manager is in a text-only or list view, double-click the preset name. You can also select multiple presets and then click Rename, in which case naming dialogs will open in succession.
You can reset any category of presets to the factory defaults, append (add) more presets to the current ones on the picker or panel, or replace the current presets with those in a library. Presets on the pickers and panels remain there when you relaunch Photoshop. Changes made in the Preset Manager appear in the corresponding picker, and vice versa.
To load presets via the Preset Manager
1. Open the Preset Manager by following step 1 in the instructions at left.
2. From the Preset Type menu, choose a category of presets.
3. Any unsaved presets on the chosen picker will be deleted in the next step, unless you select the Append option. To save the current presets as a library before proceeding, follow steps 4–5 at left.
4. From the menu in the dialog, ![]() choose a library name; or to reload the default library, choose Reset [preset type]. In the alert dialog, click Append to add the new library to the current ones on the picker, or click OK to replace the current presets with the new ones.
choose a library name; or to reload the default library, choose Reset [preset type]. In the alert dialog, click Append to add the new library to the current ones on the picker, or click OK to replace the current presets with the new ones.
If the picker contains any unsaved presets (you didn’t follow step 3, above), another alert will appear. Click Don’t Save or Save.
5. Optional: To delete presets from the picker (not from the library), click a preset to be deleted or Shift-click or Ctrl-click/Cmd-click multiple presets, then click Delete. This can’t be undone (but of course you can reload any library).
6. Click Done to exit the Preset Manager.
Creating tool presets
For any tool, you can choose a preset (such as a brush), Options bar settings, and a Foreground color (if applicable), then save that collection of settings as a tool preset. Thereafter, upon selecting that tool, you can simply choose your preset from the Tool Preset picker on the Options bar or from the Tool Presets panel; it contains all your saved settings. Although tool presets take some time and effort to set up initially, it’s time well spent.
To acquaint yourself with the Tool Presets panel, ![]() uncheck Current Tool Only. The tool presets for all tools display. Click a tool preset; the tool with which that preset is used becomes selected automatically. Check Current Tool Only; only presets for the current tool display. Via the panel or picker menu, you can load additional presets (see page 117).
uncheck Current Tool Only. The tool presets for all tools display. Click a tool preset; the tool with which that preset is used becomes selected automatically. Check Current Tool Only; only presets for the current tool display. Via the panel or picker menu, you can load additional presets (see page 117).
To create a tool preset
1. Select a tool and choose Options bar settings for it. For some tools, such as the brush and shape tools, the current Foreground color can be included in the preset; for the Gradient tool, you can include the currently selected gradient. If you opt to do this, choose that color or gradient now.
2. Do either of the following:
At the far left end of the Options bar, click the Tool Preset picker thumbnail or arrowhead.A

A To open the Tool Preset picker, click the thumbnail or arrowhead on the Options bar.
Show the Tool Presets panel. ![]() B
B
B You can also create a tool preset via the Tool Presets panel.
3. Click the New Tool Preset button ![]() on the picker or panel. The New Tool Preset dialog opens.
on the picker or panel. The New Tool Preset dialog opens.
4. Optional: Rename the preset, if desired.
5. Optional: Check Include Color or Include Gradient (if listed).
6. Click OK. The new preset appears on the Tool Preset picker and the Tool Presets panel.
7. The presets that are on the Tool Presets panel (for all tools) will still be there when you relaunch Photoshop, ![]() but will disappear if you replace them with a library. To preserve your custom presets for future use, see the first task on page 117.
but will disappear if you replace them with a library. To preserve your custom presets for future use, see the first task on page 117.
• To restore the default tool presets, follow the steps on page 118. Don’t confuse the Reset Tools command with the Reset Tool Presets command.
• To create a variation of an existing tool preset, click a preset, choose custom settings for it, then follow steps 3–6, above (rename it in step 4).