
20. Layer Styles

In This Chapter
Applying a bevel or emboss effect
Applying the Gradient and Pattern Overlay effects
Copying, moving, removing layer effects
Changing the layer fill percentage
Making type look like rusted metal
As a Photoshop user, you’re in the business of creating illusions. With layer effects, you can accomplish this in a few easy steps.
The Photoshop effects that you can apply to a layer, either alone or in combination, include Bevel & Emboss, Stroke, Inner Shadow, Inner Glow, Satin, Color Overlay, Gradient Overlay, Pattern Overlay, Outer Glow, and Drop Shadow. Once applied, layer effects can be edited, hidden, or removed at any time. And best of all, when you modify type or pixels on a layer, any effects on that layer will update automatically (they should be called “Smart Effects”!). Once you develop a combination of effects that you like, you can save it collectively (along with other Layers panel settings) as a style, for use in any document.
In this chapter, we include generic instructions for applying, copying, moving, and removing layer effects; provide specific steps for some individual effects; teach you how to create and apply layer styles; and finally, show you a couple of fun exercises that involve type and layer styles.
Layer effect essentials
Layer effects can be applied to any type, image, Smart Object, or shape layer (or a group thereof ![]() ), but not to the Background. They are applied and edited via the Layer Style dialog and are listed on the Layers panel below the layer they belong to. Layer effects appear either on or along the edges of layer pixels or vector shapes (including type), and will update instantly if you add, modify, or delete areas (or type characters) from the layer. You can edit the settings for a layer effect at any time, and turn its visibility on or off.
), but not to the Background. They are applied and edited via the Layer Style dialog and are listed on the Layers panel below the layer they belong to. Layer effects appear either on or along the edges of layer pixels or vector shapes (including type), and will update instantly if you add, modify, or delete areas (or type characters) from the layer. You can edit the settings for a layer effect at any time, and turn its visibility on or off.
Before exploring any of the individual effects, familiarize yourself with these generic instructions.
To apply layer effects (generic steps)
1. Do any of the following:
Double-click to the right of a layer or layer group name; or for an image layer (not a type or shape layer or a Smart Object), you can double-click the layer thumbnail instead.
Click a layer or layer group, ![]() then choose an effect from the Add Layer Style menu
then choose an effect from the Add Layer Style menu ![]() from the bottom of the Layers panel.
from the bottom of the Layers panel.
The Layer Style dialog opens (A, next page). Check Preview.
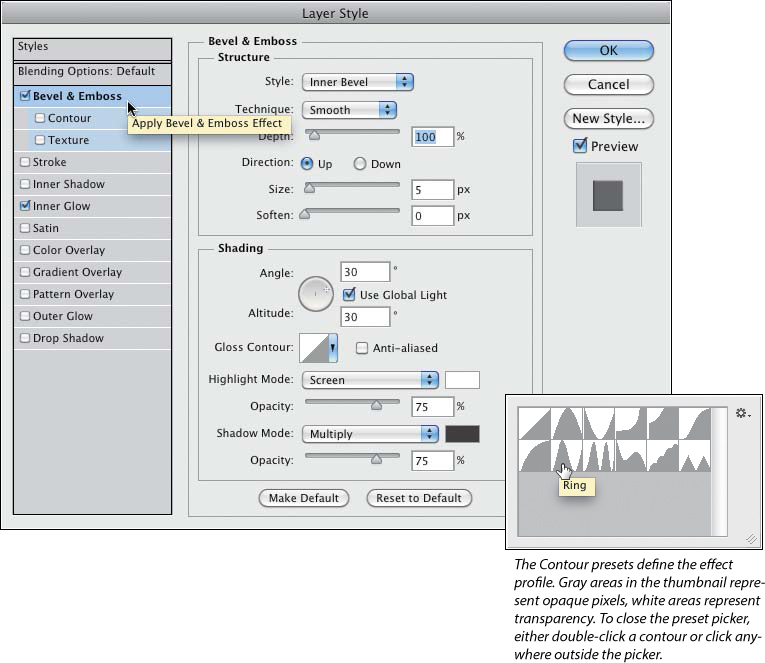
A In the Layer Style dialog, click the name of a layer effect to display its settings (the box becomes checked automatically).
2. Click an effect name on the left side of the dialog, then choose settings on the right side.
3. Optional: Click other effect names to apply additional effects to the same layer.
4. Click OK.
5. Edit the layer (e.g., transform or move a shape, edit the type in a type layer, add pixels to an image layer). Watch as the “smart” effect(s) update instantly.
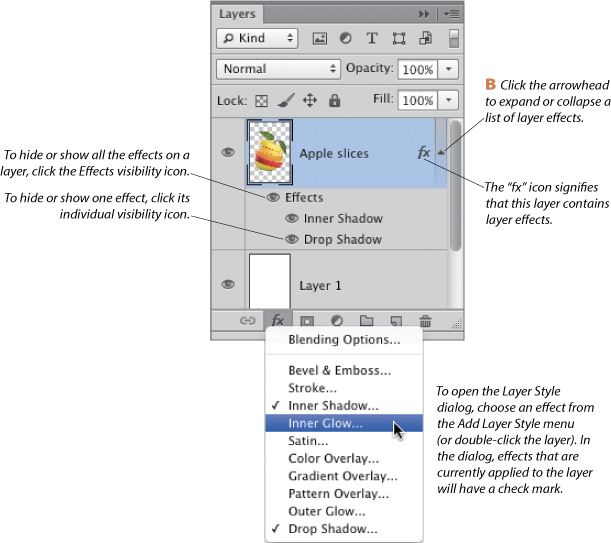
On the Layers panel, any layer that contains effects will have this icon: ![]() . Click the arrowhead next to the icon to collapse or expand that list of effects (B, next page).
. Click the arrowhead next to the icon to collapse or expand that list of effects (B, next page).
6. To change the settings for an effect or to add more effects to a layer, double-click the layer or the Effects listing or double-click an individual effect name (nested below the layer name).
7. To hide or show one layer effect, expand the effects list for the layer, then click the visibility icon ![]() for the effect.
for the effect.
To hide or show all the effects on a layer, click the visibility icon for the Effects listing.
• Some effects have an Angle setting (e.g., Inner Shadow, Satin, and Drop Shadow). If you change the Angle for an individual effect while Use Global Light is checked, the angle will update on any other effects in which the Global Light option is being used. Use this feature to keep the lighting uniform among multiple effects.
Choosing imagery for layer effects
• We usually apply layer effects that work inward or outward from edges — Bevel, Emboss, Stroke, Inner Shadow, Inner Glow, Outer Glow, and Drop Shadow — to a type or shape layer, or to an image layer that contains some transparent areas.A To produce such a layer, create a selection, then press Ctrl-J/Cmd-J (the Layer via Copy command).
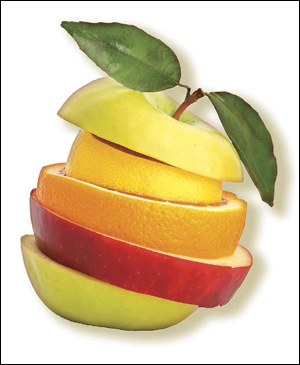
A The Layers panel for this document is shown at right. Note that the image layer contains transparent areas.
• The Satin, Color Overlay, Gradient Overlay, and Pattern Overlay effects look fine on any kind of layer, whether the layer contains transparency or not.
• When applying effects that spread outward (e.g., Outer Glow, Drop Shadow) to type, allow some breathing room between the characters. You can use the Tracking and/or Kerning controls on the Character panel to adjust the horizontal spacing (see page 361).
Applying a bevel or emboss effect
The Bevel and Emboss effects create an illusion of volume by adding a highlight and shading. The results can range from a chiseled bevel to a pillowy emboss that looks as if it’s been stamped onto porous paper. For variety, experiment with the Contour options.
To apply the Bevel or Emboss effect
1. On the Layers panel, double-click a layer A to open the Layer Style dialog.
A The original image contains two layers.
2. Click Bevel & Emboss.
3. Under Structure, choose a Size for the depth of the bevel or emboss effect.B

B We chose these Layer Style options for figure C.
4. Choose other Structure settings:
Choose a Style option: Outer Bevel, Inner Bevel, Emboss, Pillow Emboss, or Stroke Emboss C–D (and A–B, next page). (Note: Before applying the Stroke Emboss style, we recommend applying the Stroke effect, at an increased Size setting.)

C The Inner Bevel effect is applied (and also the Drop Shadow effect).
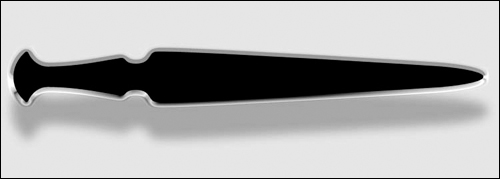
D Here we applied the Outer Bevel effect (plus a Drop Shadow).

A We imported these original Illustrator objects into Photoshop as a Smart Object.
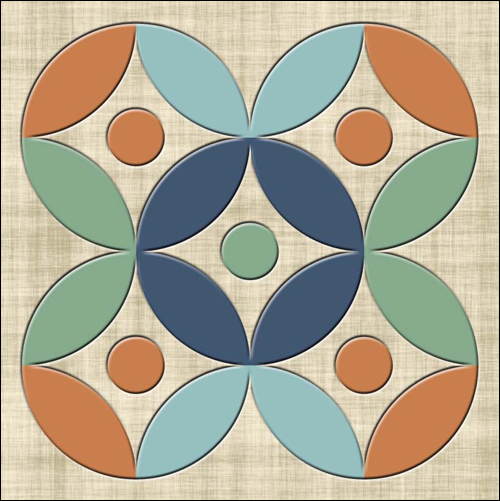
B We applied the Pillow Emboss effect (Technique: Smooth).
From the Technique menu, choose Smooth, Chisel Hard, or Chisel Soft.
Choose a Depth for the intensity of the highlight and the shadow.
Click the Up or Down button to swap the positions of the highlight and shadow (try this on the Pillow Emboss style).
Raise the Soften value if you want to blur the effect. The softening is most noticeable when a Chisel option is chosen as the Technique.
Steps 5–7 are optional.
5. Under Shading, do any of the following:
Choose an Angle and an Altitude (height) to change the location of the light source, and therefore the position of the highlight and shadow. Check Use Global Light to apply the same Angle and Altitude settings to all effects in which the Global Light option is being used, for uniform lighting, or uncheck it to apply a unique setting for just this effect. Note: If you change the Angle or Altitude for an effect while Use Global Light is checked, all other effects that are using the Global Light option will adopt those values.
Click the Gloss Contour arrowhead, then choose a profile in the Contour Preset picker.
• For a reverse bevel, try the Rolling Slope – Descending contour.
Choose a Highlight Mode and Opacity for the highlight and a Shadow Mode and Opacity for the shadow.
To change the highlight or shadow color, click the corresponding color swatch, then choose a color via the Color Picker (or, while the picker is open, click a color in the Swatches panel or the document). Click OK.
6. To add a Contour to the edges of the bevel or emboss, do the following:
On the left side of the dialog, under Bevel & Emboss, click Contour. Click the Contour arrowhead, then click a contour preset in the picker. This option can alter the appearance of the effect dramatically.
Check Anti-aliased to soften the transition between the dark and light areas in the contour.
For the Style option of Outer Bevel or Inner Bevel, adjust the Range (the position of the bevel on the chosen contour) to minimize or maximize the prominence of the bevel.
7. To add a texture to the effect, click Texture on the left side of the dialog, click the Pattern arrowhead, click a pattern in the picker, then do any of the following: C

C We added the Texture option of the Emboss effect.
Adjust the Scale of the pattern.
Change the Depth to increase or reduce the contrast between the highlights and shadows in the pattern.
Check Invert to swap the highlights and shadows. This has the same effect as changing the Depth percentage from negative to positive, and vice versa.
Check Link with Layer to link the texture and layer so they will move as a unit when dragged in the document.
Drag in the document to reposition the texture within the effect; click Snap to Origin to realign the pattern to its default location.
8. Click OK.
• For another use of the Emboss effect, see page 386.
Applying a shadow effect
You can create an inner shadow or drop shadow with just a few clicks of the mouse.
To apply the Inner Shadow or Drop Shadow effect
1. On the Layers panel, double-click next to a layer name to open the Layer Style dialog.A

A This original image consists of an image layer (hammer and nail and transparent pixels) above a solid-color background.
2. Click Inner Shadow or Drop Shadow.B–D

B We applied the Drop Shadow effect to the image layer.

C This image consists of an image layer (popsicle and transparent pixels) above a solid white Background.
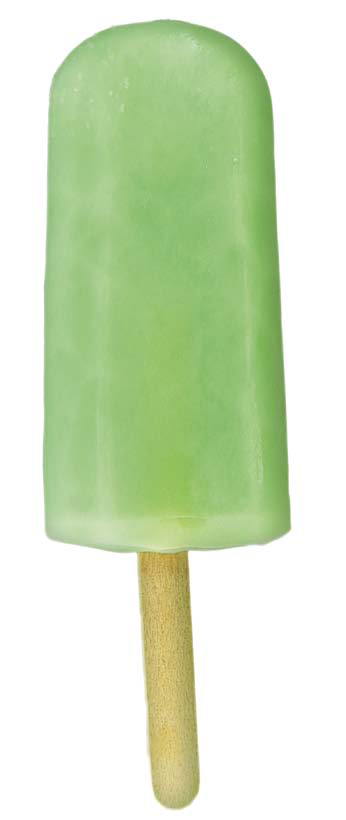
D We applied the Inner Shadow effect to the popsicle layer. Slurp.
3. Choose a Distance value (in pixels) by which you want the shadow to be offset from the edge of the layer shapes.
• You can reposition a drop shadow by dragging in the document while the dialog is open, but be aware that this will also reposition any other effects that are using the Global Light option.
Choose a Choke percentage for an Inner Shadow or a Spread percentage for a Drop Shadow to control where the shadow begins to fade.
Choose an overall Size for the shadow (in pixels).
4. Do any of the following (optional):
Choose a Blend Mode from the menu. (For a drop shadow, we usually keep this on the default setting of Multiply.)
To choose a different shadow color, click the color swatch, choose a color via the Color Picker or click a color in the document with the eyedropper (the color previews in the document), then click OK.
Choose an Opacity percentage for the transparency level of the shadow. For a drop shadow, we usually lower the Opacity below the default value of 75%.
Choose an Angle for the position of the shadow relative to the original layer shapes.
In the Quality area, click the Contour arrowhead and choose a preset in the picker for the edge profile of the shadow (we’re usually content with the shape of the default Contour).
Check Anti-aliased to soften any jagged edges between the shadow and the layer imagery.
Adjust the Noise level. The addition of noise (speckling) can help prevent banding on print output, but a very low value is best.
For the Drop Shadow effect, if the Fill value of the layer is below 100% or the blending mode of the layer isn’t set to Normal, check Layer Knocks Out
Drop Shadow to prevent the shadow from showing through.
5. Click OK. If you want to reshape the shadow, follow the steps below.
Depending on the time of day and the angle of the sun or other light source, cast shadows tend to be either short or elongated. You can reshape a drop shadow via the Distort command to mimic this natural effect.
To transform a Drop Shadow effect
1. Apply the Drop Shadow effect to a layer (see the preceding instructions) and no other effects. Keep the layer selected.
2. To transfer the shadow effect to its own layer, right-click the Effects listing on the Layers panel, then choose Create Layer from the context menu. If an alert dialog appears, click OK.
3. Click the new Drop Shadow layer.A
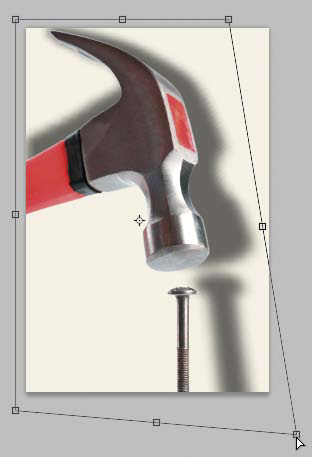
A Starting with the image shown in figure B on the preceding page, we applied the Create Layer command to transfer the drop shadow to its own layer and then, as shown above, we applied a Distort transformation.
4. Choose Edit > Transform > Distort, drag the handles of the transform box to slant the shape, or for a symmetrical perspective distortion, hold down Ctrl-Alt-Shift/Cmd-Option-Shift while dragging a corner handle. Press Enter/Return.B Note: If you don’t see all the handles, press Ctrl-0/Cmd-0 (zero) to fit the image in the document window.

B This is the final image, the Layers panel for which is shown at left. Note: We lowered the Fill setting for the Drop Shadow to 68%.
• To link the image and shadow layers so they will move and transform as a unit, Shift-click them, then click the Link Layers button ![]() at the bottom of the panel.
at the bottom of the panel.
• To limit any painting or fill edits that you apply to the Drop Shadow layer to just the pixels on the shadow layer, activate the Lock Transparent Pixels button on the Layers panel first.
Applying the Stroke effect
The Stroke effect works particularly well on type.
To apply the Stroke effect
1. Double-click a layer on the Layers panel to open the Layer Style dialog.
2. Click Stroke.
3. Do any of the following:
Choose a Size (width) for the stroke.
From the Position menu, choose a location for the stroke relative to the layer content: Outside, Inside, or Center.
Choose a Blend Mode.
Choose an Opacity percentage.
For the Fill Type, choose Color, Gradient (see steps 3–5 below), or Pattern (see steps 3–4 on the next page) and choose settings for the options that become available.
4. Click OK.A

A We applied the Stroke effect to a type layer, selecting Gradient as the Fill Type.
Applying the Gradient and Pattern Overlay effects
You can apply the Gradient Overlay and Pattern Overlay effects to an image, shape, or type layer. On an image layer, the overlays work effectively whether the layer contains transparency or not. (Color Overlay, not covered here, works the same way.)
To apply the Gradient Overlay effect
1. Double-click a layer on the Layers panel to open the Layer Style dialog.B

B We applied a Bevel effect (Inner Bevel style) to this type.
2. Click Gradient Overlay.C–D

C We chose these options for the Gradient Overlay layer effect.

D We added the Gradient Overlay effect.
3. Click the Gradient arrowhead, then click a gradient on the picker. (To load gradients from another library, choose a library name from the lower part of the picker menu; see page 119.) You could also click the gradient thumbnail and edit the gradient.
4. From the Style menu, choose Linear, Radial, Angle, Reflected, or Diamond.
5. Do any of the following:
Choose a Blend Mode.
Check Dither to help prevent noticeable color bands in the gradient on print output. ![]()
Adjust the Opacity of the overlay.
Check Reverse to swap the position of the colors in the gradient.
Check Align with Layer to fit the gradient within just the nontransparent pixels, type, or shape on the layer, or uncheck this option to center the gradient on the full layer.
Set the Angle of the gradient.
Choose a Scale percentage to control how gradually the gradient colors transition across the layer.
Drag in the document to reposition the gradient within the layer shapes.
6. Click OK.
• If you apply two overlay effects to the same layer, such as Gradient Overlay and Pattern Overlay, lower the Opacity of the one that’s listed first in the dialog; otherwise the bottom one won’t be visible.
The patterns that you apply via the Pattern Overlay effect can range from those that have an obvious repeat, such as polka dots or stripes, to overall textures resembling surfaces, such as gritty sandpaper, hand-made paper, woven fabric, or variegated stone.
To apply the Pattern Overlay effect
1. Double-click a layer on the Layers panel to open the Layer Style dialog.
2. Click Pattern Overlay.
3. Click the Pattern arrowhead, then click a pattern preset in the picker. To load patterns from another library, choose a library name from the lower part of the picker menu (see page 119). To create a custom pattern, see page 199.
4. Do any of the following:
Change the Blend Mode.
Adjust the Opacity of the overlay.
Drag in the document to reposition the pattern; click Snap to Origin to realign the pattern with the upper left corner of the document.
Choose a Scale percentage for the pattern size.
Check Link with Layer to link the pattern to the layer so they’ll move as a unit if you drag the layer.
5. Click OK.A–B

A To produce these metallic letters, we created a pattern from a photograph of rusted metal, then applied it as a Pattern Overlay layer effect. (We also applied the Drop Shadow and Emboss effects.)

B To learn how to create the grommets shown above, visit our blog at elaineandpeter.com.
• If you don’t see enough of the Satin effect, try increasing the Distance and/or Size values.
• Before adding this effect to type, try applying a medium or light type color and a strong Inner Glow or Bevel effect.

To the type shown in figure B on the preceding page (which has an Inner Bevel), we added the Satin effect.
Copying, moving, and removing layer effects
If you like how an effect looks on one layer, you can copy it to another one.
To copy an individual effect from one layer to another
Alt-drag/Option-drag an individual effect name from one layer to another.
You can also move an individual effect from one layer to another. No existing effects will be deleted from the target layer. However, if an existing effect bears the same name as the incoming effect, the new settings will override the existing ones.
To move an effect to another layer without replacing any existing effects
Drag an individual effect name from one layer to another. The effect will be removed from the source layer and placed on the target layer.
And finally, you can also move all the effects from one layer to another (that is, replace any existing effects on the target layer and remove them from the source layer).
To move all the effects from one layer to another, replacing existing effects
Drag the Effects listing from one layer to another.
Clicking to remove the visibility icon for a layer effect or unchecking the box for an effect in the Layer Style dialog doesn’t remove the effect — it merely hides it from view. If you want to permanently delete one or all effects from a layer, do as follows.
To remove layer effects
Do either of the following:
Drag a single effect name to the Delete Layer button ![]() at the bottom of the Layers panel.
at the bottom of the Layers panel.
To remove all the effects from a layer, drag the Effects listing over the Delete Layer button. ![]()
• If you turn off an effect via the check box in the Layer Style dialog and then check it to turn it back on again, the last-used options for that effect will redisplay.

We applied the Emboss, Gradient Overlay, Outer Glow, and Drop Shadow effects to the type layer, and the Inner Glow and Drop Shadow effects to the image layer.

When we shrank the image layer and added a type character, the effects updated automatically.
Changing the layer fill percentage
The Fill setting on the Layers panel controls the opacity of a layer, excluding any layer effects (as shown below), whereas the Opacity setting controls the opacity of a layer, including any layer effects (see page 144).
To change the layer fill percentage
1. Click any kind of layer (not the Background) or select multiple layers.A

A This image contains three image layers and an editable type layer. The Drop Shadow effect is applied to all the layers.
2. On the Layers panel, choose a Fill percentage (you can use the scrubby slider).B The lower the Fill value, the more pixels from the underlying layer(s) will be revealed.

B When we lowered the Fill percentage of the type layer to 60%, the Drop Shadow effect remained at full opacity. When we lowered the Opacity of the basil and bay leaf image layers to 70%, the drop shadows on those layers became lighter, too.
Rasterizing Layer Styles and Effects
• To rasterize all the layer style settings on the current layer, including layer effect, blending mode, and opacity and fill settings, click a layer that contains layer styles (or select multiple layers), then choose Layer > Rasterize > Layer Style. ![]() Beware! If you apply this command to a type, shape, or Smart Object layer, that layer will also be rasterized.
Beware! If you apply this command to a type, shape, or Smart Object layer, that layer will also be rasterized.
• To flatten all the layer effects in a document — on all layers — choose File > Scripts > Flatten All Layer Effects. Like the Rasterize > Layer Style command, this script rasterizes type, shape, and Smart Object layers that contain effects.
Applying layer styles
You can conveniently store multiple layer settings collectively as a style on the Styles panel. The style will include layer effects (e.g., Drop Shadow, Outer Glow) and/or blending options (blending mode and layer Opacity and Fill settings). Once stored, styles can be quickly applied to a type, image, or shape layer. To acquaint yourself with this panel, apply one of the predefined styles to a type layer or to a layer that contains some transparency.
To apply a style to a layer
1. Show the Styles panel. ![]() You can load additional style libraries onto the panel via the panel menu.
You can load additional style libraries onto the panel via the panel menu.
2. Do one of the following:
Click a layer (not the Background) on the Layers panel, then click a style on the Styles panel.A–D

A Click a layer, then click a style thumbnail on the Styles panel.

B Web Styles library > Blue Paper Clip

C Image Effects library > Water Reflection

D KS Styles library > Lightning
Double-click a layer to open the Layer Style dialog, click Styles at the top left, click a style thumbnail, then click OK.E

E Styles can also be applied to a layer via the Layer Style dialog. Click Styles at the top left side of the dialog, then click a thumbnail.
• Normally, when you apply a style, it replaces any and all existing effects on the current layer. If you want to add the effects from a style to the existing effects on a layer, Shift-click as you apply the style. Note: Whether or not you hold down Shift, if two effects have the same name, the settings in the incoming style will replace the old.
To remove styling from a layer
Click a (hidden or visible) layer that contains layer style edits, then click the Clear Style button ![]() on the Styles panel (or right-click the layer listing and choose Clear Layer Style from the context menu). All layer effects are removed, the layer Opacity is reset to 100%, and the blending mode is reset to Normal.
on the Styles panel (or right-click the layer listing and choose Clear Layer Style from the context menu). All layer effects are removed, the layer Opacity is reset to 100%, and the blending mode is reset to Normal.
Creating layer styles
In addition to using the layer style presets, you can create and save custom layer styles. You can use an applied preset as a starting point or begin from scratch with your own settings. An option is provided via a dialog for the style to include the layer effects and/or the blending option settings that are applied to the currently selected layer.
To save a style to the Styles panel
1. To any layer, apply the effects settings and/or blending option settings that you want to save collectively as a style.
2. Do either of the following:
On the Layers panel, click the layer that contains the desired settings,A then on the Styles panel, ![]() click either the blank area or the New Style button.
click either the blank area or the New Style button. ![]() B
B

A On the Layers panel, we clicked a layer that contains the effects and/or other settings to be saved as a style.

B On the Styles panel, we clicked the New Style button.
On the Layers panel, double-click the layer that contains the desired settings, then on the right side of the Layer Style dialog, click New Style.
3. In the New Style dialog, enter a name for the new style, check whether you want to Include Layer Effects and/or Include Layer Blending Options (e.g., layer opacity, blending mode, and fill opacity settings) in the style, then click OK. If the Layer Style dialog is open, click OK to exit.
The new style appears as the last listing or thumbnail on the Styles panel, and can be used in any document.C–D

C Our new custom style appeared at the bottom of the panel.
D We applied the new style to a shape layer in another document.
4. Your custom styles will be deleted from the Styles panel if you allow them to be replaced by another library or if the Photoshop Preferences file is deleted or damaged. To save the styles on the panel as a permanent library, click Save, enter a name, keep the default location, then click Save again. (See also page 117 or 119.)
• To copy a style between layers, right-click the layer that contains the desired effects and settings and choose Copy Layer Style. Click the target layer, then right-click it and choose Paste Layer Style. The incoming style will replace any existing style settings on the target layer.
• You can’t edit an existing style on the Styles panel, but you can apply a style, edit the settings, and save the new settings as a separate custom style.
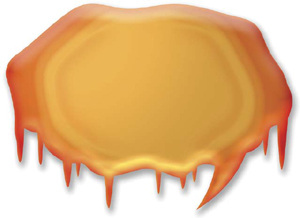
Making type look like rusted metal
With the exception of Drop Shadow and Overlay, layer effects tend to produce a more convincing visual illusion when applied in combination, as in the example shown here.A–B (and A–C, next page). After applying a series of effects, remember to preserve your settings as a layer style — and in a custom library!

A We created editable type (Bauhaus 93 Regular font, 223 pt.) above a photo of rusted metal.
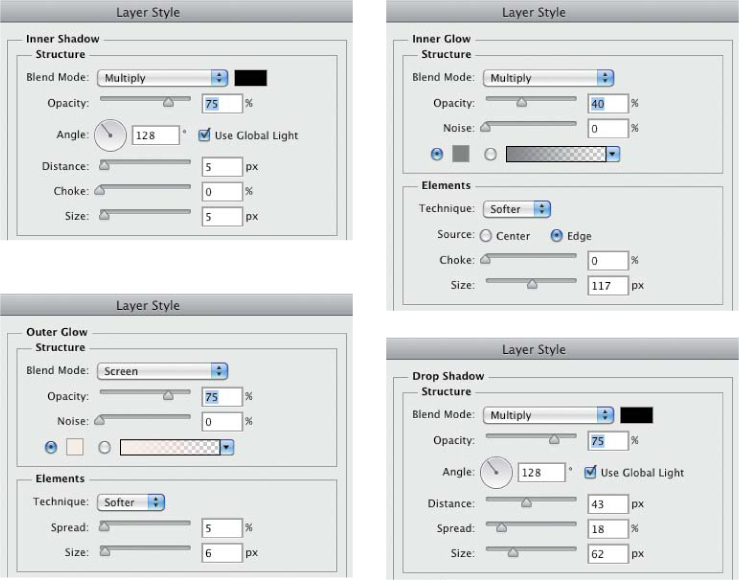
B We applied the Inner Shadow, Inner Glow, Outer Glow, and Drop Shadow effects, using the settings shown above.

A To reveal some of the underlying layer within the type, we lowered the Fill percentage of the type layer.

B To further “corrode” the edges of the letters, we Ctrl/Cmd clicked the type layer thumbnail to create a selection from the characters, clicked the Add Layer Mask button, then applied Filter > Brush Strokes > Spatter. The filter roughed up the edges of the mask. This is the Layers panel for the final image, which is shown below.

C The Spatter filter added just the finishing touch we were after. (You can use the Distort > Glass filter instead of Spatter.)
Embossing leather
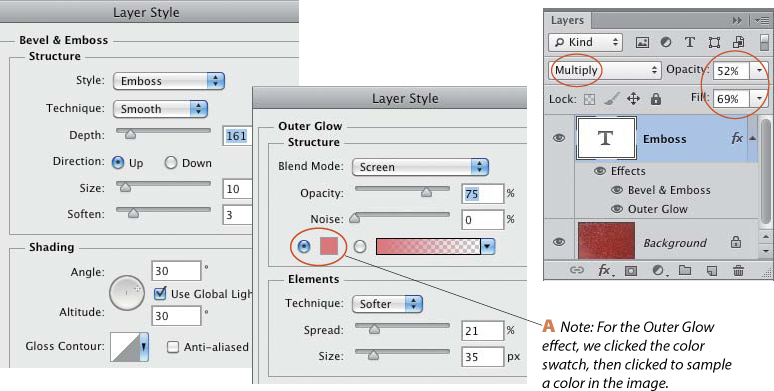

B To create these embossed letters, we opened a photo of leather and created some type (Trajan Pro font, Bold, 112 pt.). We chose the Move tool, clicked the Color swatch on the Character panel, chose a color for the type by clicking in the image (eyedropper pointer), then exited the Color Picker. We chose the Emboss and Outer Glow settings shown above, chose Multiply mode for the type layer, and lowered the layer Opacity and Fill settings.

C We saved the settings shown above as a layer style, then applied it to a type layer above a Background photo of a leather-covered book. We changed the color of the Outer Glow effect by sampling a light area in the image, and also lowered the Fill value to 10%.
We added the fleur-de-lis at the top of this image by using the Custom Shape tool (stroke of None) and the Fleur-DeLis shape preset (see pages 387–388). Finally, to apply the same style to the shape as we did to the type, we right-clicked the type layer listing and chose Copy Layer Style, then right-clicked the shape layer and chose Paste Layer Style.