
13. Combining Images
In This Chapter
Drag-copying a selection on the same layer
Drag-copying a selection or layer between files with the Move tool
Drag-copying layers between files via the Layers panel
Creating a layered document from file thumbnails
Combining multiple “exposures”
Fading the edge of a layer via a gradient in a layer mask
Aligning and distributing layers
Using the Clone Stamp tool and the Clone Source panel
Using the Auto-Align Layers command
Using Smart Guides, ruler guides, and the grid
If we had to pick one topic that represents the heart and soul of Photoshop, it would be combining images.
In this chapter, you will learn various ways to copy selections and layers within the same document and between documents; create, edit, and replace Smart Objects; combine multiple exposures; and soften the edge of a layer with a layer mask. You will also learn how to use the Clone Stamp tool to clone imagery, the Photomerge and Auto-Align Layers commands to merge multiple images, and Smart Guides and other Photoshop features to position and align layers. You’ll be amazed at how easy (and how much fun) it is to create composite images!
Using the Clipboard
One way to transfer a selection of imagery from one layer or document to another is by using the Clipboard commands (on the Edit menu). You choose the Cut, Copy, or Copy Merged command first to put the current selection into a temporary storage area in memory, called the Clipboard. Then you choose a paste command, such as Paste or Paste in Place, to paste the Clipboard contents as a new layer in the same document or in another document. If there is an active selection in the target document, another method is to use the Paste Into or Paste Outside command to paste the Clipboard contents inside or outside of the selection.
If you cut (remove) a selection from the Background via the Cut command, the exposed area fills automatically with the current Background color.A If you cut a selection from a layer, the area left behind is replaced with transparent pixels (the same results that you get when you move pixels on a layer).B

A This selection was cut from the Background.

B This selection was cut from a layer.
The same Clipboard contents can be pasted as many times as needed. Only one selection can be stored on the Clipboard at a time, however, and it is replaced by new contents each time you use the Cut, Copy, or Copy Merged command. If Export Clipboard is checked in Edit/Photoshop > Preferences > General, the Clipboard contents will stay in temporary system memory when you exit/quit Photoshop — but only until you shut down your computer.
• To empty the Clipboard at any time so as to reclaim system memory, choose Edit > Purge > Clipboard, then click OK if an alert appears. (To prevent the alert from reappearing, check Don’t Show Again. ![]() )
)
When you use a paste command, the contents of the Clipboard appear automatically on a new layer.
To copy and paste a selection
1. Read the sidebar on this page, and change the resolution of a copy of the source file, if needed.
2. Click a layer in the source document, then create a selection. Optional: Refine the selection edge via the Refine Edge dialog (see page 165).
3. Choose one of the following commands: Edit > Copy A (Ctrl-C/Cmd-C) to copy pixels from the current layer within the selection area.

A We created a selection, then pressed Ctrl-C/Cmd-C to copy its contents.
Edit > Copy Merged (Ctrl-Shift-C/Cmd-Shift-C) to copy all the pixels from all visible layers within the selection area.
Edit > Cut (Ctrl-X/Cmd-X) to cut the selection out of the current layer.
4. Click in the same document or in another document.
5. Do either of the following:
To have the Clipboard contents land in the center of the document window (or if the dimensions of the copied content are larger than those of the target document, to the top and left edges of the canvas area), choose Edit > Paste (Ctrl-V/Cmd-V).
To have the Clipboard contents land in the same x/y location as in the source layer or document, choose Edit > Paste Special > Paste in Place (Ctrl-Shift-V/Cmd-Shift-V).
6. If the source file has a different color profile than the target file, the Paste Profile Mismatch alert dialog will appear. We recommend that you click Convert (Preserve Color Appearance) to preserve the colors of the source image, then click OK.
7. The pasted pixels will appear on a new layer.B You can restack the layer or reposition it in the image with the Move tool (see the next page).
B In another document, we pressed Ctrl-V/Cmd-V to paste the Clipboard contents; they arrived on a new layer.
Working with pixels outside the canvas area
If the dimensions of the Clipboard contents that you paste are larger than those of the target document, some of the pasted pixels will be hidden from view outside the canvas area (they will save with the document). This will also occur if you use the Crop tool with the Delete Cropped Pixels option off. When you apply an image-editing command (such as a filter), it alters the entire layer, including any pixels outside the canvas area. Here are some ways to work with those pixels:
• To bring hidden pixels into view, click the layer, then hold down V (Move tool) and drag in the image.A
A We’re dragging a layer from left to right to reveal hidden pixels.
• To select all the nontransparent pixels on a layer, including any pixels outside the live canvas area (or that are hidden by a layer mask), Ctrl-click/Cmd-click the layer thumbnail on the Layers panel. (Select > All, in comparison, selects only the rectangular boundary of the canvas area.)
• To enlarge the canvas area to include all hidden pixels on all layers, choose Image > Reveal All.
• To remove pixels that are outside the canvas area from all layers, choose Select > All, then choose Image > Crop. This can help reduce the file size.
• If a layer contains pixels outside the canvas area and you merge it with the Background (not with another layer), the hidden pixels will be discarded.
• To shrink the contents of the current layer, choose the Move tool, ![]() check Show Transform Controls on the Options bar, Shift-drag a corner handle on the bounding box inward, then press Enter/Return.
check Show Transform Controls on the Options bar, Shift-drag a corner handle on the bounding box inward, then press Enter/Return.
When you use the Paste Into command to paste the contents of the Clipboard into a selection, Photoshop creates a new layer and converts the selection to a layer mask. You can reposition the pasted imagery within the mask, edit the mask to reveal more or less of the imagery that it is hiding, or adjust the mask density or feather value via the Properties panel.
To paste into a selection
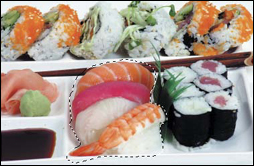
1. Select an area of a layer or the Background in the image from which you want to copy pixels.A

A We used the Rectangular Marquee tool to select an area of this image layer, then chose the Copy command.
2. Choose Edit > Copy (Ctrl-C/Cmd-C) to copy pixels from only the currently selected layer, or choose Edit > Copy Merged (Ctrl-Shift-C/Cmd-Shift-C) to copy pixels within the selection area from all visible layers.
3. Click a layer in the same document or in another document.
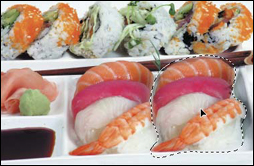
4. Select the area (or areas) into which you want to paste the Clipboard contents.B Optional: Click Refine Edge and use the controls to refine the selection edge.
B Next, we used the Quick Selection tool to select the sky area in this document.
5. Choose Edit > Paste Special > Paste Into or press Ctrl-Alt-Shift-V/Cmd-Option-Shift-V.C A new layer and layer mask will appear.

C Finally, we pasted the Clipboard contents into the selection via the Paste Into command, for a more Baroque sky.
6. Optional: Although the entire contents of the Clipboard were pasted, the layer mask may be hiding some of the imagery. To move the layer contents within the mask, hold down V (Move tool), click the layer thumbnail, then drag in the document. Or to move the layer mask, click the mask thumbnail before dragging. To move the layer and layer mask as a unit, make sure there is a Link icon ![]() between the layer and mask thumbnails (if not, click there to make the icon appear), then hold down V and drag in the image.
between the layer and mask thumbnails (if not, click there to make the icon appear), then hold down V and drag in the image.
7. Optional: To reshape the mask, click the mask thumbnail. With the Brush tool ![]() (B or Shift-B), a Soft Round brush, and white chosen as the Foreground color, paint in the document to expose more of the pasted image. To hide more of the image, press X to paint with black.
(B or Shift-B), a Soft Round brush, and white chosen as the Foreground color, paint in the document to expose more of the pasted image. To hide more of the image, press X to paint with black.
• The File > New dialog automatically displays the dimensions of the smallest rectangle that can surround the current contents of the Clipboard (if any).
• Unlike the Cut and Copy commands, the Edit > Clear command empties a selection area without putting anything onto the Clipboard.
Drag-copying a selection on the same layer
To drag-copy a selection on the same layer
1. Select an area of a layer or the Background.
2. Do either of the following:
Choose the Move tool ![]() (V), then Alt-drag/Option-drag the selection.A The duplicate pixels will remain selected.B
(V), then Alt-drag/Option-drag the selection.A The duplicate pixels will remain selected.B

A With the Rectangular Marquee tool, we selected the window area in this document, then held down Alt/Option and started dragging it to the right.
B A copy of the selection is made.
With a tool other than the Move tool chosen, Ctrl-Alt-drag/Cmd-Option-drag the selection.
3. Deselect (Ctrl-D/Cmd-D).
• Include Shift with either shortcut listed above to constrain the movement to increments of 45°.
Feathering the Edges of a Selection
We created a selection.
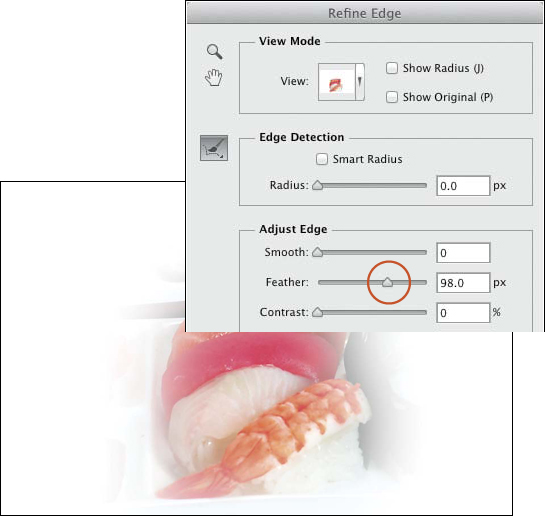
We applied a Feather value via the Refine Edge dialog.
We drag-copied the selection.
Drag-copying a selection or layer between files with the Move tool
When you drag and drop (drag-copy, for short) a selection of pixels from one document to another, presto, a duplicate of those pixels appears on a new layer in the target document. Pixels that land outside the canvas area can be moved into view at any time. An advantage of this method, as opposed to using the Clipboard, is that layer style settings (blending mode, opacity, and effects) in the layer that you drag and drop, along with any masks, are also copied. You can also drag-copy a shape, type, or Smart Object layer.
To drag-copy a selection or layer between documents with the Move tool
1. Open the source and target documents. Change the resolution in a copy of the source file, if needed (see the sidebar on page 240).
• The target file could contain a white or solid-color Background, a photograph of a texture (as in our example), or a screened-back image.
2. Click in the source document, then on the Layers panel, click a layer or the Background. Optional: Select part of the layer or Background.
3. Choose the Move tool ![]() (or hold down V).
(or hold down V).
4. Drag from inside the selection or layer in the source document to the tab of the target document,A pause until the target document displays, then release the mouse where you want the selection or layer to appear.B

A Drag a selection from inside a tabbed window to the tab of another document.
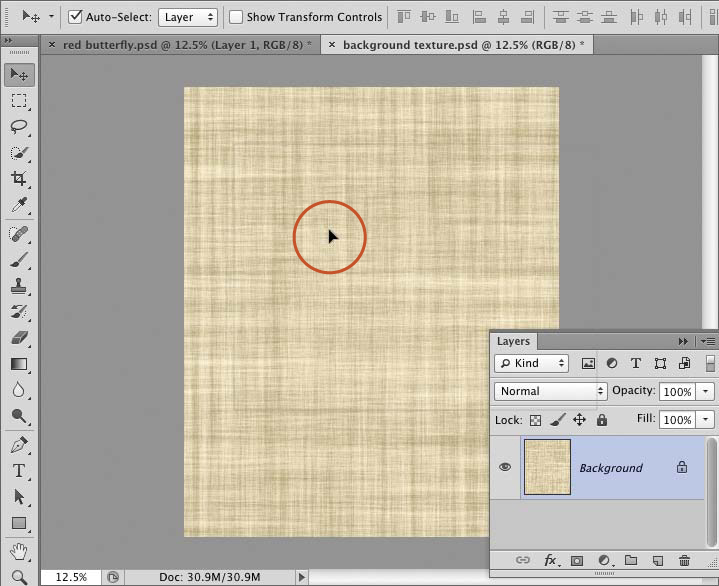
B When the target image displays, drag the selection into the image, then release.
• To drop the copied selection or layer in the center of the source document, hold down Shift as you release the mouse.
5. If the source file has a different color profile than the target file, the Paste Profile Mismatch alert dialog will appear. We recommend that you click Convert (Preserve Color Appearance) to preserve the colors of the source image, then click OK.
An alert will also appear if the source and target files have a different bits-per-channel setting. Click Yes to accept the change in image quality (or click No to cancel).
6. The duplicate content will appear on a new layer.C You can reposition or scale it with the Move tool.

C The selection appears as a new layer in the target image.
• You can also drag and drop multiple selected layers. To copy a layer group, after step 3, above, check Auto-Select on the Options bar and choose Group on the menu, then continue with steps 4–6.
Refining the Edge of a Layer After Using Drag-Copy or Paste

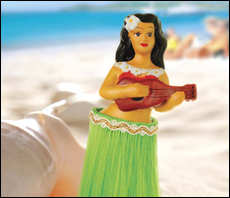
A We drag-copied a layer containing a photo of a ukulele player from a source file into a beach image. We didn’t like the white fringe around the edges of the figure, especially on the skirt (wrong kind of fringe!). To eliminate the fringe, our first step was to choose Layer > Layer Mask > From Transparency. The command converted the transparent areas of the layer into black areas in a layer mask.
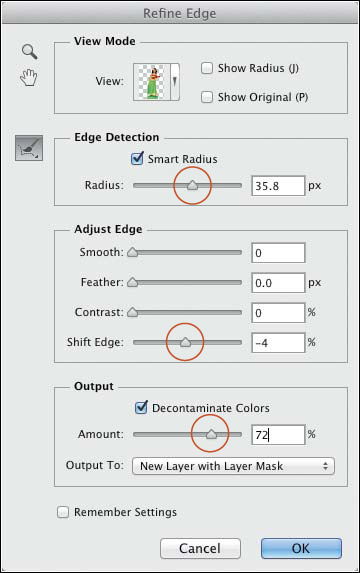
B On the Properties panel, we clicked Mask Edge to open this dialog, then used the settings shown above to mask the fringe. We chose Output To: New Layer with Layer Mask, then clicked OK.
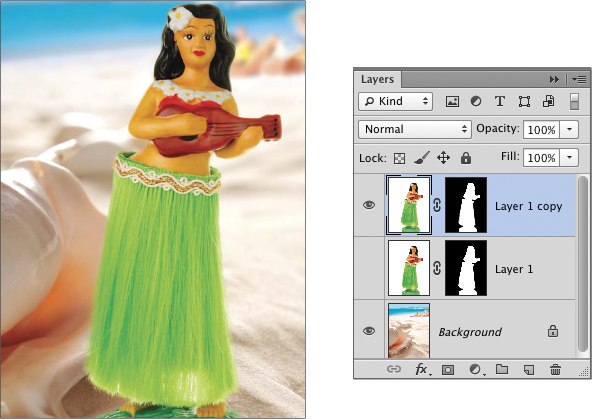
C Our adjusted layer content appeared on a new layer with the refined mask.
Drag-copying layers between files via the Layers panel
In this exercise, you will drag-copy one or more layers from the Layers panel of a source document into a target document. An advantage of this method is that you can control specifically which layers are copied. Here, as with the Move tool method, any pixels that lie outside the live canvas area are also included.
To drag-copy a layer between files via the Layers panel
1. Open the source and target documents. Change the resolution in a copy of the source file, if needed (see the sidebar on page 240).
2. From the Window > Arrange submenu, choose 2-Up Horizontal or 2-Up Vertical. ![]()
3. Click in the source document window, then on the Layers panel, click a layer, a layer group, or the Background, or Ctrl-click/Cmd-click multiple layers.
4. Drag from the Layers panel of the source document into the target document, or Shift-drag to make the new imagery appear in the center of the target document) (A, next page). The new layer (or layers) will be stacked above the previously selected one (B, next page).

A After clicking in the source document window, we are Shift-dragging a layer group from the Layers panel of that document into the target document window.

B When we released the mouse, a duplicate of the layer group appeared in the center of our target document.
5. If the source document has a different color profile than the target document, the Paste Profile Mismatch alert dialog will appear. We recommend that you click Convert (Preserve Color Appearance) to preserve the colors of the source image, then click OK.
An alert will also appear if the source and target documents have a different bits-per-channel setting. Click Yes to accept the change in image quality (or click No to cancel).
6. Either close the source document or right-click a document tab and choose Consolidate All to Here from the context menu. ![]()
7. Optional: With the Move tool ![]() (V), reposition the new layer or layers.
(V), reposition the new layer or layers.
8. Optional: To scale a new layer, choose the Move tool and check Show Transform Controls on the Options bar. If you don’t see all the handles on the bounding box, press Ctrl-0/Cmd-0 (Fit on Screen view). Shift-drag a corner handle on the bounding box, then press Enter/Return to accept the new size.
Creating a layered document from file thumbnails
The Load Files into Photoshop Layers command imports multiple files as layers into a new Photoshop document. Photoshop does all the work for you. Love it.
To create a document from file thumbnails
1. Do either of the following:
In Bridge, select one or more image thumbnails, then choose Tools > Photoshop > Load Files into Photoshop Layers.A

A In Bridge, we selected six image thumbnails, and are choosing the Load Files into Photoshop Layers command.
In Mini Bridge, select one or more image thumbnails, then right-click one of the thumbnails and choose Photoshop > Load Files into Photoshop Layers.B ![]()

B Another route to the same command is via the context menu in Mini Bridge.
2. Stand by as the files are imported as standard (non-Smart Object) layers in a new Photoshop document.C

C The command imported the selected thumbnails as multiple layers into a new Photoshop document.
3. Save the new file. If you want to convert one of the layers to the Background, see page 138.
Creating Smart Objects
A Smart Object is a copy of pixel or vector art that is embedded into a Photoshop file. Unlike an ordinary layer, you can scale a Smart Object, apply filters to it (and edit the filter settings), or edit its contents in the application in which it was created (such as Adobe Illustrator) without altering the original file.
To create a Smart Object, you either convert one or more existing layers in a Photoshop document, or you open or place an AI (Adobe Illustrator), PDF, PSD, TIFF, or Camera Raw file into Photoshop. On this page through page 251, we describe various methods for creating a Smart Object, then on pages 252–255, we describe how to duplicate, edit, and replace it.
To convert one or more layers in a Photoshop file to a Smart Object
1. Open a Photoshop document, then select one or more layers on the Layers panel.
2. Right-click one of the selected layers and choose Convert to Smart Object (A–B, next page). (This command is also available on the Layers panel menu.)
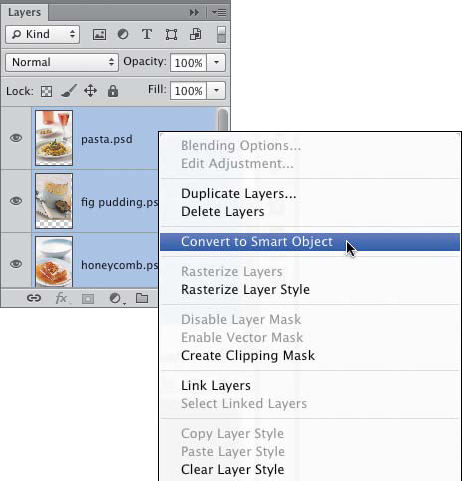
A We selected three layers in a Photoshop document, then right-clicked and chose Convert to Smart Object from the context menu.

B The command combined the layers into one Smart Object. Note the icon in the corner of the layer thumbnail.
To open a file as a Smart Object in a new Photoshop document
1. In Photoshop, choose File > Open as Smart Object. Locate and click a PSD, AI, PDF, JPEG, or TIFF file, then click Open.
2. For an AI or PDF file, the Open as Smart Object dialog opens.C For a multipage or multi-image PDF file or an AI file that contains multiple artboards, choose the Small or Medium Thumbnail Size option, and click the desired thumbnail. Also choose a Crop To option (to exclude blank areas from outside the artwork, choose Bounding Box).
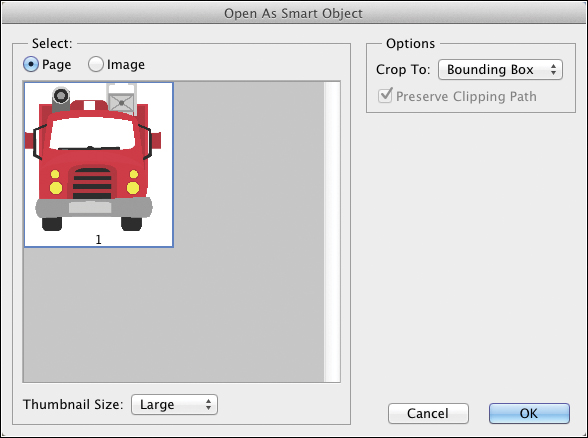
C We used the Open as Smart Object command to open an Adobe Illustrator (AI) file into Photoshop.
3. The file opens as a Smart Object in a new Photoshop document.D Save the new file.
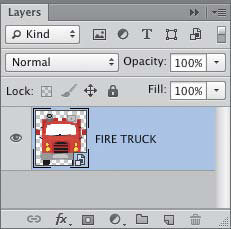
D The Illustrator file arrived as a Smart Object in a new Photoshop document.
To open a file from Camera Raw into Photoshop as a Smart Object in a new document
1. From Bridge or Mini Bridge, open a photo into Camera Raw.
2. Apply any needed corrections, then hold down Shift and click Open Object (Open Image becomes Open Object). (Note: If Open in Photoshop as Smart Objects is checked in the Workflow Options dialog, the button will be labeled Open Object; click it without holding down Shift. See also the tip on page 58.)
3. The photo appears as a Smart Object in a new Photoshop document. Save the new file.
To paste Adobe Illustrator art into a Photoshop document as a Smart Object
1. In Adobe Illustrator, go to Edit/Illustrator > Preferences > File Handling & Clipboard, check Copy As: PDF and AICB, click Preserve Appearance and Overprints, then click OK.
2. Continuing in Illustrator, open a file, then copy some artwork or type (Ctrl-C/Cmd-C).
3. Click in a Photoshop document, then paste (Ctrl-V/Cmd-V). The Paste dialog opens.A

A This cute little dialog opens if you paste a file into Photoshop.
4. Click Paste As: Smart Object, then click OK.
5. To accept the new Smart Object, double-click inside it, or click the Commit Transform button ![]() on the Options bar, or press Enter/Return. (Or to cancel it, press Esc.)
on the Options bar, or press Enter/Return. (Or to cancel it, press Esc.)
Another method is to drag or place a whole file (such as an AI, JPEG, PDF, PSD, TIFF, or Camera Raw file) into an existing Photoshop document as a Smart Object.
To drag or place a file into a Photoshop document as a Smart Object
1. Open a Photoshop document.
2. Go to Edit/Photoshop > Preferences > General, check Resize Image During Place (to let Photoshop scale placed images automatically), and, more importantly, check Place or Drag Raster Images as Smart Objects, to have Photoshop convert placed or drag-copied files to Smart Objects.
3. Do either of the following:
From Bridge, Mini Bridge, or the Desktop, drag a file thumbnail into the Photoshop document.B
In Bridge or Mini Bridge, right-click an image thumbnail and choose Place > In Photoshop. ![]()
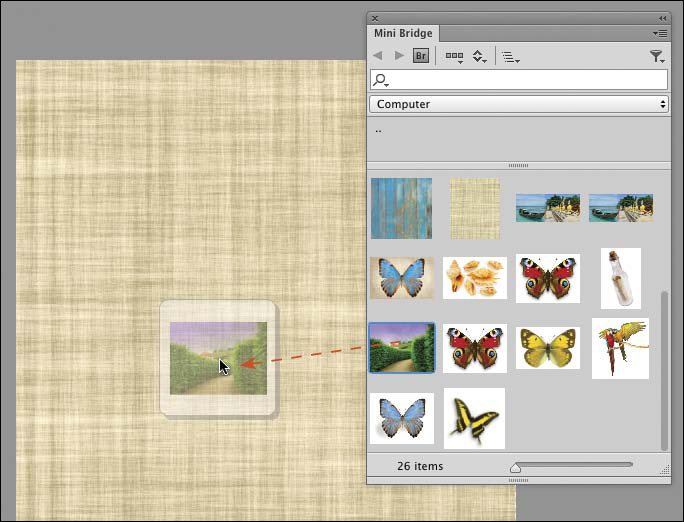
B We dragged an image thumbnail from Mini Bridge into a Photoshop document.
4. For an Illustrator AI or PDF file, the Place PDF dialog opens. Choose a Thumbnail Size to preview the file. If there are multiple thumbnails, click one. Also choose a Crop To option (to exclude blank areas outside the artwork, choose Bounding Box).
For a raw file or a file that was previously edited in Camera Raw, the Camera Raw dialog opens. Make any adjustments to the photo, if desired.
5. Click OK to exit any open dialog. The image will appear within a transform box in the Photoshop document (A, next page).
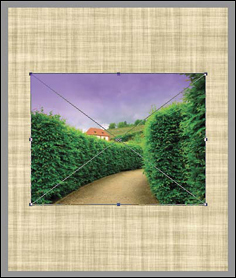
A The image appeared in the target document.
6. Optional: To scale the object proportionally, Shift-drag a handle on the transform box. To rotate it, position the pointer outside the transform box (two-headed arrow), then drag.
7. To accept the new Smart Object, double-click inside it (B, next page), or click the Commit Transform button ![]() on the Options bar, or press Enter/Return. (Or to cancel it, press Esc.)
on the Options bar, or press Enter/Return. (Or to cancel it, press Esc.)
B We double-clicked in the transform box to accept the placed file as a Smart Object.
• When you place vector art into a Photoshop document as a Smart Object, it stays as vector content (and when output, it is rendered at the resolution of the printer).
• If you want to drag or place a raster file into Photoshop as an ordinary layer (non-Smart Object), uncheck Place or Drag Raster Images as Smart Objects in Preferences > General first.
• You can also access the Place command in Photoshop via File > Place.

We opened a photo from Camera Raw into Photoshop, scaled it down via a transform handle, then accepted it.

Later, we enlarged the Smart Object: The image quality remained high (the details are still crisp).
To compare, we opened the same Camera Raw photo as an ordinary pixel layer, shrank the layer, then enlarged it: The image quality was diminished.
Duplicating Smart Objects
When you create a linked duplicate of a Smart Object, any pixel edits (e.g., painting, adding layers) that you apply to the content of the embedded file will also appear in the duplicate one, and vice versa (see the next two pages). Edits that don’t change the content of the embedded file, on the other hand, such as Smart Filters, layer styles, and transformations, will appear only in the currently selected Smart Object.
Note: The figures and captions on this page and the next three pages illustrate how to duplicate, edit, and replace a Smart Object. If you want to simply edit a Smart Object without duplicating it first (a more standard, everyday approach), skip the task on this page and follow just the steps on page 254. Smart Objects are created and edited in other chapters in this book. For examples, see pages 230–232 and pages 336–337.
To create a linked duplicate of a Smart Object
Click a Smart Object, then press Ctrl-J/Cmd-J. A new Smart Object appears in the Layers panel, bearing the same name as the original (the word “copy” is added).A–B

A In order to create an editable “template” using duplicate Smart Objects, our first step was to convert our “pasta” layer to a Smart Object.
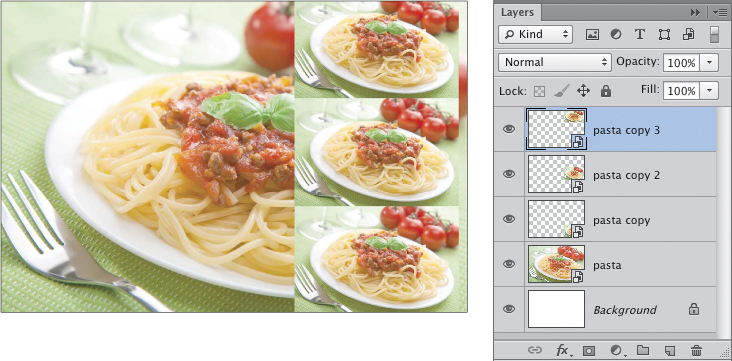
B We copied the Smart Object, scaled down and repositioned the duplicate layer, then copied and repositioned that layer twice more. All the duplicate layers remain “linked” to the original one (although no link icon appears on the panel).
• To create a duplicate of a Smart Object that isn’t linked to the original, right-click the Smart Object and choose New Smart Object via Copy. Edits made to either layer won’t affect the other. (This technique is used in the task on pages 256–257.)
Editing Smart Objects
To apply some kinds of edits to a Smart Object, such as Smart Filters (see pages 344–348), layer effects, transformations (scaling), and blending mode and opacity changes, you simply click the layer first.A–B Edits that change pixel data, however, such as those made with a painting, healing, sharpening, or cloning tool, can’t be made directly to a Smart Object (try it, and you’ll get an alert regarding rasterizing the layer; click Cancel). To make those types of edits, you double-click the Smart Object thumbnail to open the embedded file in a separate (temporary) window. After you edit, save, and close that window, your changes will appear in the Photoshop document, as described on the following page.

A We selected the original Smart Object (the large photo on the left), applied Motion Blur as a Smart Filter, and reduced the layer Opacity.
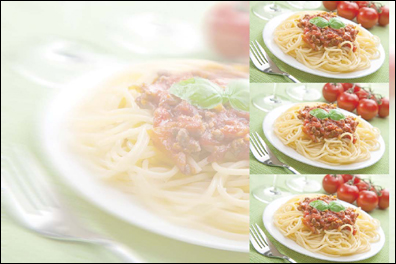
B Our edits didn’t alter pixels in the embedded file, so they didn’t appear in the linked copies of the original Smart Object.
To edit a Smart Object
1. Double-click a Smart Object thumbnail. If an alert regarding saving your changes appears, click OK.
2. If the Smart Object contains one or more Photoshop layers, a separate document will open, containing those layers. Apply edits to the temporary document, press Ctrl-S/Cmd-S to save it, close it, then click the tab of the original Photoshop document.
if the Smart Object contains imported content, that content will open in the creator application (e.g., Adobe Illustrator). If a PDF Modification Detected alert dialog appears, click “Discard Changes, Preserving Illustrator Editing Capabilities.” Edit the temporary document, save it, close it, then click the tab of the original Photoshop document.
If the Smart Object contains a Camera Raw photo, it will open in Camera Raw. Adjust the settings, then click OK.
Note: Your edits will appear in the Smart Object in Photoshop.A–B The file from which the original Smart Object was created isn’t altered.

A We double-clicked the thumbnail for the original Smart Object (the Layers panel displayed only the embedded layer, as shown above), then darkened the layer via a Levels adjustment. Because we applied the adjustment to the Smart Object content, that edit also appeared automatically in all the linked copies.

B Finally, we created a Hue/Saturation adjustment layer for the middle duplicate Smart Object and a Black & White adjustment layer for the bottom one. To restrict each adjustment effect to just the underlying Smart Object, we clicked the Clip to Layer button ![]() on the Properties panel.
on the Properties panel.
Replacing Smart Objects
Optionally, the Replace Contents command can be used to swap existing Smart Object content with a different file. You must use this command if you edit the original file (from which a Smart Object was created) directly in the creator application — not by double-clicking the Smart Object thumbnail — and you want the embedded file to be updated in Photoshop. In either case, any transformations, filters, or layer style settings that were applied to the original Smart Object will apply automatically to the replacement or edited content.
To replace a Smart Object with a new or edited file
1. Right-click a Smart Object (not the thumbnail) and choose Replace Contents. The Place dialog opens.
2. Locate a replacement file or the original (newly edited) file, then click Place.
3. Respond to any dialogs that open (e.g., the Camera Raw dialog or the Place PDF dialog). The new or updated image will appear in the original Smart Object and in any linked duplicates of that object.A

A We right-clicked the large Smart Object listing and chose Replace Contents, then chose a new food photo to replace the original one. We used the command just once, and the new image appeared in that Smart Object and in all the “linked” copies. That’s efficient work!
Combining multiple “exposures”
You may have had the common experience of trying to shoot a subject against a bright sky or in front of a window. If you set the exposure properly for the figure or object in the foreground, the brighter areas are overexposed. One way to produce an image that captures the “best of both worlds” is to shoot dual exposures, one set for the foreground and one for the background, and then combine them into one image. If you didn’t bracket your photos during the shoot, an alternative method (described here) is to produce two exposure variations of a single raw photo via Camera Raw, then blend the best of the two files in Photoshop via a layer mask.
To combine dual “exposures” into one photo
1. Open a raw photo into Camera Raw.A (Note: Avoid using a JPEG photo, which is unlikely to contain enough pixel data for this technique to work successfully.)
A Because the wide range of light conditions in this scene couldn’t be captured in one shot, the interior was correctly exposed in the resulting photo but the exterior was overexposed.
2. Optional: Use sliders in the Basic tab ![]() to adjust the exposure properly for the shadows and lower midtones.
to adjust the exposure properly for the shadows and lower midtones.
3. Hold down Shift (Open Image becomes Open Object) and click Open Object. Note: If Open in Photoshop as Smart Objects is checked in the Workflow Options dialog, the button will be labeled Open Object; click it without holding down Shift.
4. The photo opens as a Smart Object in a new Photoshop document. Save the file.
5. Right-click near the layer name and choose New Smart Object via Copy from the context menu (don’t use Ctrl-J/Cmd-J, the Duplicate Layer command).A

A The New Smart Object via Copy command created an unlinked copy of the Smart Object.
6. Double-click the thumbnail on the copy of the Smart Object to open the photo into Camera Raw. Use sliders in the Basic tab to set the proper exposure — this time for the upper midtones and highlights B — then click OK. Because the duplicate Smart Object was created via the New Smart Object Via Copy command, it isn’t linked to the original one, and your Camera Raw edits affected just the copy.

B We opened the copy of the Smart Object into Camera Raw, used sliders in the Basic tab to recover highlight details (particularly in the exterior areas), then clicked OK to return to our Photoshop file.
7. Save the file again. To blend the best areas of the two layers, follow the steps on the next page.
To blend two exposure versions via a layer mask
1. Continuing in Photoshop, click the upper of the two Smart Objects. If more of the properly exposed areas are on the topmost layer, click the Add Layer Mask button ![]() on the Layers panel to create a white mask; if more of the properly exposed areas are in the lower layer, Alt-click/Option-click the button to create a black mask.
on the Layers panel to create a white mask; if more of the properly exposed areas are in the lower layer, Alt-click/Option-click the button to create a black mask.
2. Choose the Brush tool ![]() (B or Shift-B), a Soft Round tip, Normal mode, and an Opacity setting of 80–100%.
(B or Shift-B), a Soft Round tip, Normal mode, and an Opacity setting of 80–100%.
3. If you created a white mask, keep the current Foreground color as black; if you created a black mask, press X to swap the two colors.
4. Press [ or ] to set the brush diameter, then apply strokes to hide areas of the current layer and expose the underlying layer, or to reveal areas of the current layer and hide the underlying layer.A–C If you need to remask any areas, press X and paint with the reverse color.

A We added a black mask to a copy of the Smart Object, then with the Brush tool (100% Opacity) and white as the Foreground color, we applied brush strokes in the window areas to reveal the corrected background and sky on that layer.

B In the original image (shown for comparison), only the interior of the room has the correct exposure.
C In the final image, the exposure data from the two Smart Objects is combined. The sky colors are stronger and you can see more details in the landscape.
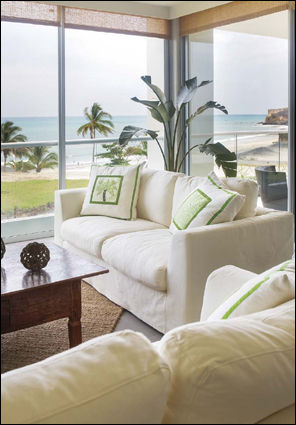
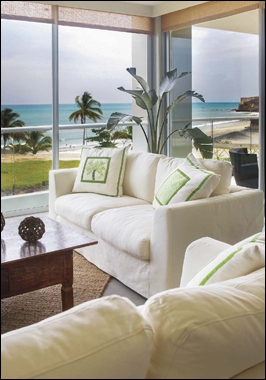
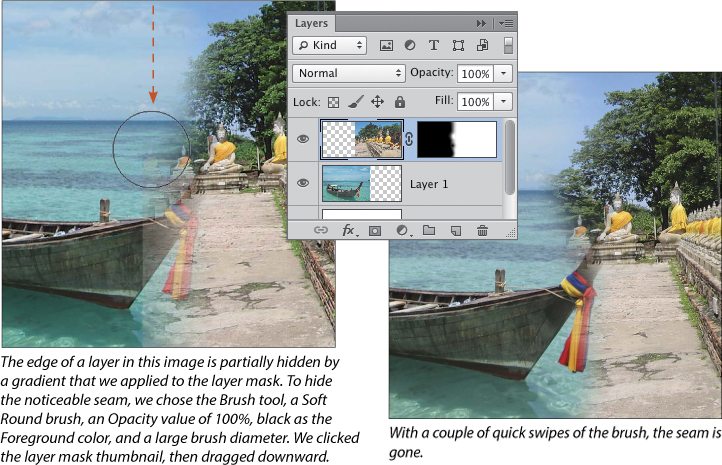
Fading the edge of a layer via a gradient in a layer mask
Once you have gathered multiple image layers into one document (regardless of the method used), you can soften the edges of any layer to make it look as if it’s blending with the underlying layers. To do this, you will apply a gradient to a layer mask.
To fade the edge of a layer via a gradient in a layer mask
1. Gather image layers into a target document by following the steps on pages 244–245, pages 246–247, or page 248. Position and scale the new image layers with the Move tool, as necessary.A

A We dragged layers from other documents onto our target image (a photo of burlap), scaled and repositioned the new layers, and rotated a couple of them.
2. In the target image, click one of the new image layers, then click the Add Layer Mask button ![]() on the Layers panel. Keep the mask thumbnail selected.
on the Layers panel. Keep the mask thumbnail selected.
3. Choose the Gradient tool ![]() (G or Shift-G). Click the Gradient picker arrowhead on the Options bar, then click the “Black, White” gradient. (If you don’t see this preset, choose Reset Gradients on the picker menu, then click OK in the alert dialog; it’s the third gradient in the default library.)
(G or Shift-G). Click the Gradient picker arrowhead on the Options bar, then click the “Black, White” gradient. (If you don’t see this preset, choose Reset Gradients on the picker menu, then click OK in the alert dialog; it’s the third gradient in the default library.)
Also click the Linear Gradient button ![]() on the Options bar, choose Mode: Normal, and choose an Opacity setting of 100%.
on the Options bar, choose Mode: Normal, and choose an Opacity setting of 100%.
4. In the image, start dragging horizontally or diagonally from where you want the complete fadeout to be, and stop dragging where you want the layer to be fully visible.B Hold down Shift while dragging to constrain the angle to an increment of 45°.

B We added a mask to the “BLUE” layer, chose the Gradient tool and the “Black, White” preset, then dragged to the left, as shown by the arrow.
The gradient will appear in the layer mask, and the imagery on that layer will be partially hidden C (see also A–B, next page).

C The gradient in the mask is hiding the right side of the “BLUE” layer.
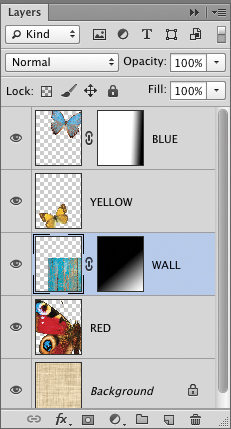
A Next, we added a layer mask to the “WALL” layer, and dragged diagonally with the Gradient tool (note the gradient in each mask).
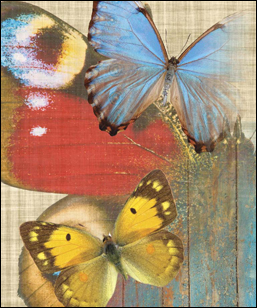
B This is the final image.
• To redo the mask effect, click the layer mask thumbnail, then with the Gradient tool at 100% Opacity, drag in the document again in a new direction, or start dragging from a new location.
Aligning and distributing layers
Similar to the way you might align objects in a drawing program, via buttons on the Options bar in Photoshop, you can align the visible parts of two or more layers to one another.
To align layers to one another
1. Choose the Move tool ![]() (V), then check Auto-Select and choose Layer on the Options bar.
(V), then check Auto-Select and choose Layer on the Options bar.
2. In the document window, click one image, type, or shape layer, then Shift-click one or more additional layers.A
A We chose the Move tool, then selected four layers.
3. Click a vertical and/or horizontal Align button on the Options bar.B


B We clicked Align Bottom Edges.
• To align layers to the edge of a selection, create the selection before following the steps above.
The distribute buttons equalize the spacing among three or more selected or linked layers.
To equalize the spacing among layers
1. Choose the Move tool ![]() (V), then check Auto-Select and choose Layer on the Options bar.
(V), then check Auto-Select and choose Layer on the Options bar.
2. In the document window, click one image, type, or shape layer, then Shift-click two or more additional layers.
3. Click a vertical and/or horizontal Distribute button on the Options bar.C


C We clicked Distribute Horizontal Centers.
• Oops! Clicked the wrong button? Choose the Undo command before you try a different one.
Using the Clone Stamp tool and the Clone Source panel
By applying strokes with the Clone Stamp tool, you can clone all or part of an image from one layer to another in the same document or between documents. This tool is useful for creative montaging, commercial retouching, and video editing. Using the Clone Source panel, you can assign and keep track of up to five different source documents (represented by a row of buttons at the top of the panel), and transform the source pixels before or as you clone them.
To use the Clone Stamp tool and the Clone Source panel
1. Open one or more RGB documents to be used as source imagery, and create or open a target document.
2. Choose the Clone Stamp tool ![]() (S or Shift-S). On the Options bar, choose a Soft Round brush, a Mode, an Opacity percentage, and a Flow percentage, and check Aligned.
(S or Shift-S). On the Options bar, choose a Soft Round brush, a Mode, an Opacity percentage, and a Flow percentage, and check Aligned.
Optional: If you have a stylus and tablet, you can activate the Pressure for Opacity button ![]() and/or the Pressure for Size button
and/or the Pressure for Size button ![]() on the Options bar.
on the Options bar.
Optional: If the source file contains any adjustment layers and you want the Clone Stamp tool to ignore their effects when sampling, activate the Ignore Adjustment Layers When Cloning button. ![]()
3. Show the Clone Source panel. ![]() A By default, the first source button is selected. Check Show Overlay and Auto Hide, then set the Opacity to around 35–50% so you’ll be able to preview the source as an overlay (a faint version of the source layer). If you want the overlay to display only within the brush cursor instead of across the whole document, check Clipped.
A By default, the first source button is selected. Check Show Overlay and Auto Hide, then set the Opacity to around 35–50% so you’ll be able to preview the source as an overlay (a faint version of the source layer). If you want the overlay to display only within the brush cursor instead of across the whole document, check Clipped.

A Using the Clone Source panel, you can switch between multiple sources, transform the clone overlay, and choose display options.
4. In the target document, create a new blank layer.
5. Click the source document tab. From the Sample menu on the Options bar, choose the part of the document from which you want to clone: Current Layer, Current & Below, or All Layers. For either of the first two options, also click a layer.
6. Alt-click/Option-click an area in the image to set the source point.B The source file and layer will be assigned to, and will be listed below, the first source button on the Clone Source panel.

B With the Clone Stamp tool, we held down Alt/Option and clicked in a source document.
7. Click the target document tab.
8. To position the clone, move the pointer over the image without clicking. Adjust the tool diameter by pressing [ or ], then start dragging to make the cloned pixels appear (A, next page). The overlay will disappear temporarily (because you checked Auto Hide), then will reappear when you release the mouse. (For other ways to transform the overlay, see the next page.)

A We’re dragging with the Clone Stamp tool on a new blank layer in our target document to “brush in” part of a bottle image layer from a source document.
9. To clone from another open document, click the second source button at the top of the Clone Source panel, then repeat steps 4–8. At any time, you can switch between clone sources by clicking a different button.
Beware! The Clone Source panel keeps the links active only while the source documents are open. If you close a source document, its link to the Clone Source panel is broken. We warned ya.
• To use the Clone Stamp tool to retouch imagery within the same document, see pages 302–303.
When you use the Clone Stamp tool, the position and orientation values of the source overlay stick unless you change them. Between strokes with the tool, you can reposition, scale, flip, or rotate the overlay via the Clone Source panel or via keyboard shortcuts. New settings will apply only to the currently selected clone source.
To reposition, scale, flip, or rotate the clone source overlay
Do any of the following:
With the Clone Stamp tool ![]() selected and an overlay displaying in your document, do any of the following (in the Clone Source panel, you can use the scrubby sliders):
selected and an overlay displaying in your document, do any of the following (in the Clone Source panel, you can use the scrubby sliders):
To reposition the source overlay, change the Offset X and/or Y values on the panel or Alt-Shift-drag/Option-Shift-drag the overlay.
To scale the source overlay, change the W or H values on the panel or hold down Alt-Shift/Option-Shift and press (and keep pressing) [ or ]. To preserve the current aspect ratio of the source image layer, activate the Maintain Aspect Ratio button ![]() before changing the W or H value. To preserve the image quality, avoid scaling the source more than 120 or –120%.
before changing the W or H value. To preserve the image quality, avoid scaling the source more than 120 or –120%.
To flip the source, click the Flip Horizontal ![]() and/or Flip Vertical
and/or Flip Vertical ![]() button.B
button.B
B This time, before we began cloning the bottle, we clicked the Flip Horizontal button on the Clone Source panel and changed the Offset values (as shown in the panel at right).
To rotate the overlay, change the Rotate value, ![]() or hold down Alt-Shift/Option-Shift and press (and keep pressing) < or >.
or hold down Alt-Shift/Option-Shift and press (and keep pressing) < or >.
• To restore the default flip, scale, and rotation values to the current clone source, click the Reset Transform button. ![]()
• To show the Clone Source panel when the Clone Stamp tool is selected, click the Toggle Clone Source panel button ![]() on the Options bar.
on the Options bar.

Using the Photomerge command
The Photomerge command combines two or more photos of the same scene into a single panoramic image. To accomplish this, it produces a layer from each photo, then blends the seams using a mask on each layer. It does all the work for you!
To merge photos into one document via the Photomerge command
1. In Bridge or in Mini Bridge, arrange the photos in the correct sequence for the panorama (this will help Photomerge work faster), then select them all. PSD files process more quickly than raw files.
2. In Bridge, choose Tools > Photoshop > Photomerge, or in Mini Bridge, right-click one of the thumbnails and choose Photoshop > Photomerge. ![]() The Photomerge dialog opens.A
The Photomerge dialog opens.A
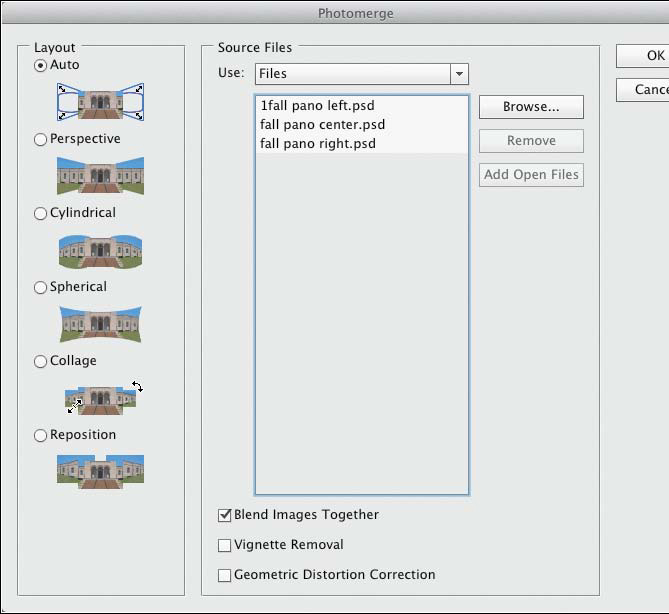
A Choose a Layout and correction options in the Photomerge dialog.
3. Click a Layout option: Auto (Photoshop picks the best layout), Perspective, Cylindrical, Spherical (best for a 360° panorama), Collage (photos are combined by stretching and rotating), or Reposition (no stretching or rotating occurs). Unfortunately, the layout options can’t be previewed.
4. Check any of these correction options, if available for your Layout choice:
Blend Images Together uses color matching and layer masks to produce seamless transitions between the photos. By default, this option is checked for all the Layout options.
Vignette Removal lightens any dark areas that the camera lens produced around the perimeter of the photos.
Geometric Distortion Correction corrects lens distortion, such as pincushioning (pinching), barreling (bulging), or extreme wide angles.
5. Click OK, then sit back while Photoshop opens the source files, aligns and blends them into a panorama, and opens a new document onscreen.
6. To eliminate any transparent areas that resulted around the edges, use the Crop tool ![]() (A–C, next page).
(A–C, next page).
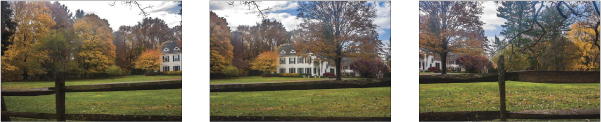
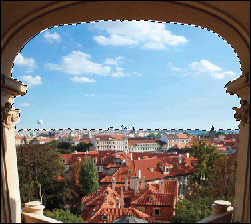
A We chose these three source photos for our panorama.

B The Auto option in Photomerge used masks to produce this seamless composite image.
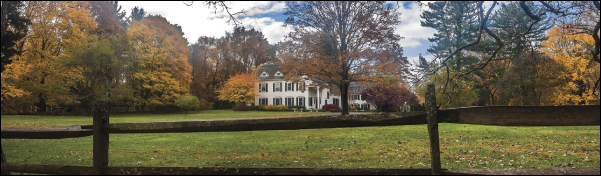
C We squared off the image with the Crop tool.
7. Save the new document.
• The Tools > Photoshop > Process Collections in Photoshop command (in Bridge) locates a series of photos within the current folder that contain similar exposure settings and capture times, creates a panorama, saves the new file in the PSD format to the current folder, then closes it.
Using the Auto-Align Layers command
It can be a challenge to get a whole group of people to smile simultaneously for a portrait (unless there happens to be a comedian in the crowd!) and to keep everyone from blinking. If you take multiple shots of the same scene, you can blend the choice areas of two of the best shots in Photoshop via the Auto-Align Layers command and a layer mask.
To blend two shots of the same scene
1. Open two RGB photos from the same shoot that contain figures or areas that you want to combine.A–B (We used a portrait as an example, but other subject matter can be used.)
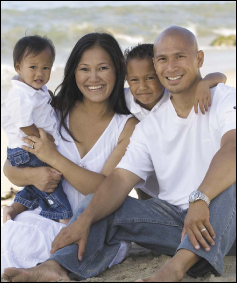
A We decided to combine the mother and child on the left from this photo ...

B ... with the father and child on the right from this photo. To begin, we dragged the image layer from one document into the window of the other.
2. On the Window > Arrange submenu, choose a 2-Up option. Shift-drag the Background from the Layers panel of one photo onto the window of the other (Shift centers the copy in the document). Right-click the tab of the target document and choose Consolidate All to Here. Save the file.
3. On the Layers panel, Shift-click to select both layers, then choose Edit > Auto-Align Layers.
4. In the Auto-Align Layers dialog, click a Projection option. We recommend clicking Reposition if you used a tripod, or Auto for all other shooting situations to let Photoshop determine the best alignment option.C Click OK. The Background will be converted to a layer.
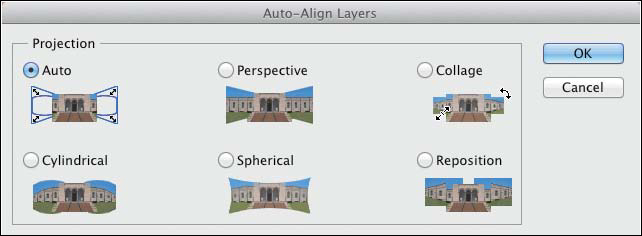
C In the Auto-Align Layers dialog, we clicked the Projection option of Auto.
5. Click the top layer, Alt-click/Option-click the Add Layer Mask button ![]() at the bottom of the Layers panel, and keep the mask thumbnail selected. For the moment, the mask is hiding the top layer entirely.A
at the bottom of the Layers panel, and keep the mask thumbnail selected. For the moment, the mask is hiding the top layer entirely.A
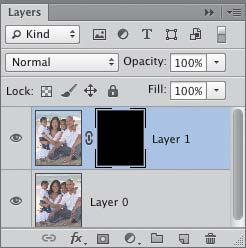
A The Auto-Align Layers command converted the Background to a layer and aligned the two layers. We added a black layer mask, which is fully blocking the top layer.
6. Choose the Brush tool ![]() (B or Shift-B), a Soft Round tip, Normal mode, and 100% Opacity. Zoom in, then paint strokes with white as the Foreground color to reveal the more desirable parts of the top layer.B–C
(B or Shift-B), a Soft Round tip, Normal mode, and 100% Opacity. Zoom in, then paint strokes with white as the Foreground color to reveal the more desirable parts of the top layer.B–C
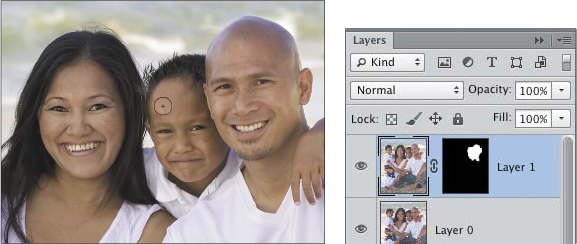
B With the Brush tool, we applied white strokes to the black layer mask to expose the faces of the father and child from the top layer.

C In the process, we also revealed some of the light background along the edge of the child’s face. We zoomed in, reduced the brush diameter, then painted with black to remask that area.
7. To touch up the mask, decrease the brush diameter and zoom in further. Apply brush strokes along the edges of shapes, where necessary, to reveal more of the top layer, or press X and apply strokes with black to reveal more areas of the underlying layer.D
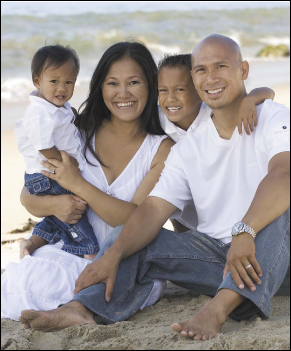
D The final image is a seamless composite of the two photos.
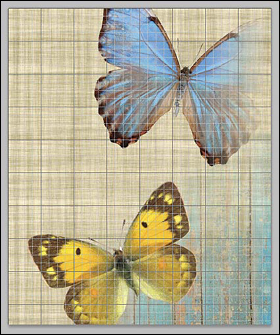
Using Smart Guides, ruler guides, and the grid
Sometimes a great composite image comes together in a serendipitous way without much forethought or careful alignment. At other times, say, if your Photoshop image must fit perfectly within the confines of a specific Web or print page layout, you will need to plan ahead or position objects more precisely. To accomplish this, you can use one of the Photoshop layout features, such as grids, rulers, or guides.
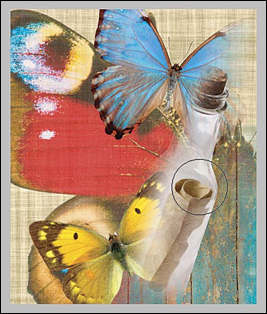
Our favorite alignment feature is Smart Guides. If you turn this feature on in a multilayer document, then drag a layer, temporary magnetic guide lines will appear where that layer nears the top, middle, or bottom edge of a shape, type, or imagery on another layer.
To use Smart Guides while moving a layer
1. Click a layer in a multilayer document.
2. Verify that both the View > Extras and View > Show > Smart Guides commands have a check mark.
3. With the Move tool ![]() (V), drag the layer. Magenta (default color) lines will appear if the edge of the layer you’re dragging nears the top, middle, or bottom of content on another layer. Let the layer snap to a horizontal or vertical guide, or to a pair of intersecting guides.A–B
(V), drag the layer. Magenta (default color) lines will appear if the edge of the layer you’re dragging nears the top, middle, or bottom of content on another layer. Let the layer snap to a horizontal or vertical guide, or to a pair of intersecting guides.A–B

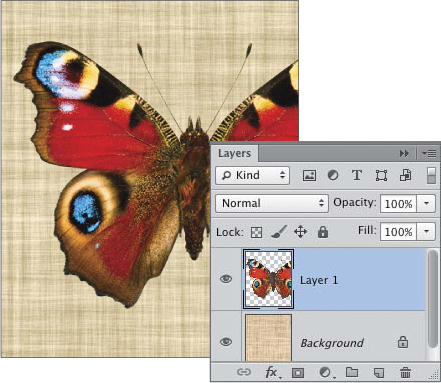
A With the help of a Smart Guide, we are aligning the top edge of the blue butterfly layer to the top edge of the bottle layer.
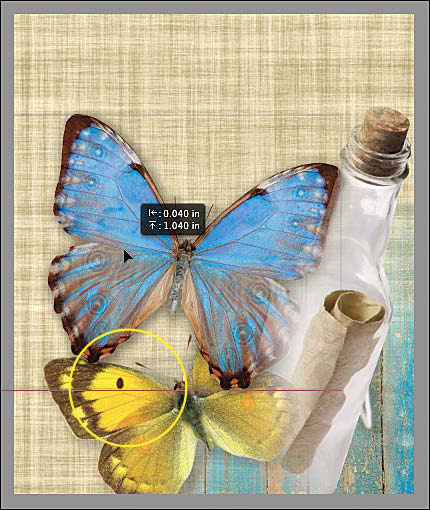
B Here, we are aligning the bottom edge of the blue butterfly layer to the vertical center of the yellow butterfly layer.
• In Edit/Photoshop > Preferences > Guides, Grid & Slices, you can change the color and other characteristics of guides, Smart Guides, and the grid. Your preference settings will apply to all Photoshop documents. See page 442.
When you enable the Rulers command in Photoshop, rulers display along the top and left sides of the document window. From the rulers, you can create magnetic, moveable horizontal and vertical guides.
To show or hide the rulers
Choose View > Rulers or press Ctrl-R/Cmd-R.
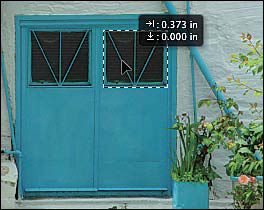
Move the pointer in the image (mouse button up), and you’ll notice that its current location is indicated by a dotted marker on each ruler.A

A As we move a layer, the current location of the pointer is indicated by a dotted line on each ruler.
• To change the units for both rulers quickly, right-click in either ruler and choose a unit from the context menu. Or to get to the Units & Rulers panel in the Preferences dialog quickly, where you can change the units and other settings, double-click either ruler. Changing the units in one location also changes it in the other.
• To change the ruler origin (so as to measure distances from a specific location), starting from the upper-left corner where the two rulers meet, drag diagonally into the image. To restore the default origin, double-click in the upper-left corner.
Guides that you create from the horizontal or vertical ruler can be repositioned or removed at any time. Like Smart Guides, they have magnetism, but unlike Smart Guides, they linger onscreen and save with your document. (To use ruler guides, see the next page.)
To create ruler guides
Show the rulers, then drag from the horizontal or vertical ruler into the image, releasing the mouse where you want the guide to appear.
If View > Snap is checked as you create a guide, you can snap it to a selection, to the edge of content on the currently selected layer,B–C or to the grid, if displayed (see the next page).
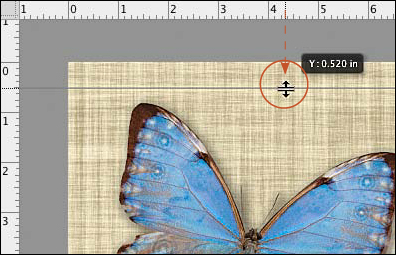
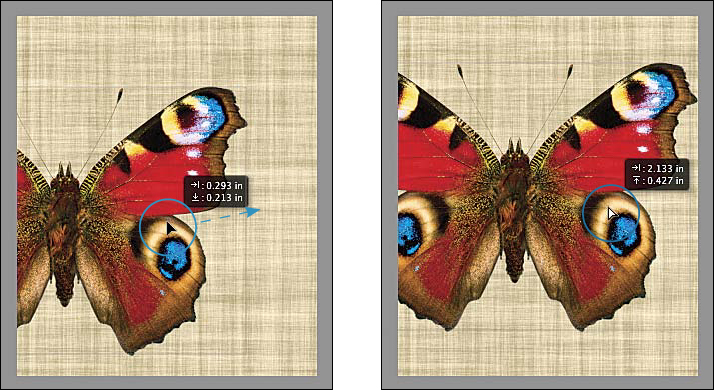
B To create a guide, we are dragging downward into the image from the horizontal ruler.
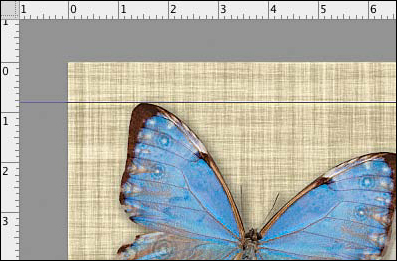
C We snapped the new guide to the top edge of the butterfly layer (which was selected).
• You can reposition an existing guide with the Move tool (double arrow pointer), provided guides aren’t locked (see the next page). As you move a guide, its current x or y position displays in a readout onscreen. ![]()
• Alt-drag/Option-drag as you create a guide to switch its orientation from vertical to horizontal, or vice versa.
• To show the guides if they are hidden, choose View > Show > Guides.
When the View > Snap command is on — and depending on which options are checked on the View > Snap To submenu — as you move a selection or layer near a ruler guide, a grid line, the edge of layer imagery, or the edge of the canvas area, it will snap to the guide or edge with a little magnetic tug.
To turn on the Snap To feature
1. Choose View > Snap To > Guides, Grid, Layers, Slices, Document Bounds, or All (of the above). Note: For the Snap To > Guides, Grid, or Slices option to be available, that option must have a check mark on the View > Show submenu.
2. Make sure View > Snap has a check mark (Ctrl-Shift-;/Cmd-Shift-;), and turn off View > Show > Pixel Grid. This command enables whichever options are currently checked on the Snap To submenu.
To reposition ruler guides (Move tool), they must be unlocked first. Conversely, to prevent guides from being moved, lock ’em up.
To lock or unlock all ruler guides
Choose View > Lock Guides or press Ctrl-Alt-;/Cmd-Option-;.
• If guides are unlocked and you change your document size via the Image Size command, Photoshop will maintain the relative position of the guides in the document.
To create a ruler guide at a specific location
1. Choose View > New Guide.
2. In the New Guide dialog, click Orientation: Horizontal or Vertical, enter a Position value relative to the 0 (zero) point on the x or y axis in any measurement unit that is used in Photoshop, then click OK. A guide appears in the document.
To remove one or all ruler guides
Do either of the following:
To remove one guide, make sure guides aren’t locked, hold down V (Move tool), then drag the guide off the edge of the document window. (Don’t press Backspace/Delete, which would delete the current layer!)
To remove all guides from the document, choose View > Clear Guides.
The grid is a nonprinting framework to which you can snap a layer or selection. It can be displayed or hidden as needed for each individual Photoshop document.
To show or hide the document grid
To show or hide the grid, choose View > Show > Grid or press Ctrl-’/Cmd-’.A
A The grid is showing in this document.
(See also “To turn on the Snap To feature” at left.)
On page 133, you used the Ruler tool to straighten a crooked image. Here you will use it as a measuring device.
To measure the distance and angle between two points
1. Choose the Ruler tool ![]() (I or Shift-I).
(I or Shift-I).
2. Drag in the document window. The angle (A) and length (L) of the ruler line will be listed on the Options bar and the Info panel. Shift-drag to constrain the angle to an increment of 45°.
3. Optional: With the Ruler tool, you can drag the measure line to a new location. To change the angle or length of the line, drag either one of its endpoints.
4. To hide the ruler line, choose another tool.
• To redisplay the measure line, hold down I (temporary Ruler tool). To remove the line, click Clear on the Options bar (not Backspace/Delete). A document can contain only one measure line at a time.