
12. Adjustments
In This Chapter
Editing adjustment layer settings
Merging and deleting adjustment layers
Editing an adjustment layer mask
Applying a Brightness/Contrast adjustment
Applying a Photo Filter adjustment
Applying a Color Balance adjustment
Applying a Hue/Saturation adjustment
Applying a Vibrance adjustment
Applying a Black & White adjustment
Tinting an image via a Gradient Map adjustment
Applying the Shadows/Highlights command
Dodging and burning with paint
Applying the Merge to HDR Pro command
Screening back a layer using Levels
When you open a photo into Photoshop, take a few minutes to study it. Is it over- or underexposed (too light or too dark)? Could it use a boost in contrast (brighter highlights, richer shadows)? Are the colors too bright or too dull (over- or undersaturated)?
Does it have a color cast? Would you like to transform the photo in some way, say, by tinting it with colors from a gradient, or give it a vintage look by converting the colors to grayscale? Enter the digital darkroom!
If you normally capture your photos as raw files or in the JPEG or TIFF format, you can rectify most or all of their tonal and color flaws in Camera Raw. If for some reason you don’t use Camera Raw to correct your photos, or if you want to tweak those corrections at any point in the editing cycle, Photoshop offers an impressive array of adjustment commands.
Most tonal and color corrections in Photoshop can be applied as adjustment layers, a method that offers the greatest flexibility in editing. At the beginning of this chapter, you will find generic instructions for creating and editing an adjustment layer and its mask. You will also learn how to read the graph on the Histogram panel to monitor changes in the tonal levels of your document as you apply corrections. From page 210 onward, you will find instructions for a wide-ranging assortment of adjustment features. By the end of this chapter, you will have mastered most of the key Photoshop commands!
Creating adjustment layers
The effects of a command that you apply via the Image > Adjustments submenu are permanent, whereas the effects of an adjustment layer become permanent only when you merge it downward into the underlying layer or flatten your document. We recommend using an adjustment layer because its settings will remain editable. You can hide its effect in areas of the image by editing its mask — plus you can restack, hide, or delete it, and even drag-copy it between files. Moreover, adjustment layers increase the file size only slightly.
You create an adjustment layer via either the Adjustments or Layers panel, then choose and edit the settings for it via the Properties panel. ![]() Each adjustment type has unique options, and each adjustment layer keeps its own settings. Some controls are easy to get the hang of, whereas others take some effort to master but enable you to apply more targeted corrections. For some adjustment types, you also have a choice of presets. The Properties panel also provides controls for viewing, clipping, and restoring adjustment settings.
Each adjustment type has unique options, and each adjustment layer keeps its own settings. Some controls are easy to get the hang of, whereas others take some effort to master but enable you to apply more targeted corrections. For some adjustment types, you also have a choice of presets. The Properties panel also provides controls for viewing, clipping, and restoring adjustment settings.
To create an adjustment layer 
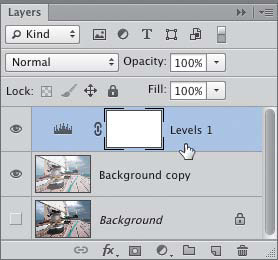
1. On the Layers panel, ![]() click an image layer or the Background.A The adjustment layer is going to appear above the layer you select.
click an image layer or the Background.A The adjustment layer is going to appear above the layer you select.

A The original image lacks contrast.
2. Optional: Create a selection, to become the white area in the editable adjustment layer mask, and therefore the only area in which the adjustment effect is visible.
3. Do either of the following:
On the Adjustments panel, ![]() click the button for the desired adjustment type.B
click the button for the desired adjustment type.B

B On the Adjustments panel, we clicked the Levels button.
From the Create Fill/Adjustment Layer menu ![]() on the Layers panel, choose an adjustment type (A, next page).
on the Layers panel, choose an adjustment type (A, next page).

A Alternate route, same result: You can use the Create Fill/Adjustment Layer menu on the Layers panel instead of the Adjustments panel.
4. Controls for the chosen command appear on the Properties panel. Choose settings to correct your document (B, next page). For a Levels, Curves, Exposure, Hue/Saturation, Black & White, Channel Mixer, or Selective Color adjustment, another option is to choose a preset from the menu at the top of the panel (you can also customize the settings from the preset).
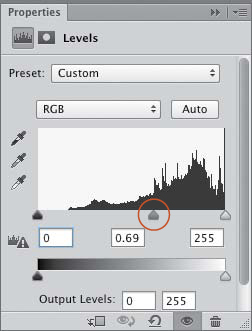
B To darken the midtones, we dragged the top middle slider to the right.
A new adjustment layer with a layer mask appears on the Layers panel (C–D, next page).
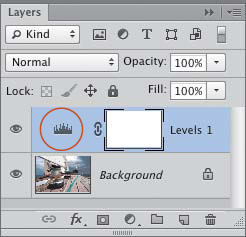
C You can identify each adjustment layer type by its unique icon in the layer thumbnail.
D One simple (editable) step corrected the contrast.

Editing adjustment layer settings
Note: For the steps in this section, we recommend showing the Properties panel (it can be in a dock). If your Properties panel is closed, you will need to double-click the adjustment layer to display the Properties panel (instead of just a single click, as in our instructions).
To change the settings for an adjustment layer
1. On the Layers panel, ![]() click an adjustment layer. The layer becomes selected and the current settings display on the Properties panel.A
click an adjustment layer. The layer becomes selected and the current settings display on the Properties panel.A

A We used a Curves adjustment to darken the midtones in this photo.
2. Edit the settings.B

B Later, we double-clicked the Curves layer thumbnail to display the current settings, and tweaked the adjustment by reshaping the curve for the midtones and highlights.
• To undo the last individual Properties panel edit, press Ctrl-Z/Cmd-Z.
• To lessen the overall impact of an adjustment layer, lower its opacity via the Layers panel.
The View Previous State button gives you a temporary view of the image without the current edits you are making to the adjustment layer settings.
To view the image without the newest adjustment layer edits
1. On the Layers panel, click an adjustment layer, then edit the settings on the Properties panel. Keep the layer selected and stay on the panel.
2. To toggle your latest edits off (and then on again), press and hold down the View Previous State button ![]() or the key, then release.
or the key, then release.
To restore settings to an adjustment layer
1. On the Layers panel, click an adjustment layer.
2. After editing any of the settings on the Properties panel, click the Reset to Adjustment Defaults button; ![]() the last chosen settings will be restored. To restore the default settings for that adjustment type, click the button again.
the last chosen settings will be restored. To restore the default settings for that adjustment type, click the button again.
To hide the effect of an adjustment layer
To hide the effect of an adjustment layer, click the visibility icon ![]() on the Properties panel or Layers panel (clicking the icon in one location also makes it disappear in the other location). To show the effect, click the icon (or in the icon column) again.
on the Properties panel or Layers panel (clicking the icon in one location also makes it disappear in the other location). To show the effect, click the icon (or in the icon column) again.
Normally, an adjustment layer affects all the layers below it, but you can clip (restrict) its effect to just the layer directly below it.
To clip an adjustment layer to the layer directly below it
1. On the Layers panel, click an adjustment layer.A–B Make sure it is stacked directly above the layer that you want to clip it to.

A This image contains an image layer, a type layer, and a Background image (the texture).
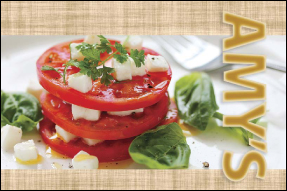
B We applied a Hue/Saturation adjustment to boost the saturation of the Tomatoes layer, but the edit gave the Background texture a pinkish cast.
2. Do either of the following:
On the Properties panel, ![]() click the Clip to Layer button.
click the Clip to Layer button. ![]() C–D
C–D

C We clipped the adjustment layer so it is affecting just the Tomatoes layer.
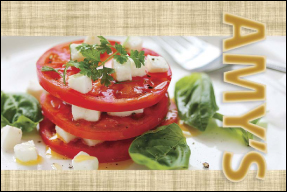
D This is the result of our clipping the adjustment.
On the Layers panel, hold down Alt/Option and click the line between the adjustment layer and the layer below it (![]() icon).
icon).
The adjustment layer listing is now indented. To “unclip” it at any time, repeat either step.
Saving adjustment presets
You can save your custom adjustment settings for future use in any document. If you have a group of photos, say, that were shot under the same lighting conditions, have the same color profile, and require the same correction, you can save those settings as a preset, then apply that preset to each of the files.
To save custom adjustment layer settings as a preset
1. Create and choose settings for an adjustment layer. Presets can be saved only for a Levels, Curves, Exposure, Hue/Saturation, Black & White, Channel Mixer, or Selective Color adjustment.
2. From the Properties panel menu, choose Save [adjustment type] Preset. In the Save dialog, enter a name, keep the default location and extension, then click Save. Your user preset is now available on the menu at the top of the Properties panel when the controls for that adjustment type are displaying.
• To delete a user preset, choose that preset, choose Delete Current Preset from the panel menu, then click Yes in the alert dialog.
• If you created an adjustment that you want to copy to another document — but it can’t be saved as a preset — open the source and destination documents (both RGB) and tile them via the Window > Arrange submenu. Click in the source document, then drag and drop the adjustment layer from the Layers panel into the other document window.
Merging and deleting adjustment layers
When you merge an adjustment layer downward, the adjustments are applied permanently to the underlying image layer. If you change your mind, click the prior state on the History panel.
To merge an adjustment layer
On the Layers panel, ![]() do either of the following:
do either of the following:
Click the adjustment layer to be merged downward (or Shift-click multiple adjustment layers and the layer into which you want to merge them),A then press Ctrl-E/Cmd-E.B
A We clicked the adjustment layer to be merged downward.

B The Merge Down command applied the Levels values from the adjustment layer to the underlying image layer, which in this case was a copy of the Background.
Right-click on or near the adjustment layer name and choose Merge Down from the context menu.
Note: Adjustment layers can’t be merged with one another. If you use the Merge Visible command (see page 149) or the Flatten Image command (see page 150), the effect of any adjustment layers in the file will be applied to the resulting merged layer (and will disappear from the Layers panel).
To delete an adjustment layer
Do either of the following:
Click the icon for an adjustment layer on the Layers panel, then click the Delete Layer button ![]() on the same panel or the Delete Adjustment Layer button
on the same panel or the Delete Adjustment Layer button ![]() on the Properties panel. If an alert dialog, appears, click Yes. (Click Don’t Show Again if you want to prevent the alert from reappearing.)
on the Properties panel. If an alert dialog, appears, click Yes. (Click Don’t Show Again if you want to prevent the alert from reappearing.)
Click the adjustment layer on the Layers panel, then press Backspace/Delete. (See also the sidebar on the previous page.)
Editing an adjustment layer mask
Photoshop creates a mask for every adjustment layer. If you create a selection before creating an adjustment layer, the selection will appear as the white area in the mask. If you didn’t create a selection first, or you want to edit the mask at any time, follow these steps.
To edit the adjustment layer mask
1. Click the mask thumbnail on an adjustment layer.
2. Press D to choose the default colors, then press X to switch to black as the Foreground color.
3. To hide the adjustment in some areas of the image, do either or both of the following:
Create a selection with any selection tool (e.g., Rectangular Marquee or Lasso); refine it via the Refine Edge dialog, if desired; choose Edit > Fill (Shift-Backspace/Shift-Delete); choose Use: Foreground Color; then click OK. Deselect.
Choose the Brush tool ![]() (B or Shift-B). On the Options bar, choose a Soft Round brush, Mode: Normal, and an Opacity of 100% (or a lower Opacity to apply a partial mask), press [ or ] to set the brush diameter, then apply strokes in the image.A–C
(B or Shift-B). On the Options bar, choose a Soft Round brush, Mode: Normal, and an Opacity of 100% (or a lower Opacity to apply a partial mask), press [ or ] to set the brush diameter, then apply strokes in the image.A–C

A The bottom area of this photo looks too pink.

B We corrected the color via Curves, clicked the mask thumbnail on the adjustment layer, then applied brush strokes to hide the adjustment in the top part of the image. The adjustment is visible in only the bottom half of the photo.

C Our brush strokes are represented by black areas in the adjustment layer mask thumbnail.
4. Optional: To remove black areas of the mask, press X to swap colors (make the Foreground color white), then apply brush strokes.
• To remove all black areas from the mask, deselect, click the adjustment layer mask, choose Edit > Fill, then choose Use: White in the dialog.
• To confine the effect of an adjustment layer to a small area, start with a fully black mask (click Invert on the Properties panel ![]() or apply Edit > Fill, Use: Black), then apply strokes with white.
or apply Edit > Fill, Use: Black), then apply strokes with white.
• To create a gradual mask by applying a gradient, see pages 259–260. To adjust the edge or density of a mask, see pages 174–175.
Using the Histogram panel
The Histogram panel ![]() displays a graph of the distribution of tonal (light and dark) values in the current image. The horizontal axis on the graph represents the grayscale or color levels between 0 and 255, the vertical bars represent the number of pixels at specific color or tonal levels, and the contour of the graph shows the overall tonal range. Before you begin editing your document, study the histogram to evaluate the existing distribution of tonal values. Then as you edit your document, note how the graph updates to reflect changes to the tonal values. The panel remains accessible even while the Properties panel is being used or an adjustment dialog is open.
displays a graph of the distribution of tonal (light and dark) values in the current image. The horizontal axis on the graph represents the grayscale or color levels between 0 and 255, the vertical bars represent the number of pixels at specific color or tonal levels, and the contour of the graph shows the overall tonal range. Before you begin editing your document, study the histogram to evaluate the existing distribution of tonal values. Then as you edit your document, note how the graph updates to reflect changes to the tonal values. The panel remains accessible even while the Properties panel is being used or an adjustment dialog is open.
To choose a view for the Histogram panel
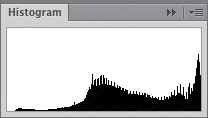
From the Histogram panel menu, choose one of the following: Compact View (just the histogram),A Expanded View (the histogram plus statistics and a menu providing access to individual channels),B or All Channels View (all the features of Expanded View, plus a separate histogram for each channel). When the panel is in either of the latter two views, you can check Show Statistics on the panel menu to display file data on the panel.

A This Histogram panel is in Compact View.
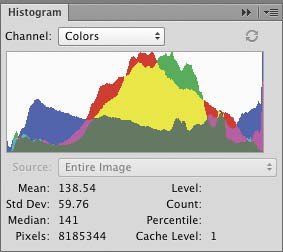
B Here the panel is in Expanded View. By default, the Channel menu is set to Colors.
For Expanded or All Channels view, choose an option from the Channel menu: RGB (all the channels combined),C a specific channel, Luminosity, or Colors. To display the individual channels in color when the panel is in All Channels view, check Show Channels in Color on the panel menu.
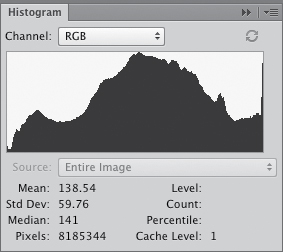
C With RGB chosen on the Channel menu, the current tonal values in the image are represented by black areas in the graph.
While a large file is being edited, Photoshop maintains the redraw speed of the Histogram panel by reading the data from the histogram cache — not from the actual image. When this is occurring, a Cached Data Warning icon ![]() displays on the panel. Try to remember to keep updating the panel, as described below (even while editing the settings for an adjustment layer), so it will continue to reflect the current tonal values of the image.
displays on the panel. Try to remember to keep updating the panel, as described below (even while editing the settings for an adjustment layer), so it will continue to reflect the current tonal values of the image.
To update the Histogram panel
Do one of the following:
Double-click anywhere on the histogram.
Click the Cached Data Warning icon. ![]()
Click the Uncached Refresh button. ![]()
• To specify a Cache Levels value for screen redraw in Photoshop (including this panel), see page 439.
Interpreting the histogram
If you want to focus on monitoring tonal values when using the Histogram panel, choose Expanded View from the panel menu and choose RGB from the Channel menu. In the graph, pixels are represented by vertical bars: shadows on the left, midtones in the middle, and highlights on the right. For a dark, low-key image, the bars will be clustered primarily on the left side of the graph; for a medium-key image in which the lights and darks are relatively balanced, the bars will be more uniformly distributed across the graph; and for a very light, high-key image that contains few or no shadow areas, the bars will be clustered primarily on the right side.
If an image has a wide tonal range, the bars will be more uniformly distributed in all the tonal zones, and will stretch fully from one end of the graph to the other. Also, the graph will be mostly solid and will have a relatively smooth contour instead of a spiky one.A If an image lacks detail in a particular tonal range, the graph will contain gaps and spikes, like teeth on a comb.

A The tonal ranges in this image are well balanced.
The following are some typical graph profiles:
• For an average-key but underexposed image that lacks details in the highlights, pixels will be clustered primarily on the left side of the histogram.B

B This image is underexposed.
• For an overexposed image that lacks details in the shadows, pixels will be clustered mostly on the right side of the histogram.C
C This image is overexposed.
• For an image in which pixels were clipped (details discarded) from the extreme shadow or highlight areas, a line or cluster of pixels will rise sharply at the left or right edge, respectively, of the histogram.D

D Shadow pixels are clipped in this image.
• If an image has lost detail as a result of editing (such as from Photoshop filters or adjustments), the histogram will contain gaps and spikes.E The gaps indicate a loss of specific tonal or color levels, whereas the spikes indicate that pixels from different levels have been averaged together and been given the same value (the bar will be taller at that level). A few gaps and spikes are an acceptable result of editing, whereas large gaps signify that posterization has occurred and too many continuous tonal values have been discarded. On the other hand, an imperfect histogram doesn’t always signify failure; the graph can be thrown off by a simple edit, such as adding a white border to the image. If you like the way the image looks, go with that!

E This image has lost some detail.
Applying a Levels adjustment
Levels is a workhorse feature of Photoshop that you should learn well and use often. A bonus feature of this command is that it displays a histogram of the tonal values of your image. You can use Levels when you first bring a photo into Photoshop, and then use it again, if needed, during the course of editing. (Levels is also used on pages 214–215 and on page 238.)
To correct tonal values using Levels
1. Click an image layer that needs tonal correction.A

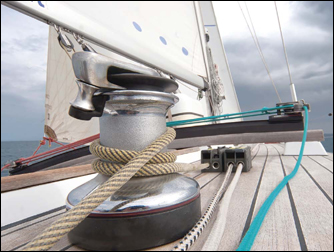
A This image lacks contrast (looks flat and dull).
2. On the Adjustments panel, ![]() click the Levels button.
click the Levels button. ![]()
![]() The Levels controls display on the Properties panel.
The Levels controls display on the Properties panel.
3. Do either of the following:
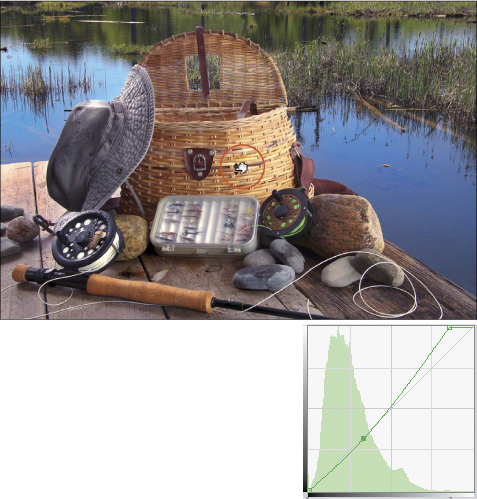
To intensify the contrast, brighten the highlights by moving the white input highlights slider to the left and darken the shadows by moving the black input shadows slider to the right.B Any pixels located to the left of the black slider will become black; any pixels located to the right of the white slider will become white. (This shifting of tonal values to black or white is called “clipping.”)
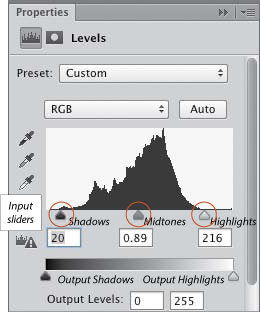
B The histogram in this Levels panel doesn’t extend all the way to the edges, an indication that the tonal range of the photo is narrow. To expand the range, we moved the Shadows and Highlights input sliders inward to align with the outer edges of the histogram, and moved the middle slider to the right to darken the midtones.
To control when clipping starts to occur in a temporary high-contrast display called Threshold mode, hold down Alt/Option and drag the highlights slider, then release when only a few areas of color or white display (A, next page); those pixels will be given the lightest tonal value. Next, hold down Alt/Option and drag the shadows slider, then release when only a few areas of color or black appear (B, next page); those pixels will be given the darkest tonal value.
A We held down Alt/Option and dragged the white highlights slider.
B Next, we held down Alt/Option and dragged the black shadows slider.
4. With the shadows and highlights sliders now in their proper positions, move the middle (midtones) Input Levels slider to lighten or darken just the midtones.
5. To compare the original and adjusted images, press and hold , then release (C–D, next page).
C Our Levels adjustments improved the contrast (the shadows are darker and the highlights are brighter).

D We can tell that the Levels adjustments expanded the tonal range of the image, because now the bars extend all the way from one end of the graph to the other.
• If the “Calculate More Accurate Histogram” alert button ![]() appears on the Properties panel as you’re applying a Levels adjustment, you can click the button to refresh the histogram in the panel.
appears on the Properties panel as you’re applying a Levels adjustment, you can click the button to refresh the histogram in the panel.
• To apply the current Levels settings to other images — such as to a group of images that were taken under similar lighting conditions and need the same adjustments — save and apply them as a preset (see page 206). There are also some ready-made presets that you can use.
Applying a Brightness/Contrast adjustment
The Brightness and Contrast controls are ultra simple to use, but have a big impact.
To apply Brightness/Contrast adjustments
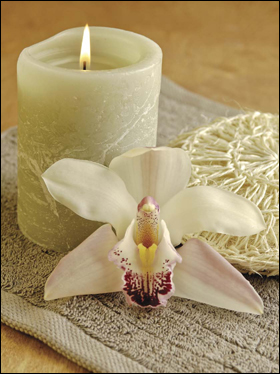
1. Click a layer or the Background.A

A The original image is too light and lacks contrast.
2. On the Adjustments panel, ![]() click the Brightness/Contrast button.
click the Brightness/Contrast button. ![]()
![]() The Brightness/Contrast controls display on the Properties panel.
The Brightness/Contrast controls display on the Properties panel.
3. Do either of the following:
Move the Brightness and/or Contrast sliders.B
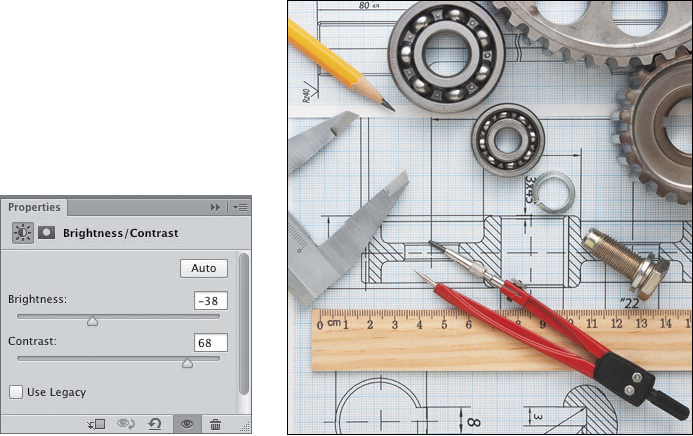
B We reduced the Brightness to darken the image and increased the Contrast to intensify the shadows and highlights (settings shown at left).
Click Auto to let Photoshop set the sliders; you can tweak the settings afterward. ![]()
• The Use Legacy option for Brightness/Contrast causes tonal levels to be eliminated from the shadows or highlights (after adjustment, the histogram will show clipped areas on the left or right edge of the graph). Keep this option off to preserve pixel data (in which case, after moving the sliders, the histogram will show only a minor redistribution of tonal values).
Applying a Photo Filter adjustment
To change the color temperature of a scene (make it look warmer or cooler) during a shoot, photographers use colored lens filters. In Photoshop, you can simulate the effect of these filters via a Photo Filter adjustment layer, either to neutralize an unwanted color cast or to apply a tint (as a special effect). You select one of the 20 preset tints that are offered or choose a custom color.
When using this feature, we recommend aiming for subtle (sophisticated) or extreme (so it looks deliberate), but not in between. If you go for in between, it can look like the image has an ugly color cast.
To apply a Photo Filter adjustment
1. Click a layer or the Background.A
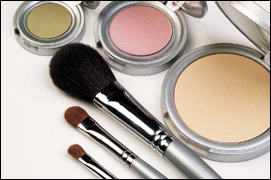
A This is the original image.
2. On the Adjustments panel, ![]() click the Photo Filter button.
click the Photo Filter button. ![]()
![]() The Photo Filter controls display on the Properties panel.
The Photo Filter controls display on the Properties panel.
3. Do either of the following:
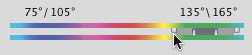
Click Filter, then from the menu, choose a preset warming or cooling filter, or a filter color. The current filter color displays in the swatch.
Click the Color swatch, choose a color for the filter via the Color Picker, noting the change in the image, then click OK.
• For a subtle change, pick a color that is similar to colors in the image. Or for a more striking change, pick a color that is complementary to the predominant colors in the image (one that is on the opposite side of the color wheel — red/green, blue/orange, purple/yellow).
4. Using the Density slider or scrubby slider, choose an opacity percentage for the tint. Try a modest value between 10% and 25% first.B–C

B For our Photo Filter adjustment layer, we chose Cooling Filter (82) from the Filter menu and a Density value of 20%.
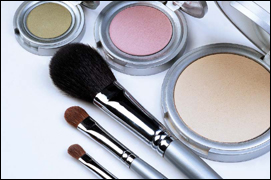
C The Photo Filter adjustment made the image look cooler.
• You can also lessen the Photo Filter effect after using the Properties panel by lowering the opacity of the adjustment layer.
5. Check Preserve Luminosity to preserve the overall brightness and contrast values of the image. With this option unchecked, the highlights may be softened, but the resulting colorization effect may be too pronounced.
6. To compare the original and adjusted images, press and hold , then release.
Applying an auto correction
The Auto Color Correction Options dialog offers preset algorithms (formulas) for automatic color and tonal corrections, two of which we cover in this section.
The Find Dark & Light Colors algorithm, used in the task below, analyzes the darkest and lightest colors in an image, then repositions the shadow and highlight settings in each channel based on those colors. You will also use controls in the dialog to adjust the brightness and color temperature of the midtones.
To apply the Find Dark & Light Colors algorithm
1. Open an RGB image.A
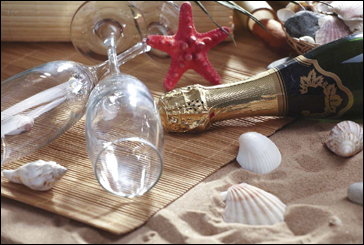
A The midtones in the original image have a magenta cast, which is noticeable primarily in the sand.
2. On the Adjustments panel, ![]() click the Levels
click the Levels ![]() or Curves button.
or Curves button. ![]()
![]()
3. Hold down Alt/Option and click Auto on the Properties panel. ![]() The Auto Color Correction Options dialog opens. Move it out of the way if it’s blocking the image, then click Find Dark & Light Colors.
The Auto Color Correction Options dialog opens. Move it out of the way if it’s blocking the image, then click Find Dark & Light Colors.
4. Check Snap Neutral Midtones. Any colors in the image that are close to neutral will be adjusted to match the current values of the Midtones target color.
5. To choose a color value for the midtones, click the Midtones color swatch. In the Color Picker, click the H button in the HSB group, then drag the circle in the large square slightly to the right (keep the S value around 10–30). Next, on the vertical Hue bar, click a warm or cool hue. To adjust the brightness of the midtones, drag the circle in the big square slightly upward or downward.B

B To neutralize the color cast, in the Auto Color Correction Options dialog, we clicked Find Dark & Light Colors, checked Snap Neutral Midtones, clicked the Midtones swatch, then chose a medium brown via the Color Picker (the new color appeared in the swatch).
Note: Midtones is the only swatch you need to change; Photoshop will adjust the other two swatches automatically based on the printer color profile that is used when you output the file.
6. Click OK to exit the Color Picker, then once again to exit the Auto Color Correction Options dialog (A, next page).
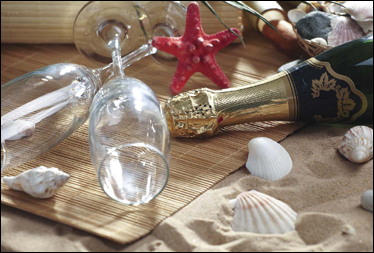
A The adjustments made via the Auto Color Correction Options dialog successfully removed the magenta cast.
7. When the alert dialog appears, offering you the option to save the new target colors as defaults, click No (thank you!) if you would rather choose settings on a case-by-case basis (as we do).
The Enhance Brightness and Contrast algorithm is a good option for an image that needs substantial tonal correction (e.g., one that is very underexposed). This algorithm uses content-aware technology to evaluate data in the entire image, then via either the sliders or the curve, it corrects the tonal values for the composite RGB channel (instead of for each channel).
To apply the Enhance Brightness and Contrast algorithm
1. Open an RGB image.B

B The original image is very underexposed.
2. On the Adjustments panel, ![]() click the Levels
click the Levels ![]() or Curves button.
or Curves button. ![]()
![]() In the dialog, hold down Alt/Option and click Auto.
In the dialog, hold down Alt/Option and click Auto.
3. The Auto Color Correction Options dialog opens. Click Enhance Brightness and Contrast, then click OK.C

C The Enhance Brightness and Contrast algorithm did a quick but effective job of brightening the image. Not bad.
4. Hopefully, the auto algorithm took care of most of the heavy lifting. If further refinement is needed, click the Levels or Curves adjustment layer, and modify the controls on the Properties panel.
Applying a Color Balance adjustment
You can use a Color Balance adjustment layer to apply a warm or cool cast to an image or, conversely, to neutralize an unwanted cast. You choose a tonal range to adjust first (Shadows, Midtones, and Highlights), then move any of the sliders toward a warmer or cooler hue. Note: If you need to restrict color adjustments to an even smaller tonal range, use Curves or Hue/Saturation.
To apply a Color Balance adjustment
1. Click a layer or the Background.A
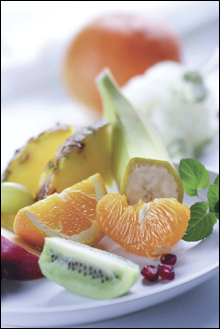
A This image has a blue cast.
2. On the Adjustments panel, ![]() click the Color Balance button.
click the Color Balance button. ![]()
![]()
3. The Color Balance settings display on the Properties panel. From the Tone menu, ![]() choose the range you want to adjust: Shadows, Midtones, or Highlights.
choose the range you want to adjust: Shadows, Midtones, or Highlights.
Optional: Keep Preserve Luminosity checked to preserve the tonal values of the layer as you make color corrections, or uncheck this option to allow the adjustment to change only the color values.
4. Each slider pairs a cool hue with a warm one. Move a slider toward any color you want to add more of or away from any color you want to reduce somewhat B–C (and A–B, next page). For instance, you could move a slider toward green to reduce magenta, or toward yellow to reduce blue.
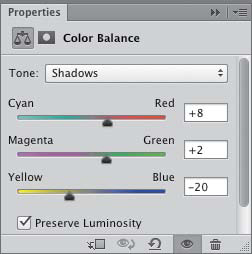
B For a Color Balance adjustment layer, we chose Tone: Shadows, then moved the sliders toward Red, Green, and Yellow to neutralize the colors in that tonal range.

C The shadow areas look more neutral than they did before, but further corrections are needed.
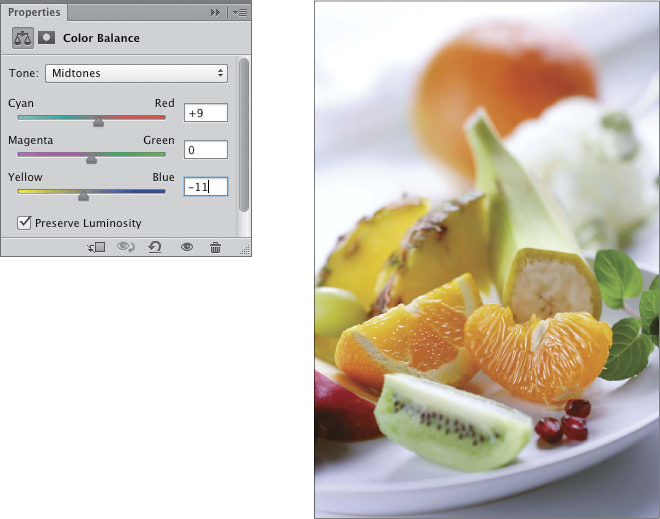
A To neutralize the blue cast in the midtones, we chose Tone: Midtones, then moved the sliders toward Red and Yellow. Only the highlight adjustment remains.
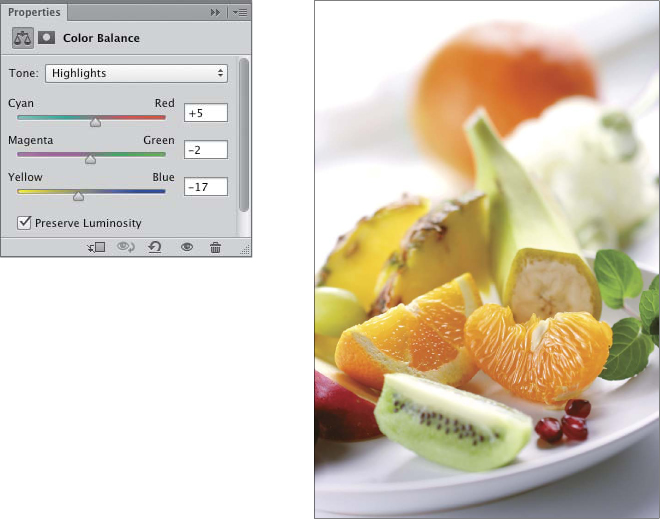
B To warm the highlights and neutralize the remaining traces of the blue color cast, we chose Tone: Highlights, then moved the sliders toward Red and Yellow (and very slightly toward Magenta). Now the food and the plate look warmer (and more appetizing!) and the shadows look neutral.
• Try moving two or more sliders toward similar hues. For example, to add a cool cast, you could move the first slider toward Cyan and the third one toward Blue. Or to make an image warmer, move the first slider toward Red and the third one toward Yellow.
5. Choose any other range from the Tone menu, then adjust the color sliders for that range. To compare the original and adjusted images, press and hold , then release.
Applying a Hue/Saturation adjustment
Using Hue/Saturation, you can apply very targeted hue, saturation, and lightness adjustments (no selection is needed). In the example shown below, we use it to correct a color cast and to recolor a garment. This is a very useful command.
To apply a Hue/Saturation adjustment
1. Click a layer.A
A The original image has a reddish color cast.
2. On the Adjustments panel, ![]() click the Hue/Saturation button.
click the Hue/Saturation button. ![]()
![]() The Hue/Saturation settings display on the Properties panel.
The Hue/Saturation settings display on the Properties panel.
3. Do any of the following:
To correct all the colors in the image, keep Master as the choice on the second menu;B to adjust a specific color range, choose that color on the menu. Move the Hue slider to adjust the hue(s),C the Saturation slider to adjust the color intensity, or the Lightness slider to lighten or darken. If you adjust the Lightness, you may need to increase the Saturation to revive any colors that were lightened or darkened.

B To fix the color cast, we chose Master from the menu, then moved the Hue slider slightly toward the right.

C To recolor her top, we chose Magentas from the menu, then moved the Hue slider to –73 (blue).
To change a hue, click the Targeted Adjustment tool ![]() on the panel, then Ctrl-drag/Cmd-drag horizontally over the color area in the image that you want to adjust. The color range you dragged over is now listed on the menu, and the Hue slider shifts to that color on the panel. Or to change the Saturation of a color range, drag horizontally with the same tool over a color area in the image without holding down Ctrl/Cmd.
on the panel, then Ctrl-drag/Cmd-drag horizontally over the color area in the image that you want to adjust. The color range you dragged over is now listed on the menu, and the Hue slider shifts to that color on the panel. Or to change the Saturation of a color range, drag horizontally with the same tool over a color area in the image without holding down Ctrl/Cmd.

Applying a Vibrance adjustment
Here you will use the Vibrance controls to adjust the saturation of a color layer. On the next two pages, Vibrance is used as a desaturation method.
To guard against oversaturation and clipping, the Vibrance slider boosts the intensity of less saturated colors more than that of highly saturated colors, making this slider particularly useful for adjusting skin tones. The Saturation slider, by comparison, applies the same change to all colors regardless of their original saturation levels.
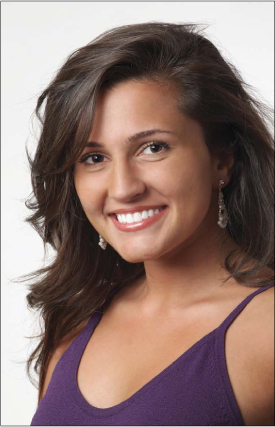
To adjust the vibrance of skin tones
1. Click a layer or the Background.A

A The color in this portrait is oversaturated.
2. On the Adjustments panel, ![]() click the Vibrance button.
click the Vibrance button. ![]()
![]() The Vibrance settings display on the Properties panel.
The Vibrance settings display on the Properties panel.
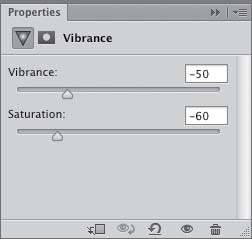
3. Increase the Vibrance value, then reduce the Saturation value slightly.B

B For the Vibrance adjustment layer, we set the Vibrance value to +42 and the Saturation value to –15. Now the skin tones look more natural.
In this task, you will use a Vibrance adjustment layer to either strip the color completely from a layer or desaturate a layer partially, and then use the Vibrance slider to adjust the intensity of the remaining color.
To desaturate a layer using a Vibrance adjustment
1. Click a layer or the Background.A
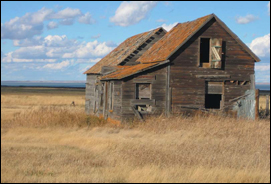
A This is the original image.
2. On the Adjustments panel, ![]() click the Vibrance button.
click the Vibrance button. ![]()
![]() The Vibrance settings display on the Properties panel.
The Vibrance settings display on the Properties panel.
3. Do either of the following:
For a simple, full desaturation, reduce the Saturation to its lowest value of –100.
To adjust the color vibrance as you desaturate the layer, reduce the Saturation to between –60 and –80, then to control the color intensity in the now desaturated layer, increase or reduce the Vibrance value.B–D Remember, the Vibrance option boosts the intensity of the least saturated colors the most.
B To desaturate the color partially, we lowered the Saturation value on a Vibrance adjustment layer to –60 and set the Vibrance value to –50.
C This is the image after we applied the Vibrance adjustment layer settings shown in the preceding figure.

D For this version, we kept the Saturation value of –60 but raised the Vibrance to the maximum value of +100.
To desaturate a color layer using Vibrance, then restore color selectively
1. Click a layer or the Background.A

A This is the original image.
2. On the Adjustments panel, ![]() click the Vibrance button.
click the Vibrance button. ![]()
![]() The Vibrance settings display on the Properties panel.
The Vibrance settings display on the Properties panel.
3. Reduce the Saturation to the lowest value of –100.
4. Choose the Brush tool, ![]() and on the Options bar, choose a Soft Round brush, Normal mode, and an Opacity of 50% or less. Choose black as the Foreground color.
and on the Options bar, choose a Soft Round brush, Normal mode, and an Opacity of 50% or less. Choose black as the Foreground color.
5. Adjust the brush diameter, make sure the mask thumbnail is still selected on the adjustment layer, then apply strokes where you want to restore the original colors.B–C You can change the brush opacity and diameter between strokes. To restore desaturated areas, set the brush Opacity to 100%, and paint with white (press X to swap the colors).
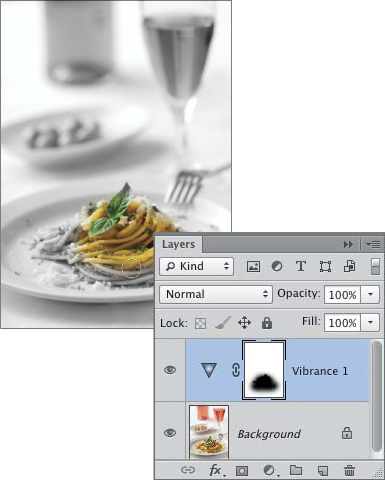
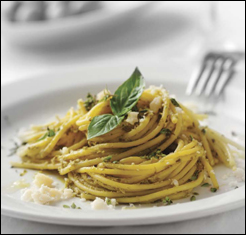
B To strip the color from the image, we created a Vibrance adjustment layer, then lowered the Saturation value to –100. To reveal some color, we applied brush strokes to the adjustment layer mask.

C The pasta commands most of the attention now, because it is the only area in color.
Applying a Curves adjustment
By using a Curves adjustment layer, you can limit tonal and color adjustments to a narrow range (such as to the highlights, quarter tones, midtones, three-quarter tones, or shadows). These corrections can be applied to the composite image (all the channels) or to individual color channels. In these steps, you will apply tonal corrections first, then apply color corrections. Note: These instructions pertain to RGB images (the Curves controls work in the opposite way for a CMYK image).
To apply tonal and color corrections using a Curves adjustment layer
Part 1: Apply tonal adjustments
1. Open an image that needs color and/or tonal adjustments.A

A This image is underexposed (too dark) and has a bluish cast.
2. On the Adjustments panel, ![]() click the Curves button.
click the Curves button. ![]()
![]()
3. On the Properties panel menu, choose Curves Display Options. In the dialog,B keep the Show Amount Of value on the default setting of Light, check all four of the Show options, then click OK.

B For this task, check all the Show options in the Curves Display Options dialog. (The grid buttons control the size of the grid squares.)
4. If you need to increase the contrast in the image, do either of the following:
The Input sliders set the white and black tonal values in the image. To darken the shadows and brighten the highlights, drag the black shadow Input slider and white highlight Input slider inward so they align with the ends of the gray areas in the histogram (A, next page) — or until you see that the contrast in the image is improved. The steeper the curve (which is, for the moment, still a straight line), the stronger the contrast.

A To lighten the highlights, we created a Curves adjustment layer, then moved the white slider to the left.
To establish the white and black values via a high-contrast display of clipping (called Threshold mode), Alt-drag/Option-drag the black slider until a few areas of color or black appear, and do the same for the white slider until a mere smidgen of white appears.
5. For more targeted adjustments, do either of the following:
Drag part of the curve; a (selected) point appears on it. For example, to lighten the midtones, drag the middle of the curve upward, or to darken the midtones, drag the middle of the curve downward.
• When a tonal value is lightened, its Output value is increased above its Input value (the original brightness value). When a tonal value is darkened, its Output value is reduced below its Input value.
Click the Targeted Adjustment tool ![]() in the panel, then move the pointer over an area of the image that contains the tonal level you want to darken or lighten; a small circle appears on the curve. Drag upward to lighten that level or downward to darken it. A point corresponding to that level appears on the curve.B
in the panel, then move the pointer over an area of the image that contains the tonal level you want to darken or lighten; a small circle appears on the curve. Drag upward to lighten that level or downward to darken it. A point corresponding to that level appears on the curve.B
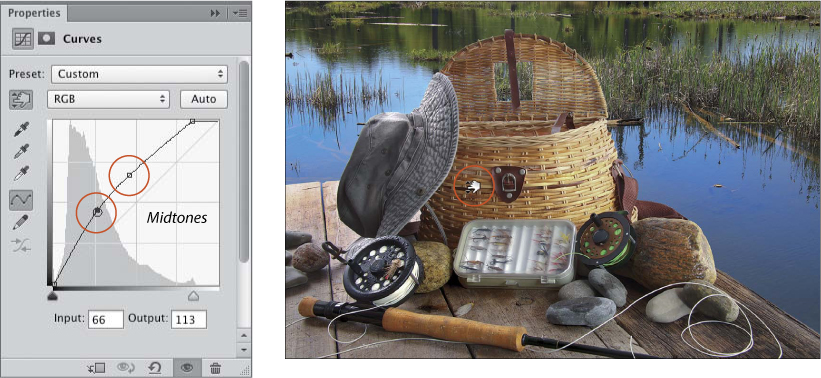
B To lighten the midtones, we clicked the Targeted Adjustment tool, dragged upward slightly on the left side of the basket, then did the same on the right side of the basket (points appeared on the curve). Although our Curves adjustments improved the tonal balance, the colors look a bit washed out. We’ll correct that next.
6. Keep the Curves controls showing on the panel. If the color also needs correcting, see the next page.
• If the “Calculate More Accurate Histogram” alert button ![]() appears on the Properties panel as you’re applying a Curves adjustment, click the button to refresh the histogram in the panel.
appears on the Properties panel as you’re applying a Curves adjustment, click the button to refresh the histogram in the panel.
• To cycle through and select the points on the curve, press the + (plus) key. To nudge a selected point, press an arrow key. To remove a selected point, press Backspace/Delete.
• To enlarge the graph and curve, drag an edge of the Properties panel. ![]()
Part 2: Correct the color
1. With the Curves adjustment layer still selected, from the second menu, choose Red to adjust that channel separately, then do any of the following:
Add or subtract red in the shadows by dragging the lower part of the curve or the black slider, or in the highlights by dragging the upper part of the curve or the white slider.A

A To add red to the highlights (such as on the basket), with the Red channel selected, we moved the white slider slightly inward (to the left).
Drag the middle of the curve upward to add red to the midtones or downward to subtract red B (to a lesser extent, this adjustment will also affect the reds in the shadows and highlights). Often, this midtone adjustment is all that’s required.
B We dragged slightly downward on the lower part of the curve (where most of the red pixels are clustered on the histogram). This produced a point on the curve (shown at right) and removed some red from the midtones.
Click the Targeted Adjustment tool ![]() in the panel, then drag upward in the image to add red to that tonal level or downward to subtract red (the part of the curve that corresponds to that level adjusts accordingly).
in the panel, then drag upward in the image to add red to that tonal level or downward to subtract red (the part of the curve that corresponds to that level adjusts accordingly).
2. Choose the Green channel, then the Blue channel, adding or subtracting that color from the image, as in the preceding step. You can switch back and forth between the color channels, and readjust them if needed (A–D, next page).

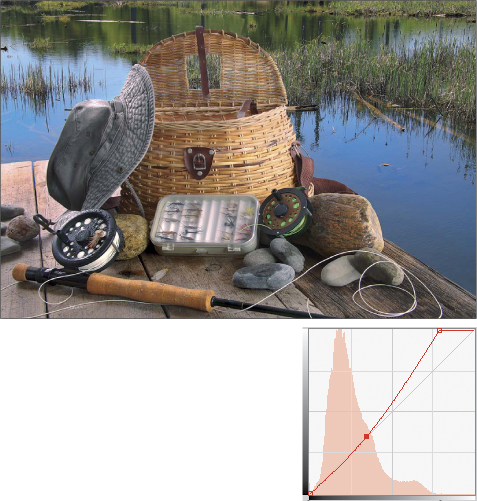
A To add green to (and remove red and blue from) the highlights, with the Green channel selected, we dragged the white slider slightly inward.
B To reduce the amount of green in the midtones, we clicked the Targeted Adjustment tool, then dragged downward slightly in the image, starting from the center of the basket. A point appeared on the curve for the Green channel.

C Finally, to add blue to (and remove green from) the highlights, with the Blue channel selected, we dragged the white slider slightly inward.
D To reduce the amount of blue in the midtones, we dragged downward slightly on the lower part of the curve on the panel (where most of blue pixels are clustered); a point appeared on the curve. Although we made only minor adjustments to the curve for each channel, in the final image, you can see that overall, the colors are now better balanced.
3. Optional: To lessen the impact of the Curves adjustment layer, lower the layer opacity; or click the adjustment layer mask, then with the Brush tool and the Foreground color set to black, apply brush strokes to the image.
• To save your adjustment settings as a preset for future use, see page 206.
• As an alternative to adjusting the curves individually for each color channel, you could, theoretically, correct the overall color by clicking a neutral gray area in the image with the gray point (middle) eyedropper on the Properties panel for Curves. However, this method is less reliable than the method described in the steps on this page, because locating a neutral gray is harder than it sounds (in fact, the image may not even contain a neutral gray).
Applying a Black & White adjustment
Our preferred way to strip color from a layer is via a Black & White adjustment. With this awesome command, you can control how the individual R, G, B and C, M, Y color channels are converted to grayscale values. As an added option, you can apply a tint. Note: A Black & White adjustment has no effect on the document color mode.
To convert a layer to grayscale via a Black & White adjustment
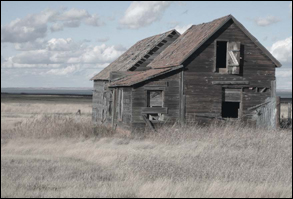
1. Click a layer or the Background.A
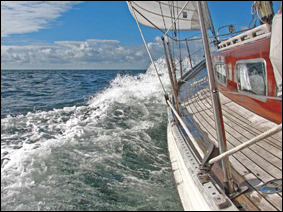
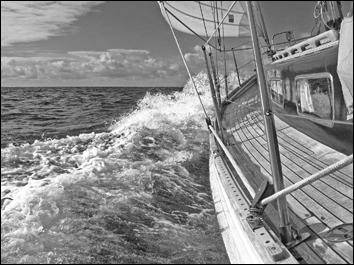
A This image layer is a good candidate for a conversion to grayscale, because it has clearly defined shapes.
2. On the Adjustments panel, ![]() click the Black & White button.
click the Black & White button. ![]()
![]() The Black & White controls appear on the Properties panel.
The Black & White controls appear on the Properties panel.
3. Do any of the following:
Click Auto to let Photoshop choose the settings (A–B, next page) or choose a preset from the Preset menu. You can also customize the settings, as described below.
A These are the slider values that Photoshop chose when we clicked the Auto button.
B This is the image after we created a Black & White adjustment layer and clicked Auto on the Properties panel.
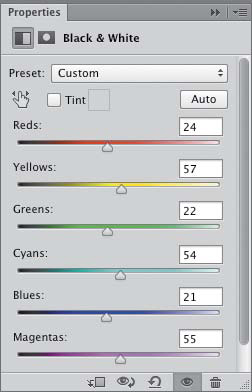
Adjust any of the sliders. A lower value produces a darker gray equivalent for a color; a higher value produces a lighter gray equivalent (C–D, next page). For example, you could use the Yellows slider to lighten or darken the skin tones in a portrait or move the Cyans and Blues sliders to adjust the sky in a landscape.

C To darken the cabin on the boat, we reduced the Reds value; to lighten the upper midtones on the boat deck, we increased the Yellows value; to darken the water in the foreground, we reduced the Greens value; and to darken the sky slightly, we reduced the Cyans value.

D This final version of the image has better contrast than the Auto version shown above.
Click the Targeted Adjustment tool ![]() in the panel, then drag to the right in an area of the image to lighten that shade, or to the left to darken it. The slider corresponding to the predominant color in that area will shift accordingly.
in the panel, then drag to the right in an area of the image to lighten that shade, or to the left to darken it. The slider corresponding to the predominant color in that area will shift accordingly.
4. Optional: To apply a tint to the image, check Tint, click the color swatch, choose a color in the Color Picker, then click OK (A, page 228).
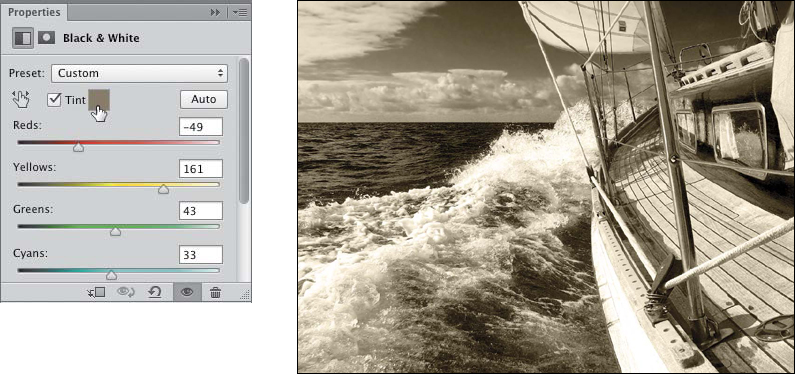
A For a Black & White adjustment, we checked Tint on the Properties panel, clicked the Tint swatch, chose a color in the Color Picker, then used the sliders to intensify the color in some areas, such as on the boat cabin and upper sky. The results are shown at right.
5. Optional: To restore some of the original color to the whole layer uniformly, lower the opacity of the adjustment layer. To restore color to specific areas, click the adjustment layer mask thumbnail, choose black as the Foreground color, then with the Brush tool, apply strokes to the image (for a more subtle effect, lower the opacity for the tool first).
Auto-Selecting the Targeted Adjustment Tool
To have Photoshop select the Targeted Adjustment tool (![]() or
or ![]() ) automatically on the Properties panel when you create a Curves, Hue/Saturation, or Black & White adjustment layer, display the controls for one of those three adjustment types, then choose Auto-Select Targeted Adjustment Tool from the panel menu.
) automatically on the Properties panel when you create a Curves, Hue/Saturation, or Black & White adjustment layer, display the controls for one of those three adjustment types, then choose Auto-Select Targeted Adjustment Tool from the panel menu.
Orchestrating a Scene
Tinting an image via a Gradient Map adjustment
A Gradient Map adjustment matches luminosity values of colors in a gradient to luminosity values in an image, replacing one with the other. It produces beautiful effects with little effort (you can look like a Photoshop pro even if you’re not one — yet!). This is a fun feature to experiment with.
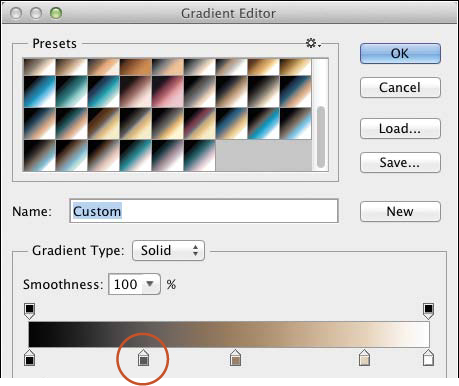
Note: A recommended prerequisite is familiarity with the Gradient Editor, which is covered on pages 196–197.
To tint an image via a Gradient Map adjustment
1. Click a layer or the Background.B

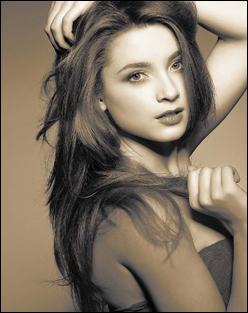
B This is the original image.
2. On the Adjustments panel, ![]() click the Gradient Map button.
click the Gradient Map button. ![]()
3. On the Properties panel, click the Gradient picker arrowhead, then via the picker menu, ![]() load a couple of preset libraries, including the new Photographic Toning library. Click a preset on the picker
load a couple of preset libraries, including the new Photographic Toning library. Click a preset on the picker ![]() (A, next page). To minimize visible banding on print output, check Dither.
(A, next page). To minimize visible banding on print output, check Dither.

A Via a Gradient Map adjustment, we applied the Sepia 2 gradient (Photographic Toning library); we kept the default settings for the gradient.
4. Optional: Click the Gradient thumbnail to open the Gradient Editor, then edit the gradient (e.g., add or change some color stops, or reposition some stops or midpoint diamonds) (B, next page).
B This is another variation of a Gradient Map adjustment we made to the original image. We chose the Sepia-Selenium 2 gradient (Photographic Toning library). In the Gradient Editor, we deleted the second color stop, and also dragged the third color stop slightly to the left and lightened that color.
5. Optional: Check Reverse to apply the lightest colors in the gradient to the darkest values in the image, and the darkest colors to the lightest values in the image (the opposite of the default behavior). If the gradient contains dark colors, this option may produce a “film negative” effect.
Another optional step is to change the blending mode of the Gradient Map layer (C, next page).
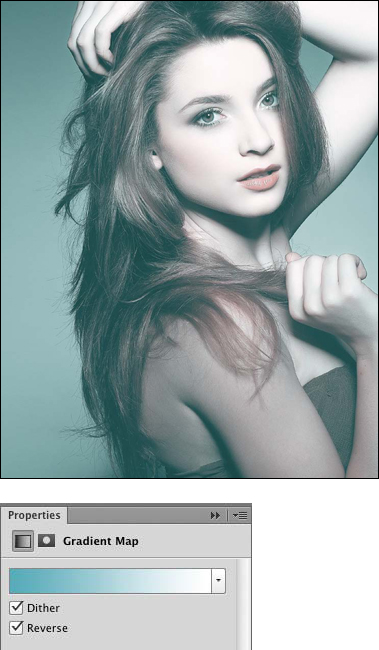
C One more variation of a Gradient Map adjustment we made to the original image: Light Cyan gradient (Simple library), Reverse checked on the Properties panel, and Pin Light chosen as the blending mode for the adjustment layer.
Applying the Shadows/Highlights command
Using the Shadows/Highlights command, you can apply separate corrections to the darkest and lightest areas of an image. It does an especially good job of recovering some or most of the details in overexposed highlight areas and underexposed shadow areas (such as subjects that are in shadow due to strong side or back lighting). As the command adjusts the tonal value of each individual pixel, it factors in the values of neighboring pixels. In fact, it preserves more pixels in each tonal range than Levels and Curves. This can be confirmed by studying the Histogram panel before and after applying the command.A

A No gaps or spikes are created on the Histogram panel when you apply Shadows/Highlights, because the command preserves an adequate number of pixels in each tonal range.
To apply the Shadows/Highlights command
1. Click a layer or the Background B and display the Histogram panel, ![]() so you can monitor the tonal adjustments.
so you can monitor the tonal adjustments.

A The shadow areas in this image lack detail.
The Shadows/Highlights command can’t be applied via an adjustment layer. To keep the settings you choose for the command accessible, convert a copy of the image layer to a Smart Object (see page 248).
2. Choose Image > Adjustments > Shadows/Highlights. The Shadows/Highlights dialog opens and the image is adjusted automatically. Check Show More Options to display the full assortment of sliders; they will give you added control over which image areas are affected by the adjustment.
3. For the Shadows:
To lighten the shadows (and to recover details), increase the Amount value (A–B, next page); for a strong correction, increase this value to 60–80%.

A In the Shadows/Highlights dialog, we checked Show More Options, then under Shadows, we chose an Amount setting of 55.

B The first adjustment successfully lightened the shadows, but also lightened too many of the midtones.
Use the Tonal Width slider to control the range of midtones that are affected by the adjustment. For example, if you need to limit the adjustment to just the darkest shadows, keep this value low (C–D, next page). Note: If you notice that halos have appeared along dark or light edges, lower the Tonal Width value.
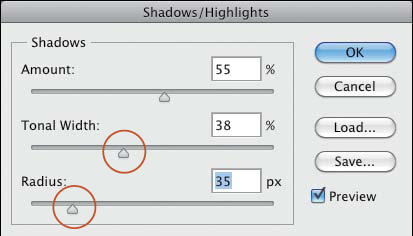
C We reduced the Shadows: Tonal Width setting to restrict the adjustment to just the lower midtones and then, with that tonal restriction in place, we increased the Shadows: Radius setting to 35 to create slightly more contrast in the midtones.

D The adjustments so far successfully restored details to the shadows and midtones. For the highlights adjustment, see the next page.
Raise or lower the Radius value to allow more or fewer neighboring pixels to be compared to each pixel in the shadow areas. Note: If you increase this value too much, Photoshop will compare too many pixels, which can reduce the contrast and negate the desired adjustment.
Note: After adjusting the Tonal Width or Radius value, you may need to readjust the Amount value.
4. For the Highlights:
Adjust the Amount value. You can increase this value to darken and recover details in overex-posed highlight areas.
Use the Tonal Width and/or Radius sliders to control the range of midtones that Photoshop includes in the Highlights adjustment.A If needed, readjust the Highlights: Amount setting.

A Next, we increased the Highlights: Amount setting to recover details in the sky, which had an unintended result of making the lower part of the sky too dark. To lighten the upper midtones and thereby correct this problem, we lowered the Highlights: Tonal Width setting and increased the Radius setting slightly.
5. To compare the original and adjusted images, press P, then release.
6. Under Adjustments, use the Color Correction slider to adjust the saturation, which may have been thrown off by the other adjustments.
7. Use the Midtone Contrast slider to increase or decrease the contrast in the midtones.
8. Optional: To save your Shadows/Highlights settings as a preset for use with any image, click Save, enter a descriptive name (keep the .shh extension), choose a location for the preset file, then click Save again. (To load a saved preset in the dialog, click Load.)
9. Click OK.B

B As shown in this final image, using the Shadows/Highlights command, we were able to lighten the shadows and midtones and improve the overall balance among the tonal ranges.
Because you smartly applied the command to a Smart Object (see step 1 on page 230), you can access and edit the adjustment settings at any time by double-clicking the Shadows/Highlights listing on the Layers panel.
• To restore the default settings to the dialog, hold down Alt/Option and click Reset (Cancel becomes Reset).
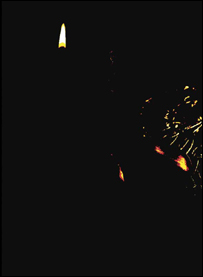
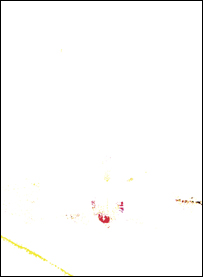
Dodging and burning with paint
When we need to lighten or darken small areas of an image by hand, we apply strokes with the Brush tool on a separate, editable layer, as in the steps below. (Although the Dodge and Burn tools might seem to be a logical choice for this job, we avoid them because they alter layer pixels permanently.)
To dodge or burn areas with the Brush tool
1. On the Layers panel, click an image layer or the Background,A click the New Layer button, ![]() then choose Overlay as the blending mode for the new layer.
then choose Overlay as the blending mode for the new layer.
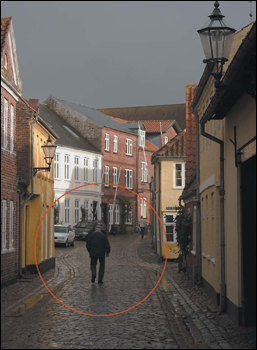
A We want to draw attention to the central figure in this image, but that area lacks contrast.
2. Choose the Brush tool ![]() (B or Shift-B). On the Options bar, choose a Soft Round brush and an Opacity of 15–20%. Press [ or ] to set the brush diameter.
(B or Shift-B). On the Options bar, choose a Soft Round brush and an Opacity of 15–20%. Press [ or ] to set the brush diameter.
3. Press D to make the Foreground color black, then apply brush strokes to areas you want to darken.
4. Press X to make the Foreground color white, then apply brush strokes to areas you want to lighten.
5. To further darken or lighten an area, apply additional brush strokes on top of existing ones (to build up the color).B
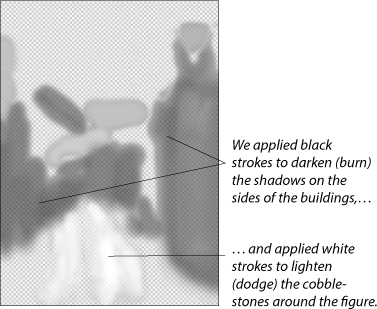
B This is a view of our paint strokes on the new layer, with the image layer hidden.
6. Optional: To lessen the effect, lower the Opacity of the paint layer.C Another option is to choose Soft Light as the layer blending mode.

C To convey the impression of reflected light on the cobblestones, we applied paint strokes on a blank layer, then we lowered the layer Opacity to 80% to soften the effect.
• To remove any unwanted “dodge” or “burn” strokes from the paint layer, drag across them with the Eraser tool set to 100% Opacity.
Applying the Merge to HDR Pro command
To produce an HDR (High Dynamic Range) image, you combine multiple exposures of the same scene into one image. The composite image contains a wider range of tonalities than could be captured in a single shot.
To shoot photos for an HDR composite
• Use a tripod to ensure that the shots align uniformly.
• Capture the photos as raw files.
• To keep the aperture constant, set the camera to Aperture Priority mode (A mode for a Nikon; AV mode for a Canon).
• Set the auto bracket feature to capture either 3 or 5 shots using different exposures (shutter speeds) automatically. For a Nikon, use the Auto Bracketing Set < AE option; for a Canon, use the Exposure Comp/AEB Setting option. For 3-shot bracketing, set exposures of 2 stops underexposed, 1 normal exposure, and 2 stops overexposed. For 5-shot bracketing, set exposure differences of 1 and 2 stops underexposed, 1 normal exposure, and 1 and 2 stops overexposed.
• Optional: To let your camera capture all the bracketed shots with one press of the shutter, set it to continuous-shooting mode.
To apply the Merge to HDR Pro command
1. Do either of the following:
In Bridge, select the 3 or 5 bracketed photos you captured for the HDR image,A then choose Tools > Photoshop > Merge to HDR Pro.
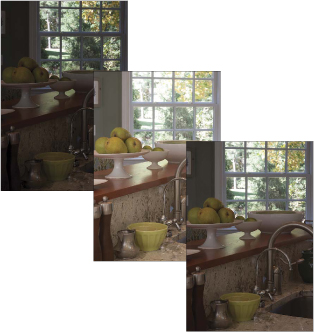
A This scene was shot using three different exposures: One for the exterior light, one for the interior light, and one in between.
In Mini Bridge, select the 3 or 5 bracketed photos you captured for the HDR image, then right-click a selected photo and choose Photoshop > Merge to HDR Pro.
2. Sit tight while Photoshop merges your photos. When the Merge to HDR Pro dialog opens, choose Mode: 16 Bit, and choose Local Adaptation from the menu as the conversion method. (Avoid the 32-bit option, because 32-bit images are very large and can’t be displayed or printed.)
3. Under Tone and Detail, increase the Detail value to boost the image sharpness and contrast, and to provide more pixel variation for the other sliders to work with.
4. Under Edge Glow, increase the Strength value to increase edge contrast and create a white edge glow. Increase or reduce the Radius value to adjust the size of the glow (A, next page). Optional: To preserve the edge quality, especially if you increased the Detail value, check Edge Smoothness.
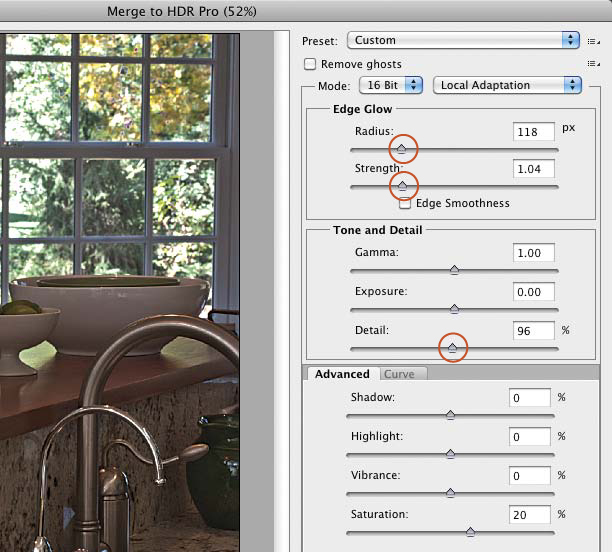
A In the Merge to HDR Pro dialog, we raised the Detail, Strength, and Radius values first to increase detail and edge definition in the image.
5. Under Tone and Detail, use the Gamma slider to increase or reduce the contrast.
Use the Exposure slider to adjust overall lighting (B, next page).

B We lowered the Radius value to reduce the edge glow, increased the Gamma value to decrease the contrast, and increased the Exposure value to lighten the overall image.
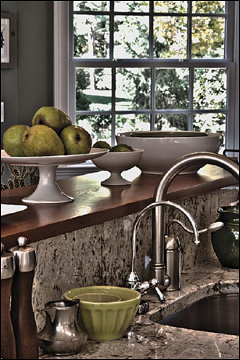
6. In the Advanced tab, use the Shadow slider to adjust the lightness of the shadow areas. Lower the Highlight value if you need to recover details in the highlights (C, next page). If you plan to refine the HDR image in Camera Raw, as we recommend, use these sliders to apply only minor adjustments.
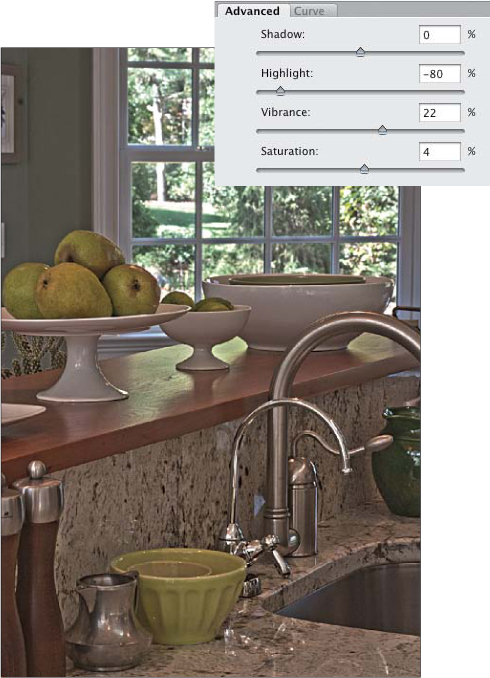
C In the Advanced tab, we lowered the Highlight value substantially to recover highlight details, reduced the Saturation value, and increased the Vibrance value to boost the color saturation.
Readjust the Detail value to tweak the image sharpness.
7. Check Remove Ghosts, then click an exposure thumbnail (at the bottom of the dialog) to remove any discrepancies between shots that resulted from the movement of the subject (A–B, next page). The normal (EV.0) or dark (EV.1) exposure thumbnail may work best.
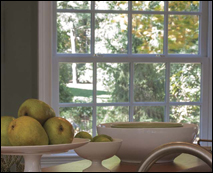
A The leaves outside the window moved as we were shooting our three exposures, which produced “ghosts” in the composite image.
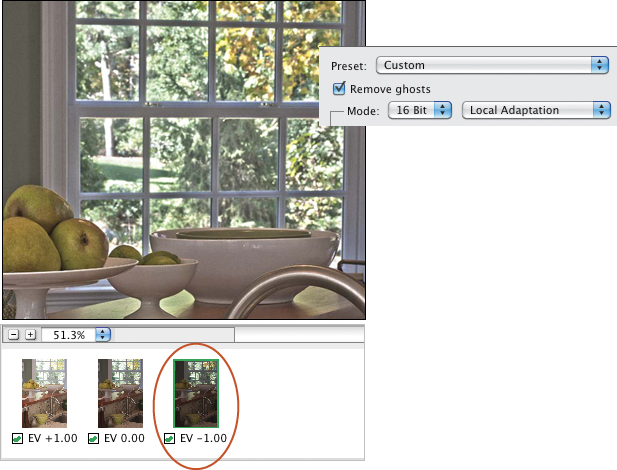
B We checked Remove Ghosts, then clicked the darkest thumbnail to designate that shot as the one to control the position of all the elements in the merged image.
8. To tweak the shadows, midtones, or highlights, click the Curve tab and gently drag that part of the curve, just as you would for a Curves adjustment (C, next page).
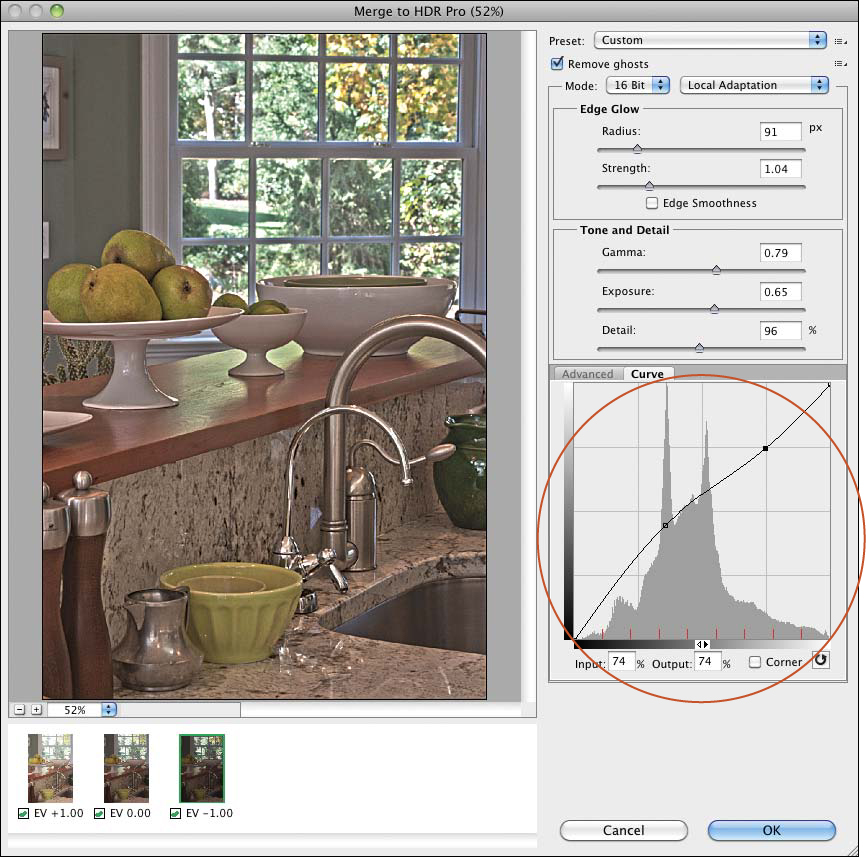
C Finally, in the Curve tab, we raised the lower middle part of the curve slightly to lighten the shadows and lowered the upper part of the curve to darken the highlights and upper midtones. As you can see in the preview, these HDR Pro settings improved the image considerably.
9. Click OK. The HDR file will open as a new document in Photoshop. Save it in the Photoshop PSD format, then follow the steps on page 237 to refine it in Camera Raw.
After using the Merge to HDR Pro command, we like to tweak the exposure, color, and tonal values in the composite file via Camera Raw.
To process an HDR file in Camera Raw
1. After following the steps on pages 234–236, use File > Save As to save another version of the file in the TIFF format.
2. From Bridge, open the TIFF file into Camera Raw.*
*If the TIFF file won’t open into Camera Raw, choose Edit/Adobe Bridge CS6 > Camera Raw Preferences, then from the TIFF Handling menu, choose Automatically Open All Supported TIFFs.
3. Use the Basic (or any other) tab sliders to further improve the image (see pages 61–65).
4. Click Open Image. In Photoshop, save the revised document in the Photoshop format, then sit back and admire your work.A
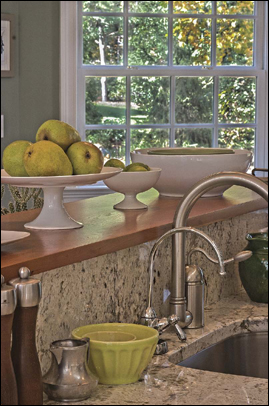
A This is the final HDR image after we applied some adjustments via the Basic tab in Camera Raw.
Screening back a layer using Levels
When printing dark text or a logo on top of a photo, you need to make sure the picture is light enough for the text or logo to be readable, but not so light that the image content is lost. Here, a Levels adjustment is used to screen back (lighten) an image layer.
To screen back a layer using Levels
1. Open an image.A
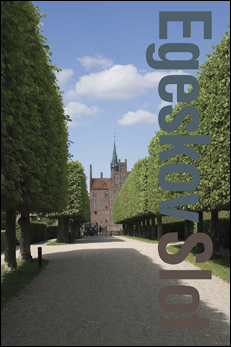
A This document contains an editable type layer above an image layer.
2. Optional: To limit the adjustment to a specific area of the image, create a selection.
3. On the Adjustments panel, ![]() click the Levels button.
click the Levels button. ![]()
![]() Levels controls display on the Properties panel.
Levels controls display on the Properties panel.
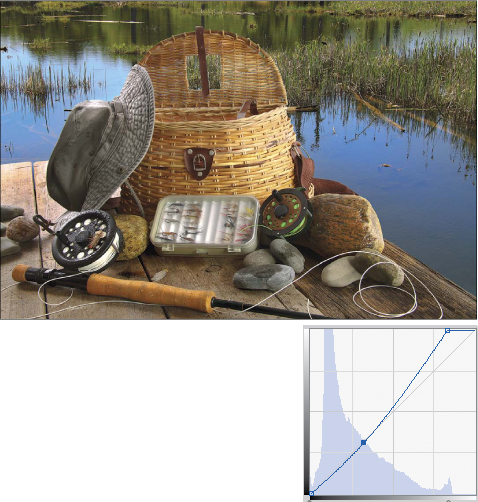
4. To reduce contrast in the image, move the Output Levels shadows (black) slider to the right.
5. To lighten the midtone values in the image, move the Input Levels midtones (gray) slider to the left.B
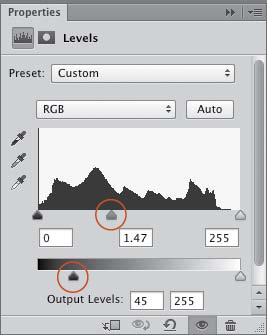
B To lighten the selected image layer, we created a Levels adjustment layer and chose these settings.
6. To compare the original layer and the adjusted version, press and hold , then release.C

C With the image screened back, the type is more eye-catching and easier to read.